Loading...
Loading...
Loading...
Loading...
Loading...
Loading...
Loading...
Loading...
Loading...
Loading...
Loading...
Loading...
Loading...
Loading...
Loading...
Loading...
Loading...
Loading...
Loading...
Loading...
Loading...
Loading...
Loading...
Loading...
Loading...
Loading...
Loading...
Loading...
Loading...
Loading...
Loading...
Loading...
Loading...
Loading...
Loading...
Loading...
Welcome to the N2W Backup & Recovery User Guide. Here you will find all the documentation that you need to make the most of N2W.
N2W Backup & Recovery (CPM), known as N2W, is an enterprise-class backup, recovery, and disaster recovery solution for Amazon Web Services (AWS). Designed from the ground up to support AWS, N2W uses cloud-native technologies (e.g., EBS snapshots) to provide unmatched backup and, more importantly, restore capabilities in AWS.
N2W also supports backup and recovery for Microsoft Azure Virtual Machines, SQL Servers, and Disks (section 26).
N2W also supports using Wasabi Cloud Object Storage for Amazon S3 backups (section 27).
N2W is sold as a service. When you register to use the service, you get permission to launch a virtual Amazon Machine Image (AMI) of an EC2 instance. Once you launch the instance, and after a short configuration process, you can start backing up your data using N2W.
Using N2W, you can create backup policies, schedules, and import non-N2W backups to Amazon Simple Storage Service (S3). Backup policies define what you want to back up (i.e., Backup Targets) as well as other parameters, such as:
Frequency of backups
Number of backup generations to maintain, duration of retention periods, and lock application
Whether to copy the backup data to other AWS regions, etc.
Backup targets can be of several different types, for example:
EC2 instances (including some or all instance’s EBS volumes)
Independent EBS volumes (regardless of whether they are attached and to which instance)
Amazon Relational Database Service (RDS) databases - regular and custom
In addition to backup targets, you also define backup parameters, such as:
In Windows achieving application consistency using Microsoft Volume Shadow Copy Service (VSS)
Running backup scripts
Number of retries in case of a failure
Schedules are used to define how you want to time the backups. You can define the following:
A start and end time for the schedule, including time zone of data
Backup frequency, e.g. every 15 minutes, every 4 hours, every day, etc.
Days of the week to run the policy
A policy can have one or more schedules associated with it. A schedule can be associated with one or more policies. As soon as you have an active policy defined with a schedule, backups will start automatically.
N2W provides monitoring at multiple levels. The Dashboard displays key performance indicators for backups, disaster recoveries, volume usage, backups to S3, and other metrics. Operation-specific monitors allow you to view details. And support for additional monitoring using Datadog and Splunk is available.
Following is a summary of the supported services for AWS and Azure backup targets:
AWS Main Backup Targets
*Cross-account DR to the original region incurs additional costs.
**Snapshots of EBS/RDS encrypted with default key cannot be copied cross account.
AWS FSx Backup Targets with Exceptions, Services, and Options
*Cross Account - FSx and Vaults must be encrypted with custom encryption key.
Azure Backup Targets
N2W is available in several different editions that support different usage tiers of the solution, e.g. number of protected instances, number of AWS, Azure, and Wasabi accounts supported, etc. The price for using the N2W software is a fixed monthly price which varies between the different N2W editions.
To see the different features for each edition, along with pricing and details, go to the . Once you subscribe to one of the N2W editions, you can launch an N2W Server instance and begin protecting your AWS environment. Only one N2W Server per subscription will actually perform a backup. If you run additional instances, they will only perform recovery operations (section ).
If you are already subscribed and using one N2W edition and want to move to another that better fits your needs, you need to perform the following steps:
Before proceeding, it is highly recommended that you create a snapshot of your CPM data volume. You can delete that snapshot once your new N2W Server is up and running. The data volume is typically named N2W – Data Volume.
Terminate your existing N2W instance. N2W recommends that you do so while no backup is running.
Unsubscribe from your current N2W edition. It is important since you will continue to be billed for that edition if you don’t cancel your subscription. You will only be able to unsubscribe if you don’t have any running instances of your old edition. You manage your subscriptions on the AWS Marketplace site on the page.
Subscribe to the new N2W Edition and launch an instance. You need to launch the instance in the same Availability Zone (AZ) as the old one. If you want to launch your new N2W Server in a different zone or region, you will need to create a snapshot of the data volume and either create the volume in another zone or copy the snapshot to another region and create the volume there.
Once configuration completes, continue to work with your existing configuration with the new N2W edition.
If you moved to a lower N2W edition, you may find yourself in a situation where you exceed the resources your new edition allows. For example, you used N2W Advanced Edition and you moved to N2W Standard Edition, which allows fewer instances. N2W will detect such a situation as a compliance issue, will cease to perform backups, display a message, and issue an alert detailing the problem.
To fix the problem:
Move back to an N2W edition that fits your current configuration, or
Remove the excessive resources, e.g., remove users, AWS accounts, or instances from policies.
Once the resources are back in line with the current edition, N2W will automatically resume normal operations.
The N2W Server is a Linux-based virtual appliance. It uses AWS APIs to access your AWS account. It allows managing snapshots of EBS volumes, RDS instances and clusters, Redshift clusters, DocumentDB, and DynamoDB tables. Except in cases where the user chooses to install our Thin Backup Agent for Windows Servers or use the AWS Simple System Manager (SSM) Remote Agent, N2W does not directly access your instances. Access is performed by the agent, or by a script that the user provides, which performs application quiescence.
N2W consists of the following parts, all of which reside on the N2W virtual server:
A database that holds your backup related metadata.
A Web/Management server that manages metadata.
A backup server that performs the backup operations. These components reside in the N2W server.
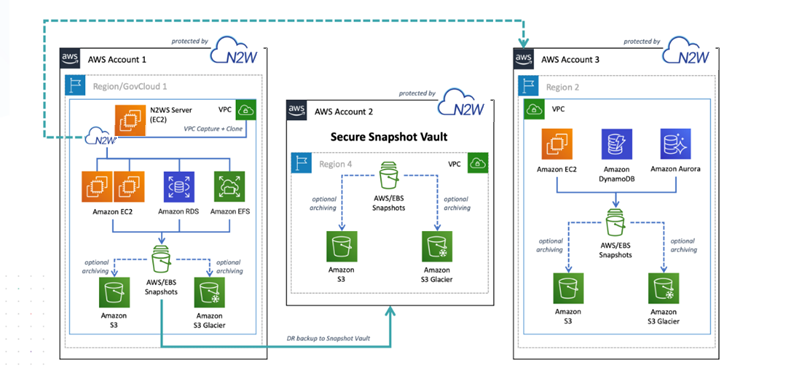
The N2W architecture is shown below. N2W Server is an EC2 instance inside the cloud, but it also connects to the AWS infrastructure to manage the backup of other instances. N2W does not need to communicate or interfere in any way with the operation of other instances. The only case where the N2W server communicates directly with and has software installed on an instance is when backing up Windows Servers for customers who want to use Microsoft VSS for application quiescing.
If you wish to have VSS or script support for application quiescence, you need to install the AWS SSM Agent or the N2W Thin Backup Agent. The agent gets its configuration from the N2W server, using the HTTPS protocol.
The SSM Agent doesn't require any inbound ports to be opened. All communication from the agent is outbound from HTTPS to the SSM and EC2 Message endpoints in the region where your instances are registered.
The N2W instance is an EBS-based instance with two EBS volumes. One is the root device, and the other is the CPM data volume. All persistent data and configuration information reside on the data volume. From N2W’s perspective, the root device is dispensable. You can always terminate your N2W instance and launch a new one, then using a short configuration process continue working with your existing data volume.
Although you have access to the N2W Server instance via SSH, N2W Software expects the N2W Server instance will be used as a virtual appliance. N2W Software expects you not to change the OS and not to start running additional products or services on the instance. If you do so and it affects N2W, N2W Software will not be able to provide you with support. Our first requirement will be for you to launch a clean N2W server.
Remember that all your changes in the OS will be wiped out as soon as you upgrade to a new release of N2W, which will come in the form of a new image (AMI). If you need to install software to use with backup scripts (e.g., Oracle client) or you need to install a Linux OS security update, you can. N2W Software recommends that you consult before doing so.
N2W server runs on an EBS-based instance. This means that you can stop and start it whenever you like. But if you create an image (AMI) of it and launch a new one with the system and data volume, you will find that the new server will not be fully functional. It will load and will allow you to perform recovery, but it will not continue performing backup as this is not the supported way to back up N2W servers. What you need to do, is to back up only the data volume, launch a fresh N2W server, and connect it to a recovered data volume. See section .
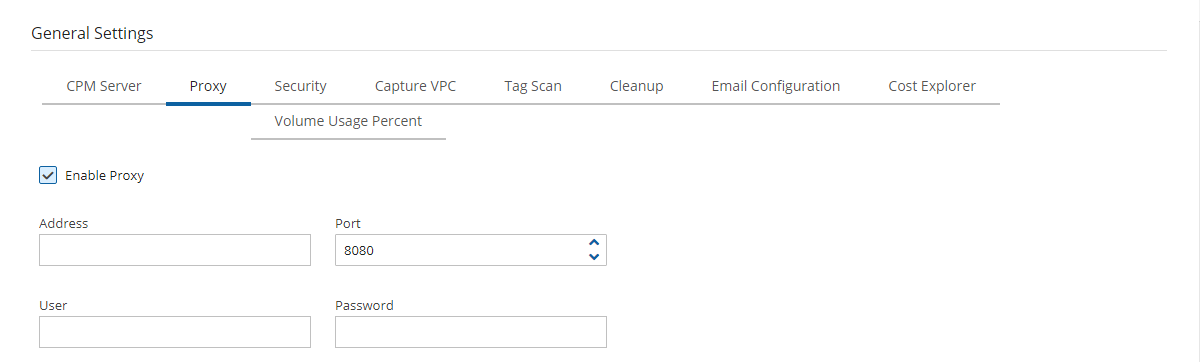
N2W needs connectivity to AWS endpoints to be able to use AWS APIs. This requires Internet connectivity. If you need N2W to connect to the Internet via an HTTP Proxy, that is fully supported. During configuration, you will be able to enable proxy use and enter all the required details and credentials: proxy address, port, user, and password. User and password are optional and can be left empty if the proxy server does not require authentication. Once you configure proxy settings at the configuration stage, they will also be set for use in the main application.
The proxy setting can be modified at any time in the Proxy tab of N2W Server Settings > General Settings. Select or clear Enable Proxy. If enabled, enter the requested proxy information.
If you are trying to launch multiple N2W servers of the same edition in the same account, you will find that from the second one on, no backup will be performed. Each such server will assume it is a temporary server for recovery purposes and will allow only recovery. Typically, one N2W server should be enough to back up your entire EC2 environment. If you need more resources, you should upgrade to a higher edition of N2W. If you do need to use more than one N2W server in your account, contact .
As part of the cloud ecosystem, N2W relies on web technology. The management interface through which you manage backup and recovery operations is web-based. The APIs which N2W uses to communicate with AWS are web-based. All communication with the N2W server is performed using the HTTPS protocol, which means it is all encrypted. This is important since sensitive data will be JavaScript communicated to/from the N2W server, for example, AWS credentials, N2W credentials, object IDs of your AWS objects (instances, volumes, databases, images, snapshot IDs, etc.).
Most interactions with the N2W server are performed via a web browser.
Since N2W uses modern web technologies, you will need your browser to be enabled for JavaScript.
N2W supports Microsoft Chromium Edge, Mozilla Firefox, and Google Chrome.
Other browsers are not supported.
If you want to view a getting-started tutorial, or to try the fully-functional N2W free for 30 days, go to . Follow the instructions in the ‘Getting Started with N2W Backup & Recovery for AWS’ video.
It is not necessary to reinstall N2W after purchasing a license.
It is now possible to have a free trial of N2W with the usage limitations customized for your specific AWS infrastructure. Contact to start your customized free trial. The N2W Software sales team may provide a reference code for your customized installation.
N2W provides customers the ability to back up and recover on-premise workloads running on AWS Outposts as well as workloads on AWS. N2W can run the core backup application on the AWS cloud and protect workloads running either on regions outside of AWS Outposts or protect applications that need to be backed up on AWS Outposts.
N2W supports the following AWS services running on Outposts:
EC2/EBS/RDS/SES/S3/VPC
The services can be deployed in all AWS regions.
N2W is available on AWS Marketplace with different editions ready to support any size environment:
You can launch N2W as an AMI directly from the AWS Marketplace or use a pre-configured CloudFormation (CF) template. Configuration takes a few minutes. Find our install videos here:
For further information regarding the AWS Outposts service, go to
The prerequisite for support is complete installation of N2W Backup & Recovery. Use cases are:
Backup - N2W can either back up applications, such as a media server, that run on AWS Outposts by storing the backup data on Outposts, as well as protect applications running outside of AWS Outposts by storing backup data in the same AWS region.
Disaster Recovery (DR) - In the case of Disaster Recovery, N2W protects resources running on AWS Outposts and copies data to another AWS Region or AWS account.
Be sure to review this entire section before starting an N2W installation (section or an upgrade (section ).
You might want to review the configuration options available in silent mode installation. See section for AWS, section for AWS with Secrets Manager, and section for Azure.
The primary differences between an installation and an upgrade are:·
RDS Aurora clusters, including Aurora Serverless
Redshift clusters
DocumentDB
DynamoDB tables
Elastic File System (EFS)
FSx File Systems - Lustre, NetApp ONTAP, Windows with managed Active Directory, OpenZFS
S3 Sync to copy objects between S3 buckets
EKS Clusters and Namespaces
For Azure policies, Virtual Machines (VM), SQL Servers, and Disks
EBS
Y
Y **
Y
Y
EFS
Y
Y
N
N
FSX
See below
See below
See below
N
Redshift Cluster
N
Y *
XAccount to original region is always Full
Y
Y
RDS
Y
Y
Y
Y
S3 Bucket
Y
Y
N
N
Y
N
N
OpenZFS
Y
Y AWS
Y AWS - Optional XRegion
Windows File Server
Y
Y FSx
Y AWS - Optional XRegion
Y
DR – XRegion ONLY
Y
VM
Y
Y
N
During configuration, choose Use Existing Data Volume and select the existing data volume.
DR failback reverses the workflow.
EC2
Y
Y
Y
Service/Option
Backup
Cross Region DR
Cross Account DR*
Lustre
Y
Y FSx
Y Persistent HDD -
AWS - Optional XRegion
Service
Backup
DR - Cross Region
Copy to Repository
Disk
Y
Y
N
Y
NetApp ONTAP
SQL Server
In an upgrade, you use an existing CPM data volume, rather than creating a new volume.
In an upgrade, for each version you are upgrading from, there are specific steps to follow before performing the actual upgrade.
The N2W management console is accessed via a web browser over HTTPS.
When a new N2W Server is launched, the server will automatically generate a new self-signed SSL certificate. This certificate will be used for the web application in the configuration step.-
If no other SSL certificate is uploaded to the N2W Server, the same certificate will be used also for the main N2W application.
Every N2W Server will get its own certificate.
Since the certificate is not signed by an external Certificate Authority, you will need to approve an exception in your browser to start using N2W.
For complete details about securing default certificates on N2W server, see Appendix G – Securing Default Certificates on N2W Server.
When configuring the N2W server, define the following settings:
AWS Credentials for the N2W root user.
Time zone for the server.
Whether to create a new CPM data volume or attach an existing one from a previous N2W server.
Whether to create an additional N2W server from an existing data volume during Force Recovery Mode.
Proxy settings. Configure proxy settings in case the N2W server needs to connect to the Internet via a proxy. These settings will also apply to the main application.
The port the web server will listen on. The default is 443. See section .
Whether to upload an SSL certificate and a private key for the N2W server to use. If you provide a certificate, you will also need to provide a key, which must not be protected by a passphrase.
Register the AWS account with N2W Software. This is mandatory only for free trials but is recommended for all users. It will allow N2W to provide quicker and enhanced support. Registration information is not shared.
For the configuration process to work, as well as for normal N2W operations, N2W needs to have outbound connectivity to the Internet, for the HTTPS protocol. Assuming the N2W server was launched in a VPC, it needs to have:
A public IP, or
An Elastic IP attached to it, or
Connectivity via a NAT setup, Internet Gateway, or HTTP proxy.
If an access issue occurs, verify that the:
Instance has Internet connectivity.
DNS is configured properly.
Security groups allow outbound connections for port 443 (HTTPS) or other (if you chose to use a different port).
Following are the configuration steps:
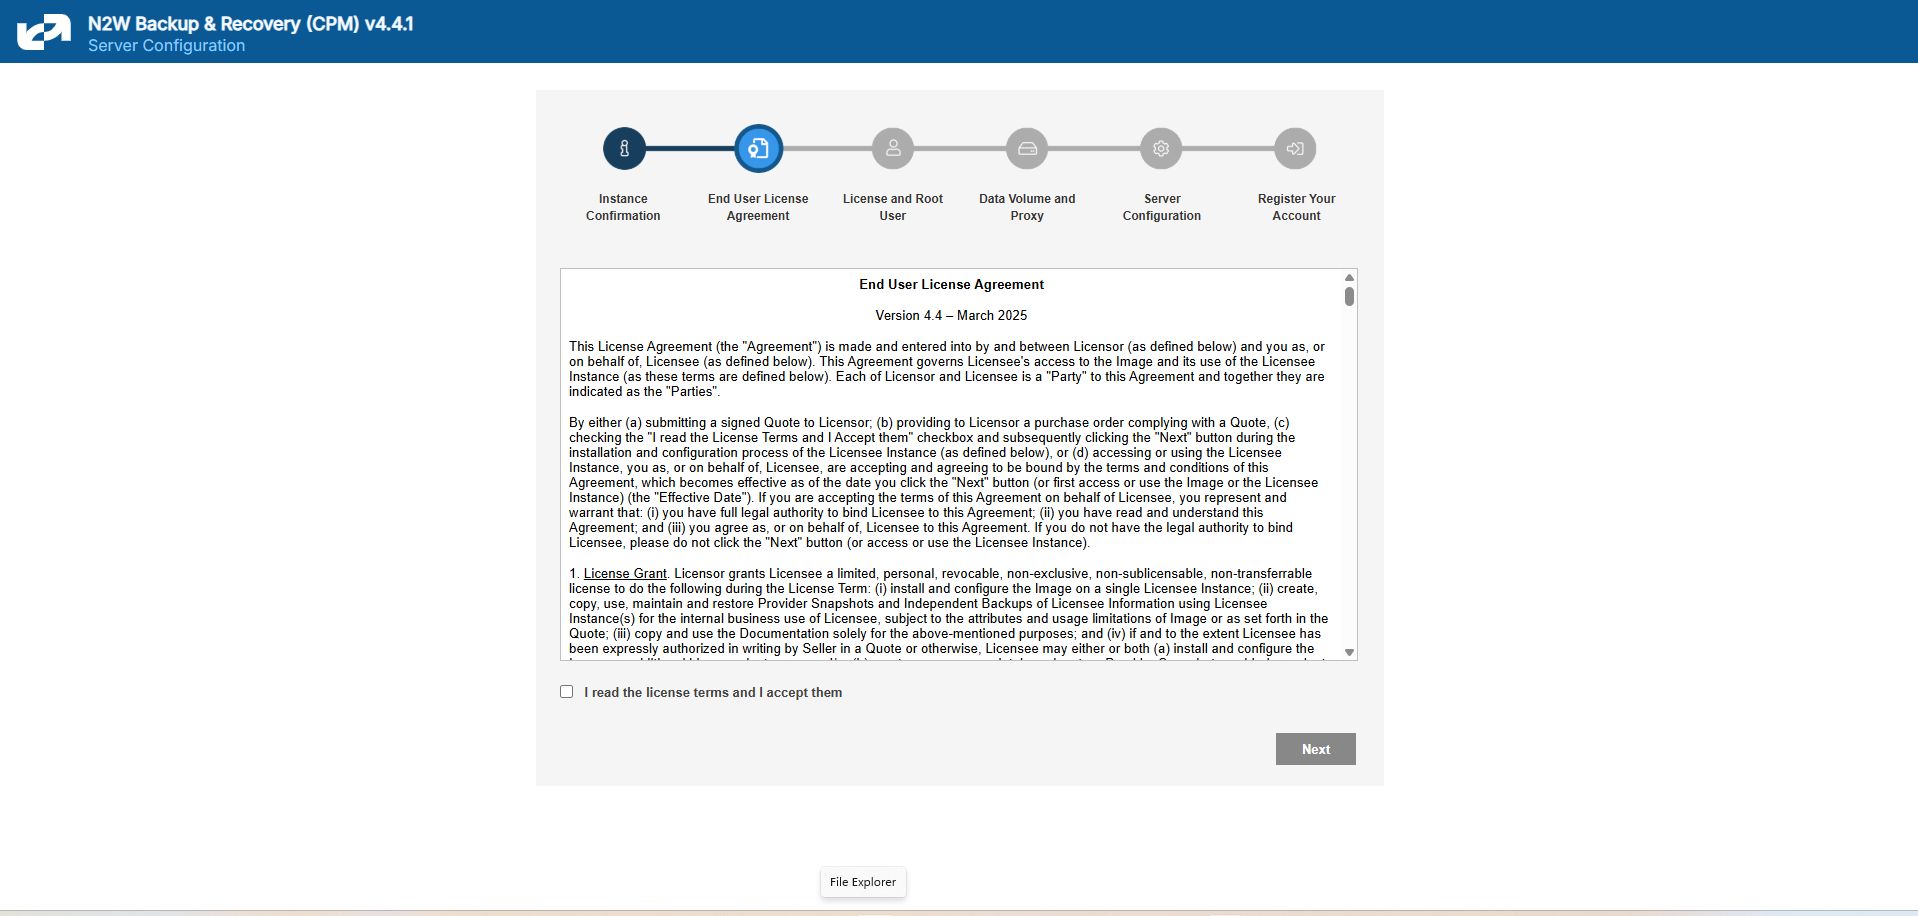
Approve the end-user license agreement.
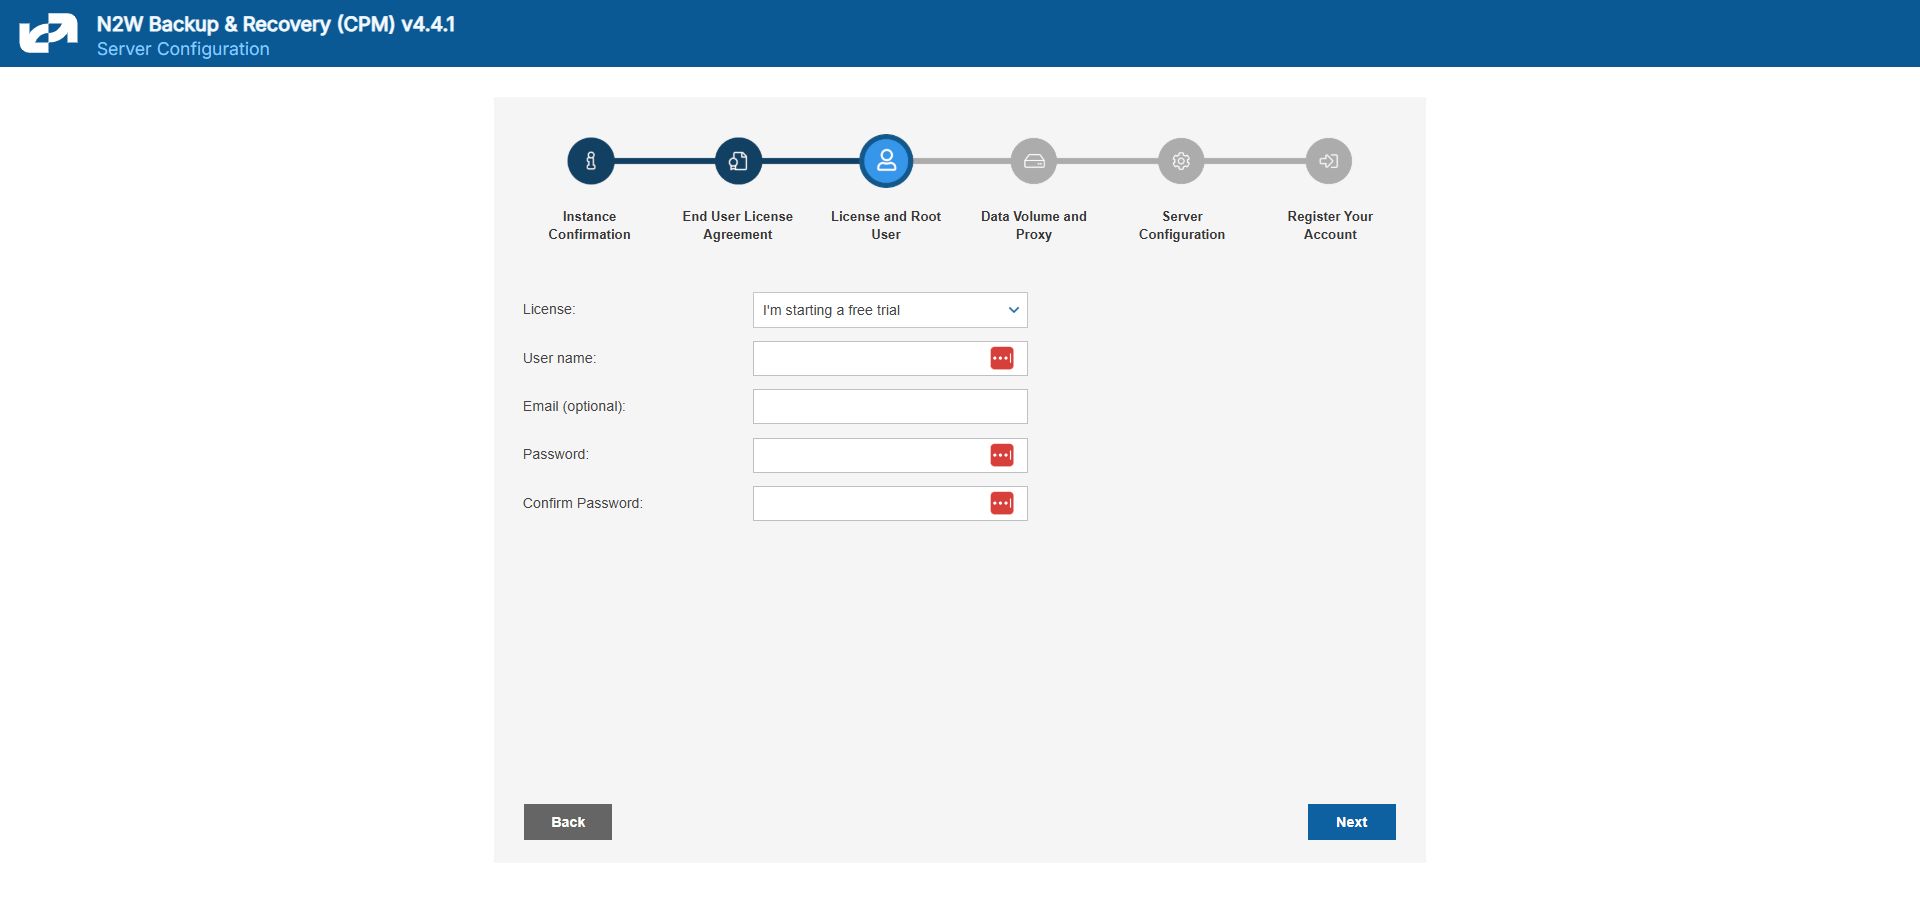
Define the root username, email, and password.
The admin/root username CAN'T be changed after setting it.
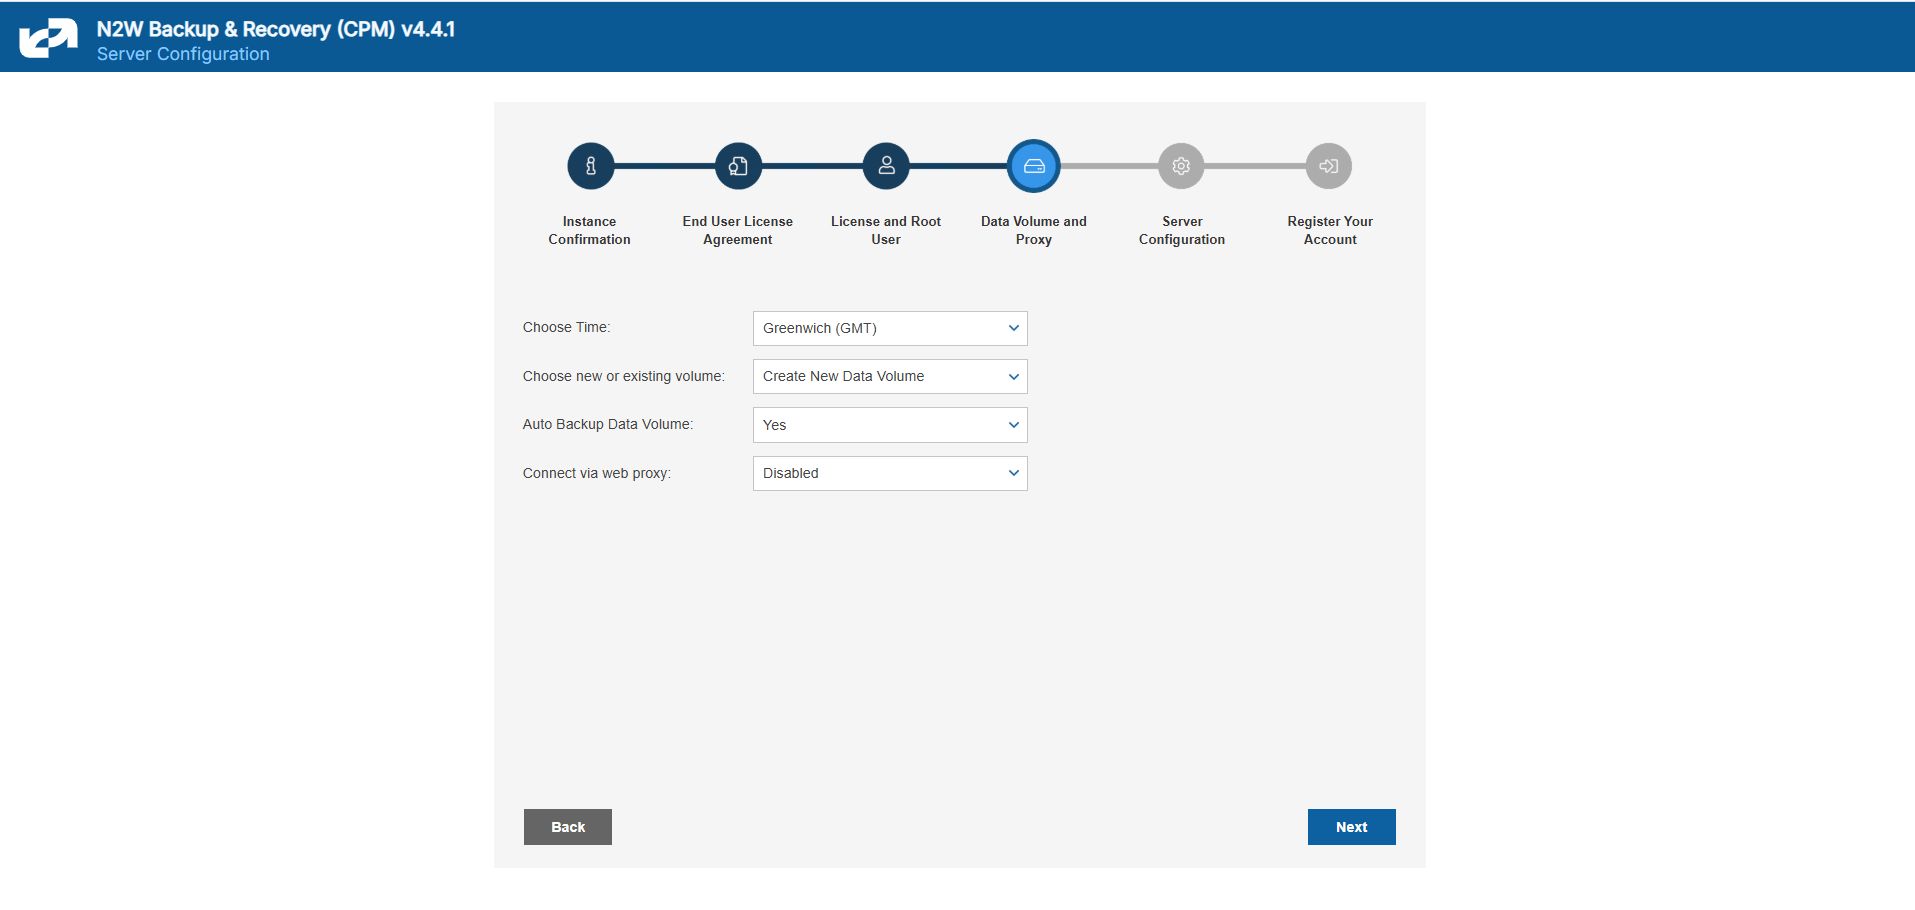
3. Define the time zone of the N2W Server and usage of data volume.
4. Fill in the rest of the information needed to complete the configuration process.
N2W Server Sizing Guidelines
Following are the recommended instance type sizes to consider when deploying your N2W server:
Up to 200 instances - T3.medium
Up to 500 instances - M5.large, C5.large, R5.large, C6i.large, R6i.large, M6i.large, C7i.large, M7i.large
Up to 1000 instances - M5.xlarge, C5.xlarge,R5.xlarge,C6i.xlarge, R6i.xlarge, M6i.xlarge, C7i.xlarge, M7i.xlarge
Up to 2000 instances - M5.2xlarge, C5.2xlarge, R5.2xlarge, C6i.2xlarge, R6i.2xlarge, M6i.2xlarge, C7i.2xlarge, M7i.2xlarge
Up to 4000 instances - M5.4xlarge, C5.4xlarge, R5.4xlarge, C6i.4xlarge, R6i.4xlarge, M6i.4xlarge, C7i.4xlarge, M7i.4xlarge
Over 4000 instances – Move additional instances to a new CPM Server
When using the S3 Backup feature, upgrade to the next available instance size listed above but not smaller than 'large'.
To initially be identified as the owner of this instance, you are required to type or paste the N2W server instance ID. This is just a security precaution.
In the next step of the configuration process, you will also be required to approve the end-user license agreement.
The End User License Agreement field is presented. Select I’m starting a free trial for a free trial. Otherwise, select the appropriate license option in the list, such as Bring Your Own License (BYOL) Edition. Alternatively, if your organization purchased a license directly from N2W Software, additional instructions are shown.
The AWS root user (IAM User) is no longer allowed to control the operation of the N2W server. A user with the Authentication credentials for N2WS Instance IAM Role is the only user allowed to install N2W, log on to the system server, and operate it. As shown below, you need to define the root username, email, and password. This is the third step in the configuration process. The email may be used when defining Amazon Simple Notification Service (SNS) based alerts. Once created, choose to automatically add this email to the SNS topic recipients.
Passwords: N2W recommends that you use passwords that are difficult to guess and that are changed from time to time. For the password rules that N2W enforces, see section 16.2.3.
In the fourth step of the configuration process, you can:
Set the time zone of the N2W Server.
If using a paid license, choose whether to create a new data volume or to use an existing one. Your AWS credentials will be used for the data volume setup process.
Create an additional N2W server in recovery mode only, by choosing an existing data volume and set Force Recovery Mode.
Configure proxy settings for the N2W server. See section .
As you will see in section 4.1.3, all scheduling of backup is performed according to the local time of the N2W Server. You will see all time fields displayed by local time; however, all time fields are stored in the N2W database in UTC. This means that if you wish to change the time zone later, all scheduling will still work as before.
Here, you choose to use a new or existing data volume. Actual configuration of the volume, including encryption, will be accomplished at the next step. See section 2.1.4.1.
AWS credentials are required to create a new Elastic Block Storage (EBS) data volume if needed and to attach the volume to the N2W Server instance.
If you are using AWS Identity and Access Management (IAM) credentials that have limited permissions, these credentials need to have permissions to view EBS volumes in your account, to create new EBS volumes, and to attach volumes to instances. See section 16.3. These credentials are kept for file-level recovery later and are used only for these purposes.
If you assigned an IAM Role to the N2W Server instance, and this role includes the needed permissions, select Use Instance’s IAM Role, and then you will not be required to enter credentials
If the N2W server needs an HTTP proxy to connect to the Internet, define the proxy address, port, user, and password. The proxy settings will be kept as the default for the main application. In the N2W UI, proxy settings are made in the Proxy tab of Server Settings > General Settings.
Make sure to enable SSH connections (port 22) through your proxy.
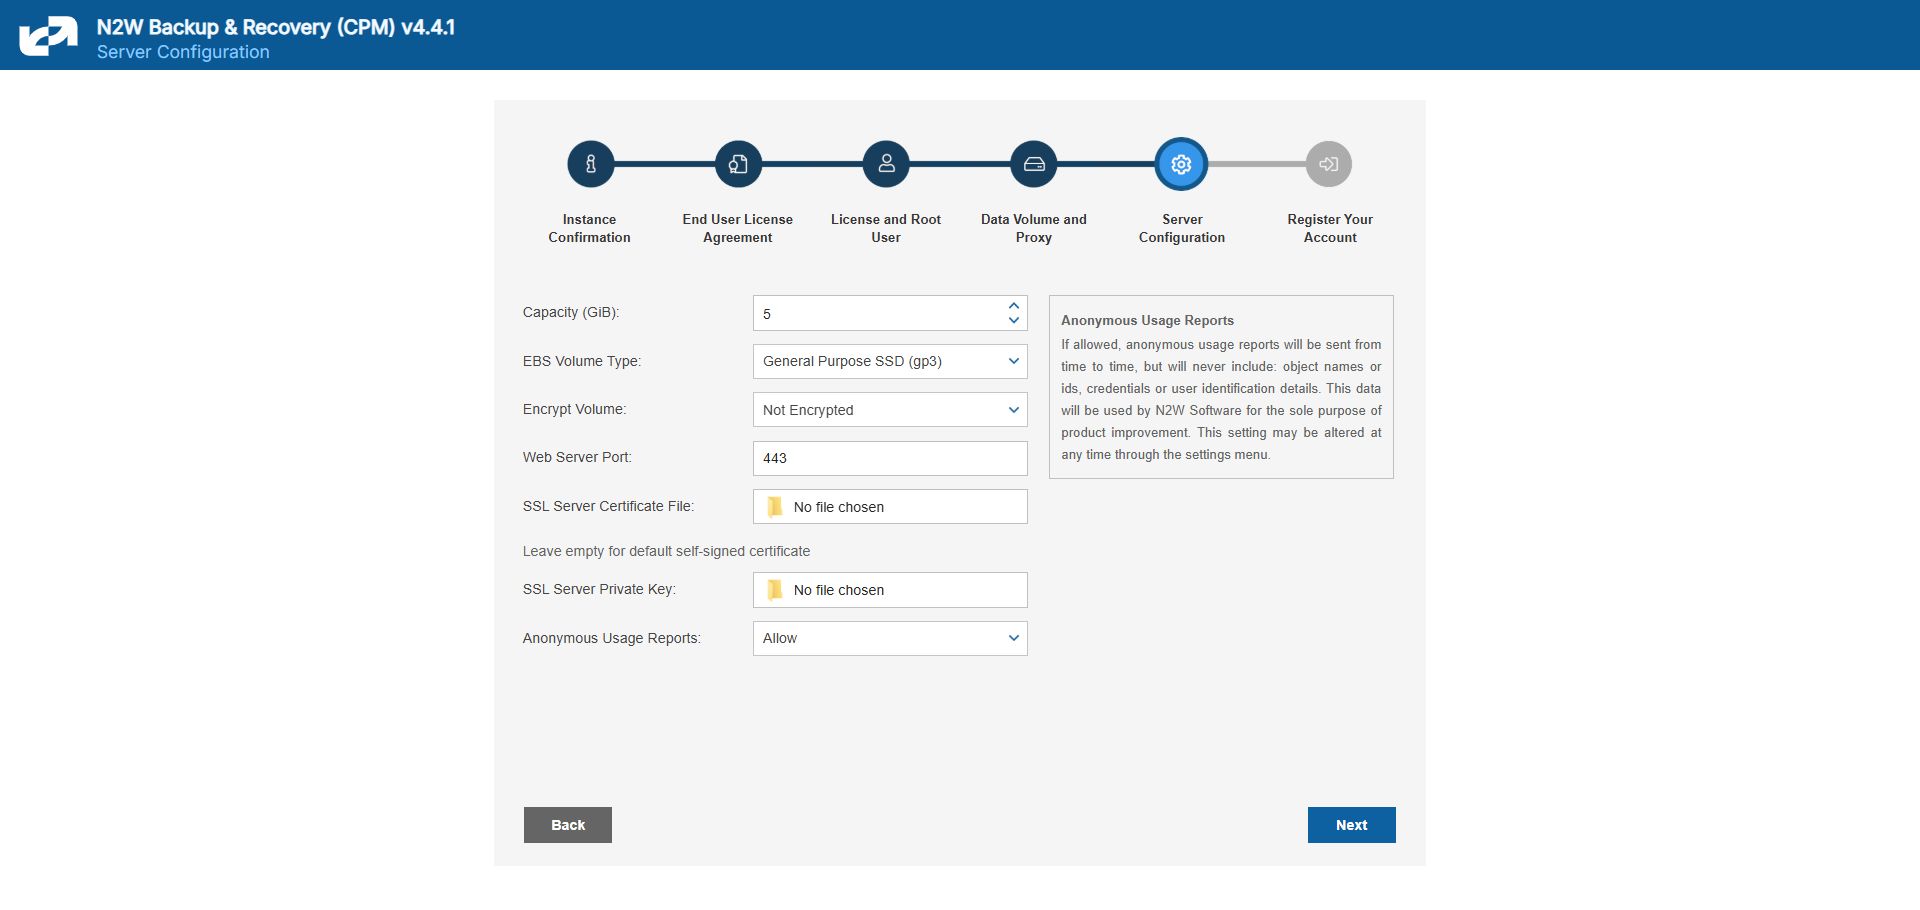
In the fifth step, you will fill in the rest of the information needed for the configuration of the data volume for the N2W Server.
When creating a new data volume, the only thing you need to define is the capacity of the created volume at this step. The default size of the data volume is 10 GiB.
The volume is going to contain the database of N2W’s data, plus any backup scripts or special configuration you choose to create for the backup of your servers. The backup itself is stored by AWS, so normally the data volume will not contain a large amount of data.
Volume Recommendations
Volume size should be at least 10 GB, which is large enough to manage roughly 50 instances and about 3 times as many EBS volumes.
If your environment is larger than 50 instances, increase the volume at about the ratio of 1 GB per 10 backed-up instances·
Volume type should be at least GP3.
For Azure, Volume Type defaults to Premium LRS.
GP3 volume types are cheaper and deliver better performance than GP2 volume types. For details, see https://docs.aws.amazon.com/emr/latest/ManagementGuide/emr-plan-storage-compare-volume-types.html
The new volume will be automatically created in the same AZ as the N2W instance. It will be named N2W Data Volume. During the configuration process, the volume will be created and attached to the instance. The N2W database will be created on it.
Select Encrypted in the Encrypt Volume drop-down list and choose a key in the Encryption Key list. You have the option to use a custom ARN.
Port 443 is the default port for the HTTPS protocol, which is used by the N2W manager. If you wish, you can configure a different port for the web server. But, keep in mind that the specified port will need to be open in the instance’s security groups for the management console to work, and for any Thin Backup Agents that will need to access it.
The final detail you can configure is an SSL certificate and private key.
If you leave them empty, the main application will continue to use the self-signed certificate that was used so far.
If you choose to upload a new certificate, you need to upload a private key as well. The key cannot be protected by a passphrase, or the application will not work.
If a corrupted SSL certificate is installed, it will prevent the N2W server from starting.
Leaving the Anonymous Usage Reports value as Allow permits N2W to send anonymous usage data to N2W Software. This data does not contain any identifying information:
No AWS account numbers or credentials.
No AWS objects or IDs like instances or volumes.
No N2W names of objects names, such as policy and schedule.
It contains only details like:
How many policies run on an N2W server
How many instances per policy
How many volumes
What the scheduling is, etc.
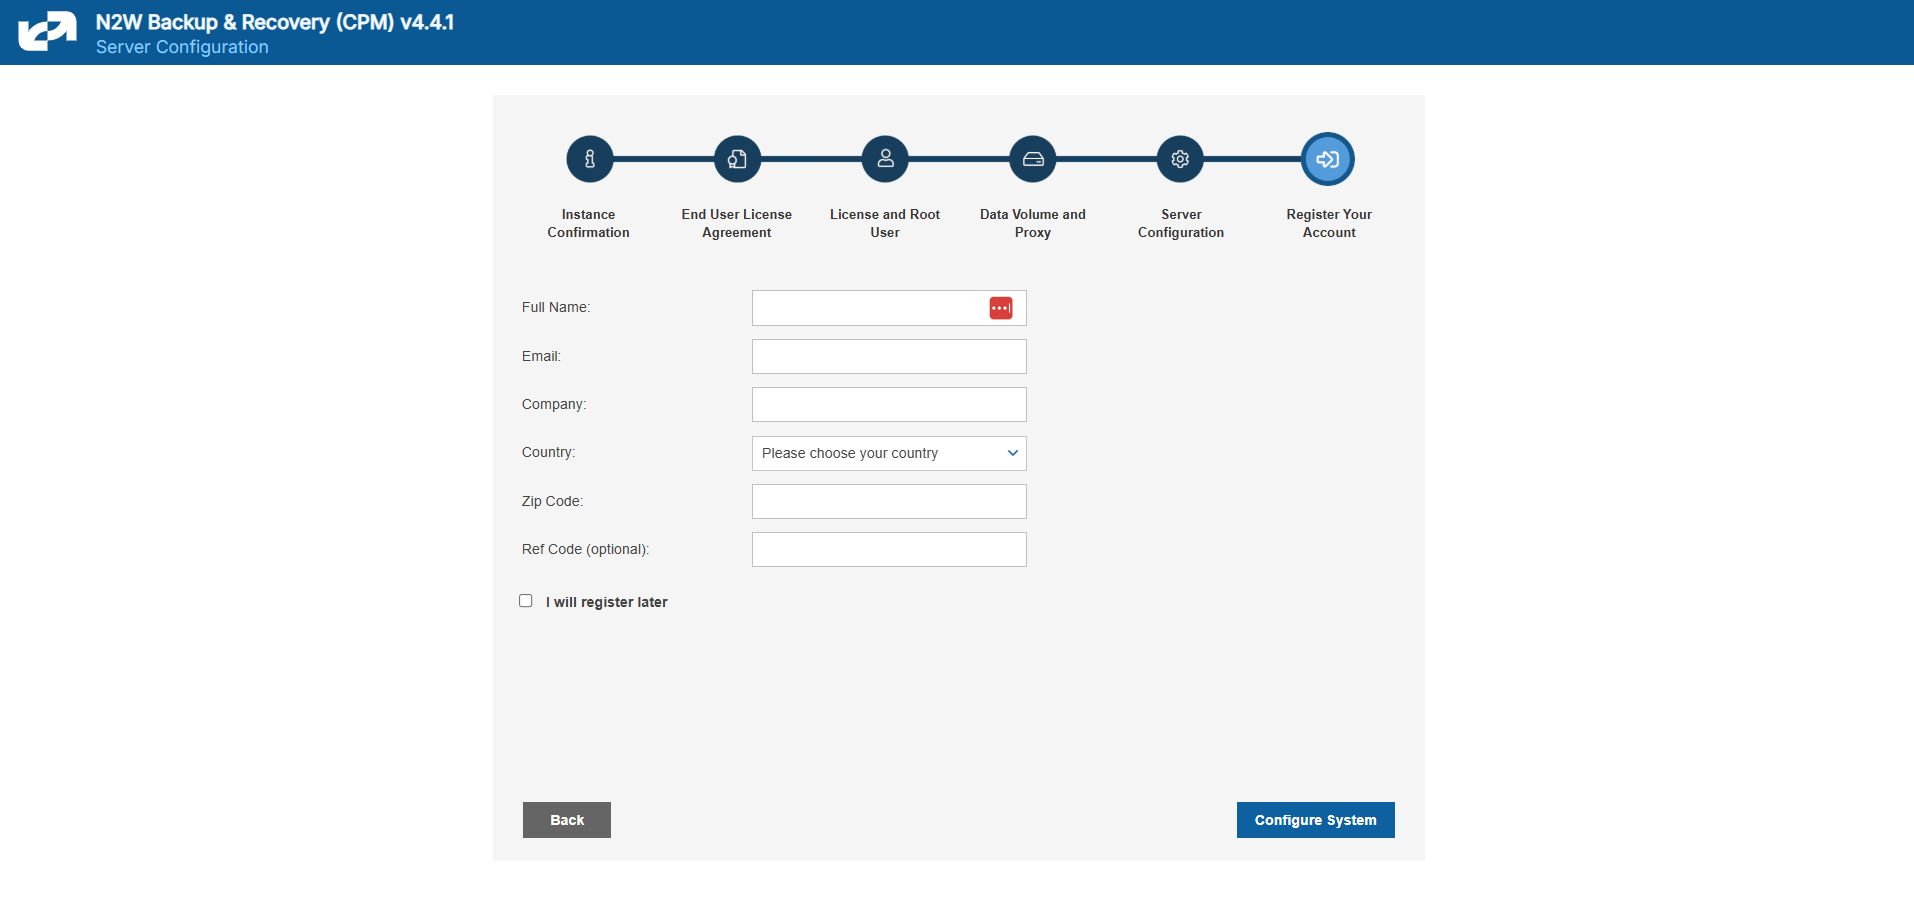
After filling in the details in the last step, you are prompted to register. This is mandatory for free trials and optional for paid products.
Select Configure System to finalize the configuration. The configuration will take between 30 seconds and 3 minutes for new volumes, and usually less for attaching existing volumes. After the configuration is complete, a ‘Configuration Successful – Starting Server …’ message appears. It will take a few seconds until you are redirected to the login screen of the N2W application.
If you are not redirected, refresh the browser manually. If you are still not redirected, reboot the N2W server via AWS Management Console, and it will come back up, configured, and running.
Most inputs you have in the configuration steps are validated when you select Next. You will get an informative message indicating what went wrong.
A less obvious problem you may encounter is if you reach the third step and get the existing volume select box with only one value in it: No Volumes found. This can arise:
If you chose to use an existing volume and there are no available EBS volumes in the N2W Server’s AZ, you will get this response. In this case, you probably did not have your existing data volume in the same AZ. To correct this:
Terminate and relaunch the N2W server instance in the correct zone and start over the configuration process, or
Take a snapshot of the data volume, and create a volume from it in the zone the server is in.
If there is a problem with the credentials you typed in, the “No Instances found” message may appear, even if you chose to create a new data volume. This usually happens if you are using invalid credentials, or if you mistyped them. To fix, go back and enter the credentials correctly.
In rare cases, you may encounter a more difficult error after you configured the server. In this case, you will usually get a clear message regarding the nature of the problem. This type of problem can occur for several reasons:
If there is a connectivity problem between the instance and the Internet (low probability).
If the AWS credentials you entered are correct, but lack the permissions to do what is needed, particularly if they were created using IAM.
If you chose an incorrect port, e.g., the SSH port which is already in use.
If you specified an invalid SSL certificate and/or private key file.
If the error occurred after completing the last configuration stage, N2W recommends that you:
Terminate the N2W server instance.
Delete the new data volume (if one was already created).
Try again with a fresh instance.
If the configuration still fails, the following message will display. If configuring a new instance does not solve the problem, contact the N2W Software Support Team. To access configuration error details, select Download Configuration Logs.
The AWS Key Management Service (KMS) allows you to securely share custom encryption keys between accounts. For details on enabling shared custom keys, see https://aws.amazon.com/blogs/security/share-custom-encryption-keys-more-securely-between-accounts-by-using-aws-key-management-service/.
The use of custom keys is required in the following cases:
Authentication of cpmuser to N2W server using a non-default certificate with a private key.
Encrypting new volumes.
Associating an account for File Level Recovery.
Authentication of IAM User.
Running scripts.
Performing Recoveries, DR, and Cross-Account activities for RDS, EC2, and EFS resources.
Important: Choose the right upgrade method and sequence.
There are 3 upgrade paths depending on the version from which you are upgrading:
For versions 4.2 onward, you can upgrade by installing a patch. See section .
For versions 2.6 onward, you can use Amazon Machine Images (AMI).
For versions older than 2.6, you must first upgrade to 4.2 using an Amazon Machine Image (AMI), and then upgrade from 4.2 to 4.3.0.
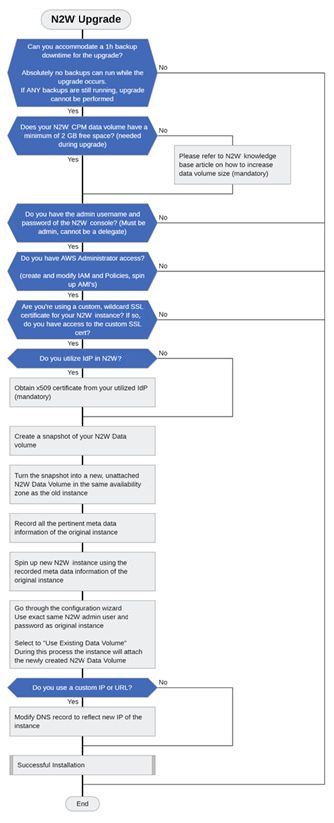
The following diagram shows the major steps and considerations in an N2W upgrade. The upgrade flow is the same as the installation flow with the addition of using an existing CPM data volume (section 2.2.2).
We strongly recommend that you read this entire section BEFORE starting the upgrade.
The upgrade process consists of the following phases:
Before starting the upgrade, refer to instructions specific to your current version in section 2.2.
Stop the current CPM instance.
Select the existing data volume from the snapshot to be used in the upgrade.
Configure the new version instance according to instructions in section .
Terminate the old version instance, and launch the new version as described in section .
After the upgrade, there are still a few steps to ensure a complete transition. See section .
If you have any questions or encounter issues, visit the N2W Support Center where you will find helpful resources in a variety of formats or can open a Support Ticket.
The following sections outline the steps required to upgrade to the latest N2W Backup & Recovery version.
Due to new functionality in v4.4.x, you may need to update your permission policies. If you have more than one AWS Account added to the N2W console, you will have to update the IAM Policies for each account.
For AWS: See https://n2ws.zendesk.com/hc/en-us/articles/33252616725533--4-5-0-Required-Minimum-AWS-permissions-for-N2W-operations
For Azure: See https://n2ws.zendesk.com/hc/en-us/articles/33252710830109--4-5-0-Required-Minimum-Azure-permissions-for-N2W-operations
Collecting Information Before Starting Upgrade
Following is the important information you must have ready before starting:
Verify that there are no backups, DRs, or Cleanups running or scheduled to run within the next 15-30 minutes.
If the only thing processing is an S3 archive, you are able to abort it if you want.
Have the username and password for the root/admin user ready.
If you are using a proxy in the N2W settings, write down the details.
Take a screenshot of the N2W EC2 instance network settings: IP, VPC, Subnet, Security Groups, and IAM Role and Keypair name.
Take a screenshot of the Tags if you have more than a few.
Terminate the N2W EC2 instance.
Terminating is only necessary BEFORE launching the new AMI if it is a Marketplace Subscription.
If you are using BYOL, you can keep the old server until the new upgrade is complete and tested for an easy rollback if necessary.
Take a snapshot of the N2W Data Volume. Only the Data Volume is important, as it contains all your settings, backup entries, etc.
Download the latest IAM permissions (section ) and update the IAM Policies from your role.
If you are using a custom SSL certificate, make sure you have the .CRT and .KEY files available in a place where you can easily add them during the configuration process.
The new CPM instance needs to be in the same Availability Zone as the cpmdata EBS volume.
Use the cpmdata volume created from the snapshot, and leave the original volume attached to the stopped instance.
If your data volume is very big, wait 10 minutes before starting the upgrade, as AWS is creating new volumes from snapshots. The Ready message may show before the volume is actually ready.
To upgrade/redeploy the N2W Server Instance:
About 1 minute after launching the new instance, it should in the running state. Connect to the user interface (UI) with a browser using https://[ip-of-your-new-instance].
Confirm the Instance ID of your newly launched instance.
Accept the Terms and Conditions.
Enter the username and password of the admin/root user.
The admin/root username CAN'T be changed after setting it.
5. Approve the exception to the SSL certificate.
6. Choose the time zone and select Use Existing Data Volume in step #4, “Data Volume and Proxy”.
7. Select your old data volume in the Existing CPM Data Volume list in step #5, “Server Configuration”.
8. Select Configure System in step #6, “Register Your Account”. N2W will automatically resume operations. Wait until the login mask appears.
See section 2 for complete details for the Server Configuration.
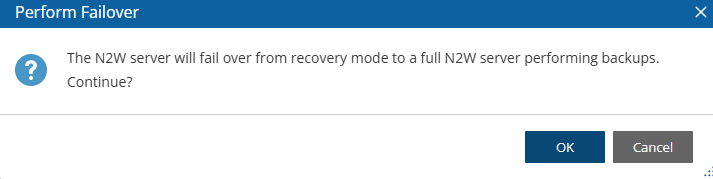
If you have a Marketplace instance, after a successful upgrade, the new CPM will automatically detect the existence of the old instance and will launch in recovery mode. You will need to terminate the old CPM and perform a failover.
Terminate the existing CPM instance.
Launch a new N2W Server instance in the same region and AZ as the old one. You can launch the instance using the Your Marketplace Software page on the AWS web site.
To determine the AZ of the new instance, launch the instance using the EC2 console rather than using the 1-click option.
Wait until the old CPM instance is in the terminated state.
5. Confirm Perform Failover prompt.
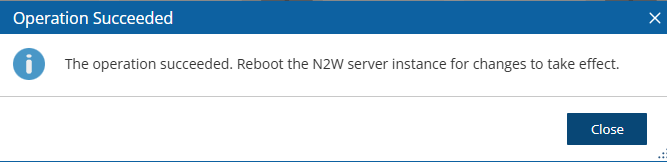
6. Wait 5 minutes for the ‘Operation Succeeded’ message.
Reboot.
The Existing data volume option is used if:
You have already run N2W and terminated the old N2W server, but now wish to continue where you stopped.
You are upgrading to new N2W releases.
You are changing some of the configuration details.
You want to configure an additional N2W server in recovery mode only. See section .
The select box for choosing the volumes will show all available EBS volumes in the same AZ as the N2W Server instance. When choosing the volumes, consider the following:
It is important to create the instance in the AZ your volume was created in the first place.
Another option is to create a snapshot from the original volume, and then create a volume from it in the AZ you require.
Although CPM data volumes typically have a special name, it is not a requirement. If you choose a volume that was not created by an N2W server for an existing data volume, the application will not work.
After upgrading:
If you were using N2W Thin Backup Agents to perform app-consistent backups:
Check the Agents tab and see if “last heard from” is updated with a recent date and time.
If not, you may have to download and install the N2W Thin Backup Agent on your Windows EC2 instances.
If you were using the AWS SSM Remote Agent to perform app-consistent backups, note that the SSM Agent will not appear in the Agents tab. You will need to verify the SSM Agent separately.
If you were using backup scripts that utilize SSH, you may need to log in to the N2W Server once and run the scripts manually so that the use of the private key will be approved.
If you have more than one AWS Account added to the N2W console:
Update the IAM Policies for each Account by downloading the latest IAM permissions (section ) and updating the IAM policies for your role.
Confirm using Check AWS Permissions for each Account. See note in section about limitation.
You can configure an additional N2W server, in recovery mode only, by choosing an existing data volume:
In step 4, choose to use an existing volume and in the Force Recovery Mode, select Yes.
In step 5, in the Existing CPM Data Volume list, select the volume that holds your backup records.
The N2W server configured for recovery mode will NOT:
Perform backups.
Perform data Lifecycle Management operations.
Have Resource Control management.
Perform any scheduled operations.
Configuring N2W in silent mode is available using AWS user data, using AWS Secrets Manager, and for Azure.
Launching an EC2 instance in AWS can optionally be set with User Data. See the description of how such user data can be utilized at https://docs.aws.amazon.com/AWSEC2/latest/UserGuide/user-data.html.
The N2W instance can also use this user data when launching.
If the string CPMCONFIG exists in the user data text, then the text following it is used for the CPM configuration.
The extraction is until the string CPMCONFIGEND or the end of the data.
The extracted text is assumed to be in .ini file format.
The extracted configuration text of the new N2W instance should start with a [SERVER] section, followed by the configuration details.
For the relevant time_zone parameter value, see .
Following is an example of the whole script:
To use AWS Secrets Manager in Silent Mode for AWS, also see 2.3.2.
Additionally, if you need the N2W server to connect to the Internet via an HTTP proxy, add a [PROXY] section:
The snapshot option does not exist in the UI. It can be used for the automation of a Disaster Recovery (DR) server recovery. Additionally, if you state a volume ID from another AZ, N2W will attempt to create a snapshot of that volume and migrate it to the AZ of the new N2W server. This option is for DR only.
You are not required to select the license terms when using the silent configuration option, since you already approved the terms when subscribing to the product on AWS Marketplace.
After executing the configuration, on the AWS Instances page, select the Tags tab. If the CPM_Silent_Configuration key value equals ‘succeeded’, then the CPM instance was successfully launched with the user data configured in silent mode.
To verify configuration user data:
In AWS, select the CPM instance.
In the right-click menu, select Instance Settings, and then select View/Change User Data.
You can keep Silent Configuration values, such as username and password, on AWS Secrets Manager. Secrets Manager can be used on any textual (not numeric or Boolean) field value in the configuration file. Secrets Manager is:
Not available for proxy settings
Available only for AWS.
The format is <silent config key>=@<Secret name>#<key in secret>@
Different secrets may be used within a configuration file, such as a user's password from another secret.
Silent configuration for Azure can only be executed programmatically using the Azure CLI, not through the Azure Portal.
The Azure Portal has a limitation whereby a User Managed Identity is not associated with a Virtual Machine until after its creation.
An existing Managed Identity with predefined permissions must be assigned to the Virtual Machine immediately upon its creation in order to perform various operations.
To deploy N2W using the Azure CLI:
In the Azure Portal, accept the license terms for N2W Backup & Recovery for Azure one time.
Select the Get Started link.
In the Configure Programmatic Deployment screen, Enable the Subscription for the image you are deploying.
Create a text file containing the following configuration parameters, including the Managed Identity Client ID, in the indented format shown:
5. Pass the file to the Azure CLI VM creation command as follows:
To keep your N2W running at its highest efficiency, N2W will occasionally send you notification of the existence of a patch through an Announcement or an email. Download the patch according to the notification instructions.
To install patches:
In the top right toolbar, select Server Settings and then select Patches.
Select Choose file to select the patch file.
Select Upload and Install.
[any-script-before-cpmconfig]
CPMCONFIG
[SERVER]
user=<username for the N2W user>
password=<password>
volume_option=<new or existing>
volume_size=<in GB, used only for the new volume option>
volume_id=<Volume ID for the data volume, used only in the existing volume option>
volume_type=<set your storage performance and cost.
The default is “gp3”. It can be set to “io1”, "io2", “gp2” or "gp3">
snapshot_id=<snapshot ID to create the data volume from, used only with the existing volume option, and only if volume_id is not present>
encryption_key=<encrypt user-data volume by setting the ARN of the
KMS key. used only for the new volume option>
time_zone=<set N2W server’s local time.
The default timezone is GMT. See Appendix C for available time zones.>
allow_anonymous_reports=<send anonymous usage data to N2W Software.
The default is “False”>
force_recovery_mode=<allow additional N2W server to perform recovery
operations only. The default is “False”. If it set to “True” - it
requires volume_option=existing>
activation_key=<Activation Key>
CPMCONFIGEND
[any-script-after-cpmconfig][PROXY]
proxy_server=<address of the proxy server>
proxy_port=<proxy port>
proxy_user=<user to authenticate, if needed>
proxy_password=<password to authenticate, if needed>CPMCONFIG
[SERVER]
user=@<secret_name>#<secret_name_user_key>@
password=@<secret_name>#<secret_name_pw_key>@
volume_option=existing
volume_id=@<secret_name>#<secret_name_vol_key>@
volume_type=gp2
time_zone=Europe/Berlin
CPMCONFIGENDuser=@CPMCredentials#N2W_User2@
password=@CPMAlternativeCredentials#N2W_Password@ [SERVER]
user=root
password=rootroot
disk_size=30
disk_option=new
time_zone = Asia/Jerusalem
allow_anonymous_reports=True
managed_identity_client_id=66d64e6d-e735-47e0-a3a5-f6b5fbbdbd26
path: /etc/cpm/cpm_silent_config.cfgaz vm create --resource-group my-resource-group --name my-n2w-backup-and-recovery-vm --image n2wsoftwareinc1657117813969:n2ws_backup_and_recovery:byol_edition_and_free_trial:4.1.2 --ssh-key-name my-ssh-key --admin-username cpmuser --assign-identity /subscriptions/<my-subscription-id>/resourceGroups/my-resource-group/providers/Microsoft.ManagedIdentity/userAssignedIdentities/my-n2w-vm-identity --nsg my-n2w-nsg --public-ip-sku <basic|standard> --custom-data cloud-init.txt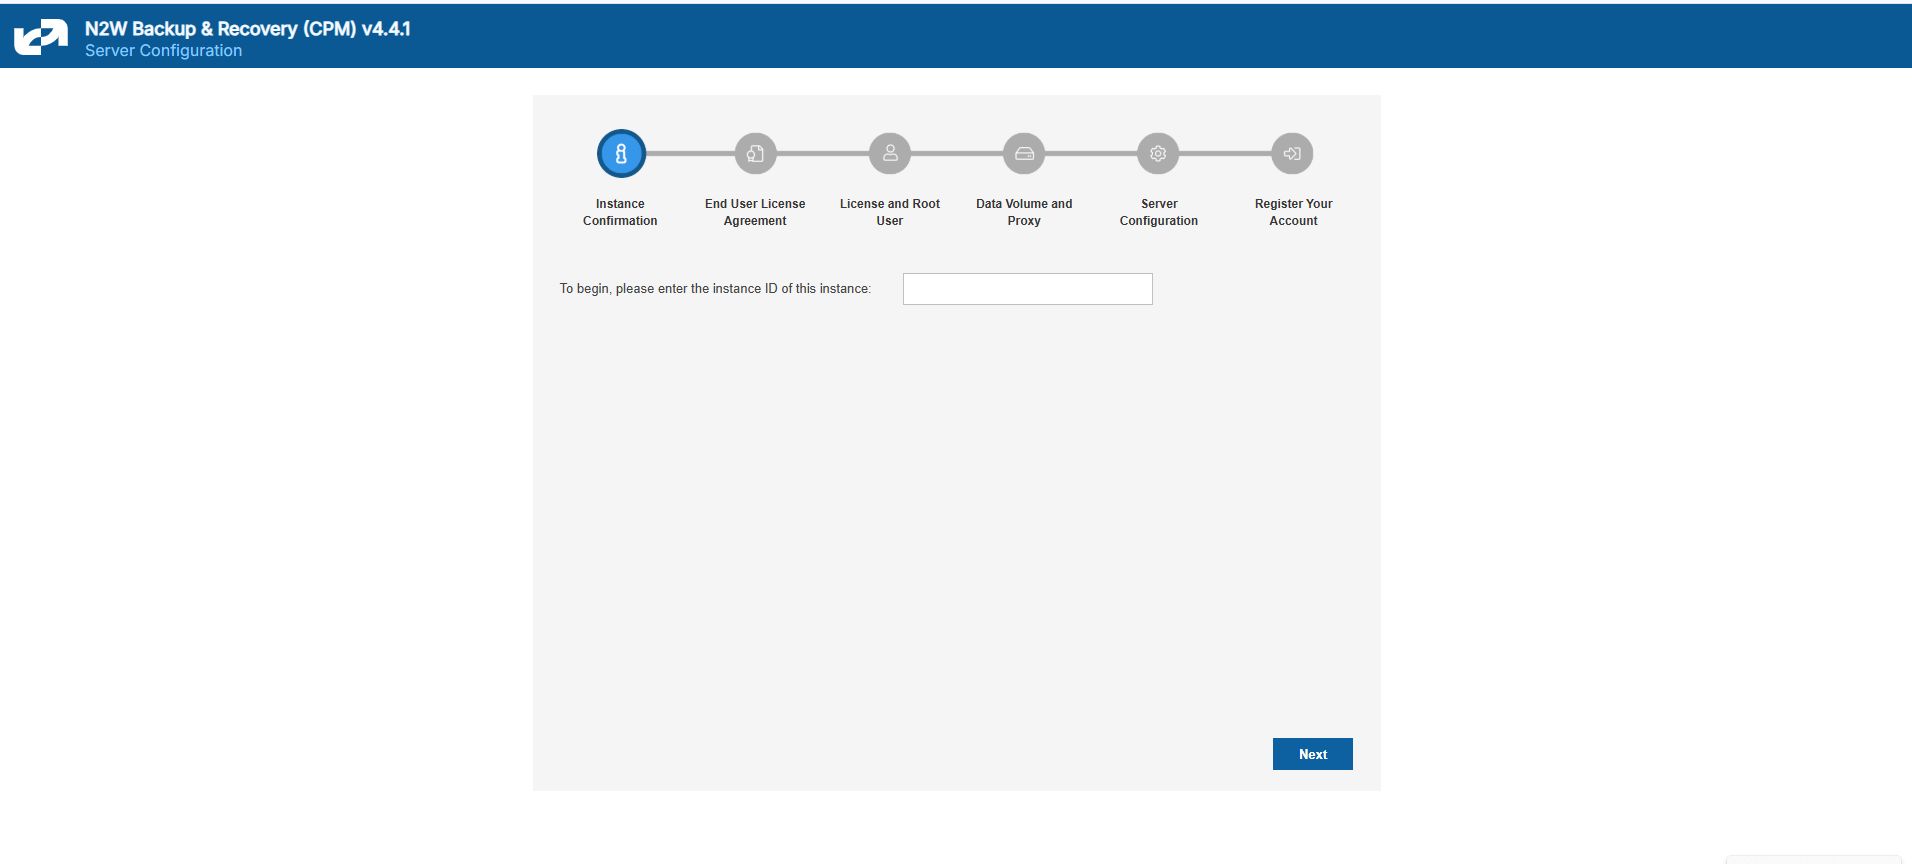

None of the following procedures should be attempted when Backups/DR/Cleaning/S3 Copy are running. Linux Knowledge is required.
The N2W server comes with a default self-signed HTTPS certificate that will show as ‘Not Secure’ in the browser. You can secure the certificate and reach the UI by either:
Selecting the Advanced button in the ‘Your connection is not private” message, or
Adding an exception to the browser. See the Appendix B screenshot in the N2W Quick Start Guide at
If you purchased an HTTPS certificate from a certificate authority, you can replace the default certificate with the new one as follows:
Connect to the N2W instance over SSH.
Use ‘sudo’ to reach the certificate folder, keeping the ownership and permissions of the files (‘cp’).
Go to /opt/n2wsoftware/cert
4. In the folder, replace cpm_server.crt and cpm_server.key with new files having the same names.
5. If you are using MobaXterm, you can drag/drop files to the SSH session, and then copy the files to the correct folder.
6. After replacing the files, restart Apache: sudo service apache2 restart
For full details, see:
To test the certificate before deploying to production:
The user can launch a new N2W trial instance to see if the new certificate works there.
If there are any issues, you can restore/recreate the original default certificate as follows:
Only perform these steps if you know how to use SSH and Linux commands.
Connect to the N2W instance over SSH using a tool such as PuTTY or MobaXterm.
Use ‘sudo’ to reach the certificate folder, keeping the ownership and permissions of the files: sudo su
Go to /opt/n2wsoftware/cert:
4. Move the existing .crt and .key files to a new name:
5. Stop/Start the instance.
For full details, see:
This section explains a few key concepts to help you use N2W correctly.
By default, snapshots taken using N2W are Crash-consistent. When you back up an EC2 instance at a certain time, and later want to restore this instance from backup, it will start the same as a physical machine booting after a power outage. The file system and any other applications using EBS volumes were not prepared or even aware that a backup was taking place, so they may have been in the middle of an operation or transaction.
Being in the middle of a transaction implies that this backup will not be consistent, but this is not the case. Most modern applications that deal with important business data are built for robustness. A modern database, be it MySQL, PostgreSQL, Oracle, or SQL Server, has transaction logs. Transaction logs are kept separately from the data itself, and you can always play the logs to get to a specific consistent point in time. A database can start after a crash and use transaction logs to get to the most recent consistent state. NTFS in Windows and EXT3 in Linux have implemented journaling, which is not unlike transaction logs in databases.
Learn how to set the time zone for a server.
The following example is the CPMCONFIG time_zone parameter for Israel:
To obtain the list of time zones or to set the time zone:
SSH into the CPM instance using the logon cpmuser and the instance’s private key.
During application-consistent backups, any application may be informed about the backup progress. The application can then prepare, freeze, and thaw in minimal-required time to perform operations to make sure the actual data on disk is consistent before the backup starts, making minimal changes during backup time (backup mode) and returning to full-scale operation as soon as possible.
There is also one more function that application-consistent backups perform especially for databases. Databases keep transaction logs which occasionally need to be deleted to recover storage space. This operation is called log truncation. When can transaction logs be deleted without impairing the robustness of the database? Probably after you make sure you have a successful backup of the database. In many cases, it is up to the backup software to notify the database it can truncate its transaction logs.
When taking snapshots, the point in time is the exact time that the snapshot started. The content of the snapshot reflects the exact state of the disk at that point in time, regardless of how long it took to complete the snapshot.
The type of backup to choose depends on your needs and limitations. Every approach has its pros and cons:
Pros:
Does not require writing any scripts.
Does not require installing agents in Windows Servers.
Does not affect the operation and performance of your instances and applications.
Fastest.
Cons:
Does not guarantee a consistent state of your applications.
Does not guarantee the exact point in time across multiple volumes/disks.
No way to automatically truncate database transaction logs after backup.
Pros:
Prepares the application for backup and therefore achieves a consistent state.
Can ensure one exact point in time across multiple volumes/disks.
Can truncate database transaction logs automatically.
Cons:
May require writing and maintaining backup scripts.
Requires installing an N2W Thin Backup Agent or the AWS SSM Agent for Windows Servers.
May slightly affect the performance of your application, especially for the freezing/flushing phase.
To obtain a list of all time zones, type: sudo cpm-set-timezone
To set the time zone, type: sudo cpm-set-timezone <new-time-zone>
For example, to set the time zone to 'New York', type:
CPMCONFIG
[SERVER]
user=demo
password=1
volume_option=new
time_zone=Asia/Jerusalemsudo cpm-set-timezone America/New_Yorkcd /opt/n2wsoftwar/certcd /opt/n2wsoftwar/certmv cpm_server.crt backup_cpm_server.crt
mv cpm_server.key backup_cpm_server.key

In this section, you will learn how to configure agents.
N2W allows configuring remote and local agents from the UI. See section 6.1.2.
The configuration in the text box needs to be in ‘INI’ format.
According to the section header, N2W will pass the key-value pairs to the appropriate agents.
Each agent writes the set of key-value pairs it receives for a section to its configuration file and restarts to reload the configuration.
To configure agents:
Select Server Settings > Agents Configuration.
Write the configuration in the text box with the section header followed by its key-pair, as shown in the sample rules below.
Select Publish.
The following sample rules show how to configure relevant agents:
Pass configuration to all remote agents of a given policy. The following will pass the key-value max_seconds_to_wait_for_vss=100 to all remote agents that belong to the policy by the name ‘p1’:
Pass configuration to a specific remote agent. The following will pass the key-value max_seconds_to_wait_for_vss=100 to the remote agent whose AWS instance ID is ‘agent_id ‘:
Pass configuration to all remote agents. The following will pass the key-value max_seconds_to_wait_for_policy=600 to all remote agents:
Pass configuration to a local agent. The following will pass the key-value max_seconds_to_wait_for_policy=600 to the local agent:
One or more instances of all of the above can be pasted together to the text box in the Agent Configuration screen. On Publish, N2W iterates over all sections and passes the relevant configuration to each agent.
With cross-account backup and recovery, you can easily copy backups between accounts as part of the disaster recovery process.
Available only in Standard, Advanced, and Enterprise Editions, N2W's cross-account functionality allows you to automatically copy snapshots between AWS accounts as part of the DR module. With cross-region DR, you can copy snapshots between regions as well as between accounts and any combination of both. In addition, you can recover resources (e.g., EC2 instances) to a different AWS account even if you did not copy the snapshots to that account. This cross-account functionality is important for security reasons.
The ability to copy snapshots between regions can prove crucial if your AWS credentials have been compromised and there is a risk of deletion of your production data as well as your snapshot data. N2W utilizes the snapshot share option in AWS to enable copying them across accounts. Cross-account functionality is currently supported only for EC2 instances, EBS volumes, and RDS instances, including Aurora.
Cross-account functionality is enabled for encrypted EBS volumes and instances with encrypted EBS volumes and RDS databases.
Learn how to reset a root password or multi-factor authentication.
The reset method depends on whether you have SSH access to the N2W instance and what is your version of N2W:
If you have SSH access to the N2W instance and are running version 4.2 and above, see section .
If you do not have SSH access to the instance or are running an older version, see section .
FSx types need to be encrypted with a custom key.
Supported cross-region FSx types are Lustre, Windows, and OpenZFS.
Supported cross-account FSx types are Lustre (Persistent, HDD), Windows, and OpenZFS
Backup and DR vaults need a custom key.
Users will need to share the encrypted key used for the encryption of the volumes or instances to the other account as N2W will not do it.
In addition, N2W expects to find a key in the target account with the same alias as the original key (or just uses the default key).
For information on sharing encryption keys between different accounts, see https://n2ws.zendesk.com/hc/en-us/articles/28815492111005-Use-custom-KMS-encryption-keys-for-cross-region-cross-account-DR
If a matching encryption key is not found with an alias or with custom tags, the behaviour of the backup depends on the setting in the Encryption Key Detection list in the Security & Password tab of the General Settings screen:
Use Default Key – If the encryption key is not matched, the default encryption key is used.
Strict – DR encryption key must match, either with an alias or a custom tag.
Use Default Key & Alert – Use the default key and send an alert.
N2W can support a DR scheme where a special AWS account is used only for snapshot data. This account’s credentials are not shared with anyone and used only to copy snapshots. The IAM credentials used in N2W can have limited permissions that do not allow snapshot deletion.
N2W will tag outdated snapshots instead of deleting them, allowing an authorized user to delete them separately using the EC2 console or a script. The tag cpm_deleted will have a value of ‘CPM deleted this snapshot (<time-of-deletion>)’. Also, you may choose to keep the snapshots only in the vault account and not in their original account. This will allow you to save storage costs and utilize the cross-recovery capability to recover resources from the vault account back to the original one.
Once you have created an account with the Account Type DR, you can configure cross-account DR from the DR tab of a policy.
Cross-account fields will be available only if your N2W is licensed for cross-account functionality. See the pricing page on our website to see which N2W editions include cross-account backup and recovery.
Once you select Cross-Account DR Backup Enabled, other fields become visible:
To Account – Which account to copy the snapshots to. This account needs to have been defined as a DR Account Type in the Accounts screen.
DR Account Target Regions – Which region or regions you want to copy the snapshots of the policy to. To include all Target Regions selected for backup, select Original in the list. Select additional regions as needed.
Keep Original Snapshots – Enabled by default, the original snapshot from the source region will be kept. If disabled, once the snapshot is copied to the DR account, it will be deleted from the source region.
Keep Original Snapshots must be enabled for Copy to S3 for Cross-Account DR Backup.
N2W performs clean-up on backup policies and deletes backups and snapshots that are out of the retention window, according to the policy’s definition. By default, N2W will clean up snapshots copied to other accounts as well. However, if you do not wish for N2W to clean up, because you want to provide IAM credentials that are limited and cannot delete data, you have that option. If you defined the DR account with Allow Deleting Snapshots set as False, N2W will not try to delete snapshots in the DR account. It will rather flag a snapshot for subsequent deletion by adding a tag to the snapshot called cpm_deleted. The tag value will contain the time when the snapshot was flagged for deletion by N2W.
When using this option, occasionally make sure that these snapshots are actually deleted. You can either run a script on a schedule, with proper permissions or make it delete all snapshots with the tag cpm_deleted. Or, using the EC2 console, filter snapshots by the tag name and delete them.
If you configure the backup policy to copy snapshots across accounts as well as across regions, be aware of how the increased number of copies might affect your AWS costs.
Cross-account with cross-region DR with AMIs is supported.
AWS limits RDS snapshot cross-account copy to the DR account in the original region. To overcome this limitation, N2W performs two snapshot copies during the DR process:
Copy from 'Backup account - origin region' to ‘DR account - origin region'.
Copy from 'DR account - origin region' to ‘DR account - DR region'.
To ensure incremental snapshot copies across regions, enable Keep Original Snapshots on the Policy DR tab. If ‘Keep Original Snapshots’ is not enabled, then the cross-region copies will be full copies of the database.
In most usage scenarios, it is more cost efficient to enable Keep Original Snapshots. Incremental copies will use less space in the aggregate, reduce cross-region data transfer costs, and reduce Recovery Time Objective.
If you have cross-account functionality enabled in your N2W license, and even if you configured N2Wto copy snapshots between accounts, you can recover across accounts. This is already mentioned in Recovery section 10. You need to choose which account to recover the resource (EC2 instance, EBS volume, or RDS database) to.
Only account type DR may be the target of a cross-account recovery.
When copying snapshots between accounts and not keeping the original snapshots, you will also have the option to restore the instance/volume to the original account. N2W will utilize the AWS share snapshot option to enable recovering resources across accounts.
N2W Login Reset Utility n2ws-reset-login:
To reset login credentials and/or MFA for specific or all users:
Connect to N2W instance via SSH with user 'cpmuser' and your SSH key.
Switch to root: ‘sudo su’.
To see options for using the utility to reset the password or MFA, type ‘n2ws-reset-login’.
4. Disable the root user MFA without changing the password:
5. Disable the root user MFA and reset the password:
6. Enter password and confirmation entry.
7. Reset MFA if relevant.
If you don’t have SSH access, perhaps because the key is lost, or if you just need to recover your password and disable the MFA, redeploy the instance as follows:
If you know the root/admin username:
Make sure there are no backups or DR in progress.
Follow the upgrade procedure in the N2W User Guide at https://docs.n2ws.com/user-guide/#1-4-upgrading-n-2-ws.
When configuring the new instance, use the old username of the root/admin (important!) and the new password.
After the new CPM is launched, apply any necessary patches to make sure it’s up-to-date with the latest fixes and features: https://support.n2ws.com/portal/en/kb/articles/release-notes-for-the-latest-v4-1-x-cpm-release
If you don’t know the root/admin username:
Make sure there are no backups or DR in progress.
Follow the upgrade procedure in the N2W User Guide at https://docs.n2ws.com/user-guide/#1-4-upgrading-n-2-ws.
During the “upgrade” process, type the username you think it is and the new password.
If you typed the wrong root username, N2W will assume you forgot it and will create a file on the server, '/tmp/username_reminder', containing the old username.
To view this file, connect to the N2W server using SSH as ‘cpmuser’.
Now you will be able to use the older username with the new password.
After the new CPM is launched, apply any necessary patches to make sure it’s up-to-date with the latest fixes and features:
For further information, see https://support.n2ws.com/portal/en/kb/articles/how-to-reset-the-password-for-the-root-admin-cpm-user
Wasabi Storage is an independent third-party provider of storage account services. Wasabi storage is compatible with Amazon S3 object storage and is available for use through N2W. Storing snapshots with Wasabi instead of S3 allows customers to save on their long-term storage costs.
Because Wasabi is an external cloud storage provider, customers should be aware that Data Transfer charges to the Internet will be applied by their cloud provider for data sent to Wasabi.
A Wasabi repository is based on a bucket in the Wasabi system. Wasabi repositories can be used to store snapshots for both AWS and Azure policies. You can cross-cloud backups by going from N2W on AWS to Wasabi or from N2W on Azure to Wasabi.
Make sure that your license supports Wasabi.
Enable Wasabi Cloud as one of your UI defaults in N2W Server Settings > General Settings > User UI Default.
Compliance-only Immutable backups are supported for Wasabi repositories.
Authentication to Wasabi using user-specified credentials is required first for N2W to access a Wasabi bucket.
Authentication of Wasabi accounts is by Access Key ID and Secret Access Key only.
Create a Wasabi account in N2W with the required credentials.
Create a Wasabi repository in any bucket accessible to the specified account. See section .
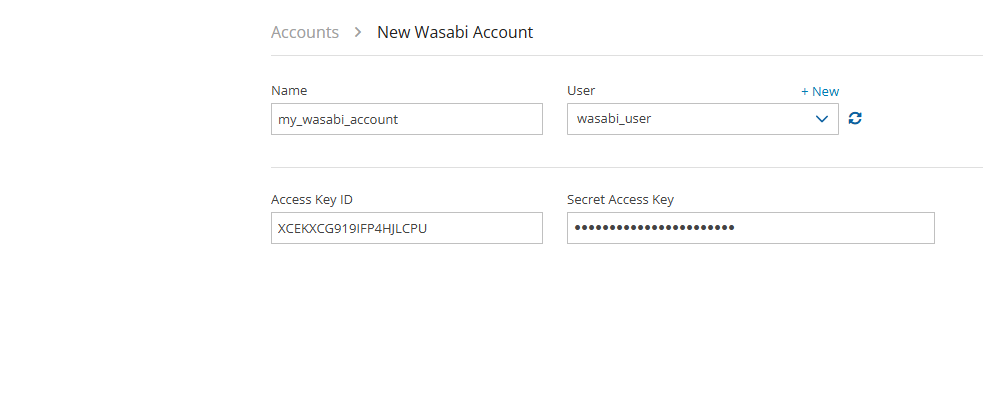
To create a Wasabi account:
Log on to N2W using the root username and password used during the N2W configuration.
Select the Accounts tab.
In the New menu, select Wasabi Account..
Wasabi repositories are where backups of SQL servers are stored. Wasabi repositories can also be used to store disk snapshots via a Lifecycle policy or serve as cross-cloud storage for AWS volume snapshots via a Lifecycle policy. For further details, see section
A single Wasabi container can have multiple repositories.
Wasabi buckets may not be versioned.
In N2W, select the Storage Repositories tab.
In the New menu, select Wasabi Storage Repository.
In the Storage Repository screen, complete the following fields, and then select Save.
Do not rename this bucket after selection for the Repository as the copy will fail.
f. Immutable backups (Using Compliance Lock) - Select to enable immutable backups. It will not be possible to delete snapshots before their retention expiration dates in an enabled repository.
You can delete all snapshots copied to a specific Wasabi repository.
Deleting a repository is not possible when the repository is used by a policy. You must change the policy’s repository to a different one before you can delete the target repository.
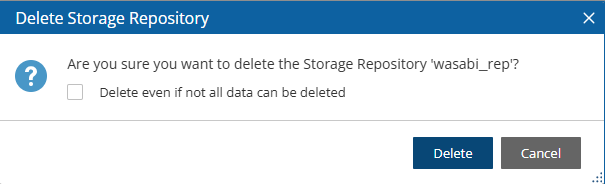
To delete a Wasabi repository:
Select the Storage Repositories tab.
Select the repository to delete.
Select Delete, and confirm.
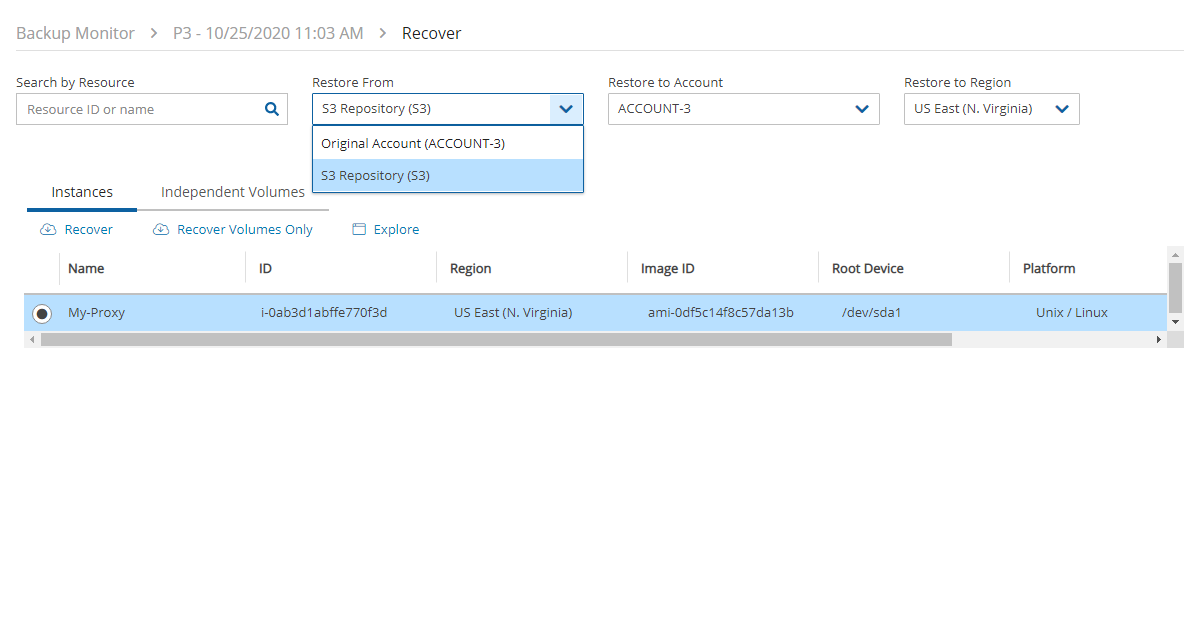
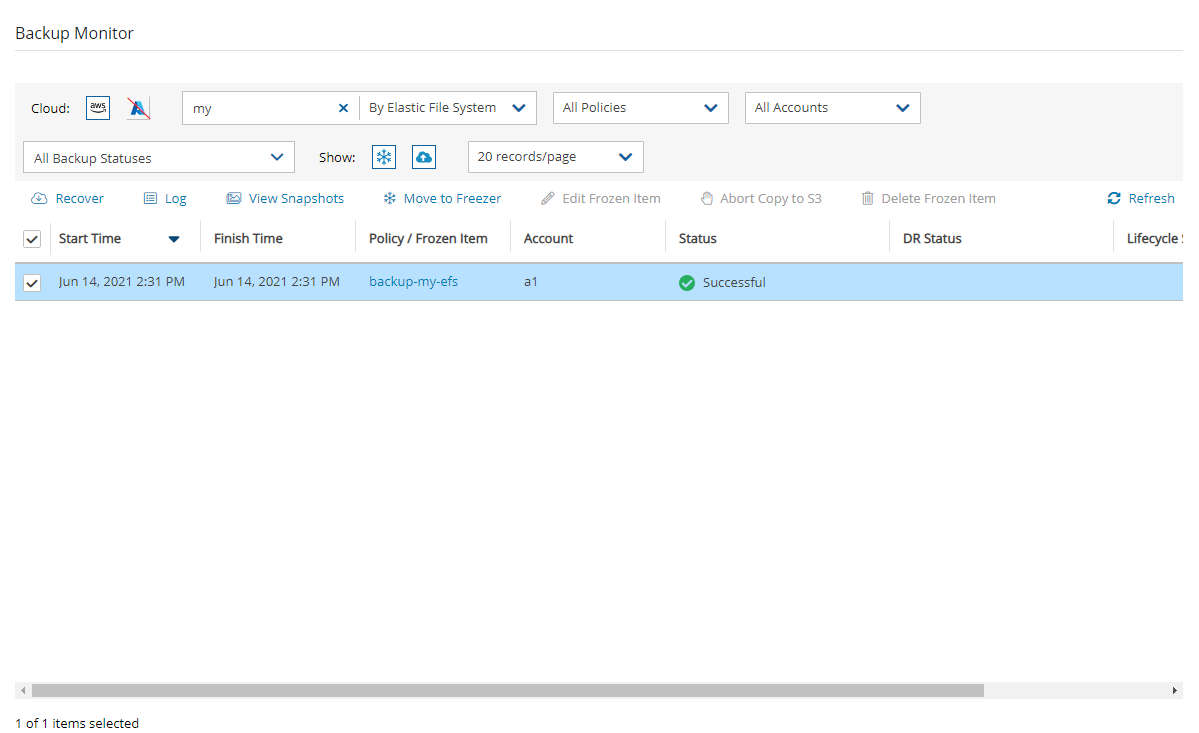
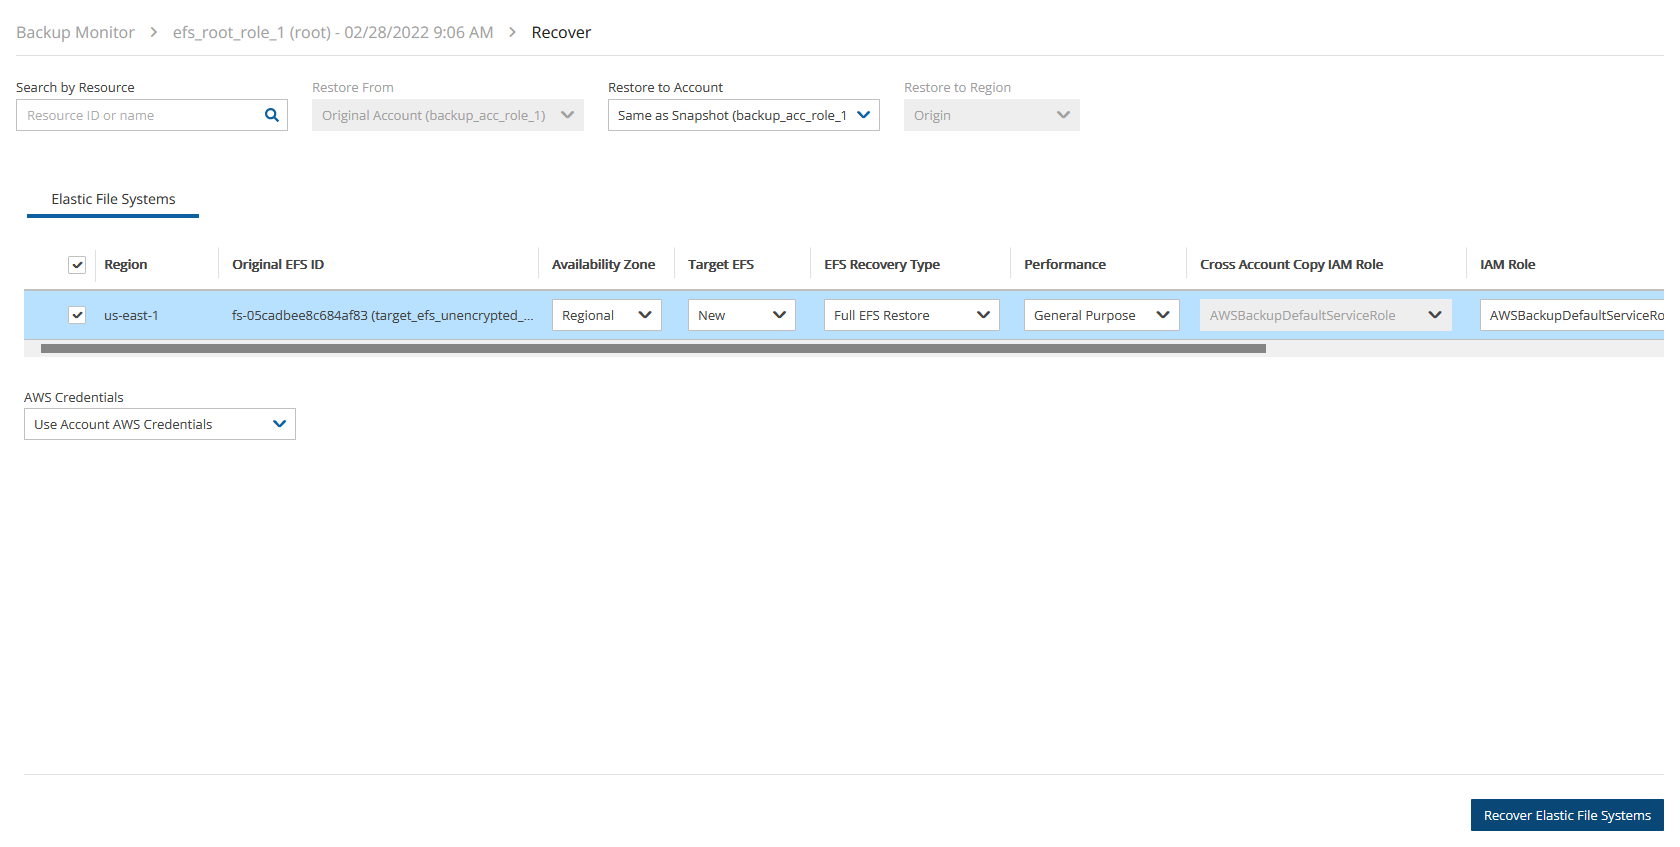
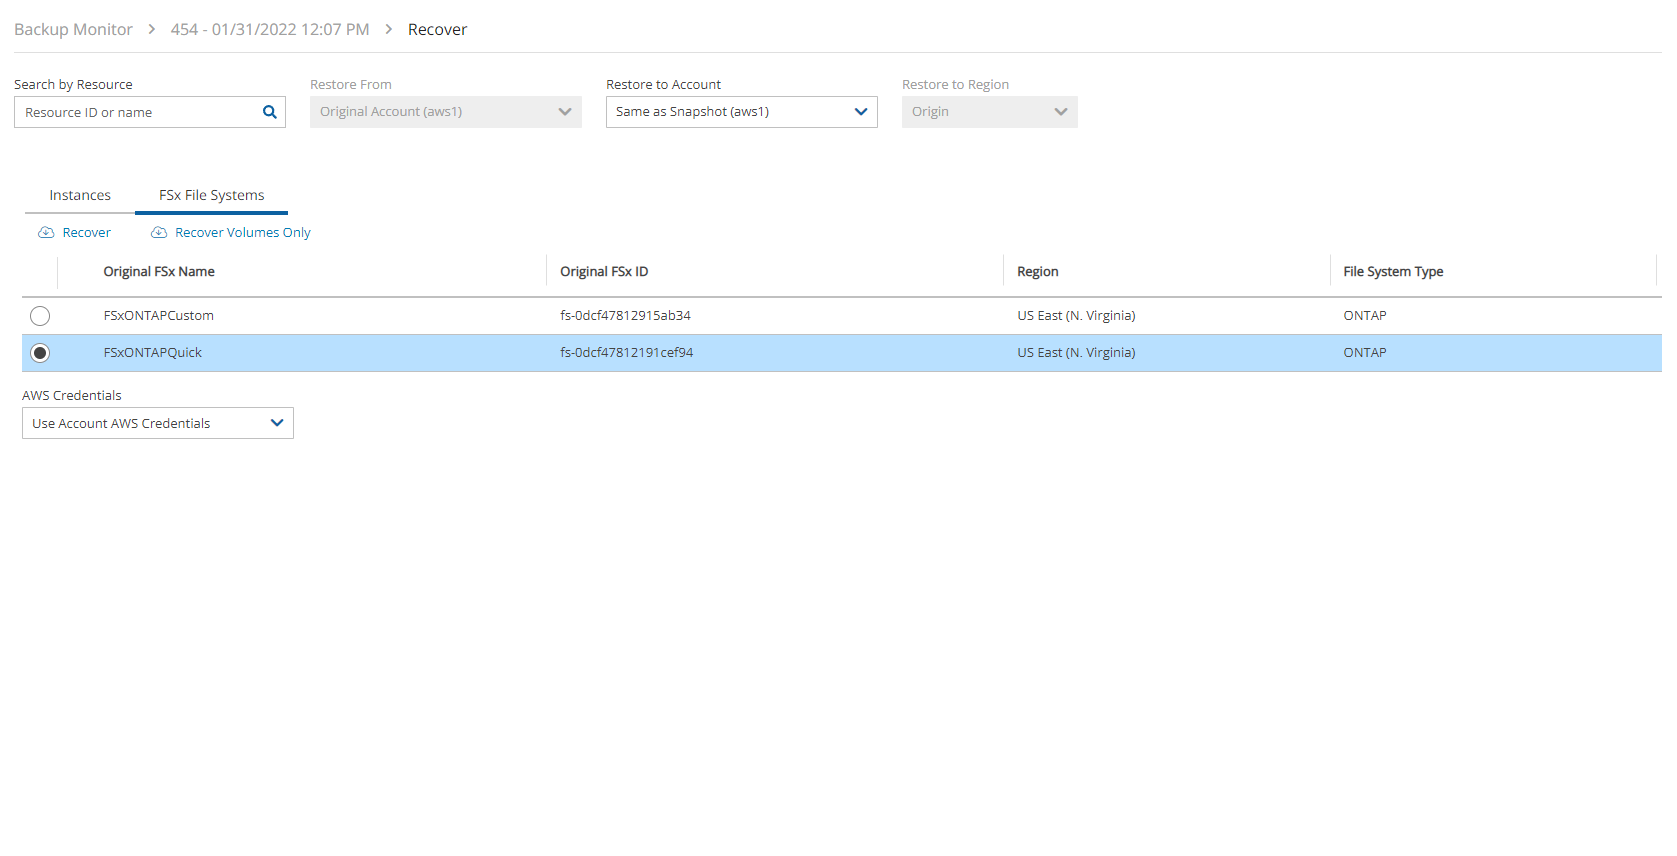
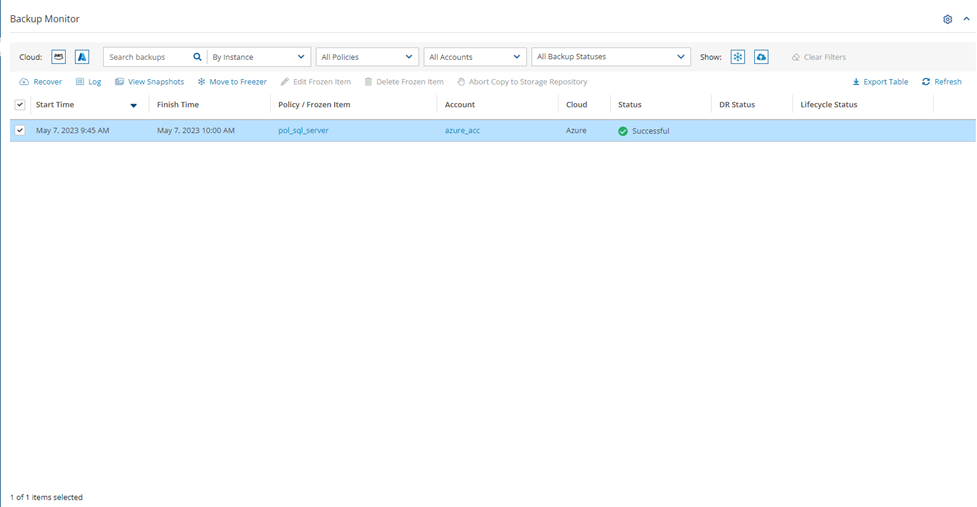
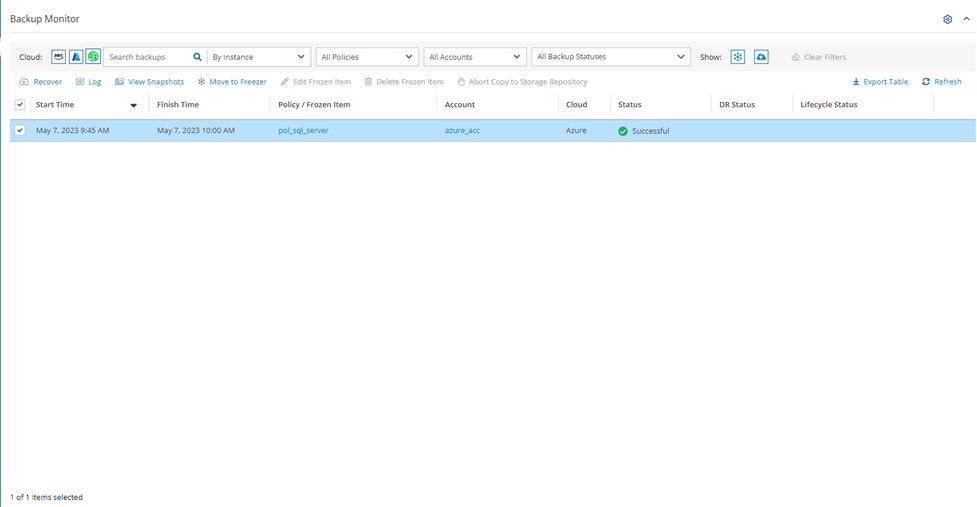
In the Backup Monitor, select the Cloud button for Wasabi .
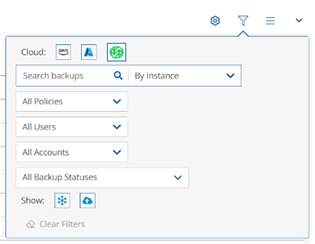
To minimize the top bars, select the up arrow in the top right corner. To open the filters dialog box, select the filter icon ( ).
Filter as necessary by type of target, policies, users, accounts, backup status, and freezer status.
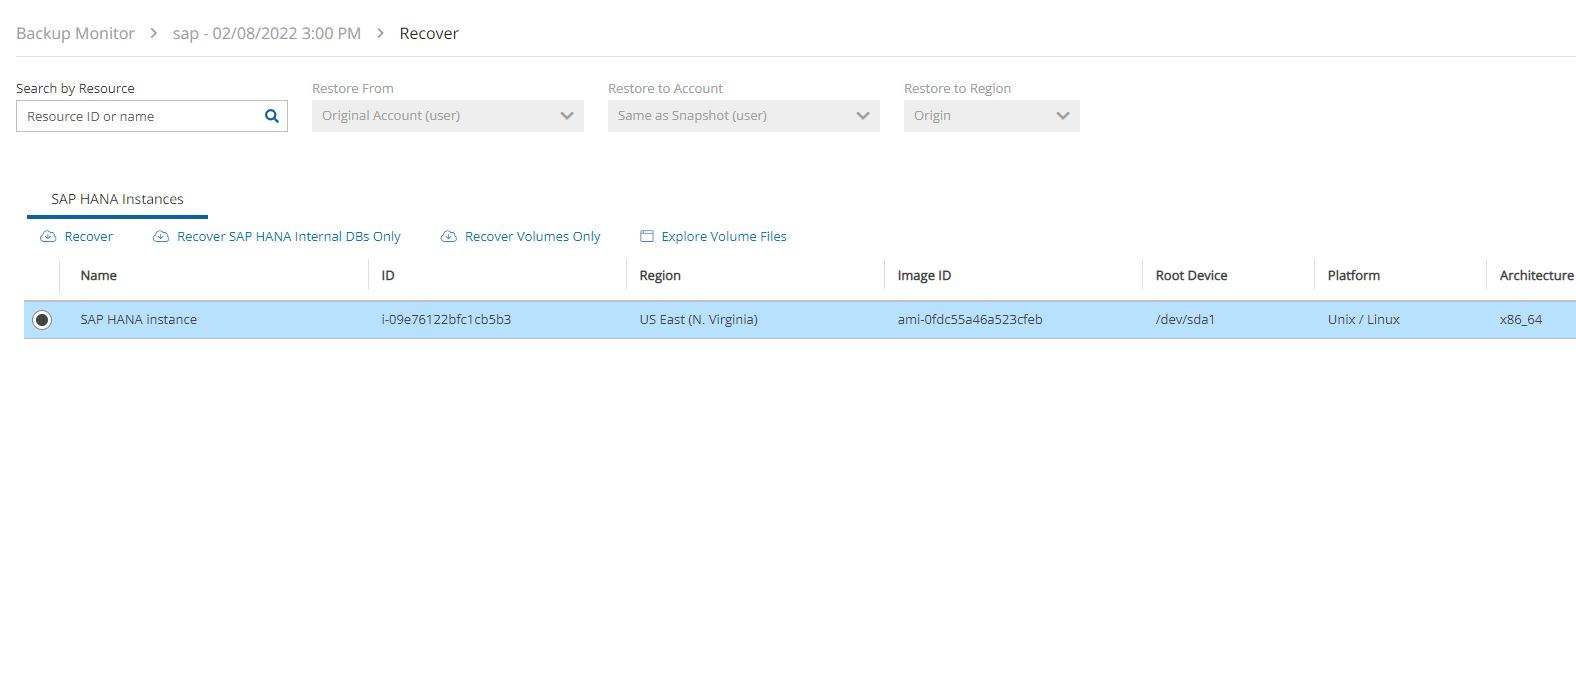
4. Select a backup, and then select Recover. The Recover screen opens. For backups with multiple resource types as targets, the Recover screen will have a separate tab for each type.
5. Follow the recovery instructions for the resource type as described in section .
You can model and manage your infrastructure resources with AWS CloudFormation.
The process to configure N2W to work with CloudFormation is a single stream that starts with subscribing to N2W on the Amazon Marketplace and ends with configuring the N2W server.
N2W provides several editions, all of which support CloudFormation.
An IAM role will automatically be created with minimal permissions and assigned to the N2W instance.
Configure CPM with CloudFormation will fail where the requested Instance type is not supported in the requested Availability Zone. Retry your request, but do not specify an Availability Zone or choose us-east-1a, us-east-1b, us-east-1c, us-east-1d, or us-east-1f.
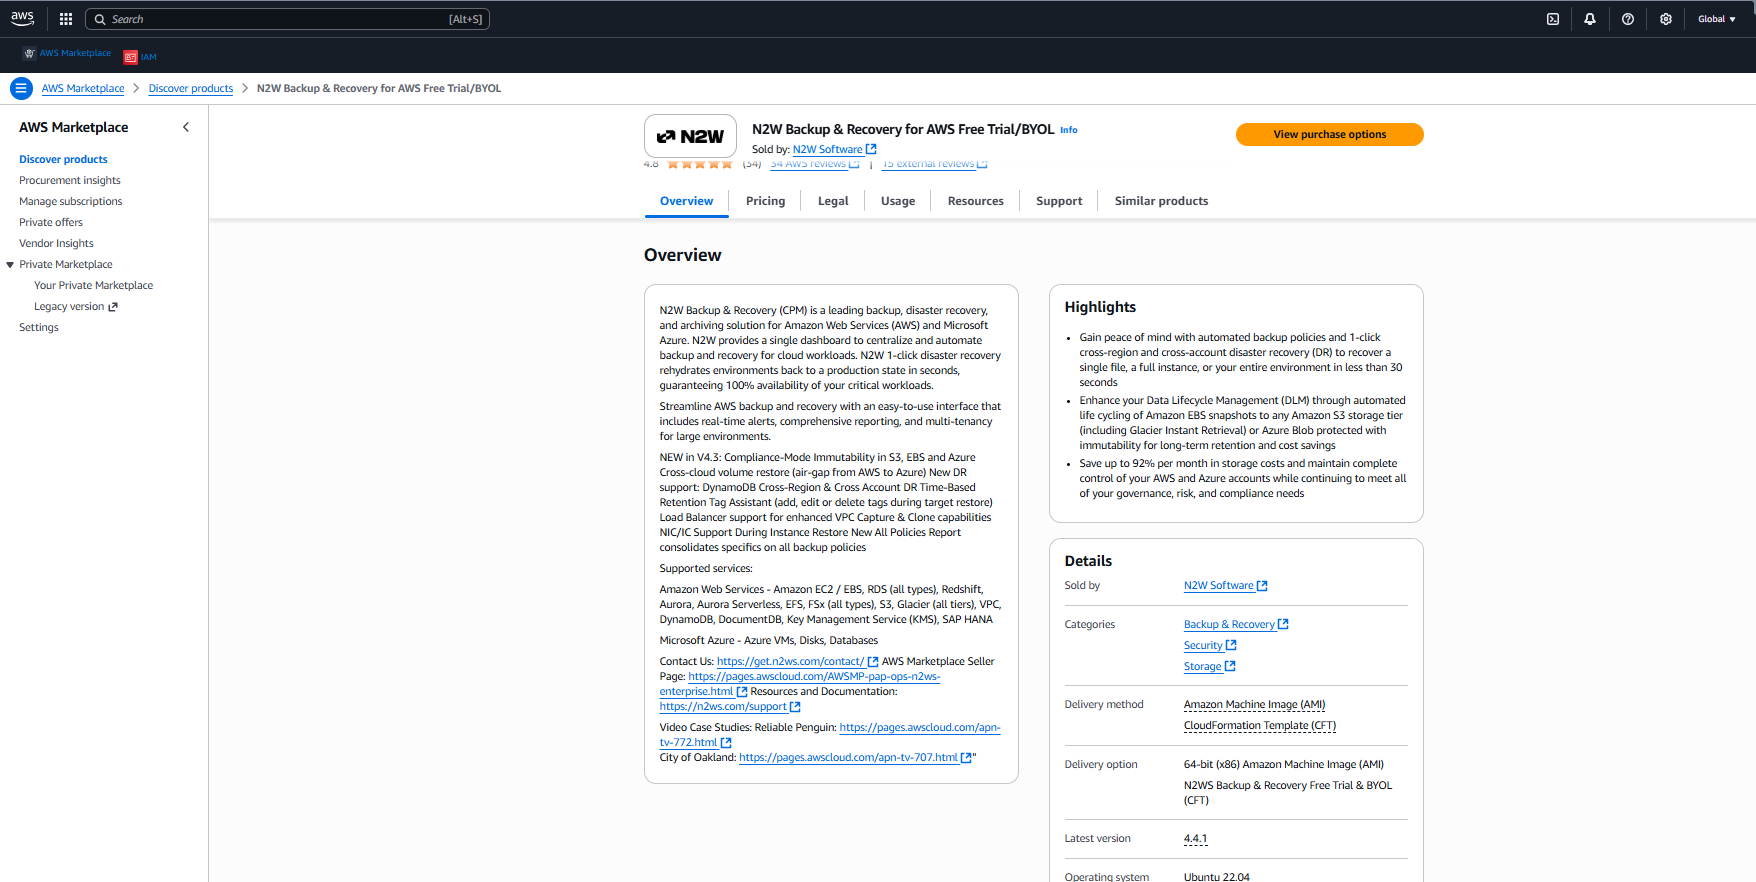
Go to
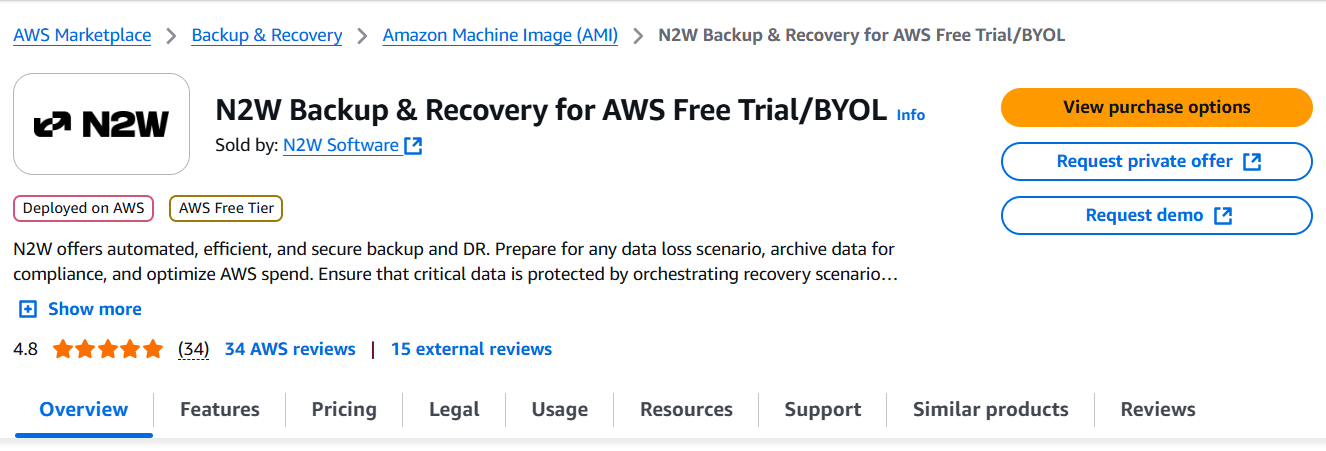
Search for N2W Software.
Select the AWS Free Trial & BYOL CPM edition, and then select View purchase options.
4. After reviewing the Overview, select View purchase options again.
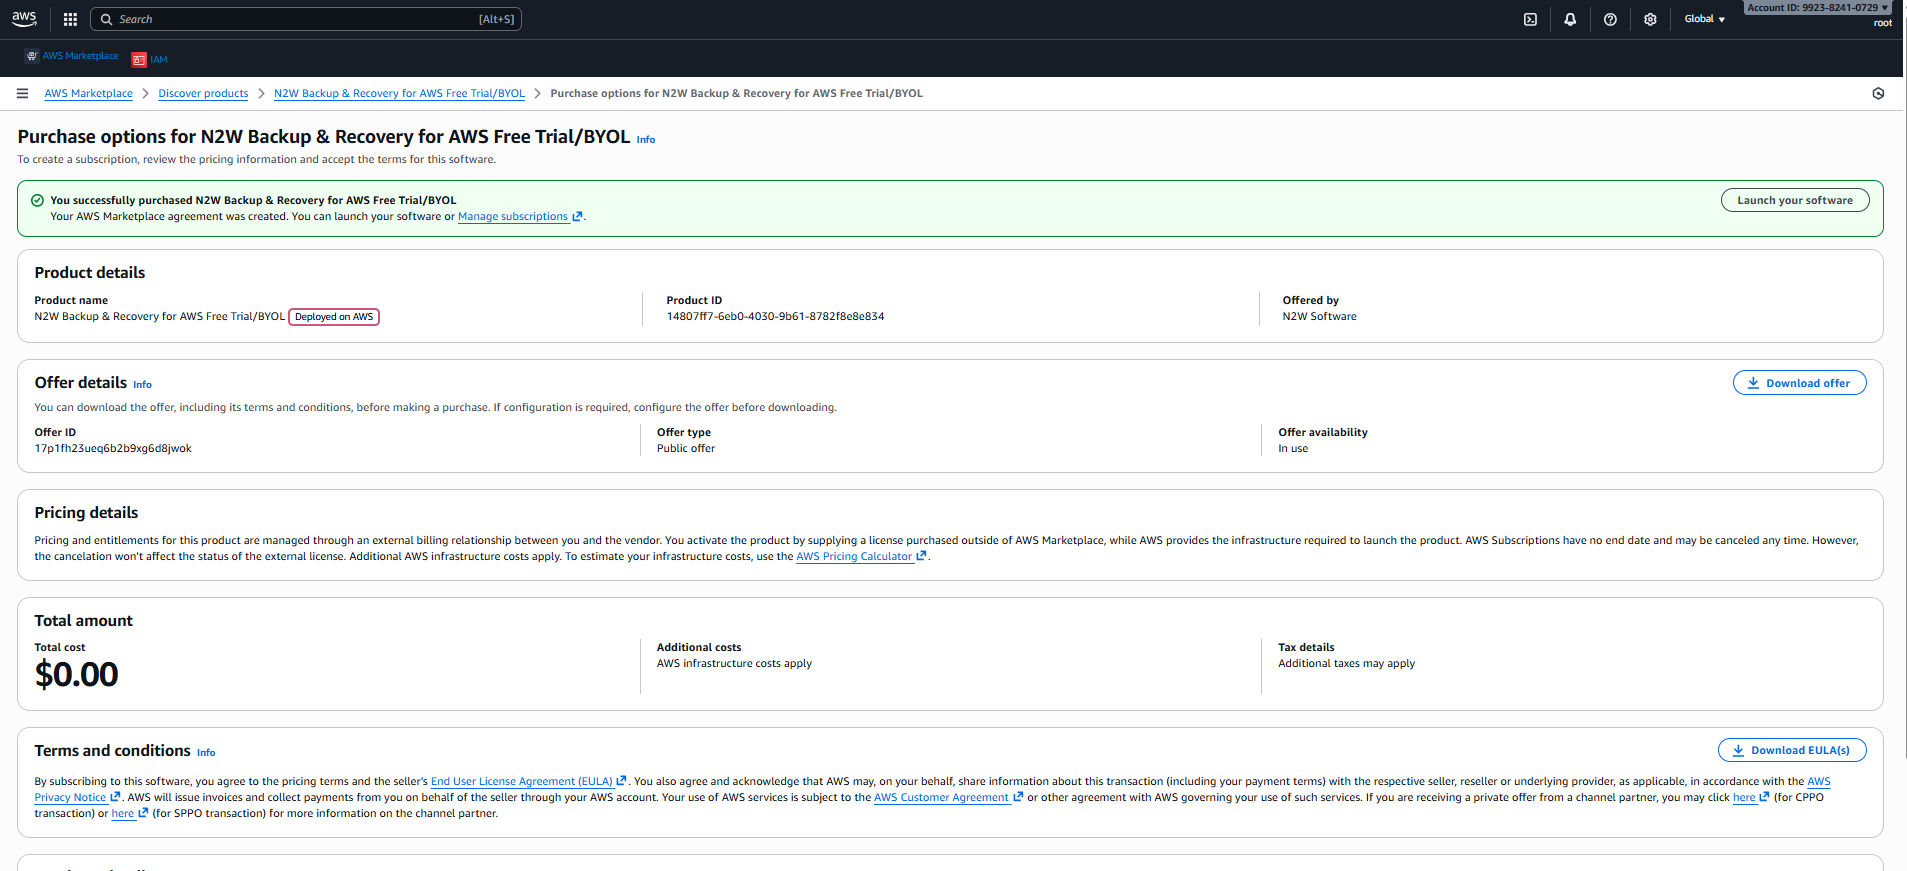
5. After purchasing N2W Backup & Recovery for AWS Free Trial/BYOL, select Launch your software.
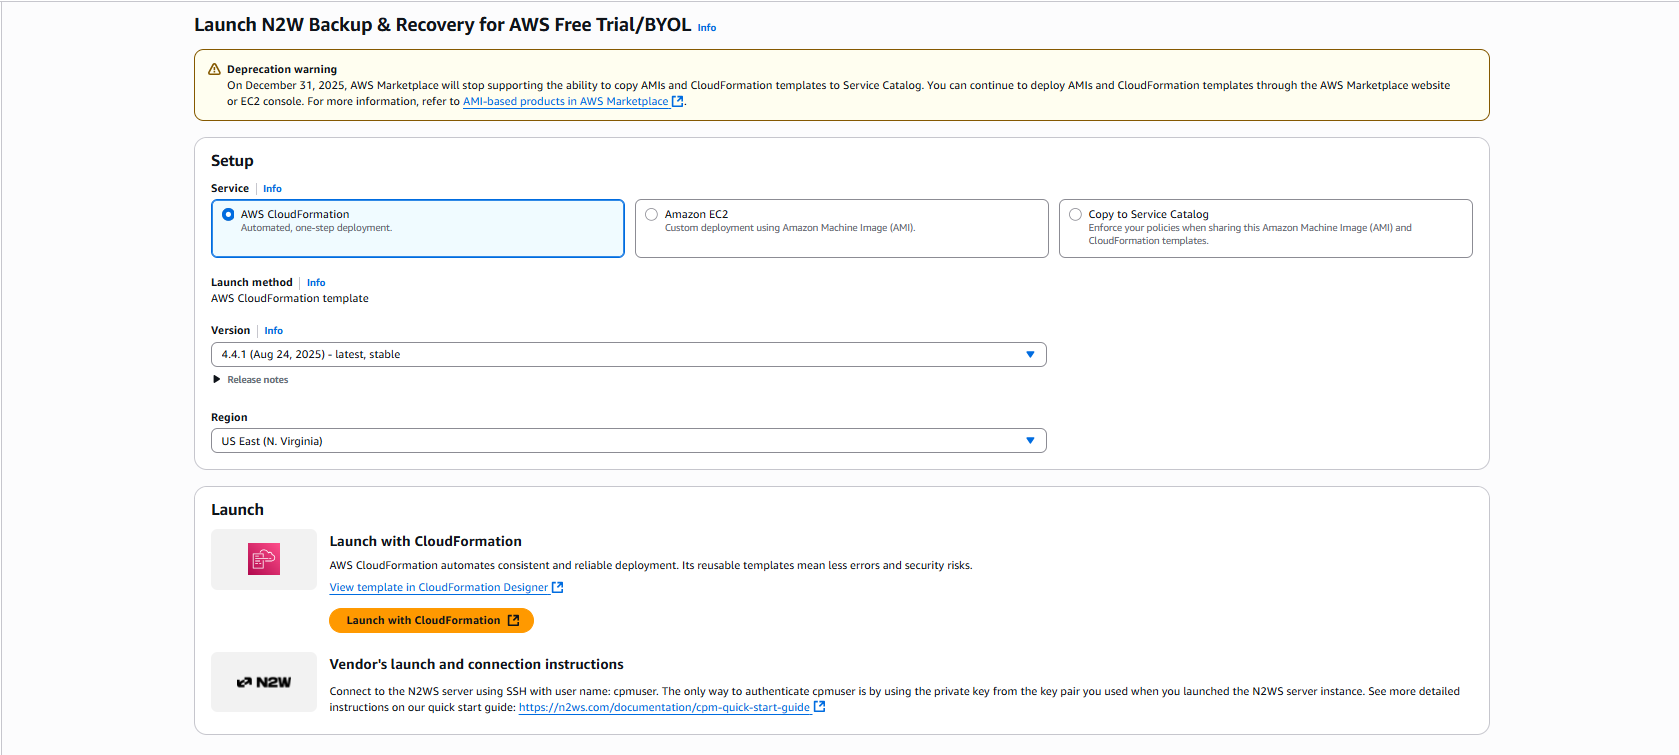
6. In the Setup section, select AWS CloudFormation for the Service. Select the relevant Version and Region, and then select Launch with CloudFormation.
7. In the Create Stack page:
a. In the Prerequisite - Prepare template section, select Choose an existing template.
b. In the Specify template section, select Amazon S3 URL. In the Amazon S3 URL window, the address of the template will appear.
c. Select View in Infrastructure Composer.
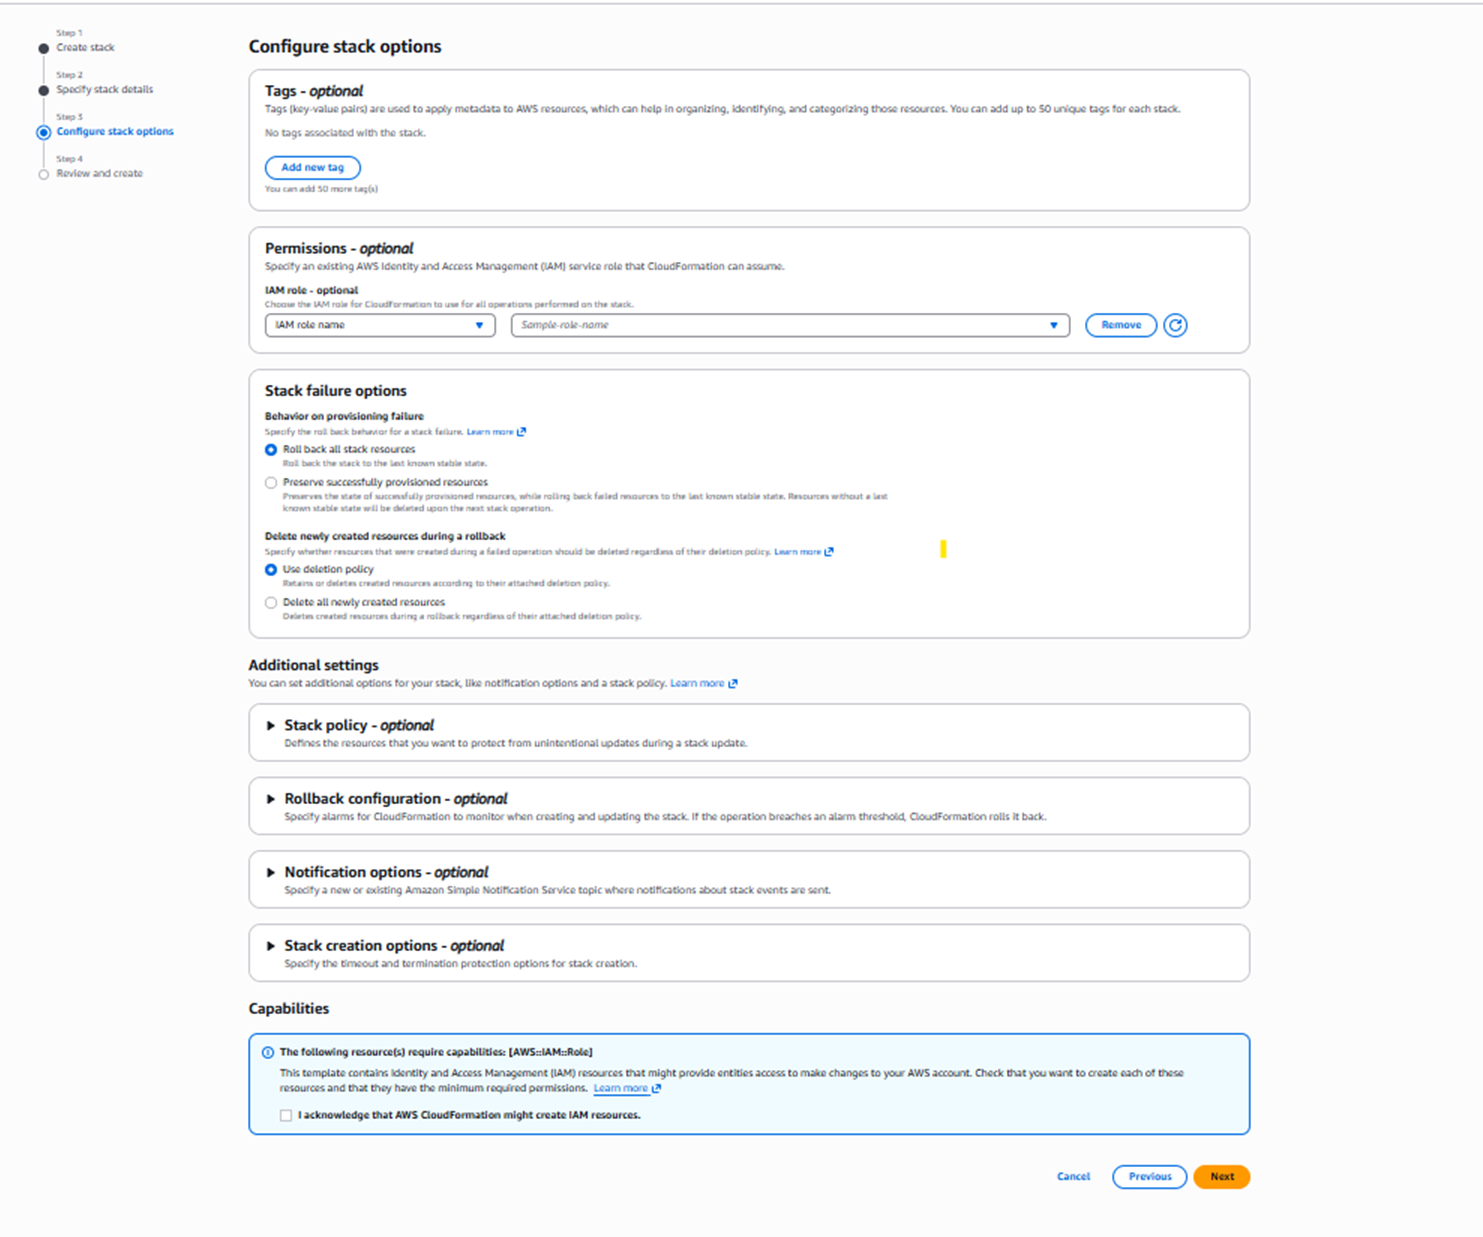
8. Select Next. The Configure stack options page opens.
a. If needed, select Add new tag.
b. In the Capabilities section, select I acknowledge that AWS CloudFormation might create IAM resources.
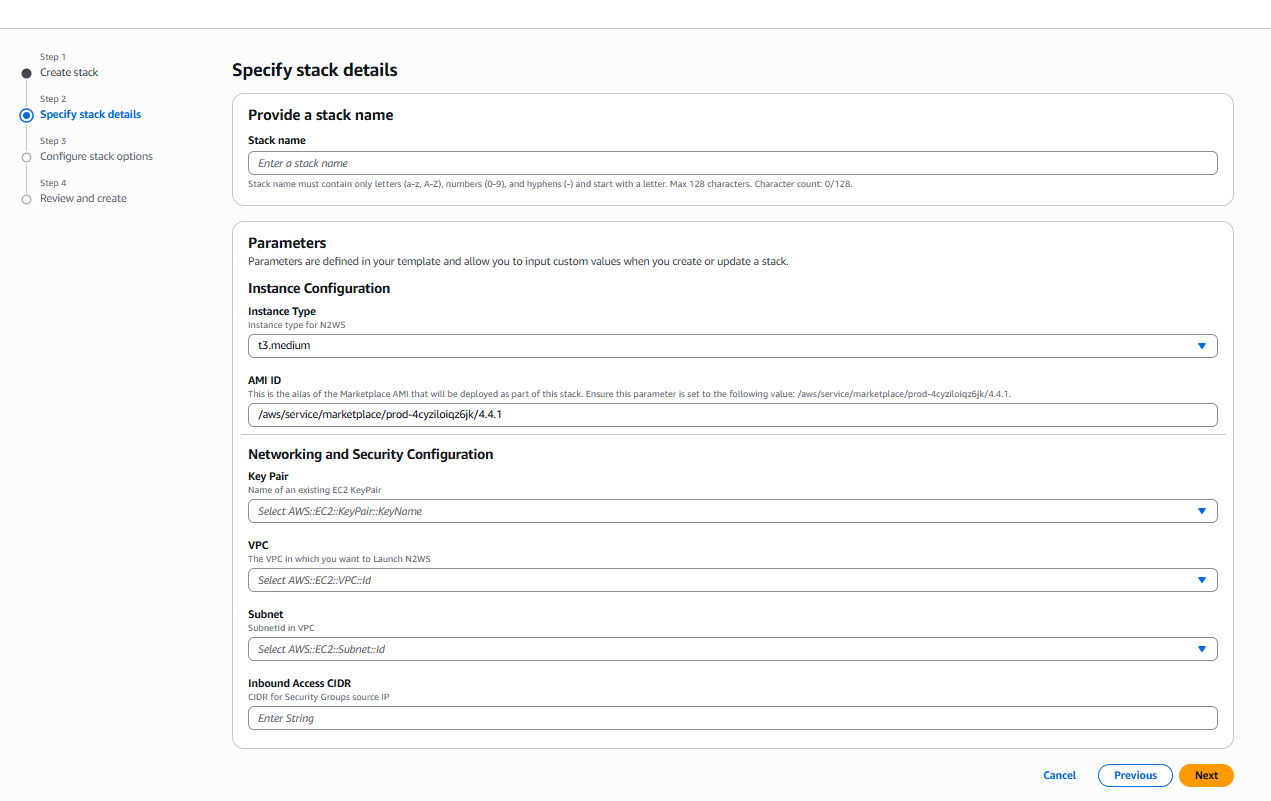
9. Select Next. The Specify stack details page opens. Provide a stack name and parameters.
For Inbound Access CIDR, security groups act as a firewall for associated instances, controlling both inbound and outbound traffic at the instance level. Configuring Inbound Access CIDR allows you to add rules to a security group that enable you to connect to your Linux instance from your IP address using SSH:
If your IPv4 address is 203.0.113.25, specify 203.0.113.25/32 to list this single IPv4 address in CIDR notation.
If your company allocates addresses within a range, specify the entire range, such as 203.0.113.0/24
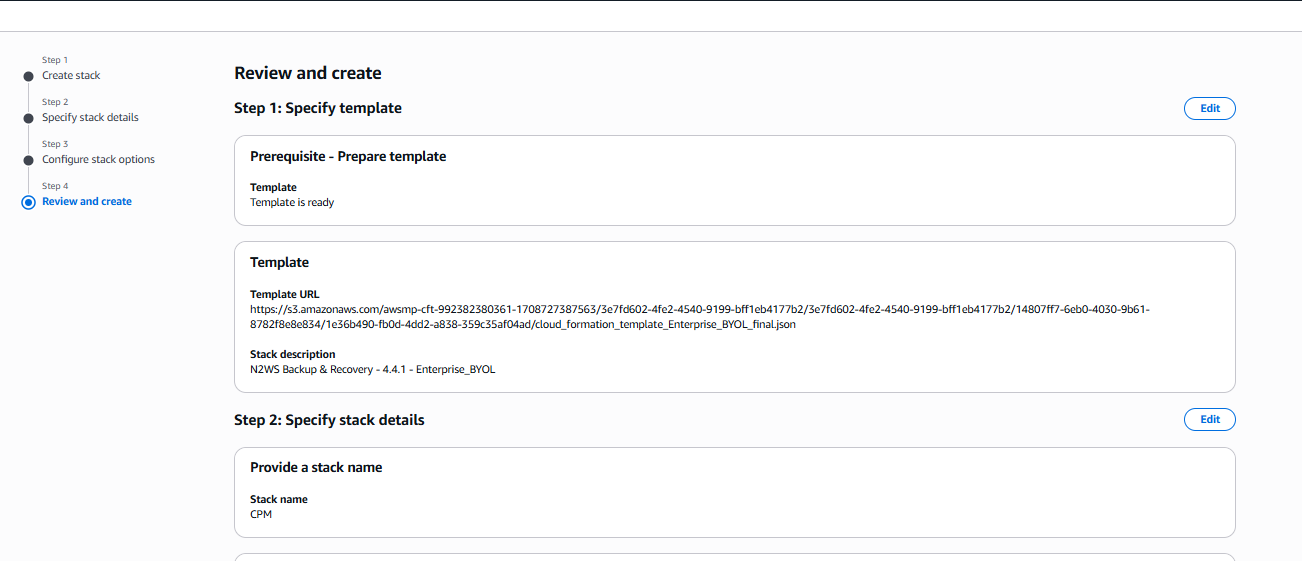
Select Next. The Review and create page opens. Review and edit as necessary.
Step 1, Specify template, and Step 2, Specify stack details:
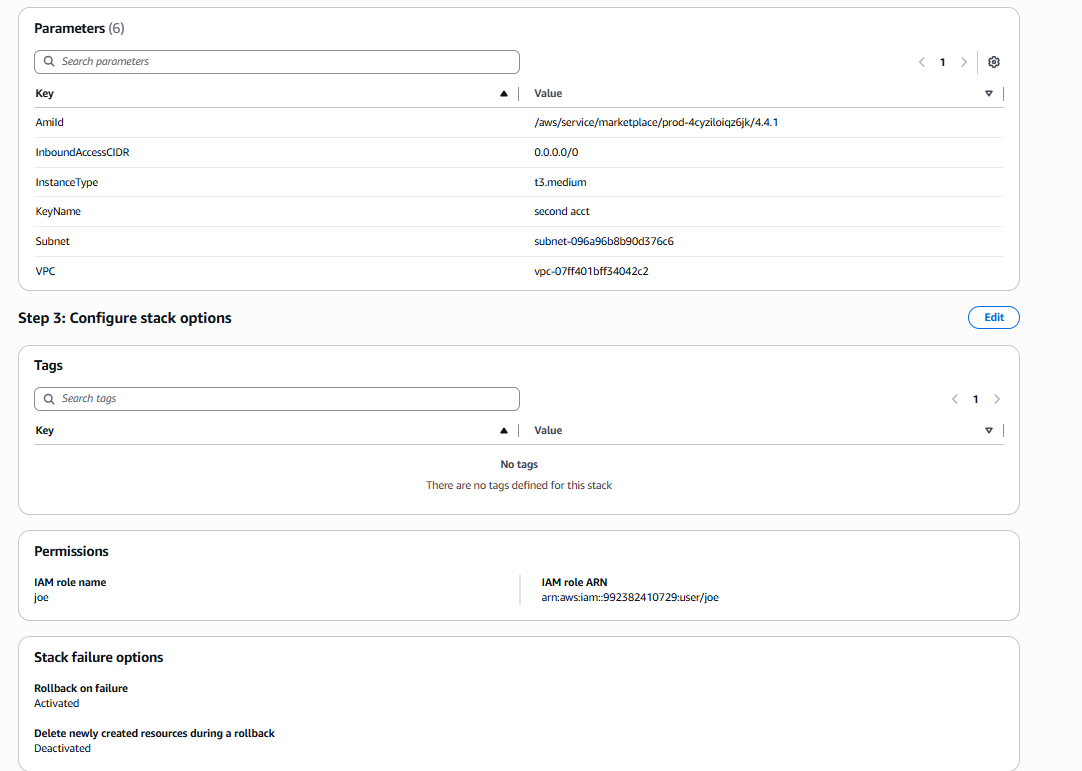
b. Step 2, Parameters, and Step 3 Configure stack options, such as Tags and Permissions:
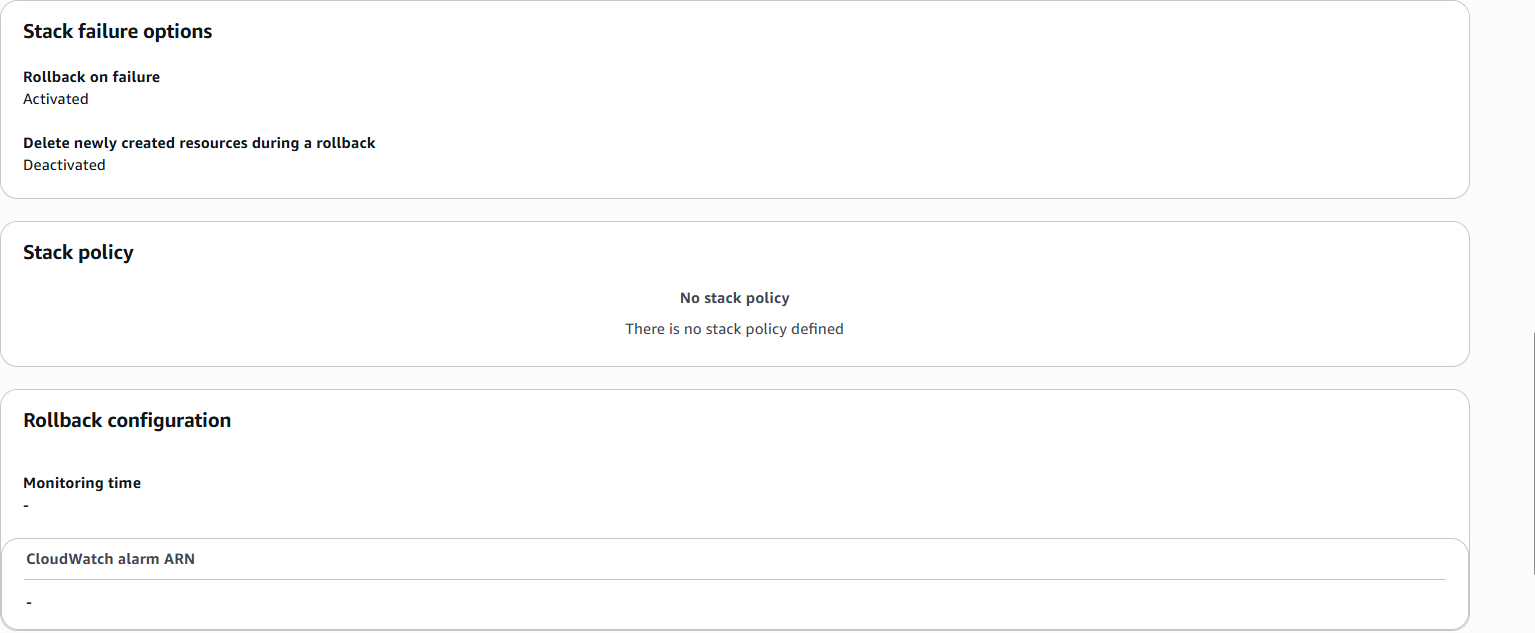
c. Step 3, Stack failure options, Stack policy, and Rollback configuration:
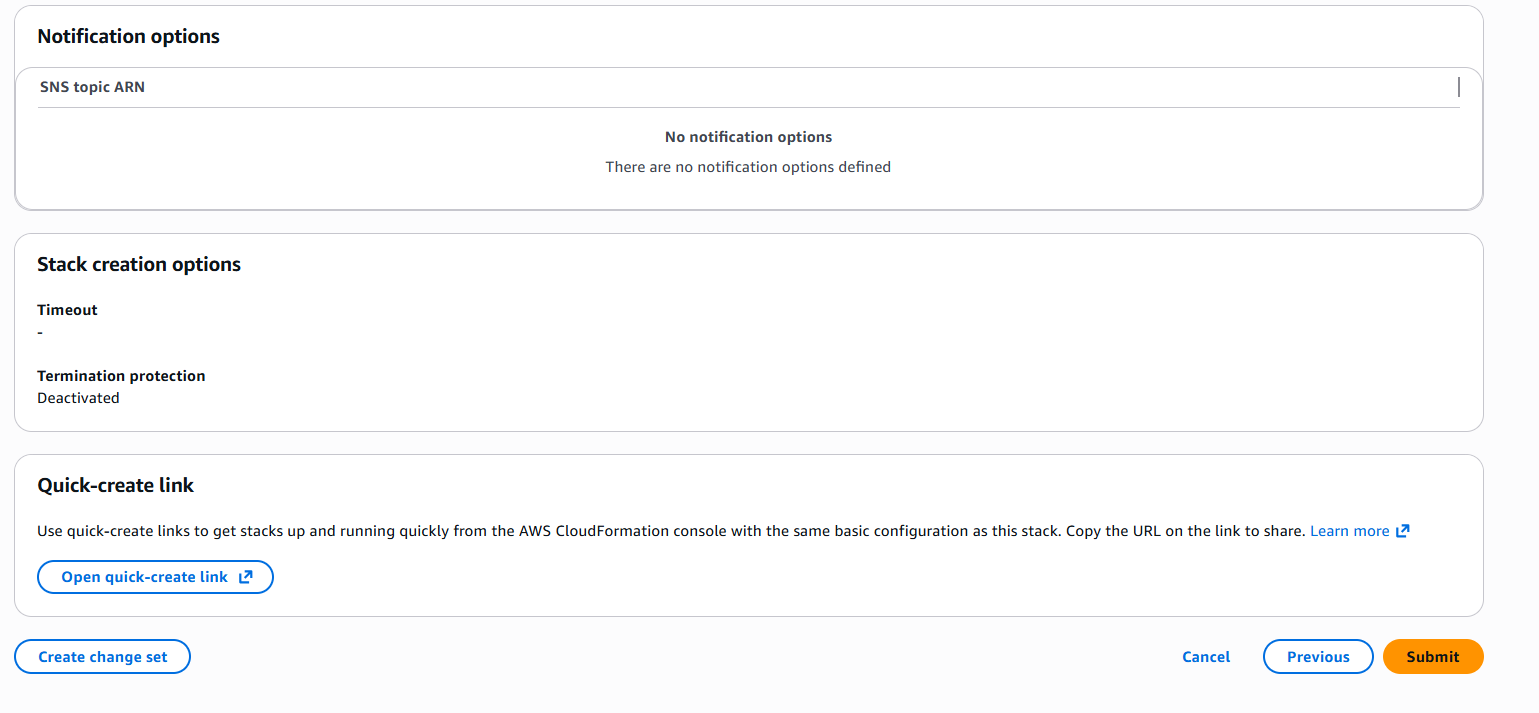
d. Step 3, Notification options, Stack create options, and Quick-create link:
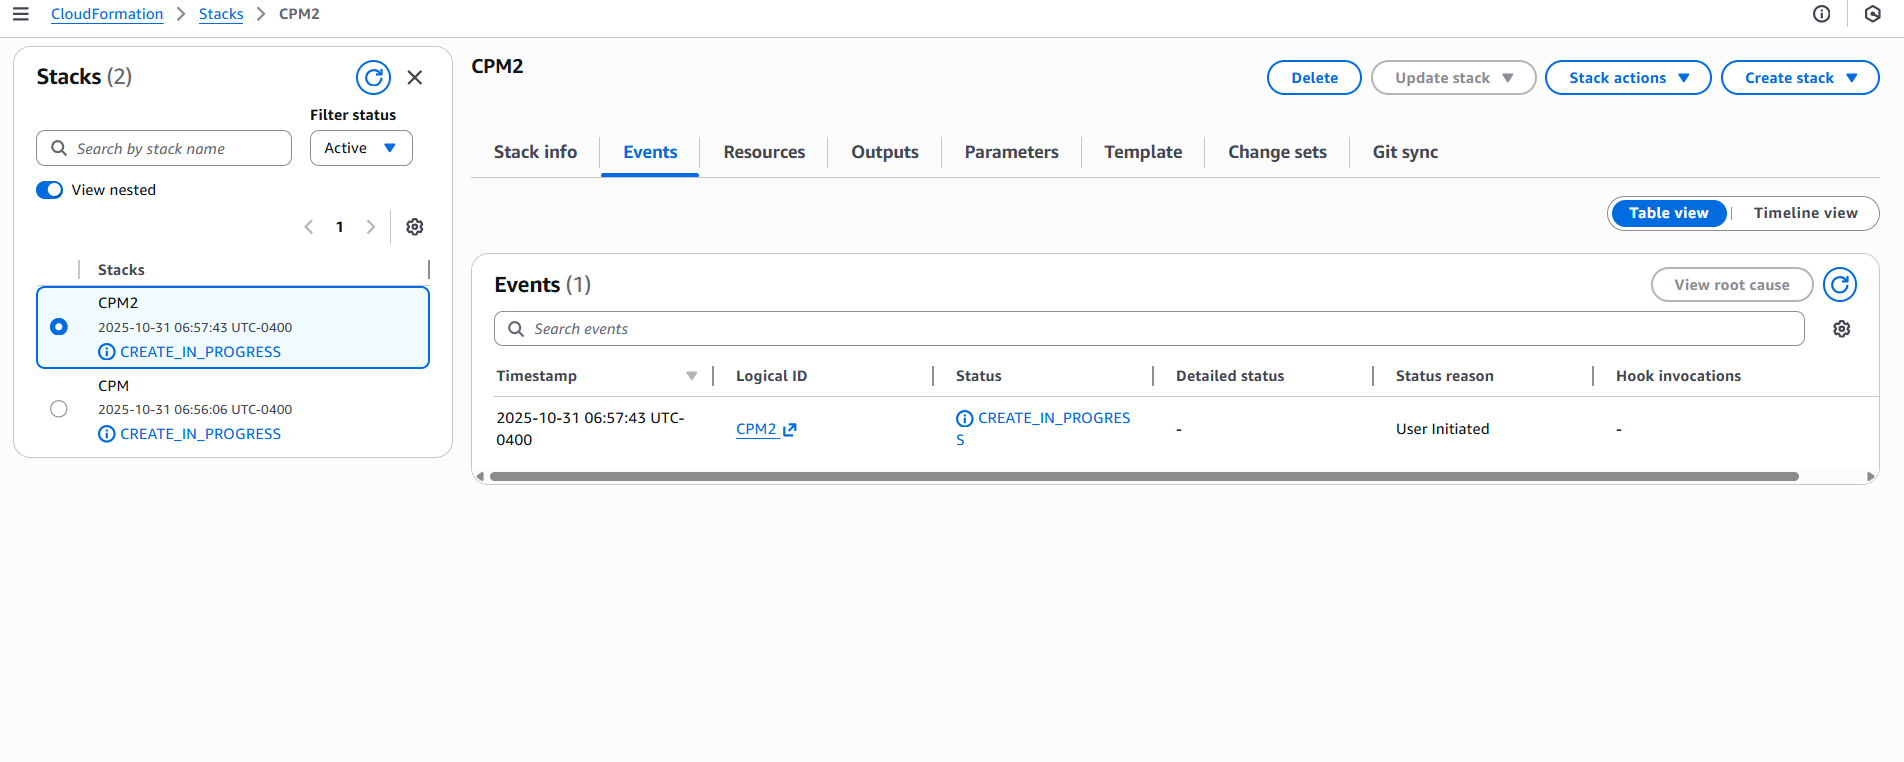
After all sections are reviewed, select Submit. The last configuration page opens, where you can observe the progress of the stack creation.
12. Continue configuring N2W as in section .
This section describes how to monitor and manage N2W costs.
N2W Software customers have a single point of control and management over the procedure of backing up their cloud-based services and data stores. Monitoring the costs will help customers define backup plans that fit their budget and thereby avoid unexpected costs. N2W provides the following services for monitoring costs:
Cost Explorer – Cost of storage that was created by N2W to hold short-term backup snapshots of the customer’s cloud-based assets.
In this section, you will learn how to integrate Datadog with N2W.
N2W Backup & Recovery Instance is now supporting the monitoring of backups, DR, copy to S3, alerts, and more by Datadog. Datadog is a monitoring service for cloud-scale applications, providing monitoring of servers, databases, tools, and services, through a SaaS-based data analytics platform. Datadog will allow CPM users to monitor and analyze the N2W Backup & Recovery Dashboard metrics.
Use the following procedure to activate Datadog. Ready-made dashboards for monitoring are included.
usage: n2ws-reset-login.pyc [-h] [-u USER] [-a] [-p] [-m] [-y]
Reset login credentials and/or MFA for specific/all users.
optional arguments:
-h, --help show this help message and exit
-u USER, --user USER apply for specific user (name)
-a, --all apply for all users
-p, --password password to set
-m, --mfa disable MFA
-y, --yes auto confirmn2ws-reset-login -u <root_user_name> -m -yn2ws-reset-login -u <root_user_name> -m -y -p[policy__p1]
max_seconds_to_wait_for_vss=100[agent__agent_id]
max_seconds_to_wait_for_vss=100[all_remote_agents]
max_seconds_to_wait_for_policy=600[local_agent]
max_seconds_to_wait_for_policy=600If you specify 0.0.0.0/0, it will enable all IPv4 addresses to access your instance using SSH.
For further details, refer to “Adding a Rule for Inbound SSH Traffic to a Linux Instance” at https://docs.aws.amazon.com/AWSEC2/latest/UserGuide/authorizing-access-to-an-instance.html
Wasabi Repository buckets may not be versioned.
Don't rename a Wasabi bucket after selection as a repository as the copy will fail.
Name – Name for this N2W account.
User – The N2W user that this account belongs to. See section 18.
Access Key ID - ID provided by N2W for authentication.
Secret Access Key - Key provided by N2W for authentication.
Name - Type a unique name for the new repository, which will also be used as a folder name in the Wasabi Repository container. Only alphanumeric characters and the underscore are allowed.
Description - Optional brief description of the contents of the repository.
User – Select the user in the list.
Account - Select the account that has access to the repository.
Wasabi S3 Bucket Name – Select the name of the S3 bucket from the list.


When creating a policy with the S3 option enabled, N2W will manage the lifecycle according to the policy settings. When configuring S3, consider the differences in the storage types:
Snapshot – The fastest option. It enables free recovery within seconds, but it has the highest storage cost. Snapshot is useful for backups that you need to recover quickly and keep for a short time.
S3 Storage – Provides much cheaper storage costs, but recovery is slower and costs a little more. S3 Storage is useful for backups that do not need quick recovery time and that you want to keep for a long time.
Glacier – Provides the cheapest storage costs, but recovery is the most expensive and the slowest. Glacier is useful for backups that you need to keep for several decades for compliance purposes and which you don’t expect to have to recover urgently.
N2W does not support File Level Recovery from Glacier.
When configuring Copy to S3, consider the following when deciding where to put your S3 buckets:
Having the bucket in a different region then the target snapshot will incur AWS cross-region charges and will also result in slower copy speed due to the greater physical distance.
Putting the bucket in the same region as your protected resources will:
Help avoid cross-region data charges by AWS.
Help make the copy faster.
One bucket for all regions makes for easier management, while one bucket per region makes for optimal cost.
Since each AWS S3 bucket has some performance limits, configuring an AWS S3 Repository per policy will result in faster and more stable copies to S3. Or, if several policies are all writing to the same bucket, you can stagger the copies to avoid putting too much load on the same bucket at the same time.
Using VPC endpoint enables instances to use their private IP to communicate with resources in other services, such as S3, within the AWS network without incurring network transfer fees.
You can set up a VPC S3/EBS endpoint in the VPC where the S3 worker is launched to make sure that the communication from the worker will be over private IP. Using an VPC S3 Endpoint can help avoid NAT costs (if used in the VPC) as there is no data processing or hourly charges for using Gateway Type VPC endpoints. Additionally, the copy process will be more secure as the communication will be over private IP, and the copy speed over the S3 Endpoint should be faster than over the Internet.
If the bucket is in another region or in another account, the transport charges will be incurred anyway.
In addition, you can set up VPC peering between the worker VPC and the N2W server VPC so that communication between the worker and the server will also be routed over private IP.
When creating the S3 bucket in AWS, you have 2 encryption options:
SSE-S3 server-side encryption with Amazon S3-managed keys. This option is free, but it is less secure than SSE-KMS.
SSE-KMS server-side encryption with AWS KMS. This option has a cost per request, but it is more secure than SS3-S3.
When setting up the bucket, consider whether the free option (SSE-S3) is sufficient for your use case, or if you need greater security with SSE-KMS, which is more expensive.
1. In AWS, create a subnet within the VPC of the region.
After successful creation, the successful creation message appears.
The subnet is automatically associated with the default route table.
2. Create a new route table.
3. Change the subnet association by associating the previously created subnet with this route table. 4. Create a VPC endpoint for S3 in the region and associate it with the previously created route table.
5. Choose a region.
6. Then choose the previously defined route table. The permissions to access the bucket will be defined by the IAM policies attached to the roles of N2W.
7. Grant Full Access.
The route table of the subnet now looks like the following:
8. If N2W is in a different account/region/VPC, add an Internet Gateway to the route table so the ‘worker’ can communicate with N2W.
1. Add the following rule:
The route table will look like:
2. In this configuration, the connection to S3 will be routed to the VPC endpoint. See the example below:
9. In N2W, select the Worker Configuration tab.
1. Select New. 2. Configure the worker to use this subnet in the specific region and the VPC where it is defined.
For additional information about setting up VPC Gateway Endpoints, see https://docs.aws.amazon.com/vpc/latest/userguide/vpce-gateway.html
Allows customers to issue monthly bills per policy backups.
Calculations are made for the last month by default and can be set to prior periods.
Breakdown of costs is found in the Costs ($) column of the Policies tab.
Cost Savings – Amount of money that users can save by enabling Resource Control management.
Calculations are made for the next month.
Breakdown of savings is found in the Cost Savings column of the Resource Control Groups tab.
Cost Explorer support is currently limited to the AWS resource EBS.
N2W uses the AWS REST API for retrieving costs for the specified policy. The Cost Explorer API allows us to programmatically query your data usage and compute the cost and usage data. It can take up to 48 hours for the cost increase to take effect.
The costs will include both short-term and long-term backups (cross-region DR), but not snapshots that were copied onto cheaper media such as S3 and Glacier.
In the Dashboard screen, you can find both Cost Explorer and Cost Savings information in their respective tiles:
Cost Explorer is not available currently in AWS GovCloud (US).
Following are the steps necessary for using Cost Explorer:
In AWS, activate cost allocation tags. See section 25.1.1.
In N2W:
For CPM, select Enable Cost Explorer in the Cost Explorer tab of General Settings.
For each designated user, enable Allow Cost Explorer. See section .
To disable Cost Explorer, it is sufficient to clear Enable Cost Explorer in the Cost Explorer tab.
To allow CPM Cost Explorer calculations in AWS, users must add cost allocation tags once.
To activate user cost allocation tags:
Log in to the AWS Management Console at https://console.aws.amazon.com/billing/home#/.
Open the Billing and Cost Management console.
In the navigation pane, choose Cost Allocation Tags.
Choose the following tags to activate, and then select Activate:
cpm_server_id
cpm_policy_name
It can take up to 24 hours for tags to activate.
For complete details, see http://docs.aws.amazon.com/awsaccountbilling/latest/aboutv2/activating-tags.html
In the Policies tab, you can monitor the backup costs of each policy for the last month or a different time period. The breakdown of costs per policy in dollars for the desired period appears in the Cost ($) column.
Cost Explorer inclusions and exclusions:
The cost figure includes all policies that were ever backed up by N2W and does not filter out deleted policies. The costs for policies deleted during a cost period are still included in the cost figure for that period.
N2W Cost Explorer does not include the cost of cross-account DR snapshots.
If the Allow Cost Explorer option is not enabled for the logged-in user, or if the backup was generated within the last 24 hours, the Cost ($) column will show ‘N/A’. To enable Cost Explorer for a user, see section 18.3.
You can monitor costs for a different time period by setting the Cost Period for all policies. The maximum period is one year. The current period is shown next to Cost Period in the Policies tab below the filters.
To specify the period for cost calculations:
Select the Policies tab and then select Cost Period.
Select Period.
Choose the From and To dates from the calendars, selecting Apply after each date.
In the Resource Control Groups tab, you can monitor the expected Cost Savings for each group, based on the schedules you have set to Turn Off an instance or an RDS database.
When the Operation Mode of a Resource Control Group is Turn Off Only, N2W will show ‘No-Data’ in the Cost Savings column.
Cost Savings currently is not supported in GovCloud regions.
To update the screen with the current AWS savings, select Refetch Savings Data from AWS, and then select View updated data in the data refetched message.
Setup Datadog Account.
Visit Datadog at https://www.datadoghq.com/pricing/ and set up an account that fits your scale.
Install Python Integration.
a. Login to Datadog and go to Integrations.
b. Search for ‘Python’ and install it:
c. Search for 'N2WS' and install it. See step 6.
3. Enable Datadog support on N2W Instance.
a. Connect to your N2W Backup & Recovery Instance with SSH Client.
b. Type sudo su.
c. Add the following lines to /cpmdata/conf/cpmserver.cfg:
If cpmserver.cfg doesn't exist, create, and add the above lines.
d. Run service apache2 restart.
4. Install Datadog Agent on N2W Instance. a. Login to Datadog and go to Integrations > Install Agents > Linux:
b. In step 3 of the Install the Datadog Agent on Linux page, create the install command by selecting an API Key, and then selecting Use API Key.
c. Use the copy icon in the upper right corner of the code block to copy the entire agent install command.
d. Connect to your N2W Backup & Recovery Instance with SSH Client, type sudo su and run the agent Install command.
e. Restart the Datadog Agent: sudo service datadog-agent restart
Datadog updates N2W metrics hourly.
5. Setup Datadog Dashboard metrics.
a. Log in to Datadog and go to Metrics > Explorer.
b. In the Graph list, select your metrics. All N2W metrics begin with cpm_ followed by <metric-name>.
c. In the Over list, select data. You can either select a specific user or the entire N2W instance. All N2W user data begins with cpm:user: followed by <user-name>.
6. Configure your Datadog dashboard by using the N2W template or creating your own dashboards, and choose the data to monitor. a. To use the N2WS template, in Datadog Integrations at https://app.datadoghq.com/account/settings#integrations, search for the 'N2WS' tile and install it. You will get a variety of dashboards for your account. Dashboards are named 'N2WBackup&Recovery-<dashboard_name[-version]>'. When dashboards are added for a new N2W version, the dashboards will contain the version number, such as '3-2-0' and '4-0-0'. Version numbers indicate which dashboards are valid for versions going forward. b. To create a Datadog dashboard: i. Go to Dashboards and select New Dashboard.
ii. Add a graph type by dragging and dropping its template to the dashboard:
iii. Edit the graph for the data to be monitored:
iv. Save the graph settings.
7. View N2W Alerts on Datadog Events. a. Log in to Datadog and go to Events. b. View your instance alerts:
If you have restricted outbound traffic, you can proxy all Datadog Agent traffic through different hosts.
Connect to your N2W Backup & Recovery Instance with SSH Client.
2. Enable proxy: section on datadog.yaml.
3. Add your proxy IP, port, username, and password:
4. Validate datadog.yaml on https://yamlchecker.com/.
Example:
For additional proxy configuration options, see https://docs.datadoghq.com/agent/proxy/
In this section, you will learning about working with Amazon Elastic File System.
Configuring EFS on N2W allows you to determine backup:
Schedule and frequency
Retention
Lifecycle policy, including moving backups to cold storage, defining expiration options, and deleting them at end of life.
Whether to use AWS Backup Vault Lock. See section .
With AWS Backup, you pay only for the backup storage you use and the amount of backup data you restore in the month. There is no minimum fee and there are no set-up charges.
EFS Backup and Restore is performed by AWS Backup Service. When adding an EFS target for the first time in a region, you must create the default backup vault in AWS. Go to the AWS Backup console and choose Backup vaults. For more information regarding the AWS Backup Service, refer to
Before continuing, consider the following:
Check AWS for regions that are available for EFS backup on the AWS Backup service. Currently, regions EU (Milan) and Africa (Cape Town) are not supported by AWS for cross-region DR.
Permissions required to get the relevant information about mounted targets and access points are optional. Backup and recovery will not fail if no permissions are granted to get/set mounted targets or access points.
In the AWS Console, create the EFS in one of the available regions. See section for regions not supported for EFS.
In N2W, in the Backup Targets tab of a Policy, select Elastic File Systems in the Add Backup Targets menu.
In the Add Elastic File System screen list, select one or more EFS targets and then select
Backup Vault – A logical backup container for your recovery points (your target snapshots) that allows you to organize your backups. This method is commonly used for EFS and S3 backups.
Default Backup vaults are created in AWS: AWS Backup > Backup vaults.
Prerequisite for Cross-Account backup: In AWS, for each target vault (backup and DR account), update the target access policy to enable the copy of recovery points. See the Access Policy section on the vault’s properties page.
IAM Role – An IAM identity that has specific permissions for all supported AWS backup services. The following AWS backup permissions should be attached to your IAM role:
AWSBackupServiceRolePolicyForBackup - Create backups on your behalf across AWS services.
AWSBackupServiceRolePolicyForRestores - Perform restores on your behalf across AWS services.
If adding or removing IAM Role permissions for immediate use, reboot the instance to have the change take effect quickly.
Transition to cold storage – Select the transition lifecycle of a recovery point (your target snapshots). The default is Never.
Transition to cold storage is not supported by AWS for S3.
Expire – Define when the protected resource expires. The default is Policy Generations.
Moving a backup to the Freezer will set Expire to Never.
A default or custom IAM role is necessary for AWS to perform EFS operations on behalf of N2W.
If adding or removing IAM Role permissions for immediate use, reboot the instance to have the change take effect promptly.
To create a default IAM Role:
Go to the AWS Backup Service:
Select Create an on-demand backup.
For Resource type, select EBS.
To create a custom IAM Role:
Go to AWS IAM Service:
Select Create role.
Select AWS Backup and then select Next: Permissions.
EFS can be configured by creating the cpm backup or cpm_backup tag. In this case, N2W will override the EFS configuration with the tag values. See section for keys and values.
For complete details on using AWS Backup Vault Lock for EFS, see
The lock is created using an AWS API, not the AWS console.
N2W supports AWS Backup Vault Lock by setting the expiration time on an EFS target.
N2W cleanup will work correctly.
Important: You cannot change the lock’s retention after the AWS ‘cooling period’ has passed. The default ‘cooling period’ is a minimum of 72 hours but is extendable by setting the AWS parameter ChangeableForDays.
To configure N2W to support AWS Backup Vault Lock:
If configured with minimum/maximum retention period, the stored recovery points (created or copied) must also have a matching expiration time.
In the EFS Policy Configuration screen, select the Expire time on the EFS target. When selecting the Expire time, consider that AWS may have a vault lock on the backup.
Back up and restore entire EKS clusters and selected Namespaces.
The N2W platform provides a built-in Kubernetes backup and recovery solution for AWS EKS clusters. This capability gives you the ability to protect Kubernetes resources, namespaces, and persistent volumes, while allowing you to manage backups and restores directly from N2W, just like any other AWS resource.
N2W supports backing up entire EKS clusters or selected namespaces, which is useful for:
Application-level protection
Avoiding system or control-pane namespaces
[external_monitoring]
enabled=Truecd /etc/datadog-agenthttps: "http://your-proxy-IP:your-proxy-port"
http: "http://your-proxy-IP:your-proxy-port"proxy:
http://54.159.14.45:3128
http://54.159.145.45:3128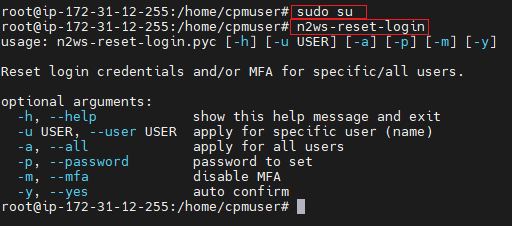

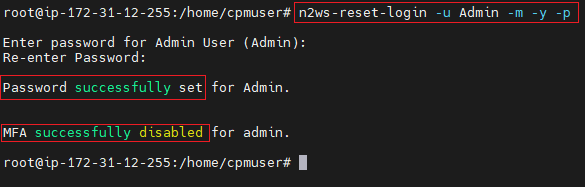
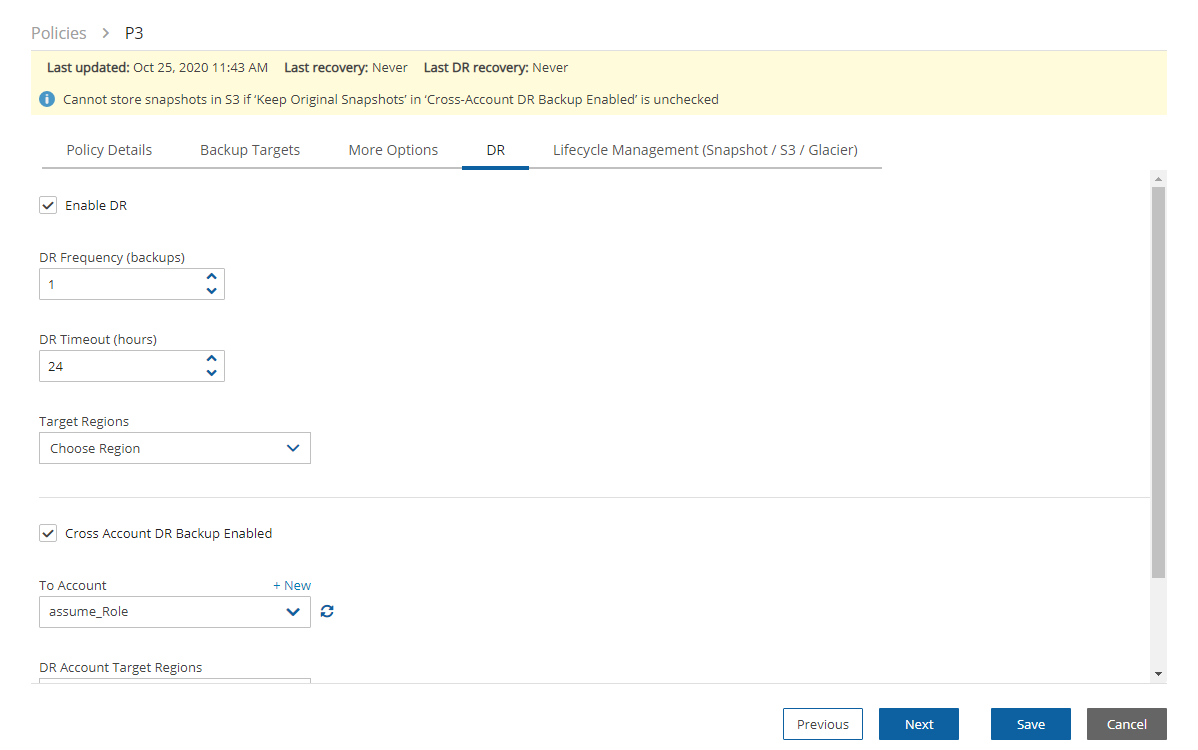
Backup transitions and expirations are performed automatically according to the configured lifecycle.
A default or custom IAM role must exist in AWS to create and manage backups on behalf of N2W. The IAM identity contains the backup and restore policies allowing operations on EFS. If a default was not automatically created, or you prefer to use a custom IAM role, see section 8.2.
In the Backup Targets tab, select an EFS target and then select Configure.
Configure the EFS backup and restore options described in section 8.1.1.
When finished, select Apply.
Select Save in the Backup Targets screen to save the configuration to the policy.
If a default IAM role was not automatically created by AWS, or you require a custom IAM role, see section 8.2. Selecting the preferred IAM role is only required during the target configuration.
For Volume ID, select any EBS volume to backup.
Select Default IAM Role.
Select Create on-demand backup. Ignore the error provided by AWS.
Verify that the following role was created on AWS IAM Service:
Search for BackupService.
Select the following AWS managed policies:
AWSBackupServiceRolePolicyForBackup
AWSBackupServiceRolePolicyForRestores
Select Next: Tags and then select Next: Review.
Enter a Role name and select Create role.
Restore the backups to the same or different EKS clusters with the same namespace or a different one, at your choice.
N2W simplifies Kubernetes backup and restore workflows. You can:
Add EKS Cluster or Namespaces to a policy like any other AWS resource.
Back up entire an entire EKS Cluster, including:
All namespaces
Cluster-scoped resources
EBS snapshots of Persistent volumes
Kubernetes manifests (to S3)
Back up specific Namespaces only
Restore anywhere:
To the same cluster
To a new cluster
And rename namespaces.
Combine EKS backups with other AWS services in a single policy. In the same policy, you can back up:
An EKS namespace containing a WordPress deployment together with
The associated AWS RDS database instance
Before adding EKS resources to a CPM policy, the following steps must be completed:
Install Velero on each EKS cluster you want to protect.
Velero is an open-source tool that provides backup and restore for Kubernetes clusters. It backs up Kubernetes resources and persistent volumes, saves them in S3-compatible storage, and lets you safely restore clusters when needed.
Velero must be installed on:
Every source EKS cluster you back up.
Every destination EKS cluster you restore into.
See Appendix H for the Velero Installation Guide.
Configure the Velero backup storage (S3).
During Velero installation, specify:
An S3 bucket that stores your Kubernetes manifests.
The velero-plugin-for-aws, which enables Velero to create EBS snapshots.
Ensure that the following IAM permissions and access are set:
Kubernetes RBAC (EKS Access Entry & Policies). Configure an EKS Access Entry for the EC2 instance's IAM role with appropriate policies:
Required: Velero Namespace Admin Access
Policy: AmazonEKSClusterAdminPolicy
Scope: namespace - specifically the velero namespace
Purpose: Allows creating and managing Velero backup/restore resources
Optional: Cluster-Wide Read Access
Policy: AmazonEKSViewPolicy
Scope: cluster
Velero S3 and IAM Roles for Service Accounts (IRSA) Configuration. Ensure that the Velero pod uses IRSA with permissions to:
Access the Velero backup S3 bucket
Create and manage EBS snapshots
Ensure Network connectivity between the VPC and EKS API endpoint.
Set EKS Access Entry: Associate the IAM role with EKS access policies.
Enable Security Group: Allow outbound HTTPS (port 443) to the EKS cluster API endpoint.
To define EKS policies, see section 4.2. Select EKS Clusters or EKS Namespaces from the Backup Targets menu.
N2W supports flexible restore operations for EKS:
Restore the entire EKS cluster backup, which includes:
All namespaces
All workloads and resources
Persistent volumes
Optional cluster-scoped resources
Restore only selected namespaces, which allows restoring workloads into the same cluster or into a different EKS cluster:
One or multiple namespaces
Optionally rename namespaces during recovery
During recovery, you can choose whether to restore Cluster-Scoped Resources, such as:
ClusterRoles
ClusterRoleBindings
When to enable the Cluster-Scoped Resources option:
Scenario
Recommendation
Restoring into the same cluster
Usually leave unchecked
Restoring into a new empty EKS cluster
Recommended to enable
To recover EKS clusters or EKS namespaces:
In the Backup Monitor, select the AWS Cloud button.
In the Search backups box, enter a string to search by. The string can be part of the resource ID or part of the resource tag value.
To filter by resource type, select a resource type in the By Instance list, such as EKS Cluster.
Select and then choose a backup in the list and then select Recover. A list of clusters opens.
Select a Cluster Name.
To recover namespaces:
To recover specific namespaces, select the Namespaces tab.
To include Cluster-Scoped Resources, select Include Cluster Resources.
In the Namespace Name list, select one or more Names.
For each Name, change the Target Namespace Name, if required.
Select Recover.
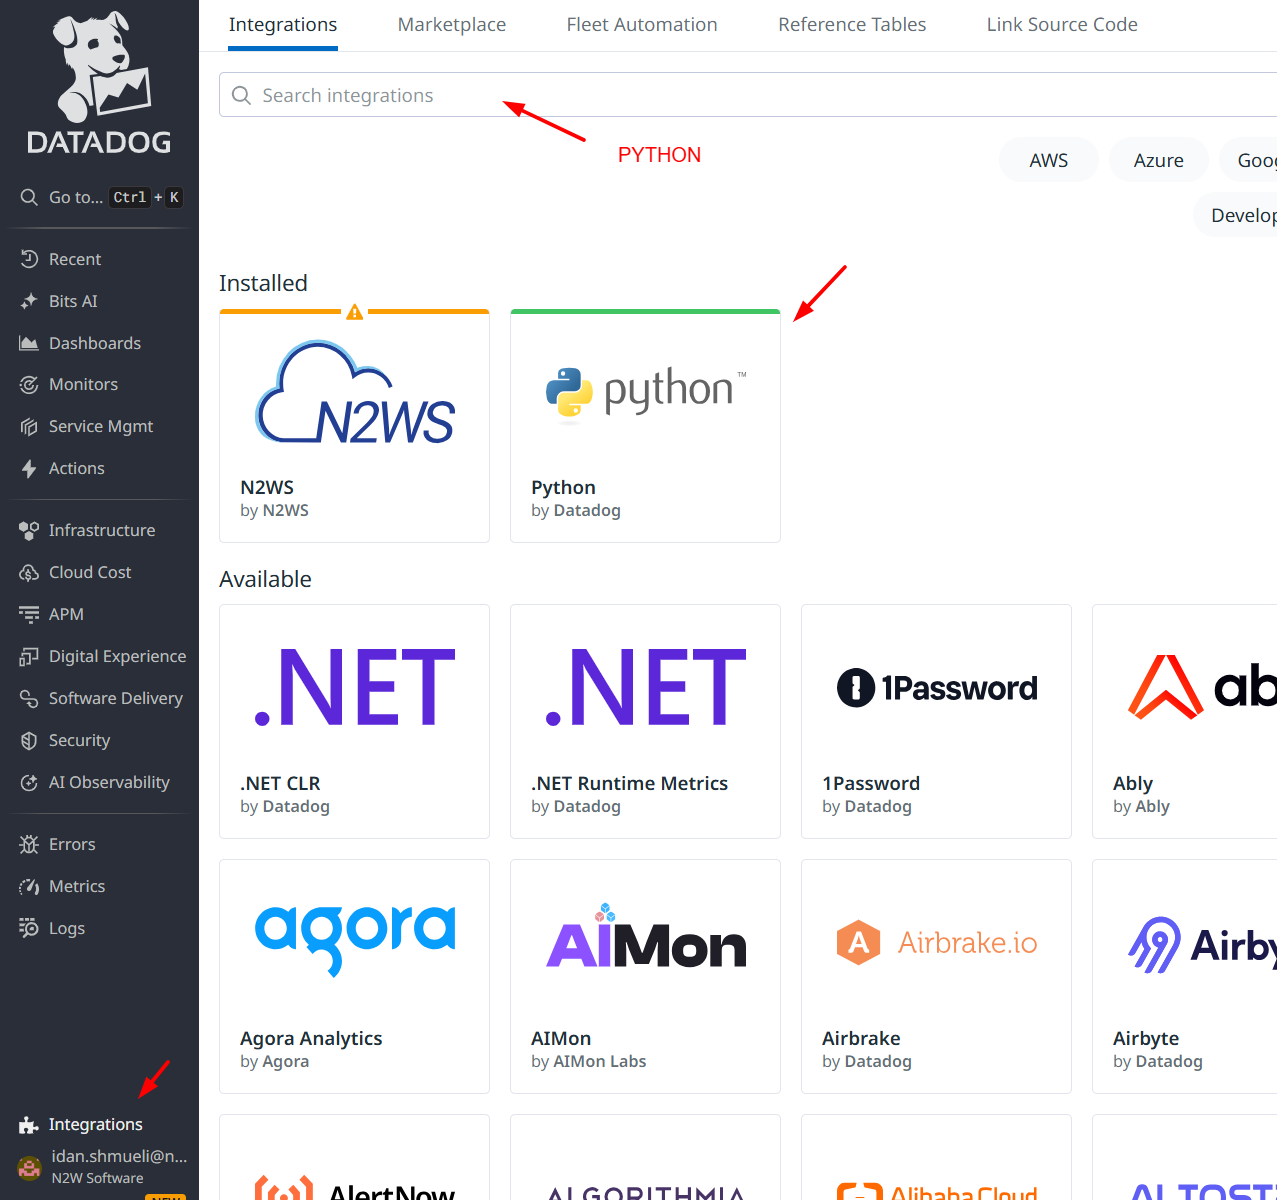
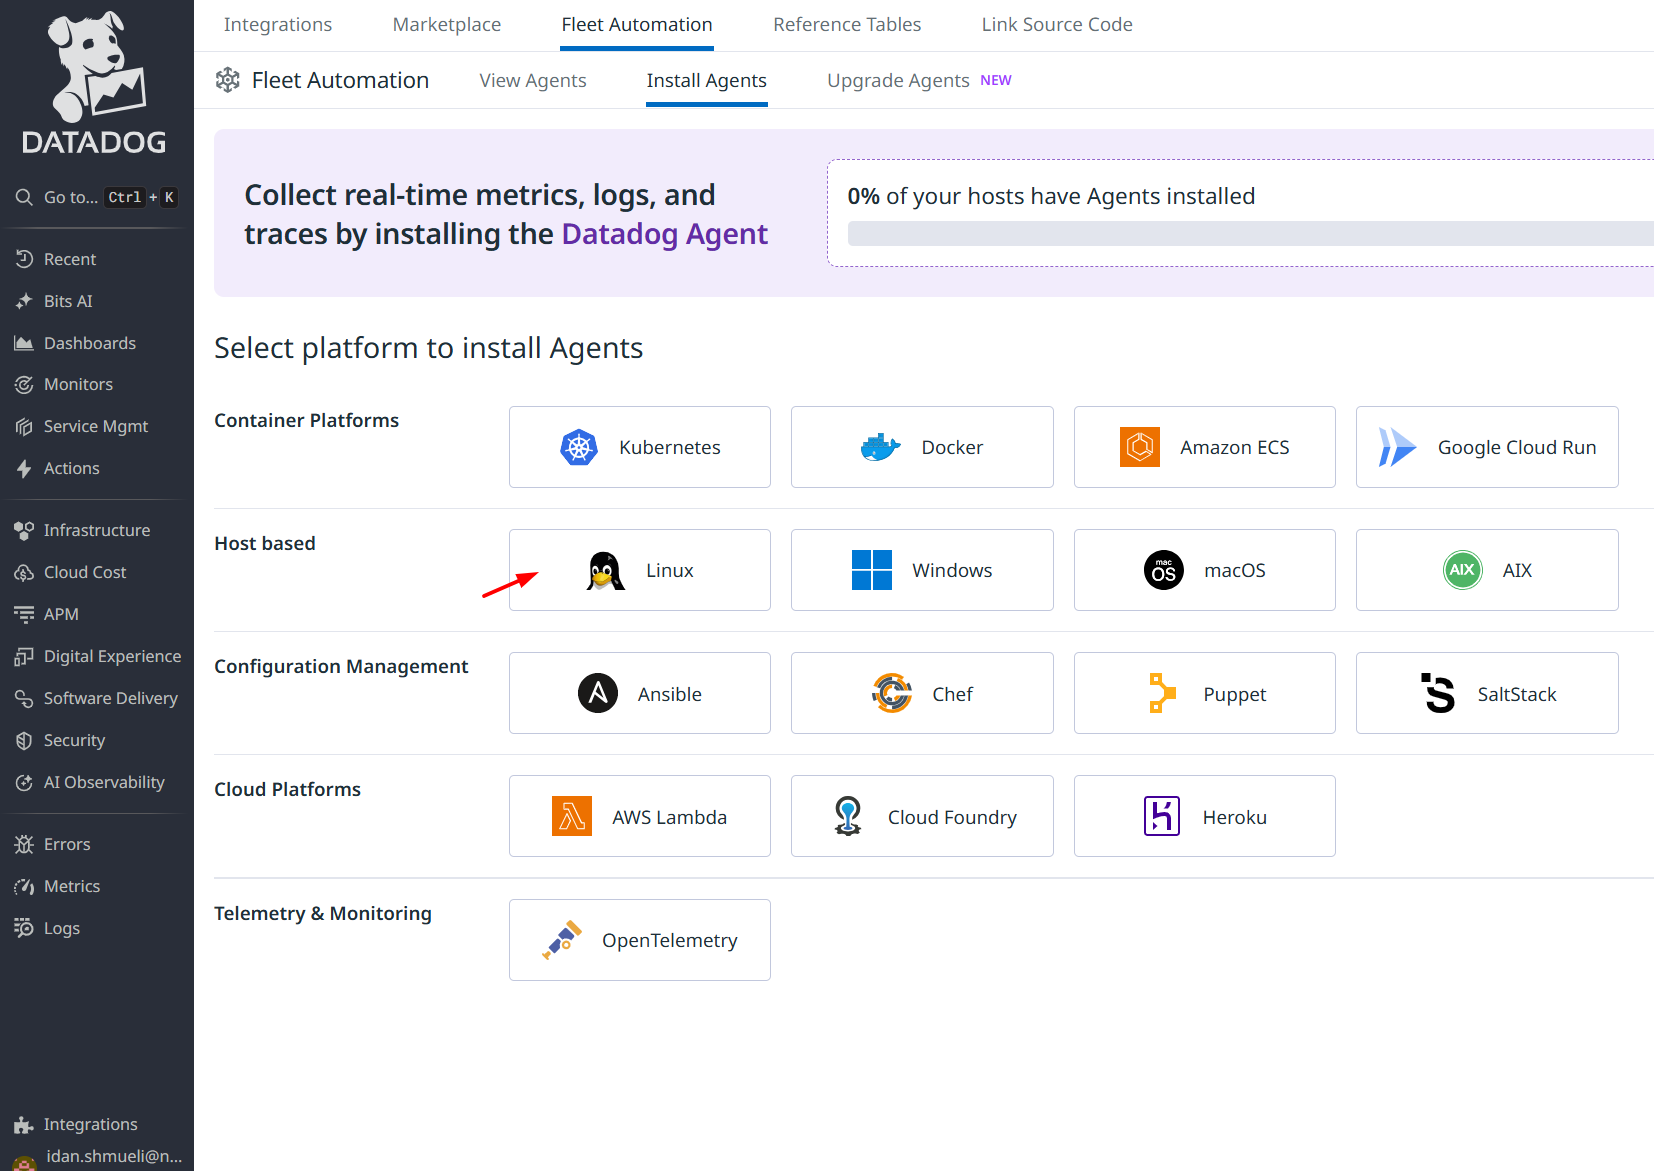
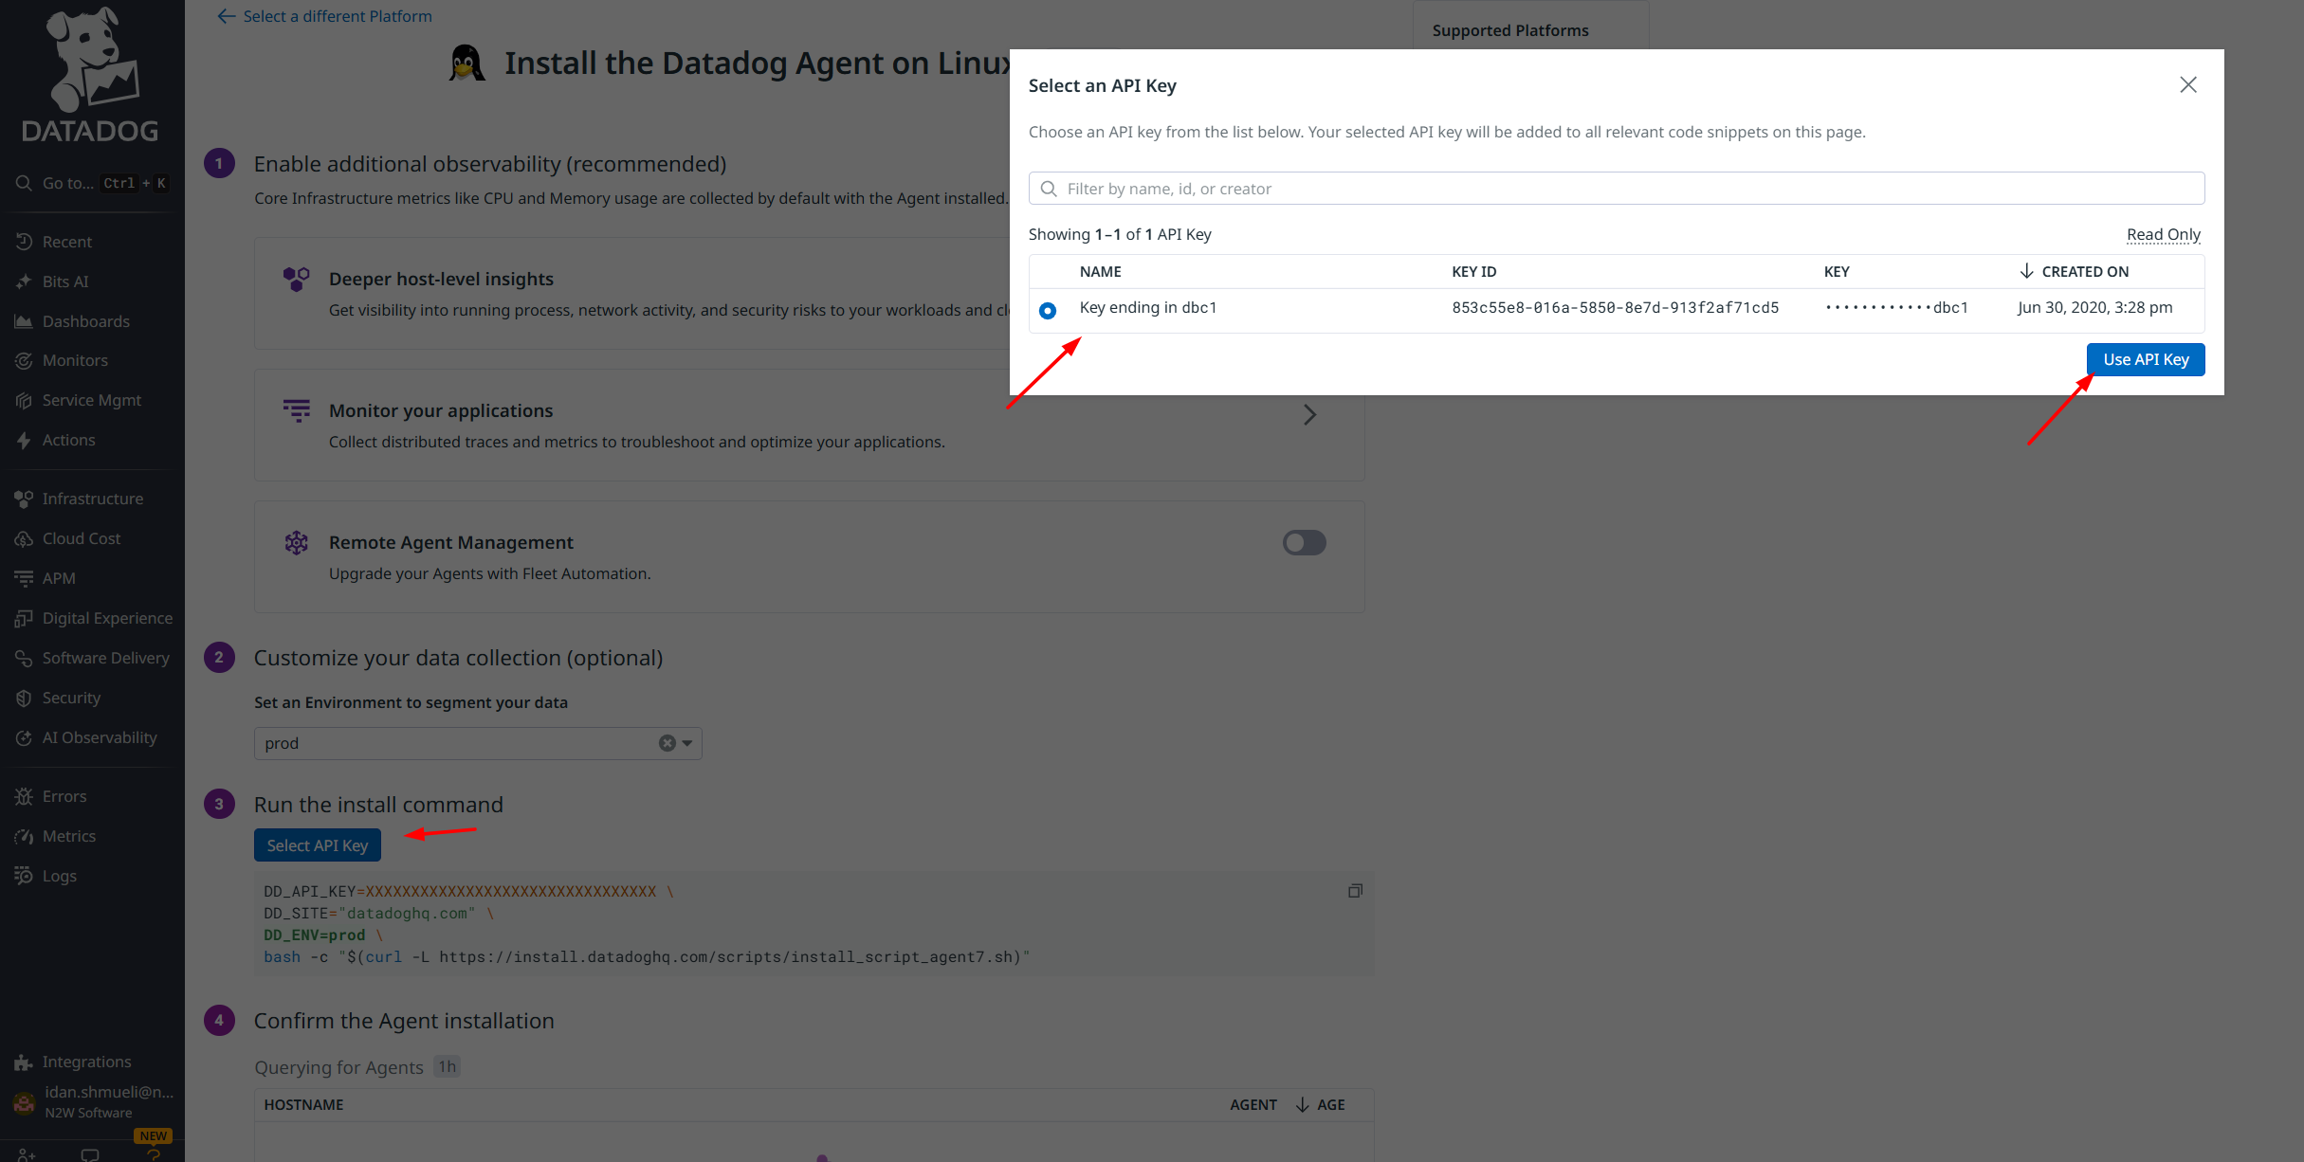
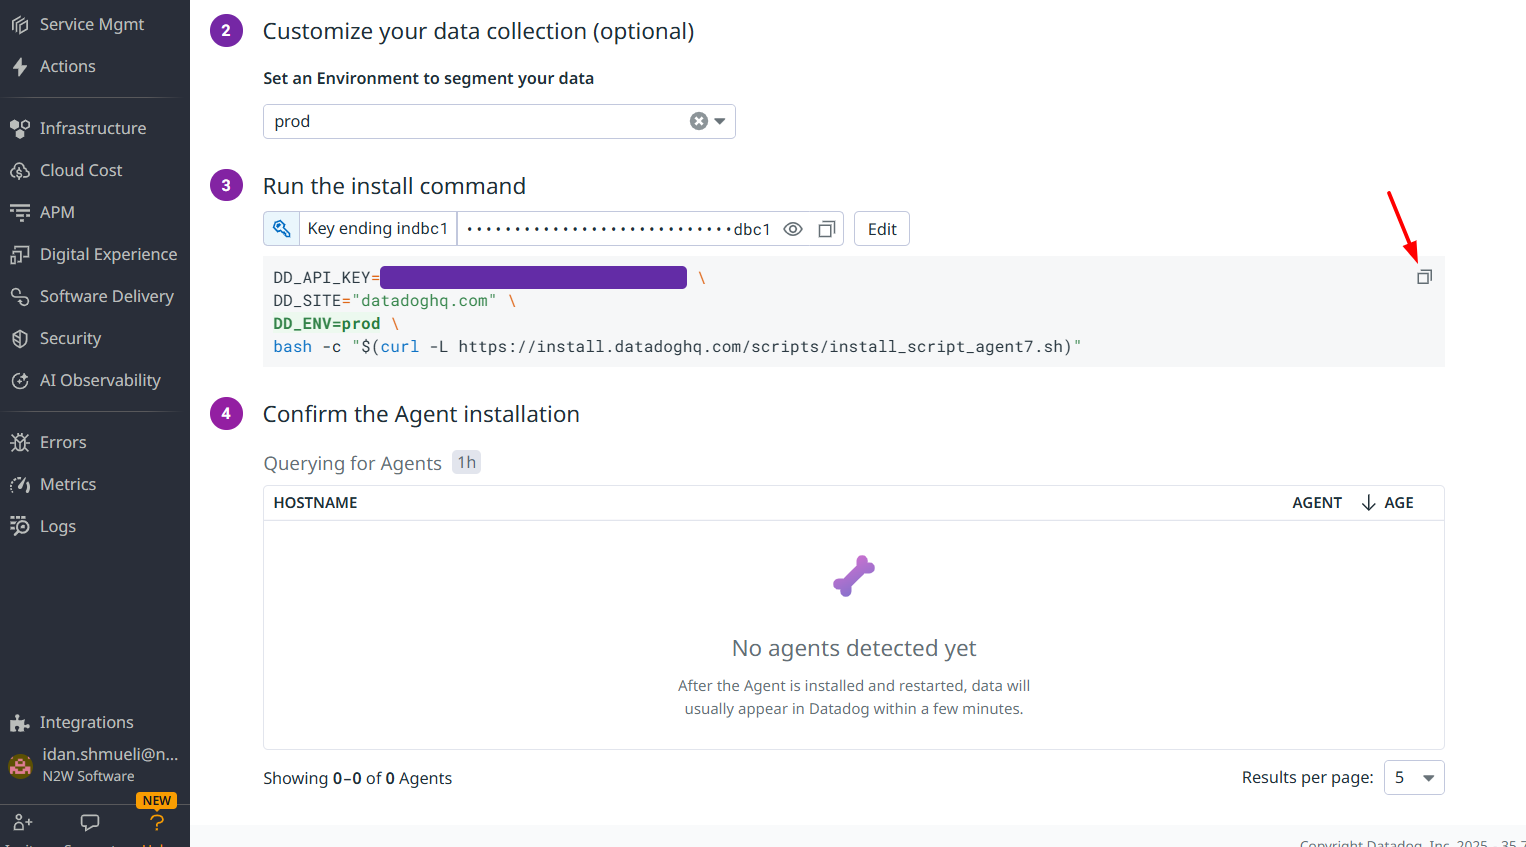
When working with Linux/Unix, it is important to understand some of its basic features.
Making an application-consistent backup of Linux instances does not require any agent installation. Since the N2W server is Linux based, backup scripts will run on it. Typically, such a script would use SSH to connect to the backed-up instance and perform application quiescence. However, this can also be accomplished using custom client software.
There is no parallel to VSS in Linux, so the only method available is by running backup scripts.
To create, test, and install backup scripts, you will need to connect to the N2W server using SSH with cpmuser. The only way to authenticate cpmuser is by using the private key from the key pair you used when you launched the N2W server instance. If your key is not compromised, no unauthorized person will be able to connect to the N2W server.
With cpmuser, you will be able to copy (using secure copy), create, and test your scripts. cpmuser is the same user N2W will use to run the scripts. If you need to edit your scripts on the N2W Server, you can use Vim or nano editors. Nano is simpler to use.
Backup scripts should be placed in the path /cpmdata/scripts. If the policy belongs to an N2W user other than the root user, scripts will be in a subfolder named like the user (e.g., /cpmdata/scripts/cpm_user1). This path resides on the CPM data volume and will remain there even if you terminate the N2W server instance and wish to launch a new one. Backup scripts will remain on the data volume, together with all other configuration data. As cpmuser, you have read, write, and execute permissions in this folder.
All scripts should exit with the code zero 0 when they succeed and one 1 (or another non-zero code) when they fail.
All scripts have a base name (detailed for each script in the coming sections) and may have any addition after the base name. The delimiter between the base part of the name and the file extension is a period (.). For example,before_policy1.v11.5.bashwhere ‘before_policy1
Having more than one script with the same base name can result in unexpected behaviour. N2W does not guarantee which script it will run, and even to run the same script every backup.
There are three scripts for each policy:
Before
After
Complete
The before_<policy-name>[.optional_addition].<ext> script runs before backup begins. Typically, this script is used to move applications to backup mode. The before script typically leaves the system in a frozen state for a short time until the snapshots of the policy are fired. One option is to issue a freeze command to a file system like XFS.
The after_<policy-name>[.optional_addition].<ext> script runs after all the snapshots of the policy fire. It runs within a few seconds after the before script. This script releases anything that may have been frozen or locked by the before script. This script accepts the success status of the before script. If the before script succeeded, the argument will be one 1. If it failed, crashed, or timed out, the argument will be zero 0.
This is the opposite of the exit status. Think of this as an argument that is true when the before script succeeds.
The complete_<policy-name>[.optional_addition].<ext> script runs after all snapshots are completed. Usually, it runs quickly since snapshots are incremental. This script can perform cleanup after the backup is complete and is typically used for transaction log truncation. The script accepts one argument. If the entire backup was successful and all the previous scripts were successful, it will be one 1. If any issues or failures happened, it will be zero 0. If this argument is one 1, truncate logs.
You can have the output of backup scripts collected and saved in the N2W Server, see section .
You can use the output collected by N2W to debug backup scripts. However, the recommended way is to run them independently of N2W, on the N2W Server machine using SSH. You can then view their outputs and fix what is needed. Once the scripts work correctly, you can start using them with N2W. Assuming these scripts are using SSH, during the first execution you will need to approve the SSH key by answering yes at the command line prompt. If you terminate your N2W Server and start a new one, you will need to run the scripts again from the command line and approve the SSH key.
Following is an example of a set of backup scripts that use SSH to connect to another instance and freeze a MySQL Database:
The before script will flush and freeze the database.
The after script will release it.
The complete script will truncate binary logs older than the backup.
These scripts are presented as examples without warranties. Test and make sure scripts work in your environment as expected before using them in your production environment.
The scripts are written in Bash:
before_MyPolicy.bash
This script connects to another instance using SSH and then runs a MySQL command. Another approach would be to use a MySQL client on the N2W Server, and then the SSH connection will not be necessary.
After that script is executed, the N2W server will start the snapshots, and then call the next script:
after_MyPolicy.bash
This script checks the status in the first argument and then does two things:
First, it saves an exact timestamp of the current backup of the frozen database to a file,
Then, it releases the lock on the MySQL table.
After that, when all snapshots succeed, N2W runs the complete script:
complete_MyPolicy.bash
It calls an inner script, complete_sql_inner:
These two scripts purge the binary logs only if the complete script receives one 1 as the argument. They purge logs earlier than the time in the timestamp files.
If your N2W configuration requires multiple users, which are separated from each other, you may wish to allow users to access N2W using SSH to create and debug backup scripts:
Create additional Linux users in the N2W instance and allowing each user access to their own scripts folder only.
cpmuser will need to be able to access and execute the scripts of all users. This can be achieved by assigning the user cpmuser as the group of all user subfolders and scripts. Then, if given executable permissions for the group, cpmuser will be able to access and execute all scripts.
Some differences between the ‘old backup scripts’ and the new SSM scripts:
SSM scripts are per instance and run on the instance, which can give better granularity and don’t require SSH.
The old local scripts are per policy and can be good for a centralized approach or operations that function across instances.
The old local scripts require the use of SSH for connectivity, thereby requiring connectivity between the CPM and the target.
To use SSM for Linux backups:
Install an SSM Agent on the target machine. Some Linux AMI, such as AWS Linux AMI, come with SSM already installed. To install an agent, see
An IAM role with the core SSM policy (AmazonSSMManagedInstanceCore) attached to an instance should be sufficient for using the agent. To attach an IAM instance profile to an EC2 instance, see
Similar to using normal backup scripts, as mentioned in section , create before/after/complete scripts.
Learn how to perform operations in non-N2W server regions using temporary worker instances.
Workers for recovery of RDS databases are not configured here but in the Worker Configuration tab of the RDS database Recover screen. See section .
When N2W copies data to or restores data from a Storage Repository, or Explores snapshots, it launches a temporary ‘worker’ instance to perform the actual work, such as writing objects into the repository or exploring snapshots.
Learn how to integrate Splunk with N2W.
N2W Backup & Recovery Instance is now supporting the monitoring of backups, DR, copy to S3, alerts, and more by Splunk. The N2W add-on features:
Ability to define data input from N2W via a Technology Add-on (TA)
Ability to monitor resources and instances
Here you will learn how to recover specific files and folders rather than an entire volume.
N2W supports file-level recovery. N2W performs a backup on the volume and instance level and specializes in the instant recovery of volumes and complete instances. However, in many cases, a user may want to access specific files and folders rather than recovering an entire volume.
N2W also provides the ability to locate the same item across a chain of consecutive snapshots during a single recovery session.
AWS allows item-level recovery for individual files from S3 and EFS. After reviewing this section, see the sections below for target-specific considerations.
IRSA requires an OIDC identity provider to be associated with the EKS cluster


v11.5bashScripts can be written in any programming language: shell scripts, Perl, Python, or even binary executables.
You must make sure the scripts can be executed and have the correct permissions.
SSM, however, requires a setup that includes putting an IAM role on your instance, which you may not want to do.
For root user policies, scripts need to be under /cpmdata/<instance_id>, for example, ‘/cpmdata/scripts/i-0031fe7934041cf41’.
For non-root user policies, scripts need to be under the user folder, for example, ‘cpmdata/scripts/username/i-0031fe7934041cf41’.
#!/bin/bash
ssh -i /cpmdata/scripts/mysshkey.pem sshuser@ec2-host_name.compute-1.amazonaws.com "mysql -u root –p<MySQL root password> -e 'flush tables with read lock; flush logs;'
if [$? -gt 0[; then
echo "Failed running mysql freeze" 1>&2
exit 1
else
echo "mysql freeze succeeded" 1>&2
fi#!/bin/bash
if [ $1 -eq 0 ]; then
echo "There was an issue running first script" 1>&2
fi
ssh -i /cpmdata/scripts/mysshkey.pem sshuser@ec2-host_name.compute-1.amazonaws.com "date +'%F %H:%M:%S' > sql_backup_time; mysql -u root -p<MySQL root password> -e 'unlock tables;'"
if [ $? -gt 0 ]; then
echo "Failed running mysql unfreeze" 1>&2
exit 1
else
echo "mysql unfreeze succeeded" 1>&2
fi#!/bin/bash
if [ $1 -eq 1]; then
cat /cpmdata/scripts/complete_sql_inner |ssh -i /cpmdata/scripts/mysshkey.pem sshuser@ec2-host_name.compute-1.amazonaws.com "cat > /tmp/complete_ssh; chmod 755 /tmp/complete_ssh; /tmp/complete_ssh"
if [ $? -gt 0 ]; then
echo "Failed running mysql truncate logs" 1>&2
exit 1
else
echo "mysql truncate logs succeeded" 1>&2
fi
else
echo "There was an issue during backup - not truncating logs" 1>&2
fibutime='<sql_backup_time'>
mysql -u root -p<MySQL root password> -e 'PURGE BINARY LOGS BEFORE "'"$butime"'" When performing backup operations, or Exploring snapshots, the ‘worker’ instance is launched in the region and account of the target instance. The backup or Explore ‘worker’ instance is configured in the Worker Configuration tab.
When performing restore operations, the ‘worker’ instance is launched in the region and account that the backed-up instances are to be restored to. The restore ‘worker’ instance is selected or configured according to the following criteria:
If a ‘worker’ for the target account/region combination was configured in the Worker Configuration screen, that ‘worker’ instance will be used during the restore or the Explore.
If such a ‘worker’ does not exist for the target account/region combination, N2W will attempt to launch one based on N2W’s own configuration.
If the N2W configuration cannot be used because the restore, or Explore, will be to a different account or region than N2W's, the user will be prompted during the restore to configure the ‘worker’.
If you plan to copy to Storage Repository only instances belonging to the same account and residing in the same region as that of the N2W server, worker configuration Is not required since the worker will derive its configuration from the N2W server instance.
Attempts to perform Storage Repository/Cold Storage backup and restore operations from an account/region, or to Explore out of the N2W server account/region, without a valid worker configuration will fail.
You can manage workers and their configurations as well as test their communication with the CPM, SSH, EBS API, and S3 Endpoint in the Worker Configuration tab (section 22.3).
It is necessary to define a separate worker configuration for each planned account/region combination of Copy to S3 instance snapshots, or each Explore region.
To keep transfer fee costs down when using Copy to 3, create an S3 endpoint in the worker’s VPC.
To configure S3 worker parameters:
Select the Worker Configuration tab.
On the New menu, select AWS Worker.
In the User and Account lists, select the User and Account that the new worker is associated with.
In the Region list, select a Region. This configuration will be applied to all workers launched in this region for this account.
In the Key pair list, select a key pair. Using the default, Don’t use key pair, disables SSH connections to this worker.
In the VPC list, select a VPC. The selected VPC must be able to access the subnet where N2W is running as well as the S3 endpoint.
In the Security Group list, select a security group. The selected security group must allow outgoing connections to the N2W server and to the S3 endpoint.
In the Subnet list, select a subnet, or choose Any to have N2W choose a random subnet from the selected VPC.
When performing a recovery, if you choose ‘Any’ in the Subnet drop-down list, N2W will automatically choose a subnet that is in the same Availability Zone as the one you are restoring to.
If you choose a specific subnet that is
In the Worker Role list, select an instance role granting the Worker the permissions required for its policies, or select No Role to not attach an instance role to the Worker.
If Custom ARN is selected, enter the Custom ARN.
If No Role is selected, N2W will generate temporary credentials and securely pass them to the Worker thereby granting the Worker the permissions linked to the Account that owns the policy and/or the repository.
In the Network Access list, select a network access method.
Direct network access or indirect access via an HTTP proxy is required:
Direct - Select a Direct connection if no HTTP proxy is required.
via HTTP proxy – If an HTTP proxy is required, select, and fill in the proxy values.
11. Select Save.
12. Test the new worker (section 22.3).
To edit or delete a worker configuration:
In the Worker Configuration tab, select a worker.
Select Delete or Edit.
You can add multiple tags to each account for workers for subsequent monitoring of cost and usage in the AWS Cost Explorer. When the worker is launched for any type of operation, such as Copy to S3, Recover S3, file-level recovery, Cleanup, worker testing, etc., it will be tagged with the specified tags. You will then be able to filter for the N2W worker tags in the Tags tab of the AWS Cost Explorer.
To activate your worker tags, see section 22.2.1.
To add worker tags:
In the Worker Configuration tab, select a worker and then select the Worker Tags tab.
Select New, and enter the Tag Name and Value. The Value may be blank.
Select Save.
To allow CPM Cost Explorer calculations in AWS, users must add cost allocation tags once.
To activate user cost allocation tags:
Log in to the AWS Management Console at https://console.aws.amazon.com/billing/home#/ and open the Billing and Cost Management console.
In the navigation pane, select Cost Allocation Tags.
Choose the worker tags to activate.
Select Activate.
It can take up to 24 hours for tags to activate.
For complete details, see http://docs.aws.amazon.com/awsaccountbilling/latest/aboutv2/activating-tags.html.
Before a worker is needed, you can test whether it successfully communicates with the N2W server and other communication targets. Depending on the test, some, but not all, AWS permissions are also checked.
Connectivity to N2W Server (default)
SSH Test - Connectivity to N2W server using SSH
EBS API Test - Test API connectivity and check AWS ebs:ListSnapshotBlocks permission
S3 Endpoint Test - Test connectivity; check AWS s3:ListAllMyBuckets and s3:ListBucket permissions
To test a worker configuration:
Select a worker, and then select Test.
If you want to test connections in addition to the worker, in the Select Additional Tests dialog box, select the relevant tests.
Select Run Tests. The ‘Worker Configuration test is underway’ message briefly appears at the top right and the ‘ In Progress’ message appears in the Test Status column. Select Refresh as necessary.
Check the results in the Test Status column: Successful or Failed.
If not 'Successful':
Select Test Status to display information about the root cause.
To check settings, select Edit.
Besides the requested connectivity tests, the Configuration Test Details include Account, Region, Zone, Key Pair, VPC, Security Group, and whether an HTTP Proxy was required.
To view and download the latest log, selectTest Log.
An N2W app with 2 dashboards for displaying operational insights:
N2W activity monitor - Information about the data
N2W Alerts
Limitations:
No support for Microsoft Azure
No support for multiple CPMs
Supported with Splunk Enterprise only
Integration consists of installing Splunk and configuring the TA for N2W.
To configure the N2W Server:
Edit the N2W configuration file as follows:
2. Restart apache:
3. To check the status of the Splunk integration, in N2W, go to Help > About and verify that 'External monitoring (Datadog / Splunk) enabled' is Yes.
Splunk can work with a proxy for reaching N2W APIs.
Verify that you have the correct app installation files:
N2WS_app_for_splunk.spl
ta_N2WS_for_splunk.spl
Both files can be downloaded from the Splunk MarketPlace.
To install:
Log on to your Splunk Web and in the Enterprise Apps screen, select Settings .
The Manage Apps page opens.
2. In the upper right, select Install app from file.
3. For an initial installation:
a. Browse for the N2WS_app_for_splunk.spl file. Select Upload.
b. Browse for ta_N2WS_for_splunk.spl. Select Upload.
4. For updates, browse for the current file and select Upgrade app.
Installation of Splunk is fully documented at https://docs.splunk.com/Documentation/Splunk/8.1.1/Installation/InstallonLinux
Two configurations are required:
TA of the REST API
Data inputs from N2W for Alerts and Dashboard information
To configure the TA:
Go to splunk > App N2WS Add-on > Configuration.
If needed, select the Proxy tab, complete the settings, and select Save.
3. In the Logging tab, select the TA Log level: DEBUG, INFO, WARNING, ERROR, CRITICAL.
4. In the Add-on Settings tab, set the API Url of the target server and the API Key. You can copy and paste the API URL and API Key, or both can be left empty for the customer to fill in.
The API Url is the address of your N2W server.
You can generate an API Key in N2W at User > Settings > API Access.
5. Select Save.
To configure data Inputs:
Both Dashboard and Alerts inputs should be defined.
In the App menu, select Inputs .
In the Create New Input menu, select N2WS Dashboard information or N2WS Alerts .
Enter the relevant data input information:
Name - Unique name of the input.
Interval - Time interval for fetching the data from N2W in seconds. 300 is recommended.
Index - The Splunk index (silo) to store the data in:
Select Update.
When finished, the Inputs should look like this:
To manage the Inputs, in the Actions column, select from the Action menu: Edit, Delete, Disable, or Clone.
To configure default data indexes:
Select Settings on the upper right corner and then select Indexes.
2. Verify that the following indexes exist under the N2W app. If not, select New Index to add indexes of the CPM information.
n2ws_alerts
n2ws_di
3. In the file system, copy macros.conf from the default folder to the local folder. For example,
Source: C:\Program Files\Splunk\etc\apps\N2WS_app_for_splunk\default
Target: C:\Program Files\Splunk\etc\apps\N2WS_app_for_splunk\local
4. Edit the macros.conf file under 'local' and change the default index to the new indexes that were created.
3. Restart the Splunkd service from Windows Services.
Go to Splunk Apps and find N2WS app for splunk. The N2WS app contains tabs for N2W activity monitor and N2W Alerts. Edit and Export options are available in the upper right corner of each dashboard.
Filter for Time Range (defaults to last 24 hours) and Users, including root and delegates.
Displays All Accounts, Policies, Protected Resources, Managed Snapshots, Backups DR, S3 Backups, Volume Usage, and other requested data.
For Protected Resources and Managed Snapshots, select the displayed number to drill down and view a table of the resources and the number of items for each resource type for the selected users, or managed snapshots, count of each type, and a total.
The Alerts dashboard includes filters for:
Time range - Last 24 hours (default)
User - All (default) or username
Severity - All or Info or Warning
Category - All or Tag Scan, volume usage limit exceeded
The list defaults to descending sort order. Select any column to change sort order.
Time - Date, time, event ID
User
Severity
Category
Message
To Explore the directory tree structure and select files or directories for recovery, the disk on the target backup must have an OS. If there is no OS on the disk, Explore will not work and a File Level Recovery Session will not open.
In the Backup Monitor, select a backup and then select Recover. In the Recover screen, select an instance or an independent volume, and then select Explore Volumes. For an instance, you can also select Recover Volumes Only, select the required volume, and then select Explore Volumes.
If there is more than 1 backup available to view, the File Level Recovery dialog opens showing the number of backups.
For Windows instances with dynamic disks partitioned using the master boot record (MBR) style, Explore only supports a single generation of snapshots. When more than 1 generation is selected for browsing, the dynamic disks will not be presented to the browser.
To view an instance across a chain of snapshots, select the number of backups to view.
To view the latest backup only, leave the value at the default of 1.
Select Start Session.
Only the number of available snapshots is presented, regardless of the number of generations.
There is a limit of 72 volumes in a File Level Recovery Session.
N2W will open the Initializing File Level Recovery message.
Select Open Session for an Explorer-like view of the entire instance or a specific volume, folder, or file. Loading the session may take a few minutes. If the Initializing File Level Recovery message closes before you can select Open Session, in the left pane, select the File Level Recovery Sessions tab, select the active session, and then select Explore.
You will be able to browse, search for files, and download files and folders. Use the left and right arrows in the left corner to move between folders.
Files in an Explore volume may be soft links (symbolic links) to other files. Trying to access this type of file may result in an error. However, the file is accessible via its real path. For example, root/folder2/file2 is a soft link to root/folder1/file1, where /root/folder1/file1 is the real path.
Select any file or folder and then select Download. Folders are downloaded as uncompressed zip files.
File-level recovery requires N2W to recover volumes in the background and attach them to a ‘worker’ launched for the operation. The worker will be launched in the same account and region as the snapshots being explored, using a pre-defined worker configuration. See section 22 to configure a ‘worker’ instance in the region that the snapshots exist.
The worker will communicate with the N2W server over both HTTPS and SSH. Verify that your configuration allows such communication.
After you complete the recovery operation, select Close for all the resources to be cleaned up and to save costs. Even if you just close the tab, N2W will detect the redundant resources and clean them up, but N2W recommends that you use Close. Sessions can be closed from the File Level Recovery Sessions tab also.
There are a few limitations:
File-level recovery is supported only for file system types Ext2, Ext3, Ext4, NTFS, XFS, Btrfs.
If several XFS volumes have the same UUID, they cannot be mounted.
Explore works only on the supported file systems listed above. Attempting to Explore a volume of a non-supported file system will fail.
Explore works only on simple volumes and Logical Volume Management (LVM). LVM is supported with file-level restore on Linux, as well as for Windows dynamic disks. Additionally, disks defined with Microsoft Storage Spaces are not supported.
To Explore snapshots taken in a different region than where the N2W server is, it is required to configure a ‘worker’ instance in the region that the snapshots exist. See section .
File-level recovery from an AMI only backup is not supported.
N2W does not support Windows Data Deduplication.
In the Backup Monitor, select a backup Stored in Storage repository, and then select Recover. The Recover screen opens.
In the Recover From drop-down list, select Storage Repository. If the original EBS snapshots of the selected backup were already deleted, Storage Repository will be the only option, and the drop-down list will be disabled.
In the Recover screen, select an instance or an independent volume, and then select Explore Volumes. For an instance, you can also select Recover Volumes Only. Select the required volume, and then select Explore Volumes.
In the Initializing File Level Recovery message, select Open Session. Loading the session may take a few seconds. If the Initializing File Level Recovery message closes before you can select Open Session, in the left pane, select the File Level Recovery Sessions tab, select the active session, and then select Explore.
In the File Level Recovery Session window, navigate to the desired folder. See section .
Select the folders or snapshots to recover and select Download.
To close an active session, in the File Level Recovery Sessions tab, select the active session and then select Close.
You can restore up to 5 items in your EFS to the directory in the source file system.
To restore EFS at the item level:
In the Backup Monitor, select a snapshot, and then select Recover.
In the EFS Restore Type column, select File/Directory Restore.
The default Preserve Tags action during recovery is Preserve Original for the volumes associated with the virtual machine. To manage tags, see section .
At the left, select the right arrow (>) to open the item recovery path input box.
In the Paths for Files/Directories to Recover box, enter a forward slash (/) and the name of the path. See further limitations on the pathname in the Warning box below.
Select New to add up to 5 recovery paths.
When defining a recovery path:
AWS Backup restores a specific file or directory. You must specify the path relative to the mount point. For example, if the file system is mounted to /user/home/myname/efs and the file path is user/home/myname/efs/file1, enter /file1.
A forward slash (/) is required at the beginning of the path.
Paths should be unique. If not, the 'This path already exists' error message will appear.
Paths are case sensitive.
Wildcards and regex strings are not supported.
You can restore up to 5 items in your S3 Bucket to the directory in the source file system.
To restore S3 Bucket at the item level:
In the Backup Monitor, select a snapshot, and then select Recover.
In the Basic Options tab, in Restore Type, select Item level restore.
Complete Versions to Restore, Restore Destination, and Restore Access Control Lists.
Select New to add up to 5 recovery paths. In the Paths for Files/Directories to Recover box, enter a forward slash (/) and the name of the path. See further limitations on the pathname in the EFS Warning box above.
Select the Tag Options tab to manage any tags. The default Preserve Tags action during recovery is Preserve Original. To manage tags, see section .


Understand how to create the optimum security profile for your system.
Security is one of the main issues and barriers in decisions regarding moving business applications and data to the cloud. The basic question is whether the cloud is as secure as keeping your critical applications and data in your own data center. There is probably no one simple answer to this question, as it depends on many factors.
Prominent cloud service providers like Amazon Web Services, are investing a huge number of resources so people and organizations can answer ‘yes’ to the question in the previous paragraph. AWS has introduced many features to enhance the security of its cloud. Examples are elaborate authentication and authorization schemes, secure APIs, security groups, IAM, Virtual Private Cloud (VPC), and more.
N2W strives to be as secure as the cloud it is in. It has many features that provide you with a secure solution.
>> su cpmuser
>> vi /cpmdata/conf/cpmserver.cfg
[external_monitoring]
enabled=True>> sudo service apache2 restartFor Alerts, n2ws_alerts
For Dashboard information, n2ws_di
Last alert ID - Leave blank.
N2W Server’s security features are:
Since you are the one who launches the N2W server instance, it belongs to your AWS account. It is protected by security groups you control and define. It can also run in a VPC.
All the metadata N2W stores are stored in an EBS volume belonging to your AWS account. It can only be created, deleted, attached, or detached from within your account.
You can only communicate with the N2W server using HTTPS or SSH, both secure protocols, which means that all communication to and from N2W is encrypted. Also, when connecting to AWS endpoints, N2W will verify that the SSL server-side certificates are valid.
Every N2W has a unique self-signed SSL certificate. It is also possible to use your own SSL certificate.
AWS account secret keys are saved in an encrypted format in N2W’s database.
N2W supports using different AWS credentials for backup and recovery.
N2W Server supports IAM Roles. If the N2W Server instance is assigned an adequate IAM role at launch time, you can use cross-account IAM roles to “assume” roles from the main IAM role of the N2W instance account to all the other AWS accounts you manage and not type AWS credentials at all.
To manage N2W, you need to authenticate using a username and password.
N2W allows creating multiple users to separately manage the backup of different AWS accounts, except in the Free Edition.
Implementing all or some of the following best practices depends on your company’s needs and regulations. Some of the practices may make the day-to-day work with N2W a bit cumbersome, so it is your decision whether to implement them or not.
By using the N2W Server instance IAM role and cross-account IAM role, you can manage multiple AWS accounts without using AWS credentials (access and secret keys) at all. This is the most secure way to manage multiple AWS accounts and the one recommended by AWS.
Assuming you have to use AWS credentials, you should follow AWS practices. N2W recommends that you rotate account credentials from time to time.
After changing credentials in AWS, you need to update them in N2W. Select on the account name in the Accounts management screen and modify the access and secret keys.
To improve user security and align with current password practices, the N2W root user can enforce password rules and password expiration. Both are optional and can be enabled or disabled through Security settings.
Password settings allow the root user to enforce password rules on all N2W users (including the root user himself), to define the period for password expiration, and to enforce password expiration.
The default is to enable password rules and password expiration for 6 months.
Default password rules and expiration settings can be disabled by clearing their respective Enable/Enforce check boxes.
Password settings are enforced throughout N2W.
If you upgrade from 4.0.0c version and below, the password age will be counted on the day of upgrade.
To set password rules, expiration, and history limit:
In Server Settings in the top right toolbar, select General Settings, and then select the Security & Password tab.
In the Password Settings section, if you want to disable the default enforcement of the password roles, clear the Enable user password rules check box.
If you didn’t disable the default password rules, change the various default rule options as necessary:
Password must contain certain characters.
Set minimum password length. Default is 8.
Limit common passwords. Passwords are matched against a list of 20,000 common passwords.
Restrict numeric-only passwords.
If you want to disable the default enforcement of password expiration and history, clear the Enforce password expiration and history check box.
If you didn’t disable the default enforcement of the password expiration and history, change the various default expiration and history options as necessary:
Password expiration in terms of duration.
Limit of number of passwords to be included in history. Default is 3, maximum is 10.
If history value is 3, users can’t reuse any of their last 3 passwords.
Password Enforcement
Password rules are enforced throughout all N2W functions and features:
Configuration Wizard
User/Delegate creation
Reset Password (by root user)
Change Password (by the user itself)
In the following example, a user attempted to change their password to ‘1234’, which breaks all password rules:
Password Expiration
When the password expires, the user will see the following message after login. The user will then be transferred to a password change page.
Setting an automatic logout is another security best practice. Setting a Login Session Expiration value handles automatic logout from N2W Backup & Recovery.
To set the time for automatic logout:
In Server Settings in the top right toolbar, select General Settings tab, and then select the Security & Password tab.
In the Login Session Expiration section, select the time after which the user is to be logged out.
The default logout is after 12 hours of mouse and keyboard being idle. The minimum expiration time is 3 minutes.
Since the N2W server is an instance in your account, you can define and configure its security groups. Even though N2W is a secure product, you can block access from unauthorized addresses:
You need HTTPS access (original 443 port or your customized port) from:
Any machine which will need to open the management application
Machines that have N2W Thin Backup Agent installed on them. See section 6.1.
You will also need to allow SSH access to create and maintain backup scripts.
Blocking anyone else will make N2W server invisible to the world and therefore completely bullet-proof.
The only problem with this approach is that any time you will try to add new backup agents or connect to the management console or SSH from a different IP, you will need to change the settings of the security groups.
Learn more about AWS Security Groups and settings at https://docs.aws.amazon.com/vpc/latest/userguide/VPC_SecurityGroups.html
N2W keeps your AWS credentials safe. However, it is preferable to use IAM roles and not use credentials at all. Additionally, N2W will not accept root user credentials. To minimize risk, try:
To provide credentials that are potentially less dangerous if they are compromised, or
To set IAM roles, which will save you the need of typing in credentials at all.
You can create IAM users/roles and use them in N2W to:
Create a user/role using IAM.
Attach a user policy to it.
Use the policy generator to give the user custom permissions.
Using IAM User credentials is not recommended as they are less secure than using IAM roles.
An IAM role can also be used in the N2W Server (for the account the N2W Server was launched in) and for instances running N2W Agent to perform the configuration stage as well as normal operations by combining some of the policies. You can attach more than one IAM policy to any IAM user or role.
The permissions that the IAM policy must have depend on what you want to policy to do. For more information about IAM, see IAM documentation: http://aws.amazon.com/documentation/iam/
AWS credentials in the N2W configuration process are only used for configuring the new server. However, if you want to use IAM credentials for the N2W configuration process, or to use the IAM role associated with the N2W Server instance, its IAM policy should enable N2W to:
View volumes instances, tags, and security groups
Create EBS volumes
Attach EBS volumes to instances
Create tags
Generally, if you want to use IAM role with the N2W Server instance, you will need the following policy and the policies for N2W Server’s normal operations, as described in section 16.3.2.
Minimal IAM Policy for N2W Configuration:
You can use the N2W Server’s IAM role to manage backups of the same AWS account. If you manage multiple AWS accounts, you will still either need to create cross-account roles or enter the credentials for other accounts. If you want to use an IAM user for an account managed by N2W Server (or the IAM role), you need to decide whether you want to support backup only or recovery as well. There is a substantial difference:
For backup, you only need to manipulate snapshots.
For recovery, you will need to create volumes, create instances, and create RDS databases. Plus, you will need to attach and detach volumes and even delete volumes. If your credentials fall into the wrong hands, recovery credentials can be more harmful.
If you use a backup-only IAM user or role, then you will need to enter ad hoc credentials when you perform a recovery operation.
Generally, if you want to use the IAM role with the N2W Server instance, you will need a certain policy, or policies, for N2W Server’s normal operations. For AWS, see
For Azure, see
Using IAM User credentials is not recommended as they are less secure than using IAM roles.
You can check on the permissions required for AWS services and resources, such as backup, RDS, and DynamoDB, and compare them to the policies that cover the requirements.
Limitation: In certain circumstances, the permissions checker may evaluate IAM entities incorrectly, due to limitations on the AWS side. This is especially likely when Service Control Policies (SCPs) are applicable to the account.
In the Accounts tab, select an account and then select Check AWS Permissions. To expand a line, select its down arrow .
To download a CVS report, select Permissions Check Report.
To download a JSON file, select AWS Permissions Summary.
CloudFormation is an AWS service that allows you to treat a collection of AWS resources as one logical unit. CloudFormation provides a common language for you to describe and provision all the infrastructure resources in your cloud environment, across all regions and accounts in an automated and secure manner.
The IAM role will automatically contain the required permissions for N2W operations. See section 20.

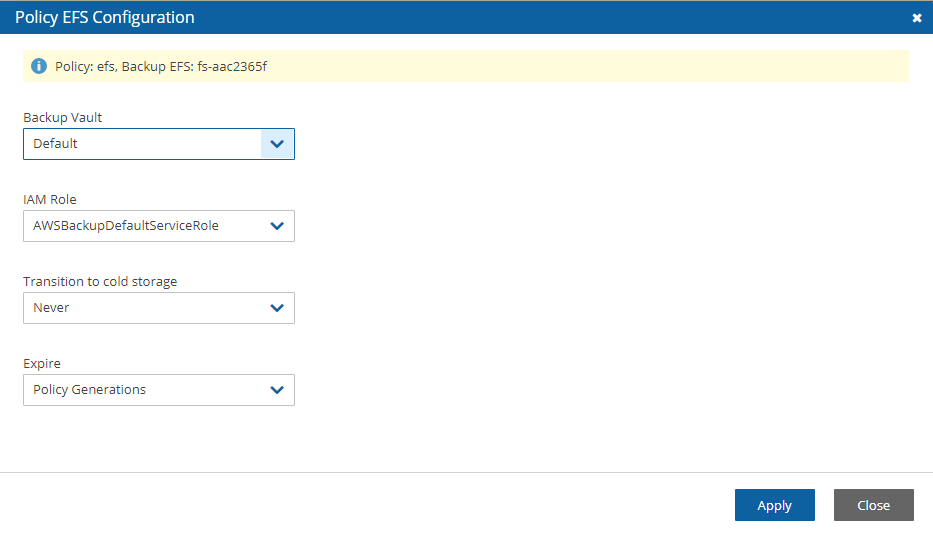


Follow this guide to install Velero on an EKS Cluster.
This guide explains how to install Velero on an EKS cluster using only the AWS plugin (without CSIsnapshots).
Installation approaches: Helm or Terraform.
Authentication options: IRSA or EKS Pod Identity.
EKS Cluster Requirements
EKS cluster with either IRSA or Pod Identity enabled
Kubernetes version v1.16+
Option 1: IRSA (IAM Roles for Service Accounts)
Uses OIDC provider and IAM roles
More secure, recommended for production
Requires OIDC provider configuration
Option 2: EKS Pod Identity (pod identity agent)
Simpler setup (no OIDC provider; no SSO/Identity Center involved)
Requires the EKS Pod Identity Agent addon
Trust policy principal: Service: pods.eks.amazonaws.com
Create an S3 bucket through the AWS Console or CLI:
Required IAM Permissions
Velero needs specific AWS permissions to perform backups and restores. When creating the IAM policy in the AWS Console, include these permissions:
S3 Permissions (scope to your Velero bucket only):
s3:ListBucket - on arn:aws:s3:::your-velero-backup-bucket
s3:GetObject - on arn:aws:s3:::your-velero-backup-bucket/*
s3:PutObject - on arn:aws:s3:::your-velero-backup-bucket/*
EC2 Permissions (for EBS snapshot management, resource: *):
ec2:DescribeVolumes
ec2:CreateSnapshot
ec2:DeleteSnapshot
ec2:DescribeSnapshots
Understanding Service Accounts and IRSA
What is IRSA?
IRSA (IAM Roles for Service Accounts) allows Kubernetes pods to securely use AWS services without storing static credentials. It's the recommended approach for EKS workloads.
How it works:
Your EKS cluster has an OIDC provider that acts as an identity issuer
You create an IAM role that trusts this OIDC provider
Velero's Kubernetes ServiceAccount ( velero-server ) gets annotated with the IAM role ARN
Creating the IAM Role (AWS Console)
Step 2.1: Create IAM Policy
Go to AWS Console → IAM → Policies → Create Policy
Click JSON tab and paste a policy with the permissions listed above
Name it VeleroBackupPolicy
Step 2.2: Create IAM Role with OIDC Trust
Go to IAM → Roles → Create Role
Select "Web Identity" as trusted entity type
Choose your EKS cluster's OIDC provider from the dropdown
The OIDC provider URL can be found in EKS Console → Your Cluster → Overview → OpenIDConnect provider URL
Step 3: Install Velero with Helm
Replace <YOUR_BUCKET> , <YOUR_REGION> , and <IAM_ROLE_ARN> with your actual values.
# Add Helm repository
# Install Velero with command-line flags
Step 4: Verify Installation
# Check pods are running
kubectl get pods -n velero
# Verify ServiceAccount annotation
kubectl get serviceaccount velero-server -n velero -o yaml
# Check Velero can authenticate to AWS
kubectl exec -n velero deployment/velero -- aws sts get-caller-identity
# Check backup storage location
kubectl get backupstoragelocation -n velero
Step 5: Install Velero CLI
Download the Velero CLI to manage backups from your machine:
# Linux
# macOS
brew install velero
# Verify
velero version
Step 6: Test Backup#Create a test backup
velero backup create test-backup --include-namespaces default
# Check status
velero backup describe test-backup
# List backups
velero backup get
IRSA (existing/standard)
Ensure an EKS OIDC provider exists.
Create an IAM role with trust for that OIDC provider and system:serviceaccount::<ns>:<sa> .
Annotate the ServiceAccount with the role ARN:
EKS Pod Identity
Install addon: eks-pod-identity-agent .
Create an IAM role with trust principal Service: pods.eks.amazonaws.com .
Create a Pod Identity Association mapping <namespace> /<serviceAccount>
Install the snapshot-controller (e.g., Piraeus snapshot-controller chart) and CRDs.
Create an EBS CSI VolumeSnapshotClass ( driver: ebs.csi.aws.com ).
Label the VSC so Velero detects it:
Tip: Run snapshot-controller with replicaCount: 2 .
# Check Velero pods
kubectl get pods -n velero
# Test backup
kubectl exec -n velero deployment/velero -- velero backup create test-backup --include-namespaces default
S3: List, Get, Put, Delete objects in backup bucket
EC2: Describe volumes, create/delete snapshots, create tags
Common Issues
Authentication not working: Check IRSA or Pod Identity configuration
S3 access denied: Verify IAM role permissions
Plugin not found: Check plugin image
# Check Velero logs
kubectl logs -n velero deployment/velero
# Test AWS credentials
kubectl exec -n velero deployment/velero -- aws sts get-caller-identity
Least privilege: Only grant necessary permissions
Bucket encryption: Enable S3 bucket encryption
Access logging: Enable S3 access logging
Lifecycle policies: Set S3 lifecycle rules
Snapshot retention: Configure deletion policies
Storage classes: Use appropriate S3 storage classes
For issues with this setup:
Check Velero documentation:
Review AWS EKS documentation:
Check Velero GitHub issues:
To enable CSI snapshots, follow Section 2.3 (controller, VSC, label) and set configuration.features = "EnableCSI" in Terraform.
For file-system backups, enable deployNodeAgent = true and uploaderType = "kopia" ; opt-in per PVC with velero.io/fs-backup=true .
{
"Version": "2012-10-17",
"Statement": [
{
"Action": [
"ec2:AttachVolume",
"ec2:AuthorizeSecurityGroupEgress",
"ec2:AuthorizeSecurityGroupIngress",
"ec2:CreateTags",
"ec2:CreateVolume",
"ec2:DescribeAvailabilityZones",
"ec2:DescribeInstanceAttribute",
"ec2:DescribeInstanceStatus",
"ec2:DescribeInstances",
"ec2:DescribeSecurityGroups",
"ec2:DescribeTags",
"ec2:DescribeVolumeAttribute",
"ec2:DescribeVolumeStatus",
"ec2:DescribeVolumes"
],
"Sid": "Stmt1374233119000",
"Resource": [
"*"
],
"Effect": "Allow"
}
]
}


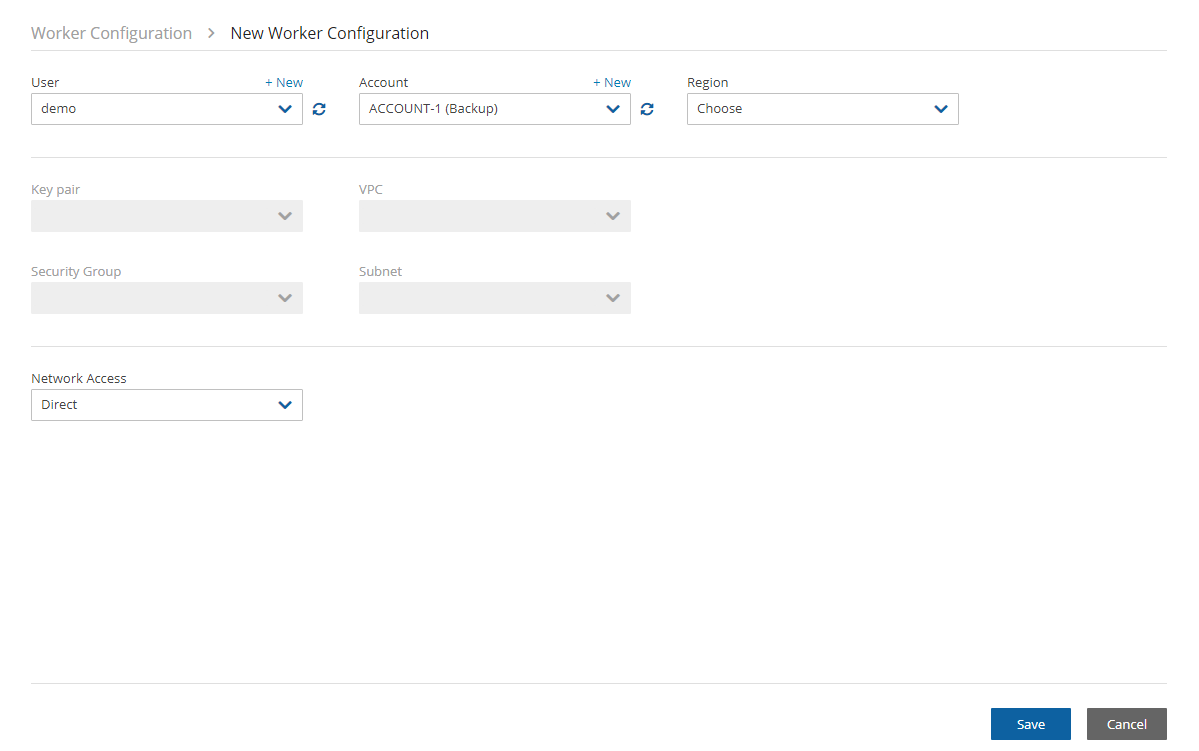
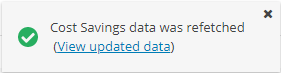
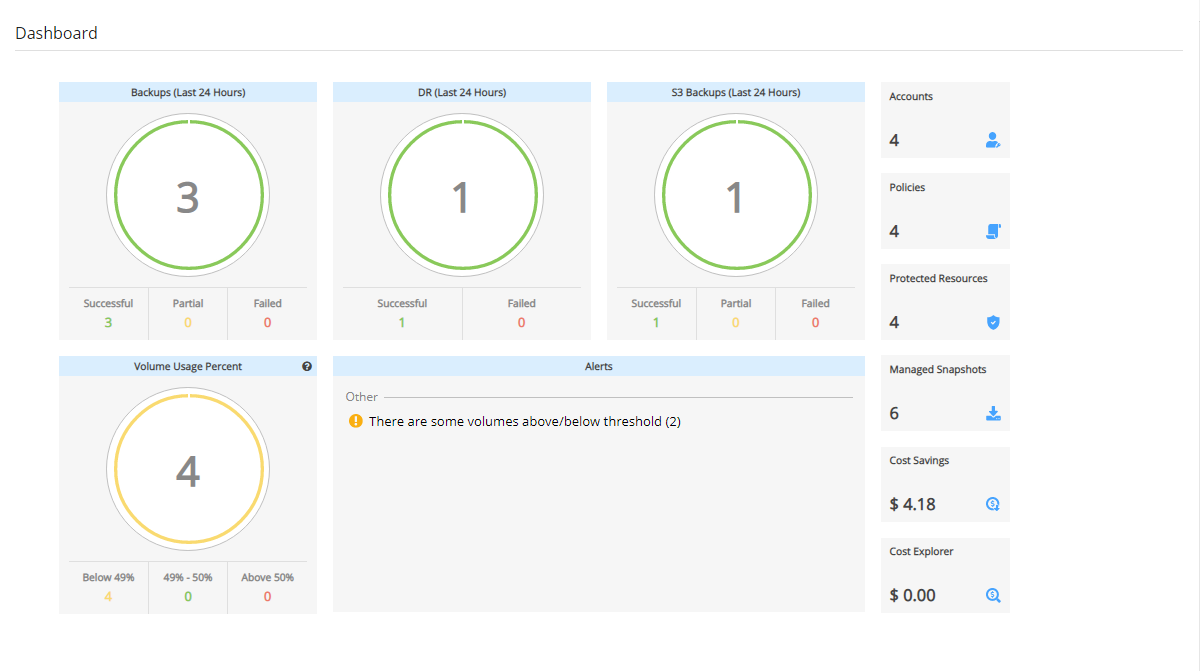
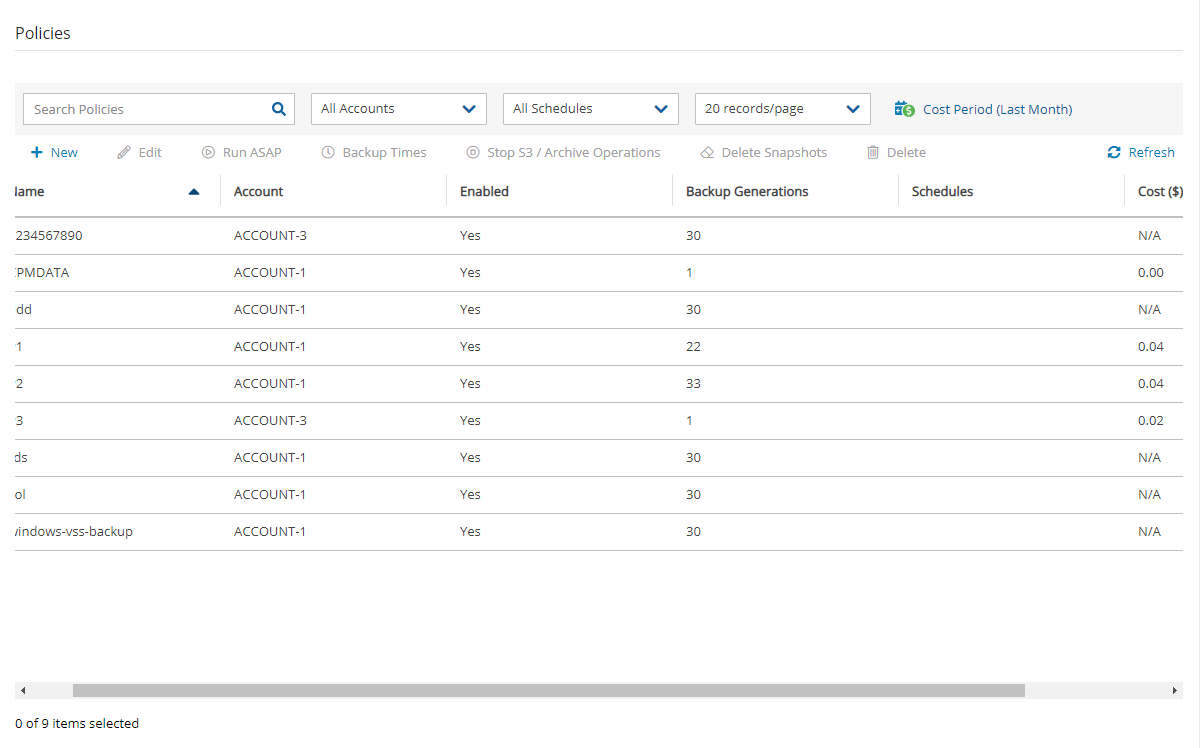

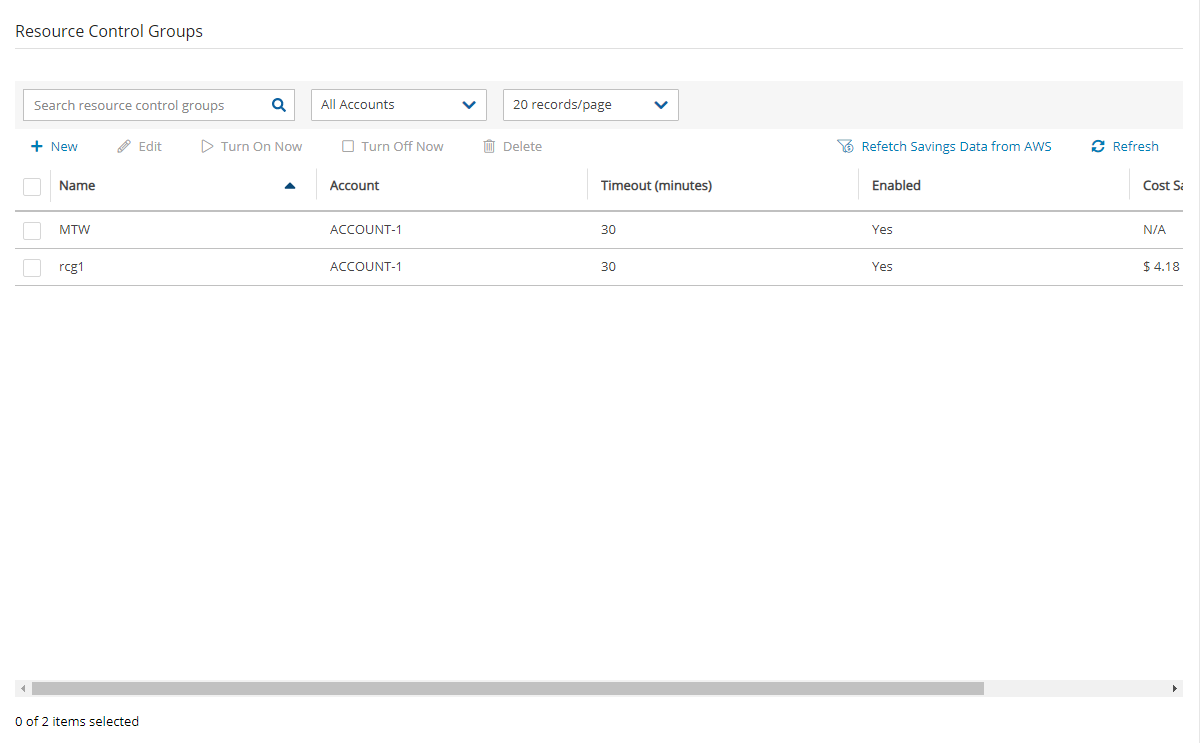


S3 bucket for storing backups
IAM role with necessary permissions
AWS CLI configured with appropriate credentials
Tools
kubectl configured to access your cluster
Helm for Helm approach
Terraform for Terraform approach
<namespace>/<serviceAccount> → IAM roleec2:CreateTags
ec2:CreateVolume
ec2:AttachVolume
ec2:DetachVolume
ec2:DescribeAvailabilityZones
ec2:DescribeTags
No AWS access keys are stored in your cluster - credentials are temporary and auto-rotate
sts.amazonaws.comAdd a condition:
Condition: StringEquals
Key: <your-oidc-provider>:sub
Value: system:serviceaccount:velero:velero-server
Attach the VeleroBackupPolicy you created
Name the role (e.g., VeleroIRSARole )
Copy the Role ARN - you'll need it for Helm installation
serviceAccount.server.annotations."eks.amazonaws.com/role-arn" = <role-arn>
Use the key exactly eks.amazonaws.com/role-arn (case-sensitive)
Remove any IRSA annotations from the SA.
velero.io/csi-volumesnapshot-class=trueManual
Easy to replicate
Best for
Single cluster
Multiple clusters
GCP: velero/velero-plugin-for-gcp
Azure: velero/velero-plugin-for-microsoft-azure
Complexity
Simple
Medium
Infrastructure
Manual
Automated
Multi-cluster
aws s3 mb s3://your-velero-backup-bucket --region us-east-1
aws s3api put-bucket-versioning --bucket your-velero-backup-bucket --versioning-configuration Status=Enabled helm repo add vmware-tanzu https://vmware-tanzu.github.io/helm-charts
helm repo updatehelm install velero vmware-tanzu/velero \
--namespace velero \
--create-namespace \
--set configuration.backupStorageLocation[0].name=default \
--set configuration.backupStorageLocation[0].provider=aws \
--set configuration.backupStorageLocation[0].bucket=<YOUR_BUCKET> \
--set configuration.backupStorageLocation[0].config.region=<YOUR_REGION> \
--set configuration.volumeSnapshotLocation[0].name=default \
--set configuration.volumeSnapshotLocation[0].provider=aws \
--set configuration.volumeSnapshotLocation[0].config.region=<YOUR_REGION> \
--set initContainers[0].name=velero-plugin-for-aws \
--set initContainers[0].image=velero/velero-plugin-for-aws:v1.10.0 \
--set initContainers[0].volumeMounts[0].mountPath=/target \
--set initContainers[0].volumeMounts[0].name=plugins \
--set credentials.useSecret=false \
--set serviceAccount.server.create=true \
--set serviceAccount.server.name=velero-server \
--set serviceAccount.server.annotations."eks.amazonaws.com/role-arn"=<IAM_ROLE_ARN> \
--set deployNodeAgent=true \
--set uploaderType=kopiawget https://github.com/vmware-tanzu/velero/releases/download/v1.14.0/velero-v1.14.0-linux-amd64.tar.gz
tar -xvf velero-v1.14.0-linux-amd64.tar.gz
sudo mv velero-v1.14.0-linux-amd64/velero /usr/local/bin/resource "helm_release" "velero" {
name = "velero"
repository = "https://vmware-tanzu.github.io/helm-charts"
chart = "velero"
version = "10.0.11"
namespace = "velero"
create_namespace = true
values = [yamlencode({
configuration = {
# Default: AWS plugin only (no CSI)
features = ""
backupStorageLocation = [{
name = "default"
provider = "aws"
bucket = ""
config = { region = "" }
}]
# Enable CSI snapshots (optional):
# features = "EnableCSI"
# volumeSnapshotLocation = [{ name = "default", provider = "aws", config = { region = "" } }]
# extraArgs = ["--default-snapshot-move-data=true"] # Only applies to CSI data-mover flows
}
# Plugins
plugins = ["velero/velero-plugin-for-aws:v1.12.0"]
# FS backups (optional but recommended to have available)
deployNodeAgent = true
uploaderType = "kopia"
# IRSA: annotate SA with the role (if using IRSA)
# serviceAccount = { server = { create = true, name = "velero-server", annotations = { "eks.amazonaws.com/role-arn" = var.velero_role_arn } } }
})]
} terraform init
terraform apply -auto-approvekubectl -n velero get deploy velero -o
jsonpath='{.spec.template.spec.containers[0].args}'; echo
kubectl -n velero logs deploy/velero | grep -Ei 'velero-plugin|credentials|error' || true Learn how to control the state of resources for each account during the course of a week or in the future.
Resource Control allows users to stop and start Instances and RDS Databases for each Account during a week. It also allows users to stop the resources at a designated time in the future.
Supported Resources:
AWS - Resource Control allows users to stop and start instances and RDS databases.
AWS - RDS Aurora Clusters are not supported by Resource Control.
Azure - Resource Control allows users to stop and start Virtual Machines.
Basics:
A Group is the controlling entity for the stopping and starting of selected resources. Resource Control allows for stopping on one day of a week and starting on another day of the same week. Once an Off/On schedule is configured for a Group, N2W will automatically stop and start the selected resource targets.
Resources that are eligible and enabled for hibernation in AWS/Azure will be hibernated regardless of whether their current operation is On or Off if their controlling Resource Control Group is enabled for hibernation. Hibernated instances (AWS) or Virtual Machines (Azure) are restarted by an On operation.
For AWS: See
N2W recommends that you not execute a stop or start operation on critical servers.
Following are Resource Control tabs in the left panel of the N2W user interface:
Resource Control Monitor – Lists the current operational status of Groups under Resource Control. The Log lists the details of the most recent operation for a Group.
Resource Control Groups – Use the Cloud buttons to select AWS or Azure resources. You can add and configure a Group: the account, the days, and off/on times, which Resource Targets are subject to the Group control, and other features. You can also delete a group and activate Turn On Now / Turn Off Now controls.
After configuring a group, you can add resources in the Operation Targets tab. See sections and .
In the Resource Control Groups tab, select New and choose the required Cloud's Resource Control Group.
Complete the Group Details tab fields:
Name – Only alphanumeric characters and the underscore allowed (no spaces).
Account – Owner of the Group. Users are configured for a maximum number of Resource Control entities. See section .
A Group may belong to only one Account.
Subscription (Azure only) - The subscription from which to choose the controlled resources.
Enabled – Whether the Group is enabled to run.
Off/On operations are not allowed for Groups that are Disabled.
Operation Mode – Two options for controlling operation:
Turn On/Off – Turn Group on and off according to schedule.
Turn Off Only – Turn off for an undefined long period of time without having to ever have the Group turned on.
If an enabled Group contains mixed types of resources, only some of which are eligible for hibernation, then the Off operation will ‘hibernate’ only the eligible resources, while the remaining resources will ‘stop’.
Select the link to view current AWS/Azure limitations on hibernating instances (AWS)/Virtual Machines (Azure). During resource creation, hibernation would have been enabled and encryption configured. If the resource is eligible and the Group is enabled, resources that are ‘stopped’ move to ‘hibernation’ state.
Description – Optional description of the Resource Control Group function.
After adding a Group, select Next at the bottom of the screen, or select the Operation Targets tab to configure the Operation Targets. See section for AWS and section for Azure. After configuring the targets, schedule resource Off/On times (section ).
Instances and RDS Databases may be added to the Group.
A Resource Target (Instance or RDS Database) may belong to only one Group.
Eligible resources within a Group enabled for hibernation that have been stopped have a Status of ‘stopped-hibernation’.
The Status column shows whether a target is ‘running’ or ‘stopped’.
Select the Operation Targets tab. In the Add Backup Targets menu, select a resource type to add to the Group.
It is important to not configure a critical server as part of a Group.
If you selected Instances, the Add Instances screen opens.
The following instance types are omitted from Add Instances and not allowed to be part of a Group:
CPM
3. If you selected RDS Databases, the Add RDS Databases screen opens:
If an RDS database is stopped, a regularly scheduled backup will fail.
In the relevant screen:
Check the Status column to determine whether a resource is eligible for adding to the Group.
Select one or more resources, and then select Add Selected. Selected resources are removed from the table.
Continue until you are finished and select Close to return to the Operations Targets screen.
It is important not to configure a critical server as part of a Group.
A virtual machine may belong to only one Group.
Within a Group enabled for hibernation, eligible resources that have been stopped have a Status of ‘Hibernated (deallocated)’.
The Status column shows whether a target is ‘running’ or ‘stopped’.
To add an Azure resource target:
In the Operation Targets tab, select Virtual Machines in the Add Targets menu. The Add Virtual Machines screen opens.
Select a resource target.
Scheduling overlapping off and on time ranges is invalid. For example:
A resource is turned off at 20:00 on Wednesday and turned on at 23:00 the same day.
Then, an attempt to schedule the same resource to be turned off on Wednesday at 9:00 and turned off at 22:00 on Wednesday will result in an invalid input error.
Select Next to advance to the Schedules tab for the group.
Select New to open a default time range row ready for your changes.
In the time range row, select the Turn Off Day and Time and the Turn On Day and
There must be 60 minutes between each operation for them to work.
After creating the Group, you can initiate a stop or start action outside of the scheduled times by selecting the Turn On Now or Turn OFF Now in the Resource Control Groups tab.
Scan tags for Resource Control can be used to:
Create a new Group based on an existing Group’s configuration.
Add a resource to a Group.
Remove a tagged or untagged resource from a Group.
The tag format isKey: cpm_resource_controlwith one of the following values:
Value:<group-name> or <group-name>:<based-on-group>
If the value in <group-name> equals ‘g1’, the resource will be added to the g1 group.
Resource Control provides individual logs of off and on operations and a summary report of all operations.
The individual log contains timestamps for each step within the operation, from firing to completion, and is downloadable as a CSV file. To view individual logs, in the Resource Control Monitor tab, select a group and then select Log.
To download the individual log, select Download Log.
To generate the summary log:
Select the Reports tab in the left panel.
Select the Immediate Report Generation tab, and then select AWS Resource Control Operations or Azure Resource Control Operations in the Report Type list.
Complete the filter and time range boxes.
The Resource Control Operations Report contains information for all saved operations for all accounts.
In AWS, for each operation, the report contains:
Resource Control Operation ID – A sequential number.
User – User generating the report.
Account – The N2W AWS account owner of the Resource Control Group.
In Azure, for each operation, the report contains:
Resource Control Operation ID – A sequential number.
Account – The N2W Azure account owner of the Resource Control Group.
Azure Subscription ID – The subscription ID of the owner of the resources.
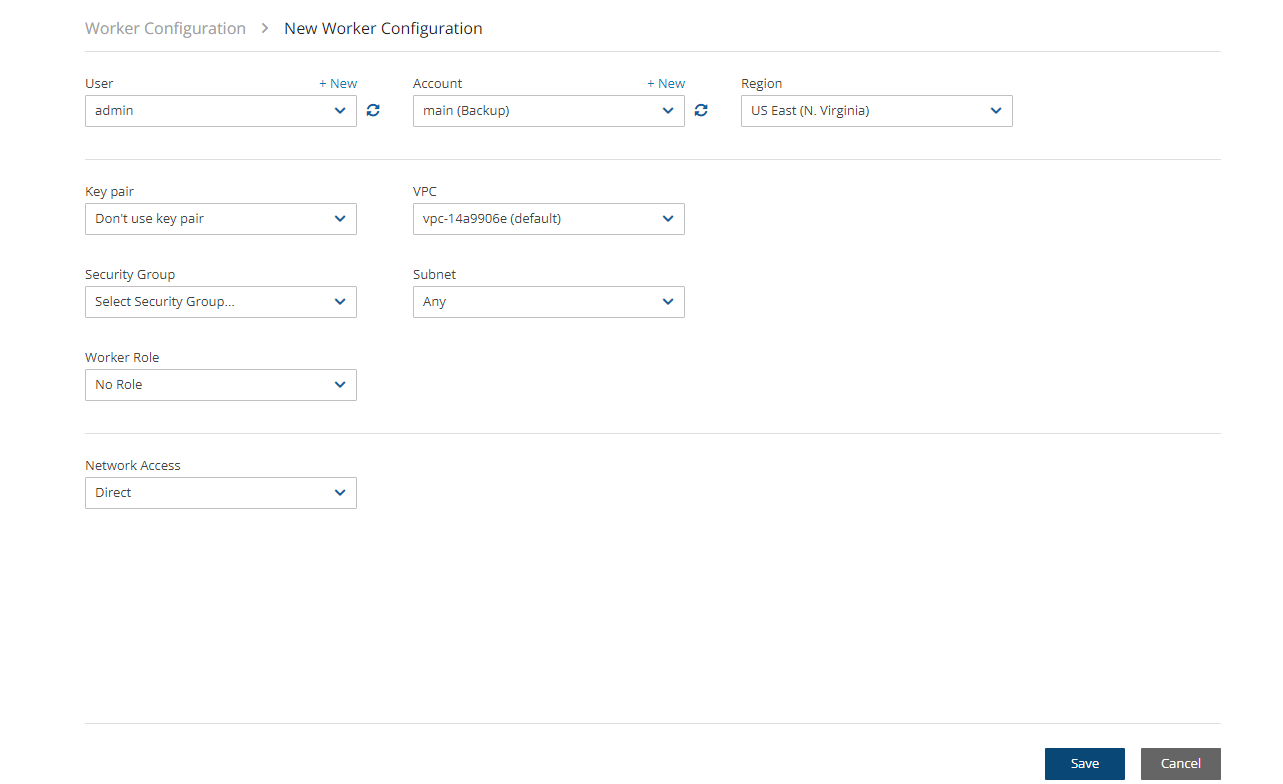
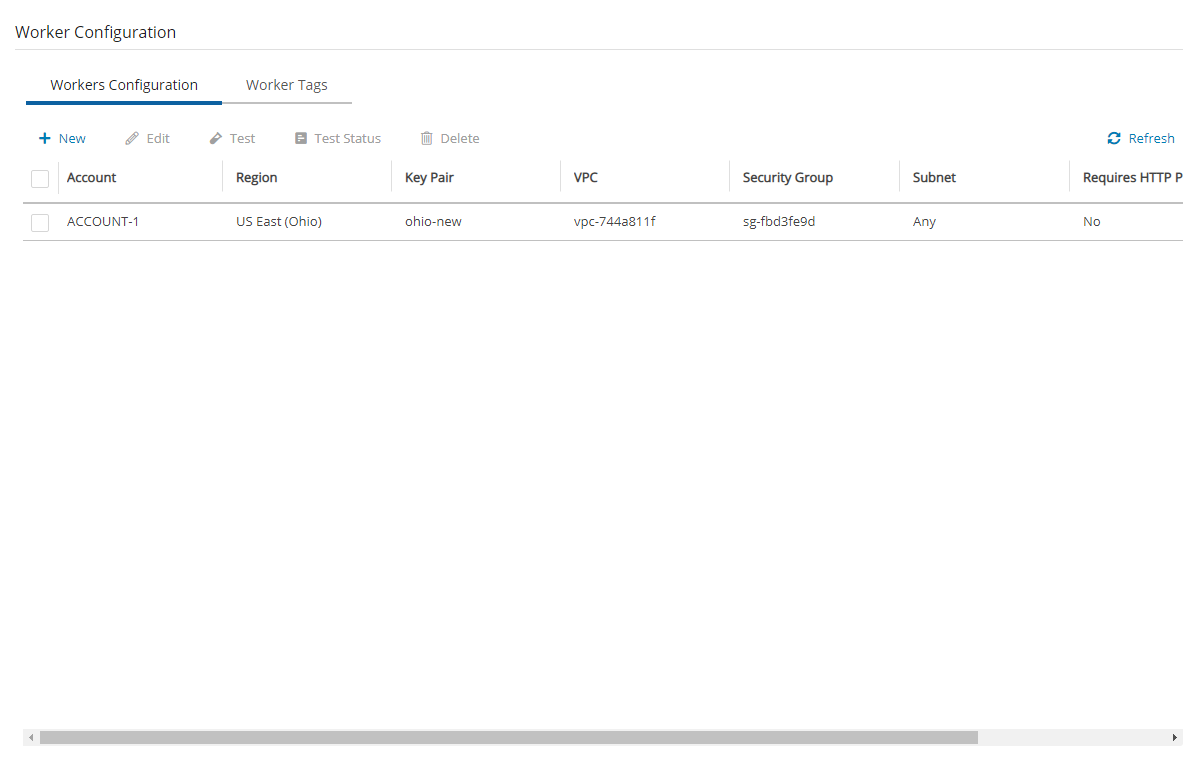
For Azure: See .
For enabling hibernation in N2W, see the Hibernate description in section .
The stopping and starting of targets identified for each Group are independent of the backup schedule for an Account’s policy.
It is possible to turn off resources for a long period of time even though the Group was never turned on.
Ad hoc Off and On operations are available in addition to the Resource Control schedule.
Off/On operations are not allowed for Groups with a Status of ‘disabled’.
Auto Target Removal – Whether a target resource is automatically removed from the Group if the resource no longer exists in AWS.
Timeout (in minutes) - How long will the operation wait in minutes until finished. Default is 30 minutes. Failure from exceeding the timeout does not necessarily mean that the operation of stopping or starting the resource has failed. The Log will show the run status for each resource.
Hibernate (if possible) – Whether eligible instances will be hibernated. If enabled, only instances within the Group’s target resources that are eligible for hibernation by AWS will be hibernated. See Info on limitations below.
Worker - See section .
Select Save to save the Operation Targets selections.
To open another time range row, select New.
When finished creating the time ranges, select the required time range rows, and then select Save.
<group-name>:<based-on-group> means, in the case of g1:g2:If g1 exists, add the resource to g1.
Otherwise, create a new group g1 based on group g2, and add the resource to it.
Value: no-resource-control- Remove the resource instance or RDS database from the Group whether it is tagged or not.
Value: <no value> - Remove the tagged resource instance or RDS database from the Group.
Select Generate Report. The report is automatically downloaded as a CSV file.
AWS Account Number – The AWS account number of the owner of the resources.
Resource Control Group – The N2W Resource Control Group name.
Status – Operation status.
Start Time – Start date and time.
End Time – End date and time.
Marked for Deletion – Whether the resource is marked for deletion.
Status – Operation status.
Start Time – Start date and time.
End Time – End date and time.


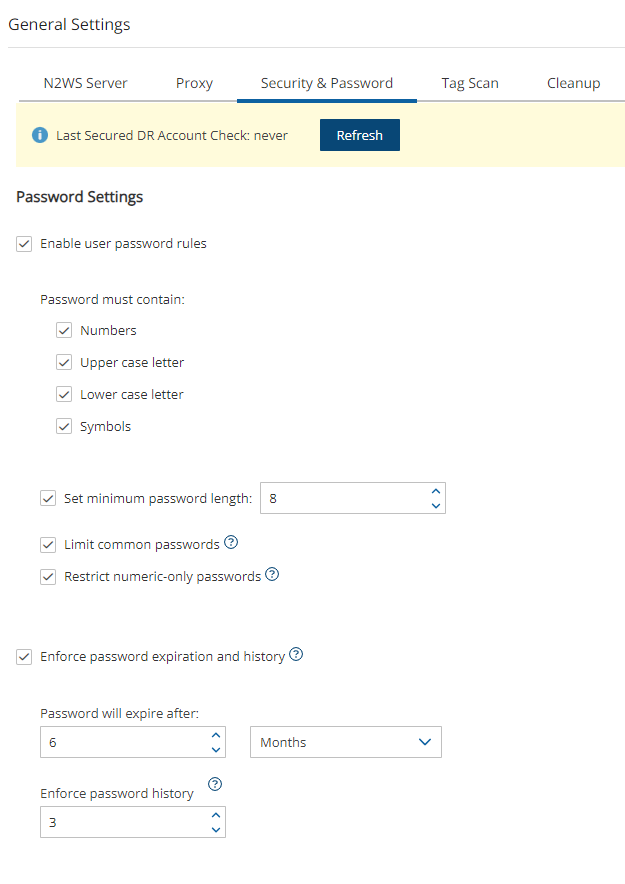

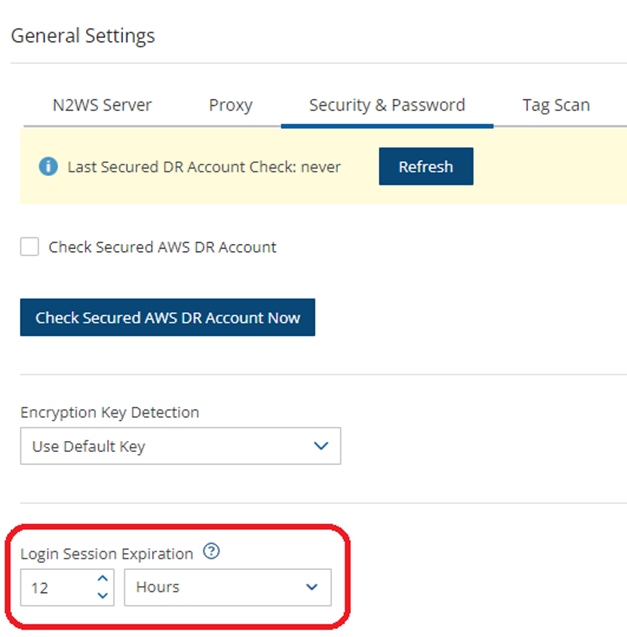
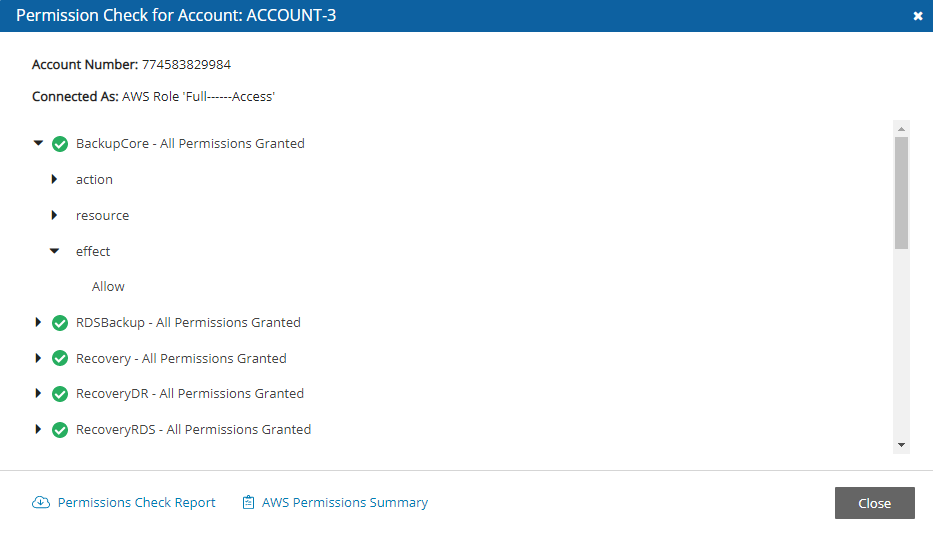
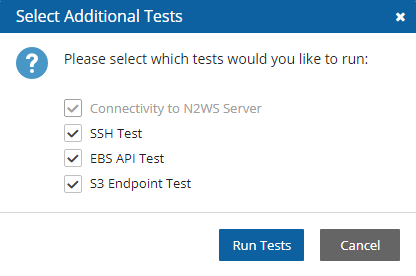
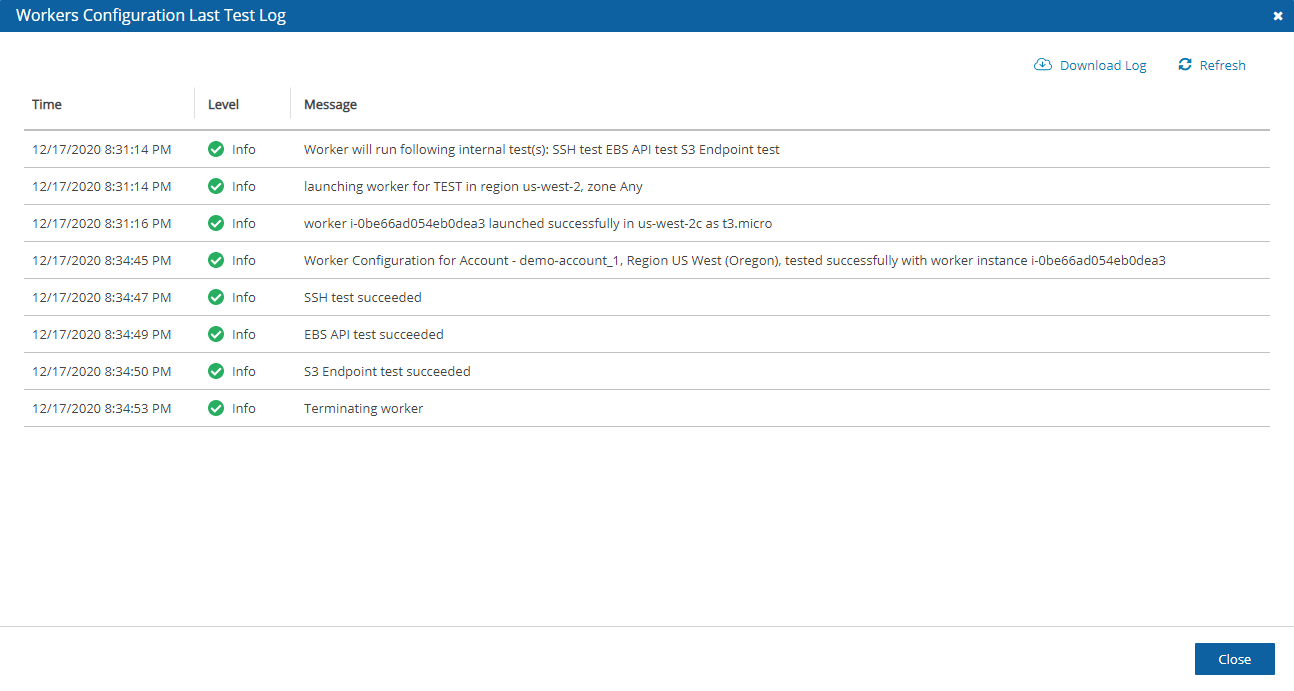
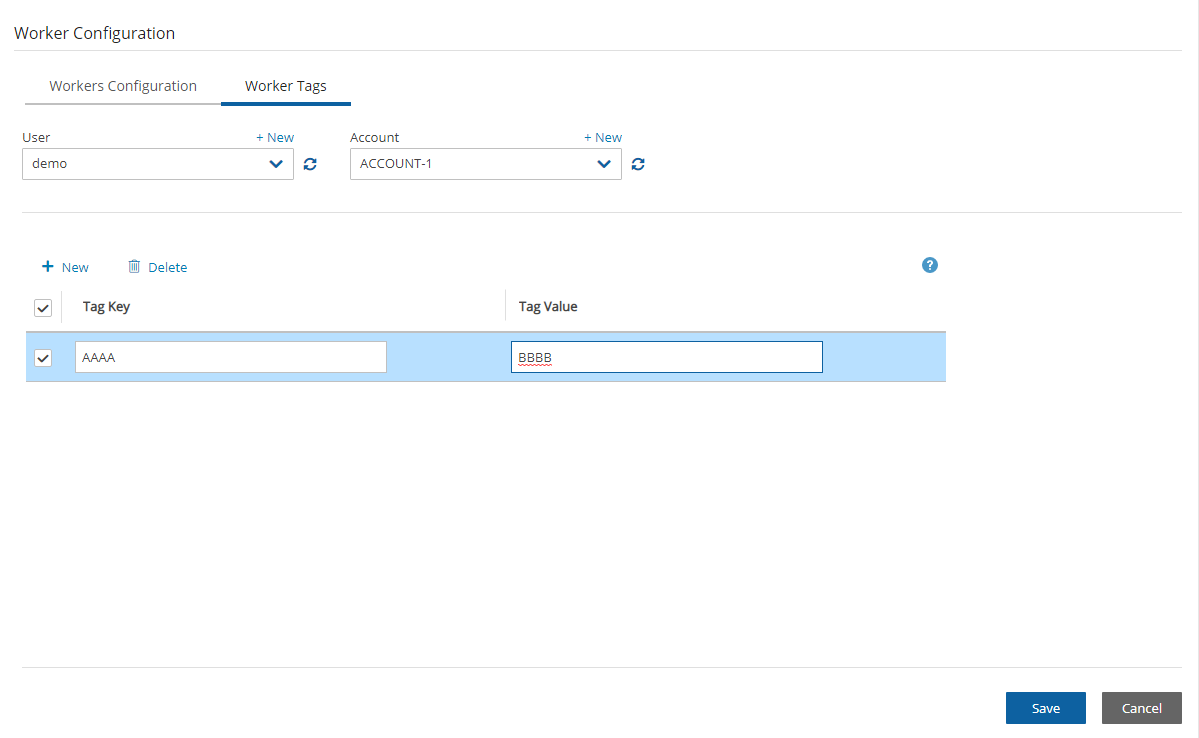


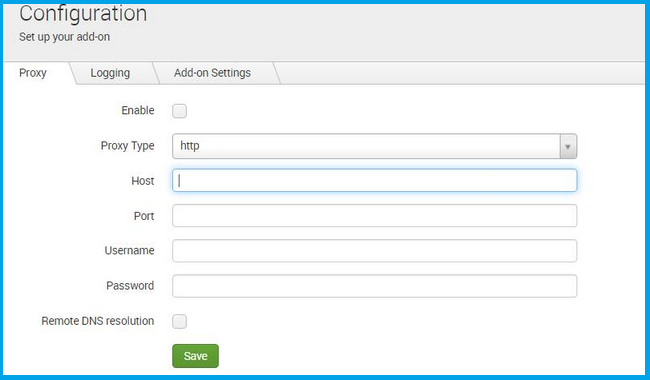

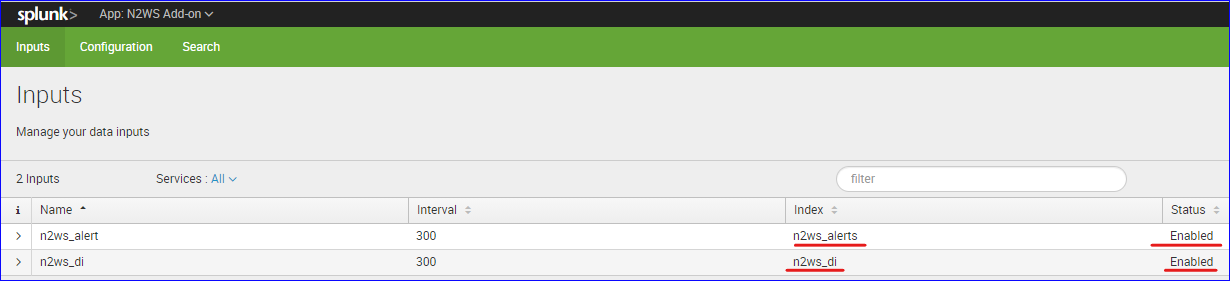

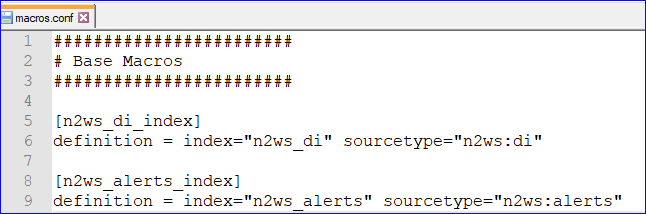


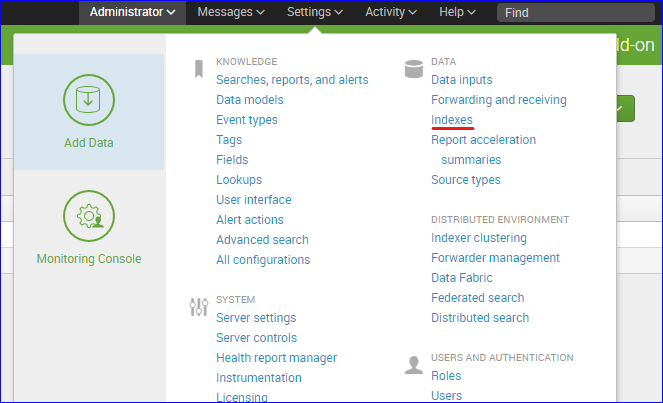

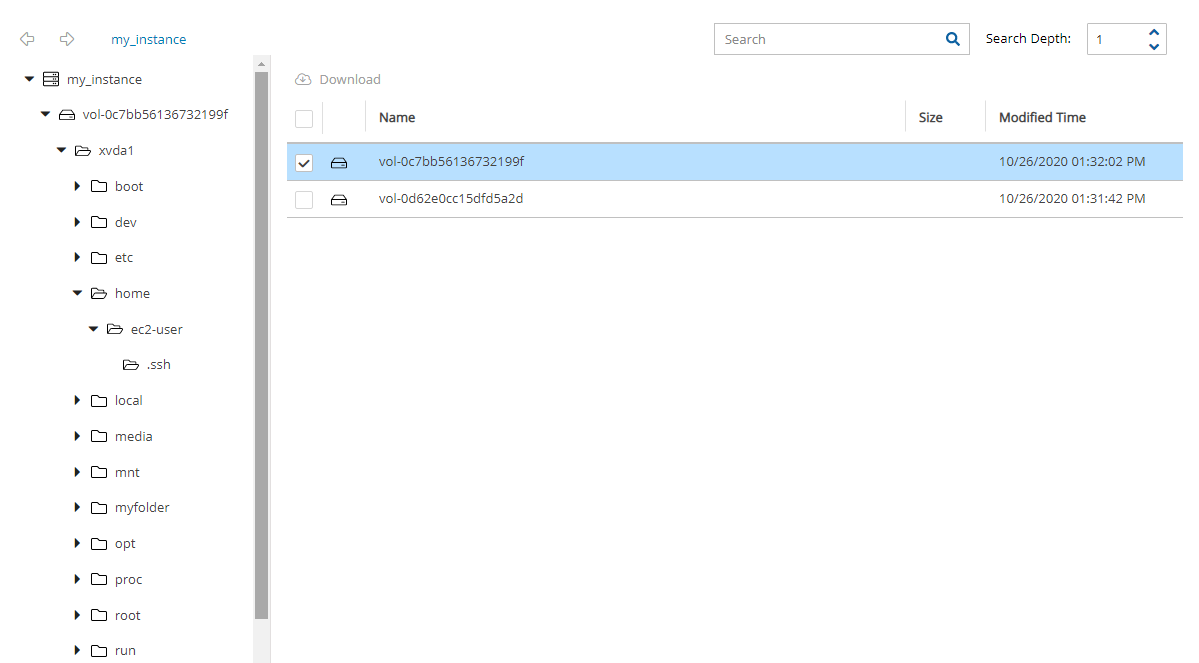
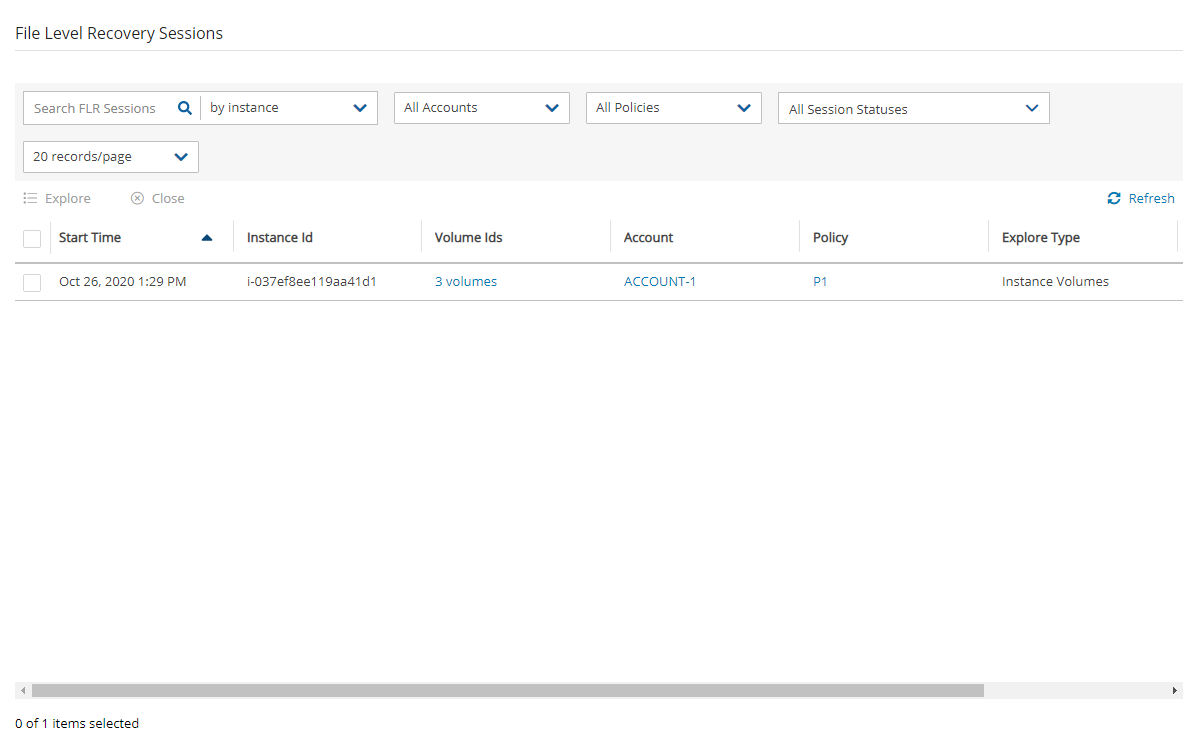
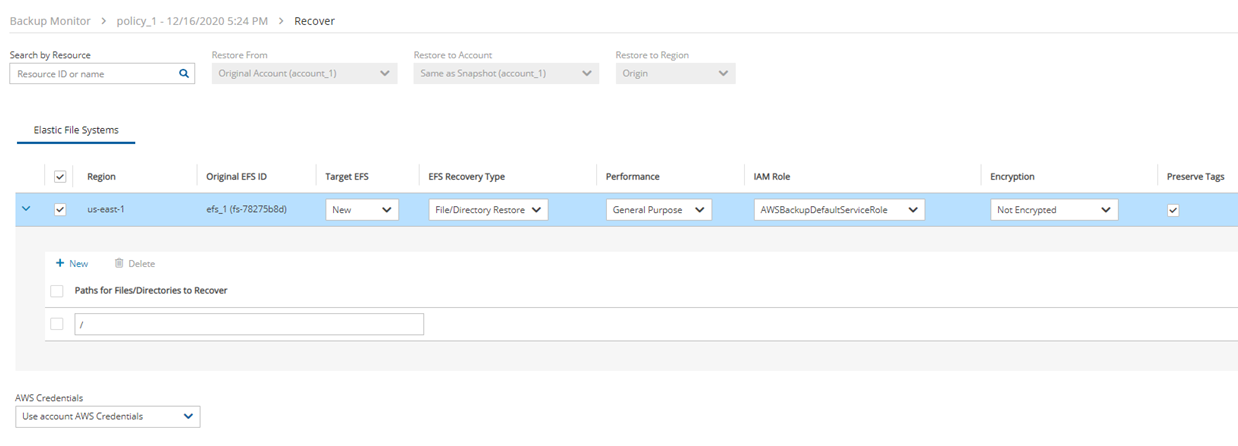
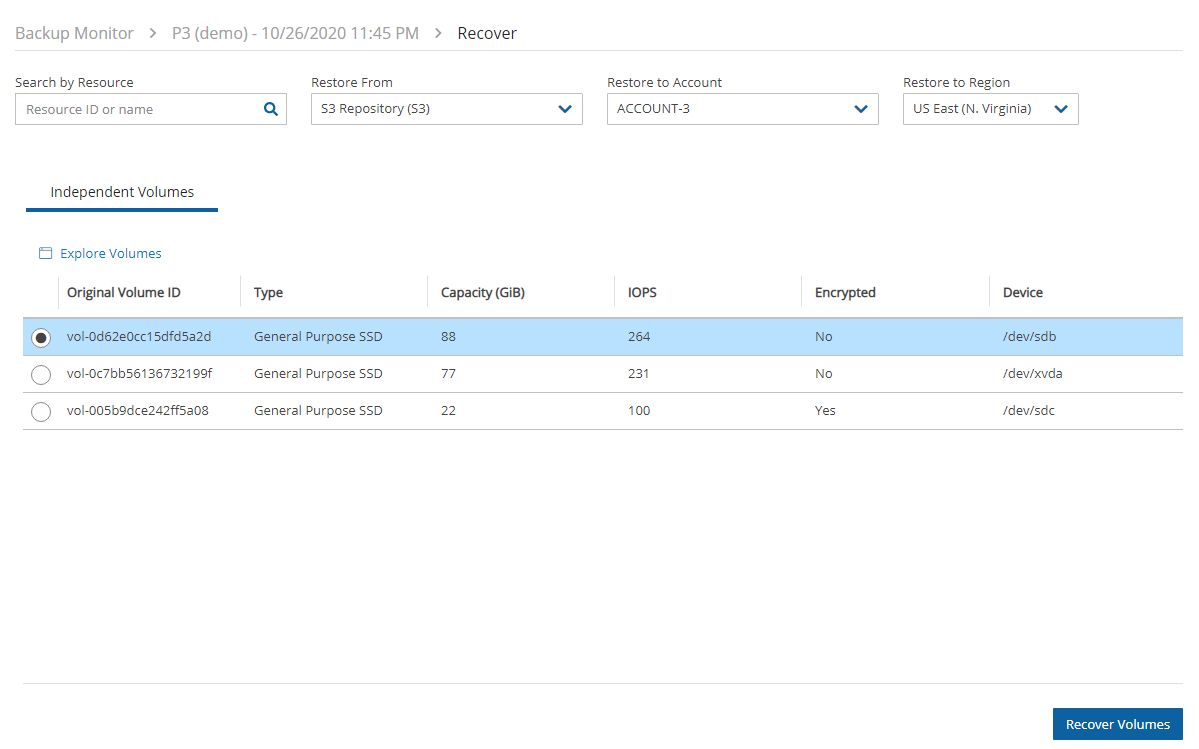
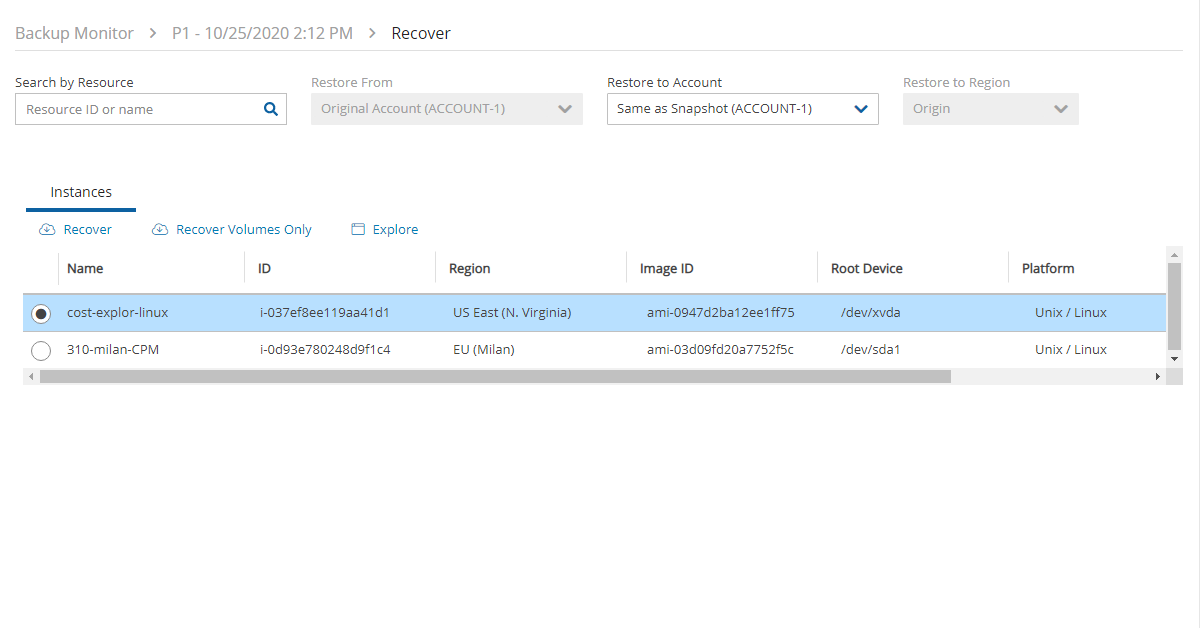
In this section, you will learn about the different types of users and the variety of user-related reporting from N2W.
N2W is built for a multi-user environment. At the configuration stage, you define a user that is the root user. The root user can create additional users, depending on the edition of N2W you are subscribed to. Additional users are helpful if you are a managed service provider, in need of managing multiple customers from one N2W server or if you have different users or departments in your organization, each managing their own AWS resources. For instance, you may have a QA department, a Development Department, and an IT department, each with their own AWS accounts. Select Server Settings > Users.
The Accounts column reflects all account types, including:
Licensed accounts (AWS, Azure)
Non-licensed accounts (Wasabi)
The following are the types of users you can define. Delegate users are typed after users are created.
Independent
Managed
Delegate
Independent users are separate users. The root user can create such a user, reset its password, and delete it with all its data, but it does not manage this user’s policies and resources. Independent users can:
Log-in to N2W
Create their own accounts
Manage their backup
Independent users can have Managed users assigned to them by the root/admin in the Users management screen. An Independent user can log on, manage the backup environment of their assigned Managed users, and receive alerts and notifications on their behalf.
Managed Users are users who can log on and manage their backup environment, or the root/admin user or independent user can do it for them. The root user can perform all operations for managed users: add, remove, and edit accounts, manage backup policies, view backups, and perform recovery. Furthermore, the root user, or independent user, can receive alerts and notifications on behalf of managed users. The root/admin user can also configure notifications for any managed user and independent users can configure notifications for their managed users (section ) To create a managed user, select New and choose Managed as the User Type. If the root user does not want managed users to log in at all, they should not receive any credentials.
Managed users may be managed by Independent users. See section .
When editing a user, the root user can modify email, password, type of user, and resource limitations.
The username cannot be modified once a user is created.
Users who are created in N2W via IdP integration (section ) cannot be edited, only deleted.
To define a user:
If you are the root or admin user, in the toolbar, select Server Settings.
In the left panel, select the Users tab. The Users screen opens.
Select New.
If the resource limitation fields are left empty, there is no limitation on resources, except the system level limitations that are derived from the licensed N2W edition used.
Delegates are a special kind of user, which is managed via a separate screen. Delegates are like IAM users in AWS:
They have credentials used to log on and access another user’s environment.
The access is given with specific permissions. By default, if no permissions are allowed, the delegate will only have permissions to view the settings and environment and to monitor backups.
Allowing all permissions will allow the non-root delegate the permissions of the original user except for notification settings.
Using IAM User credentials is not recommended as they are less secure than using IAM roles.
For each user, whether it is the root user, an independent user, or a managed user, the Manage Delegates command in the Users list screen that opens the Delegates screen for that user. Selecting an existing entry in the Delegates column also opens the Delegates screen for that user.
You can add as many delegates as needed for each user and edit any delegate’s settings.
To add a delegate:
Once a user is defined as a delegate, the name cannot be changed.
Select a user.
Select Manage Delegates and then select New.
In the Delegate Name box, type the name of the new delegate.
Perform Recovery – Can perform recovery operations.
Change Accounts and S3 Repositories – Can add and remove AWS accounts, edit accounts, and modify credentials, as well as add, edit, and remove S3 Repositories.
Change Backup - Can change policies: adding, removing, and editing policies and schedules, as well as adding and removing backup targets.
By default, the delegate will only have permissions to view the settings and environment and to monitor backups.
Allowing all permissions will grant the non-root delegate the permissions of the original user except for notification settings.
When in Edit mode, the root user can reset passwords for delegates.
The root user can also use the user management screen to download CSV usage reports for each user, which can be used for accounting and billing. The usage report will state how many accounts this user is managing, and for each account, how many instances and non-instance storage is backed up.
Reporting is now available for daily tracking of resources that were configured as a backup target on each policy. The Reports tab contains two levels of detail for Usage Reports. Users can download the following Usage Reports, both of which are filterable by user and time frame. The report can be created as a Scheduled Report or for Immediate Report Generation. In each case, select Detailed for usage per account or Anonymized for aggregated account usage per user. See sections and .
Data saved to the reports is compliant with the EU’s General Data Protection Regulation (GDPR).
N2W will record every operation initiated by users and delegates. This is important when the admin needs to track who performed an operation and when. By default, audit logs are kept for 30 days. The root user can:
Modify the audit log retention value in the Cleanup tab of the General Settings screen. See section .
Download audit reports for specific users or delegates. See section .
Included in the audit reports are:
A timestamp
The event type
A description of the exact operation.
N2W uses the following email services to effortlessly distribute reports:
Amazon Simple Email Service (SES) is a cloud-based email sending service required for AWS accounts.
Simple Mail Transport Protocol (SMTP) is an Internet standard communication protocol for non-AWS accounts.
As of version 4.3.1, you can use SMTP as the email service without providing a password. Add a new configuration as follows:
1. Connect via SSH to CPM as cpmuser
2. Edit or create the file /cpmdata/conf/cpmserver.cfg
3. Add the parameters secure and authenticate, and set them to False. Secure=False
Currently, the only regions that are available for the AWS SES service are Asia Pacific (Mumbai), Asia Pacific (Sydney), EU (Frankfurt), EU (Ireland), US East (N. Virginia), US West (Oregon).
To allow N2W to configure the email parameters:
In the toolbar, select Server Settings > General Settings.
Select the Email Configuration tab.
Select Enable Email Configuration.
Sender Email Address – The ‘From’ e-mail address.
Verify Email Address – Select to verify address.
SES Region – Select the region for the SES service.
6. If you selected SMTP, complete the following:
SMTP requires a dedicated proxy server that supports SMTP sockets.
Sender Email Address – The ‘From’ e-mail address.
Password - A non-ASCII password results in an exception on update.
SMTP Server Address
7. When finished, select Save to confirm the parameters.
Amazon will respond with an Email Address Verification Request for the region to the defined address. The Amazon verification e-mail contains directions for completing the verification process, including the amount of time the confirmation link is valid.
Currently, the Scheduled Reports are sent using the defined email identity if the reports are run with Schedules or the Run Now option.
Users and administrators can each manage their own Multi-factor Authentication (MFA) by using one of the following methods to provide an MFA token or secret code to supplement their password access.·
Token generation by an Authenticator App
The Email account or Authenticator app should only be accessible to the user
Failure to enter the correct verification code or to not finish the setup correctly will result in MFA NOT BEING SETUP ON YOUR ACCOUNT.
The time in which the code is valid for entry into the logon screen is short.
To select the MFA method for your account:
On your User menu, select Settings, and then choose Multi Factor Authentication on the left panel.
Select Click here to configure MFA for this user. The method preference window opens.
Choose Email or Token Generator for an Authenticator App, and then select
To use an authenticator app:
Before MFA setup, install Google Authenticator or another alternative TOTP token authenticator on the same device where the app registration secret key will be stored, such as your cellphone.
On your device, open the authenticator app and choose to add a new device by scanning the displayed QR code or by entering the displayed TOTP secret code if the camera or scanner is not available.
Enter the code generated by the authenticator in the Token box.
4. In subsequent usage, scan the QR code or enter the TOTP secret, and then enter the generated code in the Token box.
To use email for sending authentication tokens:
With this method, only people with access to the user’s email can complete the MFA token login phase.
Verify that a working email address is registered for that user.
Verify that the SES or SMTP Email Method was enabled in the General Settings by the administrator. See section .
No additional registration is required.
1. After choosing Email, a notification specifying the user’s registered email for the tokens opens. If the email address is correct, select Next. N2W will attempt to send email to the address shown.
2. If the email was successful, you will be forwarded to the next screen where you will be required to enter the code from the email in the Token box.
3. In subsequent usage, the login process will display the email address to use. Confirm by selecting Next, and then enter the confirmation email code in the Token box.
Once MFA is configured for email, the token login screen provides a ‘resend’ button that allows you to receive a new token 5 more times before the process is blocked.
To disable MFA:
Users: Select Multi Factor Authentication in User Settings, and select Disable MFA.
Administrators: To disable MFA for other users, go to the Users list in Server Settings, select a user, and then select Disable MFA.
Administrators who are accidentally locked out of the system can go to:
Now you can jump in and start building your backup and recovery services.
N2W opens to the Dashboard – an overview of recent backups, recoveries, alerts, resources, and costs.
Depending on your device resolution, the Alerts tile may not appear in the Dashboard. Regardless of screen resolution, all Alerts are available by selecting Alerts in the toolbar.
The first step in using N2W is to associate one or more of your cloud accounts with N2W.
In this section, you will learn how to plan and configure your disaster recovery solution.
N2W’s DR (Disaster Recovery) solution allows you to recover your data and servers in case of a disaster. DR will help you recover your data for whatever reason your system was taken out of service. N2W flexibility allows users to copy their backup snapshots to multiple AWS regions as well as to various AWS accounts, combining cross-account and cross-region options.
What does that mean in a cloud environment like EC2? Every EC2 region is divided into AZs which use separate infrastructure (power, networking, etc.) Because N2W uses EBS snapshots you will be able to recover your EC2 servers to other AZs. N2W’s DR is based on AWS’s ability to copy EBS snapshots between regions and allows you the extended ability to recover instances and EBS volumes in other regions. You may need this ability if there is a full-scale outage in a whole region. But it can also be used to migrate instances and data between regions and is not limited to DR. If you use N2W to take RDS snapshots, those snapshots will also be copied and will be available in other regions.
Redshift Clusters - Currently N2W supports cross-account DR within the original region of Redshift clusters but does not support cross-region DR.
In the User name, Email, and Password boxes, type the relevant information.
If the user can recover at the file level, select Allow File Level Recovery.
To enable Cost Explorer calculations:
Verify that Cost Explorer is enabled for CPM. See section 25.
Select Allow Cost Explorer. The default is to deny the calculations.
In AWS, allow the CPM Cost Explorer feature. See section .
For information about Cost Explorer, see section .
In the Max Number of Accounts, Max Number of Instances, Max Non-instance EBS (GiB), Max RDS (GiB), Max Redshift Clusters, Max DynamoDB Tables (GiB), and Max Controlled Entities boxes, select the value for the respective resource limitation from its list.
The value for Max Controlled Entities is the maximum number of allowed instances and RDS database resources.
For Users that will have Azure accounts, in the Azure Resources section, select the value for the respective resource limitations for Max Number of Azure Account, Max Number of Azure VMs, and Max Azure Non-VM Disk (GiB).
Enter a valid Email and set the Password.
Permissions are denied by default. To allow permissions, select the relevant ones for this delegate:
Change Settings – Root delegates can change Notifications, Users, and General Settings.
[smtp] secure=False
authenticate=False
Setting to True will require a password as before 4.3.1.
4. Restart Apache. This is best done when no important backups are running.
sudo service apache2 restart
In the Email Method list, select AWS SES or SMTP for other accounts.
If you selected AWS SES, complete the following parameters:
Authentication Method – Select a method and supply additional information if prompted:
IAM User Credentials – Enter AWS Access Key ID and Secret Access Key.
CPM Instance IAM Role – Additional information is not needed.
Account – In the Account list, select one of the CPM accounts defined in the Accounts tab.
SMTP Port - Default is 587.
SMTP Connection Method - Select STARTTLS or TLS.
Network Access - Select via Socket Proxy.
SOCKS Version - Select SOCKS4 or SOCK5.
Proxy Address and Proxy Port
Proxy Username and Password
For token generation, the validity time is 30 seconds.
For email, the validity time is 5 minutes.
If an incorrect code is entered, a new token will be required.
For token generation by an app, a new token is created when the QR code is rescanned or the TOTP code is entered manually.
For email, the user must request a new token by selecting the ‘resend’ option. After 5 additional resend requests, email token generation is blocked.
Every failed attempt to enter the correct token doubles the amount of time that is required to wait before you can try entering another token. This makes it nearly impossible to access your account using ‘brute force’.
Follow the relevant procedure below.
Perform backup and recovery operations for a variety of AWS resource types
Perform Disaster Recovery (DR)
Copy to a Storage Repository (AWS S3, Azure, Wasabi)
Manage volume usage
Monitor costs and savings
With Azure accounts, you will be able to perform backup and recovery operations for Azure VMs, SQL Servers, and Disks, and copy to a Storage Account. See section 26 for complete details.
With Wasabi accounts, you will be able to create a Storage type account. See section 27.
To associate an AWS account for Recovery, you will need to either:
Enter AWS credentials consisting of an access key and a secret key, or
Use an IAM role, either on the N2W server instance or cross-account roles.
Following are the steps to associate an N2W account with an AWS account:
To manage your users and roles and obtain AWS credentials, go to the IAM console at https://console.aws.amazon.com/iam/home?#users
Follow the directions to either add a new account or view an existing account.
Capture the AWS credentials.
If the AWS account will be operating in special regions, such as China Cloud or US Government Cloud, see section before adding the account in N2W.
To associate the AWS account with an N2W account, go to N2W:
In the left panel, select the Accounts tab.
b. In the New menu, select AWS account.
You can add as many AWS accounts as your N2W edition permits.
If you are using the Advanced or Enterprise Edition or a free trial, you will need to choose an account type.
The Backup account is used to perform backups and recoveries and is the default 3333.
The DR account is used to copy snapshots to as part of cross-account functionality.
You choose whether this account is allowed to delete snapshots. If the account not allowed to delete snapshots when cleaning up, the outdated backups will be tagged. Not allowing N2W to delete snapshots of this account implies that the presented IAM credentials do not have the permission to delete snapshots.
Enable Use Secured DR Account to select specific permissions for resource types and activities for prohibition. The Secured DR Account Check operation warns the N2W user about the existence of Prohibited Permissions in IAM policies of the DR account. Turn on the Check Secured DR Account Periodically toggle to perform a period check of whether the DR account backups are compromised by the presence of the prohibited permissions. For details about period and immediate checking of the account, see section .
The Storage type account is used to receive backups for subsequent recovery or safekeeping. Wasabi accounts are Storage type accounts. See section .
For accounts operating in special regions, in the AWS Cloud Type list, select the type of AWS cloud. See section 3.1.5.
N2W Supports the following methods of authentication:
IAM User - Authentication using IAM credentials, access and secret keys.
Using IAM User credentials is not recommended as they are less secure than using IAM roles.
CPM Instance IAM Role – If an IAM role was assigned to the N2W server at launch time or later, you can use that IAM role to manage backups in the same AWS account the N2W server is in.
Only the root/admin N2W user is allowed to use the IAM role.
Assume Role – This type of authentication requires another AWS account already configured in N2W. The operation of using one account to take a role and accessing another account is called assume role.
To allow one account to access another account, define a cross-account role in the target account and allow access from the source account.
Regions must be enabled in both the source and target accounts.
You can add as many AWS accounts as your N2W edition permits.
To allow account authentication using Assume Role in N2W:
In the Authentication box, choose Assume Role.
In the Account Number box, type the 12-digit account number, with no hyphens, of the target account.
In the Role to Assume box, type the role name, not the full Amazon Resource Name (ARN) of the role. N2W cannot automatically determine what the role name is, since it is defined at the target account, which N2W has no access to yet.
The External ID box is optional unless the cross-account role was created with the 3rd party option.
In the Assuming Account list, choose the account that will assume the role of the target account. If you are the root user or independent user and have managed users defined, an additional selection list will appear enabling you to select the user.
Select Scan Resources to include the current account in tag scans performed by the system. Once Scan Resources is Enabled:
In the Scan Regions list, select the regions to scan. To select all regions, select the check box at the top of the list. To filter regions, start typing in the search box.
In the Scan Resource Types
The Capture VPCs option defaults to enabled. Clear Capture VPCs to disable for this account. See section .
The Use accurate volume usage option defaults to enabled. Clear to disable for this account. See section.
Select Save.
Scanning only specific resource types can reduce tag scan processing time and is useful when user permissions are limited to certain resource types.
The N2W Secured DR account feature hardens N2W security. It allows the N2W user to better protect the backups of his resources by making sure that backups kept in the DR account are not compromised by unwanted permissions. N2W can perform a periodic check to alert the user about IAM Users/Roles of the DR account that have unwanted IAM permissions.
The risk of unwanted permissions is demonstrated in the following example:
If an IAM Role of a DR account has an attached policy that includes the “ec2:DeleteSnapshot” permission, the snapshot is in danger of getting deleted.
The N2W user has the flexibility of defining risky permissions for an account.
To define a 'Secured' DR Account and prohibited permissions:
In the Accounts tab, select a DR account, and then select Edit.
Select Use Secured DR Account, and then select Select Prohibited Permissions. By default, all permissions are prohibited.
For each type of target or action, clear the permissions to be 'allowed', and then select Apply.
Select Save.
N2W will check for policies whose account has permissions defined as 'prohibited' and list them as compromised in the check log. You can then generate the Secured DR Account Report to identify the accounts and policies at risk. See section 3.1.4.
The required IAM permissions for the DR account to check its users and roles are:
iam:ListUsers
iam:ListRoles
iam:SimulatePrincipalPolicy
iam:ListAccessKeys, for authentication
Removing permissions may compromise the safety of N2W backups. If permissions are removed, a warning alert for the secured DR account will appear as a potential backup risk.
Two reports are available for checking Secured DR Accounts. If the Check Secured DR Account ‘Show Log’ indicates that there are compromised permissions, then you can run the Generate Secured DR Report to view the policies and users with the compromised permissions.
Check Secured DR Account – Creates a summary status log (Show Log) with the number of policies and accounts with compromised permissions. The check can be run periodically throughout the day or run immediately.
Generate Secured DR Report - A detailed list of the AWS policies and the prohibited permissions that are compromised for an account of the current user.
To check Secured DR Accounts:
In the General Settings tab, select the Security & Password tab.
To check the DR accounts periodically during the day, select Check Secured DR Account, select an hourly interval in the Secured DR Check Interval list, and then select Save.
To run the report immediately, select Check Secured DR Account Now, and confirm.
To view the progress and status of the operation, select Background Tasks in the toolbar. Background Tasks only appears after the first Check Secured DR Account or Clone VPC operation. Select View All Tasks.
To view the log, select Show Log. To download, select Download Log in the upper right corner of the log. The Secured_DR_Account_check_log_<date>_<time>.csv file contains Log Time, security Level Type, and Log Message.
To generate Secured DR Account reports:
In the Accounts tab, select a DR (Secured) account.
To check the status of the Secured DR Account periodically during the day:
Select Edit.
Turn on the Check Secured DR Account Periodically toggle.
To view the interval for checking Secured DR Accounts, select the Secured DR Check Interval hours.
Select Save.
To run the detailed report, in the Accounts tab list, select a DR (Secured) Account, and then select Generate Secured DR Report.
The downloaded file (Secured_DR_Account_check_<account>_<date>_<time>.csv) contains a list with the following data:
AWS IAM Policy
AWS Policy’s User/Role
Compromising Permission
If the account that you are about to create will be operating with non-standard AWS regions, such as China or US government clouds, it is necessary to first contact N2W Support (see section 3.6) to adjust the N2W configuration. After N2W Support has made the adjustment, when you create the N2W account, you will be prompted for the AWS Cloud Type.
The type of cloud will appear in the Cloud column in the list of policies.
To associate an Azure account with an N2W account, see section 26.
To associate a Wasabi account, see section 27.
There are two options when deleting an account:
Delete the CPM account and all its resources and metadata, BUT leave the AWS account and all its related data on AWS. Select Delete.
Delete the CPM account and all its resources and metadata, AND delete the AWS account and all its data, including AWS Storage Repositories. Select Delete Account and Data.
In each case, you will be provided with an explanation of the scope of the delete and a prompt to confirm. In the Delete Account confirmation dialog box, type ‘delete me’ and then select Delete.
As part of starting to use N2W, you might want to enable alerts for when a volume's usage exceeds high and low thresholds. Volume usage reporting can become an integral part of the Dashboard.
Drives without a drive letter are not supported on volume usage.
After upgrading N2W, the Volume Usage tables may appear to be empty. Running a policy that includes instances with volumes will populate the Volume Usage tables with the respective volumes.
If the Volume Usage Alert is enabled, a generic message for volumes exceeding the threshold will appear on the Dashboard Alerts tile. In the Volume Usage Percentage tile, the number of volumes below, within, and above the thresholds are shown.
If Use accurate volume usage was enabled in the account definition, the following are considerations:
N2W now uses file system data to determine accurate volume usage, particularly when deleting data or formatting disks.
Make sure SSM is installed on your instance as Windows and Linux commands are run from CPM using SSM.
Mac OS is not supported.
For Ubuntu version 18, add the IAM Role: AmazonSSMManagedInstanceCore.
Volume usage is assessed at the completion of every backup if more than 24 hours has passed since the last calculation for the policy.
To report volume usage:
In General Settings of the Server Settings, select the Volume Usage Percent tab.
Select Enable Volume Usage Alert.
Enter a percentage in the High Usage Threshold and Low Usage Threshold (%) boxes for when to initiate an alert.
To enable an alert for each time a backup is run on a volume with usage exceeding the High or Low Usage Threshold, select Alert Recurring Volume. The recurring alert is turned off by default, and the alert is initiated only when there is a change in the usage or a change in the threshold that has caused the initiation.
Select Save.
If there is a volume usage alert, select the Volume Usage Percent tab in the main screen to view the specific volume and percentage which initiated the message.
The Accuracy column symbol shows the status of Use accurate volume usage calculation. Green is successful calculation, and red is failed calculation. Hover over the symbol to show the reason. To disable Use accurate volume usage, see section 3.1.2.
You can evaluate whether additional volumes are nearing the alert thresholds by adjusting the High Usage and Low Usage Thresholds in the Volume Usage screen and selecting the Enter key.
If a volume’s usage changes from high to low, or low to high, there will be an additional alert for that volume.
Changing the usage thresholds in the Volume Usage Percent tab does not change the alert thresholds set in the General Settings tab.
Enabling and configuring usage thresholds while adding a user will override the alert thresholds set in the General Settings tab.
You can quickly lower your storage costs for existing non-N2W backups by moving them to a more economical S3 storage class. After successfully importing your snapshots with the AnySnap Archiver feature, you can then safely delete the original snapshots.
Currently, the Import to S3 feature supports only EBS snapshots.
Importing consists of the following steps:
In AWS, apply custom tags to backups to import.
In N2W, create an S3 Repository. See section 21.1.
In the Policies tab, create an Importer Policy with identical custom tags. The maximum number of custom tags per policy is 20.
Verify a scan of the snapshots to import by executing Import Dry Run.
Start the import. Review the progress in the Policies tab.
If necessary, pause the import to change the S3 configuration or to postpone the migration process. See section .
Review the import process with Show Imported Backups or Show Import Log for snapshots imported to S3.
After the import process, N2W attaches an import_policy_name tag with the name of the policy to the snapshot. The tag excludes the snapshot from additional importing.
If necessary to restart the import, remove the import_policy_name tag using the AWS Snapshot console.
The Import Dry Run scans all AWS snapshots defined in the Importer Policy and marks for import those meeting the following criteria:
Snapshot date is within the Start/End Time Range.
AWS tag values equal the Import by Tags values defined in the Policy.
Snapshot date is the latest within the Record Duration. N2W marks for import the last backup made within the number of hours defined as record duration. If the duration is set for 2 and there are 3 snapshots with import tags within a 2-hour period, only the last snapshot will be imported.
Expiration of storage for S3 snapshots is computed from their EBS snapshot creation date. The S3 storage retention period is determined by the Keep backups in S3 for at least configuration value. If the retention period is set for 12 months and there are 2 imported snapshots, one 11 months old and the other 10 months old, the 11-month-old snapshot will be deleted from S3 in 1 month and the other in 2 months.
In the + New menu of the Policies tab, select New Importer Policy. When multiple clouds are enabled, select New AWS Importer Policy.
In the Policy Details tab:
Enter the policy Name, and select the User and Account.
The optional Description box would be an excellent place to identify details of the import.
In the Import Parameters tab:
Select the Start/End Source Data Time Range. End Time defaults to Up to Import Start.
In the Backup Record Interval (Hours) list, select the number of hours from which to select the latest snapshot. For example, if you select 6 and there are 4 snapshots within a period of 6 hours, only the last one of the 4 snapshots is imported.
In the S3 Storage Configuration tab, there must be at least 1 retention condition:
In the Keep backups in S3 for at least lists, select a minimum retention period.
To move S3 backups for archival in Glacier, turn on the Transition to Cold Storage toggle and select the archiving frequency and retention period.
Select Save. After saving, the Import Dry Run and Start Import buttons are enabled, and the import status in the far-right column is Not Started.
After creating the Importer policy, select the policy, and then select Import Dry Run. In the upper right corner, the Dry Run Started message appears. Shortly after the Dry Run completes and the Started message has automatically closed, the Import Snapshots Dry Run [policy name] yyyy mm dd hh mn.CSV file downloads. The report contains the list of the snapshots scanned and whether they meet the criteria for import. Fields include Backup Record number, CPM Account number, AWS Account number, Import (Yes or No), Region, Type (Resource), Volume, Snapshot ID, Start Time, Volume Size in GB, and the Dry Run Parameters.
Review and adjust the Import policy or tags as needed.
To perform the actual import:
Select the policy, and then select Start Import. The Import policy started message appears.
To view progress details of the import process:
Select Show Import Log.
In the far-right column, view the migration status symbol. Refer to the table of status symbols in section .
If it is necessary to pause the import to S3, in the Policies tab, select Pause Import. To resume, select Resume Import, and the process will restart the copy of the paused snapshot from scratch.
If it is necessary to stop the import to S3, in the Backup Monitor, when the Lifecycle Status is 'Storing in S3 ...', select Abort Copy to S3. To resume, in the Policies tab, select Resume Import, and the process will restart the copy of the snapshot from the beginning.
In the Backup Monitor, you can view the final status of the import in the Lifecycle Status column. For statuses other than Stored in S3, hover over the symbol for a description of the status.
In the Policy tab, when the import is finished:
Select Show Imported Snapshots.
To lower costs, you can Delete EBS Snapshots. The icon is active only if the import was 100% successful.
Before deleting any snapshots, N2W recommends that you perform a test recovery for each region/account that you imported from to verify that everything is working as expected.
Snapshots imported to S3 are included in the Backup and Snapshot reports. See section 17.7.
During the actual migration, you can monitor the progress in the Policies tab by viewing the following migration status symbols in the far-right column. A symbol indicates that the policy is an importer policy, and its color and design indicate its migration status. Following is a summary of the symbol colors:
Yellow: Not started, paused, pausing, no items found
Green: Scanning, running, deleting EBS snapshots (with some yellow)
Blue: Copy complete, moved to S3
Red: Copy failed
To view status details, hover over the symbol.
Symbol
Importer Policy Migration Status
Next Actions
Not started
Start Import
Scanning for custom tags, import criteria
Individual users can customize certain UI components:
Minimize toolbars and filter bars in table views
Minimize the left navigation menu
Select columns to show in a table
Select number of records per page in table views
Change and save column widths
N2W saves the customizations per user and per browser.
Toolbar and filter bar minimization extends the display of tables in list views. The up arrow minimization button (marked in red) is in the top-right corner of the view. Selecting the up arrow hides the bars shown within the thin red outline.
Before minimization:
After minimization:
After minimizing, new buttons appear to the left of the minimization button.
To open the Filters dialog box, select:
To open the Toolbar menu, select:
You can fold the left navigation menu to extend the display of a table. Hover over the menu bar. Select the minimization button that appears to the right of the Dashboard menu item.
Before minimization:
After minimization:
User can select the most relevant columns to show in the table. Select Display Settings above the table.
For example, in the following table, the DR Status and Lifecycle Status columns are empty and redundant:
To hide the empty columns, select Display Settings . A list of all columns opens.
Clear the columns to hide.
The “number of records per page” option also appears in this dialog box.
After hiding the 2 columns, the other columns become wider or do not change if they have a fixed size or a user-defined size.
For any displayed table in N2W, you can export all records, some records, or only the table records on the current page, by selecting Export Table on the right side of the action toolbar.
Select the number of records and the output File format, such as CSV, and then select Export Table.
You can email support issues to N2W Software support.
For the online help and support menu, select Help & Support in the top right toolbar.
You can view your current privileges on the N2W licensed server or activation key by selecting About and then selecting Show license and server details.
For self-service support using the N2W knowledge base, documentation, how-to guides, and tutorial videos go to the N2W Support Center by selecting Support.
To go directly to the docs and guides, select Documentation.
To collect and download support logs, select Download Logs. In the Download Support Logs dialog box, select the relevant logs and time frame, and then select Download Logs.
The following options are available:
Collect N2W Basic Logs - These logs are always collected by default.
Check Account permissions (AWS/Azure/Wasabi) – Against the required permissions for cloud services and resources.
Collect Worker Logs – When support is needed for worker-related issues. If enabled, you can choose to include logs from any worker (the default), or collect only logs related to specific policies.
Collect System Logs – For comprehensive system debugging.
Collect Miscellaneous System/Backup Logs from last - Select Day, Week, or Month in the list.
N2W support covers all N2W Software users including AWS Outposts.
You can enable copying Redshift snapshots between regions automatically by enabling cross-region snapshots using the EC2 console.
Cross-account DR of Redshift Clusters incurs additional costs.
After defining a policy (section 4), select the DR tab.
In the DR Options screen, configure the following, and then select Save.
Enable DR – Select to display additional fields.
DR Frequency (backups) – Frequency of performing DR in terms of backups. On each backup, the default is to copy snapshots of all supported backups to other regions. To reduce costs, you may want to reduce the frequency. See section 11.4 for considerations in planning DR.
DR Timeout (hours) – How long N2W waits for the DR process on the policy to complete. DR copies data between regions over a WAN (Wide Area Network) which can take a long time. N2W will wait on the copy processes to make sure they are completed successfully. If the entire DR process is not completed in a certain time frame, N2W assumes the process is hanging and will declare it as failed. Twenty-four hours is the default and should be enough time for a few 1 TiB EBS volumes to copy. Depending on the snapshot, however, you may want to increase or decrease the time.
Target Regions – List of regions of region or regions that you want to copy the snapshots of the policy to.
To configure Cross-Account backup, see section 12.1.
Things to know about the DR process:
N2W’s DR process runs in the background.
It starts when the backup process is finished. N2W determines then if DR should run and kicks off the process. In the Backup Monitor, you will see the ‘In Progress’ status.
N2W will wait until all copy operations are completed successfully before declaring the DR status as Completed as the actual copying of snapshots can take time.
As opposed to the backup process that allows only one backup of a policy to run at one time, DR processes are completely independent. This means that if you have an hourly backup and it runs DR each time, if DR takes more than an hour to complete, the DR of the next backup will begin before the first one has completed.
Although N2W can handle many DR processes in parallel, AWS limits the number of copy operations that can run in parallel in any given region to avoid congestion. See section .
N2W will keep all information of the original snapshots and the copied snapshots and will know how to recover instances and volumes in all relevant regions.
The automatic retention process that deletes old snapshots will also clean up the old snapshots in other regions. When a regular backup is outside the retention window and its snapshots are deleted, so are the DR snapshots that were copied to other regions.
N2W supports backup objects from multiple regions in one policy. In most cases, it would probably not be the best practice, but sometimes it is useful. When you choose a target region for DR, DR will copy all the backup objects from the policy that is not already in this region to that region. For example, if you back up an instance in Virginia and an instance in North California, and you choose N. California as a target region, only the snapshots of the Virginia regions will be copied to California. So, you can potentially implement a mutual DR policy: choose Virginia and N. California as target regions and the Virginia instance will be copied to N. California and vice versa. This can come in handy if there is a problem or an outage in one of these regions. You can always recover the instance in the other region.
Prerequisites for DynamoDB
To enable DR on AWS, for each region and account to be included in the backup/DR operation, set the following options:
On the DynamoDB console, go to Backups/Settings. In the Advanced features with AWS Backup section, select Turn on features.
On the AWS Backup console, go to Settings/Configure Resources, and enable DynamoDB resources.
Prerequisites for EFS
Disaster Recovery is supported for EFS to a new EFS only. DR to an original EFS is not supported.
Conditions for both DynamoDB and EFS
For each target vault (backup and DR account), update the target access policy to enable the copy of recovery points. See the Access policy section on the vault’s properties page.
If the source and target regions are the same for DR, no action is required as the target region will default to the source.
If the target region is different than the source, the target region must have a backup vault with the same name as the source and must be specified using a tag before the DR begins:
For the "Default" vault, if this is the initial time copying a snapshot to the DR region, go to the AWS Backup console and activate the vault by selecting Backup vaults.
For a non-default custom vault, a vault with the same name needs to be created in the DR region. For example, if the source region’s vault name is "Test", the DR region also must include a vault with the name "Test".
To set a custom vault name for cross-region DynamoDB/EFS DR:
Before the DR, add a tag to the resource with the key cpm_dr_backup_vault and the value of the custom backup vault ARN:
Add a key for each target region that is different from the source.
To set a custom vault name for cross-account DynamoDB/EFS DR:
Before the DR, add a tag to the resource with the key ‘cpm_dr_backup_vault’ and the value of the custom backup vault ARN:
Add a key for each target region that is different from the source.
This section describes the main concepts in planning your DR.
There are some fundamental differences between local backup and DR to other regions. It is important to understand the differences and their implications when planning your DR solution. The differences between storing EBS snapshots locally and copying them to other regions are:
Copying between regions is transferring data over a WAN. It means that it will be much slower than moving data locally. A data transfer from the U.S to Australia or Japan will take considerably more time than a local copy.
AWS will charge you for the data transfer between regions. This can affect your AWS costs, and the prices are different depending on the source region of the transfer. For example, in March 2013, transferring data out of U.S regions will cost 0.02 USD/GiB and can climb up to 0.16 USD/GiB out of the South America region.
As an extreme example: You have an instance with 4 x TiB EBS volumes attached to it. The volumes are 75% full. There is an average of 3% daily change in data for all the volumes. This brings the total size of the daily snapshots to around 100 GiB. Locally you take 4 backups a day. In terms of cost and time, it will not make much of a difference if you take one backup a day or four, which is true also for copying snapshots, since that operation is incremental as well. Now you want a DR solution for this instance. Copying it every time will copy around 100 GiB a day. You need to calculate the price of transferring 100 GiB a day and storing them at the remote region on top of the local region.
You want to define your recovery objectives both in local backup and DR according to your business needs. However, you do have to take costs and feasibility into consideration. In many cases, it is ok to say: For local recovery, I want frequent backups, four times a day, but for DR recovery it is enough for me to have a daily copy of my data. Or, maybe it is enough to have DR every two days. There are two ways to define such a policy using N2W:
In the definition of your policy, select the frequency in DR Frequency (backups). If the policy runs four times a day, configure DR to run once every four backups. The DR status of all the rest will be Skipped.
Or, define a special policy for the DR process. If you have a sqlserver1 policy, define another one and name it something like sqlserver1_dr. Define all targets and options the same as the first policy, but choose a schedule relevant for DR. Then define DR for the second policy. Locally it will not add any significant cost since it is all incremental, but you will get DR only once a day.
To perform DR recovery, you will need your N2W server up and running. If the original server is alive, then you can perform recovery on it across regions. You want to prepare for the case where the N2W server itself is down. You may want to copy your N2W database across regions as well. Generally, it is not a bad idea to place your N2W server in a different region than your other production data. N2W has no problem working across regions and even if you want to perform recovery because of a malfunction in only one of the AZs in your region, if the N2W server happens to be in that zone, it will not be available.
To make it easy and safe to back up the N2W server database, there is a special policy named cpmdata. Although N2W supports managing multiple AWS accounts, the only account that can back up the N2W server is the one that owns it, i.e., the account used to create it. Define a new policy and name it cpmdata (case insensitive), and it will automatically create a policy that backs up the CPM data volume.
Application consistency is disabled by default for the cpmdata policy. When enabled, N2W will run application-consistent scripts. See section 4.2.1.
Not all options are available with the cpmdata policy, but you can control Scheduling, Number of generations, and DR settings.
When setting these options, remember that at the time of recovery you will need the most recent copy of this database, since older ones may point to snapshots that no longer exist and not have newer ones yet. Even if you want to recover an instance from a week ago, you should always use the latest backup of the cpmdata policy.
DR recovery is similar to regular recovery with a few differences:
When you select Recover for a backup that includes DR (DR is in Completed state), you get the same Recovery Panel screen with the addition of a drop-down list.
The DR Region default is Origin, which will recover all the objects from the original backup. It will perform the same recovery as a policy with no DR.
When choosing one of the target regions, it will display the objects and will recover them in the selected region.
N2W Software strongly recommends that you perform recovery drills occasionally to be sure your recovery scenario works. It is not recommended that you try it for the first time when your servers are down. Each policy on the policy screen shows the last time recovery was performed on it. Use the last recovery time data to track recovery drills.
Volume recovery is the same in any region. For instance recovery, there are a few things that need consideration. An EC2 instance is typically related to other EC2 objects:
Image ID (AMI)
Key Pair
Security Groups
Kernel ID
Ramdisk ID
These objects exist in the region of the original instance, but they do not mean anything in the target region. To launch the instance successfully, you will need to replace these original objects with ones from the target region:
Image ID (AMI) - If you intend to recover the instance from a root device snapshot, you will not need a new image ID. If not (as in all cases with Windows and instance store-based instances), you will need to type a new image ID. If you use AMIs you prepared, you should also prepare them at your target regions and make their IDs handy when you need to recover. If needed, AMI Assistant can help you find a matching image. See section 10.4.4.
Key Pair - You should have a key pair created with AWS Management Console ready so you will not need to create it when you perform a recovery.
Security Groups - In a regular recovery, N2W will remember the security groups of the original instance and use them as default. In DR recovery, N2W cannot choose for you. You need to choose at least one, or the instance recovery screen will display an error. Security groups are objects you own, and you can easily create them in AWS Management Console. You should have them ready so you will not need to create them when you perform recovery. See section .
Kernel ID - Linux instances need a kernel ID. If you are launching the instance from an image, you can leave this field empty, N2W will use the kernel ID specified in the AMI. If you are recovering the instance from a root device snapshot, you need to find a matching kernel ID in the target region. If you do not do so, a default kernel will be used, and although the recovery operation will succeed and the instance will show as running in AWS Management Console, it will most likely not work. AMI Assistant can help you find a matching image in the target region. See section . When you find such an AMI, copy, and paste its kernel ID from the AMI Assistant window.
RAMDisk ID - Many instances do not need a RAM disk at all and this field can be left empty. If you need it, you can use AMI Assistant the same way you do for Kernel ID. If you’re not sure, use the AMI Assistant or start a local recovery and see if there is a value in the RAMDisk ID field.
DR of instances from Africa (Cape Town) and Asia Pacific (Hong Kong) might fail when using an Assuming Account.
N2W can add a tag with an AMI ID to a resource during backup. The tag will hold the AMI ID that is expected to be present on the AWS account in case of recovery to a different AWS account.
Example of tag format that will be used only on the region/account combination specified:
In this case, the region and account are optional.
Example of tag format for a tag that will be used on any region/account combination:
When this tag is found and there is no other proper option for instance recovery, N2W then uses this AMI if the recovery region and account fits.
The AMI with an ID that is provided in the value of the tag is expected to be available on the other AWS account while recovering the instance.
N2W supports DR of encrypted EBS volumes. If you are using AWS KMS keys for encryption:
N2W will seek a KMS key in the target region, which has the same alias.
The AWS ID of the DR account should be added to the ‘Other AWS accounts’ section on a Backup account.
To configure your cross-region DR:
Create a matching-alias key in the source and in the remote region for N2W to use automatically in the DR copy process:
If a matching key is not found in the target region, the DR process will fail.
If the key uses the default encryption, then it will be copied to the other region with the default encryption key as well.
N2W supports copy of AMIs with encrypted volumes with the same logic it uses for volumes.
N2W supports cross-region DR of encrypted RDS databases.
To add the AWS ID of the DR account to the ‘Other AWS accounts’ section of KMS on a Backup account:
Log on to your Backup AWS account and navigate to the KMS console.
Select your Customer managed keys.
Go to the Other AWS accounts section.
Select Add other AWS accounts.
In the box, enter the AWS account ID of the DR account.
To let N2W see keys and aliases, add these two permissions to the IAM policy that N2W is using: kms:ListKeys, kms:ListAliases.
To support the usage of a custom encryption key for DR, do the following in AWS:
In the account where the custom key resides:
Go to KMS and browse to the key you wish to share.
Go to Other AWS accounts at the bottom of the page and select Add other AWS accounts.
Add the Id of the DR account you wish to share the key with.
Go to the volume you wish to copy to the DR account and/or region and add the following tag:
The tag’s “key” = cpm_dr_encryption_key
The tag’s “value” = The full arn of the encryption key you shared in step #1, for example, arn:aws:kms:us-east-1:123456789101:key/2eaadfb1-b630-4aef-9d90-2d0fb2061e05
To recover an EFS with a non-default KMS, in AWS KMS, in the Key user field, select Add and choose “AWSBackupDefaultServiceRole”.
Let’s assume a real disaster recovery scenario: The region of your operation is completely down. It means that you do not have your instances or EBS volumes, and you do not have your N2W Server, as it is down with all the rest of your instances. Here is Disaster Recovery step by step:
In the AWS Management Console:
Find the latest snapshot of your cpmdata policy by filtering snapshots with the string cpmdata. N2W always adds the policy name to any snapshot’s description.
Sort by Started in descending order and it will be the first one on the list.
Create a volume from this snapshot by right-selecting it and choosing Create Volume from Snapshot. You can give the new volume a name so it will be easy to find later.
Launch a new N2W Server at the target region. You can use the page to launch the AWS Marketplace AMI. Wait until you see the instance in running state.
As with the regular configuration of an N2W server:
Connect to the newly created instance using HTTPS.
Approve the SSL certificate exception. Assuming the original instance still exists, N2W will come up in recovery mode, which means that the new server will perform recovery and not backup.
With a working N2W server, you can perform any recovery you need at the target (current) region:
Select the backup you want to recover.
Select Recover.
If your new server allows backup (it can happen if you registered to a different edition or if the original one is not accessible), it can start to perform backups. If that is not what you want, it is best to disable all policies before you start the recovery process.
DR is a straightforward process. If DR fails, it probably means that either a copy operation failed, which is not common, or that the process timed-out. You can track DR’s progress in the Recovery Monitor Log screen where every stage and operation during DR is recorded:
You can also view DR snapshot IDs and statuses in theView Snapshots screen of the Backup Monitor:
Every DR snapshot is displayed with region information and the IDs of both the original and the copied snapshots. In the Snapshots list, you can choose to Delete All AWS Snapshots in This Backup.
If DR fails, you will not be able to use DR recovery. However, some of the snapshots may exist and be recoverable. You can see them in the snapshots screen and, if needed, you can recover from them manually.
If DR keeps failing because of timeouts, you may need to increase the timeout value for the relevant policy. The default of 24 hours should be enough, but there may be a case with a very large amount of data, that may take longer.
You can only copy a limited number of snapshots to a given region at one time. Currently, the number is 5. If the limit is reached, N2W will wait for copy operations to finish before it continues with more of them which can affect the time it takes to complete the DR process.
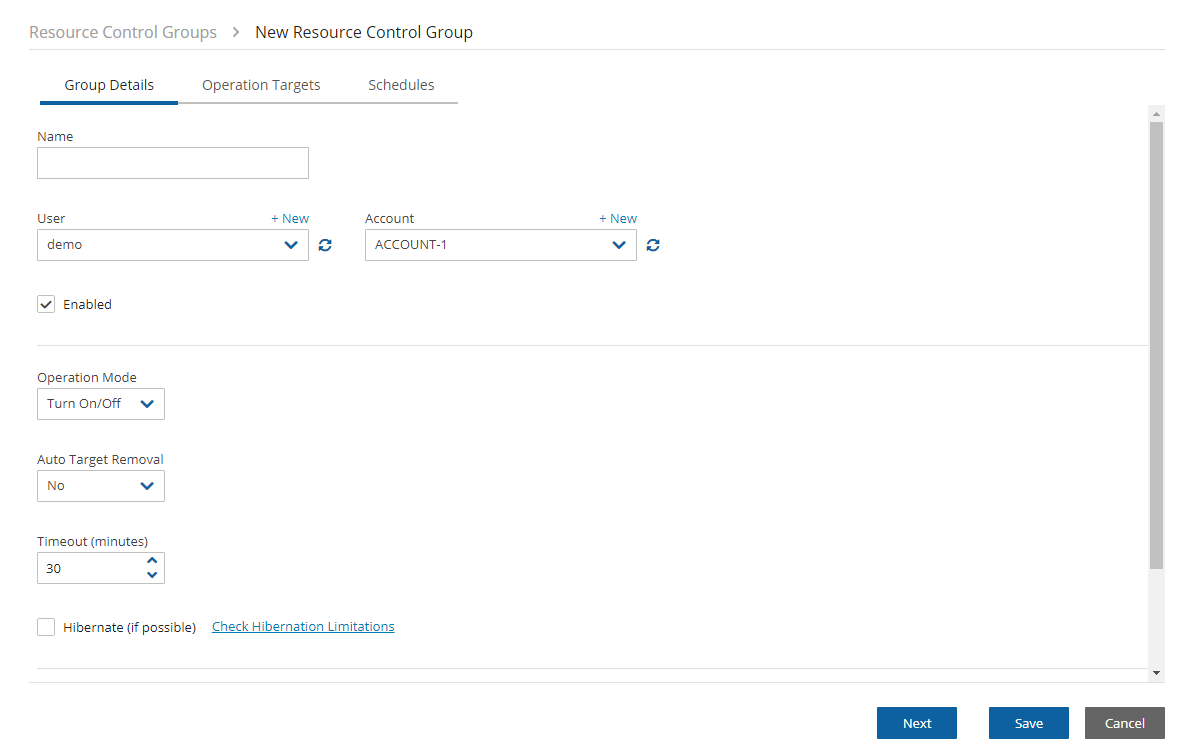
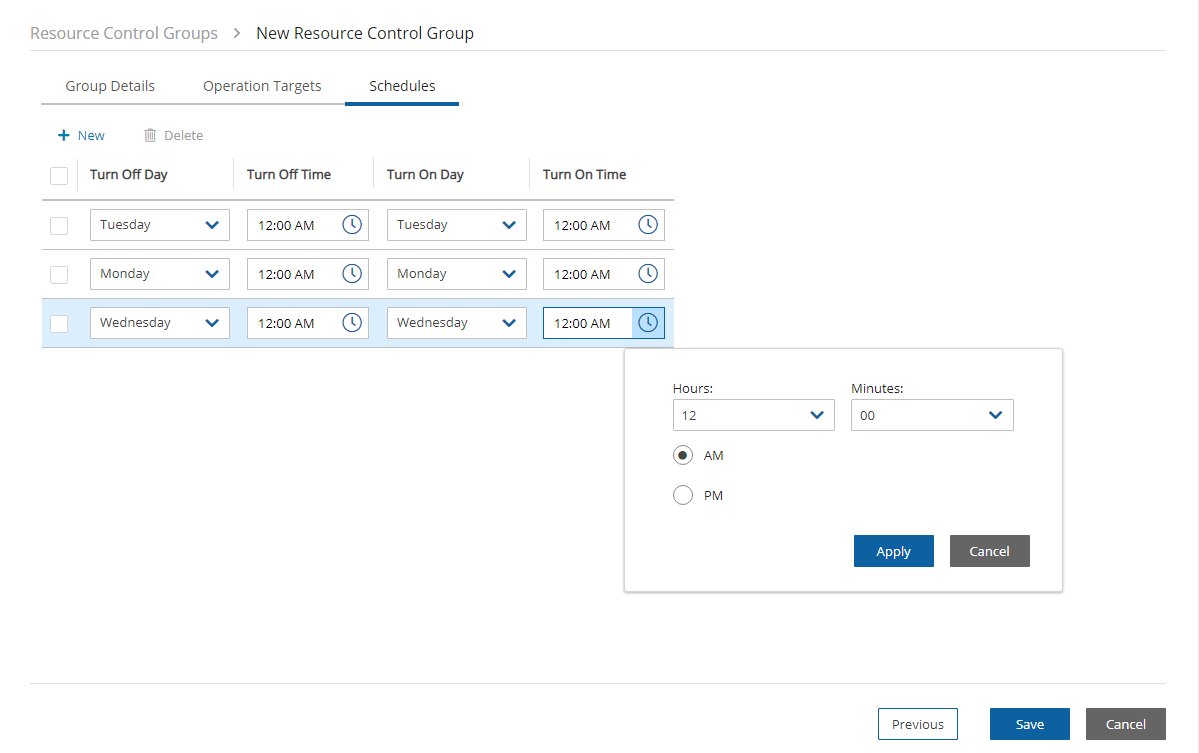
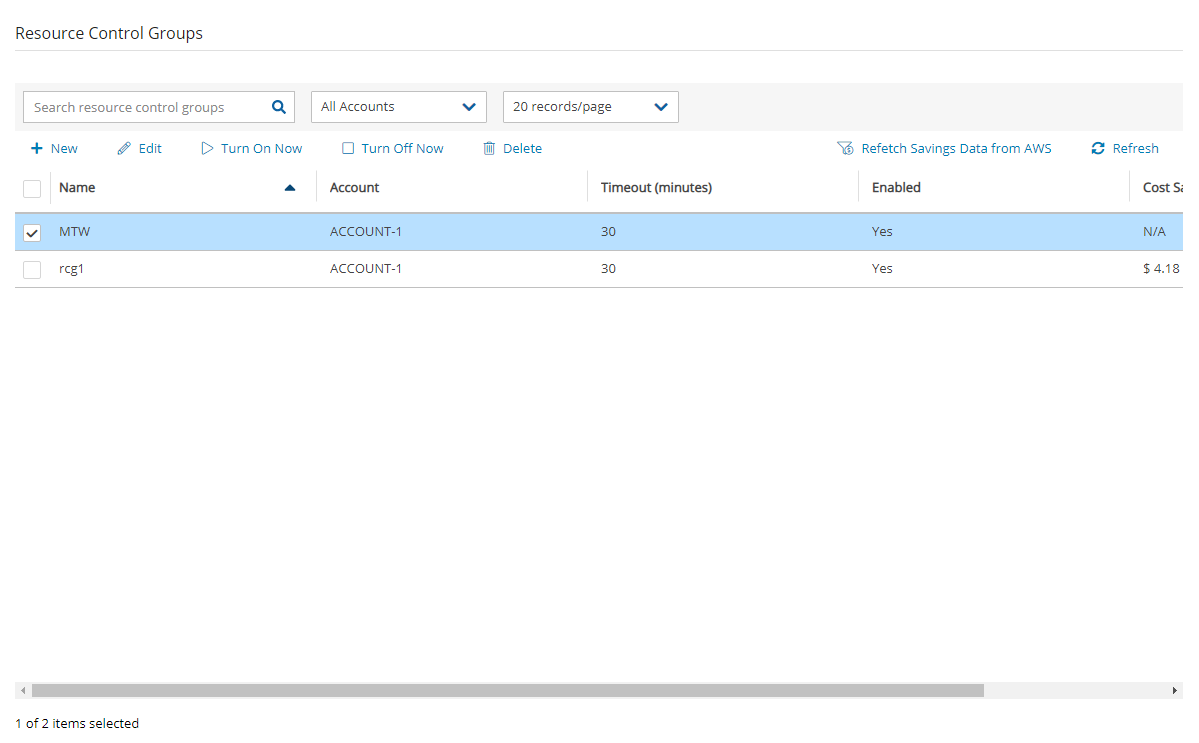
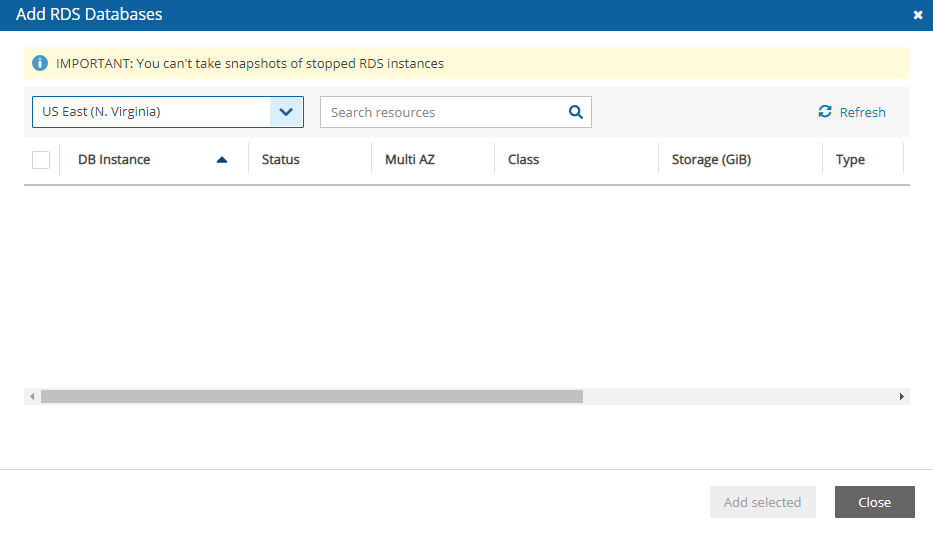
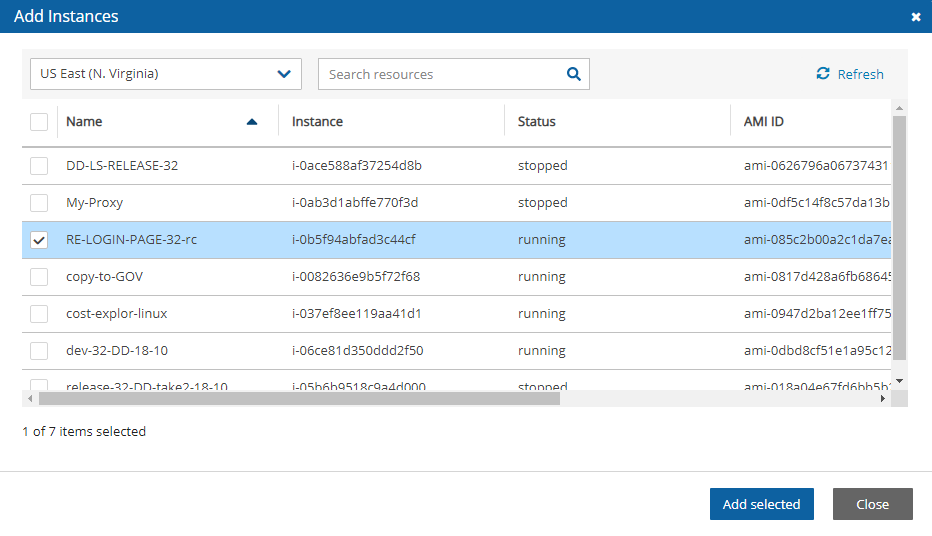

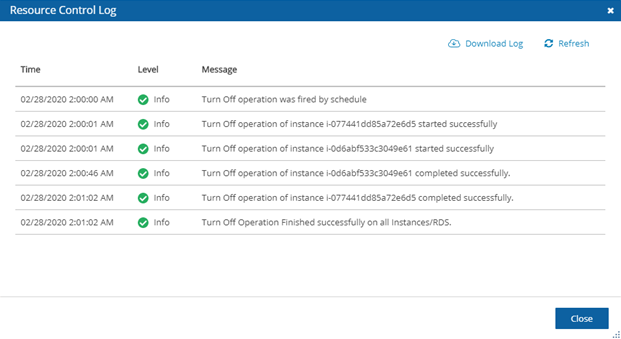
Here we cover some backup topics that haven't been addressed earlier.
The N2W server runs in a VPC, except in old environments utilizing EC2 Classic. For N2W to work correctly, it will need outbound connectivity to the Internet. To use AWS endpoints, see AWS Regions and Endpoints.
You will need to provide such connectivity using one of the following methods:
Attaching an Elastic IP.
Using a dynamic public IP, which is not recommended unless there is a dynamic DNS in place.
Enabling a NAT configuration, or
You will need to access it using HTTPS to manage it and possibly SSH as well, so some inward access will need to be enabled.
If you will run Linux backup scripts on it, it will also need network access to the backed-up instances.
If N2W backup agents will need to connect, they will need access to it (HTTPS) as well.
If backup scripts are enabled for a Linux backed-up instance, it will need to be able to get an inbound connection from the N2W Server.
If a Thin Backup Agent is used in a Windows backed-up instance, the agent will need outbound connectivity to the N2W Server.
N2W continues to back up instances even if they are stopped. This may have important implications:
If the policy has backup scripts and they try to connect to the instance, they will fail, and the backup will have Backup Partially Successful status.
If the policy has no backup scripts and VSS is not configured, or if the policy’s options indicate that Backup Partially Successful is considered successful (section ), the backup can continue running, and automatic retention will delete older backups. Every new backup will be considered a valid backup generation.
N2W recommends that if you are aware of an instance that will be stopped for a while, you disable the policy by selecting its name and changing status to disabled.
Another way to proceed is to make sure the policy is not entirely successful when the instance is stopped by using backup scripts and to keep the default stricter option that treats script failure as a policy failure. This will make sure that the older generations of the policy, before it was stopped, will not be deleted.
If you disable a policy, you need to be aware that this policy will not perform backup until it is enabled again. If you disable it when an instance is stopped, make sure you enable it again when you need the backup to resume
Backups belonging to a policy eventually get deleted. Every policy has its number of generations, and the retention management process automatically deletes older backups.
To keep a backup indefinitely and make sure it is not deleted, move it to the Freezer. There can be several reasons to freeze a backup:
An important backup of an instance you already recovered from so you will be able to recover the same instance again if needed.
A backup of interest, such as the first backup after a major change in the system or after an important update.
You want to delete a policy and only keep one or two backups for future needs.
To move a backup to the Freezer:
Once a backup is moved to the freezer, you will not be able to move it back.
In the left panel, select the Backup Monitor tab.
Select the backup and then select Move to Freezer.
Type a unique name and an optional description for identification and as keywords for searching and filtering later.
After a backup is in the Freezer:
Frozen backups are identified by the frozen symbolin the Lifecycle Status column of the Backup Monitor tab.
It will only be deleted if you do so explicitly. Use Delete Frozen Item.
If you delete the whole policy, frozen backups from the policy will remain.
While in the Backup Monitor, you can switch between showing backup records 'in the Freezer' by turning on and off the toggle key and backup records 'not in the Freezer' by turning on and off the toggle key in the Show area on the far right of the filters line.
Automatic Cleanup allows you to manage the frequency of the cleanup process and the:
Number of days to keep backup records, even if the backup is deleted.
Number of days after which to rotate single AMIs.
Keeping backups for long periods of time can cause the N2W database to grow and therefore affect the size you need to allocate for the CPM data volume. N2W Software estimates that every GiB will accommodate the backup of 10 instances. N2W Software estimates that 10 instances are correct when every record is kept for around 30 days. If you want to keep records for 90 days, triple the estimate, i.e., for 10 instances make the estimate 3 GiB, for 20 make the estimate 6 GiB, etc.
To manage the number of generations saved:
In the toolbar, select Server Settings.
In the General Settings tab, select Cleanup.
In the Cleanup Interval list, select the number of hours between cleanup runs. Select Cleanup Now to start a cleanup immediately.
The number of days is counted since the backup was created and not deleted. If you want to make sure every backup record is saved for 90 days after creation, even if it was already deleted, select 90.
The S3 Cleanup runs independently according to the retention period configured for the policy in the backup copy settings. See section . The last S3 Cleanup log however is available in the Cleanup tab.
Backing up independent volumes in a policy is performed regardless of the volume's attachment state. A volume can be attached to any instance or not attached at all, and the policy will still back it up. Backup scripts can determine which instance is the active node of a cluster and perform application quiescence through it.
If you enable the Exclude volumes option in the Tag Scan tab of the General Settings:
The Exclude volumes option overrides the exclusion of volumes performed through the UI.
Following are the ways to exclude volumes from backup:
Enabling the Exclude volumes option in General Settings:
In the toolbar, select Server Settings > General Settings.
In the
To perform certain actions on Asia Pacific (Hong Kong) and Middle East (Bahrain) AWS regions, managing Session Token Services (STS) is required, as Session Tokens from the global endpoint () are only valid in AWS Regions that are enabled by default.
For AWS Regions not enabled by default, users must configure their AWS Account settings.
To configure AWS Account settings to enable Session Tokens for all regions:
Go to your AWS console and sign in at
In the navigation pane, select .
In the ‘Security Token Service (STS)’ section, select Change Global endpoint.
Session tokens that are valid in all AWS regions are larger. If you store session tokens, these larger tokens might affect your system.
For more information on how to manage your STS, see
You can automatically synchronize S3 buckets using the N2W S3 Bucket Sync feature. When the policy backup runs, N2W will copy the source bucket to the destination bucket, without creating a backup. The buckets are selected and configured in Backup Targets of the Policies tab.
Bucket versioning is not supported. The latest version is automatically selected.
If the source S3 bucket object is of the storage class Glacier or Deep Archive, it is not possible to synchronize the bucket. It is necessary to retrieve and restore the object before synchronizing the bucket.
There is a time limitation when syncing between 2 S3 buckets. N2W will continue performing the synchronization as long as the Maximum session duration for the AWS Role is not exceeded. In the AWS IAM Console, go to the Roles Summary of the CPM instance and select Edit to configure the parameter.
To synchronize S3 buckets:
In the Policies tab, select a policy and then select the Backup Targets tab.
In the Add Backup Targets menu, select S3 Bucket Sync. The Add S3 Bucket Sync screen opens.
Choose one or more buckets, and select Add selected. Selected buckets are removed from the table.
If you change the Storage Class of an S3 Bucket in the Policies tab, the Storage Class of an existing destination bucket will not automatically update during the next S3Sync run. In the Policies tab, select the S3 Bucket Sync object, and then select Configure.
After the Policy has run, view the backup log to see the S3Sync details.
The destination S3 bucket policy must have two entries allowing the source account access to the bucket and the objects in the bucket.
If either entry under Resource is missing, the S3 Sync will fail.
For details, see:
For cross-account S3 Bucket Sync:
If using a custom KMS, allow the same in the destination bucket policy.
Cross-account S3 Bucket Sync is executed with the account of the policy, not the account of the destination S3 bucket, and requires cross-account access permissions to objects that are stored in the destination S3 bucket. For further information, see:
SAP HANA Database is an in-memory relational database that can run on an AWS EC2 instance.
N2W creates and stores both an EC2 instance and SAP HANA database snapshots as part of a policy backup. SAP HANA snapshots are stored to an AWS Storage Repository. Backups are always full to enable fast restores.
Currently, AWS only supports one backup of an SAP Hana database in parallel. For the time being, N2W allows adding an SAP Hana database to only one Policy.
Complete the following prerequisites before creating SAP HANA policies:
AWS Command Line Interface (AWS CLI) Installation
The latest version of the AWS Command Line Interface (AWS CLI) must be installed and functional on the target instance.
To install or update, see l
SSM Agent Installation
SAP HANA policies require the installation of SSM agent on the EC2 instance before it is added to an N2W policy. AWS Backint agent configuration is performed by N2W at the time of policy configuration if the target instance is running. SAP HANA backup commands are sent to EC2 instances.
To install and run an SSM agent, see
To check the status of the SSM Agent, see
The Backint configuration and the backup will fail if the target EC2 instance is stopped.
N2W to SAP HANA EC2 instance communication is completed via an SSM agent. Therefore, assign an SSM IAM role with proper permissions to both N2W and the EC2 instance running SAP HANA. See section .
To support cross-account backups, configure the S3 bucket policy with the following permissions:
An SAP Hana database may be added to only one policy. See note in section .
Before creating the policy, retrieve the Instance ID and Instance Number from the SYS.M_SYSTEM_OVERVIEW table in the SAP HANA SYSTEMDB database:
You can also check the following path: /hana/shared/<SID>/HDB<instance>/. In this case, the path is /hana/shared/HXE/HDB90/.
To back up an SAP HANA database:
Ensure that the target EC2 instance is running at the time of backup.
1. In the Policy tab, add the EC2 instance to the selected policy.
2. In the Backup Targets tab, select the instance, and then selectConfigure.
3. Select Enable SAP HANA Backup and complete the configuration:
SAP HANA SYSTEMDB User – SAP HANA System DB username.
Password – SAP HANA System DB password.
SAP HANA SID – SAP HANA System ID as shown in the SYS.M_SYSTEM_OVERVIEW table of the SYSTEMDB database.
4. Select Apply, and then select Save.
Additional permissions are required for RDS Custom backup and restore operations:
s3:CreateBucket
s3:PutBucketPolicy
s3:PutBucketObjectLockConfiguration
For full details about setting up your RDS Custom database for an SQL Server environment, see
In this section, you will learn how to use a Amazon Virtual Private Cloud (VPC) to launch AWS resources into a logically separate virtual network.
The capturing and cloning of Network Environments (VPCs, Transit Gateways, and Load Balancers (LBs)) is not available with the Free edition of N2W.
VPC is an AWS service that allows the definition of virtual networks in the AWS cloud. Users can define VPCs with a network range, define subnets under them, security groups, Internet Getaways, VPN connections, and more. One of the resources of the VPC service is also called ‘VPC’, which is the actual virtual, isolated network.
N2W can capture the VPC and Transit Gateway settings as root resources, including their related resources of user environments and clone those settings back to AWS:
In the same region and account, for example, if the original settings were lost.
To another region and/or account, such as in DR scenarios.
With VPC resource properties modified in template uploaded with CloudFormation, if required.
LBs are located under the EC2 AWS service. Users can define LBs with Listeners and Target Groups. Following are the types of LBs:
Classic
V2 which includes subtypes Application, Network and Gateway.
N2W can capture LBs of all types, including their related resources and clone those settings back to AWS:
In the same region and account, for example, if the original settings were lost.
To another region and/or account, such as in DR scenarios.
With LB resource properties modified in a template uploaded with CloudFormation, if required.
Once enabled from General Settings, N2W will automatically capture network environment settings at pre-defined intervals, such as for cleanup and tag scanning. The root/admin user can enable the feature in the Capture Network Environments tab of the General Settings screen and set the interval of captures. Capture settings are enabled at the account level, by default, same as tag scanning.
Because Network Environment configuration metadata is small, it does not consume a lot of resources during storage of the capture. Metadata is captured incrementally. If nothing changed since the last capture, the metadata will not be captured again. This is the most common case in an ongoing system, where defined networks do not change frequently.
Regions - N2W will only capture Network Environment settings in regions that include backed-up resources. If the customer is not backing up anything in a specific region, N2W will not try to capture the VPC settings there.
Retention - N2W will retain the Network Environment data if there are backups requiring it. If N2W still holds backups from a year ago, the capture version relevant for that time is still retained. Once there are no relevant backups, N2W will delete the old captured data.
CloudFormation - N2W will use the AWS CloudFormation service to clone a Network Environment’s root entities (VPCs, Transit Gateways, and LBs) to an AWS account and region. N2W will create a CloudFormation template with the definitions for the entities and use the template to launch a new stack and create all the settings of the root entities in one operation.
Limitations:
On Transit Gateways, attachments of type 'Direct Connect Gateways' are not supported.
The objective of Capture and Clone is to provide the ability to protect the root entities of Network Environment types (VPCs, Transit Gateways, and LBs) from disaster, by saving their configurations and allowing for recovery in any region.
Backed up VPC entities include:
VPC resource configuration
Subnets - N2W tries to match AZs with similar names and spread subnets in destinations in the same way as in source regions.
The Capture Log in the Capture Network Environments tab of General Settings reports the capture status of entities: captured, not captured, or only partially captured.
Backed up Transit Gateway entities include:
Transit Gateway resource configuration
Related VPCs and related resources to VPC - See above.
By default, Accounts are enabled to Capture Network Environment environment data. Configuration data is a automatically captured for all enabled Accounts according to the interval configured in the General Settings. To not Capture Network Environments for an Account, disable the feature in the Account.
To disable, or enable, an individual account for capturing Network Environments:
Select the Accounts tab, and then select an Account.
Select Edit.
Select Capture Network Environments to enable, or clear to disable.
The root user can:
Enable or disable automatic capture of Network Environment entities for Accounts with the feature enabled.
Schedule automatic capture interval.
Initiate an ad hoc capture by selecting Capture Now for all Accounts with this feature enabled, even if Network Environments is disabled in General Settings.
Select Server Settings > General Settings.
In the Capture Network Environments tab, select Capture Network Environments to enable the feature.
To change the capture frequency from the default, select a new interval from the Capture Interval list. Valid choices are from every hour to every 24 hours.
Cloning Network Environment entities include the following features:
Both cross-region and cross-account cloning are supported for VPCs, Transit Gateways, and LBs.
The target clone can have a new name. The name will automatically include ‘Clone of ’ at the beginning.
The following entities are not supported:
Inbound and Outbound Endpoint rules of Security Groups.
Inbound and Outbound rules of Security Groups that refer to a security group on a different VPC.
Route Table rules with NAT Instance as target.
Prerequisites, Conditions, and Limitations
Before cloning, verify that the destination region has sufficient quotas for all resources captured in the source region.
Cloning a VPN connection with an Authentication type other than 'Pre Shared Keys' is not supported. Attempting to clone this VPN connection requires manually replacing it after cloning.
When cloning a VPC Peering Connection, the accepter VPC must exist in the peer destination region. Download and edit the CloudFormation template.
An account with Capture Network Environments enabled must have at least one policy with a backup target to clone Network Environment entities. If no backup target is configured, the Network Environment entities will not be captured even if Enable Network Capture is enabled.
Cloning VPCs includes the following features:
The target clone can have a new name. The name will automatically include ‘Clone of’ at the beginning.
During instance recovery and DR, clones may be optionally created to replicate a particular VPC environment before the actual instance recovery proceeds. The new instance will have the environment of the cloned VPC and will subsequently appear at the top of the target region and account list. A typical scenario might be to capture the VPC, clone the VPC for the first instance, and then apply the cloned VPC to additional instances in the region/account.
Instances recovered into a cloned VPC destination environment will also have new default entities, such as the VPC’s subnet definition and 1 or more security groups attached to the instance, regardless of the original default entities. Security groups can be changed during recovery.
The following item is not supported:
Capturing and Cloning Transit Gateways on the following regions is not supported: Osaka, Jakarta, the Government regions, and China regions.
Instructions and limitations:
You can reuse the existing VPCs related to the Transit Gateway by selecting the relevant check box on the Clone page.
It is not possible to clone a Transit Gateway where the number of unique AZ references in the resources is greater than the number of AZs in the Clone region. Download and edit the CF template.
Transit Gateway peer attachment is not supported if cloned Transit Gateway is an Accepter and not a Requester.
An account with Capture Network Environments enabled must have at least one policy with a backup target for cloning Network Environment entities.
Instructions and limitations:
You can reuse the existing VPCs related to the LB by selecting the related check box on the Clone page. When selected, you can choose whether to attach the existing original instances to the cloned LB.
It is not possible to clone an LB where the number of unique AZ references in the resources is greater than the number of AZs in the Clone region. Download and edit the CF template.
If a related VPC is cloned (i.e., the existing VPCs were not reused) and the original includes VPN Connections, you will need to re-establish the connections using the new configuration for the VPN tunnels.
The 'lambda:InvokeFunction' permission will be added to the existing Lambda function during cloning.
On a Classic LB clone, the Policy may not have information such as Instance Ports or LB Ports that can’t be cloned due to CloudFormation limitations. The missing data is indicated in the clone’s Download Log.
On a V2 LB clone, the Listener’s tags are not cloned due to CloudFormation limitations. The missing data is indicated in the clone’s Download Log.
An account that has Capture Network Environments enabled must have at least one policy with a backup target to clone Network Environments entities.
When cloning Network Environment entities to an AWS account, N2W generates a JSON template for use with CloudFormation (CF).
If the size of the CF template generated is over 50 kB, N2W requires the use of an existing S3 Bucket in the target destination for storing the template. There should be an S3 bucket for each combination of accounts and regions in the destination clone. The template file in a S3 bucket will not be removed after cloning.
In addition to having a bucket in the target region in the presented settings, you must choose that bucket when defining where to Upload the CF template to S3.
To clone captured VPCs, Transit Gateways, or LBs:
Select the Accounts tab and then select an account.
Select Clone Network Entities.
In the Capture Source section Network Entity Type list, select VPC, Transit Gateway, or LB
When cloning VPCs. Transit Gateways, or LBs with resources not supported by N2W, you can download the CloudFormation template for the cloned entity, add or modify resource information, and upload the modified template to the AWS CloudFormation service manually.
To create a clone manually with CloudFormation:
In the Account Clone Network Entities screen, complete the fields as described above.
Select VPC/Transit Gateway/LB CloudFormation Template to download the CloudFormation JSON template.
Modify the template, as required. See the example in section .
N2W's tag-based backup management allows you to automatically fine-tune functionality.
Cloud and specifically AWS, is an environment based largely on automation. Since all the functionality is available via an API, scripts can be used to deploy and manage applications, servers, and complete environments. There are very popular tools available to help with configuring and deploying these environments, like Chef and Puppet.
N2W allows configuring backup using automation tools by utilizing AWS tags. By tagging a resource, such as EC2 instance, EBS volume, EFS, DynamoDB, or RDS instance, N2W can be notified of what to do with this resource without using the UI.
To tag Aurora clusters, tag one of the cluster’s DB instances, and N2W will pick it up and back up the entire cluster.
Since tagging is a basic functionality of AWS, it can be easily performed via the API and scripts. For more information on using the API or scripts, see https://docs.aws.amazon.com/AmazonRDS/latest/AuroraUserGuide/USER_Tagging.html
N2W supports both cpm backup and cpm_backup tags (section ) and custom tags (section ).
For Azure, the following options are not currently supported:
Custom tag
Exclude disk
Application awareness
For information on using tags with Resource Control, see section .
To automate backup management for a resource, you can add a tag to that resource named cpm backup (or cpm_backup).The tag is lower case with a space or an underscore. N2W will identify this tag and parse its content. In this tag you will be able to specify whether to:
Ignore the resource and remove it from all backup policies.
Add the resource to a policy or list of policies.
Create a new policy, based on an existing one (template), and then add the resource to it.
The policy name on the cpm backup or cpm_backup tag is case sensitive and should be aligned with the policy name create on CPM.
If an AWS resource has 2 AWS tags with the same tag name, differing only by the case of the letters (upper, lower), then N2W will back up just one tag. The tag name will be in the format of the first tag N2W scans, and the tag value may be from the second tag. Check that tag names are in the same case.
Following is a summary table of all cpm backup and cpm_backup tag values:
To add a resource (e.g., an EC2 instance) to an existing backup policy, all you need to do is to create the tag for this resource and specify the policy name. For example:
policy1: key:cpm backup, value:policy1 or key:cpm_backup, value:policy1 or
policy1: key:cpm_backup, value:policy1 or key:cpm_backup, value:policy1
To add the resource to multiple policies all you need to do is to add a list of policy names, separated by spaces: policy1 policy2 policy3
You can add an RDS target using the tag scan, but the resource will be added without the connection parameters. After the tag scan, you will need to configure the Connection Details in the policy manually. See
To create a new policy and to add the resource to it, add a new policy name with a name of an existing policy which will serve as a template (separated by semicolon): tag value: new_policy1:existing_policy1
You can also add multiple policy name pairs to create additional policies or create a policy (or policies) and to add the resource to an existing policy or policies.
When a new policy is created out of a template, it will take the following properties from it:
Number of generations
Schedules
DR configuration
It will not inherit any backup targets, so you can use a real working policy as a template or an empty one.
For Script definitions:
If backup scripts are defined for the template policy, the new one will keep that definition but will not initially have any actual scripts. You are responsible to create those scripts. Since the N2W server is accessible via SSH you can automate script creation. In any case, since scripts are required, the backups will have a failure status and will send alerts, so you will not forget about the need to create new scripts.
For Windows instances with a backup agent configured:
If that was the configuration of the original policy, the new instance (assuming it is a Windows instance) will also be assigned as the policy agent. However, since it does not have an authentication key, and since the agent needs to be installed and configured on the instance, the backups will have a failure status. Setting the new authentication key and installing the agent needs to be made manually.
Auto Target Removal for the new policy will always be set to yes and alert, regardless of the setting of the template policy. The basic assumption is that a policy created by a tag will automatically remove resources that do not exist anymore, which is the equivalent as if their tag was deleted.
When adding an instance to a policy, or creating a new policy from template, you may make a few decisions about the instance:
To create snapshots only for this instance.
To create snapshots with an initial AMI.
To schedule AMI creation only.
If this option is not set, N2W will assume the default:
Snapshots only for Linux.
Snapshots with initial AMI for Windows instances by adding a backup option after the policy name. The backup option can be one of the following values:
only-snaps
The only-amis option will create AMIs without rebooting them. The option only-amis-reboot will create AMIs with reboot.
For a Windows instance, you can also define backup with app-aware, i.e., a backup agent. It is used the same as the snapshots and AMI options.
When adding the app-aware option, the agent is set to the default: VSS is enabled and backup scripts are disabled.
app-aware-vss - Enable application consistent with VSS.
app-aware-script - Enable application consistent without VSS.
You can also combine the backup options: policy1#initial-ami#app-aware
EFS can be configured by creating the cpm backup (cpm_backup) tag with the following values. In this case, N2W will override the EFS configuration with the tag values:
Example:
N2W will back up EFS to the default vault, and set its expiration date to 1 day.
The max length for the cpm backup(cpm_backup) value is 256 characters.
By creating the cpm backup(cpm_backup) tag with the value no-backup (lower case), you can tell N2W to ignore the resource and remove this resource from all policies. Also, see section 14.1.
N2W can exclude a volume from an instance that is backed up on policy using the cpm backup(cpm_backup) tag with #exclude added to the end of the policy name value.
Add a tag to an instance that you want to back up:
Add a tag to volumes that you would like to exclude from being backed up:
For example, if instance1 has 3 volumes and has a cpm backup(cpm_backup) tag with the value policy1, adding the cpm backup(cpm_backup) tag with value policy1#exclude to a volume will remove it from the policy.
The instance with the excluded volume(s) will be added automatically as a backup target to the policy, after running Scan Tag.
Tagged instances are not included in the Exclude volumes option in the Tag Scan tab of General Settings and are excluded from backup only when tagged with #exclude for the policy.
Custom Tags allow N2W users to easily backup resources using any tag of their choice.
You can define any number of Custom Tags on a Policy definition.
Custom tags take precedence over cpm backup(cpm_backup) tags if both exist on a server.
Custom Tags are case-sensitive.
If the cpm backup(
To see which resources were added to back up, open the Tag Scan log (Show Log), and look for a Custom Tags match.
To create Custom Tags:
In the Policies tab, select a policy.
Select the More Options tab.
Turn on the Custom Tags toggle.
Tag scanning can only be controlled by the admin/root user. When the scan is running, it will do so for all the users in the system but will only scan AWS accounts that have Scan Resources enabled. This setting is disabled by default. N2W will automatically scan resources in all AWS regions.
In the General Settings tab, select the Tag Scan tab.
Select Scan Resources.
In the Tag Scan interval list, set the interval in hours for automatic scans.
Even if scanning is disabled, selecting Scan Now will initiate a scan.
If you do want automated scans to run, keep scanning enabled and set the interval in hours between scans using the General Settings screen. You will also need to enable Scan Resources for the relevant N2W Accounts. See section .
The following topics should help guide you when developing tags.
There are potential issues you should try to avoid when managing your backup via tags:
The first is not to create contradictions between the tags content and manual configuration. If you tag a resource and it is added to a policy, and later you remove it from the policy manually, it may come back at the next tag scan. N2W tries to warn you from such mistakes.
Policy name changes can also affect tag scanning. If you rename a policy, the policy name in the tag can be wrong. When renaming a policy, correct any relevant tag values.
When you open a policy that was created by a tag scan to edit it, you will see a message at the top of the dialog window: “* This policy was automatically added by tag scan”.
Even if all the backup targets are removed, N2W will not delete any policy on its own, since deletion of a policy will also delete all its data. If you have a daily summary configured (section ), policies without backup targets will be listed.
If the same AWS account is added as multiple accounts in N2W, the same tags can be scanned multiple times, and the behaviour can become unpredictable. N2W Software generally discourages this practice. It is better to define an account once, and then allow delegates (section ) access to it. If you added the same AWS account multiple times (even for different users), make sure only one of the accounts in N2W has Scan Resources enabled in N2W.
Sometimes you need to understand what happened during a tag scan, especially if the tag scan did not behave as expected, such as a policy was not created. In the General Settings screen, you can view the log of the last tag scan and see what happened during this scan, as well as any other problems, such as a problem parsing the tag value, that were encountered. Also, if the daily summary is enabled, new scan results from the last day will be listed in the summary.
Ensure tag format is correct. Tips for ensuring correct tag formats are:
When listing multiple policy names, make sure they are separated by spaces.
When creating new policy, verify using a colon ‘:’ and not a semi-colon ‘;’. The syntax is new_policy1:existing_policy1.
When working with Windows, it is important to understand some of its basic features.
From the point of view of the AWS infrastructure, there is not much difference between backing up Linux/Unix instances or Windows instances. You can still run snapshots on EBS volumes. However, there is one substantial difference regarding recovering instances:
In Unix/Linux instances, you can back up system volumes (root devices), and later launch instances based on the snapshot of the system volume. You can create an image (AMI) based on the system volume snapshot and launch instances.
This option is currently not available for Windows Servers. Although you can take snapshots of the system volume of a Windows Server, you cannot create a launchable image (AMI) from that snapshot.
Key=’cpm_dr_backup_vault:REGION’, Value =’BACKUP_VAULT_ARN’Key=’cpm_dr_backup_vault:REGION:ACCOUNT_NUMBER’, Value =’BACKUP_VAULT_ARN’Key = 'cpm_dr_recover_ami:REGION:ACCOUNT'; Value = 'ami-XXXXX'Key = ‘cpm_dr_recover_ami’; Value = 'ami-XXXXX'Complete the fields, entering the required information for the Account Type and Authentication method.
Enter at least 1 Import by Tags. All regions in the specified account will be scanned.
In the Target repository list, select the repository to import to.
In the Immediate Access Storage class list, select the storage type for this import. Default is Standard.
If Transition to Cold Storage is enabled, select an Archive Storage Class.
Show Import Log
Copying
Show Import Log
Completed without finding snapshots
Reconfigure; Import Dry Run
S3 running
S3 copy completed
Show Imported Snapshots
If needed, Delete EBS Snapshots
Deleting EBS snapshots
Show Import Log
Moved to S3
Show Imported Snapshots
Glacier initializing
Glacier running - in progress
Glacier running
Glacier partial
Show import Log
Glacier - expired snapshots deleted
Show import Log
Glacier - all snapshots deleted
Show import Log
Glacier OK
Show import Log
Glacier aborted
Show import Log
Pausing
If needed, Abort Copy to S3
Paused
Resume Import to continue, or
Abort Copy to S3 to stop
Failed
Show Import Log
[No symbol]
Indicates a backup policy


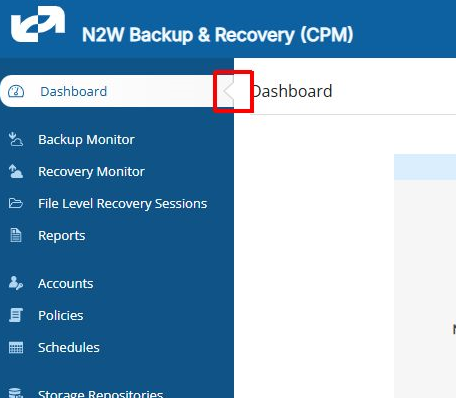
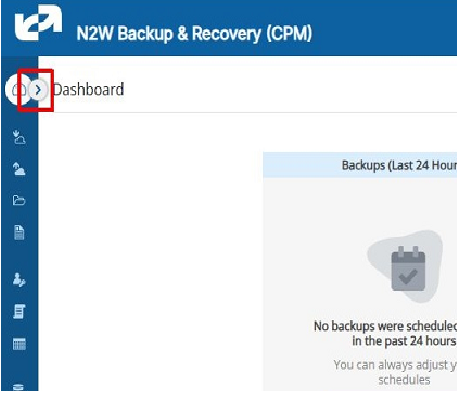

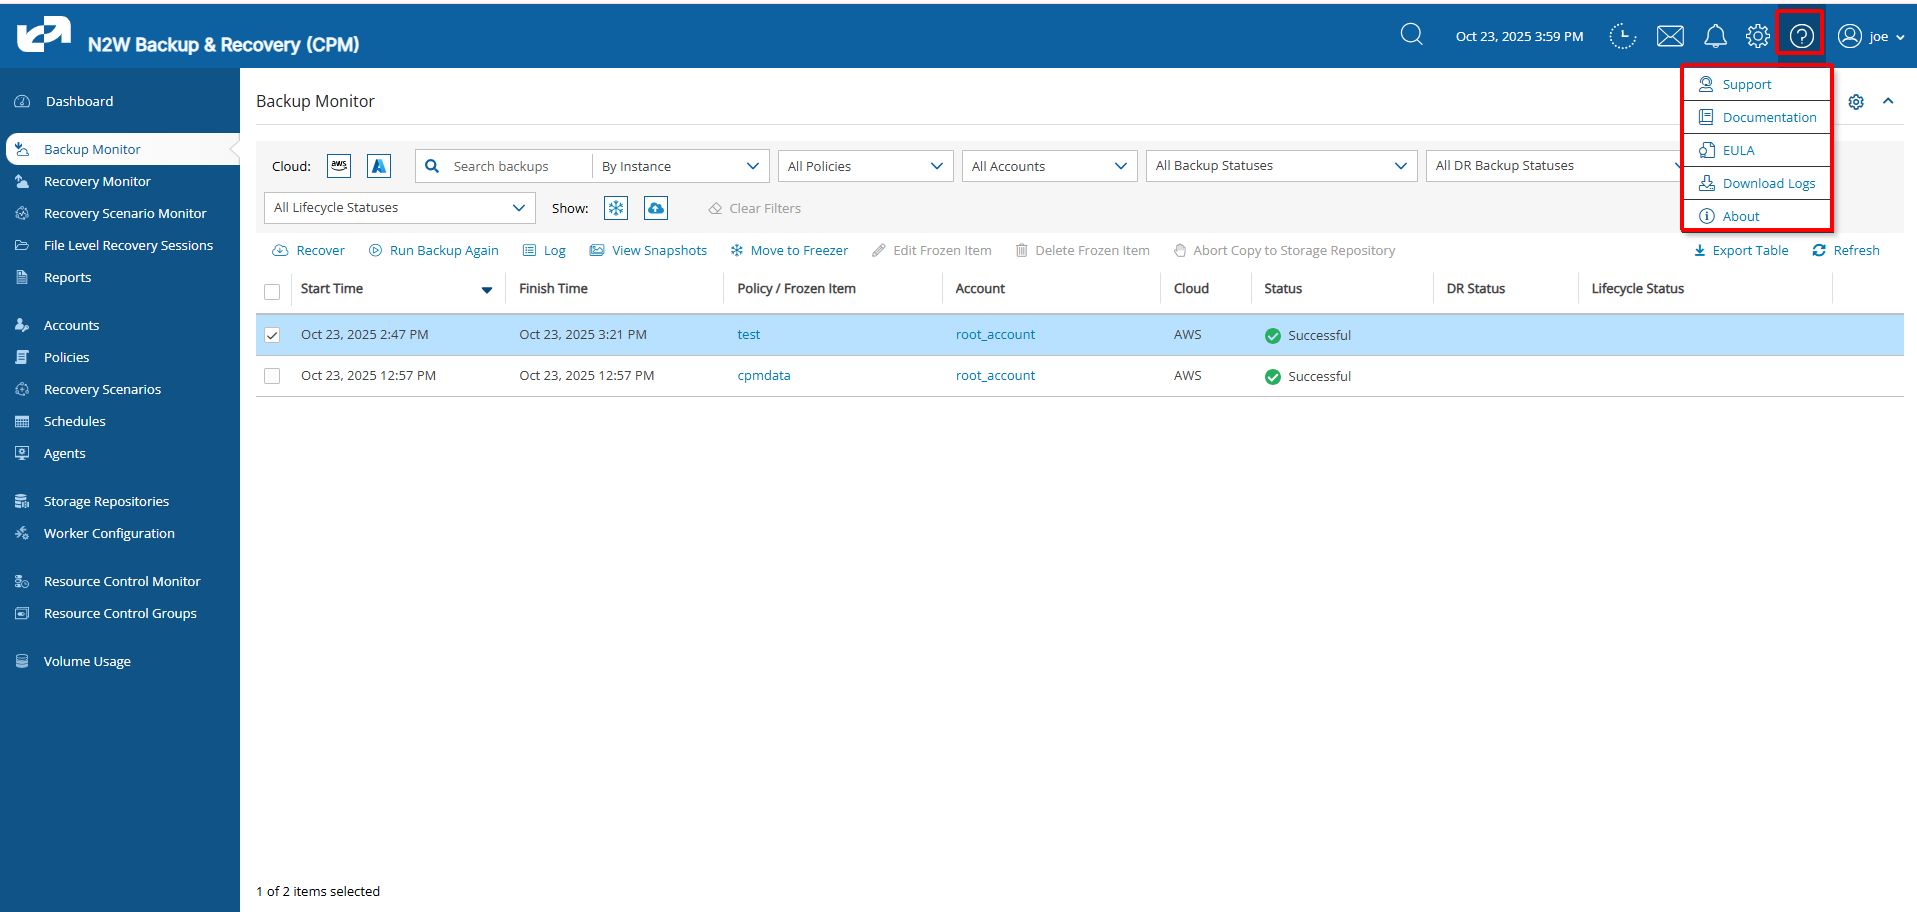
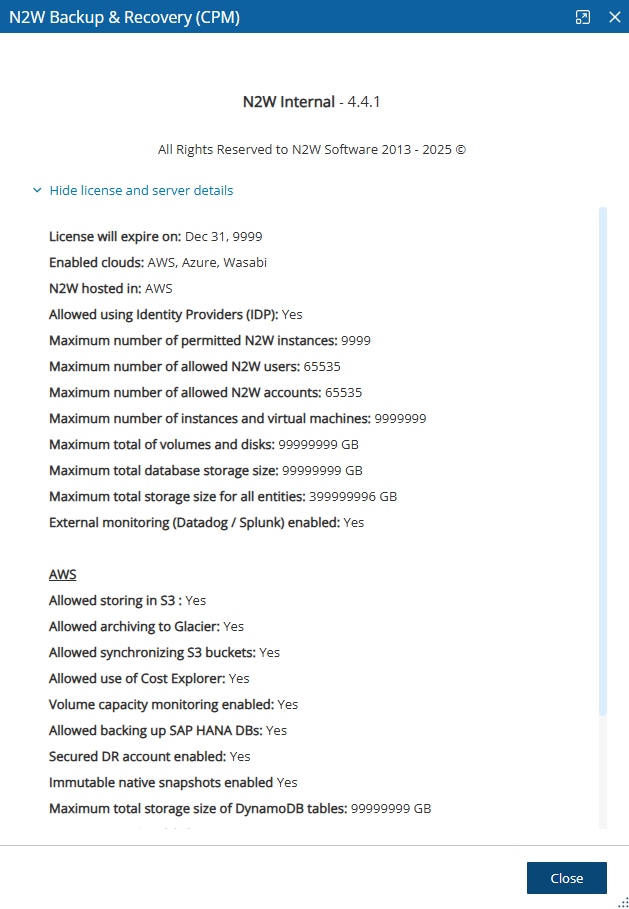
If you perform cross-region DR, you will need to have a key for each region as AWS does not allow sharing encryption keys across regions. The tag’s “key” should include the region where the key is. For example, an Ohio key tag will be key = cpm_dr_encryption_key:us-east-2, value = arn:aws:kms:us-east-1:123456789101:key/2eaadfb1-b630-4aef-9d90-2d0fb2061e05
If you are running the BYOL edition and need an activation key, most likely you do not have a valid key at the time, and you do not want to wait until you can acquire one from N2W Software. You can quickly register at N2W Free Edition. In step 2 of the registration, use your own username, and type a strong password (section 16.2.3.) In step 3, choose the volume you just created for the CPM data volume. Afterward, complete the configuration.
Choose the target region from the drop-down list.
You can recover all the backed-up objects that are available in the region.
Assuming the instance shuts down in an orderly manner and did not crash, backups will be consistent by definition.
Elements in the freezer will not be deleted by the automatic Cleanup process.
It is recovered the same way as from a regular backup.
You can search and filter frozen backups using as keywords the name or description. To change the name or description, select Edit Frozen Item.
In each list, select the number of days to:
Rotate Single AMIs
Keep Deleted Records
Keep User Audit logs
Keep Resource Control Records
To keep retry backup records for reporting, select Keep Retry Backup Records.
Disabling a scheduled backup time. See section 4.1.4.
Excluding a volume from a policy configuration in the UI. See section 4.2.3.
Using an ‘#exclude’ tag for the policy. See section 14.1.6.
In the Change region compatibility of session tokens for global endpoint dialog box, select Valid in all AWS Regions.
In the Backup Targets tab, for each newly added S3 bucket, select the bucket, and then select Configure. The Policy S3 Bucket Sync Configuration screen opens.
In the Sync Source section, you have options to enter a Source Prefix (Path) and to select whether to Keep Source Prefix at Destination. This option will allow you to combine the source prefix with the destination prefix. For example, if the source prefix is ‘/a/b’ and the destination prefix is ‘/c/d’, the objects will be synchronized to ‘a/b/c/d’.
In the Sync Destination section, configure the following, and then select Apply:
Region – Select the destination region to copy to.
Account – Select the destination account to copy to.
S3 Bucket – Select the destination bucket. The account for the destination bucket may be different than the account for the source bucket. See for cross-account S3 bucket sync.
Destination Prefix (Path) – Enter the destination prefix, if any. If a prefix is entered, the dynamic message under the box will display the destination prefix. If Keep Source Prefix at Destination was selected, the prefix will be the concatenation of the source and destination prefixes. For example, source prefix ‘abc’ and destination ‘xyz’ will result in a destination prefix of ‘abc/xyz’.
Storage Class – Select the S3 Storage Class or S3 Reduced Redundancy Storage:
Standard – For low latency and high throughput.
Reduced Redundancy - Enables customers to store non-critical, reproducible data at lower levels of redundancy than Amazon S3’s standard storage.
Standard IA - For data that is accessed less frequently, but requires rapid access. Ideal for long-term storage.
Delete Extra – Select to delete files that exist in the destination but not in the source during synchronization.
Allow access for the source account in the destination bucket by adding it to Access Control List in the AWS S3 console. To find the Canonical ID, in the AWS Account menu, go to My security credentials and scroll to Account identifiers.
SAP HANA Instance Number - SAP HANA Instance Number as shown in the SYS.M_SYSTEM_OVERVIEW table of the SYSTEMDB database.
SAP HANA S3 (Bucket) – S3 bucket repository for backup.
S3 KMS Key ARN – S3 KMS key attached to the selected bucket.
s3:PutBucketVersioning
cloudtrail:CreateTrail
cloudtrail:StartLogging
kms:Decrypt
kms:GenerateDataKey
Transit Gateway Policy Tables are not supported.
Capturing and cloning Transit Gateways in the following regions is not supported: China regions, Government regions, Jakarta, and Osaka.
The clone destination region should have sufficient quotas to hold all resources captured in the source region.
Shared Resource Limitations:
The following shared resources are not supported for cloning:
Shared Prefix lists
Shared Subnets
Shared Transit Gateway Multicast Domains
A shared Transit Gateway is supported only if the account providing the shared access is defined as a ‘CPM account’.
The clone of a Transit Gateway shared with a different account will be cloned to only one target account even though the original Transit Gateway was spread over 2, or more, AWS accounts.
Security groups
DHCP Options Sets - Not supporting multi-name in domain server name.
Route tables - Not supporting rules with entities that are specific to the source region.
Network ACLs
Internet Gateways
Egress-Only Internet Gateways
VPN Gateways
Customer Gateways
VPN Connections
NAT Gateways
VPC Peering connections - Not supporting peer on a different AWS account
Managed Prefix Lists
Transit Gateway attachments:
VPC
VPN
Peering Connection - Requires accepting connection on Peer
Connect
Transit Gateway Route Tables
Transit Gateway Multicast Domains
Related Network Interfaces
Custom Gateways
VPN Connections
NAT Gateways
VPC Peering connections - Not supporting peer on a different AWS account.
Managed Prefix Lists
Backed up LB entities include:
Related VPCs and their resources. See above.
Target Groups
Listeners
Network Environment capturing:
Accounts are enabled for Network Environment configuration capturing by default, but this setting can be disabled as needed.
Captures in all regions of interest, excluding the unsupported regions.
N2W will capture and save all changes made on AWS for a user’s VPCs, Transit Gateways, and LBs.
Not supported: Carrier gateways, Network interfaces related to VPCs, Elastic IP addresses, VPC Endpoints, VPC Endpoints services, Firewalls, and Traffic Mirroring.
Select Save.
View the last Network Environment entities captured in the different regions and accounts in Show Log.
Select Save to update N2W.
To initiate an immediate capture for all Network Environment-enabled Accounts regardless of server setting, select Capture Now.
Route Table rules with VPC peering connection as target.
Route Table rules with status 'Black Hole'.
When cloning a NAT Gateway with public connectivity, the Elastic IP allocation ID must exist and be available. Download and edit the CloudFormation template.
When cloning includes a Customer Gateway, if the original Customer Gateway exists, it will be used; otherwise, it will be created.
Cloning a VPC Peering connection with a VPC peer on a different AWS account is not supported. Download and edit the CloudFormation template.
If the original Transit Gateway had ‘DefaultRouteTableAssociation’ and/or ‘DefaultRouteTablePropagation’ in ‘enable’ state, on the cloned Transit Gateway, it will be ‘disable’. Change the flag 'enable' and choose default Route Table on VPC Console.
Cloning routes Propagation/Association of VPN to Route Table is not supported. Manually add the missing routes on VPC Console.
Cloning of Managed Prefix List references of Transit Gateway Route Table is not supported. Manually add the missing details on VPC Console.
The downloaded Clone log will indicate that a reference is required to be made manually.
The Transit Gateway Route Table that requires a reference to a Managed Prefix List will have a Tag pointing to the Prefix list to reference.
The cloned Managed Prefix List that needs to be referenced will also indicate the referencing Transit Gateway Route Tables entity.
Transit Gateway Connect Peer that is related to Connect Transit Gateway attachment is not supported. Manually add the missing details on VPC Console.
When cloning includes a Customer Gateway – if the original Customer Gateway exists, it will be used, otherwise, it will be created.
If a related VPC is cloned (i.e., the existing VPCs were not reused) and the original includes VPN Connections, you will need to re-establish the connections using the new configuration for the VPN tunnels..
Lambda function permissions: If the captured LB includes a listener that forwards to a Lambda Target Group, the following are issues to consider before cloning:
Manually add the permission: "lambda:AddPermission" to the relevant IAM policy.
In the Capture Source section Region drop-down list, select the source region of the capture to clone.
In the Source VPC/Transit Gateway/LB drop-down list, select the item to clone.
In the Captured at drop-down list, select the date and time of the capture to clone.
In the Clone to Destination section Region drop-down list, select the region to create the clone.
In the VPC/Transit Gateway Name/LB box, a suggested name for the cloned item is shown. Enter a new name, if needed.
In the Account drop-down list, select the account in which to create the clone.
If the CF template is over 50 kB, in the Upload CF template to S3 dialog box, enter the name of an S3 bucket that exists in the selected target region.
If the Network Entity Type is Transit Gateway or Load Balancer, you can choose whether to reuse existing VPCs.
If the Network Entity Type is LB and reuse existing VPCs is enabled, you can choose whether to attach the original existing instances to the cloned LB.
Select Clone VPC/Clone Transit Gateway/Clone LB. At the end of the cloning, a status message will appear in a box:
Cloning VPC/Transit Gateway/LB completed successfully. There may be an informational message that you may need to make manual changes. Check the log, using Download Log, for further information.
To view the results of the clone network entity action, select Download Log.
Manually upload the modified template with CloudFormation.
Set backup options for EC2 instances. See .
only-snaps (create AMIs without reboot)
initial-ami
only-amis
only-amis-reboot (create AMIs with reboot)
app-aware (Windows instance backup agent is same as snapshot and AMI options)
app-aware-vss (Enable application consistent with VSS)
app-aware-script
policy1#only-snaps
new_policy:existing_policy#only-amis
policy1#initial-ami#app-aware
Set backup options for EFS instances. N2W will override EFS configuration with tag values. See .
vault role_arn cold_opt
cold_opt_val exp_opt
exp_opt_val
Default (example) ARN of role Lifecycle transition: N, D, W, M, Y Integer for D,W,M,Y only When resource expires: P (Policy Gen), N, D, W, M, Y Integer for D, W, M, Y only
Remove resource from all policies. See .
no-backup
Exclude volumes from backup. See .
policy1#exclude
Note: Tagged instances are excluded from the Exclude volumes option in General Settings for Tag Scan. Tagged instances are only excluded with the ‘#exclude’ tag.
policy1#exclude policy2#exclude
Retry configuration
initial-ami
only-amis
only-amis-reboot
For example, with an existing policy: policy1#only-snaps, or for a new policy based on template and setting AMI creation: my_new_policy:existing_policy#only-amis
Additional configurations need to be made manually, and not with the tag.
cold_opt_value
Integer for D, W, M, Y only
exp_opt
When does resource expire:
P – Policy Generations W – Weeks
N – Never M – Months
D – Days Y – Years
exp_opt_val
Integer for D, W, M, Y only
If a user-defined Custom Tag exists on an AWS resource, the resource will be automatically added to the Policy during the Tag Scan process. See section 14.3.
It is possible to match an AWS Resource Tag with an N2W Tag Name or Value defined as a Prefix. For example, if the Tag Name ‘Department’ is defined as a Prefix, the following AWS resources that have a Tag Name starting with ‘Department’ will be added to the policy: ‘Department A’, ‘Departments’, and Department_3’.
no-backupWhen the cpm backup(cpm_backup) tag and a custom tag on a resource point to the same policy name, the custom tag will be ignored.
Select New.
Define the Tag Name and Tag Value.
If relevant, select Name is Prefix and/or Value is Prefix.
To override the exclusion of volumes specified in the UI and to exclude instances tagged with #exclude for the policy, select Exclude volumes. See section 9.6.
Select Save.
To initiate a tag scan immediately, select Scan Now.
To view the Last Scan, select Show Log.
Use correct names for existing/template policies.
Resource scanning order is NOT defined, so use policy names as existing/template only if you are sure that it exists in N2W defined manually or scanned previously.
Purpose
cpm backup cpm_backup Tag Value
Examples/Values
Add resource to existing backup policy. See 14.1.1.
policy1
policy1 policy2 policy3
Create policy from a template. See 14.1.2.
new_policy1:existing_policy1
Key
Value
vault
Vault. Example: Default
role_arn
ARN of role. Example: arn:aws:iam::040885004714:role/service-role/AWSBackupDefaultServiceRole
cold_opt
Lifecycle transition:
N – Never M – Months
D – Days Y – Years
W – Weeks
Because of this limitation, N2W needs an AMI to start the recovery of a Windows instance. N2W will still make sure all the volumes, including the root device (OS volume), will be from the point-in-time of the recovered backup. By default, N2W will create an initial AMI when you start backing up a Windows instance. That AMI will be used as the default when recovering this instance.
If crash-consistent backup is sufficient for your needs, you do not need to install any agent. However, to use VSS for application-consistent backups or to run backup scripts, you will need to install N2W proprietary Thin Backup Agent or the AWS SSM Agent. AWS’s SSM Agent can be installed and configured for EC2 instances, on-premise servers, or virtual machines (VMs).
When using SSM for VSS:·
Certain AWS roles are required. See section 6.2.
SSM is only applicable for Windows instances with the ‘All Volumes’ option.
Upon success, the description ‘VSS snapshot’ is added to the snapshot. For example, 'CPM policy p3|instance: i0a9ebd86122a0eab2| VSS snapshot'
If SSM is not configured, the agent will get an exception from AWS and will back up using ‘multi-volume' but without our VSS agent.
If ec2-vss-agent.exe is not configured, it will be detected too late and the backup of that target will fail.
The SSM Agent does not appear in the Agents tab. Check the system directly to verify installation and status.
If a crash-consistent backup is sufficient for your needs, you do not need to install any agent. However, to use VSS or run backup scripts, you will need to install an N2W Thin Backup Agent.
The N2W Thin Backup Agent is used for Windows instances that need to perform application quiescence using VSS or backup scripts.
The agent communicates with the N2W Server using the HTTPS protocol.
No sensitive information passes between the backup agent and the N2W Server.
Any Windows instance in a policy can have a backup agent associated with it.
After adding your Windows instance to the backup targets page (section 4.2.2), the next step is to configure its agent by associating it with a policy.
To associate an agent with a policy:
In the Policies tab, select the policy and then select Edit.
In the Backup Targets tab, select the Windows instance and selectConfigure.
In the configuration screen, select Application Consistent Backup.
Select the Remote Agent Type: AWS SSM or N2W Thin Backup Agent
You can download the installation package of the agent from the Agents tab in the left panel. Select Download Thin Backup Agent to download a standard Windows package (CPMAgentService.msi) to the Downloads folder.
After downloading the agent installation package, select Server Settings and then select Agents Configuration.
Enter the configuration syntax as described in , and select Publish.
The agent can be installed on any Windows 2016, 2019, 2022, or 2025 instance, 32 or 64-bit. After accepting the license agreement, the Setup screens open.
The required fields are:
The address of the N2W server that is reachable from this instance.
The default port is 443 for HTTPS communication. Change it if you are using a custom port.
After finishing the installation, the N2W agent will be an automatic service in your Windows system.
The N2W Thin Backup Agent is known as CPM Agent Service in the Windows Task Manager.
After the N2W Thin Backup Agent is installed and configured and a policy with a target that points at it is configured and enabled, the users must wait to see it registered in the remote Agents screen in the N2W. It may take a few minutes until the N2W connects.
To change the configuration of the backup agent after installation, edit the backup agent configuration file.
To change the agent configuration file:
Before proceeding, N2W recommends that you make a copy of the cpmagent.cfg file, which resides in the N2W Agent installation folder.
If the address or port of the N2W Server had changed, edit the agent configuration file manually. Make the change after the equation sign.
After making the changes, restart the CPM Agent Service, in the Windows Service Manager console.
As an alternative, you could uninstall and reinstall the agent.
N2W supports configurations where the backup agent for a Windows instance can reach the CPM server only through a proxy.
To configure the agent with an HTTP proxy:
See section 6.1.4 about editing cpmagent.cfg, and:
Add the following lines under the General section:
3. If your proxy server requires authentication, add the following two lines as well:
4. Restart the CPM Agent Service from the Windows Service Manager.
Following are the general steps to run a VSS snapshot backup:
Define an SSM IAM Role.
Define a VSS IAM Role.
Associate an SSM Agent with an N2W policy
Install the latest SSM Agent.
Install and run the latest VSS app.
Backup scripts for Windows targets must be PowerShell scripts.
To use the SSM agent with VSS, the following AWS permissions are required:
AmazonSSMFullAccess – For N2W and the instance to use the SSM remote agent for VSS and scripts.
AmazonSSMFullAccess and CreateVssSnapshot - For creating VSS.
To enable SSM in an N2W policy, when configuring a Windows instance in the Policy Instance and Volume Configuration screen, select All Volumes in the Which Volumes list and Simple Systems Manager (SSM) in the Remote Agent Type list. See section 4.2.3.
To create an IAM instance profile for SSM, see https://docs.aws.amazon.com/systems-manager/latest/userguide/setup-instance-profile.html
To attach an IAM instance profile to an EC2 instance, see https://docs.aws.amazon.com/systems-manager/latest/userguide/setup-launch-managed-instance.html
Following is an example of adding SSM permissions to an IAM policy on AWS:
Following is an example of attaching an SSM role to an EC2 Instance on AWS:
To manually install an SSM Agent on EC2 instances:
For Windows Servers, see https://docs.aws.amazon.com/systems-manager/latest/userguide/sysman-install-win.html
Following is an example of how to install an SSM Agent during EC2 launch:
To create an IAM role for VSS-enabled snapshots and to download and install VSS components on Windows for an EC2 instance, except for US government cloud regions, see https://docs.aws.amazon.com/AWSEC2/latest/WindowsGuide/application-consistent-snapshots-getting-started.html#run-command-vss-role
For US government cloud regions, update the IAM role with 'aws-us-gov' as shown below:
When using an SSM remote agent for Windows instance targets, all 'before' or 'after' backup scripts must be PowerShell scripts. Each script’s content must consist of valid PowerShell commands. Saving the files with the ‘.ps’ extension is not necessary.
VSS, or Volume Shadow Copy Service, is a backup infrastructure for Windows Servers. It is beyond the scope of this guide to explain how VSS works. You can read more at http://technet.microsoft.com/en-us/library/cc785914%28v=WS.10%29.aspx. However, it is important to state that VSS is the standard for Windows application quiescence, and all recent releases of many of the major applications that run on Windows use it, including Microsoft Exchange, SQL Server, and SharePoint. It is also used by Windows versions of products not developed by Microsoft, like Oracle.
N2W supports VSS for backup on Windows Servers 2016, 2019, 2022, and 2025 only. Trying to run VSS on other Windows OSs will always fail. VSS is turned on by default for every Windows agent. For unsupported OSs, you will need to disable it yourself. This can be done in the instance configuration screen, see section 6.1.1.
Any application that wishes to be backup aware has a component called VSS Writer. Every vendor who would like to support copying the actual backup data (making shadow copies) provides a component called a VSS Provider. The operating system comes with a System Provider, which knows how to make shadow copies to the local volumes. Storage hardware vendors have specialized Hardware Providers that know how to create shadow copies using their own hardware snapshot technology. Components that initiate an actual backup are called VSS Requestors.
When a requestor requests a shadow copy, the writers flush and freeze their applications. At the point of time of the shadow copy, all the applications and the file systems are frozen. They all get thawed after the copy is started (copy-on-write mechanisms keep the point in time consistent, similar to EBS snapshots). When the backup is complete, the writers get notified that they have a consistent backup for the point in time of the shadow copy. For example, Microsoft Exchange automatically truncates its transaction logs when it gets notified that a backup is complete.
The N2W Agent or SSM Agent performs under the role of a VSS Requestor to request the VSS System Provider to perform shadow copies. The process is:
When N2W initiates a backup, it requests an agent to invoke a backup of all relevant volumes. The agent then requests the VSS System Provider to start the shadow copy.
VSS only creates differential copies, which means that for the N2W to fully backup each volume, a few extra MBs are needed for the backup to complete. The amount of MBs depends on the size of the volume and the amount of data written since the last backup. Once the backup is complete, the backup agent will request the VSS Provider to delete the shadow copies. The agent will notify all relevant VSS writers that the backup is complete, only after making sure all the EBS snapshots are completed successfully.
You can see the process depicted below.
By default, VSS is enabled when a backup agent is associated with an instance in a policy. In many cases, you will not need to do anything. By default, VSS will take shadow copies of all the volumes. However, you may want to exclude some volumes. For example, since the system volume (typically C:\) cannot be used to recover the instance in a regular scenario, you may want to exclude it from the backup.
To make shadow copies of only some of the volumes:
In the Instance and Volume configuration screen, change the value of Volumes for shadow copies.
Type drive letters followed by a colon, and separate volumes with a comma, e.g., D:, E:, F:.
Writer exclusions and inclusions are configured using a text file, not the UI.
You may wish to exclude VSS Writers from the backup process in cases where the writer is:
Failing the backup.
Consuming too many resources.
Not essential for the backup’s consistency.
To exclude VSS writers:
In the subfolder scripts under the installation folder of the backup agent (on the backed-up instance), create a text file named vss_exclude_writers_<policy-name>.txt. with the following structure:
Each line will contain a writer ID, including the curly braces.
If you write in one of the lines all, all writers will be excluded. This can be handy sometimes for testing purposes.
In some cases, you want to make sure that certain writers are included (verified) in the shadow copy, and if not, fail the operation.
To verify writers:
In the subfolder scripts under the installation folder of the Thin Backup Agent (on the backed-up instance), create a text file named vss_verify_writers_<policy-name>.txt with the following structure:
Each line will contain a writer ID, including the curly braces.
all is not an option.
An example of a line in either of the files is:
{4dc3bdd4-ab48-4d07-adb0-3bee2926fd7f}
When a VSS-enabled policy runs, you will see its record in the Backup Monitor tab.
If it finished with no issues, the status of the record will be Backup Successful.
If there were issues with VSS, the status will be Backup Partially Successful.
To troubleshoot:
To view the errors that VSS encountered, look in the backup log.
To view the output of the exact VSS error, select Recover.
To view the VSS Disk Shadow log, select its link in the recovery panel. There is a link for each of the agents in the policy, with the instance ID stated.
In most cases, VSS will work out of the box with no issues. There can be a failure from time to time in stressed system conditions.
If the writers do not answer the freeze request fast enough, the process times out and fails. Often, the retry will succeed.
When VSS is constantly failing, it is usually a result of problems with one of the writers. This could be due to some misconfiguration in your Windows system.
In most cases, the problem is out of the scope of N2W. The best way to debug such an issue is to test VSS independently. You can run the Diskshadow utility from a command line window and use it to try and create a shadow copy. Any issue you have with VSS using N2W should also occur here.
To learn how to use the Diskshadow utility, see:
You may see failures in the backup because VSS times out or is having issues. You will see that the backup has status Backup Partially Successful. Most times you will not notice it since N2W will retry the backup and the retry will succeed.
If the problem repeats frequently, check that your Windows Server is working properly. You can check the application log in Window’s Event Log. If you see VSS errors reported frequently, contact .
Recovering instances using N2W is covered in section 10. When recovering a Windows Server that was backed up with VSS, you need to revert to the shadow copies in the recovery volumes to get the consistent state of the data.
To revert to shadow copies after VSS recovery:
Connect to the newly recovered instance.
Stop the services of your application, e.g., SQL Server, Exchange, SharePoint, etc.
Open an administrator command line console and type diskshadow.
In the recovery panel screen, select the VSS DiskShadow Data link to find the IDs of the shadow copies made for the required backup.
Type revert {shadow id} for each of the volumes you are recovering, except for the system volume (C: drive). After finishing, the volumes are in a consistent state.
Turn the services on and resume work.
If you wish to recover a system disk, it cannot be reverted to the shadow copy using this method. The system volume should not contain actual application data as it is not a recommended configuration, and, therefore, you should be able to skip this revert operation. However, you can expose the system disk from the shadow and inspect its contents.
To expose the system disk from the shadow:
In the Diskshadow utility, type: expose {shadow id} volletter:
After finishing, remember to unexpose the disk.
To avoid unnecessary resource consumption, delete the shadow: (delete shadow {shadow id}).
To revert to a shadow copy for a system volume:
If you have a strict requirement to recover the consistent shadow copy for the system volume as well, do the following:
Before reverting for other volumes, stop the instance; wait until it is in stopped state.
Using the AWS Console, detach the EBS volume of the C: drive from the instance and attach it to another Windows instance as an “additional disk”.
Using the Windows Disk Management utility, make sure the disk is online and exposed with a drive letter.
Go back to the process in the previous section (VSS Recovery), and revert to the snapshot of drive C which will now have a different drive letter. Since it is no longer a system volume, it is possible to do so.
Detach the volume from the second Windows instance, reattach to the original instance using the original device, which is typically /dev/sda1, and turn the recovered instance back on.
Shadow copy data is stored by default in the volume that is being shadowed. However, in some cases, it is stored on another volume. To be able to recover, you need to make sure that the volume the shadow copy is on is included in the backup and the recovery operation.
If you revert a volume that contains another volume’s shadow data, the reversion will take the volume to a state where it no longer contains the second volume’s backup data, as the second volume would need to be reverted before the first volume can be reverted. If you accidentally restore the shadow copies in the wrong order, just delete the recovered instance and its data volumes and begin the recovery operation again from N2W, taking care to revert the shadow copies in the correct order.
Besides VSS, there is also the option to run backup scripts to achieve backup consistency. It is also possible to add backup scripts in addition to VSS.
PowerShell backup scripts for use with an SSM agent do not require the 'ps' file extension.
You enable backup scripts in the Instance and Volume Configuration screen of the instance in the policy and select the type of agent that you want to execute the scripts.
All scripts are named with a prefix plus the name of the policy.
There are 3 types of events. If scripts are used, a script must be provided for each of these events. If any script is not defined, N2W will treat the missing script as a failing script.
Before the VSS backup - BEFORE_<policy-name>.<ext>
After the VSS backup started - AFTER_<policy-name>.<ext>
After the VSS backup has completed - COMPLETE_<policy-name>.<ext>
Scripts can have any extension if they are executable. They can be batch scripts, VBS scripts, PowerShell, or even binary executables. However, N2W cannot run PowerShell scripts directly as Windows scripts.
All scripts must be set with exit code zero 0.
When using the N2W Thin Backup Agent:
As opposed to Linux, Windows backup scripts run directly on the agent. All the scripts are in the subfolder scripts under the installation folder of the N2W Thin Backup Agent.
If the N2W user that owns the policy is not the root user, the scripts will be under another subfolder with the username (e.g., …\scripts\cpm_user1).
Scripts are launched by N2W Thin Backup Agent, so their process is owned by the user that runs the agent service. By default, this is the local system account. However, if you need to run it under a different user you can use the service manager to change the logged-on user to a different one. For example, you might want to run it with a user who has administrative rights in a domain.
When using the SSM Agent:
Scripts are saved locally on the N2W server and invoked remotely.
Scripts must be saved in /cpmdata/scripts/<username>/<instance_id>/
Script names are the same as for the N2W Thin Backup Agent. The PowerShell file extension is not required.
The before_<policy-name>.<ext> runs before the backup begins. Typically, this script is used to move applications to backup mode. The before script leaves the system in a frozen state. This state will stay for a very short while, until the snapshots of the policy start, which is when the after script is started.
The after_<policy-name>.<ext> script runs after all the snapshots of the policy start. It runs shortly after the before script, generally less than 2-3 seconds. This script releases anything that may have been frozen or locked by the before script.
This script accepts the success status of the before script. If the before script succeeded, the argument will be one 1. If it failed, crashed, or timed out, the argument will be zero 0.
This is the opposite of the exit status. Think of it as an argument that is true when the before script succeeded.
The complete_<policy-name>.<ext> script runs after all snapshots are completed. Usually, the script runs quickly since snapshots are incremental. This script can perform clean-up after the backup is complete and is typically used for transaction log truncation.
The script accepts one argument. If the entire backup was successful and all the previous scripts were successful, it will be one 1. If any issues or failures happened, it will be zero 0. If this argument is one 1, truncate logs.
When you enable backup scripts, N2W assumes you implemented all three scripts. Any missing script will be interpreted as an error and be reflected in the backup status. Sometimes the complete script is often not needed. In this case, write a script that just exits with the code zero 0, and the policy will not experience errors.
You can have the output of backup scripts collected and saved in the N2W Server. See section 4.2.4.
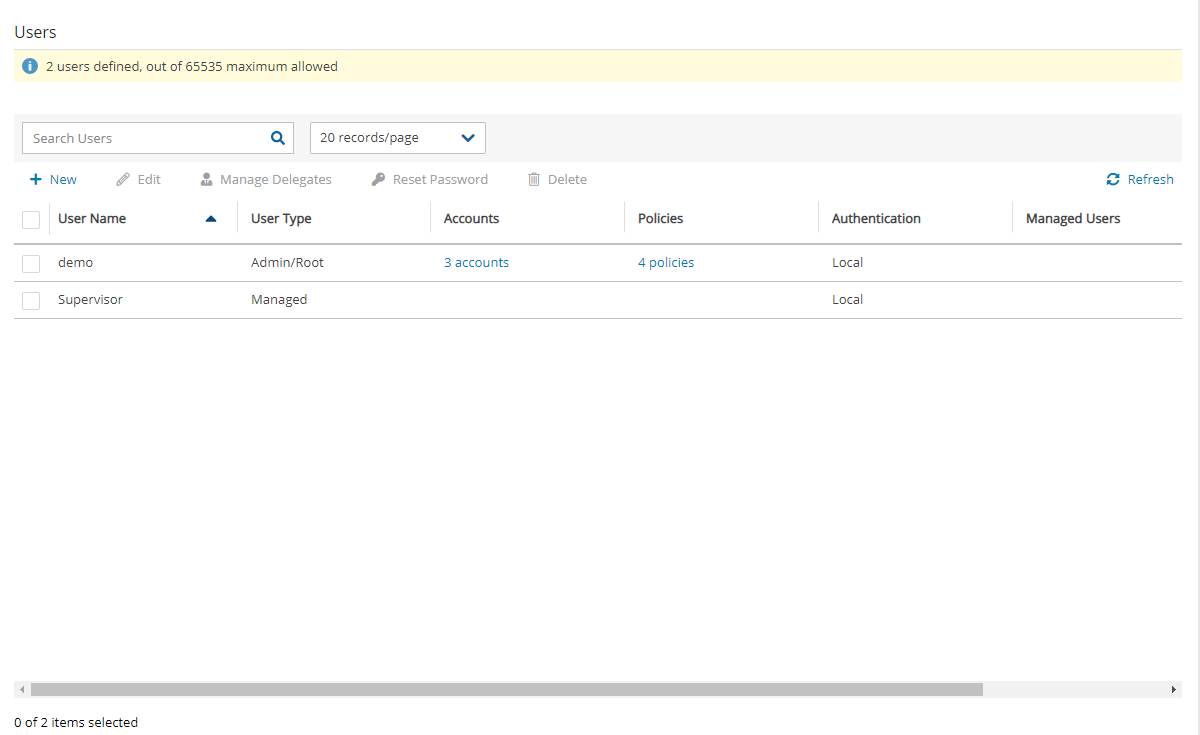
{
"Version": "2012-10-17",
"Statement": [
{
"Sid": "Statement1",
"Effect": "Allow",
"Principal": {
"AWS": "arn:aws:iam::<AWS_ACCOUNT>:root"
},
"Action": [
"s3:DeleteObject",
"s3:PutObject",
"s3:GetObject",
"s3:GetBucketAcl",
"s3:GetBucketPolicyStatus",
"s3:ListBucket",
"s3:PutObjectTagging"
],
"Resource": [
"arn:aws:s3:::<BUCKET_NAME>",
"arn:aws:s3:::<BUCKET_NAME>/*"
]
}
]
}{'AWSTemplateFormatVersion': '2010-09-09',
'Description': 'Template created by N2W',
'Resources': {'dopt4a7bcf33': {'DeletionPolicy': 'Retain',
'Properties': {'DomainName': 'ec2.internal',
'DomainNameServers': ['AmazonProvidedDNS']},
'Type': 'AWS::EC2::DHCPOptions'},
'dopt4a7bcf33vpc9d4bcbe6': {'DeletionPolicy': 'Retain',
'Properties': {'DhcpOptionsId': {'Ref': 'dopt4a7bcf33'},
'VpcId': {'Ref': 'vpc9d4bcbe6'}},
'Type': 'AWS::EC2::VPCDHCPOptionsAssociation'},
'sgcd8af6bb': {'DeletionPolicy': 'Retain',
'Properties': {'GroupDescription': 'default VPC security group',
'GroupName': 'default-0',
'SecurityGroupEgress': [{'CidrIp': '0.0.0.0/0',
'IpProtocol': '-1'}],
'SecurityGroupIngress': [],
'Tags': [{'Key': 'cpm:original:GroupId',
'Value': 'sg-cd8af6bb'}],
'VpcId': {'Ref': 'vpc9d4bcbe6'}},
'Type': 'AWS::EC2::SecurityGroup'},
'vpc9d4bcbe6': {'DeletionPolicy': 'Retain',
'Properties': {'CidrBlock': '10.0.0.0/24',
'EnableDnsHostnames': false,
'EnableDnsSupport': true,
'InstanceTenancy': 'default',
'Tags': [{'Key': 'Name',
'Value': 'Public-VPC-for-CF'},
{'Key': 'cpm:capturetime',
'Value': 'Aug 22, 2018 16:15'},
{'Key': 'cpm:clonetime',
'Value': 'Aug 25, 2018 21:20'},
{'Key': 'cpm:original:VpcId',
'Value': 'vpc-9d4bcbe6'},
{'Key': 'cpm:original:region',
'Value': 'us-east-1'}]},
'Type': 'AWS::EC2::VPC'}}}cpm backup my_policy+vault=Default+exp_opt=D+exp_opt_val=1
cpm_backup my_policy2+vault=Default+exp_opt=M+exp_opt_val=2Key = cpm backup; Value = policy_name1 policy_name2
Key = cpm_backup; Value = policy_name1 policy_name2Key = cpm backup; Value = policy_name1#exclude policy_name2#exclude
key = cpm_backup; Value = policy_name1#exclude policy_name2#excludeproxy_address=<dns name or ip address of the proxy server>
proxy_port=<port of the proxy (https)>proxy_user=<proxy username>
proxy_password=<proxy password>{
"Version": "2012-10-17",
"Statement": [
{
"Effect": "Allow",
"Action": "ec2:CreateTags",
"Resource": [
"arn:aws-us-gov:ec2:::snapshot/",
"arn:aws-us-gov:ec2:::image/"
]
},
{
"Effect": "Allow",
"Action": [
"ec2:DescribeInstances",
"ec2:CreateSnapshot",
"ec2:CreateImage",
"ec2:DescribeImages"
],
"Resource": "*"
}
]
}
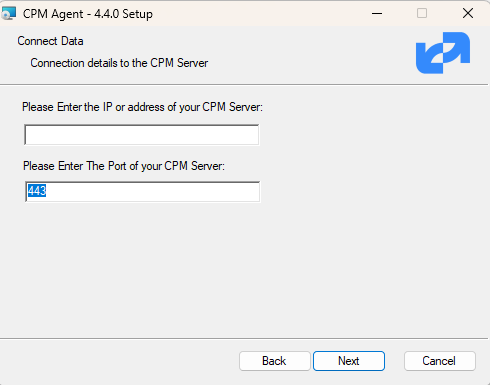

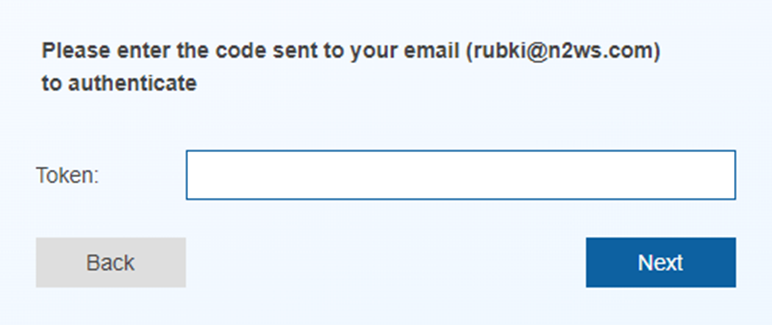
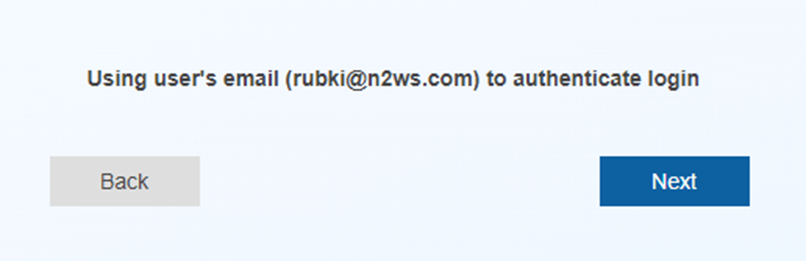
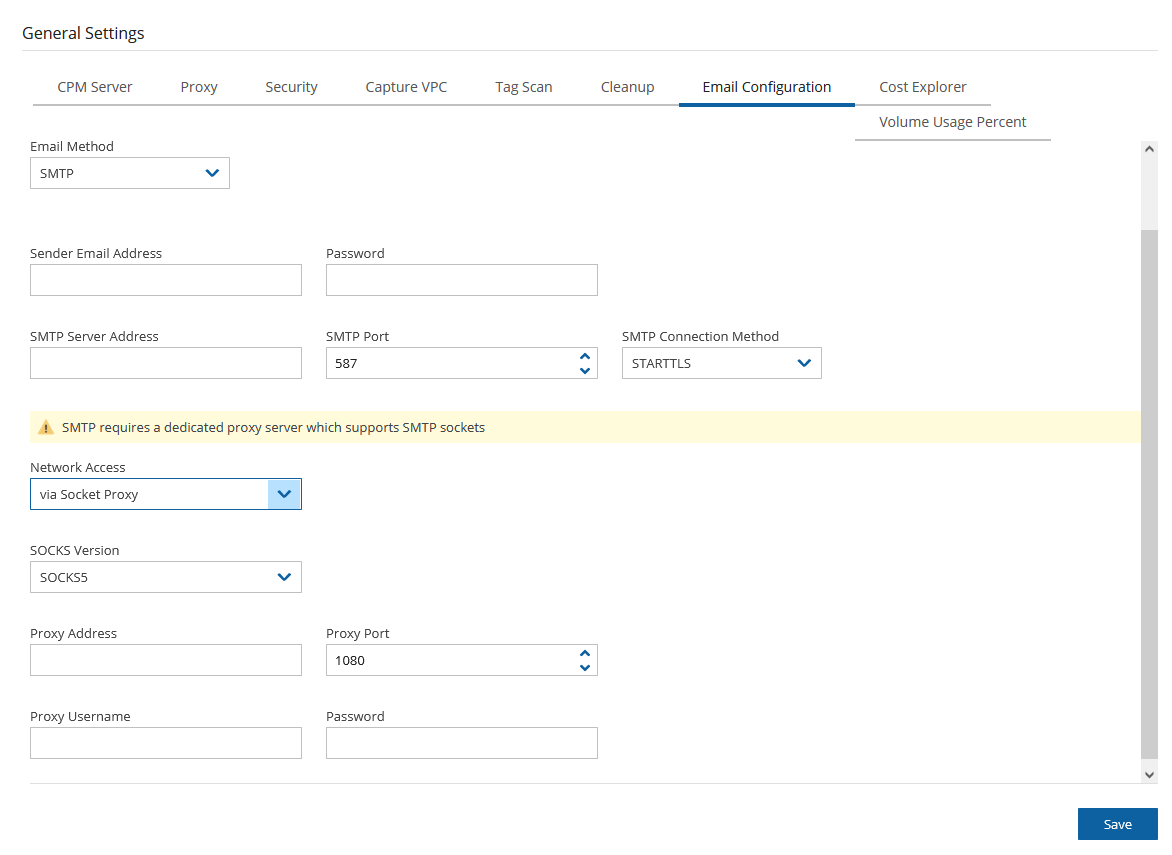
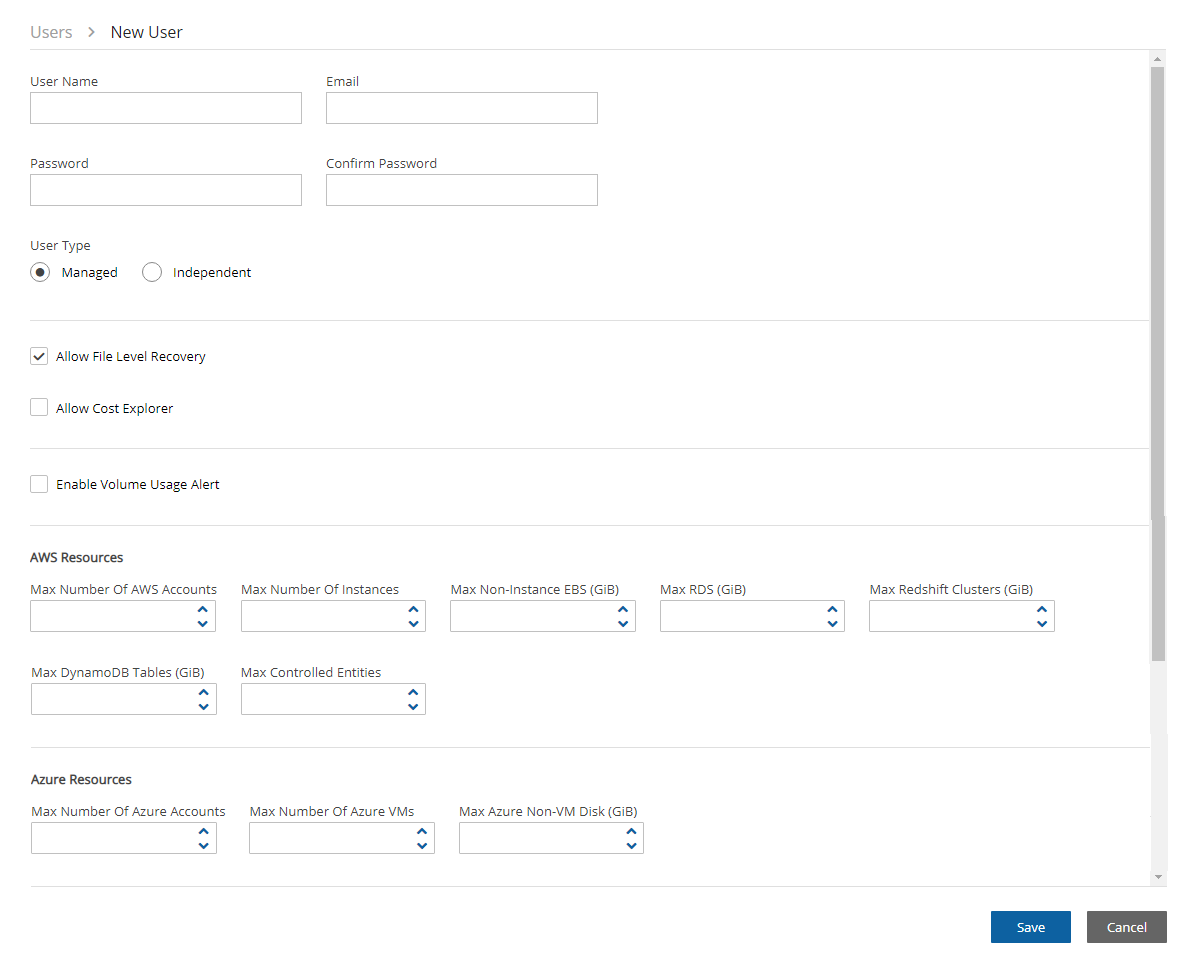
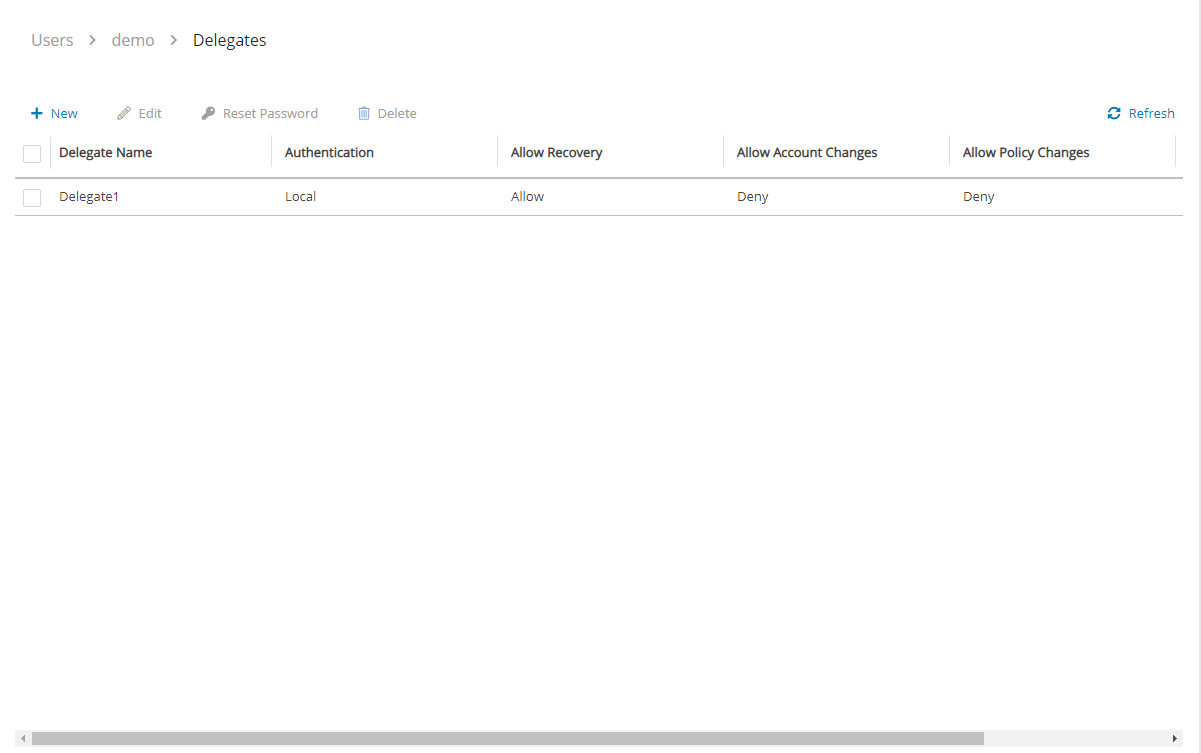
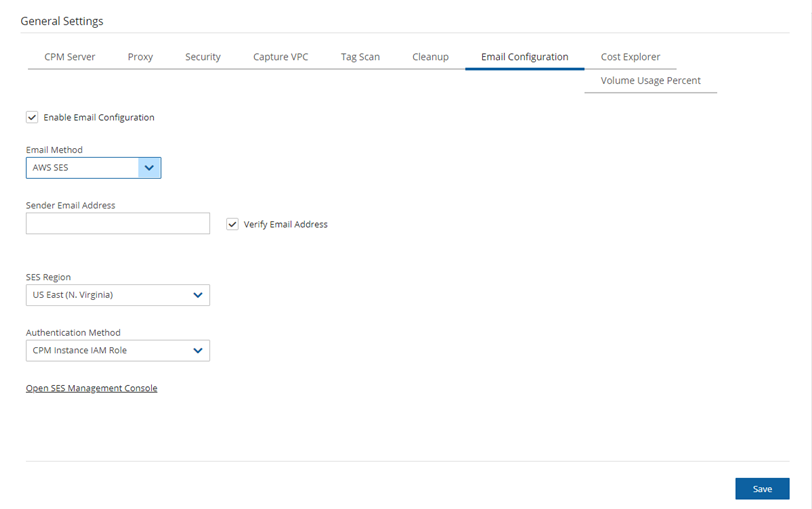
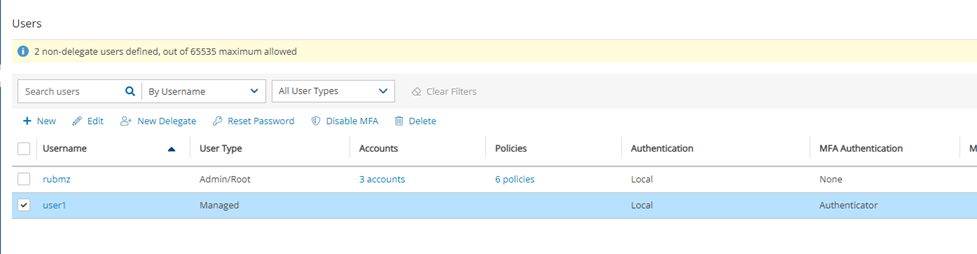
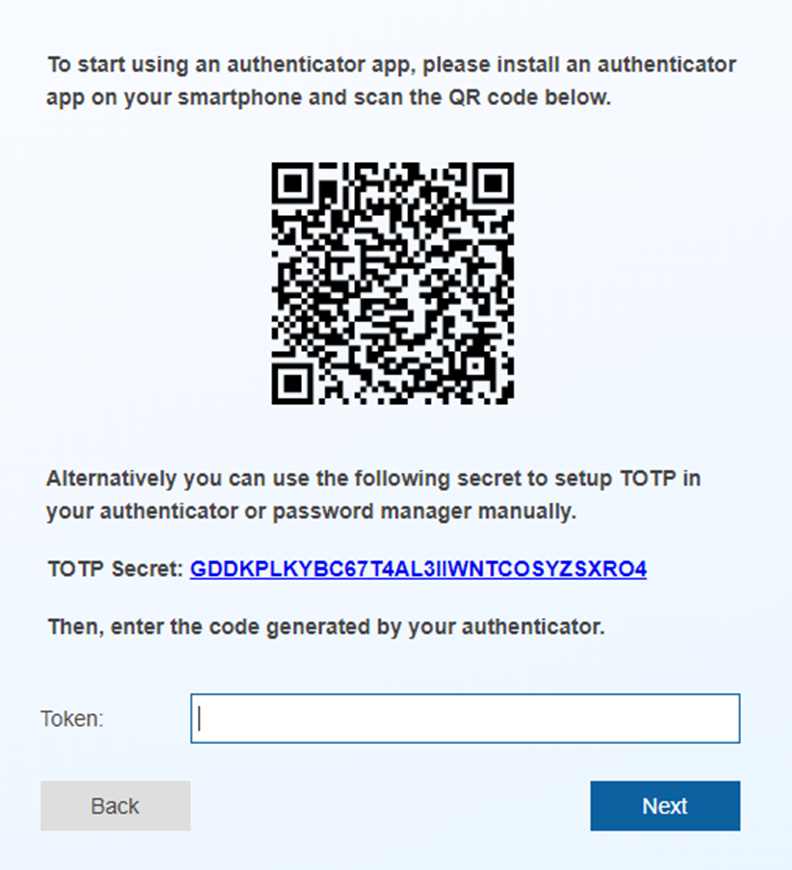
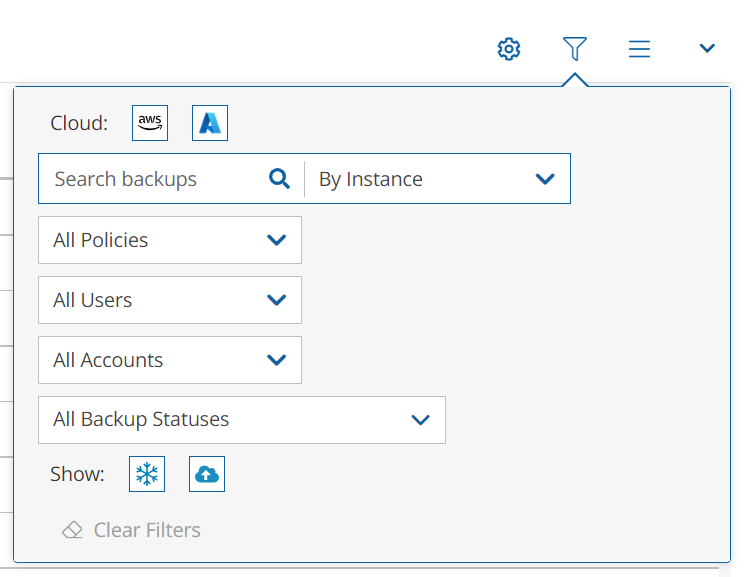
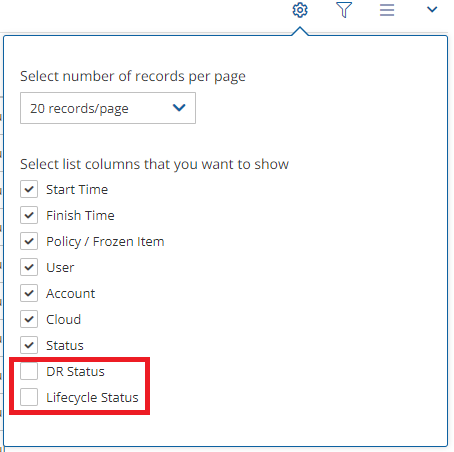
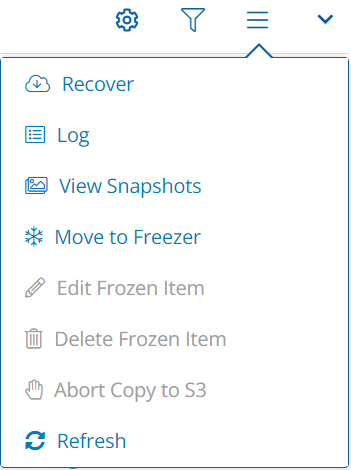
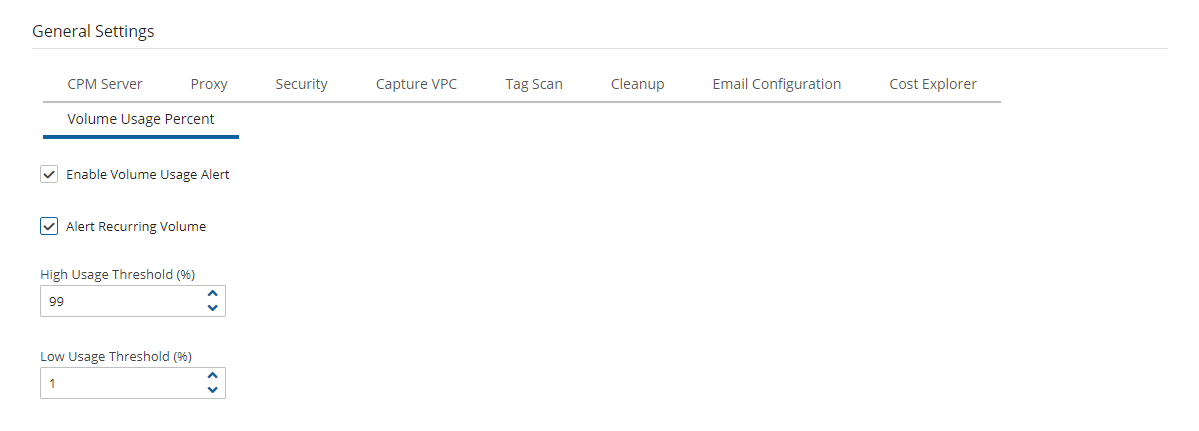

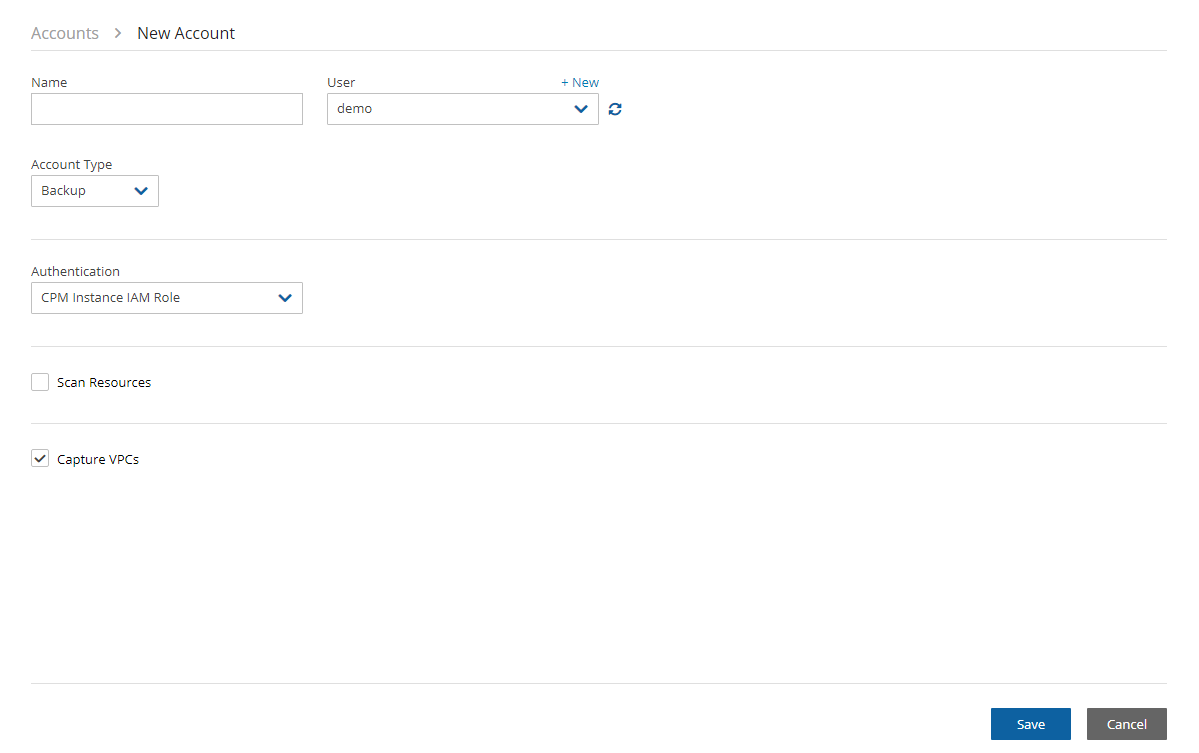

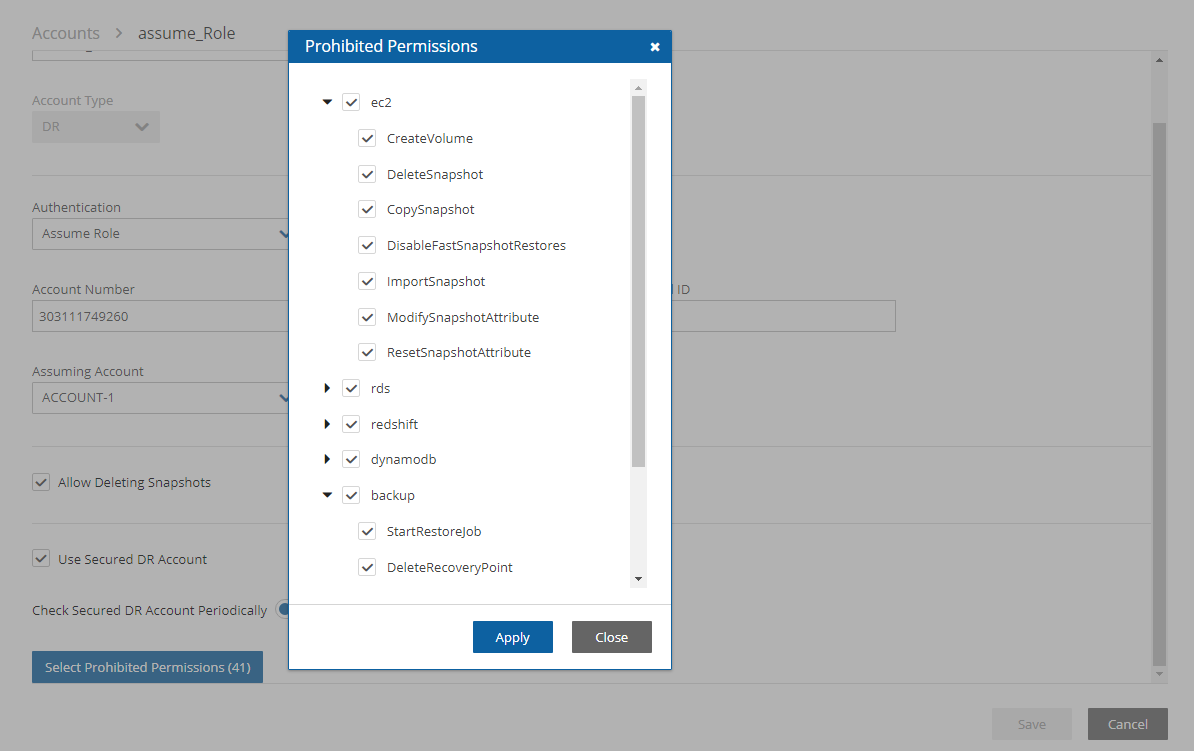
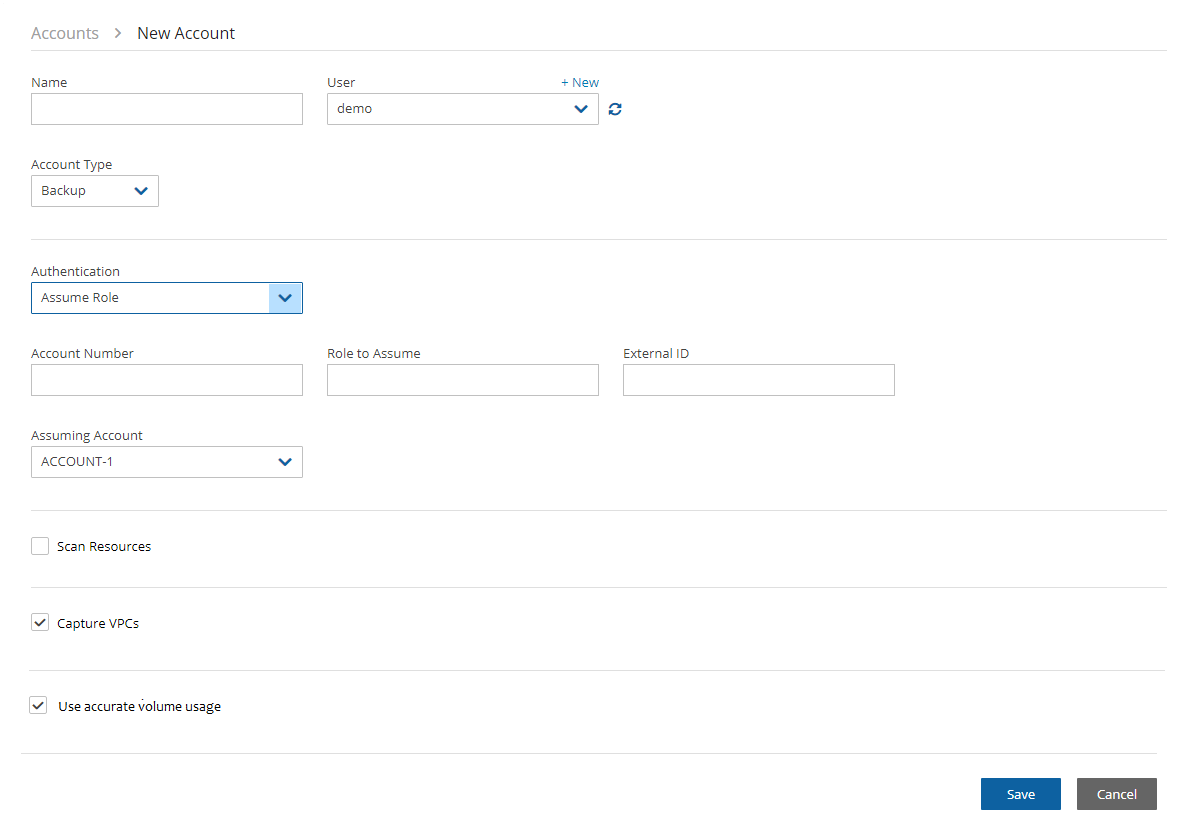
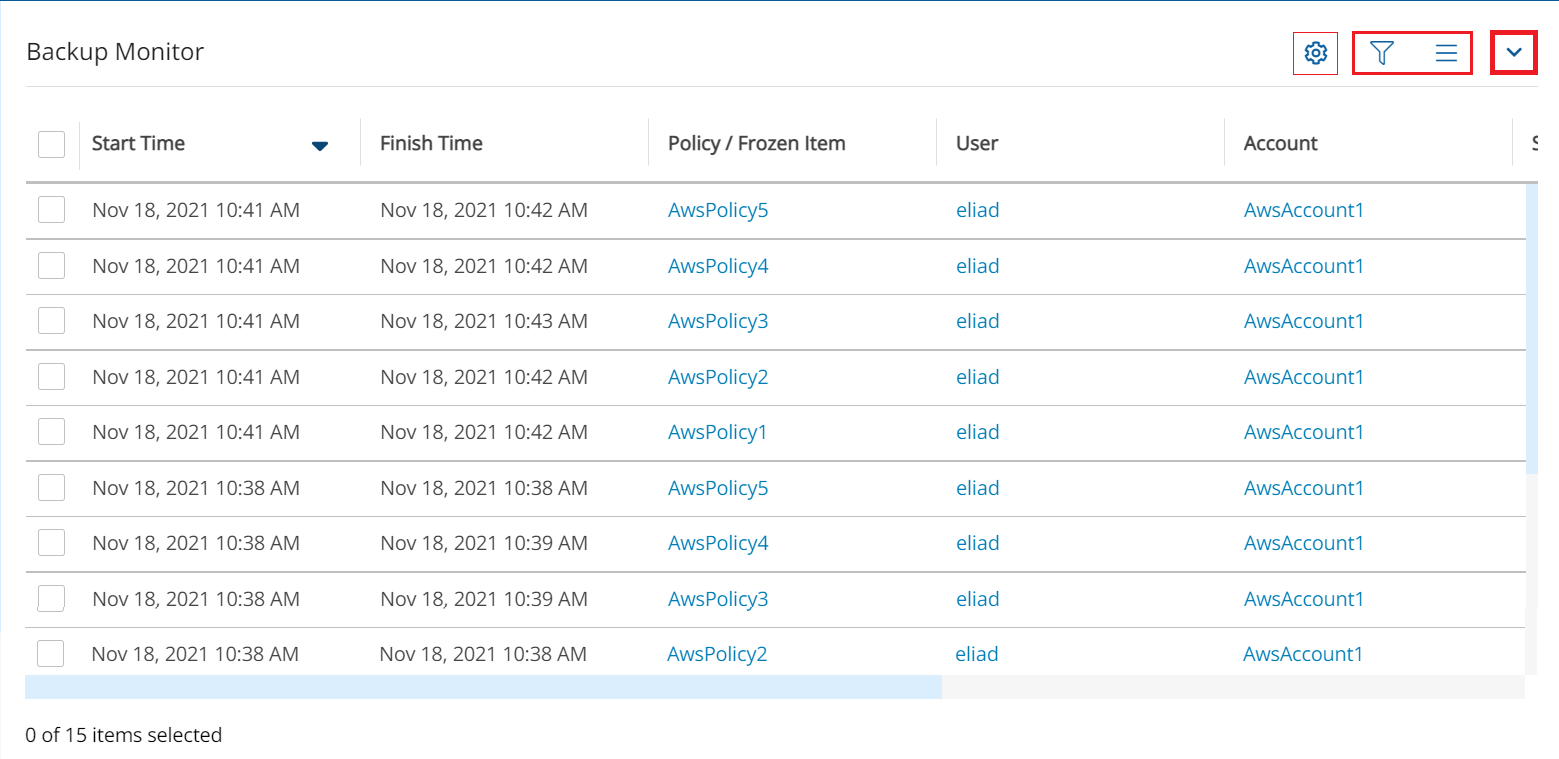
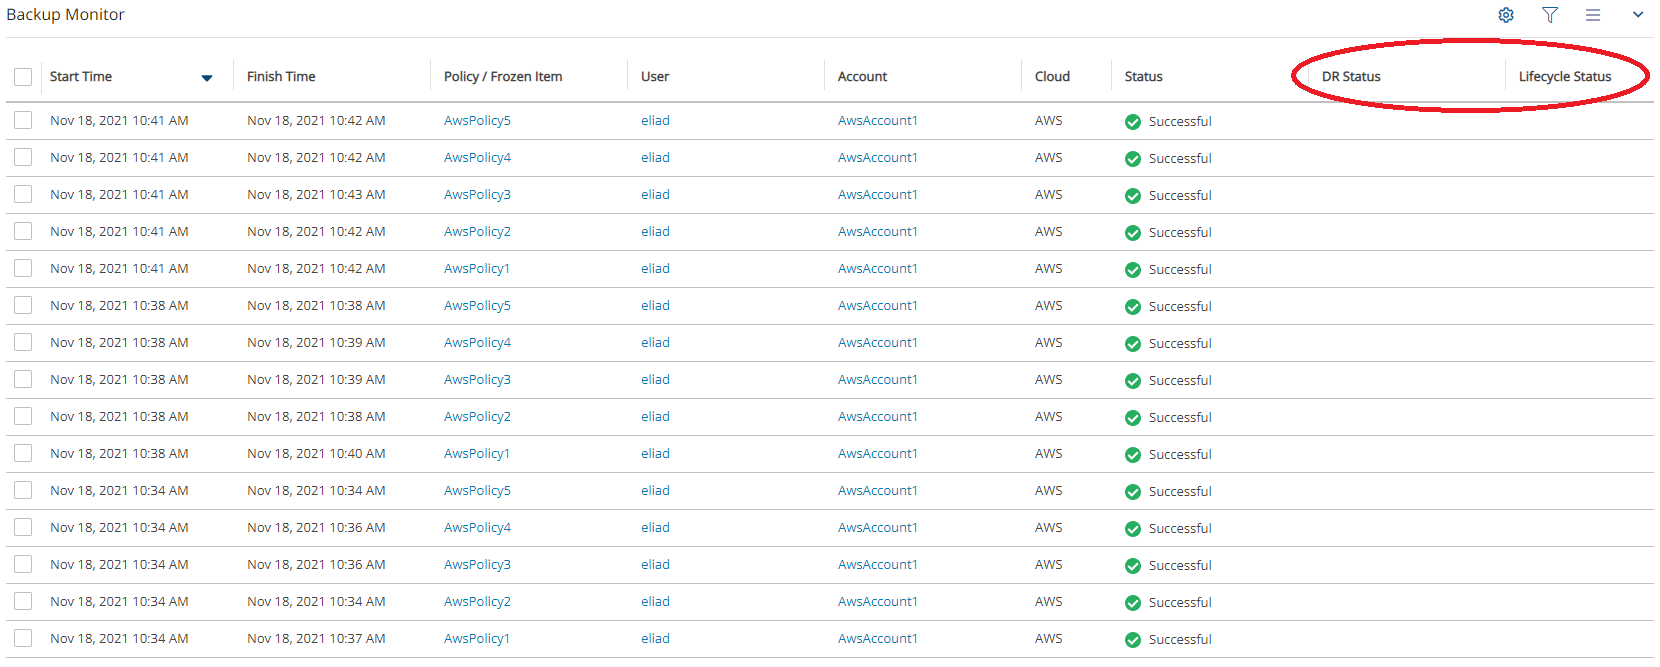
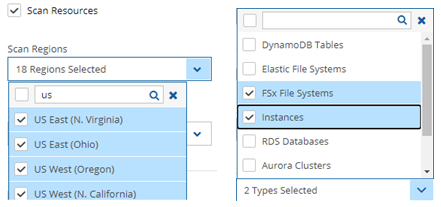
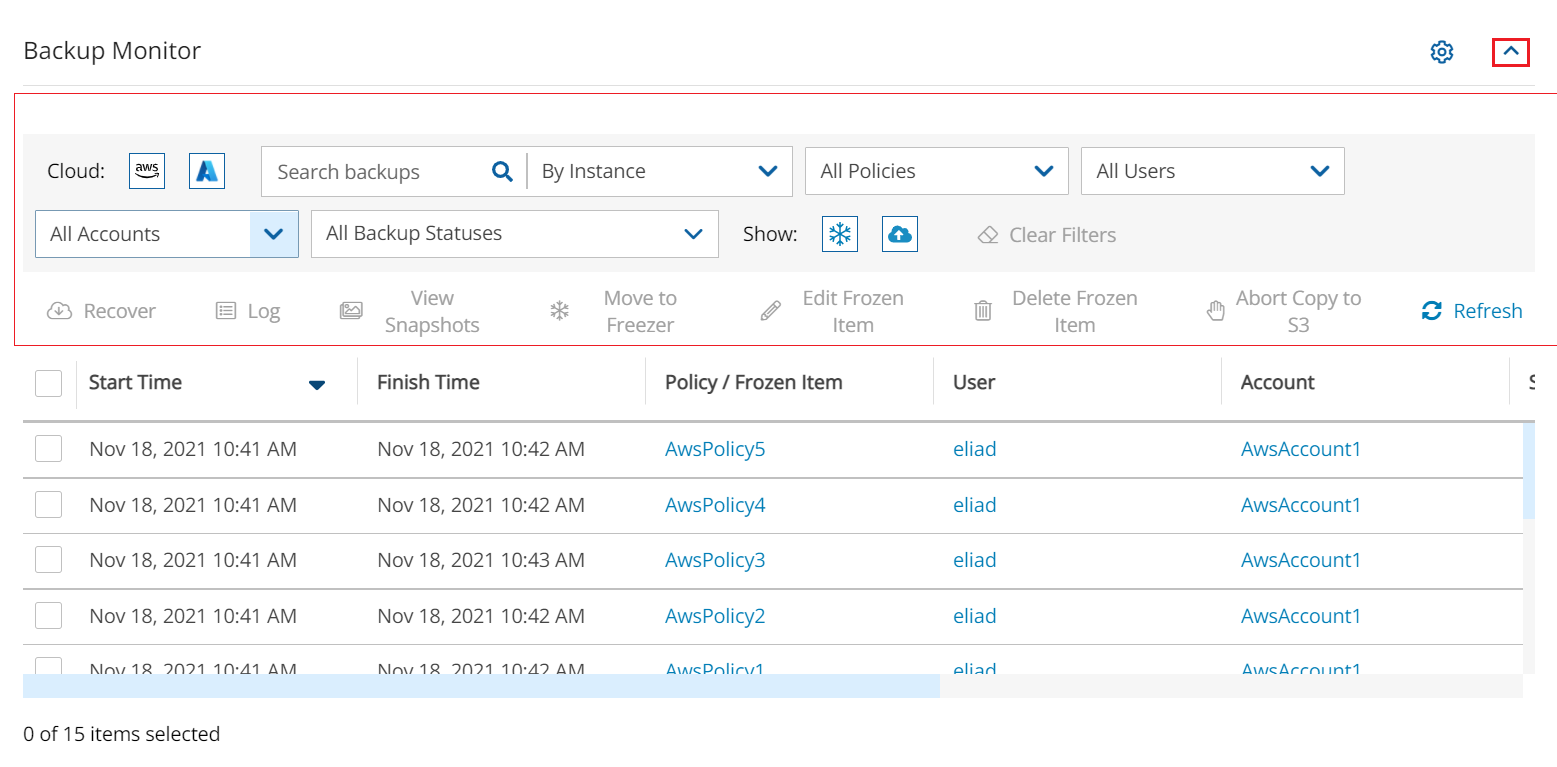
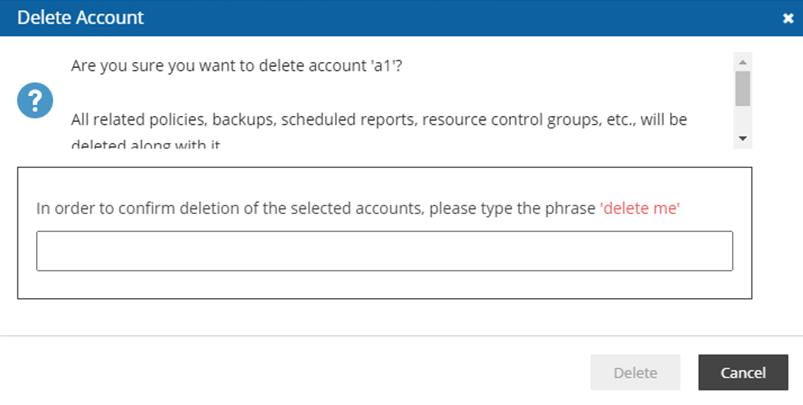
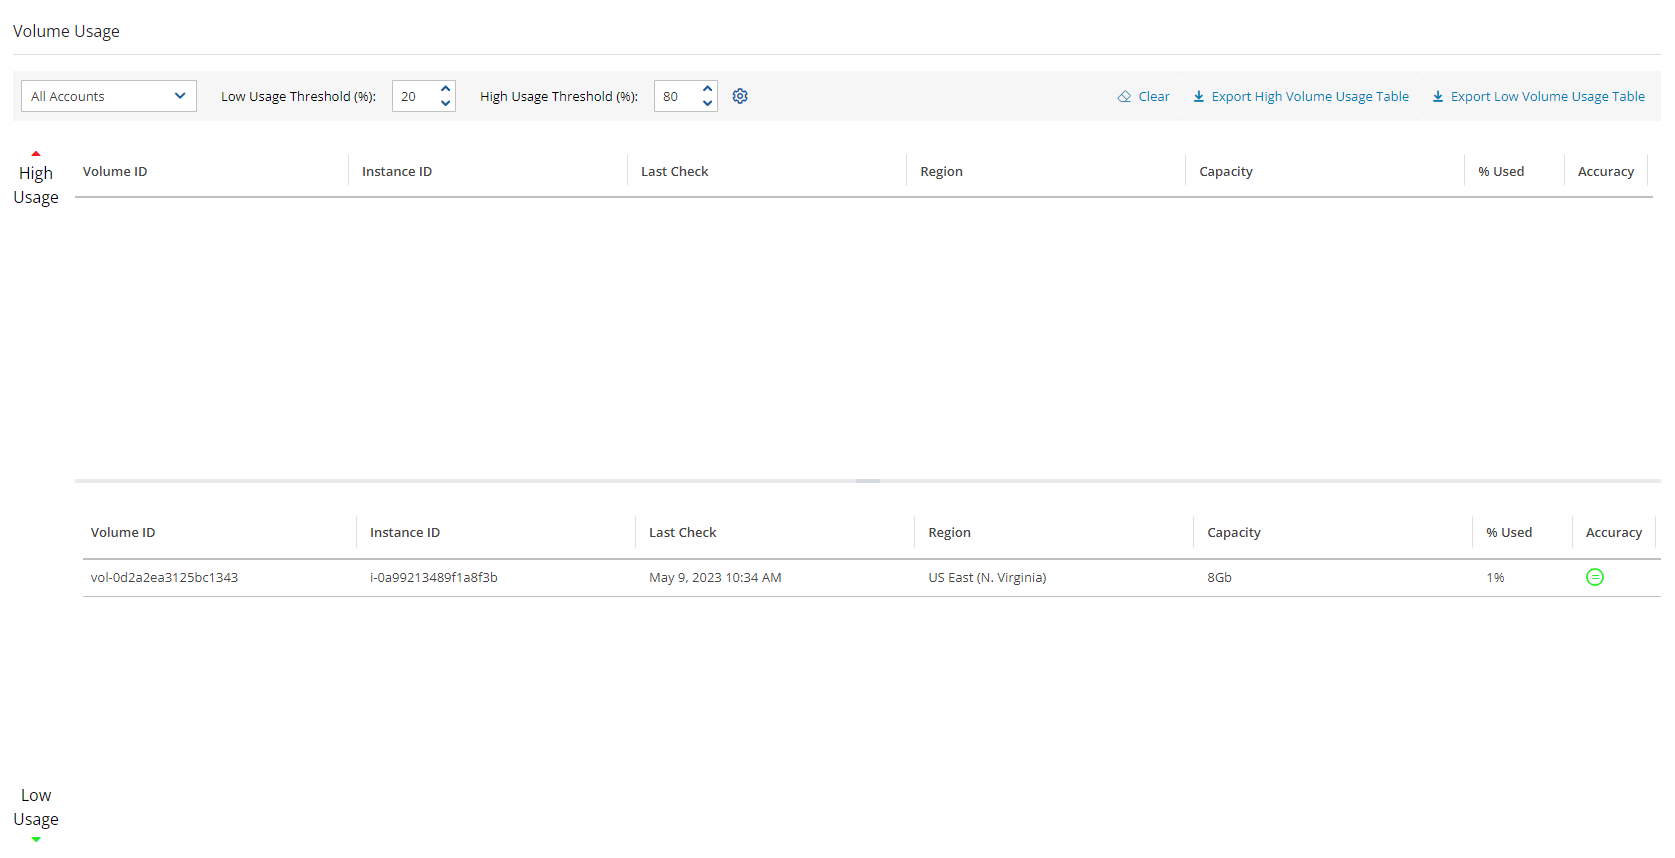
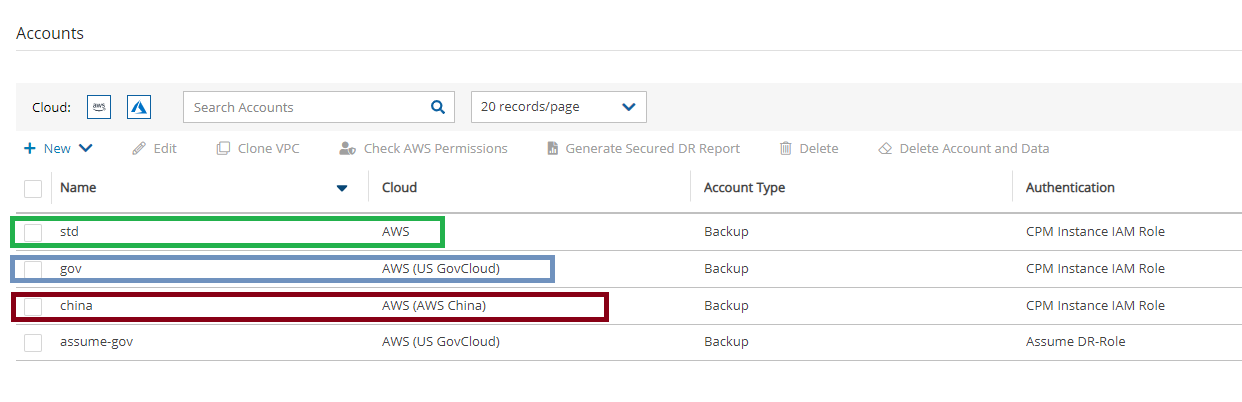
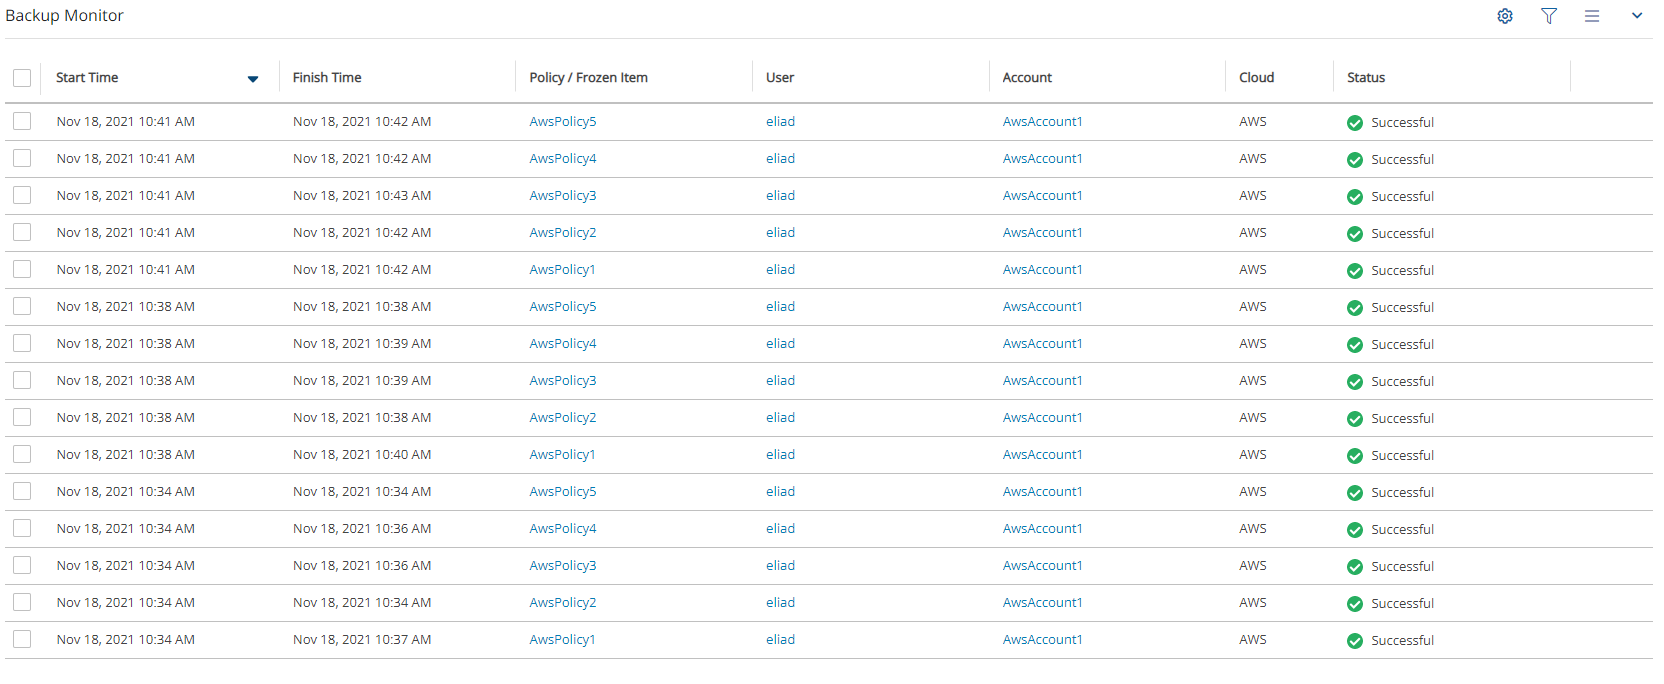
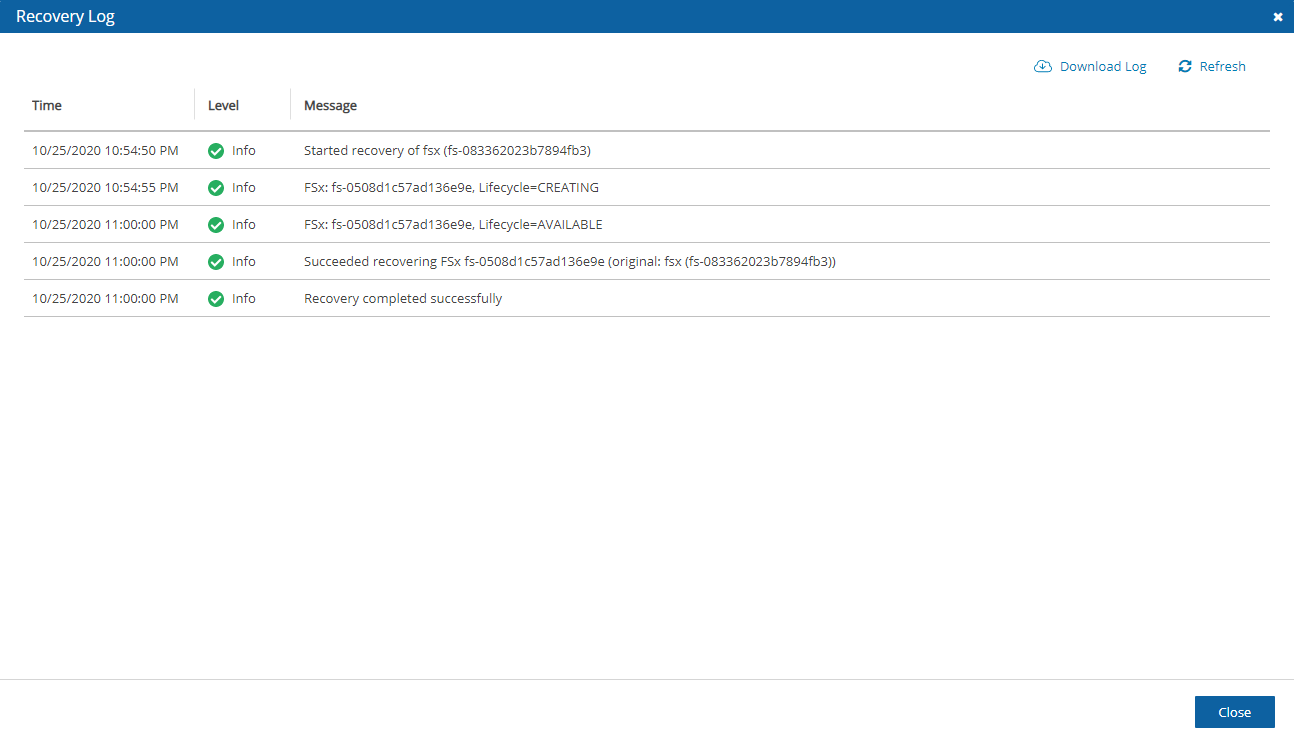
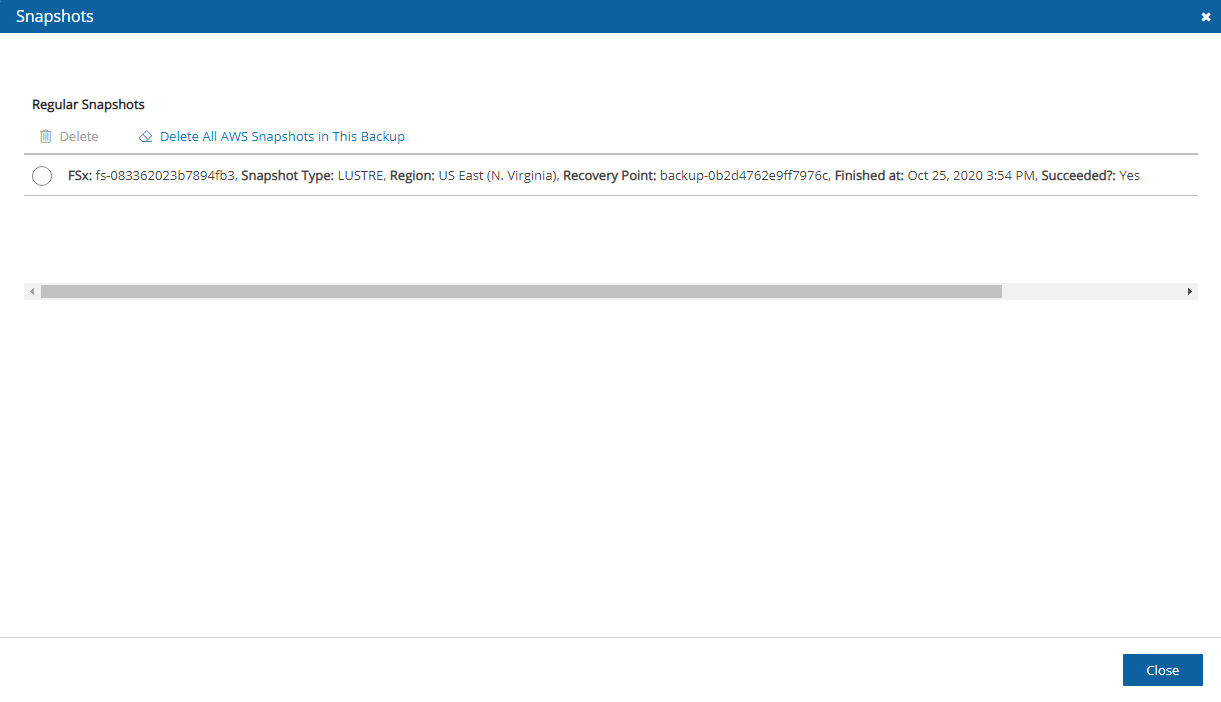

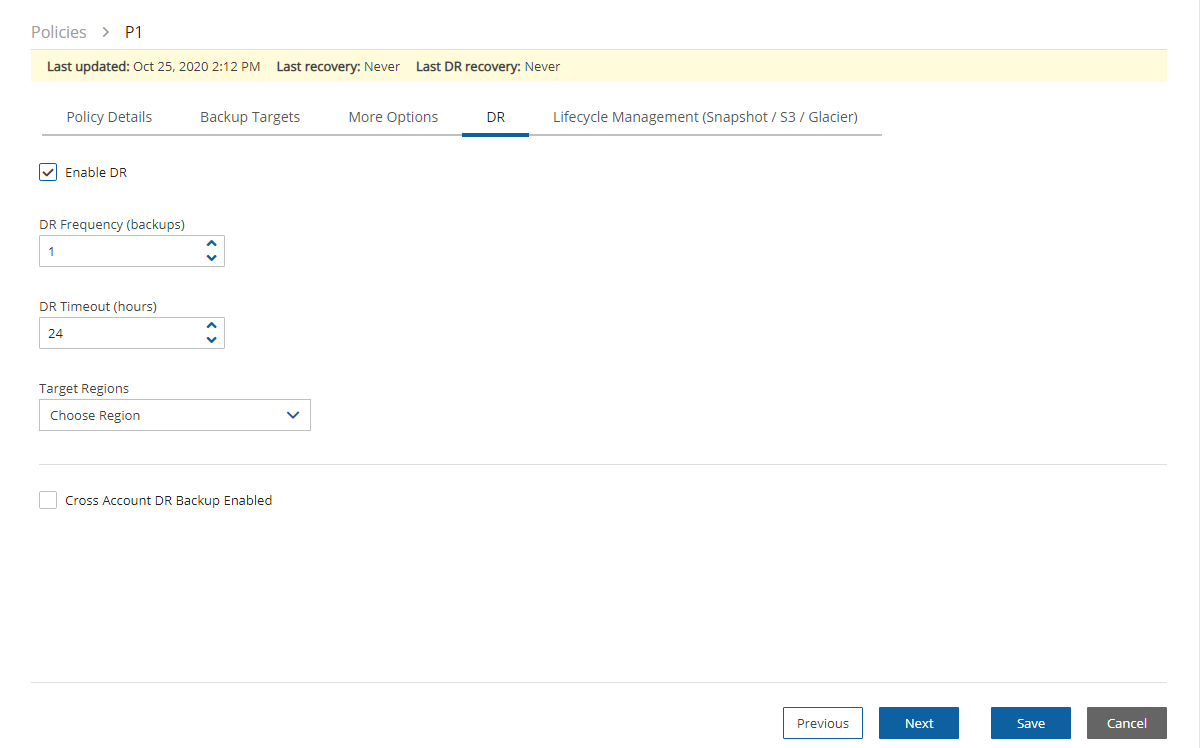
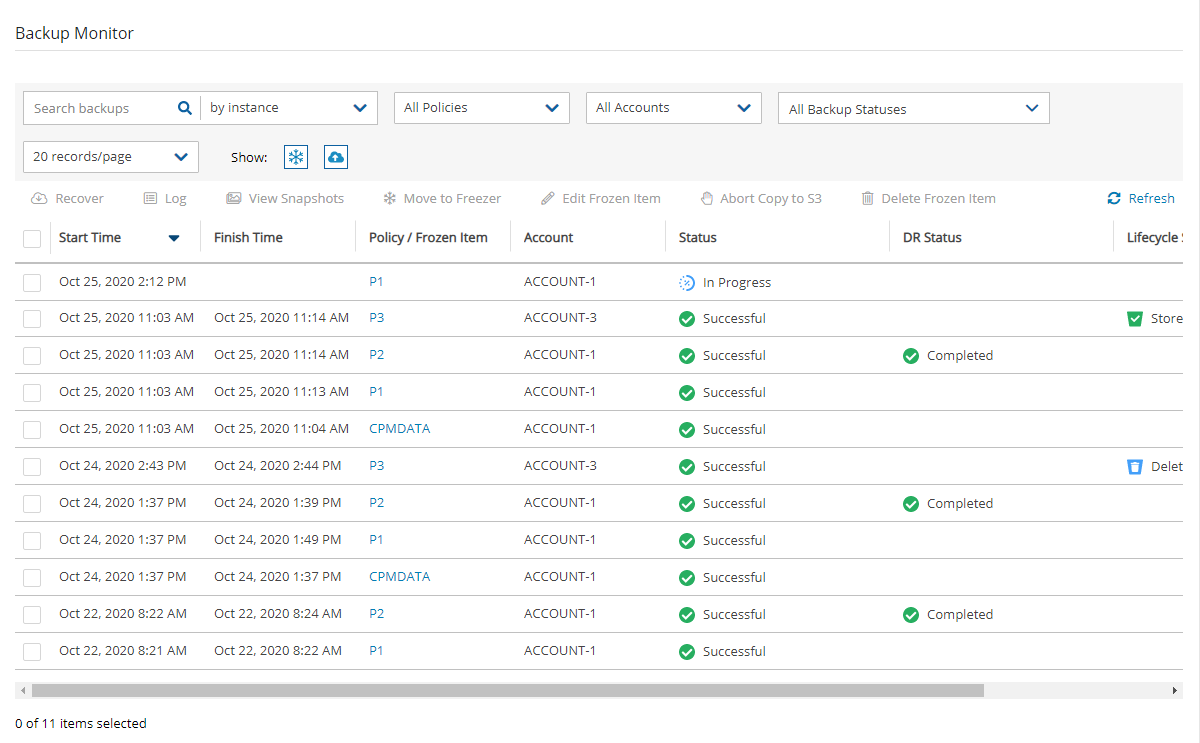
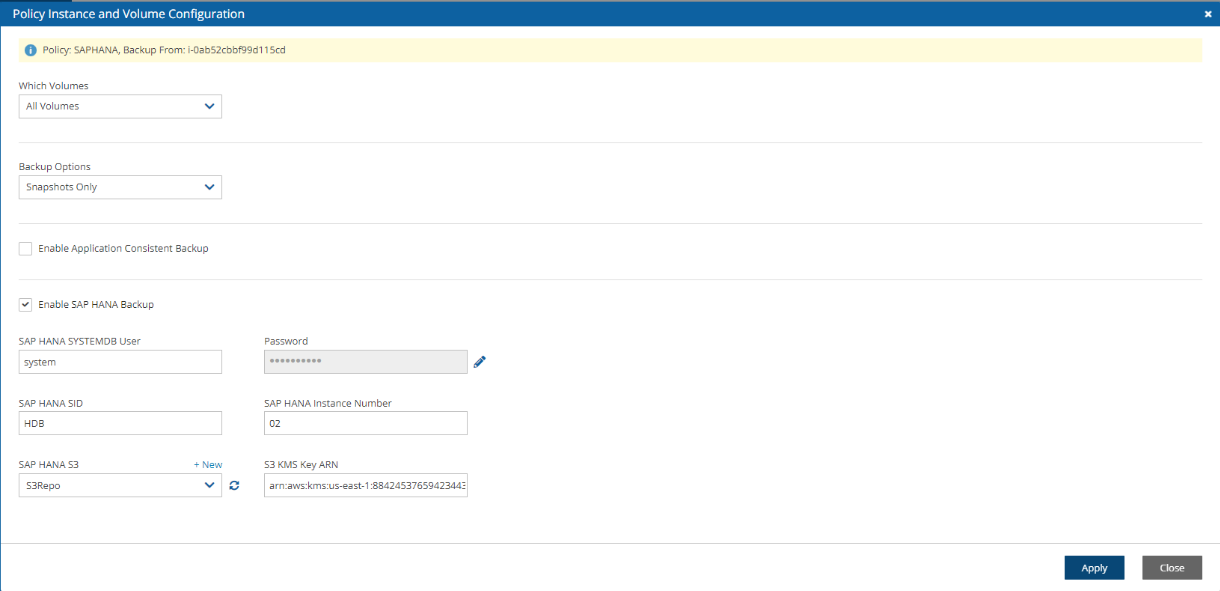
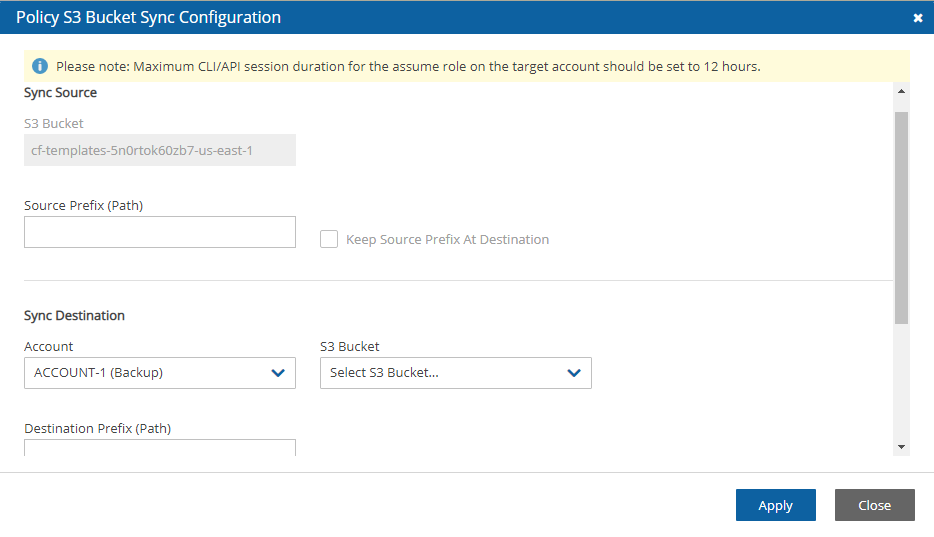
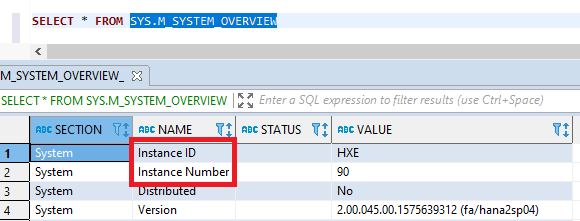

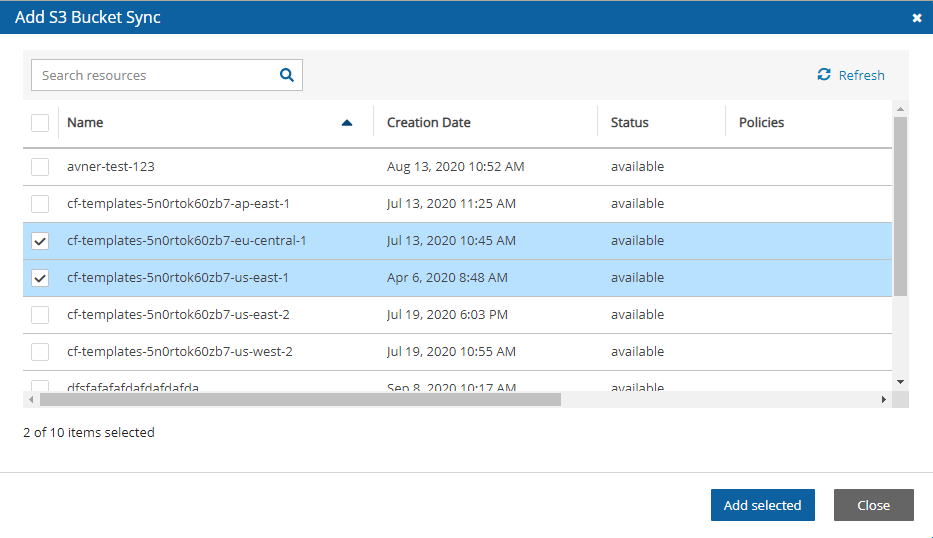
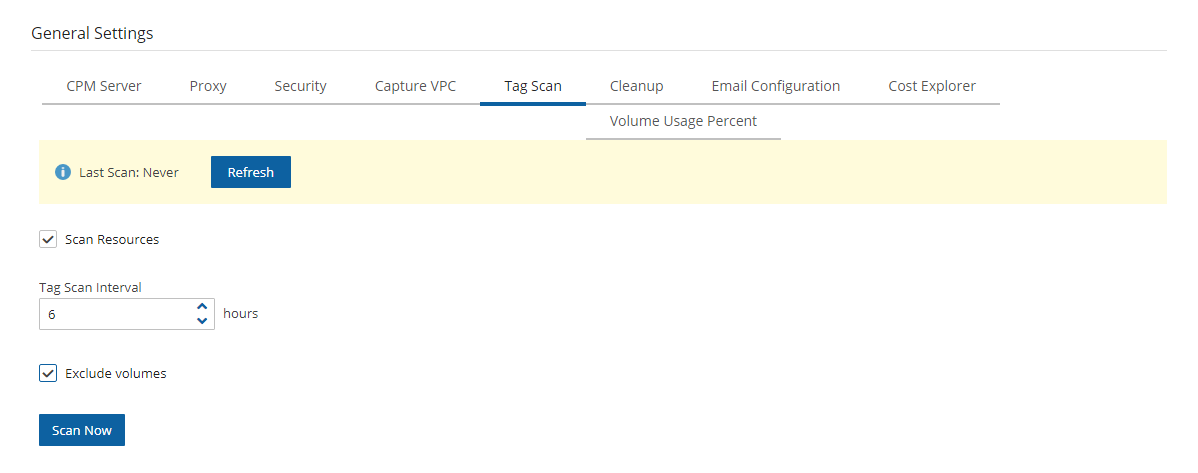
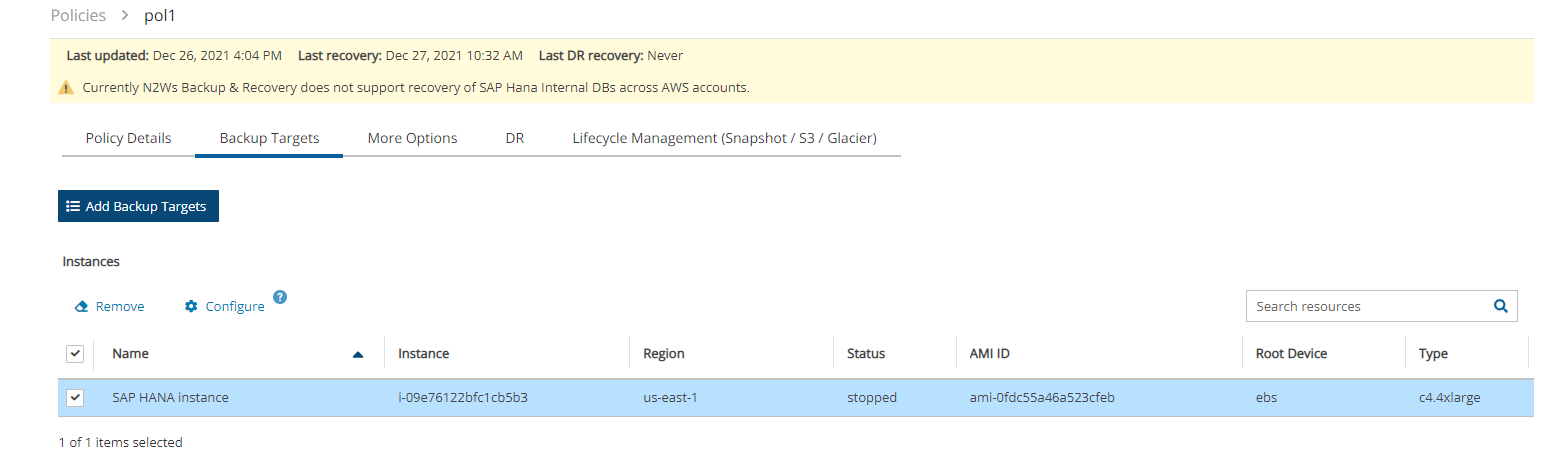


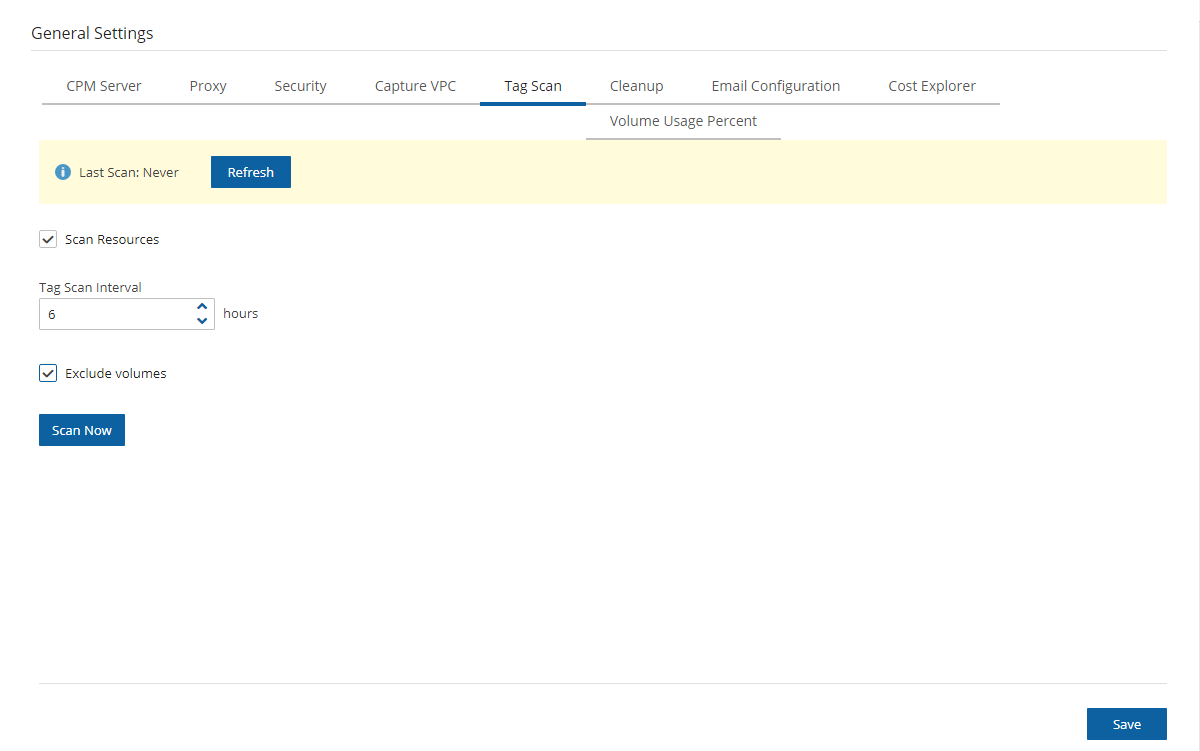

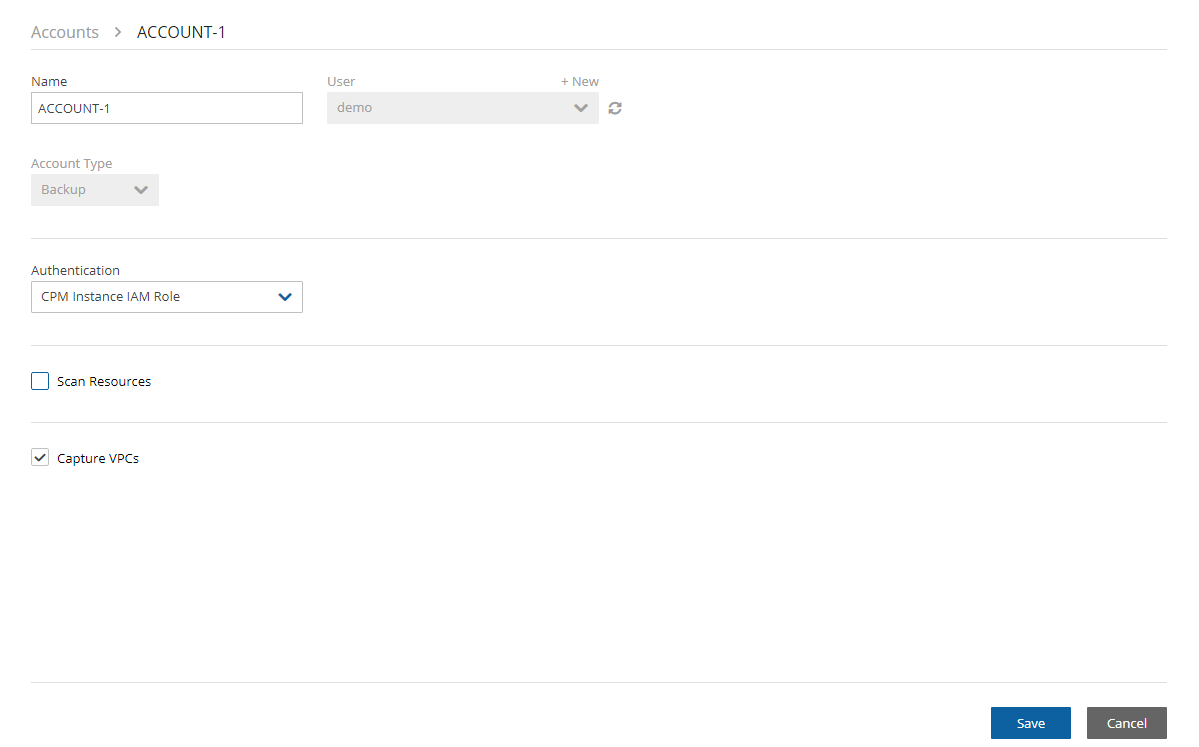
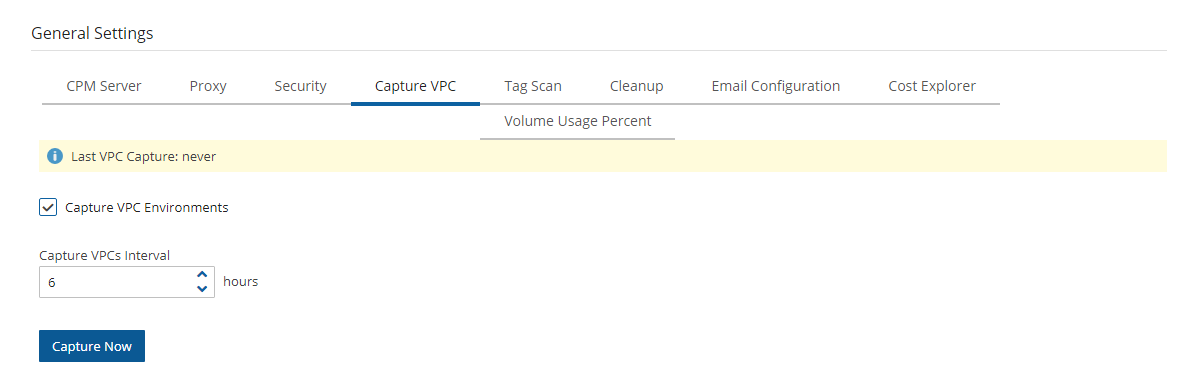
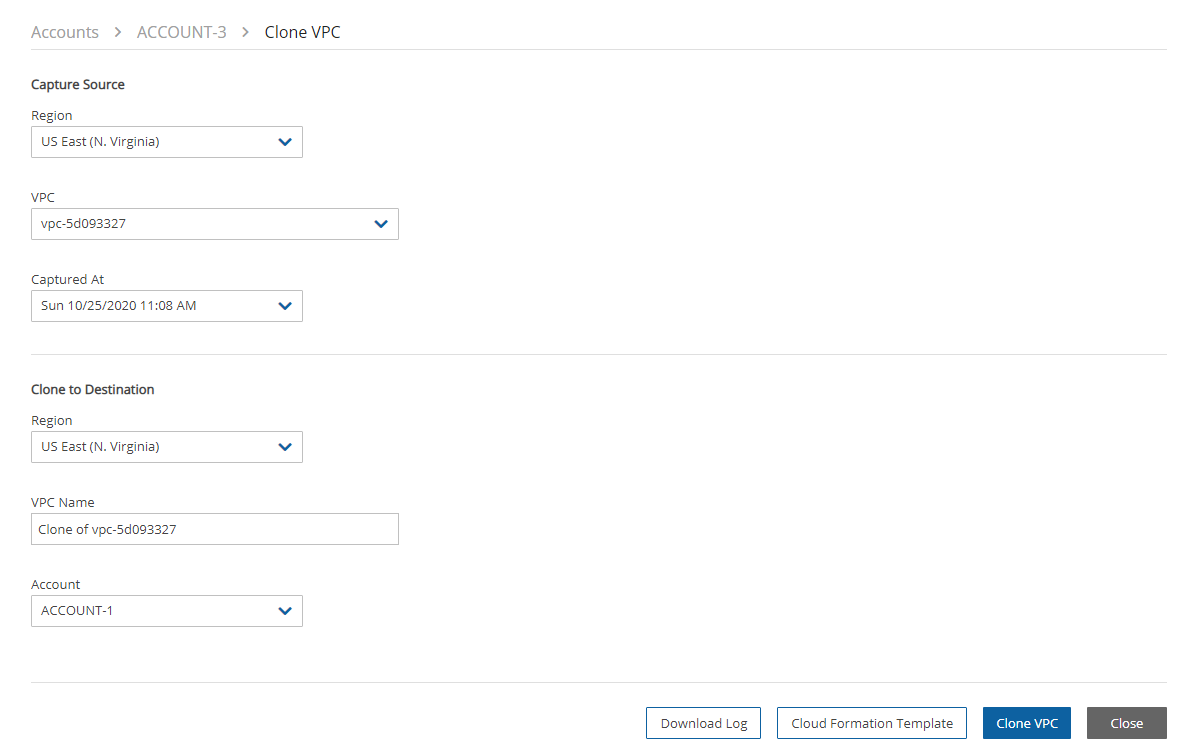

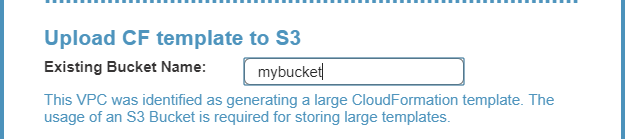
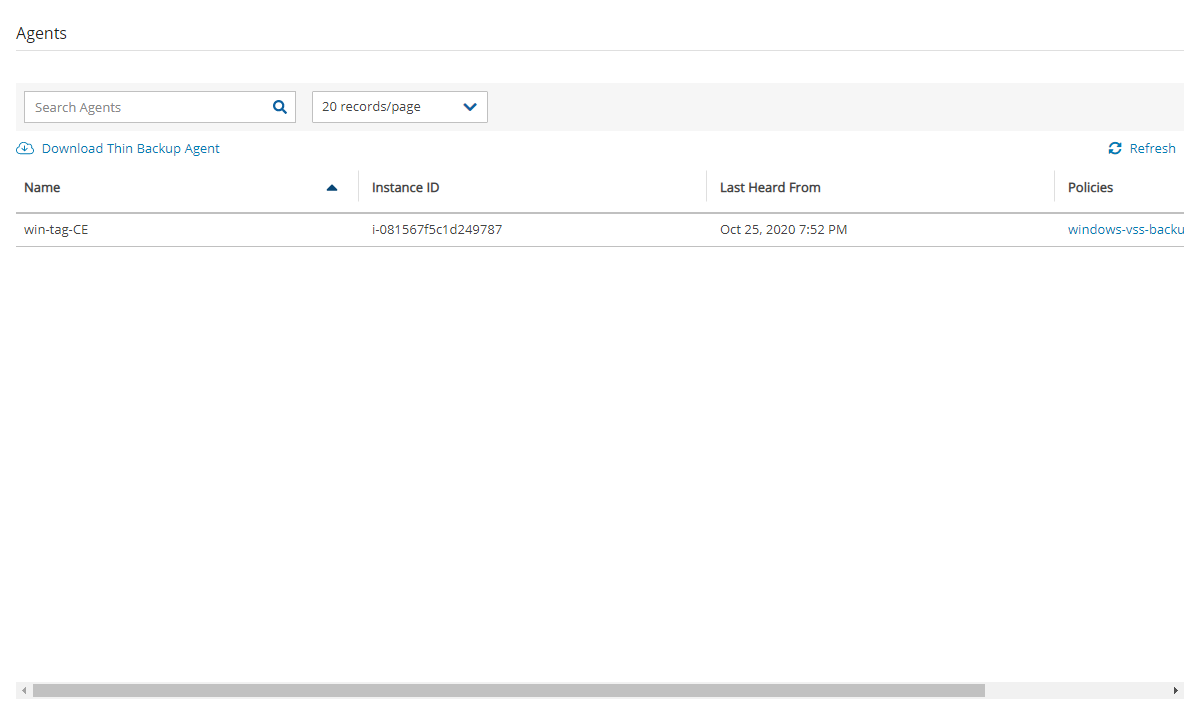

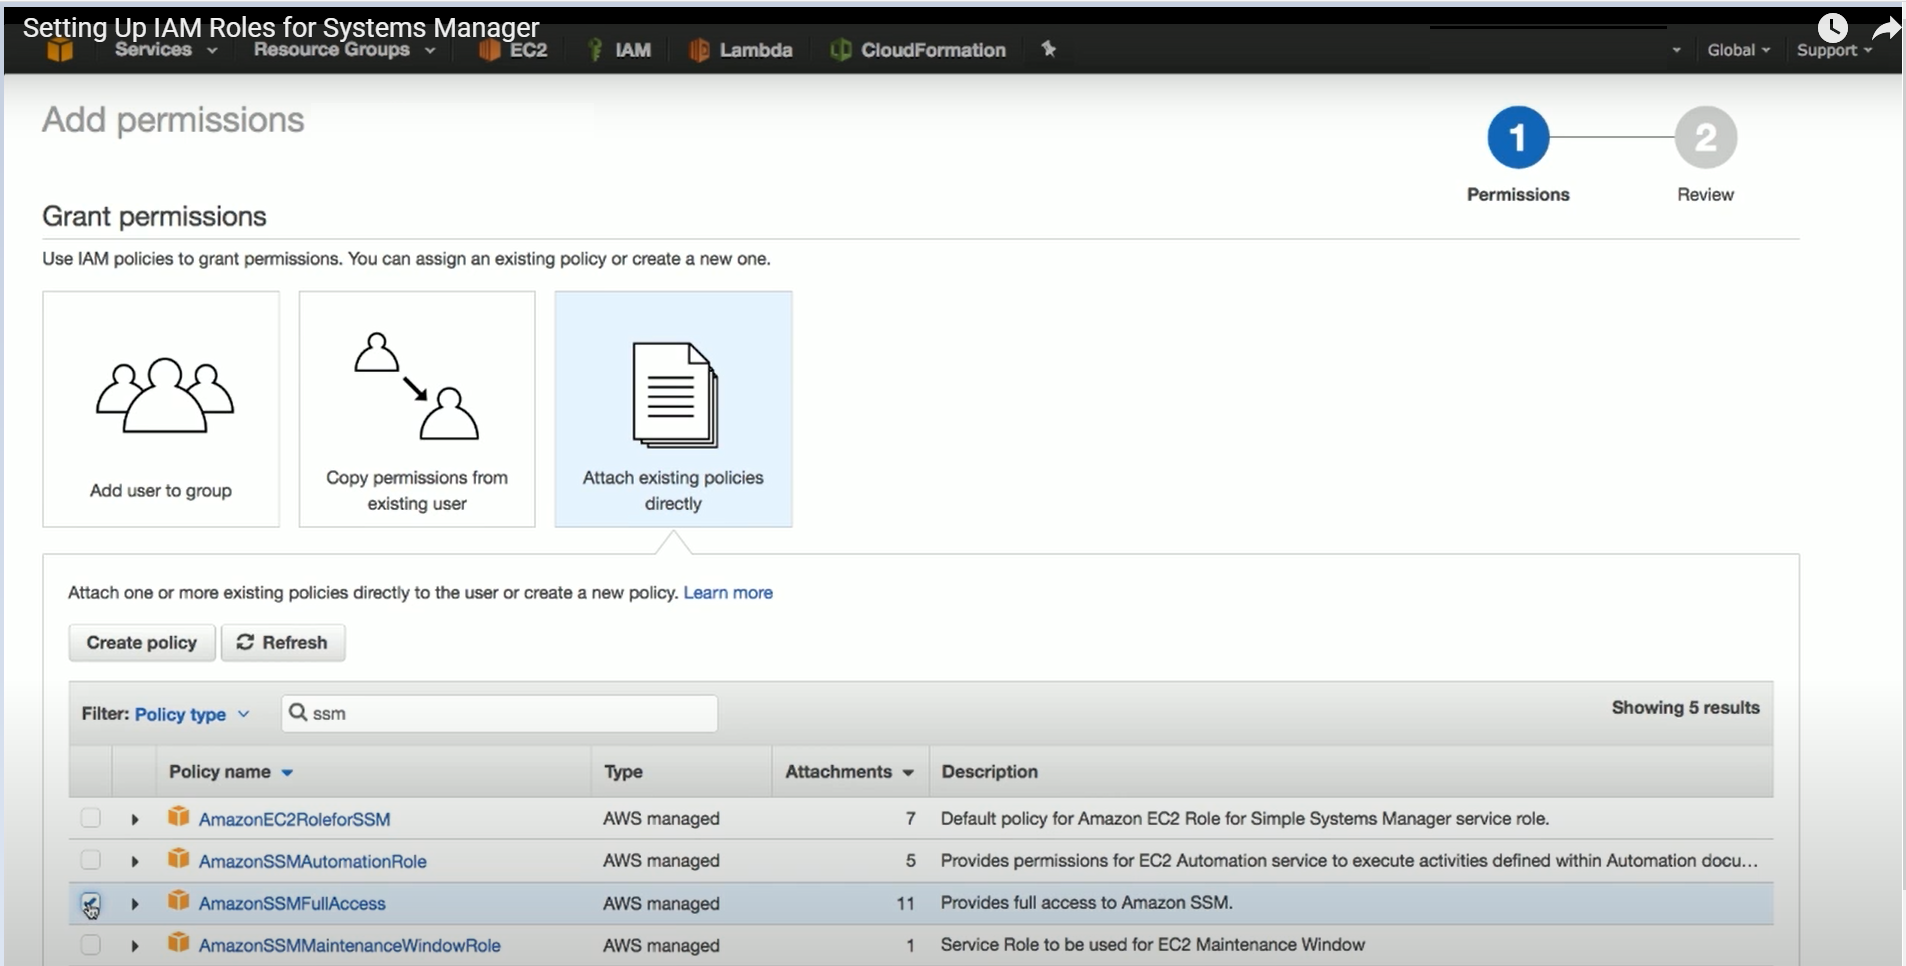
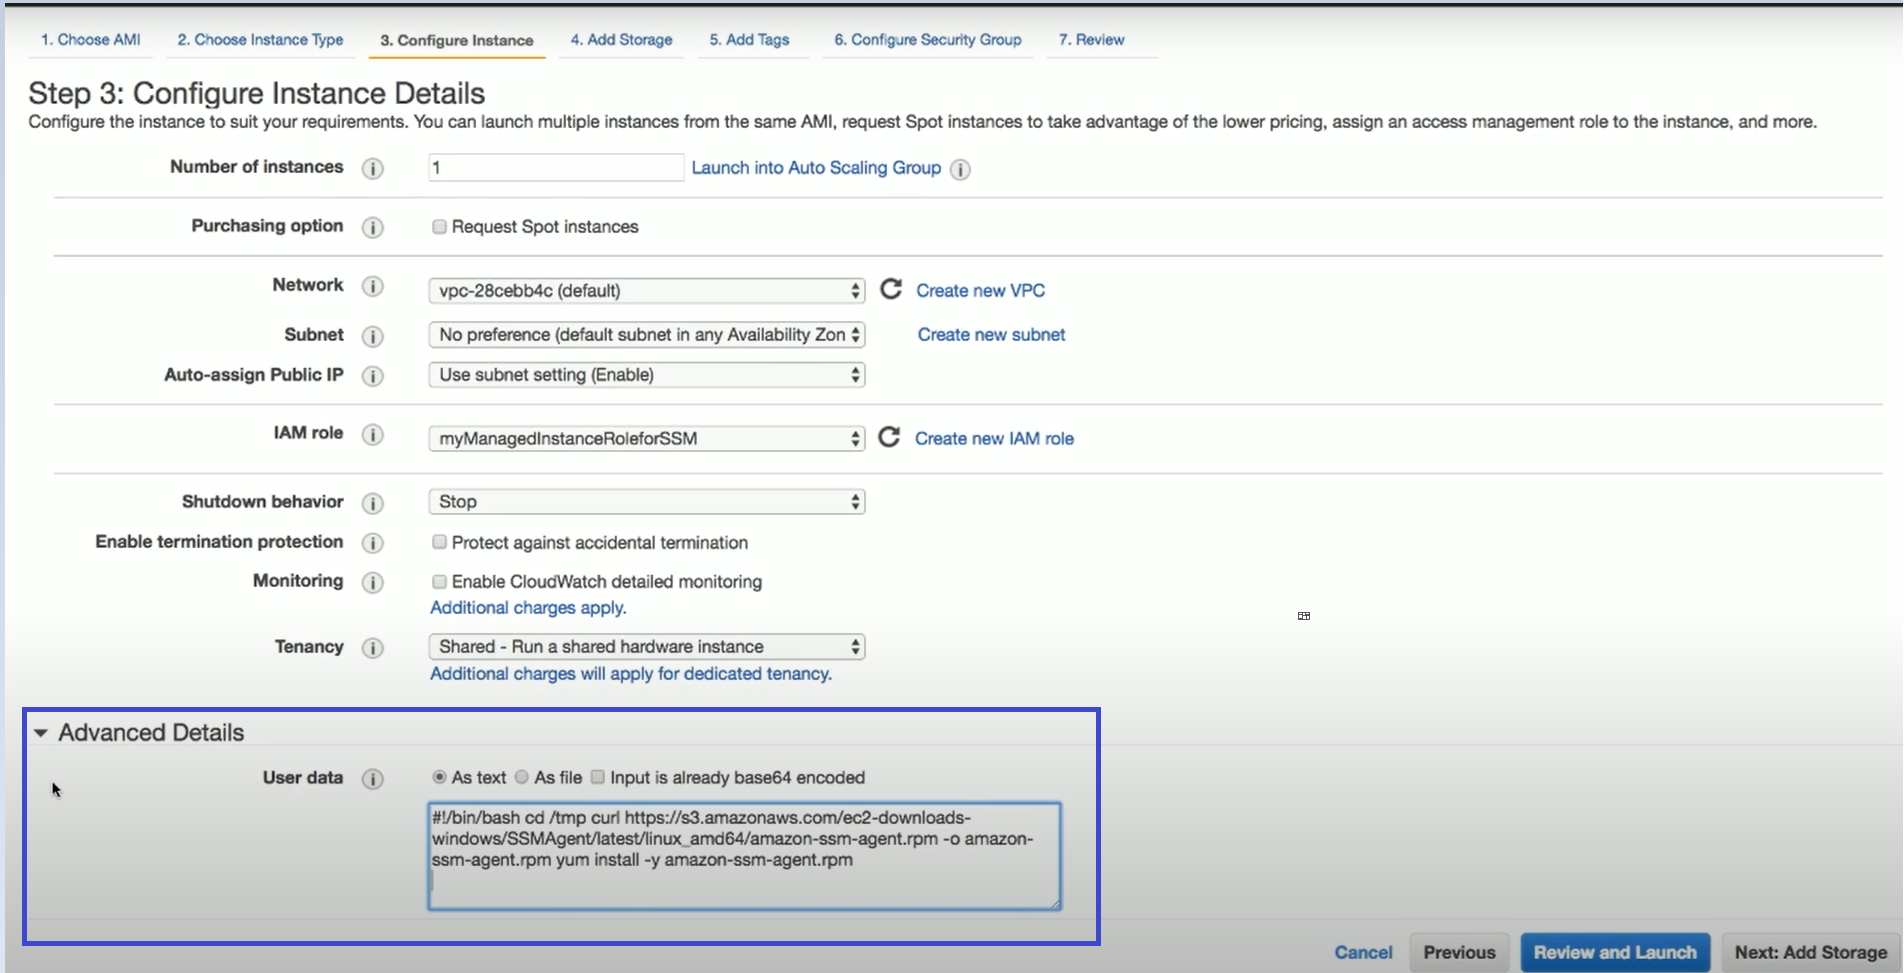


Design a procedure to execute multiple recoveries within one recovery session.
Recovery Scenarios are available for:
AWS and Azure policies
Aurora Clusters
All Azure targets (Virtual Machines, Disks, and SQL Servers)
DocumentDB
DynamoDB
EFS
FSx (including Lustre, OpenZFS, AWS-Managed and Self-Managed Windows FSx, ONTAP)
Instance
RDS (including recovery from Repository)
RedShift
Volume
The Recovery Scenarios feature allows N2W Software users to design an object that will automatically coordinate a sequence of recoveries for several or all backup targets of a single policy during one recovery session.
A Recovery Scenario object is created with the saved configurations of successful backups for the policy.
Depending on the target type, the user can configure how to handle tags during a recovery scenario. The default is to preserve existing tags.
The user will save the recovery configuration for each selected backup target and add it to the Recovery Scenario object.
Following are the options for executing a Recovery Scenario:
Test the success of the Recovery Scenario configuration using the Dry Run command.
Execute an ad hoc run of the Recovery Scenario using the Run Scenario command.
Execute the Recovery Scenario on a schedule. The last successful backup is automatically selected as input. Assign or create a schedule in the Recovery Scenario Details tab.
Backups in the Freezer are not recoverable as part of a Recovery Scenario.
During the Recovery Process:
All Recovery Scenario targets share the same destination account and destination region, which are set as part of the Recovery Scenario parameters.
Recovery Scenarios can have pre- and post-scripts which will run, respectively, before recovery execution and after recovery completion.
Be sure to execute a successful Dry Run of the Recovery Scenario before assigning a schedule.
The configuration Auto assigned values may be different at run time than the values that are shown as grayed-out. To be sure about a value, switch its Auto-assigned toggle key to Custom, and enter the desired value.
To add the details for a recovery scenario:
Select the Recovery Scenarios tab.
On the New menu, select AWS Recovery Scenario or Azure Recovery Scenario.
In the Recovery Scenario Details tab, complete the fields as follows, and then select Save:
The AWS credentials are per Recovery Scenario and not per target. All targets within the Recovery Scenario will use the selected credentials.
Schedule - Optionally select a schedule from the list, or select New to create a new schedule, for running the Recovery Scenario. N2W highly recommends executing a Dry Run before assigning a schedule.
Recipients - Enter the email addresses of users to receive notification of Scenario Run Scenario / Dry Run status.
If SES is disabled, emails are not sent to recipients.
Enable Agent Scripts – Select if the Recovery Scenario will be run by a custom script. The default is not to run user scripts. See section .
Select Agent Script Timeout in seconds from the list. When the timeout is reached, N2W will skip the script and continue with the recovery scenario.
Select Save.
To add the recovery targets:
Select the Recovery Targets tab. The available resources for each type from the policy are shown.
Select one or more Recovery Targets from each type to add to the scenario. Reminder: S3 Bucket Sync is not an option since it is not a backup action.
Every Recovery Scenario target has a number identifying the sequential Recovery Order of execution within the Recovery Scenario. The execution of the Recovery Source within the Recovery Scenario is sequenced using the target’s Recovery Order value. The recovery of the target with the lowest value runs first.
3. To change the Recovery Source or Recovery Order for a target, select a value from its list.
4. For each target, it is important to configure the recovery details. Follow the configuration instructions for the target:
For each target, the Auto assigned values may be different than the values shown as grayed-out in the Configuration screen at run time. To ensure a correct value, switch the Auto assigned toggle key to Custom, and assign the correct value.
For Instance targets, see section .
For Aurora Cluster targets, see section .
For Azure Virtual Machine targets, see section .
6. When all details are complete, select Save in the Create Recovery Scenario screen.
See section for instructions on how to create a Recovery Scenario and Add Recovery Targets.
The Configuration screen opens with additional tabs:
Basic Options
A tab for the resource type, such as Volumes
Advanced Options
For each data item in a configuration tab, assign the appropriate value. Depending on the tab's data item:
Select a different value from a drop-down list when the Auto assigned toggle key is switched to Custom.
Enable or disable a feature.
Enter a new value.
When finished with each tab, select Close.
When selecting a Custom VPC and leaving the VPC Subnet toggle key on Auto assigned, you must ensure that this VPC has a subnet. If you leave the VPC Subnet toggle key on Auto assigned and the selected VPC does not have at least one subnet, the recovery scenario will fail.
If VPC
In the Basic Options tab, you can configure basic recovery actions, such as whether to launch from a snapshot or image, which key pair to use, and network placement.
Since not all instance types are available in all AWS regions, recovery of an instance type to a region where the type is unsupported may fail. Where the instance type is not supported yet in an AWS region, N2W recommends configuring a supported Instance Type in the Basic Options parameters. See section .
In the Volumes tab, you can configure device information, such as capacity, type, and whether to preserve tags and delete on termination. To expand the configuration section for a volume, select the right arrow.
In the Advanced Options tab for an instance, you can customize recovery target features, such as Tenancy, Shutdown Behaviour, API Termination, Auto-assign Public IP, Kernel, and RAM Disk, tags, and whether to Allow Monitoring, enable ENA, EBS Optimized, and User Data.
The Recover Tags default is to preserve the existing tags. To manage the recovery of tags, see section .
To make changes, switch the Auto assigned toggle key to Custom, enter a new value, and then select Close.
For complete details about performing an instance recovery, see section .
See section for instructions on how to create a Recovery Scenario and Add Recovery Targets.
In the Recovery Targets tab, select a cluster, and change the Recovery Source and Recovery Order as needed.
Expand the details for a cluster by selecting the right arrow () next to it. To make changes, switch the Auto assigned toggle key to Custom, and enter a new value.
Select Save.
See section for instructions on how to create a Recovery Scenario and Add Recovery Targets.
After adding the Recovery Targets, select a Virtual Machine target, and then select Configure.
When configuring a Virtual Machine target, the Configuration screen opens with tabs for Basic Options and Disks.
In the Basic Options tab, configure basic recovery actions by selecting a Resource Group, Availability Type, and Networking details.
The Preserve Tags default is to preserve the existing tags. To manage the recovery of tags, see section .
Select Close.
2. In the Disks tab, configure disk information, such as Encryption Set.
3. To expand the configuration section for a disk, select the right arrow ().
1. Change Name to the desired name for the recovered disk.
2. The Preserve Tags default is to preserve the existing tags. To manage the recovery of tags, see section .
4. Select Close.
See section for instructions on how to create a Recovery Scenario and Add Recovery Targets.
After adding the Recovery Targets, select an SQL Server target, and then select Configure.
When configuring an SQL Server target, the Configuration screen opens with tabs for Basic Options, Network, SQL Server's Databases, and Worker Options. See section .
See section for instructions on how to create a Recovery Scenario and Add Recovery Targets.
In the Recovery Targets tab, select a disk, and change the Recovery Source and Recovery Order as needed.
Expand the details for a disk by selecting the right arrow () next to it. Change Name to the desired name for the recovered disk. Update other fields as needed.
Select Save.
See section for instructions on how to create a Recovery Scenario and Add Recovery Targets.
In the DocumentDB section, select a cluster, and change the Recovery Source and Recovery Order as needed.
Expand the details for a cluster by selecting the right arrow () next to it. You can change Cluster ID, Instance Class, VPC, Security Groups, and Subnet Group.
Select
See section for instructions on how to create a Recovery Scenario and Add Recovery Targets.
In the DynamoDB Tables section, select a table and change the Recovery Source and Recovery Order as needed.
Expand the details for a table by selecting the right arrow () next to it. Change Name to the desired name for the recovered table. Update IAM Role as needed.
Select Save.
See section for instructions on how to create a Recovery Scenario and Add Recovery Targets.
In the Elastic File Systems section, select an EFS, and change the Recovery Source and Recovery Order as needed.
Expand the details for an EFS by selecting the right arrow () next to it. You can change Encryption Key and tags. The Recover Tags default is to preserve the existing tags. To manage the recovery of tags, see section .
Select Save.
See section for instructions on how to create a Recovery Scenario and Add Recovery Targets.
Recovery Scenario is possible for the following types of FSx:
Lustre (section )
NetApp ONTAP (section )
OpenZFS (section )
Each FSx type has different configuration settings.
In the FSx File Systems section, select an FSx, and change the Recovery Source and Recovery Order as needed.
Expand the details for an FSx by selecting the right arrow ( ) next to it. You can make changes as needed. The Recover Tags default is to preserve the existing tags. To manage the recovery of tags, see section .
If there are Windows managed Active Directories, update as described below.
Customizing a target VPC allows for customizing and Subnets, as shown below.
N2W supports the following types of Windows FSx file systems:
Windows with Self-Managed Active Directory
Windows with AWS-Managed Active Directory
AWS-Managed Active Directory
When selecting a Windows FSx with AWS-Managed Active Directory, you can select the Active Directory from the target’s AWS account and manage recovery tags.
The Recover Tags default is to preserve the existing values. To manage the recovery of tags, see section .
Self-Managed Active Directory
For Self-Managed Active Directory Windows FSx, user can manage recovery tags and add the self-managed Active Directory settings to the Recovery Scenario:
Domain Name
Admin Group
Service account username and password
The ONTAP FSx Recovery Scenario has a configuration window. To open the configuration window, select an ONTAP FSx, and select the Configure button:
After selecting Configure, the Configure FSx File System box opens with 3 tabs.
The Common FSx Options tab includes Target VPC, Security Groups, Subnet ID, and Recover Tags options. The Recover Tags default is to preserve the existing tags. To manage the recovery of tags, see section .
The ONTAP Specific Options tab includes Original FSx Name and an option for a file system administrative password.
The SVMs and Volumes tab currently allows only Support Vector Machines (SVMs). All volumes will be selected with default settings.
To change the name of the SVM, switch the toggle key to Custom, and enter a new Recovered SVM Name. Select Specify SVM password to enter a password.
See section for instructions on how to create a Recovery Scenario and Add Recovery Targets.
In the Recovery Targets tab, select an RDS cluster, and change the Recovery Source and Recovery Order as needed.
Select the right arrow () to show the details for a resource.
Make changes as necessary, and then select Save.
See section for instructions on how to create a Recovery Scenario and Add Recovery Targets.
After configuring the RDS Recovery Scenario in the Recovery Scenario Details tab, select the Recovery Targets tab.
In the Recovery Source drop-down list, choose the repository to recover from.
Select Configure.
4. In the Basic Options tab, set additional parameters related to the recovery of RDS from the repository. Use the RDS Admin credentials for Username and Password.
5. In the Worker Configuration tab, set the parameters for the worker that will be launched for the recovery.
See section for instructions on how to create a Recovery Scenario and Add Recovery Targets.
In the Redshift Clusters section, select a cluster, and change the Recovery Source and Recovery Order as needed.
Select the right arrow () to show the details for resource, and make changes as necessary.
Select Save.
The RedShift Recovery Scenario has basic options to configure: Cluster ID, Zone, Port, and Subnet Group.
See section for instructions on how to create a Recovery Scenario and Add Recovery Targets.
The Volumes Recovery Scenario screen has only the Basic Options tab.
The Recover Tags default is to preserve the existing tags. To manage the recovery of tags, see section .
You have the option to change tags and tag values. In the Recover Tags section, switch the Auto assigned toggle key to Custom, and select a tag option:
No Tags – Do not recover tags.
Preserve (and Add/Override) – You can preserve (default), add to, or override the tags on the version of the resource selected for the recovery.
Fixed Tags – Initial display is current list of tags on resource. Set the tags to be used during recovery even if the user has subsequently changed the tags on the resource.
The Dry Run option allows you to determine whether the input parameters, such as key pair, security groups, and VPC, are correct for the recovery.
To test a Recovery Scenario:
In the Recovery Scenarios tab, select a Recovery Scenario and then select Dry Run.
In the list of successful backups, select one backup to perform the test with, and then select Dry Run.
Open the Recovery Scenario Monitor.
To manage a Recovery Scenario object:
In the Recovery Scenarios tab, select a scenario.
Select Edit, Delete, Run Scenario, or Dry Run, as needed.
To manage targets in the scenario:
In the Recovery Scenarios tab, select a scenario, and then select Edit.
To delete a target, select the Recovery Targets tab, select a target, and then select Remove from List.
A Recovery Scenario can also be run on a schedule using the last successful backup. To assign or create a schedule, see section .
In the Recovery Scenarios tab, select a Recovery Scenario and then select Run Scenario. A list of backups, successful and unsuccessful, opens.
2. Select one successful backup to recover from and then select Recover. The started message opens in the top right corner:
3. To open the Recovery Scenario Monitor, select the link, or select the Recovery Scenario Monitor tab.
A Status of ‘Recovery succeeded’ with a test tube symbol next to it indicates that the recovery was a Dry Run.
4. To view details of the recovery in the Run Log, select a Recovery Scenario and then select Log.
5. To delete a run record, select a scenario, and then select Delete Record.
Deleting a run record will trigger the deletion of all its target recovery records.
6. To view a live recovery, in the Recovery Scenario Monitor, select a scenario, and then select Recoveries. The Recovery Monitor opens.
When Enable Agent Scripts is set in the Recovery Scenario Details tab, N2W will run two scripts, one before and one after the recovery run:
before_<recovery-scenario-name>
after_<recovery-scenario-name>
A file extension is optional and, if added, may be for any interpreter.
This is somewhat like the Linux Backup Scripts feature described in the Before Script and After Script topics, sections and .
These scripts must be located on the N2W server in the following folders:
For root user: /cpmdata/scripts/scenario
For non-root user: /cpmdata/scripts/scenario/user_names
The before script passes the following parameters, in the following order:
The after script passes the same parameters as the before with the addition of parameters for the scenario’s recovery targets:
Following is an example of an after_ script for a Recovery Scenario that was defined with 2 targets: an EC2-instance and an EC2-volume. The after_ script passes 6 parameters, 2 of which are for the targets. In the following example, the instance recovery target was not recovered:
At runtime, the user selects a successful backup record to use in the recovery.
In case of a pre-script failure, the Recovery Scenario will not execute.
In case of a Recovery Scenario failure or pre-script failure, the post-script will not run.
Every Recovery Scenario target has a sequential Recovery Order value within the Recovery Scenario which determines the order in which each target is recovered.
Execution of a target recovery within the recovery scenario is sequenced using the target's Recovery Order value. The target with the lowest Recovery Order value runs first.
All recovery targets sharing the same Recovery Order value will run in an arbitrary sequence.
If the recovery of a target fails, the targets next in sequential order will not run, unless Recovery Scenario’s Continue recovering ignoring failures parameter is enabled.
Testing: You can verify the Recovery Scenario input parameters, such as key pair, security groups, and VPC, by selecting the Dry Run link. You will be prompted to select a successful backup for the Dry Run just as with an actual Run Scenario.
Name - Enter a unique name.
User, Account, Policy - Select from the lists or selectNew. After the addition, select Refresh. Select the policy for which the Recovery Scenario is defined.
Recovery Destination Account and Recovery Destination Region - Select from the lists.
AWS Credentials - Select Use account AWS Credentials or Provide Alternate AWS Credentials.
Continue recovering ignoring failures – Whether to continue the sequence of recoveries in the scenario if there is a failure. The default is to not continue the script on the failure of recovery.
For Azure Disk targets, see section 24.3.5.
For DocumentDB targets, see section 24.3.6.
For DynamoDB targets, see section 24.3.7.
For EFS targets, see section 24.3.8.
For all FSx targets, see section 24.3.9.
For RDS targets see section 24.3.10.
For RDS recovery from a repository, see section 24.3.11.
For RedShift targets, see section 24.3.12.
For Volumes targets, see section 24.3.13.
For manage the recovery of target tags, see section 24.3.14.
Select Save.
In the Status column for the Recovery Scenario, you will see a success message for the test:
Selecting Recoveries brings you to the regular Recovery Monitor.
3
Policy account Id
4
Destination region
May be null, if the value is NULL.
Target lists
Each target is in colon-separated format:
RecoveryType:OriginalAwsResourceId:
OriginalRegion:RecoveredAwsResourceId
RecoveryType
Single character identifying resource type:
I - Instance
V - Volume
R - RDS Database
A - RDS (Aurora) Cluster
C - Redshift Cluster
D - DynamoDB
E - EFS
F - FSX
OriginalAwsResourceID
AWS ID of the original resource
OriginalRegion
AWS region of the original resource
RecoveredAwsResourceID
AWS ID of the recovered resource. If not recovered, then 'null'.
#
Parameter
Notes
1
Scenario Id
2
Account Id
#
Param.
Notes
1-4
...
Same as before_ parameters
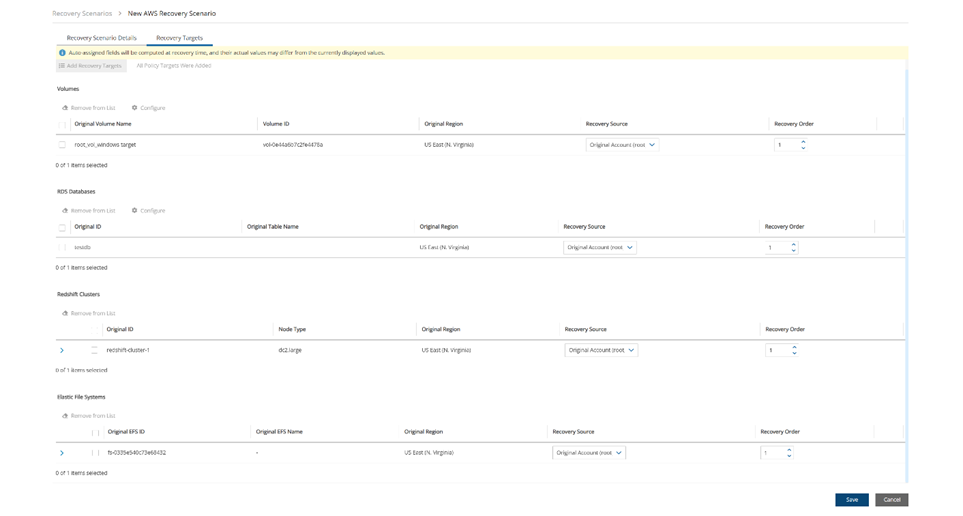

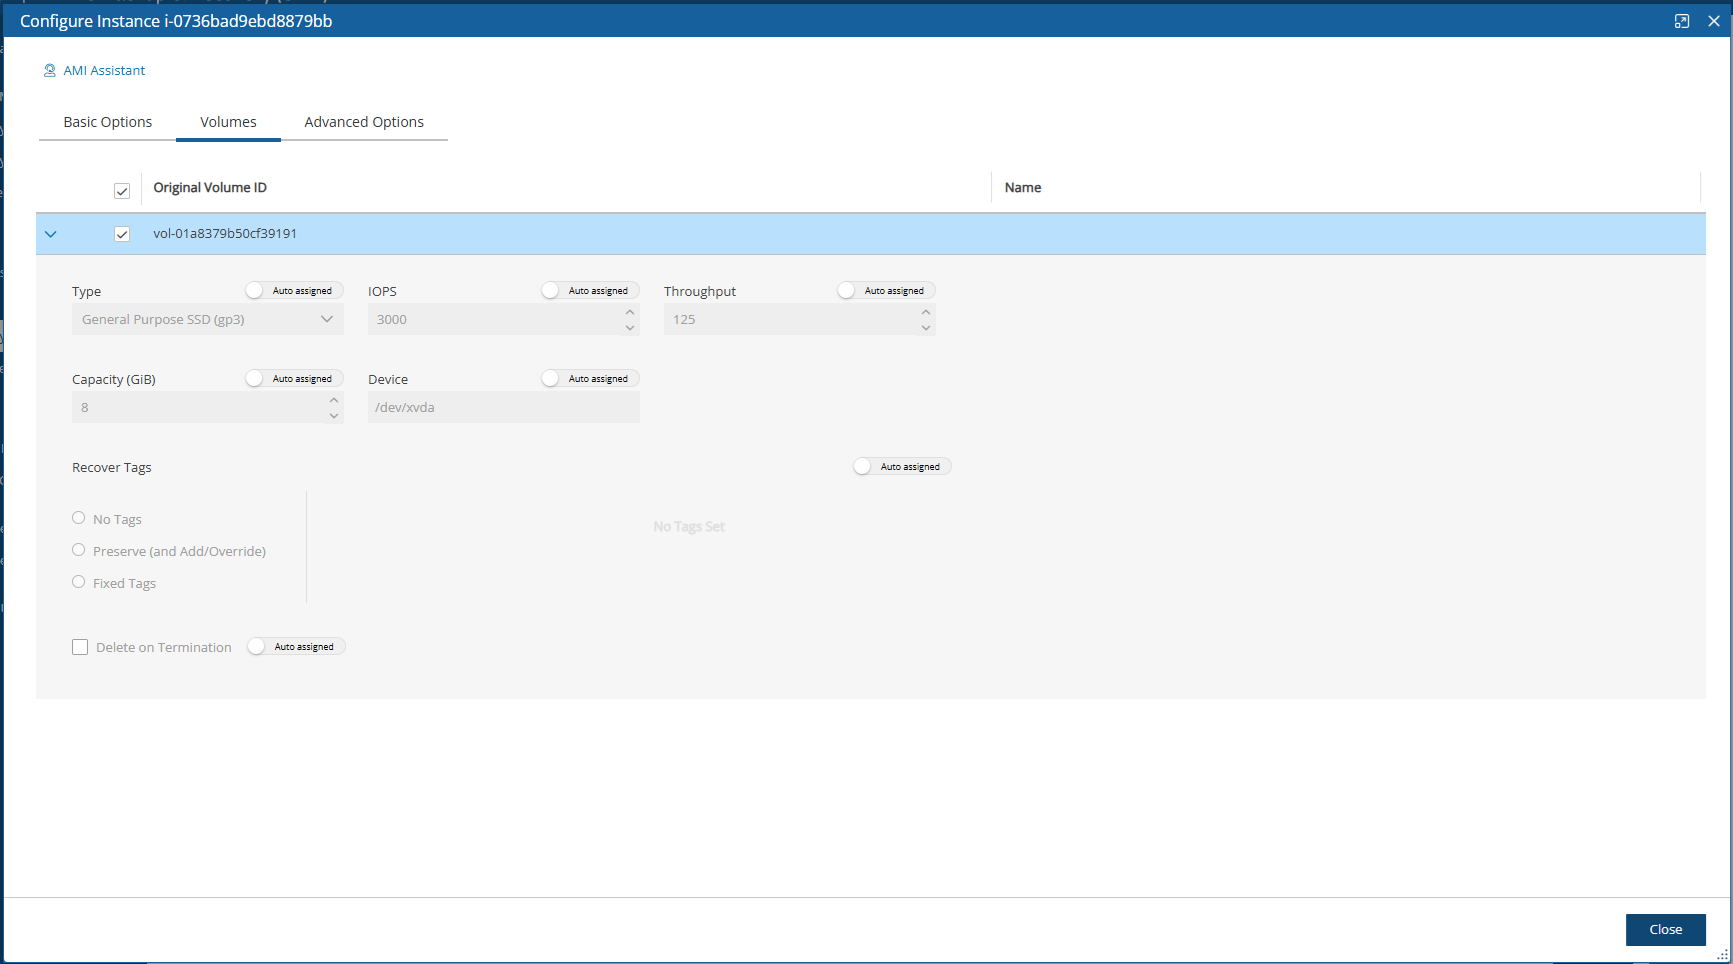
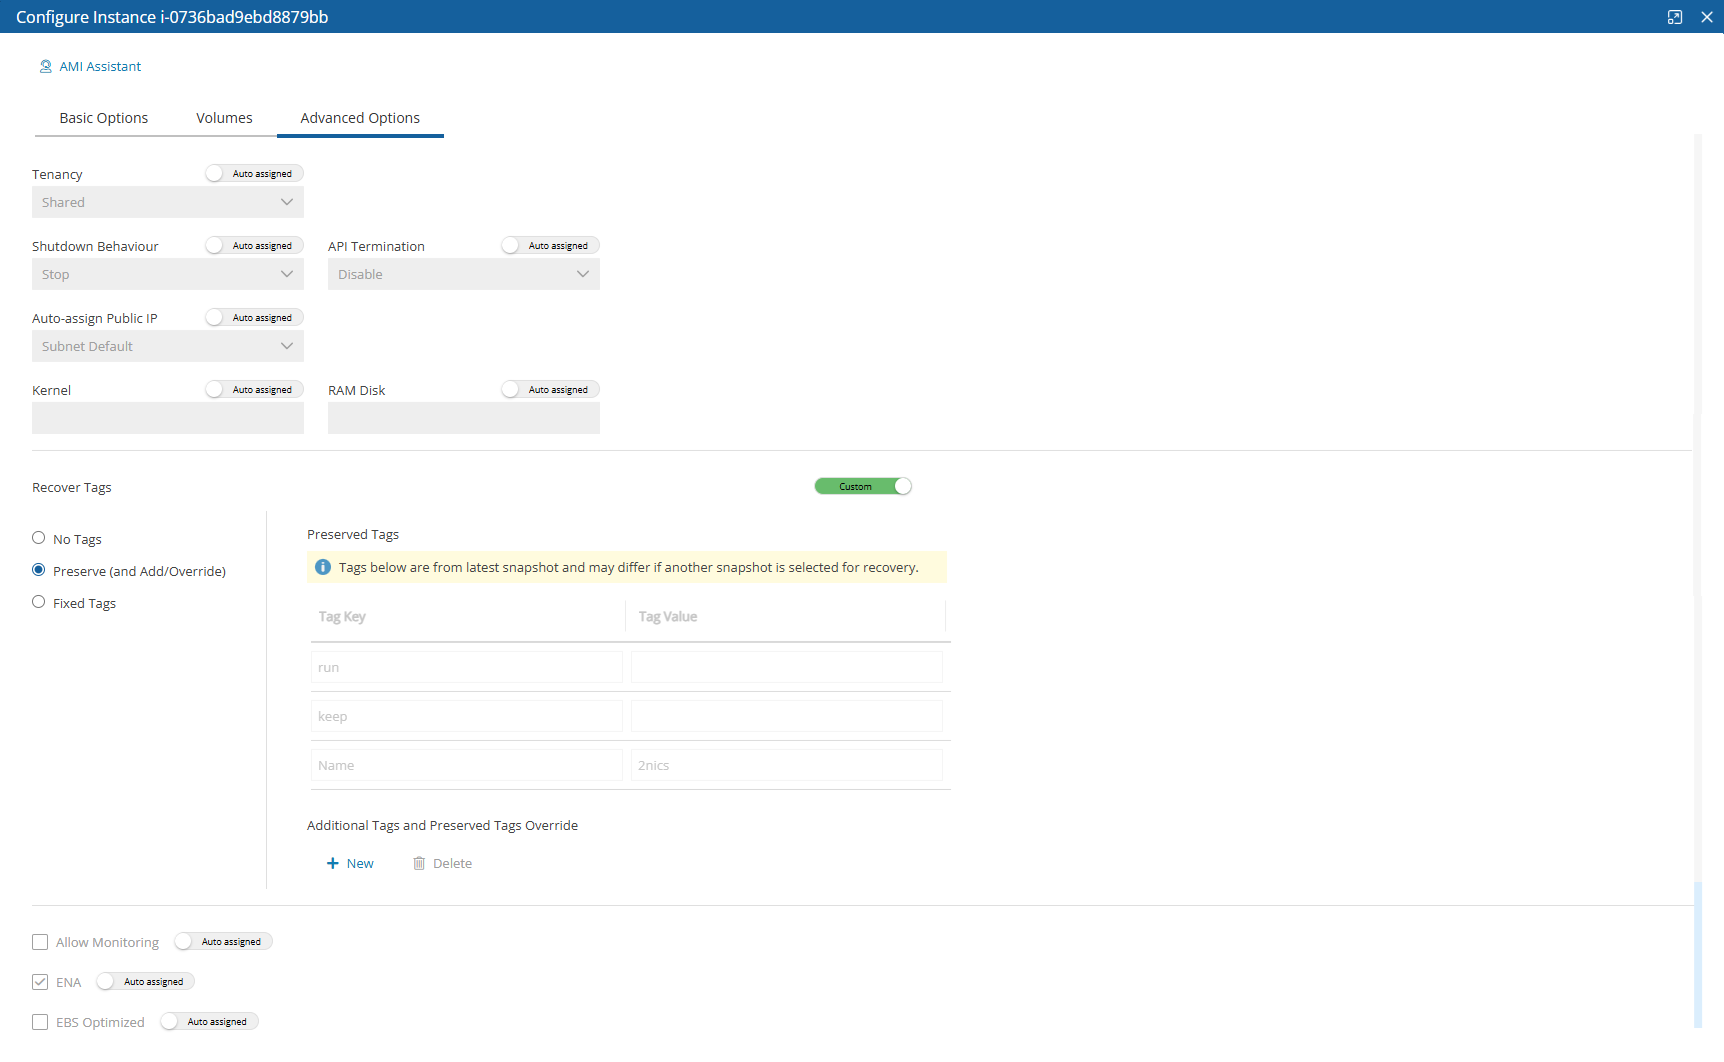
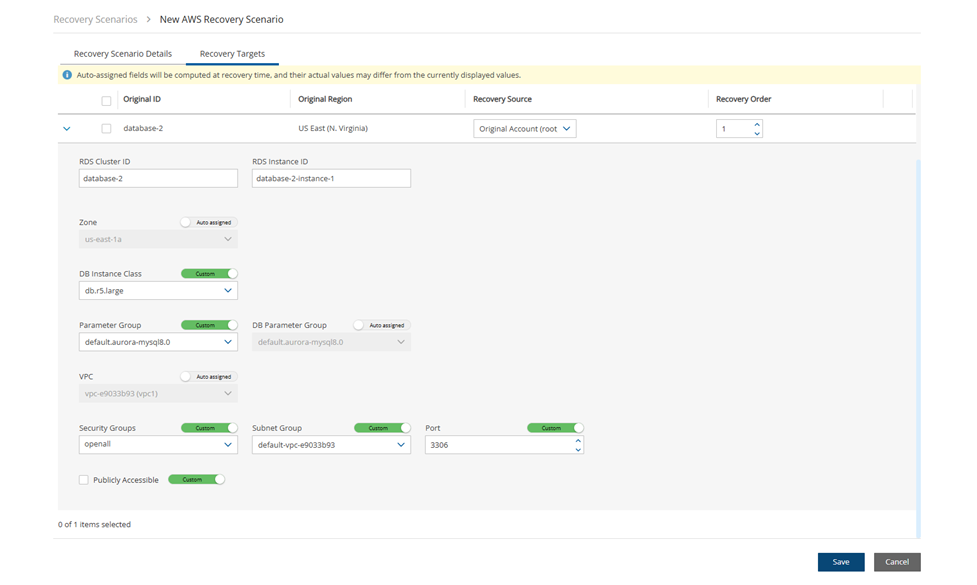
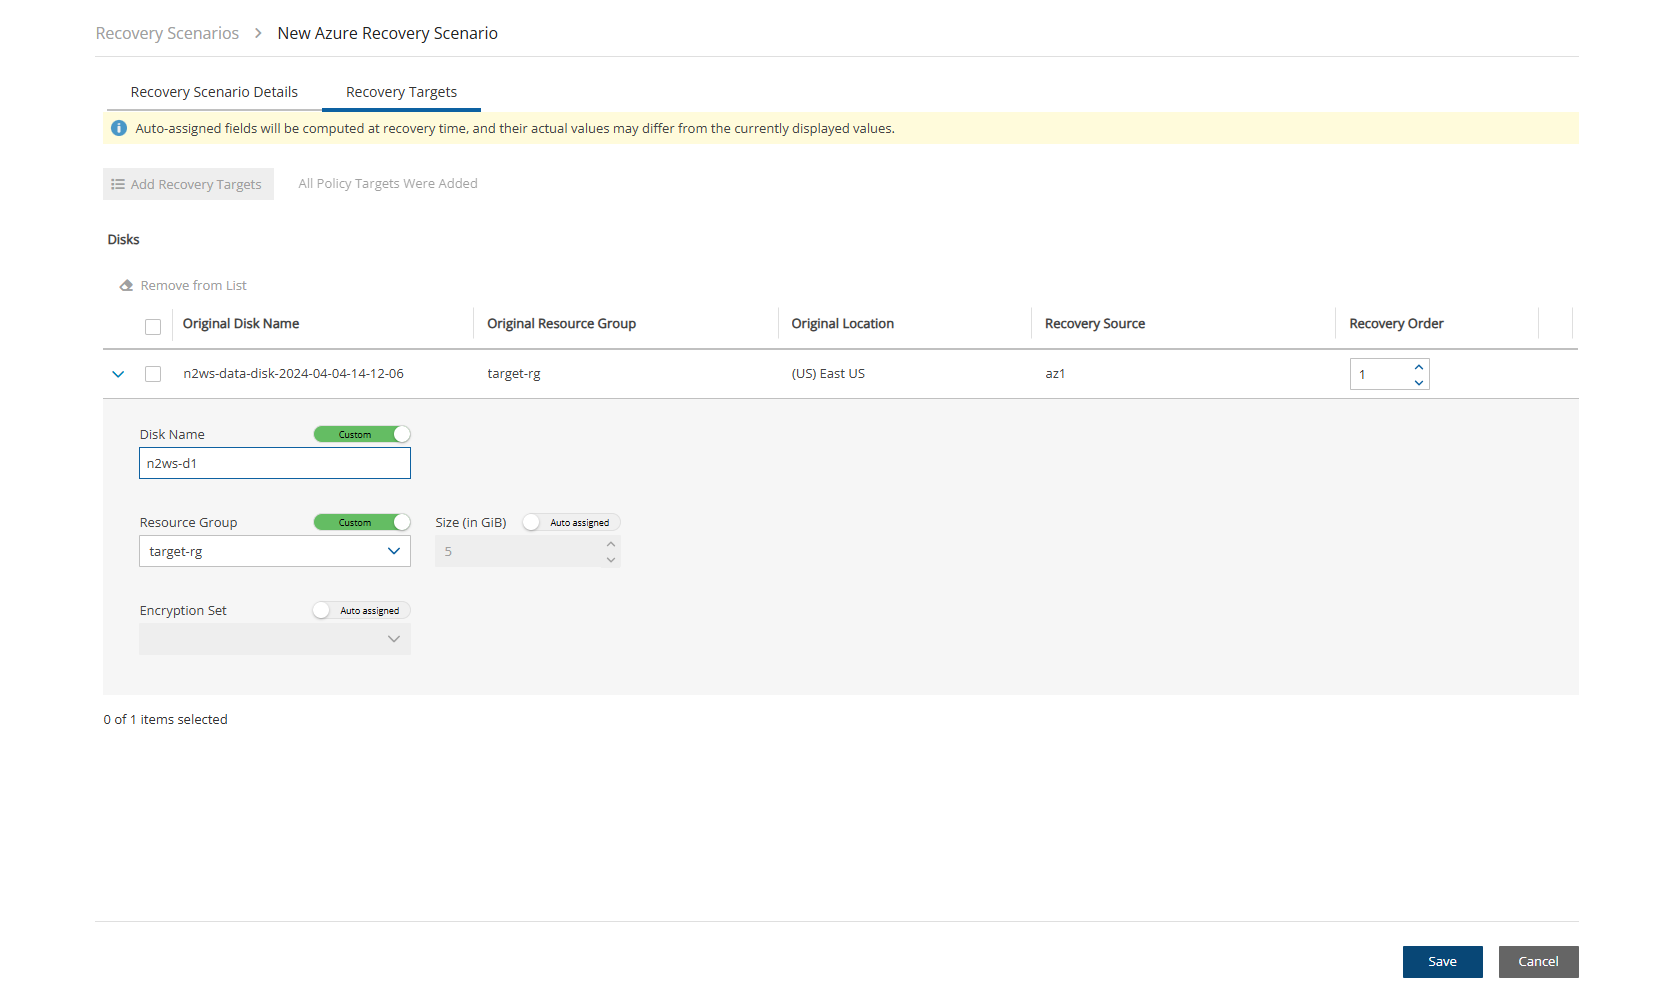
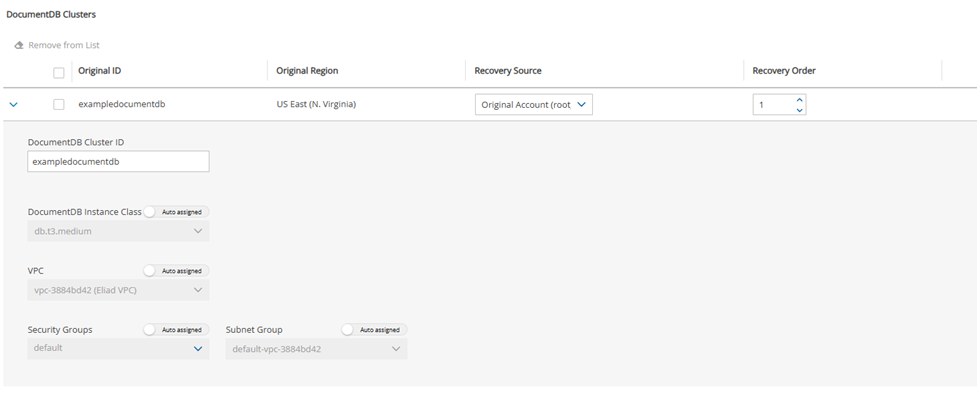
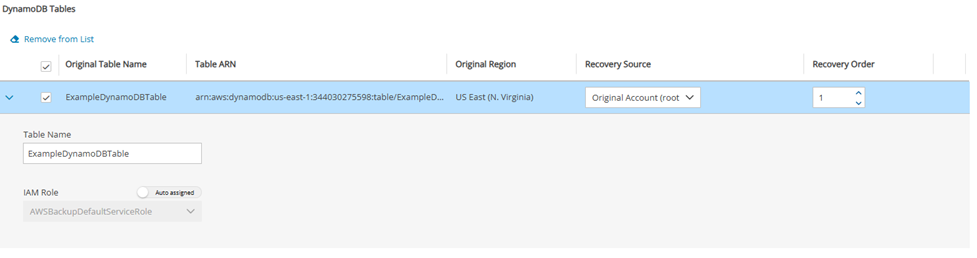
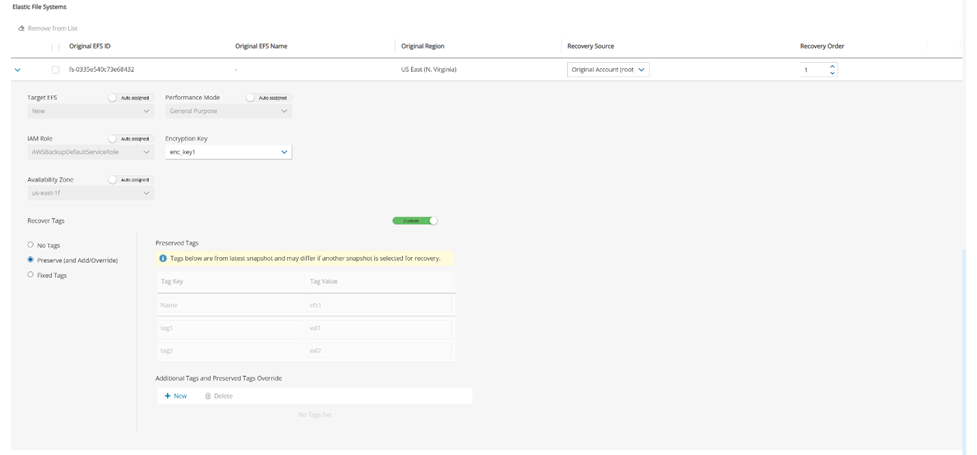
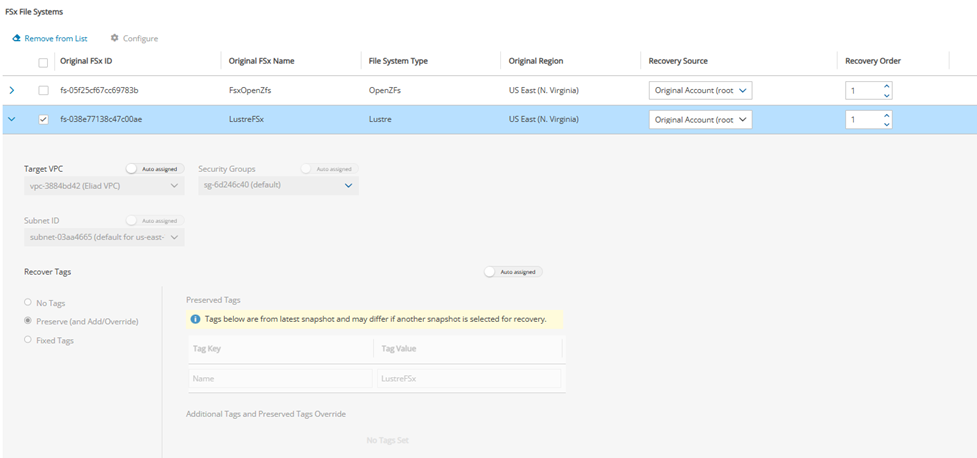
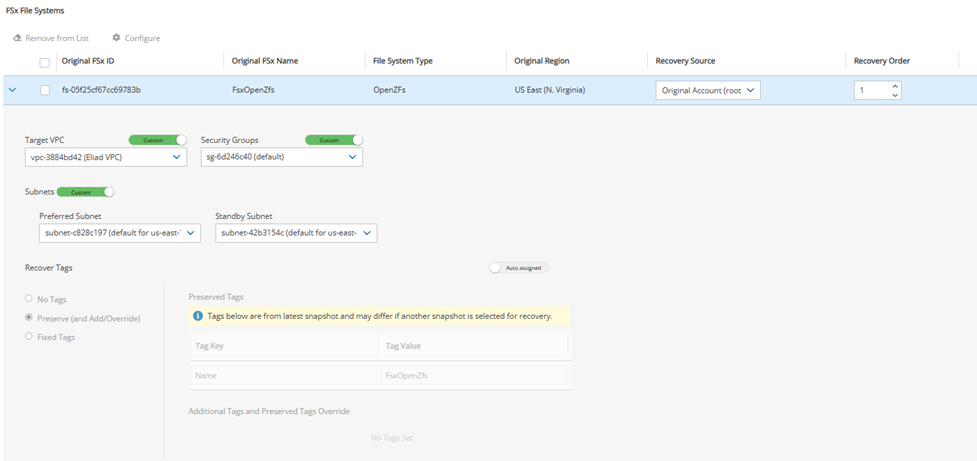
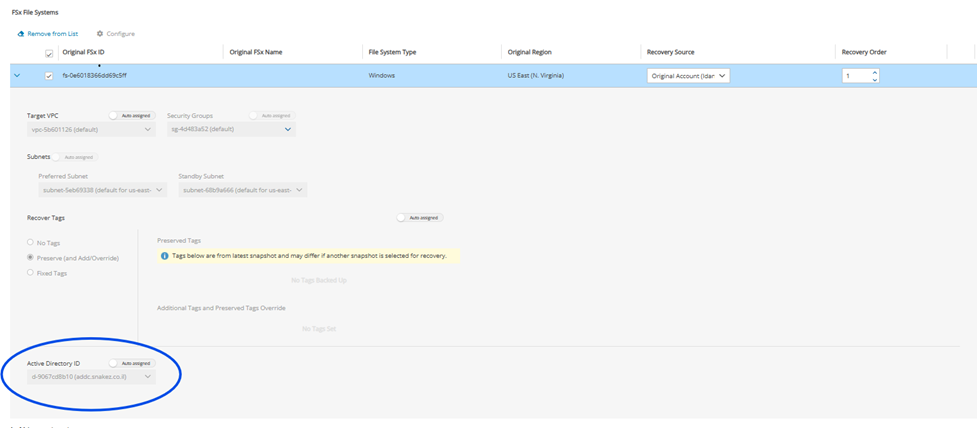
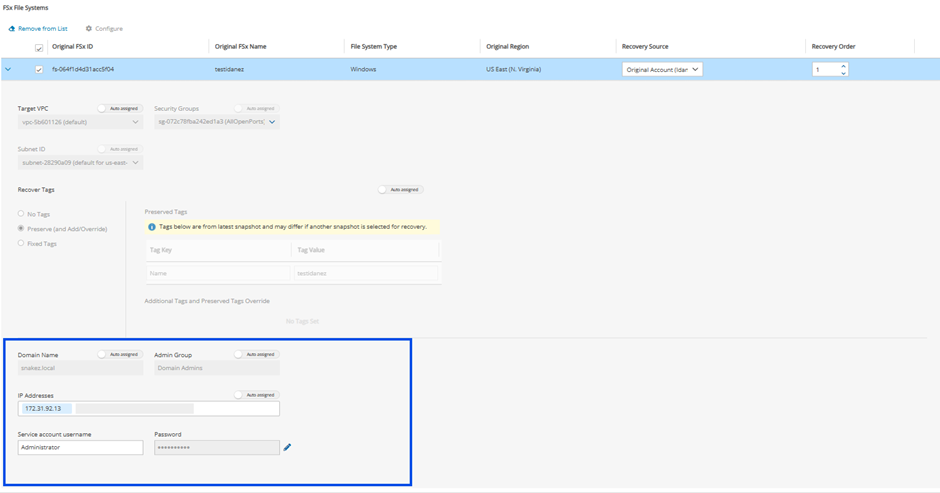

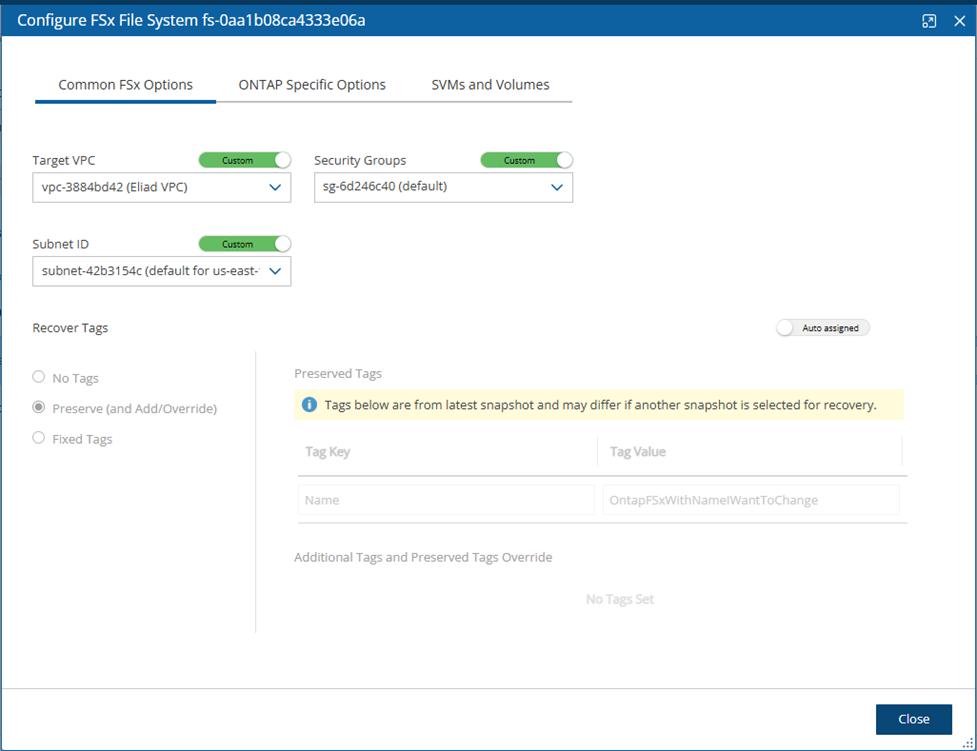
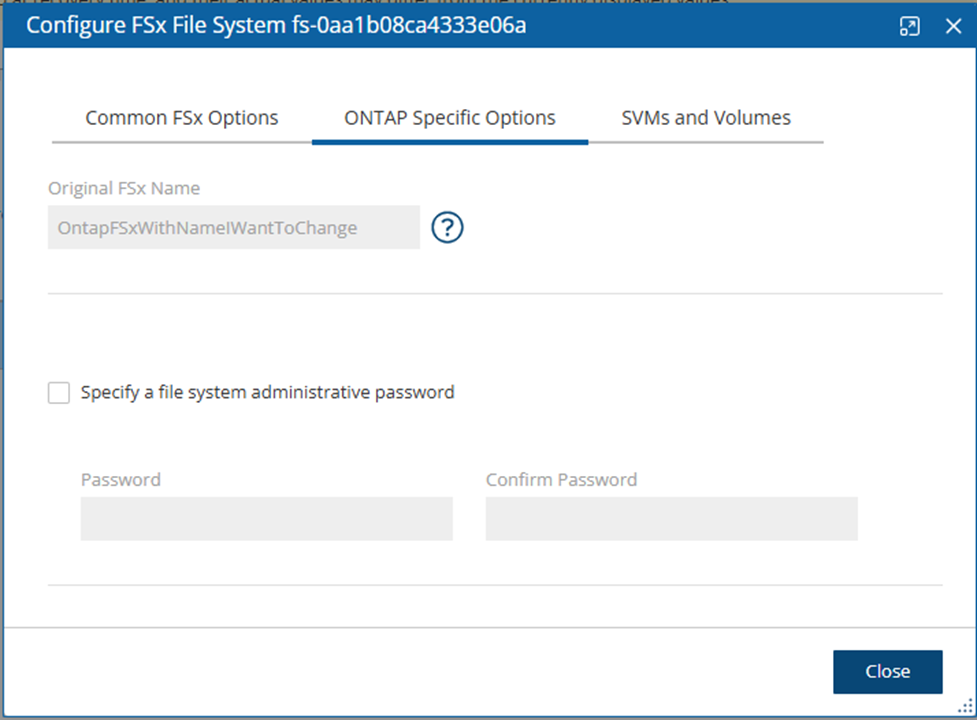
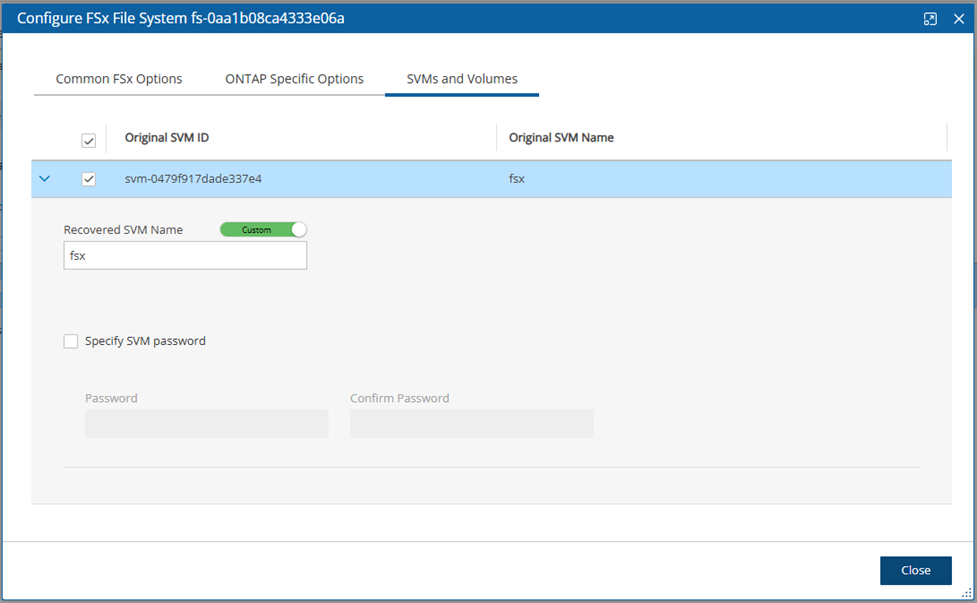
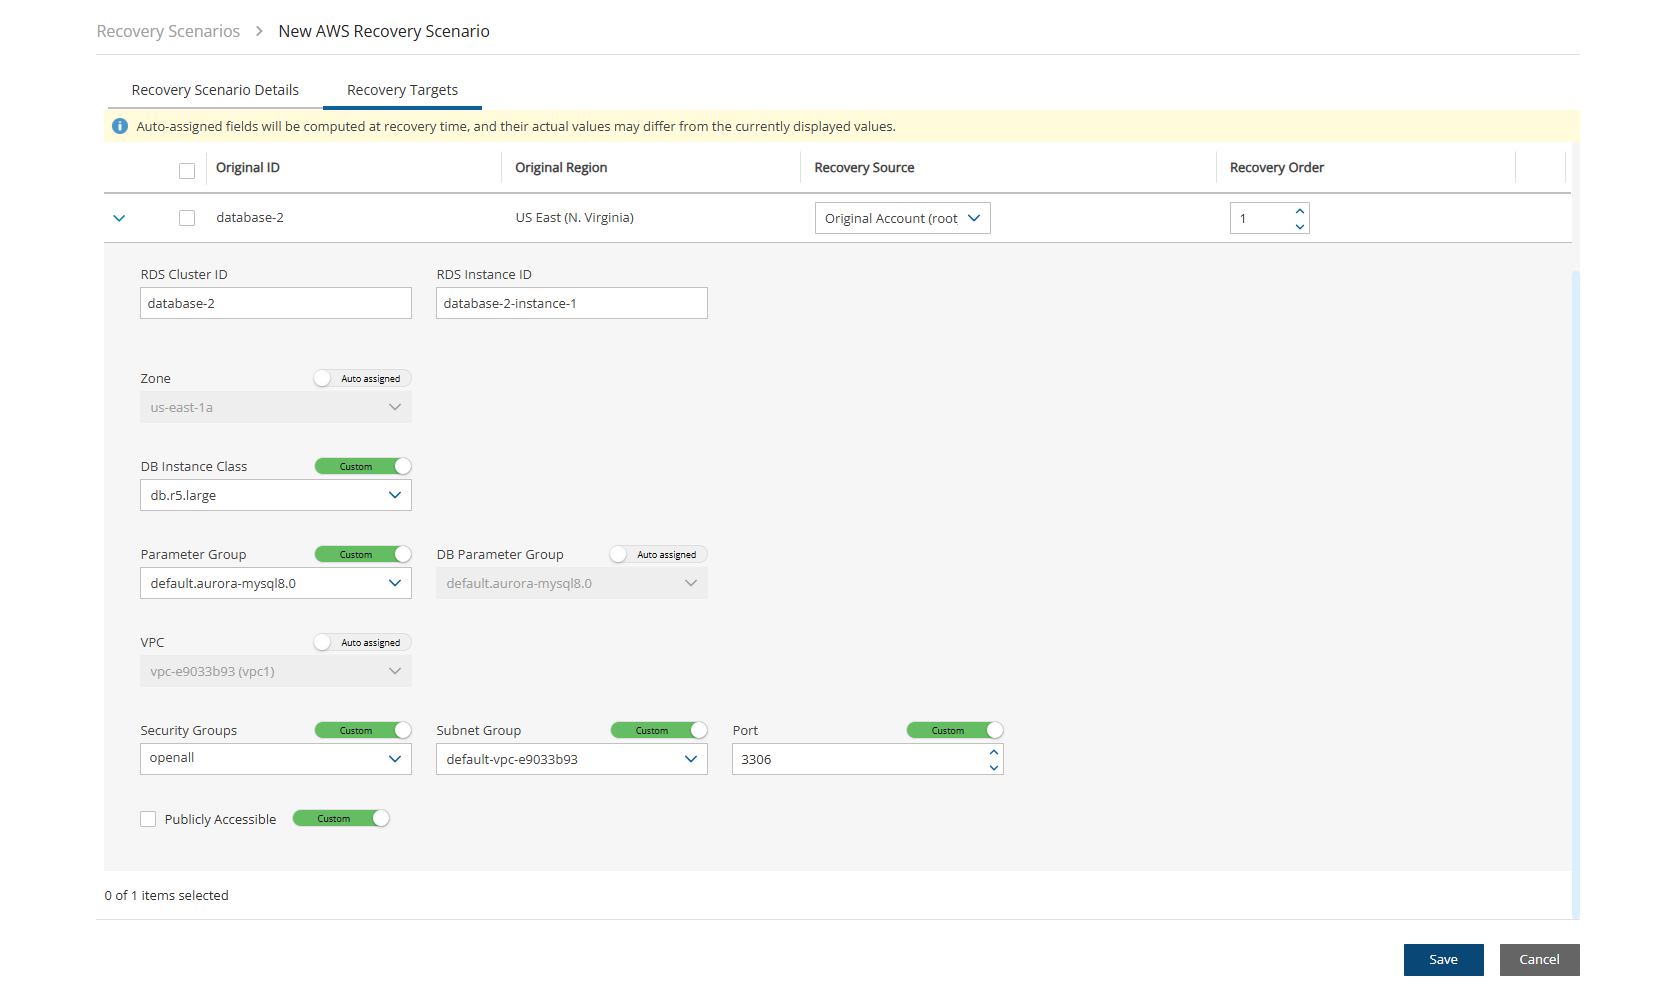
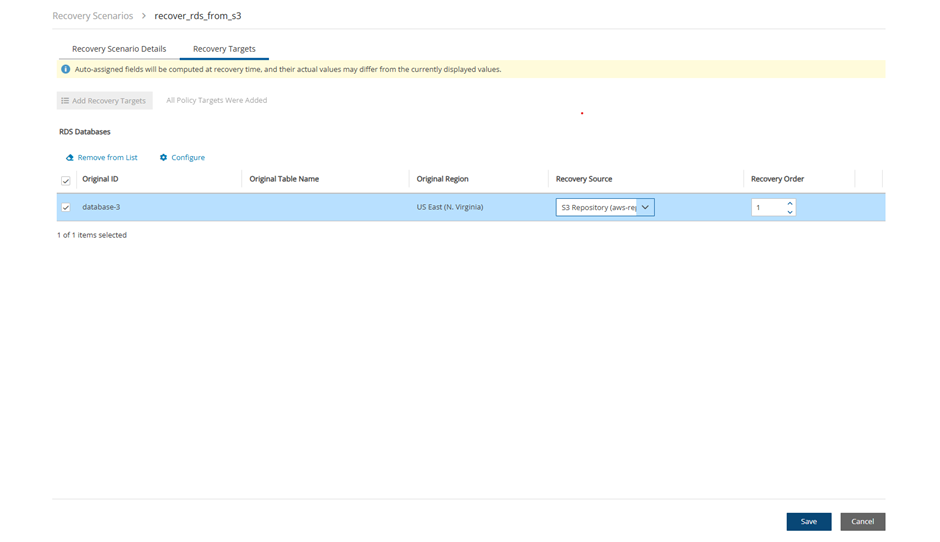
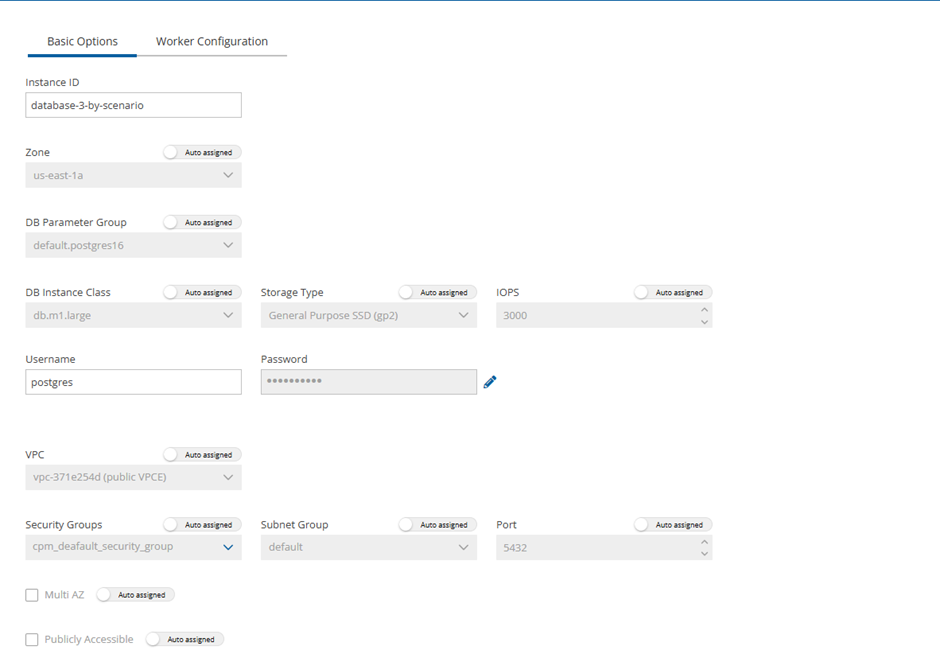
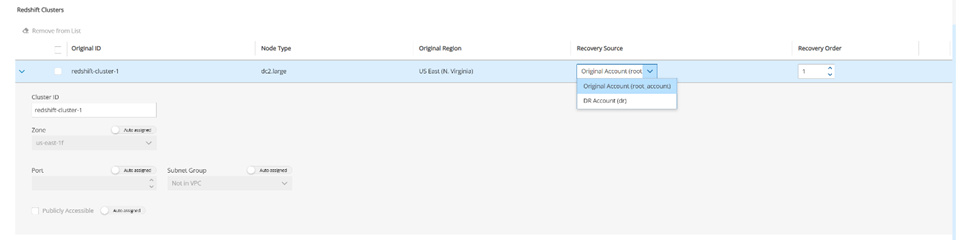
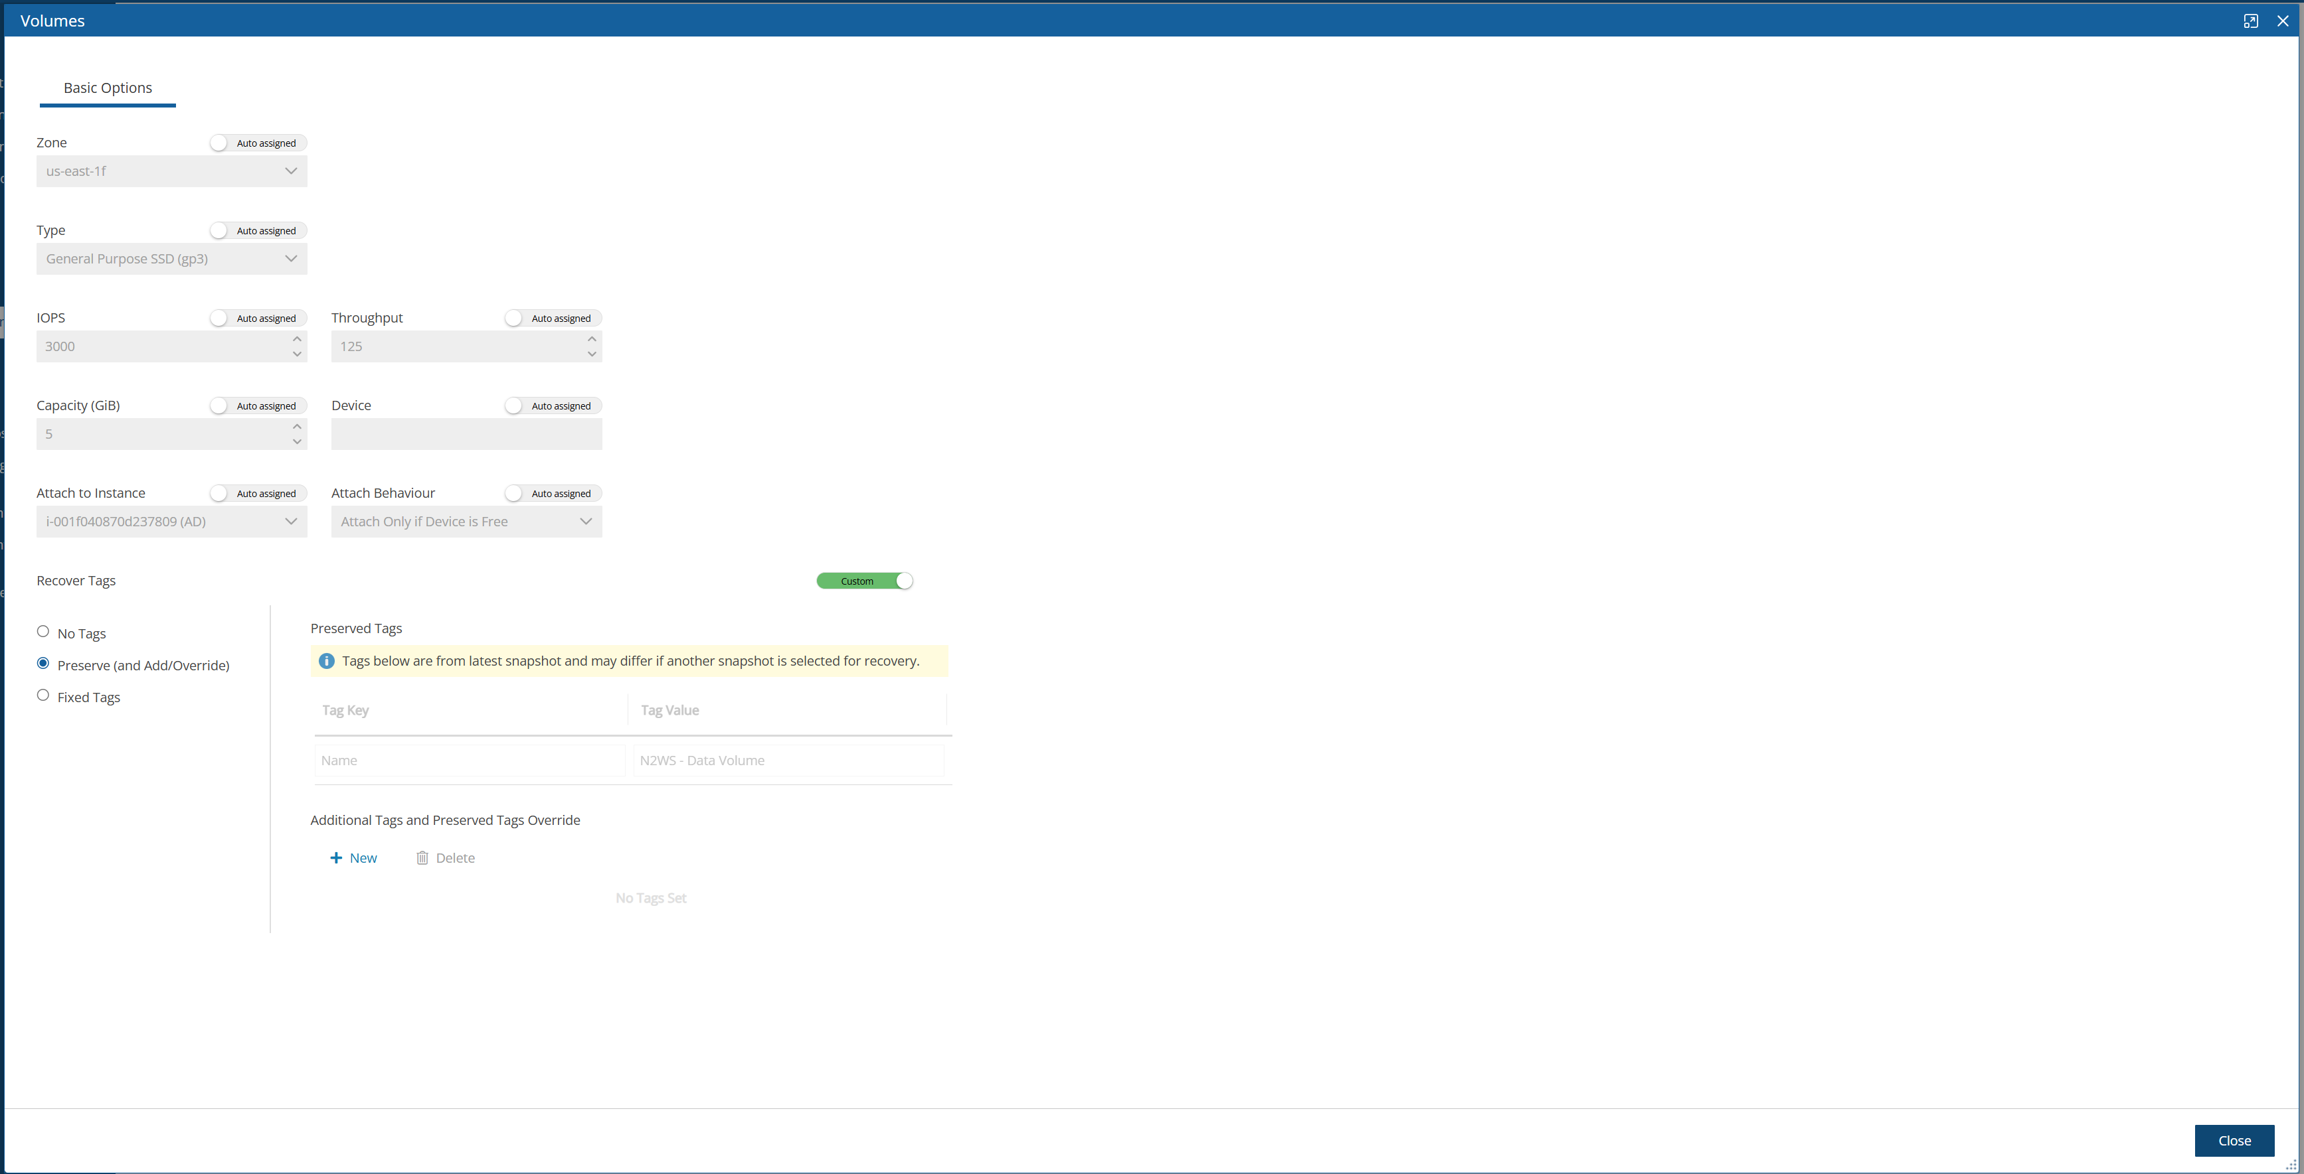
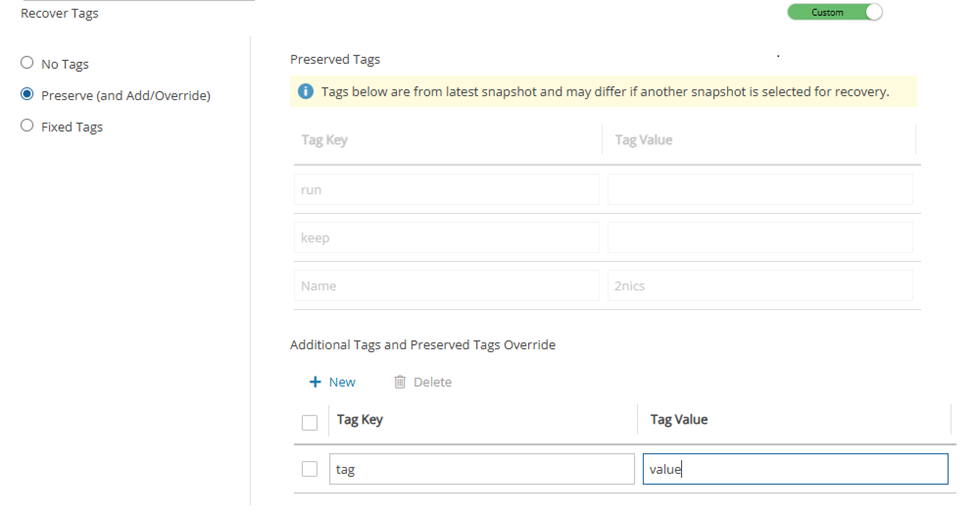
May be null, if the value is NULL.
5
Here you will learn about integrating Identity Providers (IdP) with N2W.
N2W supports users configured locally (local users) and users configured using the organization’s federated identity provider (IdP).
Local users are created and managed using the N2W User Management capabilities described above.
IdP users are users whose credentials are received from the organization’s IdP. N2W can be configured to allow users in the organization’s IdP system to log in to N2W using their IdP credentials. Integration with IdP systems is performed using the SAML 2.0 protocol.
1
null
1
null
I:i-0a87ab83ca3fa62c2:us-east-1:null
V:vol-0197aba1f7090c513:us-east-1:vol-03336f4ed151b5d29N2W supports:
Active Directory (AD) 2012 and 2016. If using SAML 2.0, AD 2019 also supported.
Azure Active Directory-based Single Sign-On (SSO)
IDP vendors who support SAML 2.0
The N2W root user can only login through the local user account even when N2W is configured to work with IdP.
Configuring N2W to work with IdP consists of the following:
Configuring the IdP to work with N2W
Configuring N2W to work with the IdP
Configuring N2W Groups in N2W
Configuring N2W Groups and Users in IdP
N2W supports the SAML 2.0 protocol for integration with IdP systems. N2W Software qualifies only certain IdP systems internally, but any SAML 2.0 compliant IdP system should be able to work smoothly with N2W.
Before configuring N2W to work with an IdP system, it is required that N2W be configured in the IdP system as a new application. Consult the IdP system’s documentation on how to configure a new application.
When configuring N2W as a new IdP application, verify that:
The default Name ID format used in SAML requests is set to Unspecified, or modify the default N2W configuration as per section on N2W configuration below.
The X509 certificate Secure hash algorithm is set to SHA-256.
The following URL values are used:
<N2W-Address> is either the DNS name or the IP address of the N2W Server.
Entity ID - https://<N2W-Address>/remote_auth/metadata
As part of configuring N2W as a new IdP application, the IdP system will request a file containing the N2W x509 certificate. The certificate file can be obtained from the N2W Settings screen in the Identity Provider tab. In the Settings tab, select Download CPM's Certificate and choose a location to save the file. See section 19.1.2.
If configuring Microsoft Active Directory/AD FS to work with N2W, refer to section 19.4.1.
If configuring N2W for integration with Microsoft Active Directory/AD FS, refer to section 19.5.
To configure N2W to work with the organization’s IdP:
In the N2W toolbar, select Server Settings.
In the left panel, select the Identity Provider tab and then select the Settings tab.
Select Identity Provider. The configuration parameters appear.
Complete the following parameters.
Once all the parameters have been entered, select Save.
Optionally, you can Download CPM’s Certificate and Metadata.
Select Test Connection to test the connection between N2W and the IdP.
CPM IP or DNS – The IP Address or DNS name of the N2W server.
N2W accepts either the IP address or DNS name in many fields. However, some IdPs require that N2W be configured using the format used when configuring N2W as an application in the IdP system. If the IdP uses DNS names, use DNS names in N2W, and if the IdP uses IP address, use IP addresses in N2W.
Entity ID – The Identity Provider Identifier’s URI provided by the IdP system. Consult the IdP system’s documentation.
Sign In URL – The authentication request target is the URL, provided by the IdP system, to which N2W will redirect users after entering their IdP credentials. Consult the IdP system’s documentation.
Sign Out URL – The logout request target is the URL, provided by the IdP system, to which N2W will redirect users once they logout of N2W. Consult the IdP system’s documentation.
NameID format – The format of the SAML NameID element.
X509 Certificate – Select Choose file to upload the IdP’s X509 certificate. Consult the IdP system’s documentation about obtaining their x509 certificate.
Groups and the permissions assigned to groups are configured in N2W. When an IdP user logs into N2W, the information about the user’s group membership is received from the IdP and that group’s permissions are assigned to the user.
Every IdP user must belong to an N2W group. IdP users who do not belong to a group, even if they have user-specific permissions as detailed below, cannot log on to N2W. Logon by IdP users who do not belong to a group will be failed with an appropriate error message.
Default groups do not appear until Identity Provider is enabled in the Settings tab.
N2W comes with pre-defined groups named with the prefix default:
default_managed_users
default_independent_users
default_root_delegates
default_root_delegates_readonly
The default groups cannot be modified or deleted. To see the permission settings assigned to the default groups, select the group name.
Additional groups can be created and removed easily in the Identity Provider tab of the N2W Server Settings screen.
To add a group:
The group permission settings essentially mirror the user permissions detailed in section 18.
In the Identity Provider tab, select the Groups tab and then select New. The New IDP Group screen will appear.
Complete the fields as needed, and then select Save.
Name – Name of the group.
User Type – For details, see section 18. Parameters depend on the User Type selected.
Managed
Independent
Delegate
Enabled – When disabled, group users will not be able to log on to N2W.
For User Type Managed:
File Level Recovery Allowed– When selected, members of the group can use the file-level recovery feature.
Allow Cost Explorer – When selected, members of the group can see cost data. For Cost Explorer information, see section .
For User Type Delegate:
Original Username – Username of delegate. The Original Username to which this group is a delegate is required although the Original Username does not yet need to exist in N2W. After creation, the Original Username cannot be modified.
IdPs indicate a user’s group membership to N2W using IdP claims. Specifically, the IdP must configure an Outgoing Claim Type of cpm_user_groups whose value is set to all the groups the user is a member of, both N2W related groups and non-N2W related groups.
Group names on the IdP side no longer need the ‘cpm’ prefix. In cases where the names of the group users are assigned to in the IdP is of the form cpm_<group-name-in-N2W>, for example cpm_mygroup where mygroup is the name of a group that was created in N2W, the <group-name-in-N2W> part of the name must match the name of a group in N2W. See section 19.2. For example, to give IdP users permissions of the N2W group default_managed_users:
The relevant users can be members of an IdP group called cpm_default_managed_users.
The IdP must have an outgoing claim called cpm_user_groups.
The value of the claim must include the names of all the user’s groups in the IdP, which presumably includes cpm_default_managed_users
Or
The relevant users can be members of an IdP group called default_managed_users.
The IdP must have an outgoing claim called cpm_user_groups.
An IdP user logging onto N2W can belong to only one N2W group, i.e., of all the groups listed in the cpm_user_groups claim, only one can be an N2W group, such as cpm_mygroup. If an IdP user is a member of more than one N2W group, the logon will fail with a message indicating the user belongs to more than one N2W group.
A user logged into the N2W system can have several types of permissions. This section discusses the different types of permissions as they are applied to N2W IdP integration. For full treatment of the meanings of these permissions, see section 16.3. To override N2W group permissions on a per user basis, see section 19.3.2.
General User Attributes
Attribute Name
Mandatory
Meaning
Valid Values
user_type
N
Type of user.
Managed
Independent
Delegate
Attributes for Independent and Managed Users
Attribute Name
Mandatory
Meaning
Valid Values
allow_file_level_ recovery
N
Whether the user is allowed to use the N2W file-level restore feature.
yes, no
Attributes for Delegate Users
Attribute Name
Mandatory
Meaning
Valid Values
original_username
Y
Name of the user for whom user_name is a delegate.
Alphanumeric string
All the permissions detailed above are set for a group when the group is created in N2W. Additionally, it is possible to assign N2W permission at the level of individual IdP users as described in 19.3.2. When there is a conflict between a user’s group permissions and a user’s individual permissions, the individual permissions take precedence.
A permission string consists of key=value pairs, with pairs separated by a semicolon.
For convenience, below is a string of all the possible security parameters. N2W will accept a partial list consisting of any number of these parameters in any order:
Users get the N2W permissions assigned to their group. However, it is possible to give specific IdP group members permissions different from their group permissions.
To override the group permission for a specific user:
The IdP administrator must first enter the new permissions in an IdP user attribute associated with the user. The attribute can be an existing attribute that will now serve this role (e.g., msDS-cloudExtensionAttribute1) or a custom attribute added to the IdP user schema specifically for this purpose. The content of the attribute specifies the user’s N2W permissions in the key=value format detailed in section 19.3.1.
Permissions specified in the user attribute will override permissions inherited from the group.
Permission types not specified in the user attribute will be inherited from the group’s permissions. For example, if the attribute contains only the value max_accounts=1, all other permissions will be inherited from the user’s group permissions.
Once a user attribute has been configured with the correct permissions, an IdP claim rule with Outgoing Claim Type cpm_user_permissions must be created. The value of the claim must be mapped to the value of the attribute chosen above.
When the user-level claim is enabled, the user will be able to log on to N2W with permissions that are different from the group’s permissions.
If configuring Microsoft Active Directory/AD FS, refer to section 19.6 for details.
To use IdP credentials to log on to N2W, select the Sign in with Identity Provider option on the N2W Logon screen.
Selecting Sign in with Identity Provider will redirect the user to the organization’s IdP system using SAML.
To log on to N2W as root, log on with the standard user and password option.
To enable N2W to integrate with AD/AD FS, N2W must be added to AD FS as a Relying Party Trust.
The following AD FS screenshots are from AD 2012. The AD 2016 screens are very similar.
To run the Add Relying Party Trust Wizard:
In the left pane of the AD FS console, select Relying Party Trusts.
In the right pane, select Add Relying Party Trust. . .. The Wizard opens.
Select Start.
Select the Enter data about the relying party manually option.
Select Next.
On the Welcome screen, type the display name for N2W (e.g., N2W), and then select Next.
On the Choose Profile screen, select the AD FS profile option, and then select Next.
Skip the Configure Certificate screen by selecting Next.
On the Configure URL screen:
Select Enable support for SAML 2.0 WebSSO protocol.
In the Relying Party SAML 2.0 SSO Service URL box, type https:// followed by the N2W DNS name or IP address, and then followed by
Select Next.
In the Configure Identifiers screen, type https:// followed by the N2W DNS name or IP address, and then followed by /remote_auth/metadata in the Relying party trust identifier box. For example, the resulting string might look like: https://ec2-123-245-789.aws.com/remote_auth/metadata
Select Add on the right.
Select Next.
On the Configure Multi-factor Authentication Now? screen, select the I do not want to configure multi-factor authentication settings for this relying party trust at this time option, and then select Next.
On the Issuance Authorization Rules screen, select the Permit all users to access this relying party option, and then select Next.
On the Ready to Add Trust screen, review the setting of the Relying party trust configured with the Wizard. When finished, select Next.
On the Finish screen of the Wizard, select Close. There is no need to select the Open the Edit Claim Rules dialogue for this relying party trust when the wizard closes option.
In order for N2W to work with AD FS the X.509 certificate used by N2W needs to be added to the AD FS Trusted Root Certification Authorities list. If you installed your own certificate in N2W when you first configured N2W (as per section 2.4.2), then your certificate may already be in your AD FS root trust. Otherwise, you will need to add it. If you used the certificate N2W creates during installation, you will need to add that certificate into the AD FS Trusted Root Certification Authorities.
To add a root certificate to the AD FS Trusted Root Certification Authorities:
Go to the Signature tab under properties and select Add….
In the File box at the bottom of the screen, type the name of the file containing the N2W x.509 certificate. This will be either:
The root certificate you installed in N2W when it was first configured as per section 2.4.2 if not already in the AD FS Trusted Root Certification Authorities, or
The certificate N2W created when it was first configured.
To obtain a copy of the certificate being used by N2W, either the one you originally installed or the one N2W created, selectDownload CPM's Certificate at the bottom of the Identity Provider tab of the Server Settings screen.
Once you have entered the name of the file, select Open. The N2W certificate is now visible in the center pane in the Signature tab.
In the center pane of the Signature tab, double select the N2W certificate.
Under the General tab, select Install Certificate….
In the Certificate Import Wizard screen, select the Local Machine option, and then select Next.
Select the Place all certificates in the following store option, select Browse…, and then select the Trusted Root Certification Authorities store. Select OK.
Select Next.
Select Finish. Then select OK on the pop-up screen, select OK on the General tab, and then select OK on the Properties screen.
Once the Relying Party Trust has been configured, set the AD FS properties.
To set the AD FS properties:
Go back to the AD FS management console, and in the middle pane, right-select the N2W line under Relying Party Trust, and then select Properties.
On the screen that opens, select the Endpoints tab, and then select Add SAML….
In the Edit Endpoint screen, select SAML Logout from the Endpoint type list.
In the Trusted URL box, type the DNS name or IP address of the AD FS server followed by /adfs/ls/?wa=wsignout1.0 (e.g. https://adserver.mycompany.com/adfs/ls/?wa=wsignout1.0)
In the Response URL box, type DNS name or IP address of the N2W server followed by /remote_auth/complete_logout/ (e.g. https://ec2-123-245-789.aws.com/remote_auth/complete_logout/).
Select OK.
Go to the Advanced tab, and in the Secure hash algorithm list, select SHA-256, and then select Apply.
To create an AD FS claim:
Open the ADFS management console. In the main page of the management console, select Relying Party Trusts in the left pane.
In the middle Relying Party Trust pane, select the N2W party (e.g., N2W).
In the right pane, select Edit Claim Rules…
In the Edit Claim Rules screen, select Add Rule.
In the Claim rule template list, select Transform an Incoming Claim and then select Next.
Complete the Add Transform Claim Rule Wizard screen:
In the Claim rule name box, type a name for the claim.
In the Incoming claim type list, select Windows account name.
The next step is to add a Token-Groups claim.
An ADFS Token-Groups claim must be configured so that AD FS will send N2W the list of groups a user is a member of. To configure the Token Group’s claim, perform steps 1 and 2 of the Configuring Name ID Claim process in section 19.4.4. Then continue as follows:
In the Claim rule template list, select Send LDAP Attributes as Claims and then select Next.
In the Claim rule name box, type a name for the rule you are creating.
In the Attribute store list, select Active Directory. In the Mapping of LDAP attributes to outgoing claim types table:
In the left column (LDAP Attribute), select Token-Groups - Unqualified Names.
In the right column (Outgoing Claim Type), type cpm_user_groups.
At this point AD FS has been configured to work with N2W. It is now possible to perform a connectivity test between N2W and AD FS.
To test the connection between N2W and AD FS:
Go to the N2W Server Settings.
Select the Identity Provider tab.
In the Groups tab, select an Identity Provider.
In the Settings tab, select Test Connection.
Type a valid AD username and password on the logon page.
Select Sign in.
To configure N2W to work with the organization’s AD server:
Go to the N2W Server Settings.
Select the Identity Provider tab.
In the Identity Provider list, select a Group.
To enable the group, select the Settings tab, and then select Identity Provider. Several IdP related parameters are presented.
In the Entity ID box, type the AD FS Federation Service Identifier, as configured in AD FS. See section to locate this parameter in AD FS.
In the Sign in URL box, type the URL to which N2W will redirect users for entering their AD credentials. This parameter is configured as part of AD FS. The AD FS server’s DNS name, or IP address, must be prepended to the URL Path listed in AD FS. See the AD FS Endpoints screen () to locate this information.
In the NameID Format list, select the format of the SAML NameID element.
In the x509 cert box, upload the X509 certificate of the AD FS server. The certificate file can be retrieved from the AD FS management console under Service -> Certificates, as shown in section .
Once all the parameters for N2W have been entered, select Save and then select Test Connection to verify the connection between N2W and the IdP.
The certificate file can be retrieved from the AD FS management console under Service -> Certificates:
To export the IdP’s certificate:
Double select the Token signing field to open the Certificate screen.
Select the Details tab and then select Copy to File . . . on the bottom right.
Select Next to continue with the Certificate Export Wizard.
Select the Base-64 Encoded X.509 (.crt) option and then select Next.
Type a name for the exported file and select Next.
Select Finish.
Once a user attribute has been configured with the correct permissions, an ADFS claim rule with Outgoing Claim Type cpm_user_permissions must be created before the user-level permissions can take effect.
To create the claim rule:
Open the AD FS management console.
In the main page of the management console, in the left pane, select Relying Party Trusts.
Select the N2W party (e.g., N2W) in the middle pane, and in the right pane, select Edit Claim Rules.
In the Edit Claim Rules screen, select Add Rule.
In the Add Transform Claim Rule Wizard screen (section ), select Send LDAP Attributes as Claims in the Claim rule template list, and then select Next.
The Claim Rule Wizard opens the Edit Rule screen (section ). Complete as follows:
In the Claim rule name box, type a name for the rule you are creating.
In the Attribute store list, select Active Directory.
Select OK to create the rule.
Once the user-level claim is enabled, the user will be able to log on to N2W with permissions that are different from the group’s permissions.
This section describes how to configure Microsoft Azure Active Directory and N2W IdP settings to communicate and enable logging.
For complete details on how to configure the Azure AD, see https://docs.microsoft.com/en-us/azure/active-directory/develop/active-directory-optional-claims
To view the Azure AD settings for use in N2W configuration:
While still in the Azure AD settings, go to single sign-on and switch to the new view
Scroll down to section 4. These parameters will be used to configure the N2W IdP settings.
To configure the N2W Azure AD IdP settings:
In the N2W UI, go to Server Settings > Identity Provider.
Select the provider, and then select Edit.
In the Settings tab, complete the following:
Entity ID - Copy Azure AD Identifier.
Sign In URL - Copy Login URL.
Sign out URL - Copy Logout URL.
NameID Format - Select Unspecified.
x509 cert - Upload the certificate exported in section .
Add a new group with the name of the group you added in the Azure Active Directory, without the cpm prefix. Select the Groups tab and then select New and add a name for the group.
Select Save.
Return to the Settings tab and select Test Connection.
In this section, you will learn how to build the foundations for your backup and recovery management program.
The backbone of the N2W solution is the backup policy. A backup policy defines everything about a logical group of backed-up objects. A policy defines:
What will be backed up - Backup Targets.
How many generations of backup data to keep.
When to back up – Schedules.
Whether to use backup scripts.
Whether VSS is activated (Windows Servers 2016, 2019, 2022, and 2025 only).
Whether backup is performed via a backup agent (Windows only).
The retry policy in case of failure.
DR settings for the policy.
Lifecycle events: Number of backup generations, retention duration, lock application, Copy to Storage Repository (AWS S3, Azure Storage Repository, Wasabi Storage Repository), Transition to Cold Storage (Glacier)
The following sections explain the stages for defining an N2W policy and its schedule. Schedule definition is addressed first as it one of the attributes of a policy and Scheduled Reports.
For Azure account and policy definition, backup and recovery, see section .
Schedules are the objects defining when to perform a backup
Schedules are defined separately from policies and Scheduled Reports.
One or more schedules can be assigned to both policies and Scheduled Reports.
Schedules can be managed in the Schedules tab found in the left panel. They can be added also during the creation of a new Policy.
Or, added when creating a new scheduled report in the Scheduled Reports tab of the Reports tab in the left panel.
Both interfaces include all defined schedules and the same definition options.
You can define schedules to:
Run for the first time at a date and time in the future.
Run forever or have a specific date and time to stop.
Repeat every ‘n’ minutes, hours, days, weeks, months.
For the root/admin user, if you have created additional managed users, you can select the user to whom the schedule belongs.
For weekly or monthly backups and report generation, the start time will determine the day of the week of the schedule and not the days of week check boxes.
The same schedule can be used in the following:
Policy backup operations.
Recovery Scenarios for policies with schedules.
Generating Scheduled Reports.
You can add a schedule from several places:
In the Schedules tab, select New.
While creating or editing a policy in the Policies tab, in the Policy Details tab, select New above the Schedules list.
All start times are derived from the First Run time. The time set in First Run becomes the regular start time for the defined schedule.
To define a schedule:
Type a name for the schedule and an optional description.
In the First Run box, if the First Run is other than immediately, select Calendar to choose the date and time to first run this schedule.
If you want a daily backup to run at 10:00 AM, set Repeats Every
You can override existing schedules and run backups and Scheduled Reports immediately:
Ad hoc backups are initiated by the Run ASAP command in the Policies tab. See section .
Ad hoc generation of Scheduled Reports is initiated by the Run Now command in the Reports tab. See section .
When you configure an N2W server, its time zone is set. See section . In the N2W management application, all time values are in the time zone of the N2W server. Schedule times, however, may be set and executed according to a specific time zone. A policy’s Backup Times will be according to the time zone.
Even when you are backing up instances that are in different time zones, the backup time that is shown on the monitor and Backup Log is always according to the N2W server’s local time.
In the N2W database, times are saved in UTC time zone (Greenwich). So, if, at a later stage, you start a new N2W server instance, configure it to a different time zone, and use the same CPM data volume as before, it will still perform backup at the same times as before.
While or after defining a schedule, you can set specific times when the schedule should not start a backup or generate a Scheduled Report. For example, you want a backup or report to run every hour, but not on Tuesdays between 01:00 PM and 3:00 PM. You can define that on Tuesdays, between these hours, the schedule is disabled.
You can define a disabled time where the finish time is earlier than the start time. The meaning of disabling the schedule on Monday between 17:00 and 8:00 is that it will be disabled every Monday at 17:00 until the next day at 8:00. The meaning of disabling the schedule for All days between 18:00 and 6:00 will be that every day the schedule will be disabled after 18:00 until 6:00.
Be careful not to create contradictions within a schedule’s definition:
It is possible to define a schedule that will never start backups or generate a report.
For each schedule, you can define as many excluded time ranges as you need.
To define disabled times:
In the New Schedule screen, turn on the Exclude Time Ranges toggle.
In the Day list, select a day of the week to exclude from the schedule.
In the Start Time and End Time lists, select the start and end time of the exclusion.
Policies are the main objects defining backups. A policy defines:
What to back up
How to back it up
When to perform the backup by assigning schedules to the policy
Policy definitions are spread among the following tabs:
Policy Details – Basic policy details: name, user, account, enabled, schedules, auto-target removal, and description.
Backup Targets – Choose and configure backup targets. Application consistency is applied at the instance level.
More Options – Backup options, such as activate Linux backup scripts, define successful backup, retry parameters, and number of failures to trigger an alert
A policy named cpmdata must exist for backing up Windows instances and the N2W server, DR, and Copy to S3. For the cpmdata policy, the relevant tabs are Policy Details and DR.
The cpmdata policy does not use scripts as the default. Users can enable application-consistent scripts for cpm data by selecting Application Consistent for the cpmdata policy in the Policy Details tab.
To define a new policy:
To avoid a Policy creation error, if the Account does not exist yet, select New to create the account and then return to the Policy creation.
In the left panel, select Policies.
In the New menu, select AWS. The Policy Details tab opens.
In the Name box, type a name for the policy.
N2W recommends that you NOT place all your backup targets under a single policy, as a failure in one instance can impact the overall success of the policy. Instead, we advise that you divide a large policy into several smaller ones.
Backup targets define what a policy is going to back up. You define backup targets by selecting the Backup Targets tab of the Create Policy screen.
Following are the types of backup targets:
Instances – This is the most common type. You can choose as many instances as you wish for a policy up to your license limit. For each instance, allowed under your license, define:
Whether to back up all its attached volumes, some, or none.
Whether to take snapshots (default for Linux), take snapshots with one initial AMI (default for Windows), or just create AMIs.
AWS automatically copies all tags set on resources to the RDS snapshots and does not allow recovering these resources without the tags.
RDS Custom Databases - With Amazon RDS Custom, you can customize the database, OS, and infrastructure.
When creating an RDS Custom instance, AWS also creates automatically an EC2 instance with the data volume associated with this RDS instance.
When creating an RDS Custom snapshot, AWS creates automatically an EBS volume snapshot from this data volume.
See section for information on the additional permissions that are required for backup and restore of RDS Custom databases.
AWS automatically copies all tags set on resources to the RDS snapshots and does not allow recovering these resources without the tags.
Aurora Clusters – Even though Aurora is part of the RDS service, Aurora is defined in clusters rather than in instances. Use this type of backup target for your Aurora clusters and Aurora Serverless.
Aurora cluster storage is calculated in increments of 10 GiB with the respect to the license. For example, if you have over 10 GiB of data but less than 20 GiB, your data is computed as 20 GiB.
Keep in mind that clusters can grow dynamically and may reach the storage limits of your license. If the total storage is approaching your license limit, N2W will issue a warning.
AWS automatically copies all tags set on resources to the Aurora snapshots and does not allow recovering these resources without the tags.
Redshift Clusters – You can use N2W to back up Redshift clusters. Similar to RDS, there is an automatic backup function available, but using snapshots can give an extra layer of protection.
License capacity metrics for Redshift are only updated if the cluster is in an 'available' state. Use Amazon CloudWatch metrics.
DynamoDB Tables – You can use N2W to back up DynamoDB tables. The recommended best practice is a backup limit of 10 DynamoDB tables per policy.
When defining your backup targets, keep in mind that DynamoDB table storage is calculated in increments of 10 GiB with the respect to the license. For example, if you have over 10 GiB of data but less than 20 GiB, your data is computed as 20 GiB.
Tables can grow dynamically and may reach the storage limits of your license. If the total storage is approaching your license limit, N2W will issue a warning.
In the Add Backup Targets drop-down menu, select the relevant resource type. A window containing a list of the available resources for the selected type and region opens. To view additional columns and rows, move the scroll bars as needed.
When adding backup targets of the resource type to the policy:
You will see all the backup targets of the requested type that reside in the current region, except the ones already in the policy.
You can select targets in another region by choosing from the region drop-down list.
If there are many targets, you can:
To add a backup target to the policy:
Select a region in the drop-down list. The resources in the selected region are shown.
To filter the resources in the region, enter all or part of a resource name in the Search resources box and select Search.
Select the check box of the desired target resources.
With N2W you can now create multi-volume snapshots, which are point-in-time snapshots for all EBS volumes attached to a single EC2 instance. After it's created, a multi-volume snapshot behaves like any other snapshot. You can perform all operations, such as restore, delete, and copy across Regions and Accounts. After creating your snapshots, they appear in your EC2 console created at the exact point-in-time.
In the case of EC2 instances, you can set options for any instance.
By default, Copy to S3 is performed incrementally. To ensure the correctness of your data, you can force a copy of the full data for a single iteration to your AWS Storage Repository. While defining the Backup Targets for a policy with Copy to S3, select Force a single full copy to S3.
To configure an instance:
Select a policy, select the Backup Targets tab, and then select an instance.
Select Configure. The Policy Instance and Volume Configuration screen opens.
In the Which Volumes list, choose whether to back up All Volumes attached to this instance, or include or exclude some of them. By default, N2W will back up all the attached storage of the instance, including volumes that are added over time.
If you choose to just create AMIs:
N2W will create AMIs for that instance instead of taking direct snapshots. App-aware backup per agent does not apply for AMI creation.
You can choose whether to reboot the instance during AMI creation or not to reboot, which leaves a risk of data corruption. As opposed to AMI creation in the EC2 console, the default in N2W is no reboot.
Try not to schedule AMI creations of an instance in one policy, while another policy running at the same time backs up the same instance using snapshots. This will cause the AMI creation to fail. N2W will overcome this issue by scheduling a retry, which will usually succeed. However, N2W recommends that you avoid such scheduling conflicts.
Single or Initial AMIs are meant to be used mainly for Windows instance recovery.
N2W will keep a single AMI for each instance with this setting. A single AMI will contain only the root device (boot disk).
N2W will rotate single AMIs from time to time. It will create a new AMI and delete the old one. N2W aims to optimize costs by not leaving very old snapshots in your AWS account.
By default, N2W will rotate single AMIs every 90 days. That value can be configured in the Server Settings > General Settings >
AMIs will be copied across regions and accounts for DR.
If you use cross-account backup, be aware that if you need to recover the instance at the remote account, you need to make sure you have an AMI ready in that account.
To see more policy options, select the More Options tab for a policy in the Policies tab. The options consist of:
Activating Linux backup scripts and defining script timeout and output. Backup scripts refer to those running on the N2W server. See section .
Defining backup success, retries, and failures for alerting.
Activate Linux Backup Scripts – This option is turned off by default. If you select Activate Linux Backup Scripts, the following options appear:
Scripts Timeout – Timeout (in seconds) to let each script run. When a backup script runs, after the timeout period, it will be killed, and a failure will be assumed. The default is 30 seconds.
The output of a script is typically a few lines. However, if it gets big (MBs), it can affect the performance of N2W. If it gets even larger, it can cause crashes in N2W processes. To avoid the risk of too much data going to stderr, redirect the output elsewhere.
Backup Successful when - This indicates whether a backup needs its scripts/VSS to complete, to be considered a valid backup. This has a double effect:
For retries, a successful backup will not result in a retry;
For the automatic retention management process, a backup that is considered successful is counted as a valid generation of data.
Retry information - The next options deal with what to do when a backup fails:
Backup Retry Policy – Select one of the retry policy options:
Full –
Perform retry on all policy targets even if only some of them have failed (as in previous version).
N2W versions 4.4.0 doesn’t support partial retry for S3 Sync targets.
Number of Retries – The maximal number of retries that can be run for each failed backup. The default is three. After the retries, the backup will run again at the next scheduled time.
Wait Between Retries (minutes) – Determines how much time N2W will wait after a failure before retrying. Backup scripts and VSS may sometimes fail or timeout because the system is busy. In this case, it makes sense to substantially extend the waiting time until the next retry when the system may be more responsive.
Alert Trigger Failures – The minimum number of failures to trigger an alert.
If the DR To Account does not exist yet, select New to create the account and then return to the policy creation.
To enable Disaster Recovery for the policy:
Select the DR tab for a policy in the Policies tab screen.
Select Enable DR.
Select the DR Frequency for backups, DR Backup Timeout, and Target Regions.
EBS Immutable Backup
While EBS supports different types of immutability, N2W is focusing on compliance locking which is impervious to ransomware.
Besides setting the mandatory generations retention, it is required that you set a time retention period before you can select Apply compliance lock for the specified duration.
The Lifecycle Management tab for a policy allows you to do the following:
For native snapshots:
Set multiple retention periods for snapshots: Backup (Original snapshots) Retention.
For DR snapshots, you can set a different number of generations and multiple retention periods.
Optionally, for both original and backup snapshots, you can set the retention time in terms of duration in addition to the required number of generations
After applying a compliance lock on a snapshot, it can’t be deleted until the lock expires.
The number of successful backups after cleanup will be at least the number of generations.
For Storage Repository:
Use Storage Repository – Enable, set copy and retention policies, choose storage options, and optionally delete backup snapshots after a backup to S3. See section .
Transition to Cold Storage - Enable, set copy and retention policies, and choose the Glacier Archive Storage Class. See section .
Transition to Cold Storage requires that the Use Storage Repository option is enabled first.
Storage settings - Enable the Use Storage Repository, define the Target repository, and Transition to Cold Storage, if relevant. See section .
FSx for NetApp ONTAP can be configured to back up only part of volumes, for example an EC2 instance, regardless of the owner Storage Virtual Machine (SVM).
The root volume of the SVM is not backed up.
To configure a file system:
Select a policy and then select the Backup Targets tab.
In the Add Backup Targets menu, select FSx File Systems.
Select an ONTAP policy.
4. SelectConfigure. The ONTAP FSx and Volume Configuration screen opens.
5. In the Which Volumes list, choose whether to back up All Volumes attached to this instance, or include or exclude individual volumes.
6. Select Apply and then Save.
A remote agent is not required.
FSx is not currently supported in AWS GovCloud (US) regions.
Following are limitations on backups of FSx for Lustre:
Backups are not supported on scratch file systems because these file systems are designed for temporary storage and shorter-term processing of data.
Backups are not supported on file systems linked to an Amazon S3 bucket because the S3 bucket serves as the primary data repository, and the Lustre file system does not necessarily contain the full data set at any given time. For further information, see
Multiple-Retention allows you to automatically retain specific backups for longer periods based on when the backup occurs. This backup rotation allows you to easily comply with retention requirements.
A key feature is that three backup types have completely independent retention settings:
Native Cloud Snapshots - The original backups in AWS/Azure
DR (Disaster Recovery) Copies - Cross-region snapshot copies
Repository Copies - Backups stored in S3/Azure Blob storage
This means you can configure:
Snapshots: 7 days daily, 4 weeks weekly, 12 months monthly
DR Copies: 14 days daily, 8 weeks weekly, 24 months monthly
Repository: 30 days daily, 12 weeks weekly, 36 months monthly
Selection Logic
Weekly Selection: The first successful backup on or after your selected day of the week becomes the weekly backup for that week
Monthly Selection: The weekly backup from your selected week of the month becomes the monthly backup
One backup per period: Only ONE backup per week is marked weekly, and only ONE per month is marked monthly
In the Lifecycle Management tab, enable Multi-Retentions.
For all backup types, in the Select your Weekly/Monthly backups section, choose from the Day of the Week and Week of Month lists to trigger backup selection.
Day of Week - Which day triggers weekly selection (e.g., Sunday)
Week of Month - Which week triggers monthly selection (e.g., First week, or Last week)
3. For each of the backup types, there is a different additional section that addresses each backup type. Configure Retention Periods for each backup type and choose relevant options.
Weekly Schedule Enabled - Turn on weekly retention
Keep Weekly Backups For - Duration (e.g., 12 weeks)
Monthly Schedule Enabled - Turn on monthly retention
Configure native retention:
Set compliance lock:
Select Apply compliance lock.
Configure Multi-Retention for DR:
Select Choose different retention for DR snapshots.
Configure Storage Repository:
Enable Use Storage Repository.
The following actions are available for both AWS and Azure policies.
In the Policies tab, select a policy, and then select Backup Times to open the Planned Backups window, which is ordered by Time Zone. You can change the Time Period from the default ‘Next Day’ to several days, weeks, or the next month.
Backup Times are relevant to the schedules of the selected policy.
An ad hoc backup will execute the selected Policy and create backups of all its targets.
An ad hoc backup counts as another generation if it completes successfully.
To run a backup immediately:
In the left panel, select the Policies tab and then select a policy in the list.
To start the backup, select Run ASAP.
To follow the progress of the backup, select the Open Backup Monitor link in the ‘Backup started’ message at the top right corner, or select the Backup Monitor tab.
To delete a particular snapshot in AWS or to delete all AWS snapshots after a successful run:
Select View Snapshots.
Select one or more backups, and then select Delete.
When deleting a policy, all related snapshots and data are deleted.
To delete a policy, select it in the Policies table, and then select Delete. In the Delete Policy confirmation dialog box, type ‘delete all’ and then select Delete.
user_type=independent;[email protected];allow_recovery=yes;allow_account_changes=yes;allow_backup_changes=yes;allow_file_level_restore=no;max_accounts=1;max_instances=2;max_independent_ebs_gib=3;max_rds_gib=4;max_redshift_gib=5;max_dynamodb_gib=5;original_username=robi@stamSign in response - https://<N2W-Address>/remote_auth/complete_login/
Sign out response - https://<N2W-Address>/remote_auth/complete_logout/
Max Number of Accounts – The maximum number of AWS accounts users belonging to this group can manage.
Max Number of Instances – The maximum number of instances users belonging to this group can manage.
Max Non-Instance EBS (GiB) – The maximum number of Gigabytes of EBS storage that is not attached to EC2 instances that users belonging to this group can manage.
Max RDS (GiB) – The maximum number of Gigabytes of RDS databases that users belonging to this group can manage.
Max Redshift Clusters (GiB) – The maximum number of Gigabytes of Redshift clusters that users belonging to this group can manage.
Max DynamoDB Tables (GiB) – The maximum number of Gigabytes of DynamoDB tables that users belonging to this group can manage.
Max Controlled Entities – The maximum number of allowed entities for Resource Control.
Allow to Change Accounts – Whether the delegate can make changes to an account.
Allow to Change Backup – Whether the delegate can make changes to a backup.
default_managed_users/remote_auth/complete_login/https://ec2-123-245-789.aws.com/remote_auth/complete_login/In the Outgoing claim type list, select Name ID.
In the Outgoing name ID format list, select Unspecified.
Select the Pass through all claim values option.
Select OK.
In the Mapping of LDAP attributes to outgoing claim types table:
In the left column (LDAP Attribute), type the name of the user attribute containing the user permissions (e.g., msDS-cloudExtensionAttribute1).
In the right column (Outgoing Claim Type), type cpm_user_permissions.
user_name
N
Username in N2W.
Alphanumeric string
user_email
N
User’s email address.
Valid email address
max_accounts
N
Number of AWS accounts the user can manage in N2W. Varies by N2W license type.
Number between 1 and max licensed
max_instances
N
Number of instances the user can backup. Varies by N2W license type.
Number between 1 and max licensed
max_independent_ebs_gib
N
Total size of EBS independent volumes being backed up in GiB (i.e., volumes not attached to a backed-up instance).
Number between 1 and max licensed
max_rds_gib
N
Total size of AWS RDS data being backed up in GiB
Number between 1 and max licensed
max_redshift_gib
N
Total size of AWS Redshift data being backed up in GiB
Number between 1 and max licensed
max_dynamodb_gib
N
Total size of AWS DynamoDB data being backed up in GiB.
Number between 1 and max licensed
max_controlled_entities
N
Total number of AWS resources under N2W Resource Control.
Number between 1 and max licensed.
allow_recovery_changes
N
Whether the user can perform N2W restore operations.
yes, no
allow_account_changes
N
Whether the user can manage N2W user accounts.
yes, no
allow_backup_changes
N
Whether the user can modify backup policies.
yes, no
allow_settings
N
Whether the user can modify S3 Repository settings.
yes, no
Repeat every day of the week, or only run on certain days.
Exclude running a report or policy during certain time ranges within the scheduled times.
If you want an hourly backup to run at 17 minutes after the hour, set Repeats Every to one hour and First Run to nn:17, where nn is the hour of the First Run.
If this schedule expires, turn on the Expires toggle and select the date and time the schedule ends. By default, schedules never expire.
In the Repeats Every list, select the frequency of the backups for this schedule. The possible units are months, weeks, days, hours, and minutes.
In the Enabled On section, select the day-of-week check boxes on which to run the schedule.
To exclude time ranges within the defined schedule, turn on the Exclude Time Ranges toggle. See section 4.1.4.
Select Save.
It is also possible to create different “disabled times”, which would effectively mean that the schedule is always disabled.
Select Apply after each definition. To add another time range, select New.
Select the check boxes of the excluded time ranges to enable, and then select Save.
DR – Enable DR
Lifecycle Management – Configure Lifecycle operations, including the number of backup generations, retention duration and multiple retention periods, lock application, Copy to Storage Repository (S3 and Azure Storage Account), and Transition to Cold Storage (Glacier).
For the root/admin user, if you have created additional managed users, select the policy owner in the User box.
If you have more than one account, in the Account list, select the account that the policy is associated with. The account cannot be modified after the policy has been created.
Select Enabled to use the Copy to Storage functionality.
In the Auto Target Removal list, specify whether to automatically remove resources that no longer exist. If you enable this removal, if an instance is terminated, or an EBS volume deleted, the next backup will detect that and remove it from the policy. Choose yes and alert if you want the backup log to include a warning about such removal.
To use application-consistent scripts as the default for CPM data, in the cdata policy, select Application Consistent.
In the Description box, optionally type a description.
To add Backup Targets now, select the Backup Targets tab. See section 4.2.2. The policy will be saved when you save the Backup Targets definition.
To add Backup Targets later, in the Policy Details tab, select Save. The new policy is included in the list of policies in the Policies screen. To add Backup Targets, select the new policy, select Edit and then select the Backup Targets tab.
EBS Volumes – If you wish to back up volumes, not depending on the instance they are attached to, you can choose volumes directly. This can be useful for backing up volumes that may be detached part of the time or moved around between instances (e.g., cluster volumes).
RDS Databases – You can use N2W to back up RDS databases using snapshots. There are advantages to using the automatic backup AWS offers. However, if you need to use snapshots to back up RDS, or if you need to back up databases in sync with instances, this option may be useful.
All automatically created resources are managed and deleted by AWS. The EBS snapshots associated with RDS snapshots are deleted as are the EC2 instances associated with RDS instances.
For Aurora Serverless, capacity units will appear in the Class column when adding RDS Clusters as Backup Targets.
If DR is enabled, configure Backup Vault and IAM Role.
Elastic File Systems (EFS) – You can use N2W to back up and restore your EFS snapshot data to AWS using AWS Backup service. Configuration options include backup vault, IAM role, transition to cold storage, and expiration.
If DR is enabled, configure Backup Vault and IAM role.
See section 8.1 for information on permissions and other details.
FSx File Systems – Use N2W to back up and restore your FSx File Systems to the same region and the same account. Following are the FSx types:
Lustre (Linux) file system
Windows file system with managed Active Directory (Win-AD)
Windows file system with self-managed Active Directory (Win-SMAD)
NetApp ONTAP file system
OpenZFS Cloud file system, backup of all volumes using AWS service
For AWS FSx backup limitations, see section .
For recovery options, see section .
Also, see .
S3 Bucket Sync – You can use N2W to synchronize a source S3 bucket to a destination bucket. Since a snapshot is not created, there is no recovery or movement to the Freezer. The buckets require configuration. See section 9.8.
S3 Bucket - You can use N2W to back up and restore your S3 Bucket using AWS Backup service. Configuration options include backup vault, IAM role, and expiration (AWS prerequisites).
If DR is enabled, configure Backup Vault and IAM Role.
See section 8.1 for information on permissions and other details.
EKS Clusters and EKS Namespaces - See Working with Elastic Kubernetes Service (EKS) in section 28.
Filter by typing part of a resource name in the search box and select Search . To clear a search, select x.
Sort by a column by selecting its heading. Select it again to change the sort direction.
Scroll between pages.
For each backup target, the Policies column shows the policy, or the number of policies, the target is already in. Select the link to see which policies the target is in.
Select Add selected. The selected objects are added to the policy’s backup target list.
Repeat as many times as needed, from multiple regions if relevant.
Select Close when finished. The selected targets are listed in the Backup Targets tab.
For Instances, Volumes, EFS, and S3 Bucket Sync targets, select Configure and complete the backup options.
In the Backup Targets screen, select Save to save the listed selections to the policy.
If All Volumes is selected, the Remote Agent list is enabled. Select N2W Thin Backup Agent or Simple System Manager (SSM) depending on what you have configured. See section 6.
If All Volumes was not selected, in the volumes table, clear or select the volume check boxes.
In the Backup Options list, select one of the following:
Snapshots Only - Default for Linux-based instances.
Snapshots with Initial AMI - Take an initial AMI and then snapshots. Default for Windows-based instances.
AMIs Only - Just schedule AMI creation. If a reboot is required after the backup, select Reboot. See section .
When Copy to S3 is enabled for the policy, to have a full copy of the data copied to your AWS Storage Repository, select Force a single full copy to S3.
Select Apply.
Continue to add instances from other regions, and select Close when finished with the resource type. Control returns to the Backup Targets tab list.
At the bottom of the Backup Targets tab list, select Save to update the policy for all listed targets.
stderrSuccess Without Any Issues – If scripts and/or VSS are defined for this policy, the backup will be considered successful only if everything succeeds. If backup scripts or VSS fails and all snapshots succeed, the backup is not considered successful. You can still recover from it, but it will cause a retry (if any are defined), and the automatic retention management process will not count it as a valid generation of data. This is the stricter option and is also the default.
Snapshot Succeeded with Possible VSS or Script Failure – This is the less strict option and can be useful if scripts or VSS fail often, which can happen in a complex environment. Choosing this option accepts the assumption that most applications will recover correctly even from a crash-consistent backup.
The failure triggering the retry can be at any point during the backup session.
Partial (Only Failed Targets) –
Perform retry ONLY on failed targets. For example, if there are 10 targets and 3 backups failed, only retry on the 3 backups that failed.
Only ‘start snapshot creation’ failure triggers a retry for the target. If the failure occurs after the snapshot creation started but before it was completed, there will not be a retry for the target. Most failures occur during ‘start snapshot creation’.
Backup Timeout (hours) - Select the backup timeout period for this policy. Restarting Apache is not necessary.
Custom Tags - You can add custom tags for the policy. Define the Tag Name and Tag Value. if the Name and/or Value is a prefix, select Name is Prefix. For details about Custom Tags, see section 14.2.
To enable Cross Account DR Backups, select the check box, and:
Choose the To Account and DR Account Target Regions in the lists.
To Keep Original Snapshots, select the check box.
After applying the compliance lock on a snapshot, it can’t be deleted until the lock expires.
If applicable, when setting a retention duration, you can enable Apply compliance lock for the specified duration.
Weekly backup from a selected week of the month
Long-term/compliance retention (2-36 months)
To update the list, select Refresh.
You can switch between showing backup records 'in the Freezer' by turning on and off the toggle key and backup records 'not in the Freezer' by turning on and off the toggle key in the Show area to the right of the filters.
To view or download backup details, select Log. Select Refresh as needed.
Default (before version 4.5)
All backups not selected as weekly/monthly
Short-term recovery (7-30 days)
Weekly
First successful backup on a selected day of the week
Medium-term recovery (4-12 weeks)


Monthly
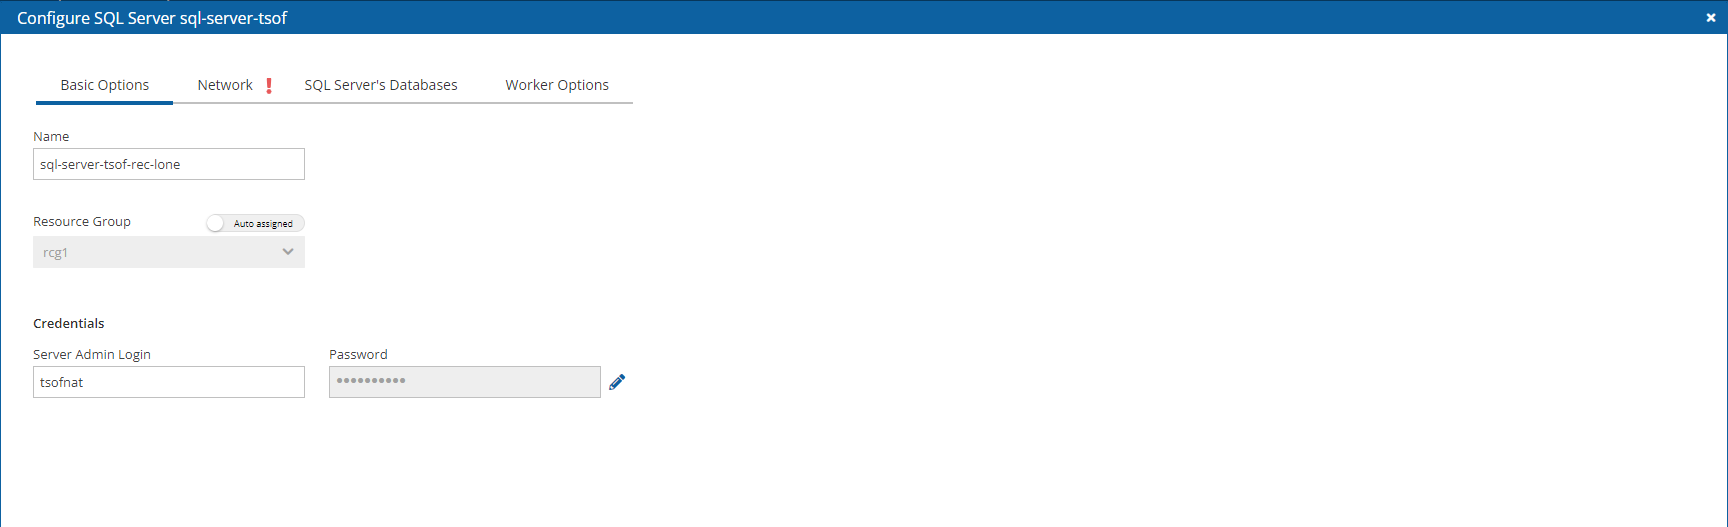
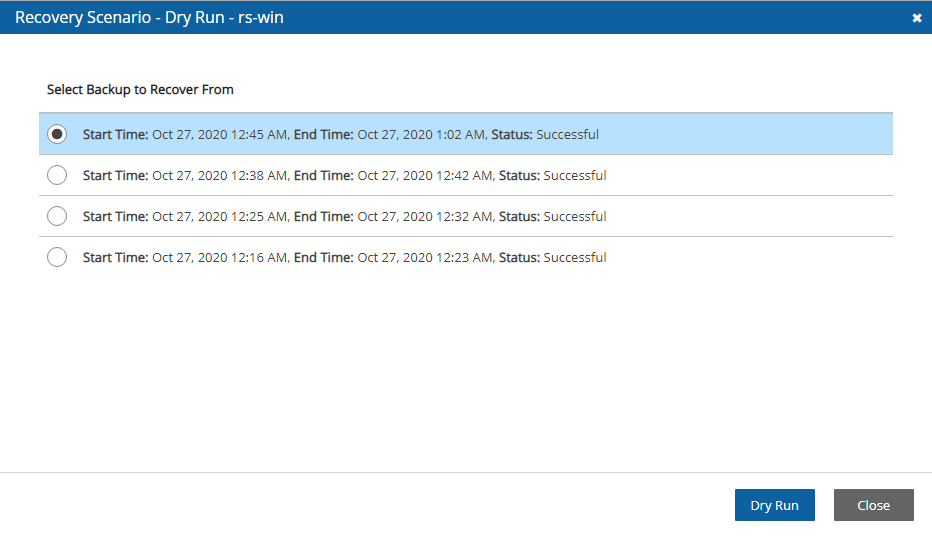
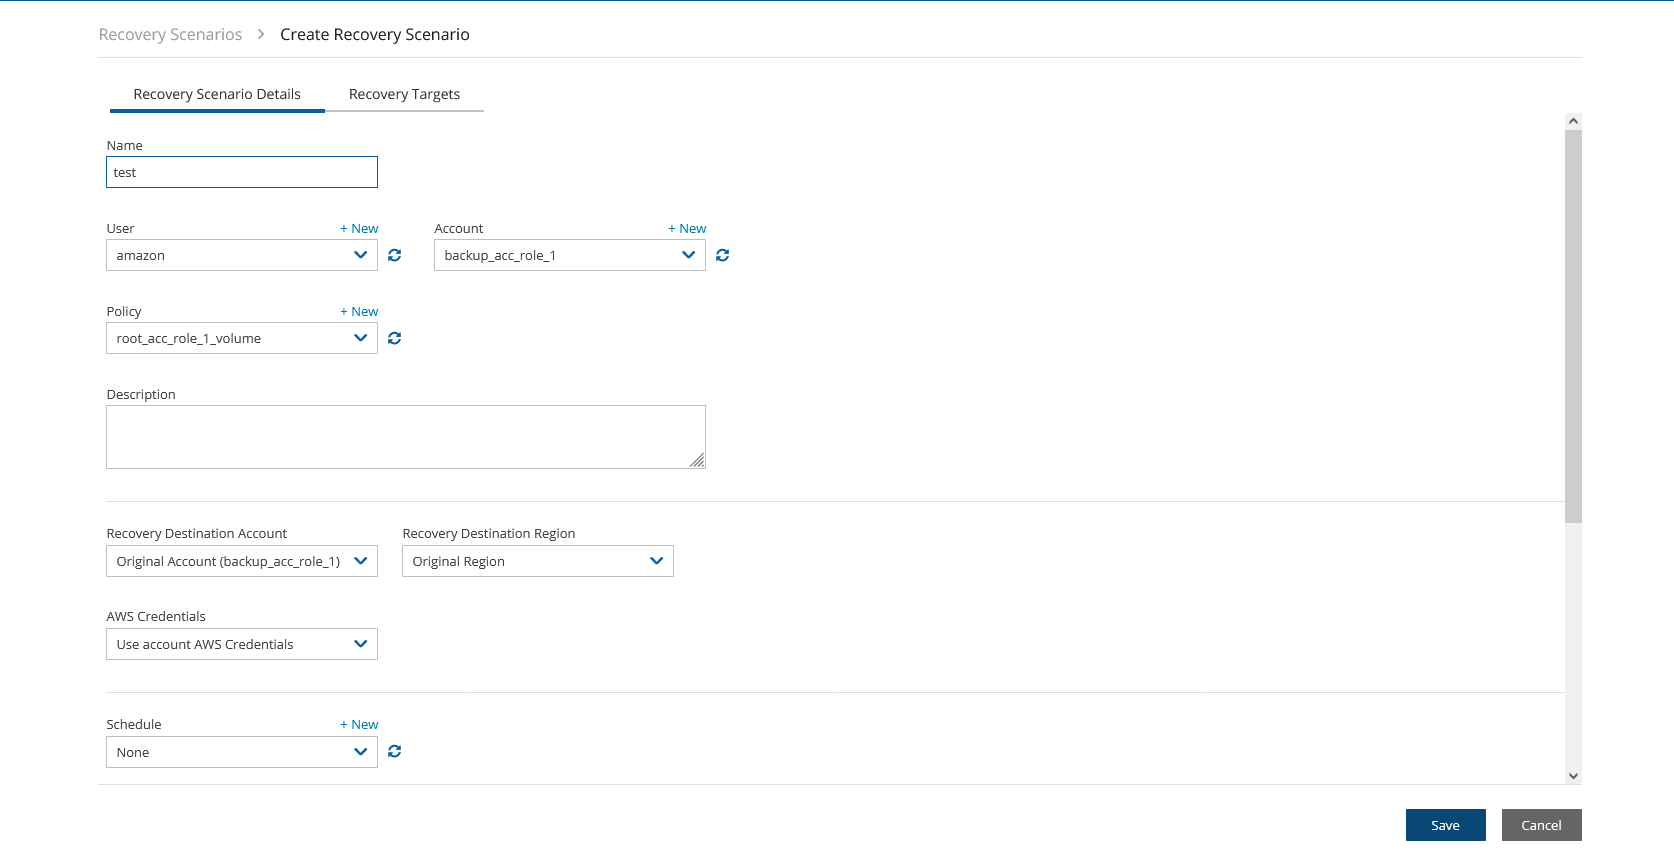
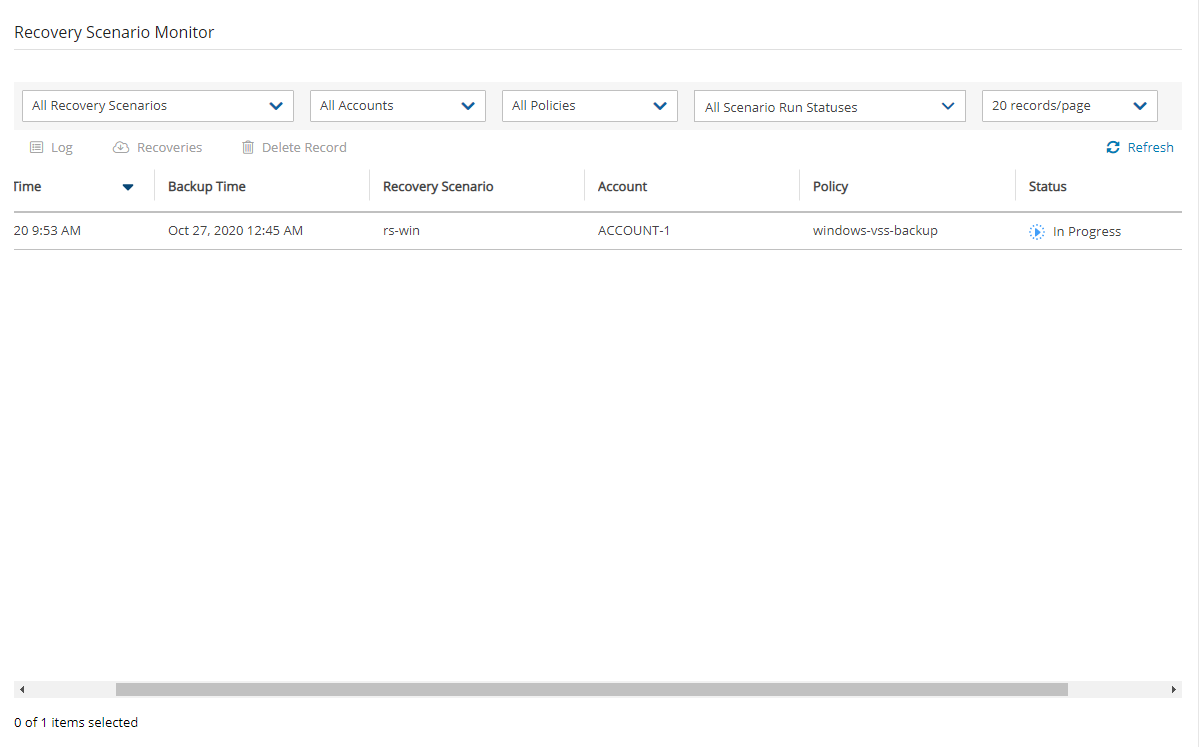
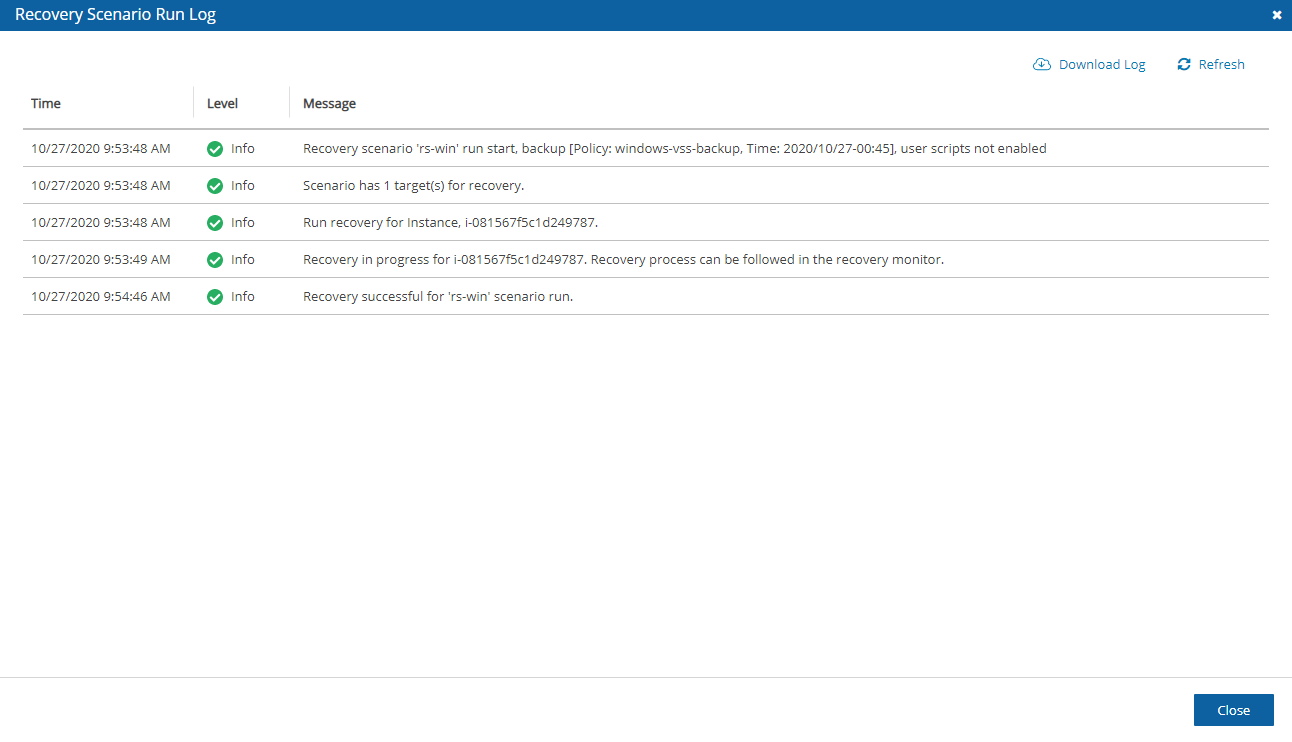
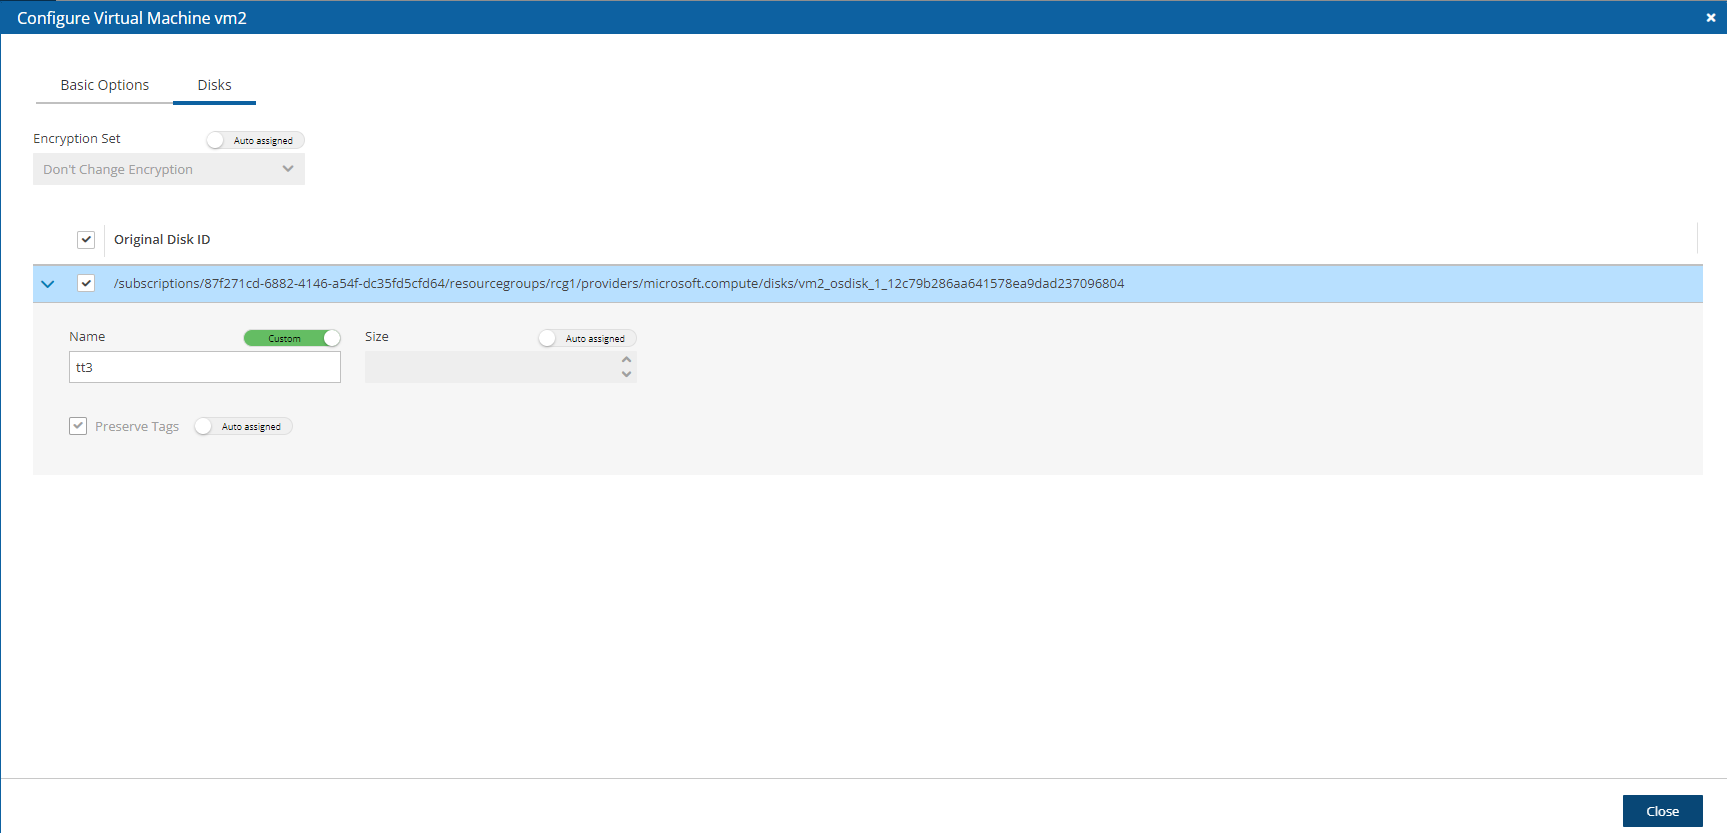
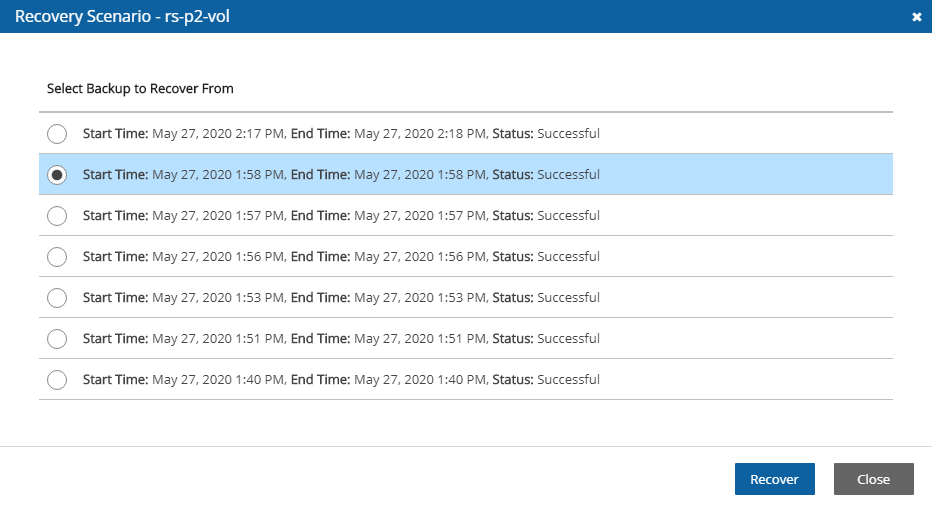
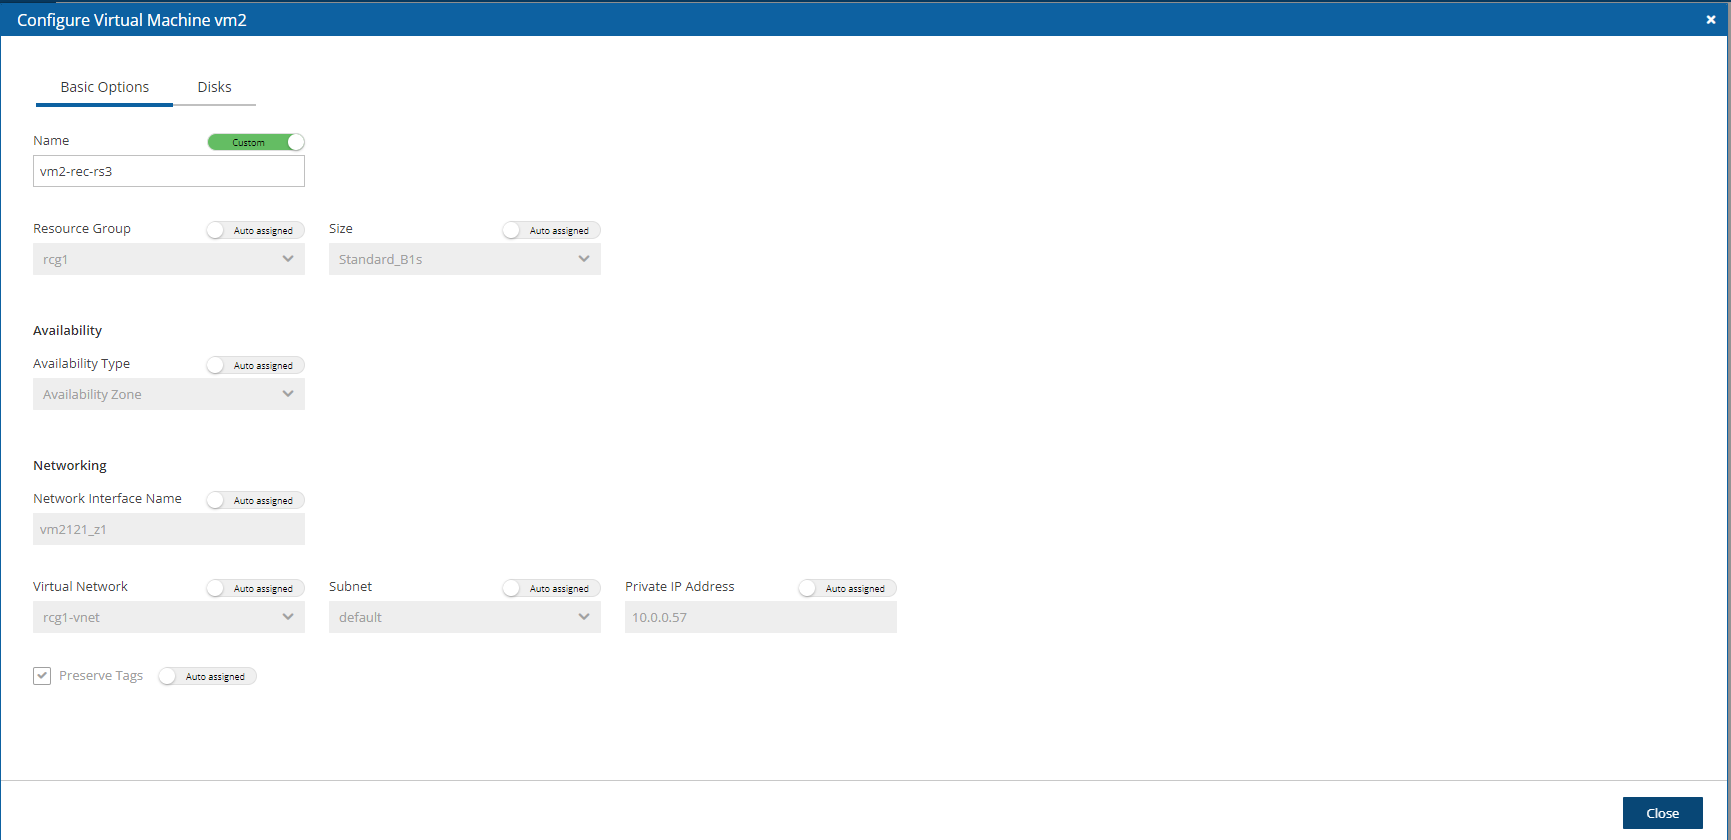
Manage the backup and recovery of your Azure resources.
Following are the steps for setup, backup, and recovery of Azure VMs, Disks, and SQL Servers:
Before starting, configure N2W Backup & Recovery according to section .
After the final configuration screen, prepare your Azure Subscription by adding the required permissions and custom IAM role in Azure. See section .
N2W provides many ways to communicate with you about the status and state of your resources and operations.
N2W manages the backup operations of your EC2 servers and Azure Virtual Machines. To notify you when something is wrong and to integrate with your other cloud operations, N2W allows sending alerts, notifications, and even raw reporting data. And when something is not wrong, N2W can send you an announcement of interest, such as a new feature or money-saving promotion.
So, if you have a network operations center (NOC), are using external monitoring tools or just want an email to be sent to the system administrator whenever a failure occurs, N2W has an answer for that.
Report types include:
Audit
Enable Azure Cloud as one of your UI defaults in N2W Server Settings > General Settings > User UI Default.
Register the CPM app in Azure. See section 26.2.
Create an N2W account user as usual and configure resource limitations for Azure as described in section 18.3.
Assign a custom role to your app. See section 26.3.
In N2W, add an Azure account with the custom N2W role. See section 26.4.
Create a Storage Account Repository for your data objects. See section 26.5.
Create an Azure policy in N2W with Azure backup targets. See section 26.6.
Configure Azure Disaster Recovery. See section 26.7.
Back up the policy. See section 26.8.
Recover from a backup, including file-level recovery. See section 26.9.
You can design a Recovery Scenario to automatically coordinate sequential recoveries for several or all backup target types in a single Azure policy during one recovery session. See section 24.3.
For Recovery Scenarios, it is important to configure the recovery details for each VM and SQL Server target.
N2W Backup and Recovery needs the following permissions to perform backup and recovery actions.
For the minimal permissions for Azure, see https://n2ws.zendesk.com/hc/en-us/articles/33252710830109--4-5-0-Required-Minimum-Azure-permissions-for-N2W-operations
Add your subscription ID value to the subscriptions attribute in the minimal permissions JSON.
2. Log on to the Azure Portal, https://portal.azure.com, and go to your subscription. Select a subscription that you want to use with N2W Backup & Recovery. 3. Select Access control (IAM), select +Add, and then select Add custom role.
4. Complete the form adding a name for the custom role, and then select the JSON file saved in step 1. 5. Create the role with the new JSON file.
In the Azure portal Dashboard section, go to the App registrations service.
In the Name box, type CPM-on-Azure and select Register.
3. Select the app. 4. Save the Application (client) ID and Directory (tenant) ID for use when adding the Azure account to N2W.
5. Select Add a certificate or secret. 6. Select New client secret. 7. Complete the secret values, and save.
In Azure, go to the Subscription service and select your subscription.
Select Access control (IAM).
Select Add and then select Add role assignment.
In the Role list, select your custom role.
In the Select list, select the app that you created.
Select Save.
In the Role assignments tab, verify that the custom role is assigned.
It might take time for Azure to propagate the changes in IAM.
Log on to N2W using the root username and password used during the N2W configuration.
Select the Accounts tab.
If you have a license for Azure cloud, select Azure account in the + New menu.
Complete the New Azure Account screen using the App registration view information in the Azure portal as needed.
Name - Copy from your App registration name.
In the User list, select your username. Or, select New to add a new user. See section 18.
Directory (tenant) ID – Copy from your App registration.
Application (client) ID – Copy from your App registration.
Client Secret – Copy from your App registration Certificates & secrets in the App registration view, or set a new secret.
Scan Resources - Select to include the current account in tag scans performed by the system. The scan will cover all VMs and disks in all locations.
5. Select Save. The new account appears in the Accounts list as an Azure Cloud account.
Storage Account repositories are where backups of SQL servers are stored. Storage Account repositories can also be used to store disk snapshots via Lifecycle policy or serve as cross-cloud storage for AWS volume snapshots via a Lifecycle policy. For more details, see section 21.
A single Azure Storage Account container can have multiple repositories.
In N2W, select the Storage Repositories tab.
In the New menu, select Azure Storage Repository.
In the Storage Repositories screen, complete the following fields, and select Save when complete.
Name - Type a unique name for the new repository, which will also be used as a folder name in the Azure Storage Repository container. Only alphanumeric characters and the underscore are allowed.
Description - Optional brief description of the contents of the repository.
User – Select the user in the list.
Account - Select the account that has access to the Storage Repository.
Subscriptions – Select the subscription that owns the Storage Repository.
Resource Group – Select the Storage Repository's resource group.
Location – Select the Storage Repository’s location.
Storage Account Name – Select the name of the Storage Account from the list.
Immutable backups - Select to protect data stored in the repository from accidental deletion or alteration. When enabled, the N2W server puts a Lease on every object stored in the Storage Repository. A leased object cannot be deleted or modified until the Lease is cancelled. You can specify the string that will be used as the Lease (in a UUID format), or let N2W create one for you.
You can delete all snapshots copied to a specific Storage Repository.
Deleting a repository is not possible when the repository is used by a policy. You must change the policy's repository to a different one before you can delete the Target repository.
Select the Storage Repositories tab.
Use the Cloud buttons to display the Azure repositories.
Select the repository to delete.
Select Delete.
To back up resources in Azure, create an N2W Azure policy.
Before saving a policy with an SQL Server backup target, the policy must have a Storage Repository. To create a Storage Repository, see section 26.5.
In N2W, select the Policies tab.
On the New menu, select Azure policy.
In the New Azure Policy screen, complete the fields:
Name – Enter a name for the policy.
User – Select from the list. Or, select New to add a user. See section 18.
Account – Select from the list. Or, select New to add an account. See section 26.2.
Enabled – Clear to disable the policy.
Subscription – Select from the list.
Schedules – Optionally, select one or more schedules from the list, or select New to add a schedule. See section .
Auto Target Removal – Select Yes to automatically remove a non-existing target from the policy.
4. Select the Backup Targets tab. 5. For each resource type to back up, in the Add Backup Targets menu, select a target. The applicable screen opens.
6. Before completing a policy with SQL Server backup targets, select a Target repository for the policy in the Storage Repository tab, and then select Save.
7. In the Backup Targets tab, review the selected targets, and then select Save.
An SQL Server backup is performed by a worker. The worker parameters for each SQL Server target are configured in the Policy SQL Server and Database Configuration screen, as shown in step 3 below.
Backups are always full to enable fast restores.
Backups are kept in an Azure Repository.
The default behavior for workers has changed in 4.3.0. The worker used for SQL Backup & Recover now uses a private IP instead of a public IP. To change:
1. Connect to your N2W Backup and Recovery Instance with SSH Client.
2. Type sudo su.
3. Add the following lines to /cpmdata/conf/cpmserver.cfg:
[azure_worker]
assign_public_ip_to_public_sql_server_workers=True
4. Run service apache2 restart
5. Choose the worker’s Vnet and subnet as the SQL Server.
Following are possible backup configurations for an SQL Server target:
Back up all databases
Include or Exclude only pre-selected databases in the backup process
Before selecting individual SQL Servers, it is required to filter by the Location of the target resources using the list in the upper left corner. Filtering by Resource Group is optional.
To add an SQL Server target:
In the Add Backup Targets menu, select SQL Servers. The Add SQL Servers table opens.
2. When finished selecting targets, select Add selected. The Backup Targets tab lists the selected targets.
3. To choose which databases to back up for each SQL Server, select a server, and then select Configure. The Policy SQL Server and Database Configuration screen opens.
4. In the Which Databases list, choose whether to back up All Databases on this server, or select databases, and then choose Include Selected or Exclude Selected.
5. For each database, change Private DNS Zone, SSH Key, Virtual Network, Subnet, Security Group, and Network Access as needed, and then select Apply.
6. In the Storage Repository tab, select the Target repository for the SQL Server backup, and then select Save.
Before selecting individual Virtual Machine targets, it is required to filter by the Location of the target resources using the list in the upper left corner. Filtering by Resource Group is optional.
On the Add Backup Targets menu, select Virtual Machines. The Add Virtual Machines table opens.
2. Select the virtual machines for backup, and then select Add selected. The Backup Targets tab lists the selected targets.
3. To choose which disks to back up for each Virtual Machine target, select a machine, and then select Configure. The Policy Virtual Machine and Disk Configuration screen opens.
4. In the Which Disks list, select the disks to Include or Exclude in the backup. Change additional information as needed, and then select Apply.
To define backup success, retries, and failures for alerting:
In the Add Backup Targets menu, select Disks.
Select the Disks to back up, and then select Configure for each target.
Configure disk information, such as Encryption Set. To expand the configuration section for a disk, select the right arrow . Change the Name to the desired name for the recovered disk, and then select Close.
To define backup success, retries, and failures for alerting:
Select the relevant policy.
In the More Options tab, complete the backup, retry, and alert options as described in section 4.2.4.
N2W version 4.4.0 does not support 'partial retry' for SQL Server targets.
Enabling Immutable Backups will prevent the unauthorized deletion of Azure VM and disk snapshots. When a policy is enabled for Immutable Backups, a ‘Delete’ lock type is assigned to a disk snapshot until the lock is removed. The lock is removed by N2W before Cleanup or by user-initiated deletion.
To enable immutable backups:
Select the relevant policy.
In the More Options tab, select Enable Immutable Backups.
To view the Lock Type in Azure:
On the Azure console, go to the Snapshot page and select Locks.
The following permissions are required:
o Microsoft.Authorization/locks/read
o Microsoft.Authorization/locks/write
o Microsoft.Authorization/locks/delete
The DR operation copies managed disk snapshots to selected locations. Policies may be enabled for cross-location and cross-subscription DR.
In the DR tab, select Enable DR.
Complete DR Frequency and DR Timeout.
Select Cross-Location Backup (DR) or Cross-Subscription Backup (DR).
If you selected Cross-Location Backup (DR), select the DR target locations in the Target Locations list.
5. If you selected Cross-Subscription Backup (DR), complete the following:
To Subscription – Select the subscription to copy the snapshots to. All policy account subscriptions can be the DR subscription target, except for the subscription of the policy (the original subscription).
DR Subscription Target Locations – Select the location (or locations) you want to copy the snapshots of the policy to. To include all Target locations selected for backup, select Original Location(s) in the list. Select additional locations as needed.
Keep Original Snapshots – By default, the original snapshot from the source location is kept. If disabled, once the snapshot is copied to the DR subscription, it will be deleted from the source location.
To use a different Resource Group on the target location/subscription for copied snapshot, add a tag to the backup target resource (disk or VM):
· Tag key - cpm_dr_resource_group
· Tag value - TARGET_RESOURCE_GROUP_NAME
Azure can manage private access disks using a Disk Access resource, which is based on subscription and location. For disk targets using private access, provide a tag with the ID of the Disk Access resource on the selected DR locations.
To provide a Disk Access ID, add a tag to the resource as follows:
Key: ‘cpm_dr_disk_access’ or ‘cpm_dr_disk_access:<LOCATION>’; Value: ‘<Disk Access ID>’
If disks are attached to a Virtual Machine target and same Disk Access is used for all backed up disks, it is sufficient to add the tag to the Virtual Machine and not each disk.
If a single DR location is selected, there is no need for ‘:<LOCATION>’ in the tag key.
If the policy has a schedule, the policy will backup automatically according to the schedule.
To run a policy as soon as possible, select the policy and select Run ASAP in the Policies view.
To view the policy progress and backups, select Backup Monitor, and use the Cloud button to display the Azure () policies. The backup progress is shown in the Status column.
To recover from a Wasabi Repository, see section 27.3.
To orchestrate recovery scenarios with Azure targets, see section 24.
Only one VM is recoverable during a recovery operation.
After creating a backup, you can recover it from the Backup Monitor.
After choosing the objects to recover, you can view the recovery process by selecting Recovery Monitor. Use the Cloud buttons to display the Azure () recoveries.
In the VM recovery Basic Options, there are Azure options for replicating data to additional locations
to protect against potential data loss and data unavailability:
Availability Zone – A redundant data center (different building, different servers, different power, etc.) within a geographical area that is managed by Azure.
Availability Set – A redundant data center (different building, different servers, different power, etc.) that can be launched and fully configured by the customer and managed by the customer.
No Redundancy Infrastructure Required – By selecting this option, the customer can choose not to replicate its data to an additional (redundant) location in another zone or set. By choosing this option, the customer would save some money, but in rare cases (usually 11 9s of durability and 99.9% of availability), the customer can experience some degree of data loss and availability.
In the Disk Recovery screen, you may be presented with an option to change the encryption when recovering certain disks.
To add an additional layer of encryption during the recovery process, see https://docs.microsoft.com/en-us/azure/virtual-machines/disks-enable-customer-managed-keys-portal.
Disk encryption settings can be changed only when the disk is unattached or the owner VM is deallocated.
After choosing the objects to recover, you can view the recovery process by selecting Recovery Monitor. Use the Cloud buttons to display the Azure ( ) recoveries.
To recover a VM and/or attached disks:
In the Backup Monitor, select the backup and then selectRecover.
2. To recover a VM, with or without its attached disks, select the VM snapshot that you want to recover from, and then select Recover.
a. In the Virtual Machines tab of the Recover screen, select 1 VM, and then select Recover. The Basic Options tab opens.
b. In the Availability Type list, select one of the following:
No Infrastructure Redundancy Required – Select to not replicate data at a redundant location in another zone or set.
Availability Zone – Select a zone in the Availability Zone list.
Availability Set – Select a set in the Availability Set list.
c. In the Private IP Address box, assign an available IP address or switch the Custom toggle key to Auto assigned.
d. The default Preserve Tags action during recovery is Preserve Original for the virtual machine. To manage tags, see section 10.3. e. In the Disks tab, enter a new Name for each disk. Similar names will cause the recovery to fail.
f. Select Recover Virtual Machine.
3. To recover only Disks attached to the VM, select Recover Disks Only. a. In the Disks tab, enter a new Name for each disk. Similar names will cause the recovery to fail. b. See Note in section 26.5 about changing the Encryption Set for certain disks. c. Change other settings as needed. d. Select Recover Disk.
Following are the basic steps in recovering a VM with a Virtual Machine Scale set:
In AWS, create a backup and recover disks.
In Azure, create and configure a VM, and then attach the recovered disks.
To recover a VM with a Virtual Machine Scale Set:
Select a successful backup, and then select Recovery.
Select the VM, and choose Recovery only Disks.
Select the disks to recover, and then select Recover Disk.
After the disks are successfully recovered, go to the Azure portal, and locate the recovered root disk.
Select "+ Create VM".
Configure the VM:
In Availability Options, select Virtual Machine Scale Set, and then proceed with the setup.
In the Disks tab, make sure to attach the existing recovered disks.
To recover from backups with independent disks:
Select the backup and then select Recover as in step 1 of the VM recovery.
In the Independent Disks tab:
Enter a new Name for each disk to recover as similar names will cause failure.
See section about changing the Encryption Set for certain disks.
The default Preserve Tags action during recovery is Preserve Original for the independent disks associated with the virtual machine. To manage tags, see section .
Change other settings as needed.
Select Recover Disk.
When recovering from a backup that includes DR (DR is in Completed state), the same Recover screen opens but with the addition of the Restore to Location drop-down list.
Default location is Origin, which will recover all the objects from the original backup. It will perform the same recovery as a policy with no DR.
When choosing one of the other regions, the objects are listed and are recovered in the selected location.
If cross-subscription DR was set in policy, Restore From dropdown list contains backup target’s (original) and DR subscriptions.
To perform cross-subscription recovery, select a different target subscription from Restore to Subscription dropdown list, which contains all subscriptions of the selected backup policy’s account.
If multiple locations were set for cross-location DR, Restore to Location contains original location and DR locations.
You can recover an SQL Server and some of or all its databases or just the SQL databases.
For Recover SQL Databases Only, enable Allow Azure services and resources to access this server.
In the Backup Monitor, select the backup, and then select Recover.
To recover an SQL Server with some or all its databases:
Select the SQL Server snapshot that you want to recover from and then select Recover.
2. In the SQL Servers tab of the Recover screen, select 1 SQL Server, and then select Recover. The Basic Options tab opens.
3. In the Server Admin Login and Password boxes, provide the credentials to use in the recovered SQL Server.
4. The default Preserve Tags action during recovery is Preserve Original for the servers. To manage tags, see section 10.3.
5. In the Network tab:
a. Select the Minimum TLS Version in the list.
b. Select Firewall Rules and Virtual Network Rules, or select Deny Pubic Network Access.
6. In the SQL Databases tab, select the databases to recover.
The default Preserve Tags action during recovery is Preserve Original for the database. To manage tags, see section 10.3.
7. In the Worker Options tab, set values to enable communication between the Worker and the SQL Server.
7. Select Recover SQL Server.
To recover SQL Databases only:
Select the SQL Server snapshot that you want to recover from and then select Recover SQL Databases Only.
In the SQL Databases tab, enter a new Name for each database. Similar names will cause the recovery to fail.
The default Preserve Tags action during recovery is Preserve Original for the database. To manage tags, see section .
Change other settings as needed.
Select Recover SQL Database.
When you back up an Azure Virtual Machine or disks, you can recover individual files from the backup without having to recover the entire Virtual Machine or all disks.
To recover individual files from a snapshot of an Azure disk or Virtual Machine:
Complete the steps required to configure a worker to be launched in the account, subscription, and location of the source snapshot. See section 22.
In the Backup Monitor, select the backup, and then select Recover.
To explore files from an entire virtual machine, go to the Virtual Machine tab, select the virtual machine, and then select Explore Disks Files.
To explore files from one or more disks belonging to a virtual machine, go to the Virtual Machine tab, select the virtual machine, then select Recover Disks Only. Select one or more disks, and then select Explore Disks.
To explore files from an independent disk, go to the Independent Disks tab, select the disk, and then select Explore Disks.
If multiple backups of the chosen target exist, you will be prompted to select the number of different backups to explore. Select the desired number, and then select Start Session.
N2W allows recovering an AWS volume backup to Azure.
Limitations:
Cross-cloud recovery is supported only for Instance Volume backups copied to S3.
From the UI, such recovery can only be initiated for one volume at a time chosen from the Volume Recovery from Instance screen.
OS\root disk functionality doesn’t migrate from AWS to S3. If N2W recovers an AWS root volume to Azure, an Azure VM can’t be spined up from that disk.
To recover a volume from S3 to Azure:
Worker configuration is required. The recovery process uses a worker machine launched in Azure to write the required data to the volume.
In the Backup Monitor, select an Instance backup that was copied to S3, and then select Recover.
In the Recover screen, select the instance from which the volume is to be recovered.
In the Restore from list, choose the repository to which the volume was copied.
In the Restore to Account list, choose the Azure account to restore to.
In the Subscription list, choose the subscription to restore to.
Select Recover volumes only.
7. In the Volume Recovery from Instance screen, select one volume to recover.
8. In the Disk Name box, type the name of the disk to be recovered in Azure.
9. In the Resource Group list, choose the resource group to which the disk will be recovered.
10. Optionally, choose an Availability Zone to recover to and the Encryption Set to use on the recovered disk.
11. Select Recover Volume.
12. To follow the progress of the recovery, select the Open Recovery Monitor link in the ‘Recovery started’ message at the top right corner, or select the Recovery Monitor tab.
13. To view details of the recovery process, select the recovery record, and select Log. Select Refresh as needed.
Snapshots of Azure Managed Disks can be stored in a Storage Repository at a lower cost.
N2W allows creation of lifecycle policies. In lifecycle policies, older snapshots are automatically moved from high-cost to low-cost storage tiers. The snapshots can be stored in any Storage Repository supported by your N2W license:
AWS Storage (S3) Repository
Azure Storage Repository
Wasabi Repository
Moving data out of the cloud incurs additional costs associated with the network traffic.
Life-cycle policy applies only to Managed Disk snapshots, whether they are backed up as independent disks, or as part of a virtual machine backup. If a policy contains resources other than virtual machine or Disks, these resources will not be affected by the lifecycle policy.
Backups copied to Storage Repository cannot be moved to the Freezer.
To use the Lifecycle Policy functionality, the cpmdata policy must be enabled. See section for details on enabling the cpmdata policy.
Due to the incremental nature of the snapshots, only one backup of a policy can be copied to Storage Repository at any given time. A backup will not be copied to the repository if the previous backup in the same policy is still being copied. Recovery from the repository is always possible unless the backup itself is being cleaned up.
Lifecycle operations, such as Snapshot Copy and Cleanup, are performed by Workers. For Copy operations, the worker is always launched in the account, subscription, and location of the disk whose snapshot is being copied. A Worker configuration must be created for every such combination. To speed up the operations, N2W will attempt to launch 2 workers per policy. Your Virtual machine quotas must be large enough to allow launching the required number of workers. For more information about workers, see section .
Copy and Restore of data to/from a repository outside of the Azure cloud, such as AWS Storage (S3) Repository, or Wasabi Repository, may incur additional network charges.
In the N2W left panel, select the Policies tab.
Select a Policy, and then select Edit.
Select the Lifecycle Management tab.
Turn on the Use Storage Repository toggle switch.
Choose the interval between backups that are to be moved to the Storage Repository. For example, to move a weekly backup of a policy that runs daily backups, choose 7.
Choose whether to delete the original Disk Snapshots after they are copied to the Storage Repository.
When enabled, snapshots are deleted regardless of whether the copy to Storage Repository operation succeeded or failed.
7. Select the retention settings for the snapshots in the repository. Retention can be specified in terms of the number of backups (generations), backup age, or a combination of the two. If generations and age are enabled, a backup will be deleted only if both criteria have been met.
8. Select the Target repository, or select New to define a new repository. If you define a new repository, select Refresh before selecting.
You can recover a backup from Storage Repository to the original location or to a different one.
‘Marked for deletion’ snapshots can no longer be recovered.
To recover a backup from Storage Repository:
Make sure a Worker Configuration exists for the location where the resource is to be recovered. See section 26.12 for more information.
In the Backup Monitor tab, select a relevant backup that has a Lifecycle Status of ‘Stored in Storage Repository’, and then select Recover.
In the Restore from drop-down list of the Recover screen, select the name of the Storage Repository to recover from.
In the Restore to Location drop-down list, select the Location to restore to.
Select the resource to recover (either a Virtual Machine or a Disk) from the list and select Recover. If you wish to recover only selected disks from a Virtual machine backup, select the Virtual machine, select Recover Disks Only, and then select the desired disks.
In the dialog, complete the relevant recovery parameters. See section for more details.
In the Recovery From Repository Options tab, choose a Storage Account that will be used to store temporary data during the recovery process.
Select Recover Virtual Machine / Recover Disks to start the recovery process.
You can follow the process in the Recovery Monitor.
To abort a recovery in progress, in the Recovery Monitor, select the recovery item, and then select Abort Recover from Repository.
Workers are used by N2W for Lifecycle operations, such as copying Azure Disk Snapshots to a Repository, as well as for Cleanup and Recovery of these snapshots. A Worker Configuration specifies the parameters required for launching a worker instance for a specific combination of account/subscription/location. Whenever a worker is required, N2W will look for a Worker Configuration according to the operation’s account, subscription, and location.
To configure Azure worker parameters:
Select the Worker Configuration tab.
On the New menu, select Azure Worker.
In the User, Account, Subscription, and Location lists, choose the values you are creating the configuration for. The configuration will be applied to all workers launched in the selected location, account, and subscription.
Select a Resource Group where the worker will be created.
Choose an SSH Key to be associated with the worker. If you leave the default, don’t use key pair as you will not be able to use key-based authentication for SSH connections to this worker.
Select a Virtual Network from the list. The selected network must allow workers to access the subnet where N2W is running as well as the Azure Blob services and the repository.
Select a Subnet from the list.
Select a Security Group to be applied to the workers.
In the Network Access list, select a network access method. Direct network access or indirect access via an HTTP proxy is required:
Direct - Select a Direct connection if no HTTP proxy is required.
via HTTP proxy -– If an HTTP proxy is required, select, and fill in the proxy values.
Select Save.
Test the new worker. See section .
To edit or delete a worker configuration:
In the Worker Configuration tab, select a worker.
Select Delete or Edit.
AWS Backups
AWS Protected Resources
AWS Resource Control Operations
AWS Snapshots
AWS Resources Summary (PDF) of regular, DR, and S3 Backups, Volume Usage Percentage, and other metrics
AWS Usage
AWS Unprotected Resources (Scheduled Report only)
Azure Backups
Azure Protected Resources
Azure Resources Summary Report (PDF) of regular, DR, S3 Backups, Volume Usage Percentage, and other metrics
All tables have an Export Table reporting option on the right side of the action toolbar. See section 3.7 for details.
Alerts are notifications about issues in your N2W backup solution. Whenever a policy fails, in backup or DR, an alert is issued so you will know this policy is not functioning properly. If there are current alerts, Alerts in the toolbar has a number to show you how many there are. Select Alerts to open the Alerts list.
Later, when the policy succeeds, the alert is turned off or deleted, so you will know that the issue is resolved. Alerts can be issued for failures in backup and DR, as well as general system issues like license expiration, for relevant installations.
Depending on the resolution of the output device, a list of Alerts is automatically shown under the Dashboard. The Dashboard list shows the same information except for an abbreviated message and is grouped by functional categories, such as Backup and Resource Control.
You can manage the number of Alerts shown by selecting alerts to remove in the toolbar Alerts list and then selecting Delete.
If you wish to integrate N2W with 3rd party monitoring solutions, N2W allows API access to pull alerts out of N2W. A monitoring solution can call this API to check if N2W has alerts. When calling this API, the caller receives the current alerts in JSON format. The call is an HTTPS call, and if you configured the N2W server to use an alternate port (not 443), you will need to use that port for this API call as well. N2W requires an authentication key from the caller. Every N2W user can define such a key to get the relevant alerts. The root user can also get relevant alerts from other managed users, but not from independent users.
To configure an API call:
In the toolbar, select Settings in the User menu.
In the User Settings panel, select the API Access tab.
To enable access and generate an Authentication Key:
Select API Access.
To generate a new Authentication Key and invalidate the current, select Generate API Authentication Key.
Select Save.
After enabling and setting the key, you can use the API call to get all alerts: https://{{host}}/api/alerts
A simple example in Python is:
The JSON response is a list of alert objects, each containing the following fields:
category
title
message_body
alert_time (time of the last failure)
policy
severity
N2W can also push alerts to notify you of any malfunction or issue via SNS. To use it, your account needs to have SNS enabled. SNS can send push requests via email, HTTP/S, SQS, and depending on location, SMS.
With SNS you create a topic, and for each topic, there can be multiple subscribers and multiple protocols. Every time a notification is published to a topic, all subscribers get notified. For more information about SNS, see https://aws.amazon.com/sns/.
N2W can create the SNS topic for you and subscribe to the user email defined in the configuration phase. To add subscribers, go to the SNS Dashboard in the AWS Management console), add a recipient, and choose a protocol (SMS, HTTP, etc.), A link to this console is in the N2W notifications screen.
For the small volume of SNS messages N2W uses, there is usually no cost or it is negligible. For SNS pricing see https://aws.amazon.com/sns/pricing/.
To configure users for SNS:
In the toolbar, select Settings in the User menu
Select the Notifications tab in the User Settings panel.
For each of the boxes, select a value from its list.
Depending on the type of credentials selected in the Authenticate using box, you may be prompted with additional boxes:
CPM Instance IAM Role – Requires no additional selections.
Account – Select the Account name or add a new Account by selecting New.
IAM User Credentials – Enter the AWS Access and Secret keys.
To use SNS:
You will need to enter AWS account credentials for the SNS service.
There is one notifications configuration per user, but there can be multiple AWS accounts, where applicable.
SNS credentials are not tied to any of the backed-up AWS accounts. You can choose a region, and enter credentials, which can be regular credentials, IAM user. See section 16.3. To use the N2W Server instance’s IAM role (only for the root user), type use_iam_role for both access and secret keys.
If you are the root (main) user, you can choose whether to include or exclude alerts about managed users. See section
Root/admin users, and independent users who oversee managed users, can also configure a managed user to receive alerts directly by selecting the user in the User list and setting the notification properties described in sections and .
SNS is used both for push alerts and for sending a daily summary.
Push alerts use SNS to send notifications about malfunctions and issues in N2W’s operation.
To enable push alerts:
In the Notifications tab of the User Settings panel, select Enable Push Alerts.
Define the Alerts Topic by selecting one of the following options in the list:
To create a new topic, select Auto Generate New Topic.
To use a current topic, select Use Existing Topic. Enter the name in the Alerts Topic Name box. Or, you can copy the topic’s ARN from the SNS tab of the AWS Management Console (Open SNS Management Console).
To have the user also receive the alert as an email, select Add User Email as Recipient. The recipient will receive a message requesting subscription confirmation before receiving alerts.
To see which SNS topic the Alerts is currently configured to use, select Use Existing Topic in the Alerts Topic list. The Summary Topic Full ARN will show the SNS topic. To check which email is configured for a topic, see the Topics and Subscriptions views under the SNS service in the AWS console.
The Daily Alert Summary is a message that is sent once a day, summarizing all current alerts, and some policy warnings, in the system. It can be configured instead of, or in addition to, regular alerts. It can be useful for several reasons:
If you are experiencing issues frequently it sometimes reduces noise to get a daily summary. Furthermore, since backup is the second line of defense, some people feel they do not need to get an instant message on every backup issue that occurs.
Even if there are no issues, a daily summary is a reminder that everything is ok. If something happens and N2W crashed altogether, and your monitoring solution did not report it, you will notice the Daily Summary will stop.
The Daily Summary contains a list of policies that are disabled and policies that do not have schedules assigned to them. Although neither is an error, sometimes someone can accidentally leave a policy disabled or without a schedule and not realize that it is not working.
To configure the Daily Summary:
In the Notifications tab of the User Settings, select Enable Daily Summary.
Define the Daily Summary Topic by selecting one of the following options in the list:
If you want to use the Alert topic for summaries, select Use Existing Topic. Enter a Summary Topic Name.
To create a new topic, select Auto Generate New Topic.
To have the user also receive the summary as email, select Add User Email as Recipient.
In the Send Daily Summary At list, select the hour and minutes to send the notification.
Select Save.
To test the notification, select Test Daily Summary.
There is an advantage of using a separate topic since sometimes you want different recipients: It makes sense for a system admin to get alerts by SNS and to get the daily summary by email only. The display name of the topic appears in the message, and in emails, it appears as the sender name. With separate topics, it is easier to distinguish alerts.
To see which SNS topic the Daily Summary is currently configured to use, select Use Existing Topic in the Daily Summary Topic list. The Summary Topic Full ARN will show the SNS topic. To check which email is configured for a topic, see the Topics and Subscriptions views under the SNS service in the AWS console.
The new downloadable Summary PDF report for AWS and Azure accounts resembles the Dashboard in layout, except for the Alerts section, and provides historical data for the filtered period. The PDF includes Dashboard graphics and statistics:
Backups, with breakdowns for Successful, Partial, and Failed, for Backups, DR Backups, and S3 Backups
Volume Usage Percentage, with breakdowns below, within, and above usage thresholds
Statistics for Accounts, Policies, Protected Resources, Managed Snapshots, Cost Savings, and Cost Explorer
Filters are available for the Resources Summary report as follows:
AWS - User, and period.
Azure - User, account, and period.
You can create the Summary PDF report as follows:
When using the REST API, see REST API/SCHEMA DOCS. Report time filters are:
period_type: ‘M’ | ’W’ for prior Months or Weeks
period_length: number of period_type units
You can download two raw data reports in CSV format (Comma Separated Values) for AWS and Azure. These reports are for the logged-in user. For the root user, they will include also data of other managed users. These reports include all the records in the database; you can filter or create graphic reports from them by loading them to a spreadsheet or reporting tool. The two reports combined give a complete picture of backups and snapshots taken by N2W.
To download the CSV reports:
In the left panel, select Reports.
For the backup view, in the Report Type list, select AWS Backups or Azure Backups.
For the snapshot view, in the Report Type list, select AWS Snapshots or Azure Backups.
For further details on Scheduled Reports, see section .
Select Run Now.
This report will have a record for each backup (similar to the Backup Monitor) with details for each of the backups, including backups imported to S3.
AWS
Azure
Field / Description
X
X
Backup ID – A unique numerical ID representing the backup
X
X
This report will have a record for each AWS EBS or RDS or Azure VM and Disk snapshot in the database.
Snapshots with the backup option ‘AMIs Only’ will be included in the Snapshot report, while ‘Snapshots with initial AMI’ will not be included.
AWS
Azure
Field / Description
X
X
Backup ID – ID of the backup the snapshot belongs to. Matches the same snapshots in the previous report
X
X
Additional columns contain data for tracking changes in storage size for EBS and S3 copies:
AWS
Azure
Field / Description
X
Volume Size (GB) - Logical size of volume, as specified during creation or resizing.
X
By default, when a backup is marked for deletion, it will be deleted right away from the N2W database, and therefore not appear in the reports. There are exceptions, such as if N2W could not delete all the snapshots in a backup (e.g., a snapshot is included in an AMI and cannot be deleted). Sometimes you need to save records for a period after they were marked for deletion for compliance, such as General Certificate of Conformity (GCC). To keep records after deletion, see section 9.4.
In addition to the raw reports, you can also download AWS CSV usage reports. A usage report for a user will give the number of AWS accounts, instance, and non-instance storage this user is using. This can be helpful for inter-user accounting.
In the left panel, select the Reports tab.
For the usage report (current user), select AWS Usage in the Report Type list and your username in the User list.
To get the usage report (all users) for the root user, select AWS Usage in the Report Type list and All in the User list.
Select Run Now.
The columns for the N2WS_aws_usage_summary_report are as follows:
Date – Date of report. Each line represents a different day.
User ID – N2W user ID. Users are defined in ‘Users’ settings tab.
User Name - N2W user Name. Users are defined in ‘Users’ settings tab.
Num Instances – number of unique backed up instances.
Independent Volumes (GiB) – Number of GIBs of unique backed up volumes.
RDS Databases (GiB) – Number of GIBs of unique backed up RDS DBs.
Number of Controlled Entities - Number of unique entities controlled by Resource Control.
Redshift Clusters (GiB) - Number of GIBs of unique backed up Redshift Clusters.
DynamoDB (GiB) - Number of GIBs of unique backed up DDBs.
Number of Elastic File Systems (EFS) - Number of unique backed up EFS).
EFS (GiB) - Number of GIBs of unique backed up EFSs.
Number of FSx systems - Number of unique backed up FSxs.
FSX (GiB) - Number of GIBs of unique backed up FSxs.
Total Non-Instance Storage (GiB) - Number of GIBs of unique resources excluding instance volumes and including independent volume GiBs, GiBs of all DB types, FSx GiBs, EFS GiBs, and SAP Hana GiBs.
Number of instances in DR policies – Number of unique instances in policies with DR enabled.
Number of instances in S3 policies – Number of unique instances in policies that Copy to S3 Repository.
Scanning Tags – True if the N2W uses the periodical ‘scanning tags’.
Capturing VPCs – True if the N2W uses the periodical ‘Capture networks’.
Number of Policies using AWS Immutable Lock – Number of policies with ‘enable immutable lock’ flag enabled.
The AWS and Azure protected reports provide information about AWS and Azure resources with backup protection. The unprotected resources report is available for AWS accounts only.
In the left panel, select the Reports tab.
For AWS accounts, select AWS Unprotected or Protected Resources in the Report Type list.
For Azure accounts, select Azure Protected Resources in the Report Type list.
For the current user, select your username in the User list.
For the root user, to get all users, select All in the User list
SelectRun Now.
When you are notified that the report has completed, check your Downloads folder.
AWS resources that are tagged with key:’cpm backup’ or 'cpm_backup', value:’no-backup’ will be ignored. Also, see section 14.1.5.
The protected resources report contains information about AWS resources with backup policies.
Account / Azure Account
User Name (on all user reports)
Resource ID
Resource Name
Region (AWS) / Location (Azure)
Polices / Azure Policies
Schedules
Resource Type (Azure)
The protected resources report is available immediately for the current user or all users depending on the account type.
The protected resources report is also available as a Scheduled Report. See section 17.10.1.
The AWS unprotected resources report is available as a Scheduled Report only and contains information about the AWS resources that do not have backup policies.
Resource Type
Name of resource
Resource ID
Region
Partial
Account
User
Count of number of unprotected resources per resource type.
All Reports are accessible from the Reports tab in the left panel.
The reports will be available in your Downloads folder. Reports are for the logged-in user. For the root user, the reports will also include the data of other managed users.
Scheduled Reports allow you to create a schedule for each report. To receive a Scheduled Report, configure at least one recipient email address and the SES service for that email. See section 18.7.
You can run reports outside of a schedule and create ad hoc reports for download:
In the Scheduled Reports tab, Run Now generates a defined Scheduled Report and sends emails to its recipients.
In the Immediate Report Generation tab, you can define a new report for immediate execution and download.
Also, see section 17.10.3.
By default, the Reports page opens with a list of all reports which have been scheduled. To narrow the list, use the search box, or the filters for report type, user, and schedule.
Filters are available based on the chosen Report Type. Depending on the report, you can filter the results as follows:
Audit – Filter for User and records for prior days, weeks, or months.
AWS / Azure Backups – Filter for User, Account, and records for prior days, weeks, or months.
AWS / Azure Protected Resources – Filter for User and Account.
AWS Resource Control Operation – Filter for Account and records for prior days, weeks, or months.
AWS / Azure Snapshots - Filter for Account and records for prior days, weeks, or months.
AWS Resources Summary (PDF) - Filter for User and historical data for prior weeks or months. Information contained is the same as in the Dashboard except that it is historical. Alerts are not included.
Azure Resources Summary (PDF) - Filter for User, Account, and historical data for prior weeks or months. Information contained is the same as in the Dashboard except that it is historical. Alerts are not included.
AWS Usage – Filter by User and records for prior days, weeks, or months. Select Detailed or Anonymized.
AWS Unprotected Resources - Filter by User and Account.
Reports are run according to their defined schedule and immediately using Run Now. Schedules reports must include at least one email recipient.
You can create a Scheduled Report without a schedule and edit the report later after creating the schedule.
To create a scheduled report:
Select the Scheduled Reports tab and then New.
Enter a name for the new report and choose the Report Type.
By default, the report is enabled. To disable the Schedule Report, clear Enabled.
In the Schedules list, select one or more schedules. To create or edit a schedule, see section .
In the Recipients box, enter the email address of recipients, separated by a semi-colon (‘;’).
Select from the filters presented for the Report Type.
If Include Records From Last boxes appear, you can select the number (first list) of Days, Weeks, or Months (last list) to include in the report. The default is all available records.
In the Description box, enter an optional informative description.
Select Save.
To run a Scheduled Report and send emails to its recipients immediately:
In the Scheduled Reports tab, select the report in the list and then select Run Now.
To define a new report and download it immediately:
Select the Immediate Report Generation tab.
Select a Report Type and one or more filters depending on the Type selected, as listed above in section 17.10.1.
To filter the report data by date and time, select Calendar and choose the From and To date and time values. Select Apply after each definition.
Select Generate Report. The output will be downloaded by your browser.
AWS uses SNS to provide several N2W alert services by subscription.
After subscribing to CPM Alerts in AWS, you will receive an email with a confirmation link:
Select the Confirm subscription link. You will receive a subscription confirmation email:
Following is an example of a CPM Daily Summary where all AWS functions were OK:
Following is an example of an alert that the unprotected resources report is available:
Announcements are a method for N2W to communicate directly to users about non-operational topics, such as promotions and other sales-related information.
In the toolbar, the Announcements icon shows the number of unread announcements waiting in the user’s mailbox. In the Announcements inbox panel, select an announcement to open.
After selecting an announcement, you can reset the message status by selecting Mark as Unread in the upper right corner of the message.


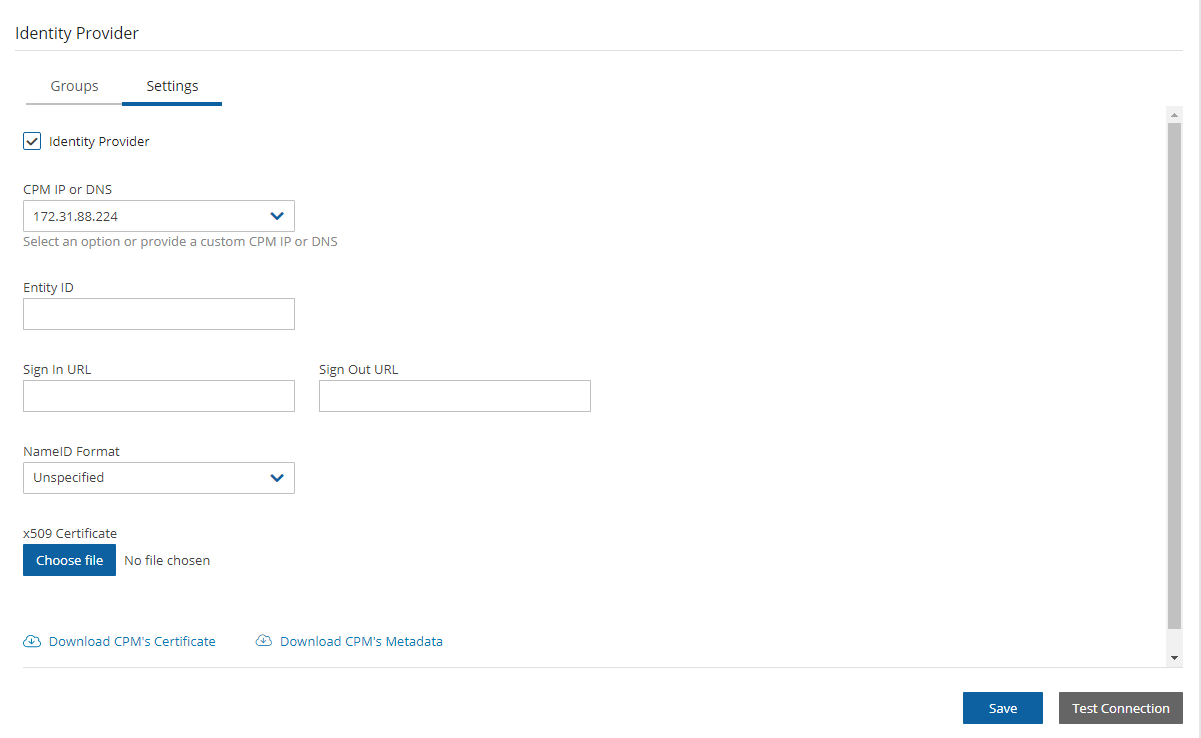
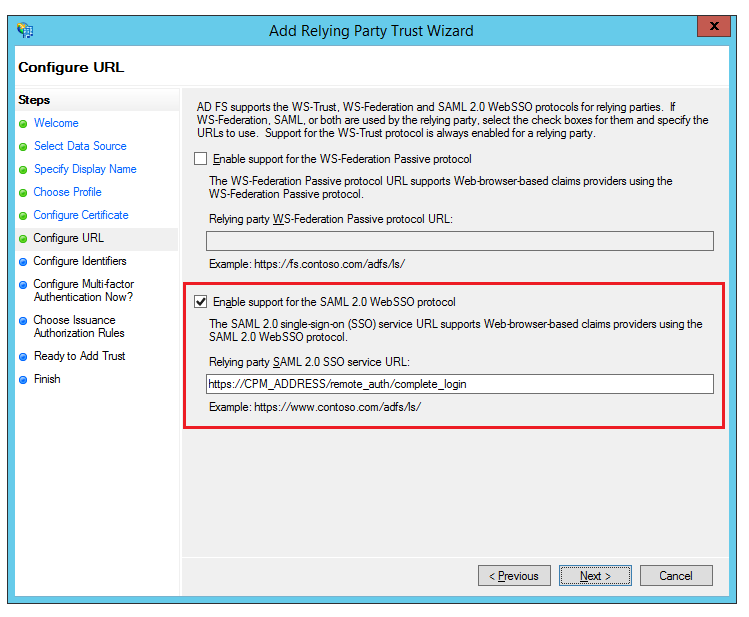

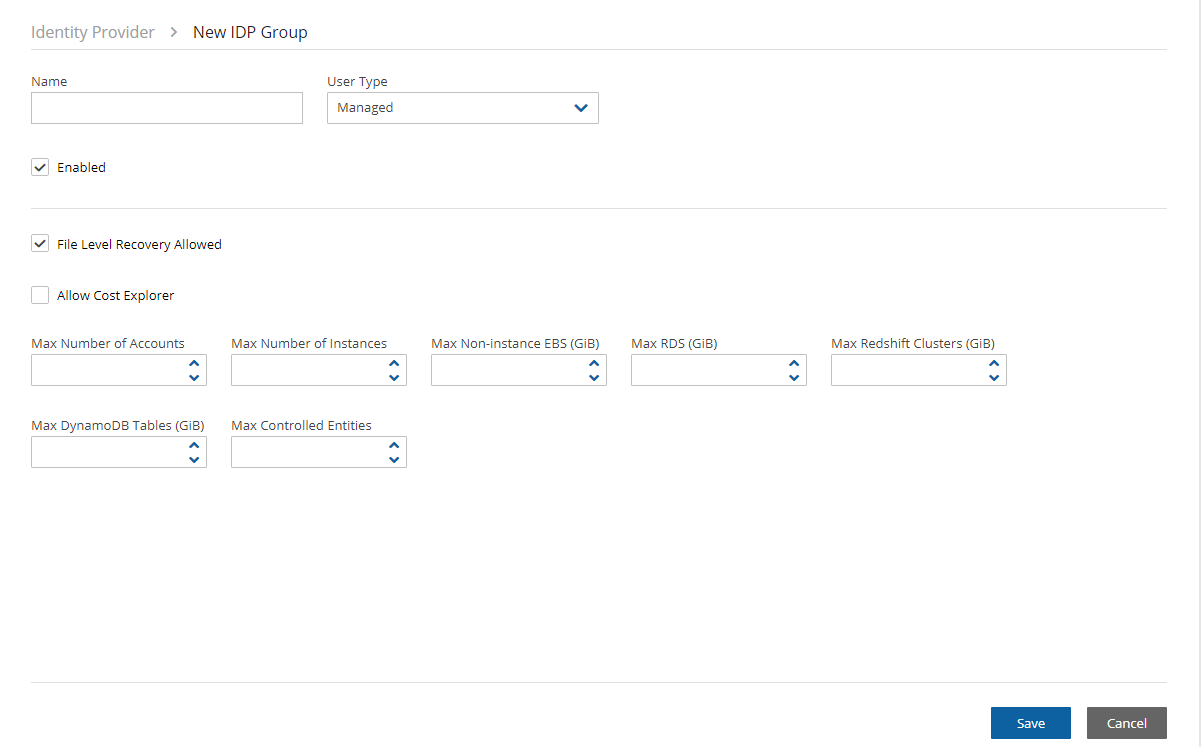


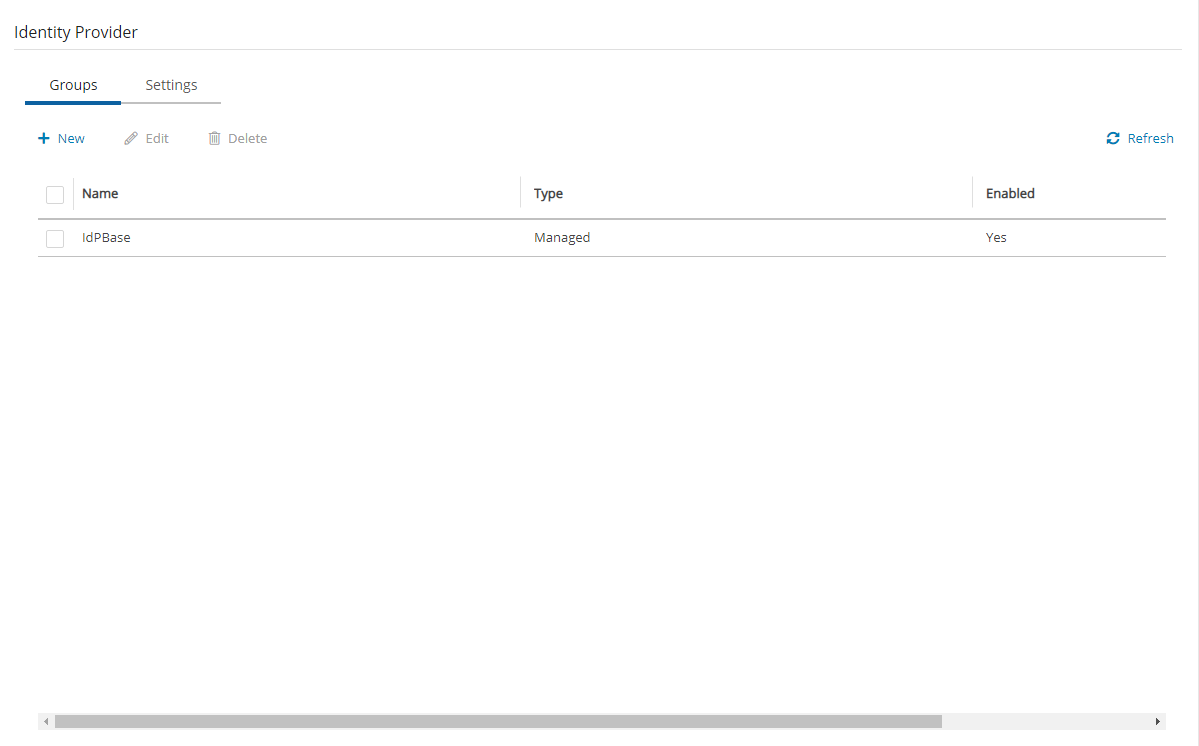
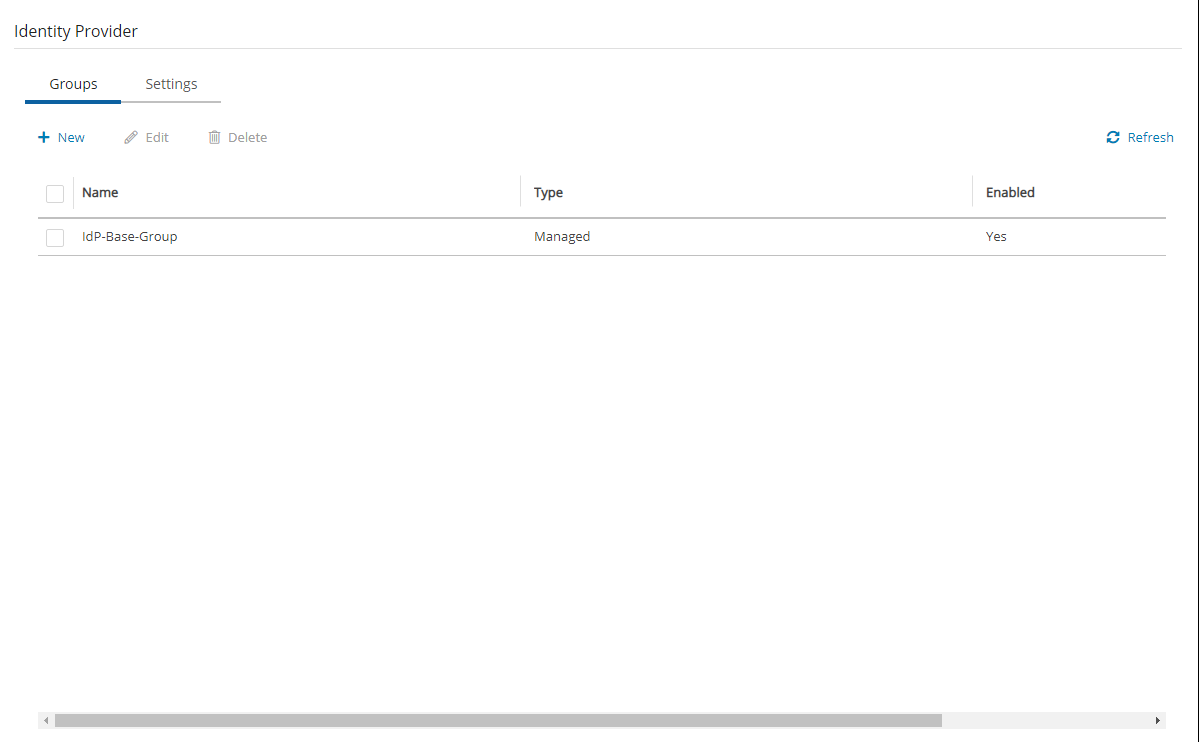
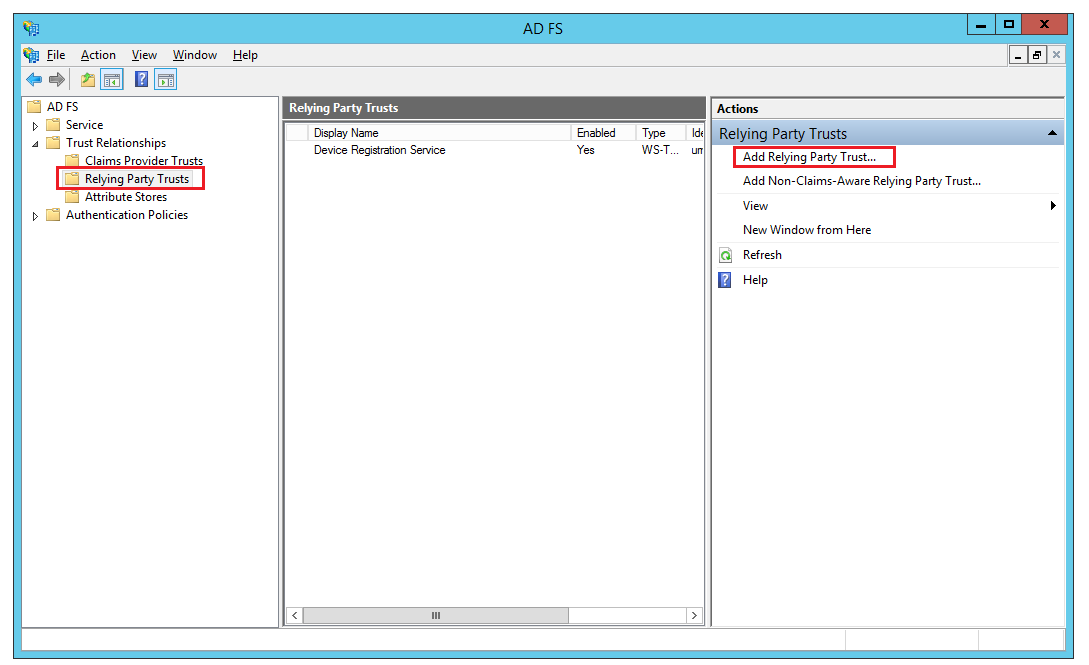

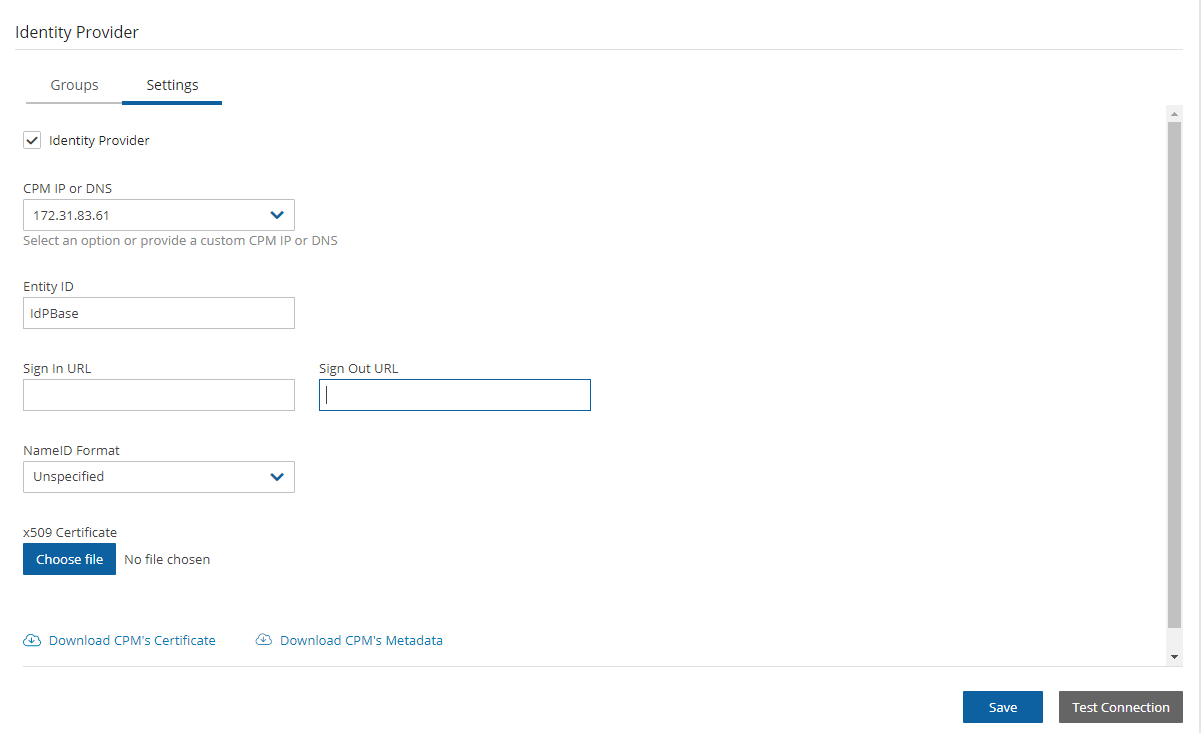
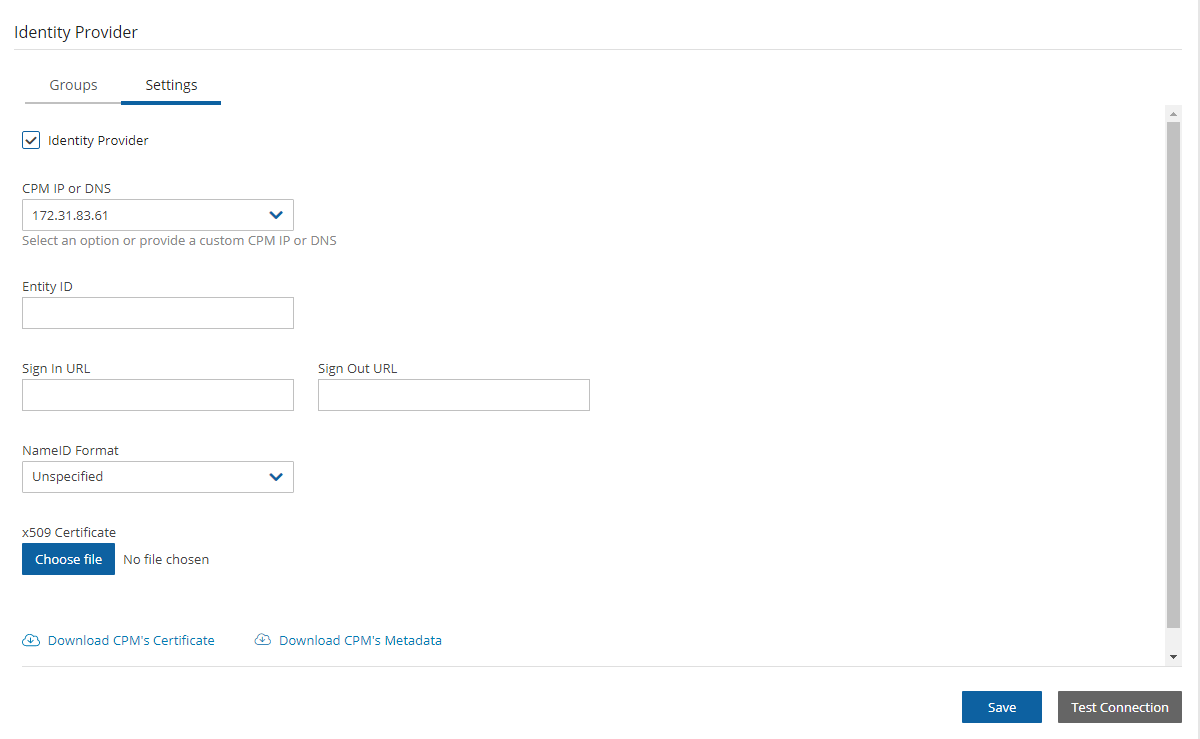

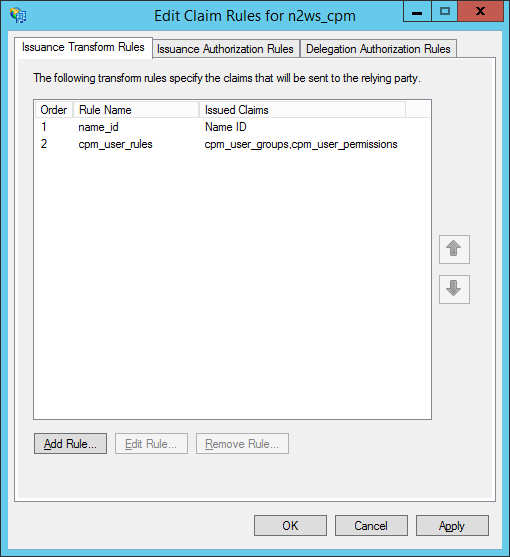


Manage the destination and costs associated with backup storage by using Lifecycle Policies.
In addition to creating and managing EBS snapshots, N2W can store backups in a Storage Repository in Simple Storage Service (S3) and S3 Glacier, allowing you to lower backup costs when storing backups for a prolonged amount of time. In addition, you can store snapshots of AWS volumes in an Azure Storage Account repository, thereby gaining an additional level of protection. N2W allows you to create a lifecycle policy, where older snapshots are automatically moved from high-cost to low-cost storage tiers.
Snapshots are operational backups designed for day-to-day and urgent production recoveries.
{
"properties": {
"roleName": "CPM",
"description": "",
"assignableScopes": [
"/subscriptions/<subscriptionID>"
],
"permissions": [
{
"actions": [
"Microsoft.Compute/virtualMachines/read",
"Microsoft.Compute/disks/read",
"Microsoft.Compute/snapshots/write",
"Microsoft.Network/networkInterfaces/read",
"Microsoft.Compute/snapshots/read",
"Microsoft.Resources/subscriptions/resourceGroups/read",
"Microsoft.Compute/disks/write",
"Microsoft.Compute/snapshots/delete",
"Microsoft.Resources/subscriptions/resourceGroups/delete",
"Microsoft.Network/virtualNetworks/read",
"Microsoft.Network/virtualNetworks/subnets/read",
"Microsoft.Network/networkInterfaces/write",
"Microsoft.Network/virtualNetworks/subnets/join/action",
"Microsoft.Network/networkInterfaces/join/action",
"Microsoft.Compute/virtualMachines/write",
"Microsoft.Compute/diskEncryptionSets/read",
"Microsoft.Compute/virtualMachines/powerOff/action",
"Microsoft.Compute/virtualMachines/start/action",
"Microsoft.Compute/availabilitySets/read",
"Microsoft.Compute/availabilitySets/vmSizes/read"
],
"notActions": [],
"dataActions": [],
"notDataActions": []
}
]
}
}
d:\tmp>python
Python 2.7.2 (default, Jun 12 2011, 15:08:59) [MSC v.1500 32 bit (Intel)] on win32
Type "help", "copyright", "credits" or "license" for more information.
>>> import urllib2, json
>>> server_address = 'ec2-54-228-126-14.compute-1.amazonaws.com'
>>> server_port = 443
>>> authkey = 'afb488681baf0132fe190315e87731f883a7dac548c08cf58ba0baddc7006132a
a74f99ab07eff736477dca86b460a4b1a7bfe826e16fdbc'
>>> url = 'https://%s:%d/agentapi/get_cpm_alerts/' % (server_address, server_port)
>>> url
'https://ec2-54-228-126-14.compute-1.amazonaws.com:443/agentapi/get_cpm_alerts/'
>>> request = urllib2.Request (url)
>>> request.add_header("Authorization", authkey)
>>> handle = urllib2.urlopen (request)
>>> answer = json.load (handle)
>>> handle.close ()
>>> answer
[{u'category': u'Backup', u'message_body': u'Policy win_server (user: root, account: main) - backup that started at 07/20/2013 09:00:00 AM failed. Last
successful backup was at 07/20/2013 08:00:00 AM', u'severity': u'E', u'title': u'Policy win_server Backup Failure', u'alert_time': u'2013-07-20 06:00:03',
u'policy': {u'name': u'win_server'}}, {u'category': u'Backup', u'message_body': u'Policy web_servers (user: root, account: main) - backup that started at
07/20/2013 09:20:03 AM failed. Last successful backup was at 07/20/2013 08:30:00 AM', u'severity':u'E', u'title': u'Policy web_servers Backup Failure',
u'alert_time': u'2013-07-20 06:22:12', u'policy': {u'name': u'web_servers'}}]
>>>S3 and Azure Storage archives are designed for long-term retention.
A typical lifecycle policy would consist of the following sequence:
Store daily EBS snapshots for 30 days.
Store one out of seven (weekly) snapshots in S3 for 3 months.
Finally, store a monthly snapshot in S3 Glacier for 7 years, as required by regulations.
Storing snapshots in Storage Repository is not supported for periods of less than 1 week.
Configuring a lifecycle management policy in N2W generally consists of the following sequence:
Defining how many mandatory original and DR snapshot generations to keep.
Optionally, defining how long original and DR snapshot retention periods should be, and applying compliance locks.
Enabling and configuring backup to Storage Repository.
Optionally, enabling and configuring Archive to Cold Storage, such as S3 Glacier.
For detailed S3 storage class information, refer to https://aws.amazon.com/s3/storage-classes.
N2W currently supports the copy of the following services to S3:
EBS
EC2
RDS MySQL – Supported versions are 5.6.40 and up, 5.7.24 and up, and 8.0.13 and up
RDS PostgreSQL – Supported versions are 9.6.6 – 9.6.9, 9.6.12 and up, 10.7 and up, 11.2 and up, 12.0 and up, and 13.1 and up
Using the N2W Copy to Storage Repository feature, you can:
Define multiple folders, known as repositories, within a single S3 bucket or an Azure Storage Account.
Define the frequency with which N2W backups are moved to a Repository, similar to DR backup. For example, copy every third generation of an N2W backup to Storage Repository.
Define backup retention based on time and/or number of generations per Policy.
N2W stores backups in Storage Repository as block-level incremental backups.
Only one backup of a policy can be copied at a time. A copy operation must be completed before a copy of another backup in the same policy can start.
In addition, the Cleanup and Archive operations cannot start until the previous backup in the policy has completed.
When choosing a copy frequency, make sure that there will be enough time for one set of operations to complete before the next ones are scheduled to start.
Important:
Avoid changing the bucket settings after Repository creation, as this may cause unpredictable behavior.
AWS Encryption at the bucket-level must be enabled. Bucket versioning must be disabled, unless Immutable Backups is enabled. See section .
Bucket settings are only verified when a Repository is created in the bucket.
Strongly Recommended:
S3 buckets configured as a Storage Repository should not be used by other applications.
Before continuing, consider the following:
Backups of instances and volumes can be copied to any Storage Repository.
RDS backups can be exported to AWS Storage (S3) repositories but not to an Azure Storage Account repository.
N2W stores backups in Storage Repository as block-level incremental backups.
Most N2W operations related to the Storage Repository (e.g., writing objects to S3, clean up, restoring, etc.) are performed by launching N2W worker instances in AWS. The worker instances are terminated when their tasks are completed.
Only the copy of instances, independent volumes, and RDS backups is supported.
Copy to Storage Repository is supported for daily, weekly, and monthly backup frequencies. However, potential savings depend on a variety of factors:
Retention period
Storage tier
Average VM size
Daily change rate
Total number of VMs protected
In most cases, a minimum retention period of 3 weeks is required. To understand the savings potential for your use case, use our , or speak with your account manager.
Copy is not supported for other AWS resources that N2W supports, such as Aurora.
Snapshots consisting of ‘AMI-only’ cannot be copied to a Storage Repository.
Due to AWS service restrictions in some regions, the root volume of instances purchased from Amazon Marketplace, such as instances with product code, may be excluded from Copy to Storage Repository. The data volumes of such instances, if they exist, will be copied.
Backup records that were copied to Storage Repository cannot be moved to the Freezer.
Users cannot delete specific snapshots from a Storage Repository. Snapshots stored in a repository are deleted according to the retention policy. In addition, users can delete all S3 snapshots of a specific policy, account, or an entire repository. See sections and .
A separate N2W server, for example, one with a different “CPM Cloud Protection Manager Data” volume, cannot reconnect to an existing Storage Repository.
To use the Copy to Storage Repository functionality, the cpmdata policy must be enabled. See section for details on enabling the cpmdata policy.
Due to the incremental nature of the snapshots, only one backup of a policy can be copied to Storage at any given time. Additional executions of Copy to S3 backups will not occur if the previous execution is still running. Restore from S3 is always possible unless the backup itself is being cleaned up.
AWS accounts have a default limit to the number of instances that can be launched. Copy to Storage launches extra instances as part of its operation and may fail if the AWS quota is reached. See AWS for details.
Copy and Restore of volumes to/from regions different from where the S3 bucket resides or to an Azure Storage Account repository may incur long delays and additional bandwidth charges.
Instance names may not contain slashes (/) or backslashes (\) or the copy will fail.
S3 Sync operation may time out and fail if copy operation takes more than 12 hours.
N2W Software has the following recommendations to N2W customers for help lowering transfer fees and storage costs:
When an ‘N2WSWorker’ instance is using a public IP (or NAT/IGW within a VPC) to access an S3 bucket within the same region/account, it results in network transfer fees.
Using a VPC endpoint instead will enable instances to use their private IP to communicate with resources of other services within the AWS network, such as S3, without the cost of network transfer fees.
For further information on how to configure N2W with a VPC endpoint, see section Appendix A.
The Copy to Storage Repository feature is similar in many ways to the N2W Disaster Recovery (DR) feature. When Copy to Storage Repository is enabled for a policy, copying EBS snapshot data to the repository begins at the completion of the EBS backup, similar to the way DR works. Copy to Storage Repository can be used simultaneously with the DR feature.
N2W can store certain RDS databases in an AWS S3 Repository. This capability relies on the AWS ‘Export Snapshot’ capability, which converts the data stored in the database to Parquet format and stores the results in an S3 bucket. In addition to the data export, N2W stores the database schema, as well as data related to the database’s users. This combined data set allows complete recovery of both the database structure and data.
RDS databases cannot be stored in Azure Storage Account Repository.
Define a Storage Repository.
Define a Policy with a Schedule, as usual.
Configure the policy to include copy to Storage repository by selecting the Lifecycle Management tab. Turn on the Use Storage Repository toggle, and complete the parameters.
If you are going to back up and restore instances and volumes not residing in the same region and/or not belonging to the same account as the N2W server, prepare a Worker using the Worker Configuration tab. See section .
Use the Backup Monitor and Recovery Monitor, with additional controls, to track the progress of operations on a Storage Repository.
In AWS, create an Export Role with required permissions. See section 21.4.1.
In N2W, define an AWS Storage (S3) Repository. See section 21.2.2.
In N2W, add required permissions to user. See https://n2ws.zendesk.com/hc/en-us/articles/28878303166365--AWS-Read-Only-user-for-RDS-to-S3-feature
Define a Policy with a Schedule as usual. In the Lifecycle Management tab, turn on the Use Storage Repository toggle, and then select Enable RDS Copy to S3 Storage. Complete the required parameters. See sections , and .
For each RDS server included in the policy, select the target, select Configure, and then complete the required parameters.
Prepare a Worker using the Worker Configuration tab. See section .
For an Azure Storage Account Repository, also see section 26.5.
For a Wasabi Repository, also see section 27.2.
AWS Storage (S3) Repositories offer an option to protect the data stored in the bucket against deletion or alteration using S3 Object Locks. There are 2 types of locks available:
Legal Hold is put on each object upon creation, remaining in place until explicitly removed. Protected objects can’t be deleted or modified while the lock exists.
During Cleanup, the server identifies objects to be deleted and removes their locks before deleting them.
Usage of Object Locks will slightly increase total cost, because there is an additional cost associated with putting and removing the locks and with the handling of object versions.
Compliance Lock is put on an object for a pre-defined duration, preventing deletion or alteration of the protected object until the lock expires.
Because it is not possible to remove a compliance lock before expiration, the expected lifespan of a locked object must be known in advance. Therefore, it’s only possible to use Compliance Lock with policies whose retention is specified in terms of duration (time-based retention) and not generations.
Because snapshots are incrementally stored in S3, objects created by one snapshot are often re-used by later snapshots, thus extending their original lifespan. When this happens, the lock duration of the objects is automatically extended.
When Compliance Lock is enabled for a repository, it’s not possible to delete snapshots stored in that repository before their pre-defined expiration, as determined by the retention rule that existed when the snapshot was stored in the repository.
To use the Immutable Backup option, an S3 bucket must be created with the following requirements:
The S3 bucket containing the repository must be created with the Object Lock option enabled.
Versioning must be enabled.
The bucket must be encrypted.
The bucket Default retention must be disabled.
AWS does not support enabling this option for an existing bucket, so it is not possible to enable Immutable Backup for existing repositories.
The cpmdata policy must exist before configuring an AWS Storage (S3) Repository.
There can be multiple repositories in a single AWS S3 bucket.
AWS encryption must have been enabled for the bucket.
Versioning must be disabled if Immutable Backup is not enabled.
In N2W, select the AWS Storage Repositories tab.
In the New menu, select AWS Storage Repository.
In the Storage Repositories screen, complete the following fields, and select Save when finished.
Name - Type a unique name for the new repository, which will also be used as a folder name in the AWS bucket. Only alphanumeric characters and the underscore are allowed.
Description - Optional brief description of the contents of the repository.
User – Select the user in the list.
You can delete all snapshots copied to a specific AWS S3 repository.
Deleting a repository is not possible when the repository is used by a policy. You must change any policy using the repository to a different repository before the repository can be deleted.
Select the Storage Repositories tab.
Use the Cloud buttons to display the AWS Storage Repositories.
Select a repository.
Select Delete.
Deleting a large number of objects from an S3 bucket may take up to several hours, especially if Immutable Backup is enabled. A notification alert is created when the deletions have completed.
N2W allows you to manually trigger a storage repository cleanup operation for one or more backup policies. This feature enables immediate execution of lifecycle operations without waiting for the scheduled cleanup cycle.
Overview
The Run Storage Repository Cleanup process performs the following storage repository lifecycle operations on demand:
Identifies and removes expired backup data from a storage repository (AWS S3, Azure Storage Account, or Wasabi) based on the policy's retention settings.
For AWS policies with Glacier archiving enabled, identifies and moves eligible expired backups to S3 Glacier or S3 Glacier Deep Archive before cleanup.
As part of cleanup, removes expired backup data from the storage repository based on retention settings.
Manual cleanup is useful when you need to:
Free up storage space immediately.
Trigger lifecycle operations before a scheduled maintenance window.
Verify that lifecycle operations are working correctly.
Prerequisites
Before running storage repository cleanup, ensure the following:
The policy has S3 Repository (AWS), Storage Account (Azure), or Wasabi Repository enabled.
The policy contains backups in the storage repository.
You have appropriate permissions to manage the policy.
To run storage repository cleanup for one or more policies:
In the main navigation menu, select Policies.
Select one or more policies from the policies list.
You can select multiple policies to run cleanup as a batch operation.
3. In the toolbar, select Run Storage Repository Cleanup.
4. To confirm and run, select Run Cleanup.
To keep transfer fee costs down when using Copy to S3, create an S3 endpoint in the worker's VPC.
Configuring a Lifecycle Policy for Copy to Storage repository includes definitions for the following:
Name of the Storage Repository defined in N2W.
Interval of AWS snapshots to copy.
Snapshot retention policy.
Selecting the Delete original snapshots option minimizes the time that N2W holds any backup data in the snapshots service. N2W achieves that by deleting any snapshot immediately after copying it to S3.
If Delete original snapshots is enabled, snapshots are deleted regardless of whether the copy to Storage Repository operation succeeded or failed.
It is possible to retain a backup based on both time and number of generations copied. If both Time Retention (Keep backups in Storage Repository for at least x time) and Generation Retention (Keep backups in Storage Repository for at least x generations) are enabled, both constraints must be met before old snapshots are deleted or moved to Glacier, if enabled.
For example, when the automatic cleanup runs:
If Time Retention is enabled for 7 days and Generation Retention is disabled, snapshots older than 7 days are deleted or archived.
If Run ASAP is executed 10 times in one day, none of the snapshots would be deleted until they are more than 7 days old.
If Generation Retention is enabled for 4 and Time Retention is disabled, the 4 most recent snapshots are saved.
If Time Retention is enabled for 7 days and Generation Retention is enabled for 4 generations, a single snapshot would be deleted, or archived, after 7 days if the number of generations had reached 5.
In the left panel, select the Policies tab.
Select a Policy, and then select Edit.
Select the Lifecycle Management tab.
Select the number of Backup Generations (original snapshots) to keep in the list.
Complete the following fields:
Use Storage Repository – By default, Use Storage Repository is disabled. Turn the toggle on to enable.
Store snapshots in Storage Repository is based on the following settings:
In the Keep backups in Storage Repository for at least lists, select the duration and/or number of backup generations to keep.
To Transition to Cold Storage, see section .
In the Storage settings section, choose the following parameters:
Select the Target repository, or select New to define a new repository. If you define a new repository, select Refresh before selecting.
Choose an Immediate Access Storage class
If Transition to Cold Storage (Glacier) is enabled, select the Archive Storage class.
Select Save.
Storage Class charges:
S3 Infrequent Access and Intelligent Tiering have minimum storage duration charges.
S3 Infrequent Access has a per GB retrieval fee.
For complete information, refer to .
You can recover a backup from Storage Repository to the same or different regions and accounts.
If you Recover Volumes Only, you can:
Select volumes and Explore folders and files for recovery.
Explore fails on non-supported file systems. See section 13.1.
Define Attach Behavior
Define the AWS Credentials for access
Configure a Worker in the Worker Configuration tab.
Clone a VPC
If you recover an Instance, you can specify the recovery encryption key:
If Use Default Volume Encryption Keys is enabled, the recovered volumes will have the default key of each encrypted volume.
If Use Default Volume Encryption Keys is disabled, all encrypted volumes will be recovered with the same key that was selected in the Encryption Key list.
‘Marked for deletion’ snapshots can no longer be recovered.
To recover a backup from Storage repository:
In the Backup Monitor tab, select a relevant backup that as a Lifecycle Status of 'Stored in Storage Repository', and then select Recover.
In the Restore from drop-down list of the Recover screen, select the name of the Storage Repository to recover from. If you have multiple N2W accounts defined, you can choose a different target account to recover to.
In the Restore to Region drop-down list, select the Region to restore to.
Continue with the regular recovery procedure for the resource:
To recover an instance, see section .
To recover a volume, see section .
5. To follow the progress of the recovery, select Open Recovery Monitor in the ‘Recovery started’ message at the top right corner, or select the Recovery Monitor tab.
To abort a recovery in progress, in the Recovery Monitor, select the recovery item and then select Abort Recover from S3.
By default, Copy to Storage Repository is performed incrementally for data modified since the previous snapshot was stored. However, you can force a copy of the full data for a single iteration to your Storage Repository. While configuring the Backup Targets for a policy with Copy to Storage Repository, select Force a single full Copy. See section 4.2.3.
This option is only available for Copy to S3.
You can set different retention rules in each Policy.
To update the Storage Repository retention rules for a policy:
In the Policies column, select the target policy.
Select the Lifecycle Management tab.
Update the Keep backups in Storage Repository for at least lists for time and generations, as described in section 21.3, and select Save.
N2W strongly advises that before deleting any original snapshots, you perform a test recovery and verification of the recovered data/schema.
Backups are always full to enable fast restores.
Limitations:
RDS snapshots can only be exported to an AWS S3 repository, not to an Azure Storage Account repository.
Exporting RDS databases to S3 is currently not supported by AWS for Osaka and GOV regions.
Default encryption keys for RDS export tasks are not supported.
RDS Export to S3 is currently not supporting Shared CMK encryption keys.
Currently, only MySQL and PostgreSQL databases are supported for copying RDS to S3.
RDS Export to S3 is supported for databases residing in the same region where the S3 bucket is located.
AWS export Parquet format might change some data, such as date-time.
AWS does not support RDS export with stored procedure triggers.
Magnetic storage type export is not supported.
In the AWS IAM Management Console, select Roles and then select Create role.
For the type of trusted entity, select AWS service.
In the Create role section, select the type of trusted entity: AWS service.
4. In the Choose a use case section, select RDS.
5. To add the role to the RDS database, in the Select your use case section, select RDS - Add Role to Database.
6. In the Review screen, enter a name for the role and select Create policy. 7. Create a policy and add the following permissions to the JSON:
8. After saving the role, in the Trust relationships tab: a. Select Edit trust relationship.
b. Edit the Trust Relationship.
If there are multiple trust relationships, the code must be exactly as follows or the role will not appear in the Export Role list.
9. To the CPM role policy, add the following required permissions under Sid "CopyToS3":
rds:StartExportTask
rds:DescribeExportTasks
rds:CancelExportTask
If you want to use the CPM role as the ExportRDS role, you can use the CPM Role Minimal Permissions and also add the Trust Relationship. For AWS: https://n2ws.zendesk.com/hc/en-us/articles/33252616725533--4-5-0-Required-Minimum-AWS-permissions-for-N2W-operations For Azure: https://n2ws.zendesk.com/hc/en-us/articles/33252710830109--4-5-0-Required-Minimum-Azure-permissions-for-N2W-operations
Create a regular S3 policy as described in section 21.3.1, and select the RDS Database as the Backup Target.
The RDS Database security group must allow the default ports, or any non-default port the database is using, in the inbound rules.
Connection parameters are required and must be valid for backup. If not specified, the database will not be copied to S3.
2. In the Lifecycle Management tab: a. Turn on the Use Storage Repository toggle. b. In the Storage settings section, select the Target repository. c. Select Enable RDS Copy to S3 Storage Repository. d. In the Export Role list, select the AWS export role that you created. e. In the Export KMS Key list, select an export KMS encryption key for the role.
The custom ARN KMS key must be on the same AWS account and region.
f. Select Save.
Only roles that include the export RDS Trusted Service, as created in section 21.4.1, are shown in the Export Role list.
3. In the Backup Targets tab, select the RDS Database, and then selectConfigure.
The policy can be saved without the complete configuration, but the copy will fail if the configuration is not completed before the policy runs.
If the target is added using a tag scan, the User name, Password, and Worker Configuration must be added manually afterward.
If the configuration is left blank, the target will not be copied, and a warning will appear in the backup log.
The username and password configured are for read-only access.
4. In the Policy RDS Copy to S3 Configuration screen, enter the following: 1. In the Database Credentials section, enter the database User name and Password. 2. Complete the Worker Configuration section.
If the database is private, you must choose a VPC and subnet that will allow the worker to connect to the database.
3. Select Apply.
When recovering RDS to a different subnet group or VPC, verify that the source AZ also exists in the recovery target. If not, the recovery will fail with an invalid zone exception.
When recovering RDS from an original snapshot, using a different VPC and a subnet group that does not have a subnet in the target AZ, the recovery will also fail.
To recover an RDS database from S3:
In the Backup Monitor, select a backup and then select Recover.
In the Recover screen, select a database and then select Recover.
In the Basic Options tab, modify default values as necessary. Take into consideration any identified issues such as changing AZ, subnet, or VPC.
Select the Worker Configuration tab within the Recover screen.
Modify Worker values as necessary, making sure that the VPC, Security Group, and VPC Subnet values exist in the recovery target.
Select Recover RDS Database.
Follow the recovery process in the Recovery Monitor.
Amazon S3 Glacier and S3 Glacier Deep Archive provide comprehensive security and compliance capabilities that can help meet regulatory requirements, as well as durable and extremely low-cost data archiving and long-term backup.
N2W allows customers to use the Amazon Glacier low-cost cloud storage service for data with longer retrieval times.
N2W can now backup your data to a cold data cloud service on Amazon Glacier by moving infrequently accessed data to archival storage to save money on storage costs.
S3 is a better fit than AWS' Glacier storage where the customer requires regular or immediate access to data.
Use Amazon S3 if you need low latency or frequent access to your data.
Use Amazon S3 Glacier if low storage cost is paramount, you do not require millisecond access to your data, and you need to keep the data for a decade or more.
Following are some of the highlights of the Amazon pricing for Glacier:
Amazon charges per gigabyte (GB) of data stored per month on Glacier.
Objects that are archived to S3 Glacier and S3 Glacier Deep Archive have a minimum of 90 days and 180 days of storage, respectively.
Objects deleted before 90 days and 180 days incur a pro-rated charge equal to the storage charge for the remaining days.
For more information about S3 Glacier pricing, refer to sections ‘S3 Intelligent – Tiering’ / ‘S3 Standard-Infrequent Access’ / ‘S3 One Zone - Infrequent Access’ / ’S3 Glacier’ / ’S3 Glacier Deep Archive’ at https://aws.amazon.com/s3/pricing/
To configure archiving backups to Cold Storage:
From the left panel, in the Policies tab, select a Policy and then select Edit.
Select the Lifecycle Management tab. See section 21.3.
Follow the instructions for backup to Storage Repository. See section .
Turn on the Transition to Cold Storage toggle.
Complete the following parameters:
Move one backup to Cold Storage every X period – Select the time interval between archived backups. Use this option to reduce the number of backups as they are moved to long-term storage (archived). If a backup stored in a Storage Repository has reached its expiration (as defined by the Retention rules) and the interval between its creation time and that of the most recently archived backup is below the specified Interval period, the backup will be deleted from the repository and not archived.
Keep snapshots in Cold Storage until
If storing to an AWS S3 repository, select the Archive Storage class:
Glacier - Designed for archival data that will be rarely, if ever, accessed.
Deep Archive - Solution for storing archive data that only will be accessed in rare circumstances.
The duration is measured from the creation of the original snapshot, not the time of archiving.
Archived snapshots cannot be recovered directly from Cold Storage. The data must first be copied to a 'hot tier' (‘retrieved’) before it can be accessed.
Once retrieved, objects will remain in the hot tier for the period specified by the Days to keep option. If the same snapshot is recovered again during this period, retrieved objects will be re-used and will not need to be retrieved again. However, attempting to recover the same snapshot again while the first recovery is still in the ‘retrieve’ stage will fail. Wait for the retrieval of objects to complete before attempting to recover again.
The process of retrieving data from a cold to hot tier is automatically and seamlessly managed by N2W. However, to recover an archived snapshot, the user should specify the following parameters:
Retrieval tier
Days to keep
Duration and cost of Instance recovery are determined by the retrieval tier selected. In AWS, depending on the Retrieval option selected, the retrieve operation completes in:
Expedited - 1-5 minutes
Standard - 3-5 hours
Bulk - 5-12 hours
A typical instance backup that N2W stores in a Storage Repository is composed of many data objects and will probably take much longer than a few minutes.
To restore data from S3 Glacier:
Follow the steps for Recovering from Storage Repository. See section 21.3.2.
In the Backup Monitor, select a backup that was successfully archived, and then select Recover.
In the Restore from drop-down list, select the Repository where the data is stored.
In the Restore to Region list, select the target region.
Select the resource to recover and then select Recover.
Review and update the Resource Parameters as needed for recovery.
In the Archive Retrieve tab, select a Retrieval tier (Bulk, Standard, or Expedited), Days to keep, and then select Recover. N2W will copy the data from Glacier to S3 and keep it for the specified period.
File-level recovery from archived snapshots is not possible.
After a policy with backup to Storage repository starts, you can:
Follow its progress in the Status column of the Backup Monitor.
Abort the copy of snapshots to Storage Repository.
Stop Cleanup and Archive operations.
Delete snapshots from the Storage Repository.
You can view the progress and status of Copy to Storage Repository in the Backup Monitor.
Select the Backup Monitor tab.
In the Lifecycle Status column, the real-time status of a Copy is shown. Possible lifecycle statuses include:
Storing to Storage Repository (n%)
Stored in Storage Repository
Not stored in Storage Repository – Operation failed or was aborted by user.
Archiving
Archived
Marked as archived – Some or all the snapshots of the backup were not successfully moved to Archive storage, either due to the user aborting the operation or an internal failure. However, the snapshots in the backup will be retained according to Archive retention policy, regardless of their actual storage.
Deleted from Storage Repository/Archive – Snapshots were successfully deleted from either Storage Repository or Archive. See section .
Retrieving
Marked for deletion – The backup was scheduled for deletion according to the retention policy and will be deleted shortly.
‘Marked for deletion’ snapshots can no longer be recovered.
The Copy portion of a Policy backup occurs after the native backups have completed.
Aborting a Copy does not stop the native backup portion of the policy from completing. Only the Copy portion is stopped.
To stop a Copy in progress:
In the Backup Monitor, select the policy.
When the Lifecycle Status is ‘Storing to Storage Repository ...’, select Abort Copy to Storage Repository.
If a Storage Repository Cleanup is ‘In progress’, in the Policies tab, select the policy, and then select Stop Lifecycle Operations to stop the Cleanup. See the Information in section 21 for the reasons you might want to stop the Storage Repository Cleanup.
Stopping Storage Repository Cleanup does not stop the native snapshot cleanup portion of the policy from completing. Only the Storage Repository cleanup portion is stopped.
Stopping Storage Repository Cleanup of a policy containing several instances will stop the cleanup process for a policy as follows:
N2W will perform the cleanup of the current instance according to its retention policy.
N2W will terminate all Storage Repository Cleanups for the remainder of the instances in the policy.
N2W will set the session status to Aborted.
N2W user will get a ‘Storage Repository Cleanup of your policy aborted by user’ notification by email.
To stop a Storage Repository Cleanup in progress:
Determine when the Storage Repository/Archiving is taking place by going to the Backup Monitor
Select the policy and then select Log.
When the log indicates the start of the Cleanup, select Stop Lifecycle Operations.
To delete a repository and all backups stored in it:
In the Storage Repositories tab, select AWS Cloud.
Select a repository, and then select Delete.
Account – Name of the account if the system has multiple users and the user downloading the report is root.
X
AWS Account Number –ID of the AWS account.
X
Azure subscription id – ID of the Azure subscription.
X
X
Policy – Name of the policy.
X
X
Status – Status of the backup, the same as in the Backup Monitor.
X
DR Status – Status of DR, same as in the Backup Monitor.
X
S3 Copy Status – Status of a Copy to S3. If Import equals Yes, then backup was imported to S3.
X
Archive Status – Status of a Copy to Glacier Archive.
X
X
Start Time – Time the backup started.
X
X
End Time – Time the backup ended.
X
X
Is Retry – Yes if this backup was a retry after failure, otherwise no.
X
X
Marked for Deletion – Yes if this backup was marked for deletion. If yes, the backup no longer appears in the Backup Monitor and is not recoverable.
X
X
Deleted – Yes if the backup was deleted.
X
Import - Yes if the backup was imported to S3.
X
Expiration Time - Time retention ends in Start Time format.
X
DR Expiration Time - Time DR retention ends in Start Time format.
Account – Name of the account.
X
Snapshot Account – Name of snapshot account.
X
Snapshot AWS Account – Number of AWS snapshot account.
X
Azure Subscription ID – ID of the Azure Subscription.
X
X
Policy – Name of the policy.
X
X
Status – Status, such as ‘Backup Successful’ or ‘All Snapshots Deleted’.
X
Region – AWS region.
X
Location – Azure location.
X
X
Type – Type of snapshot.
· For AWS: EBS, RDS, or EBS Copy, which is a DR copied snapshot.
· For Azure: VM or Disk.
X
Volume/DB/Cluster – AWS ID of the backed-up EBS volume, RDS database, or cluster.
X
Volume/DB/Cluster Name – Name of backed-up volume, database, or cluster.
X
Instance – If this snapshot belongs to a backed-up EC2 instance, the value will be the AWS ID of that instance, otherwise it will contain the string: None
X
Instance Name – Name of the instance.
X
Backed Up Resource Id – ID of backed up resource.
X
Backed Up Resource Name – Name of backed-up resource.
X
Related VM ID – ID of related VM.
X
Related VM Name – Name of related VM.
X
Snapshot/Image ID - ID of the snapshot or image.
X
Snapshot ID – ID of the snapshot.
X
X
Succeeded – Yes or No.
X
X
Start Time – Time the snapshot started.
X
X
End Time – Time the snapshot ended.
X
X
Deleted At – Time of deletion, or N/A, if the snapshot was not deleted yet.
X
Import – Yes if the snapshot was imported to S3.
X
Lock Expiration Time - Time lock retention ends in Start Time format
Valid Data Size (GB) – Part of the volume that is allocated and used at the time of the snapshot. From this number, you can deduce volume utilization.
X
Changed Data Size (GB) – If the snapshot is incremental, and N2W can locate the previous snapshot, then this is the amount of data in the current snapshot that is different from the previous snapshot, i.e., the size of the incremental snapshot. If ‘Unknown’, the above conditions are not met. From this number, you can deduce the data change rate.
X
Disk Size (GB) – Size of disk.
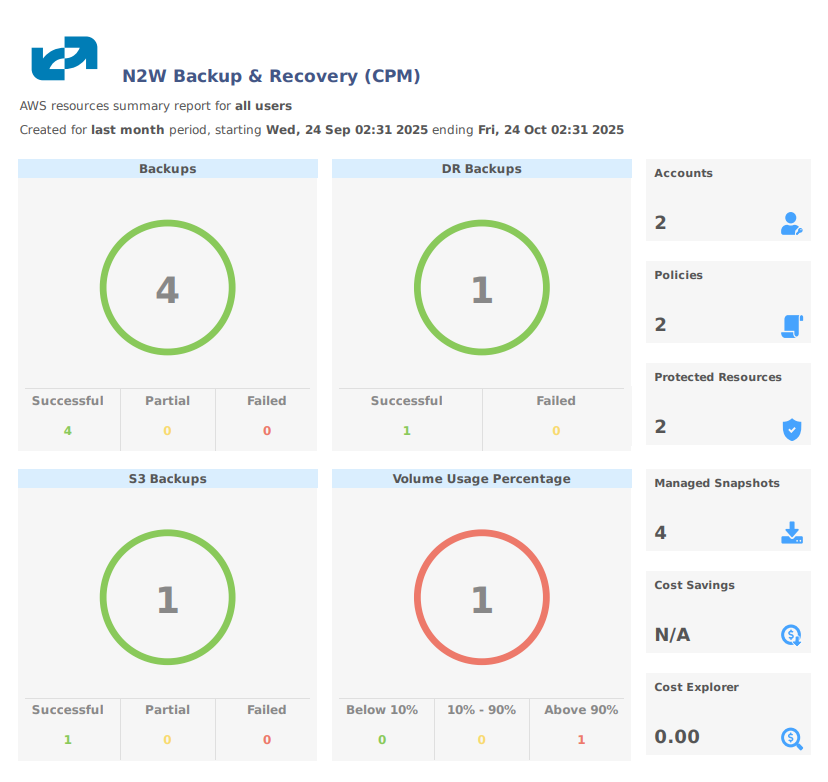
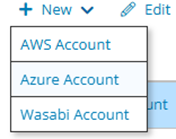
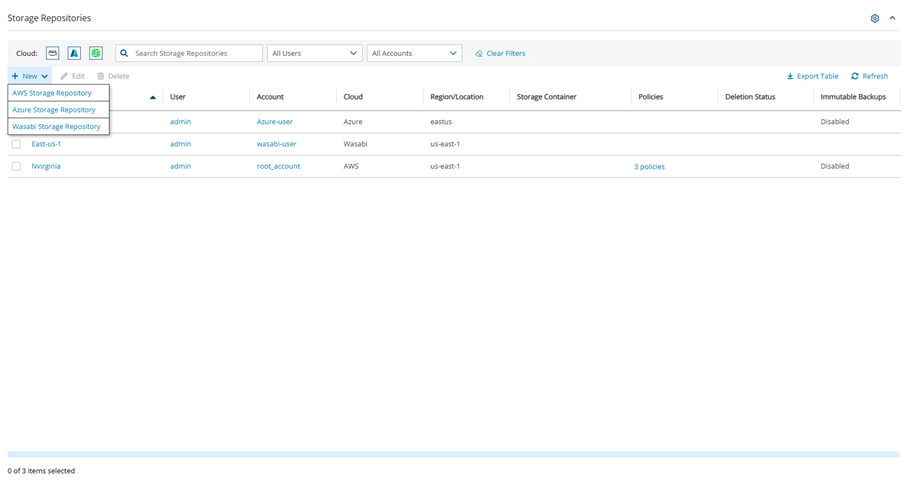
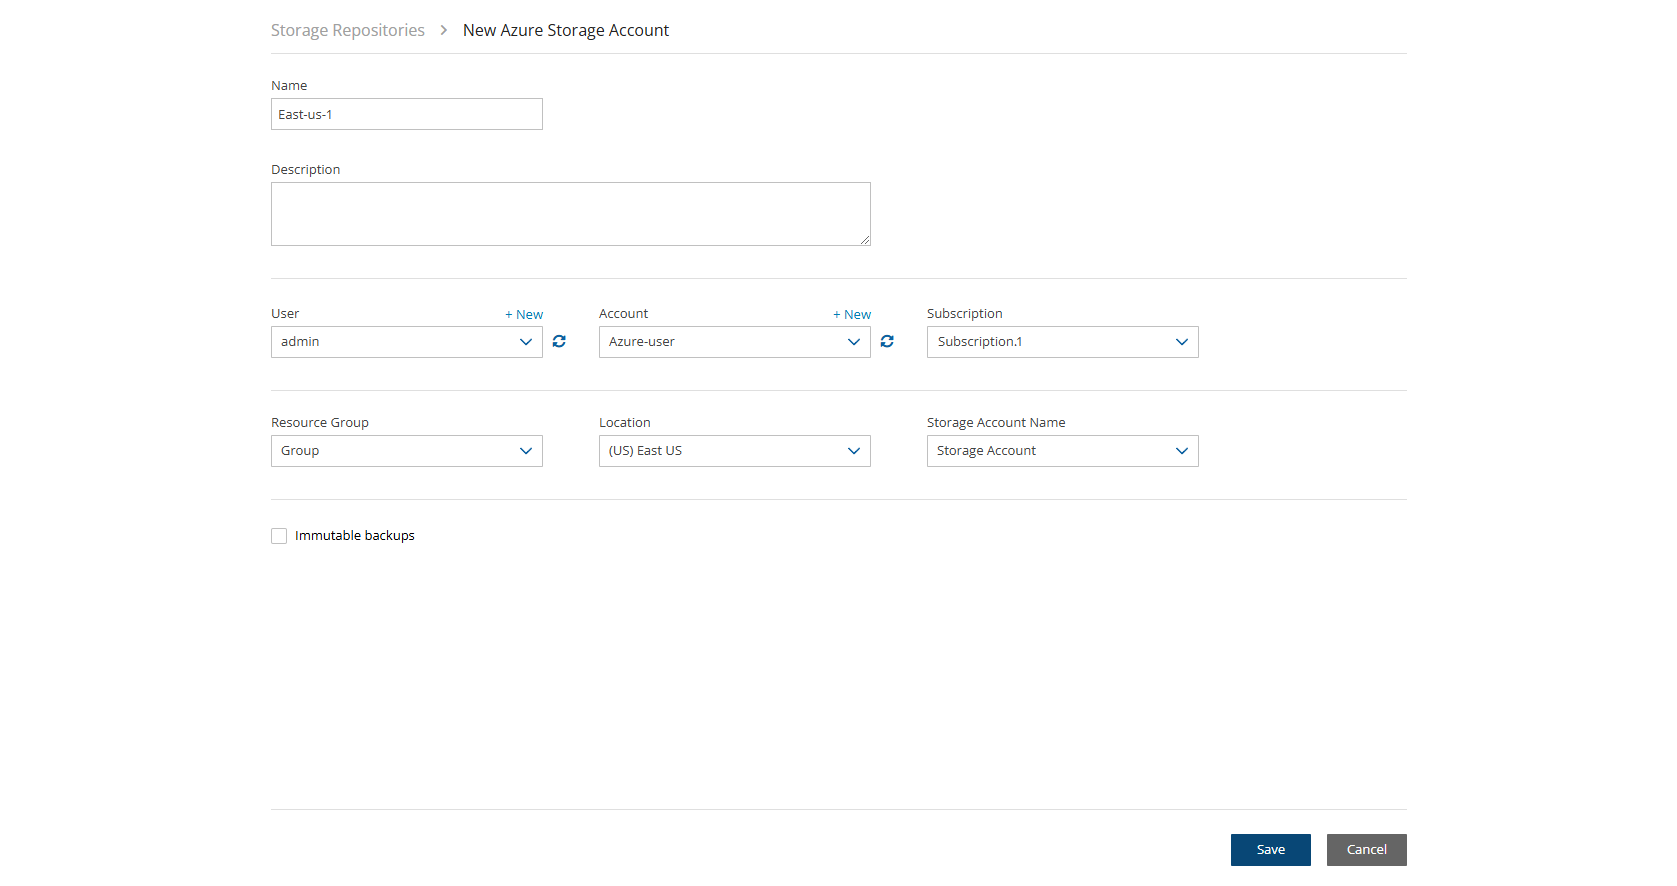
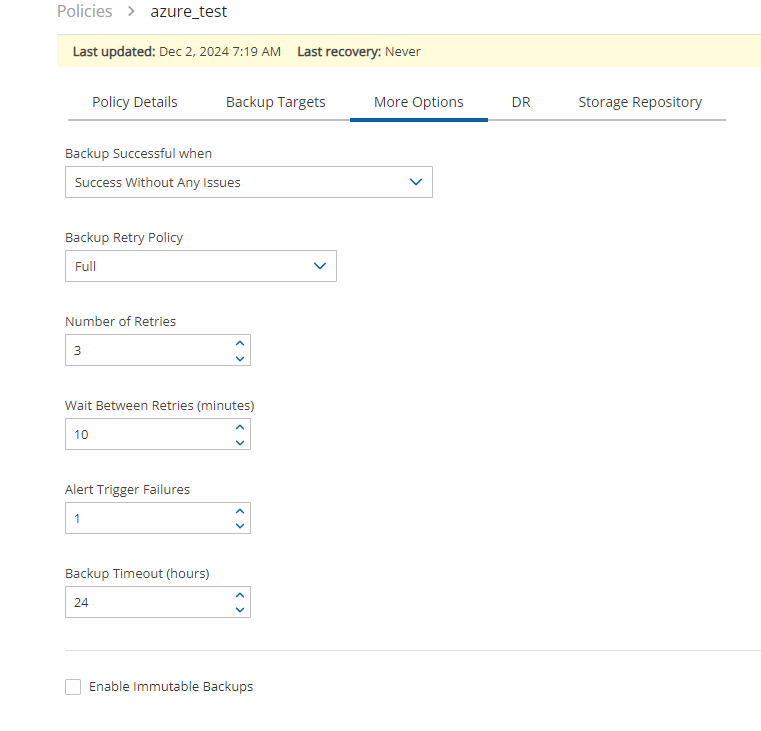

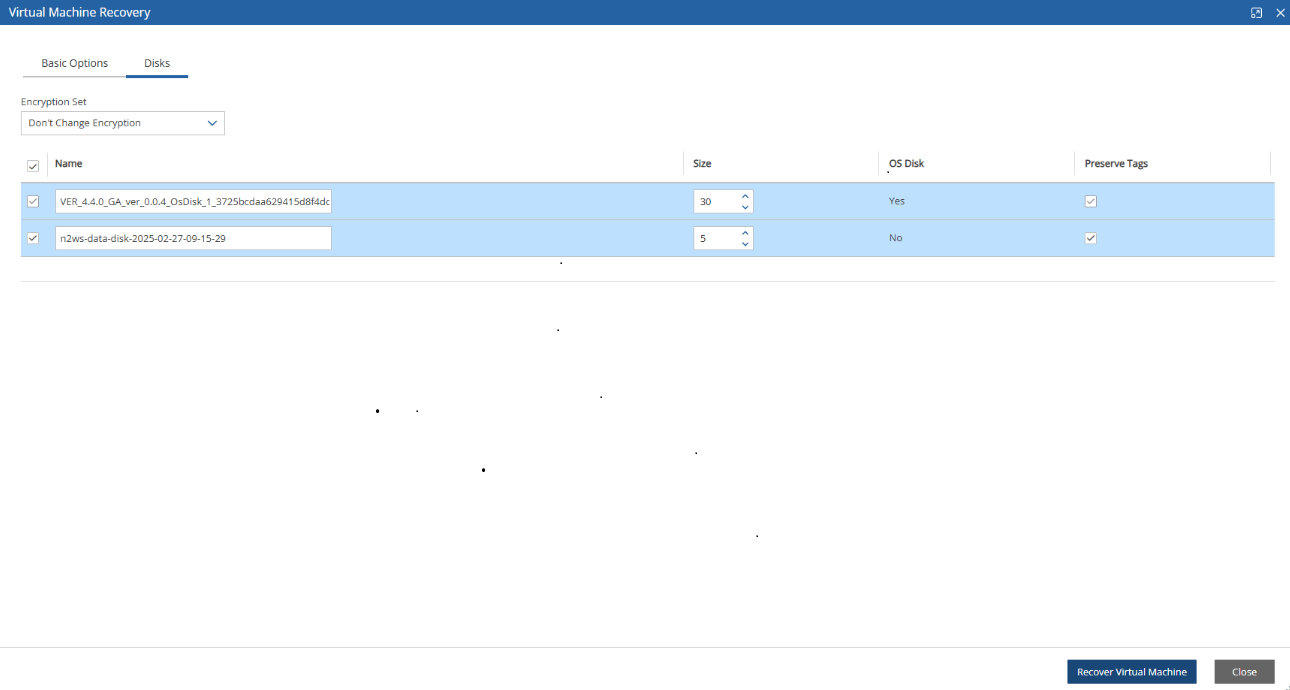

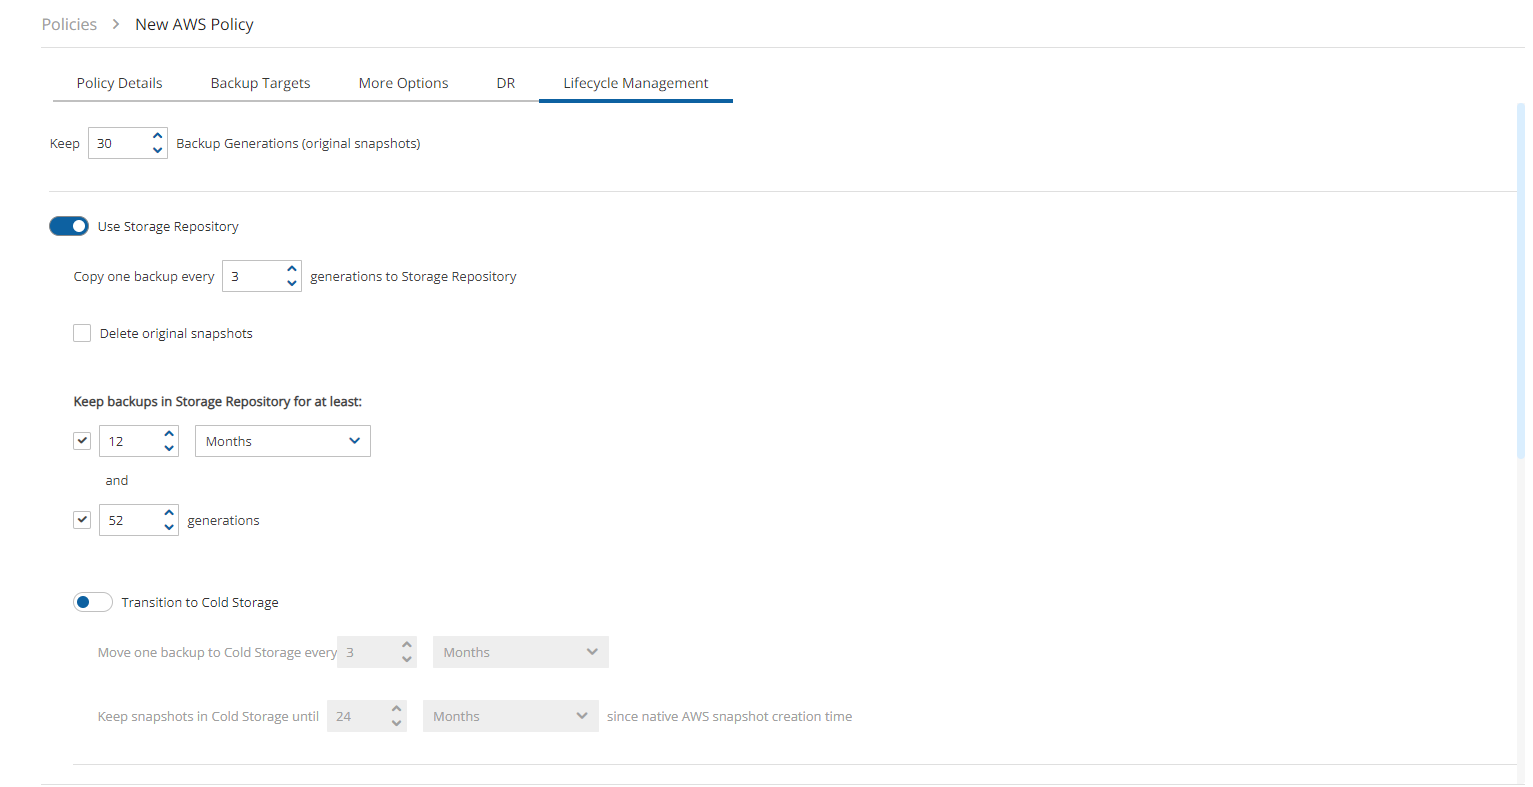
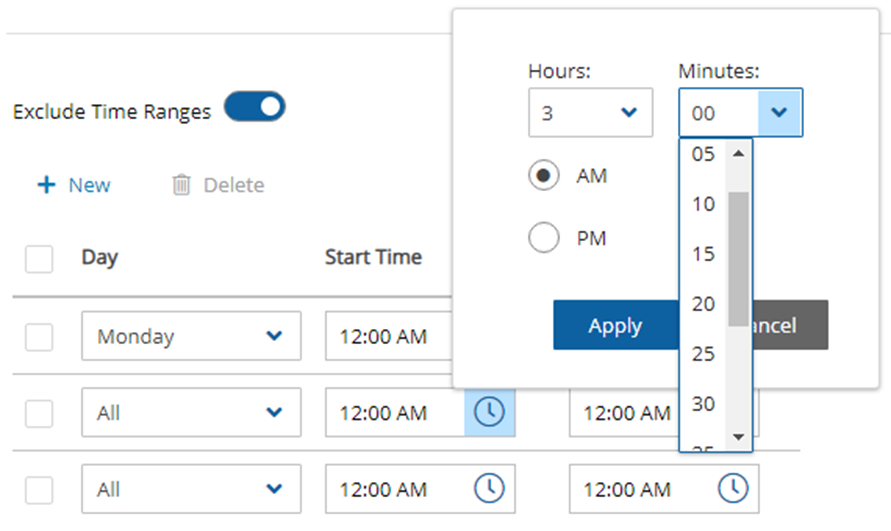
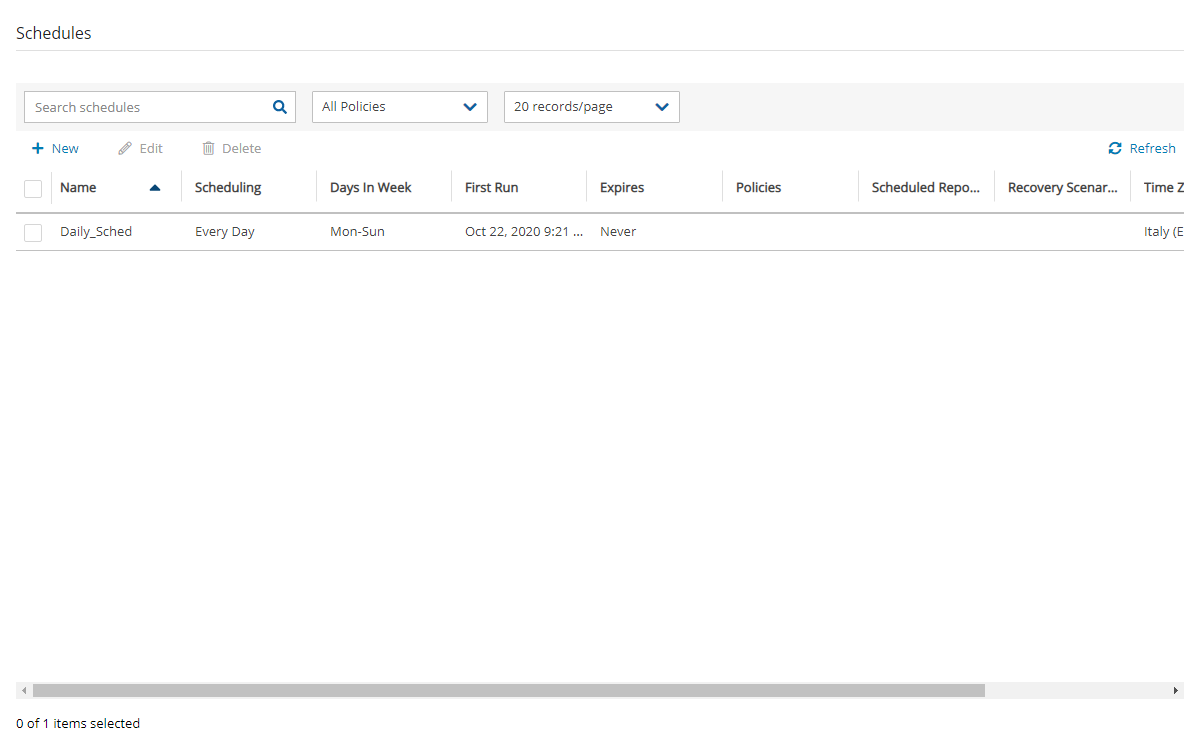
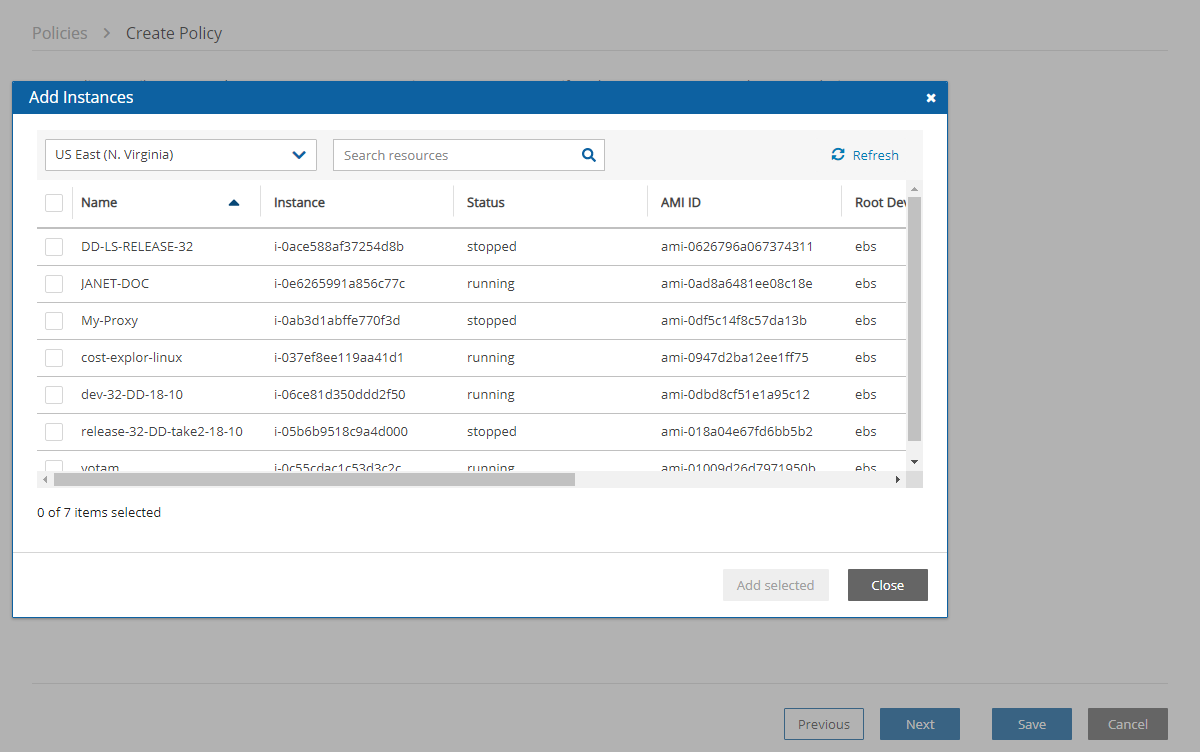
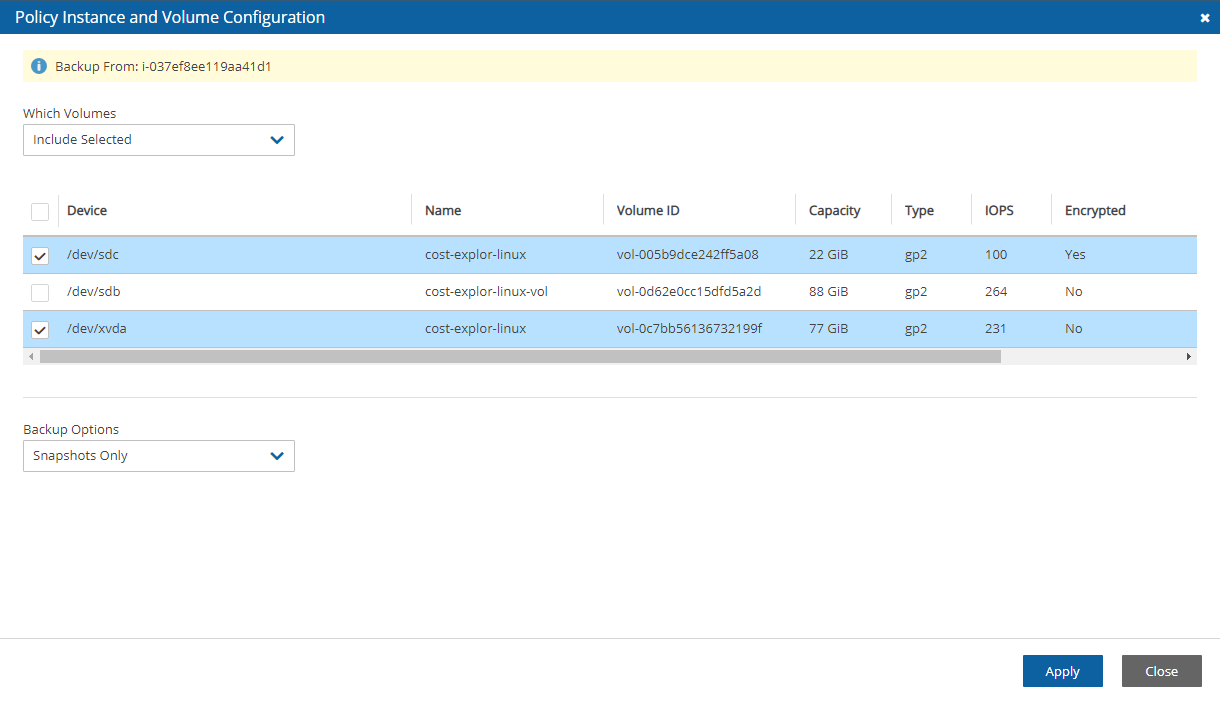
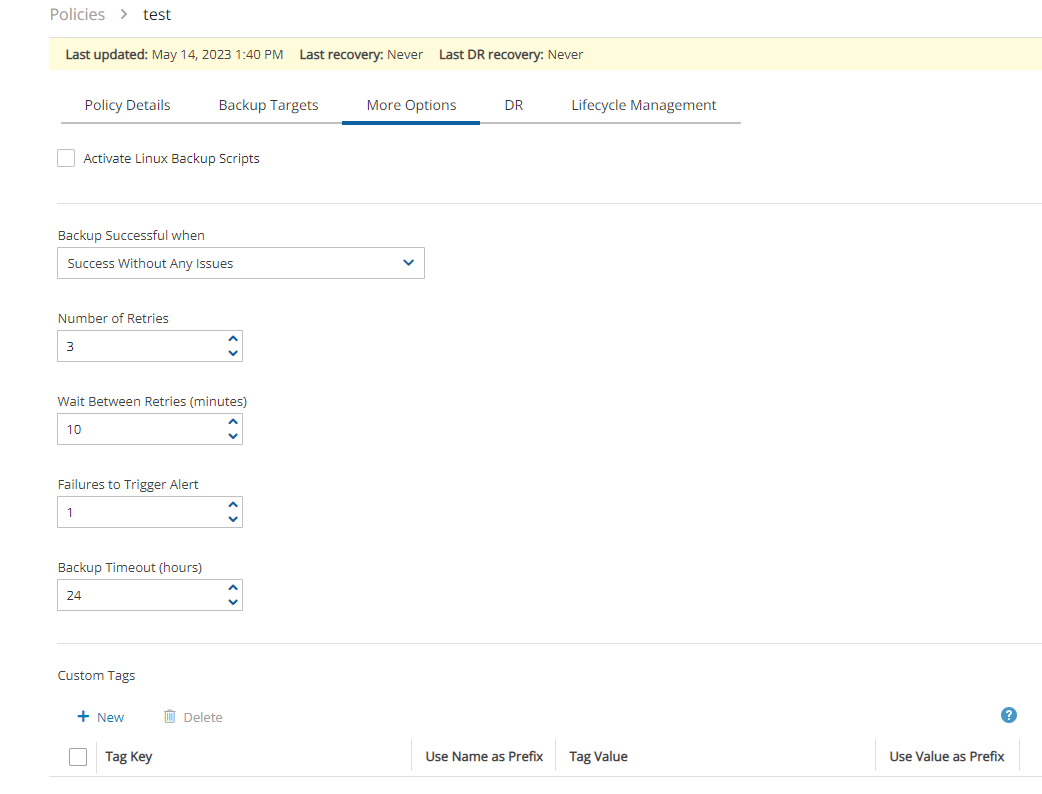
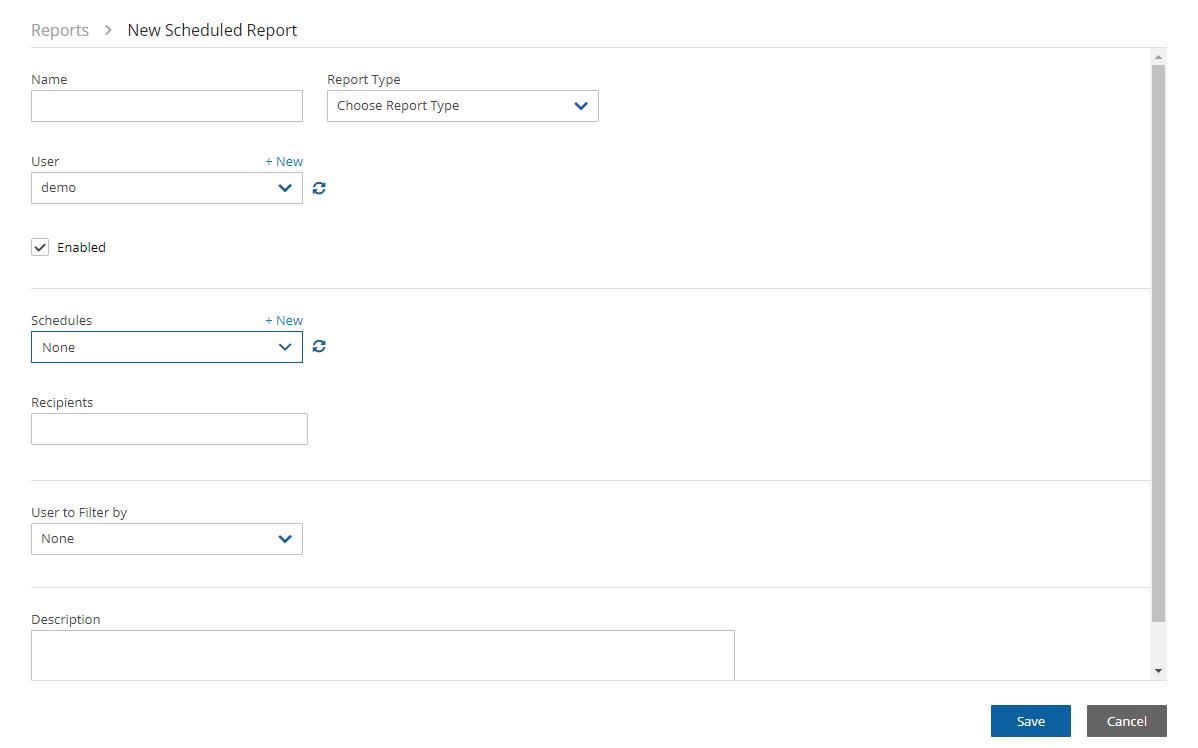

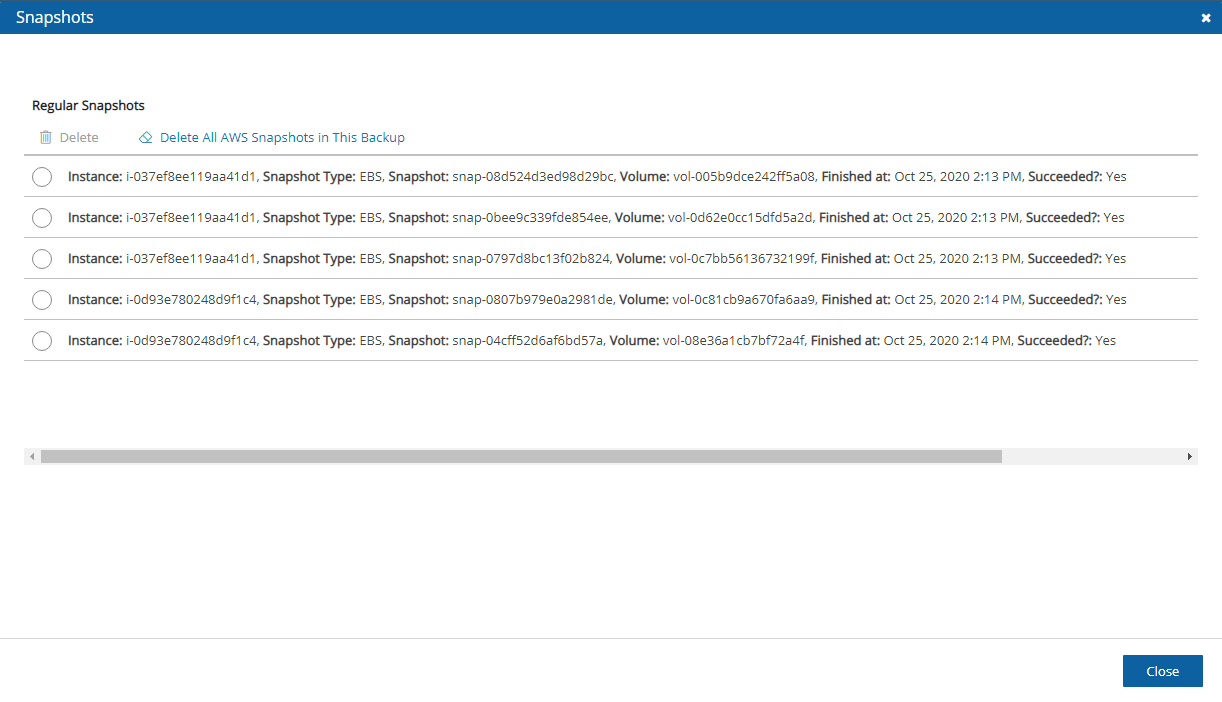
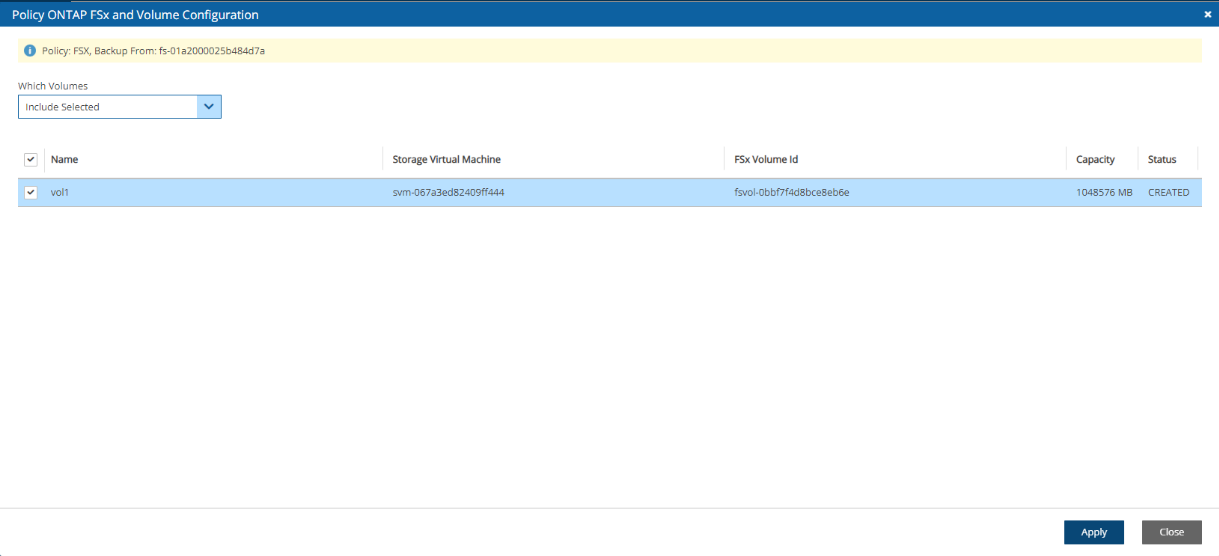
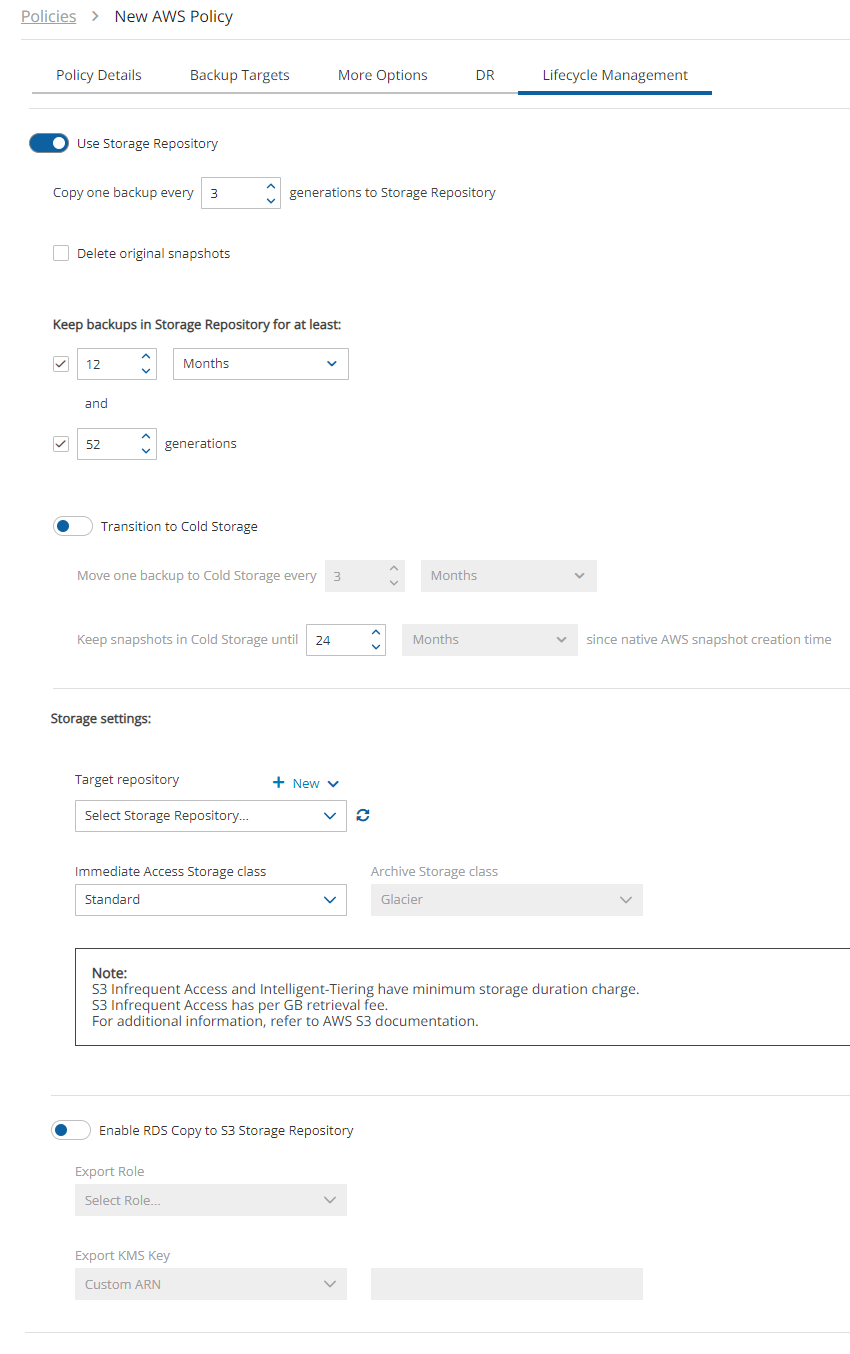
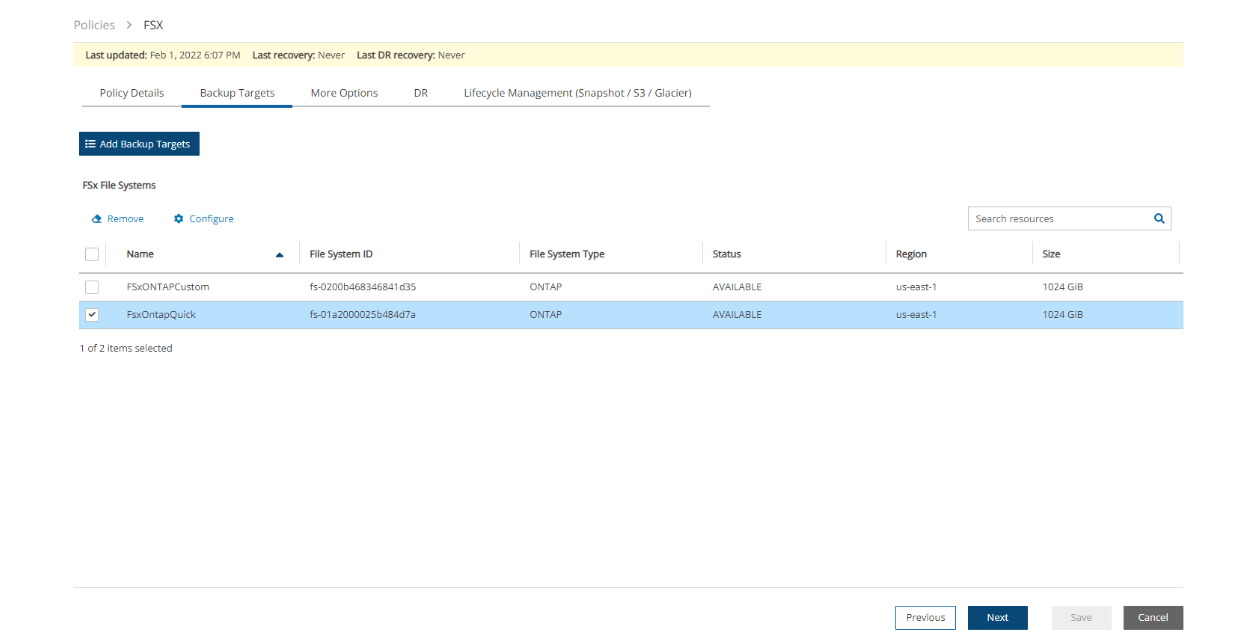

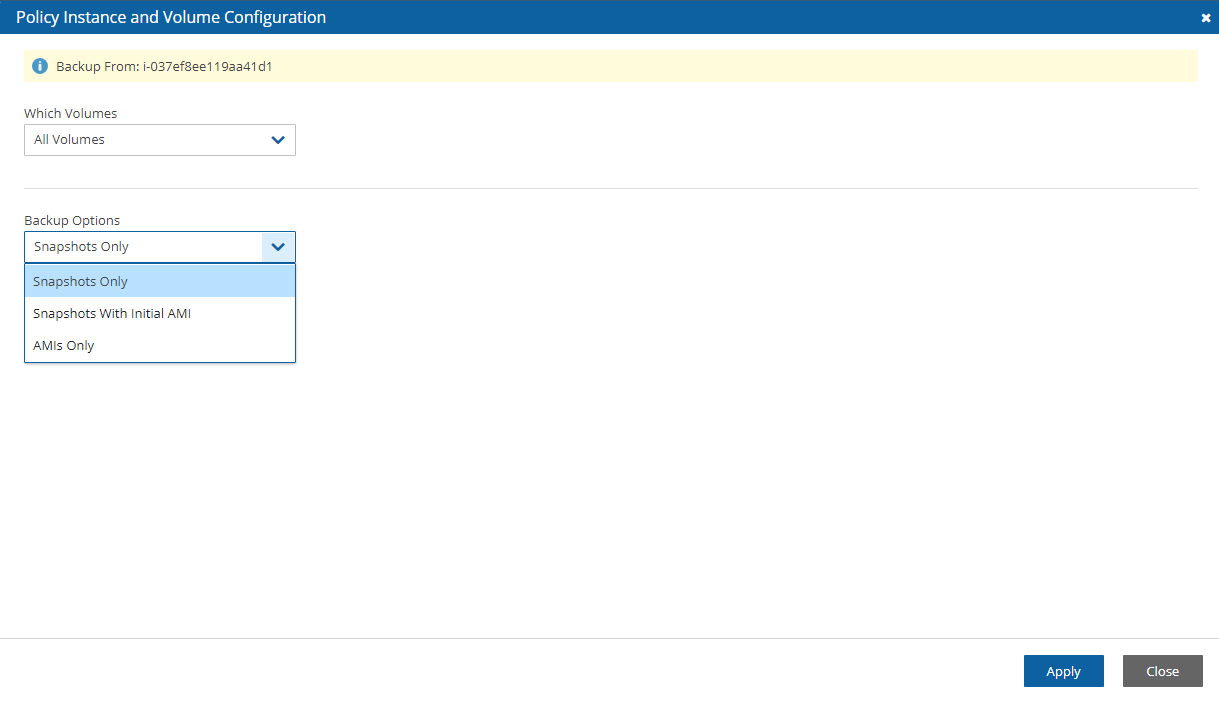
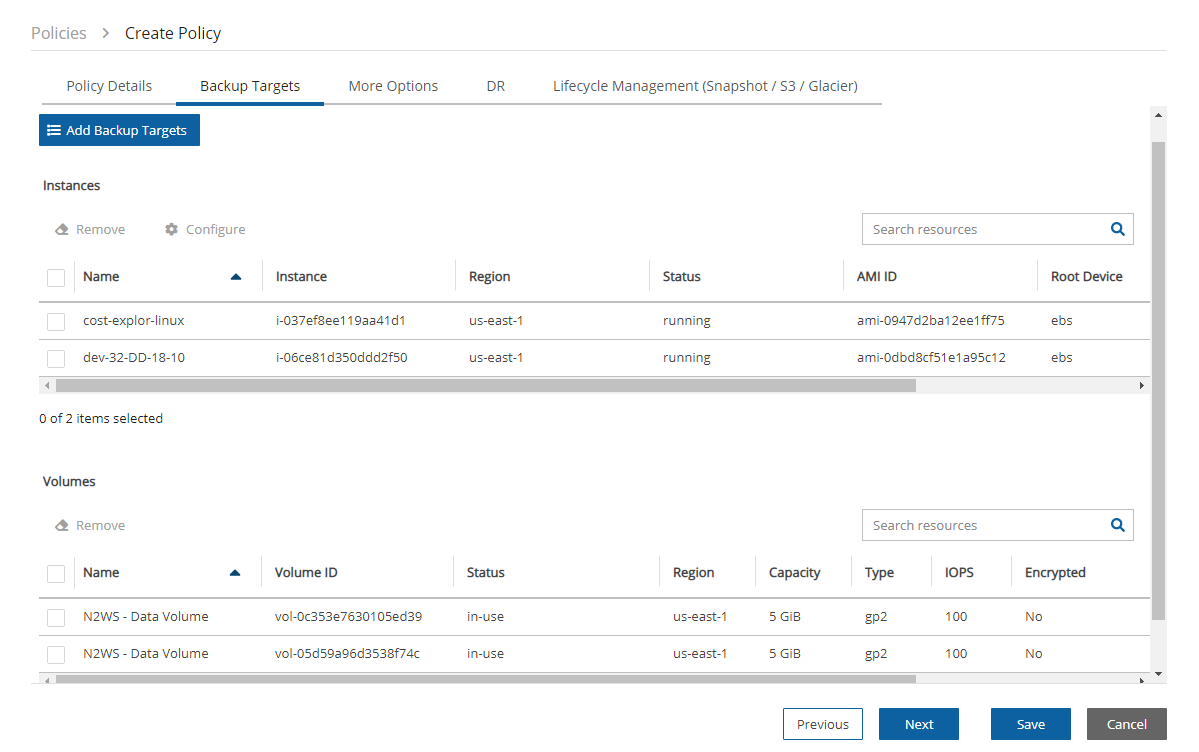
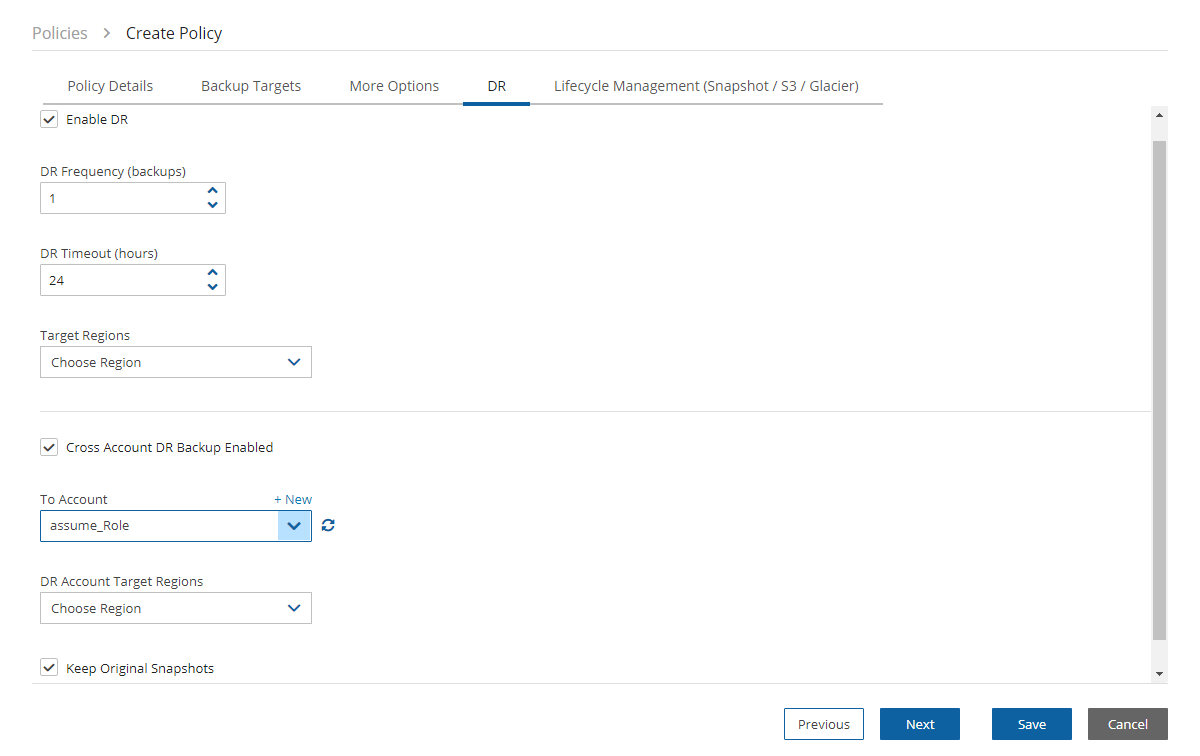

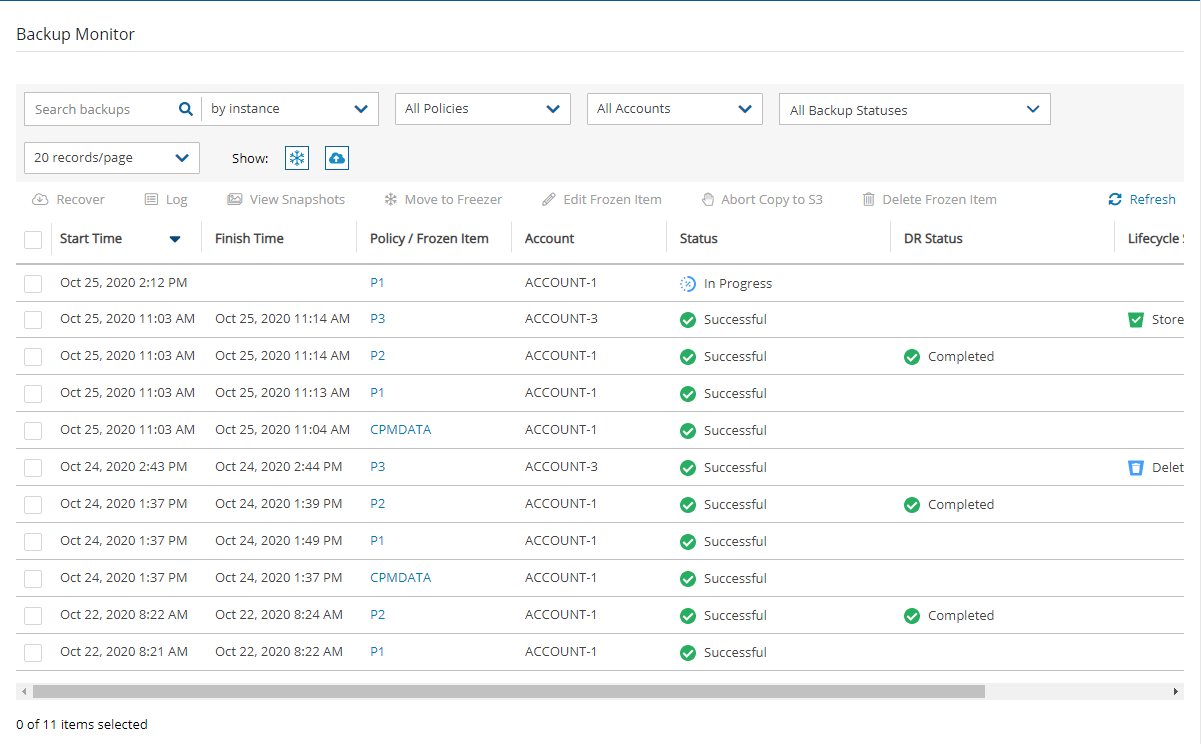
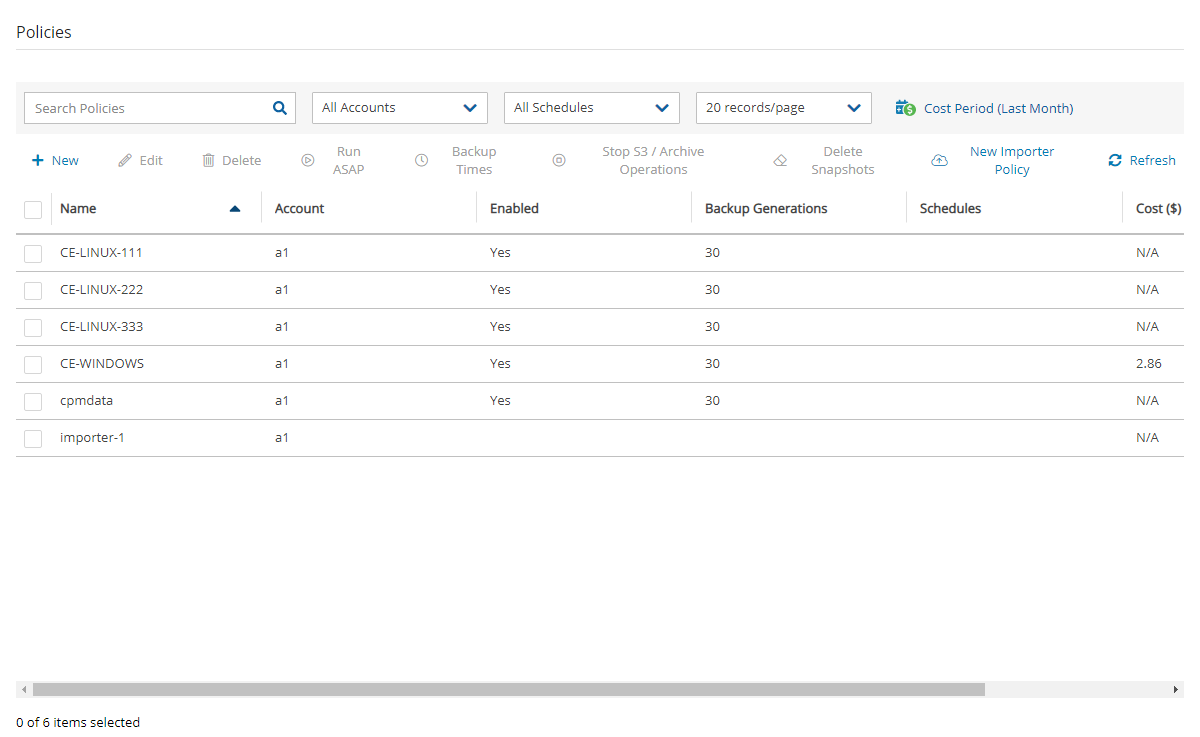

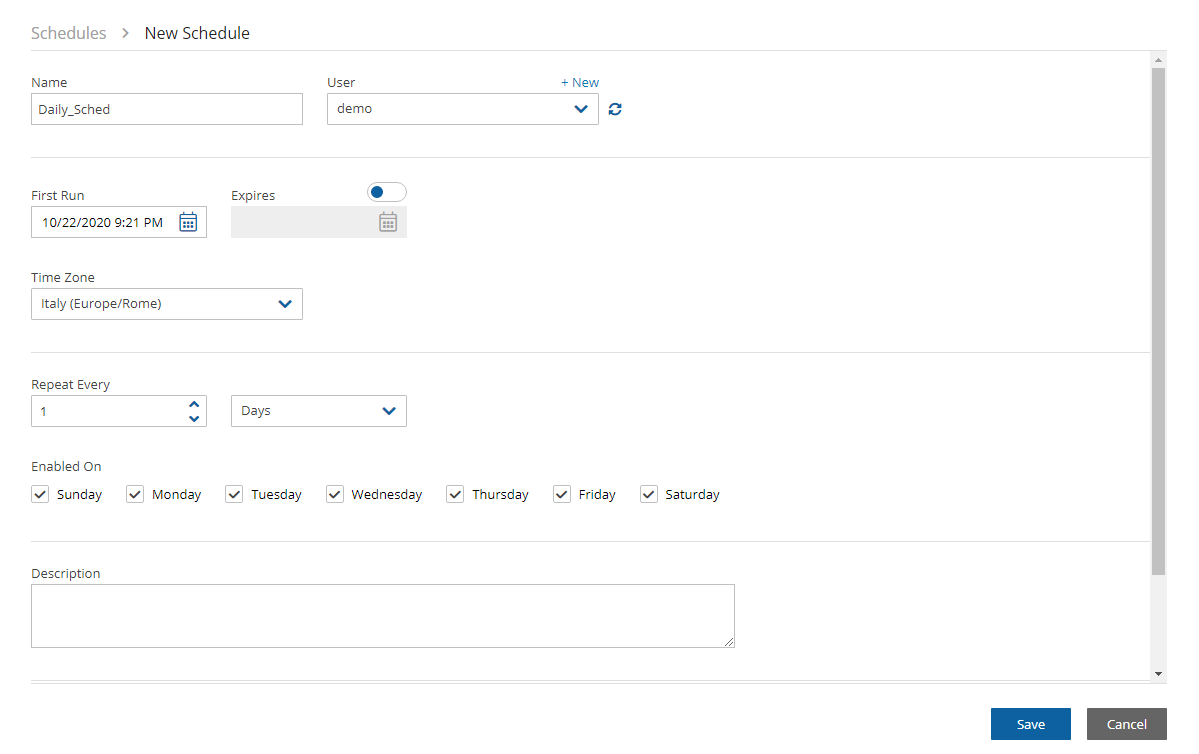
{
"Version": "2012-10-17",
"Statement": [
{
"Sid": "ExportRDS",
"Action": [
"s3:PutObject*",
"s3:GetObject*",
"s3:ListBucket",
"s3:DeleteObject*",
"s3:GetBucketLocation"
],
"Resource": [
"*"
],
"Effect": "Allow"
}
]
}{
"Version": "2012-10-17",
"Statement": [
{
"Sid": "",
"Effect": "Allow",
"Principal": {
"Service": "rds.amazonaws.com"
},
"Action": "sts:AssumeRole"
},
{
"Sid": "",
"Effect": "Allow",
"Principal": {
"Service": "export.rds.amazonaws.com"
},
"Action": "sts:AssumeRole"
}
]
}There is an additional cost involved with creation and extension of the locks.
Account - Select the account that has access to the S3 bucket.
S3 Bucket Name - Type the name of the S3 bucket. The region is provided by the S3 Bucket.
Immutable Backup - Select to enable data protection by S3 Object Locks, and then choose Legal Hold or Compliance Lock in the Method list.
Delete original snapshots
If selected, N2W will automatically set the Copy one backup every n generations to Storage Repository to 1 and will delete snapshots after performing the copy to Storage Repository operation.
When enabled, snapshots are deleted regardless of whether the Copy to Storage repository operation succeeded or failed.
Copy one backup every n generations to Storage Repository – Select the maximum number of backup snapshot generations to keep. This number is automatically set to 1 if you opted to Delete original snapshots after attempting to store in Storage Repository.
Standard - (Frequent Access) for Frequent access and backups.
Infrequent Access - For data that is accessed less frequently.
Intelligent Tiering - Automatic cost optimization for S3 copy. Intelligent Tiering incorporates the Standard (Frequent Access) and Infrequent Access tiers. It monitors access patterns and moves objects that have not been accessed for 30 consecutive days to the Infrequent Access tier. If the data is subsequently accessed, it is automatically moved back to the Frequent Access tier.
Glacier Instant Retrieve - Slightly more expensive than Glacier Flexible Retrieve (formerly known simply as Glacier) but allows for much faster retrieval and recovery.
For complete information, https://aws.amazon.com/s3/storage-classes/.
To recover folders or files, see section 13.
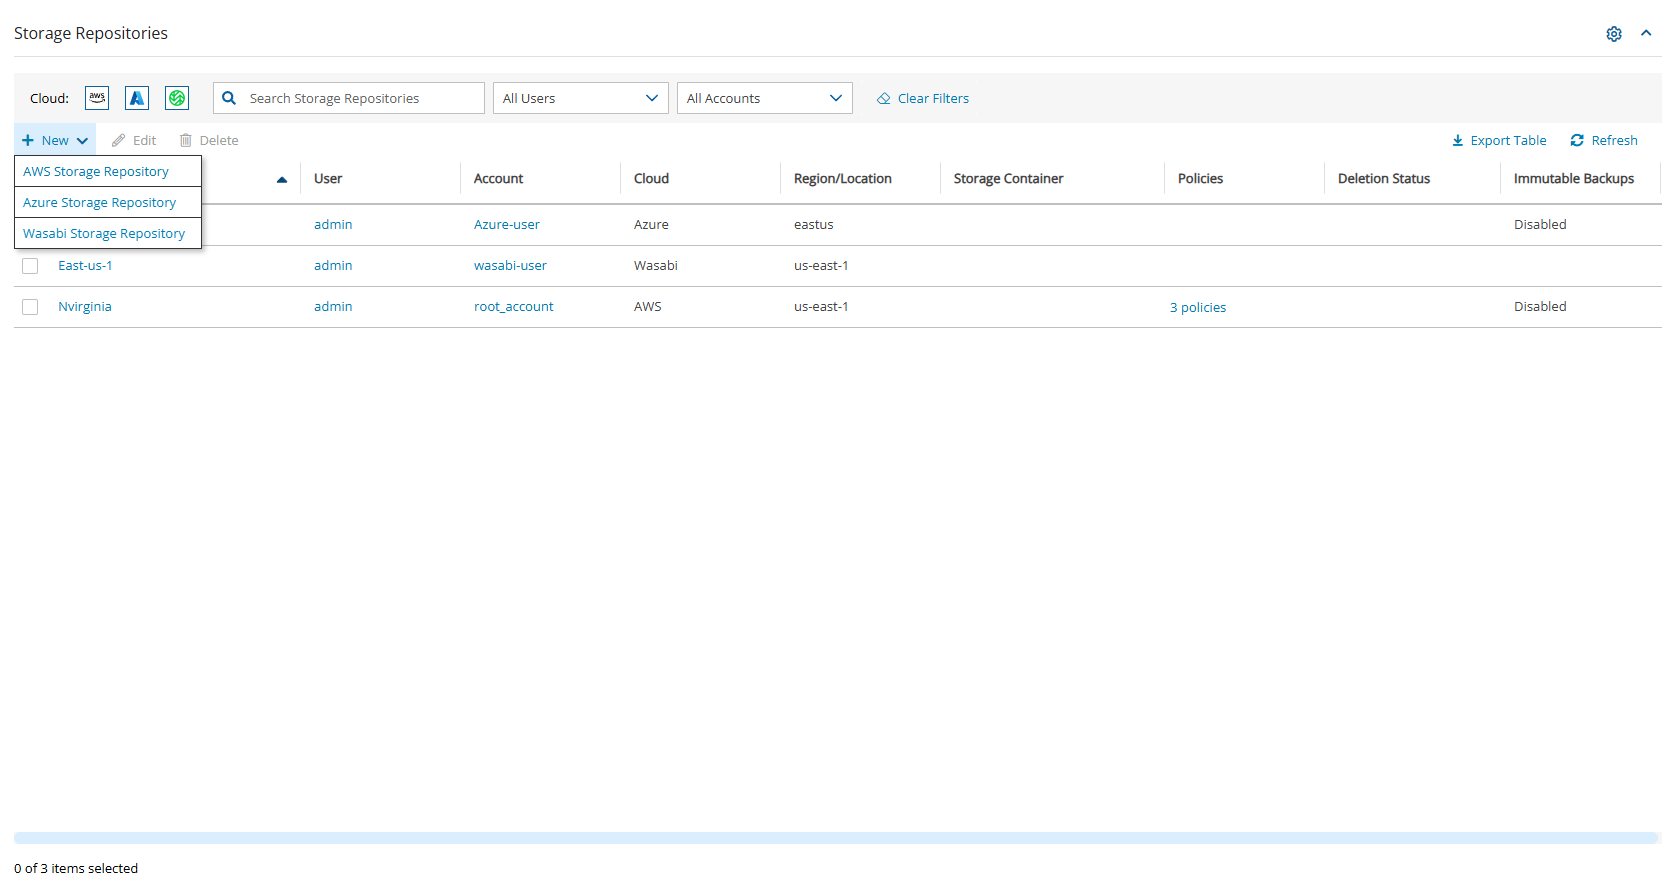


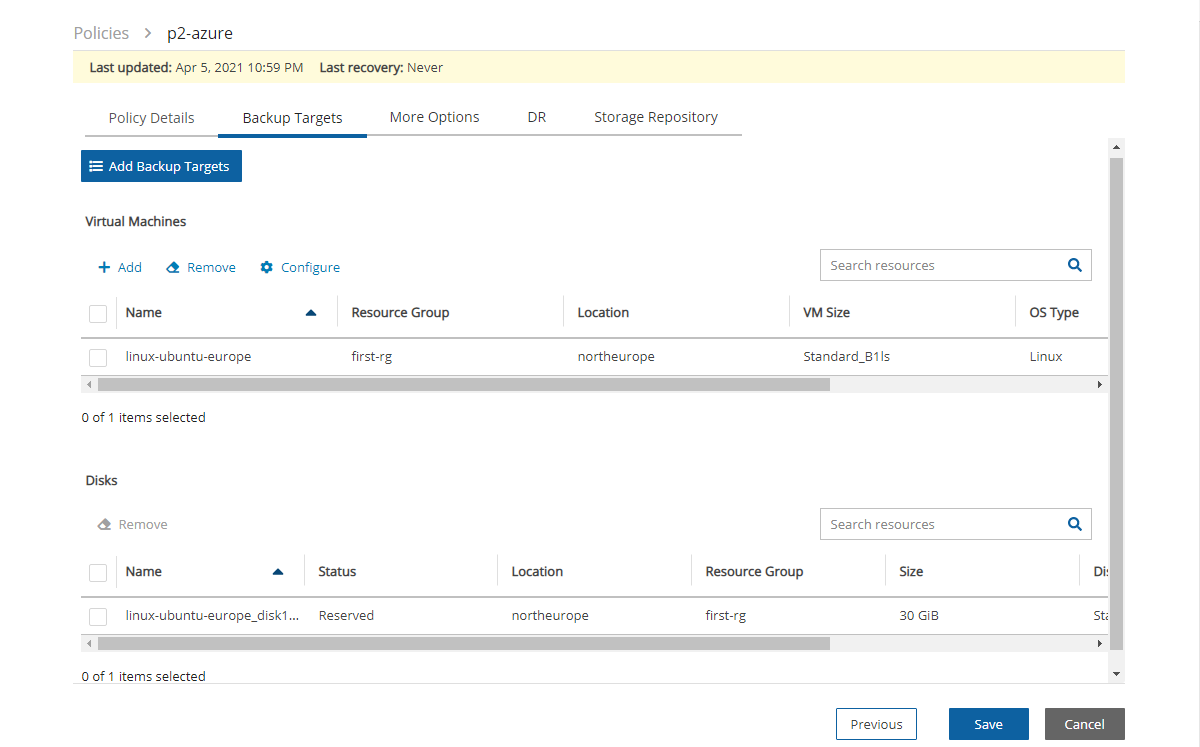

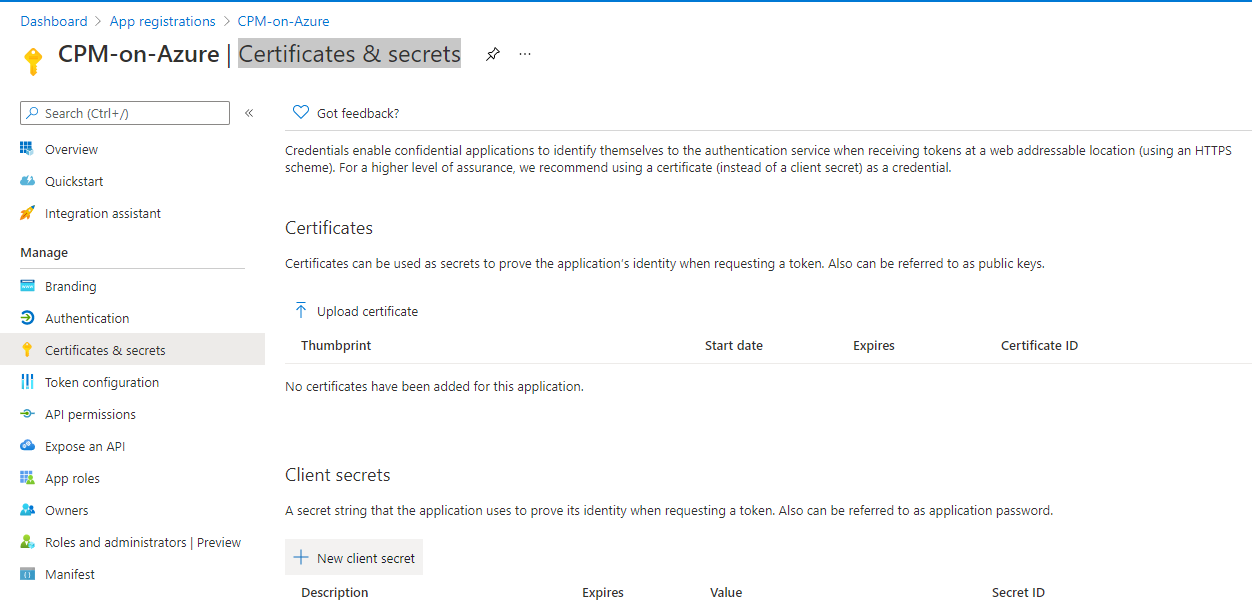
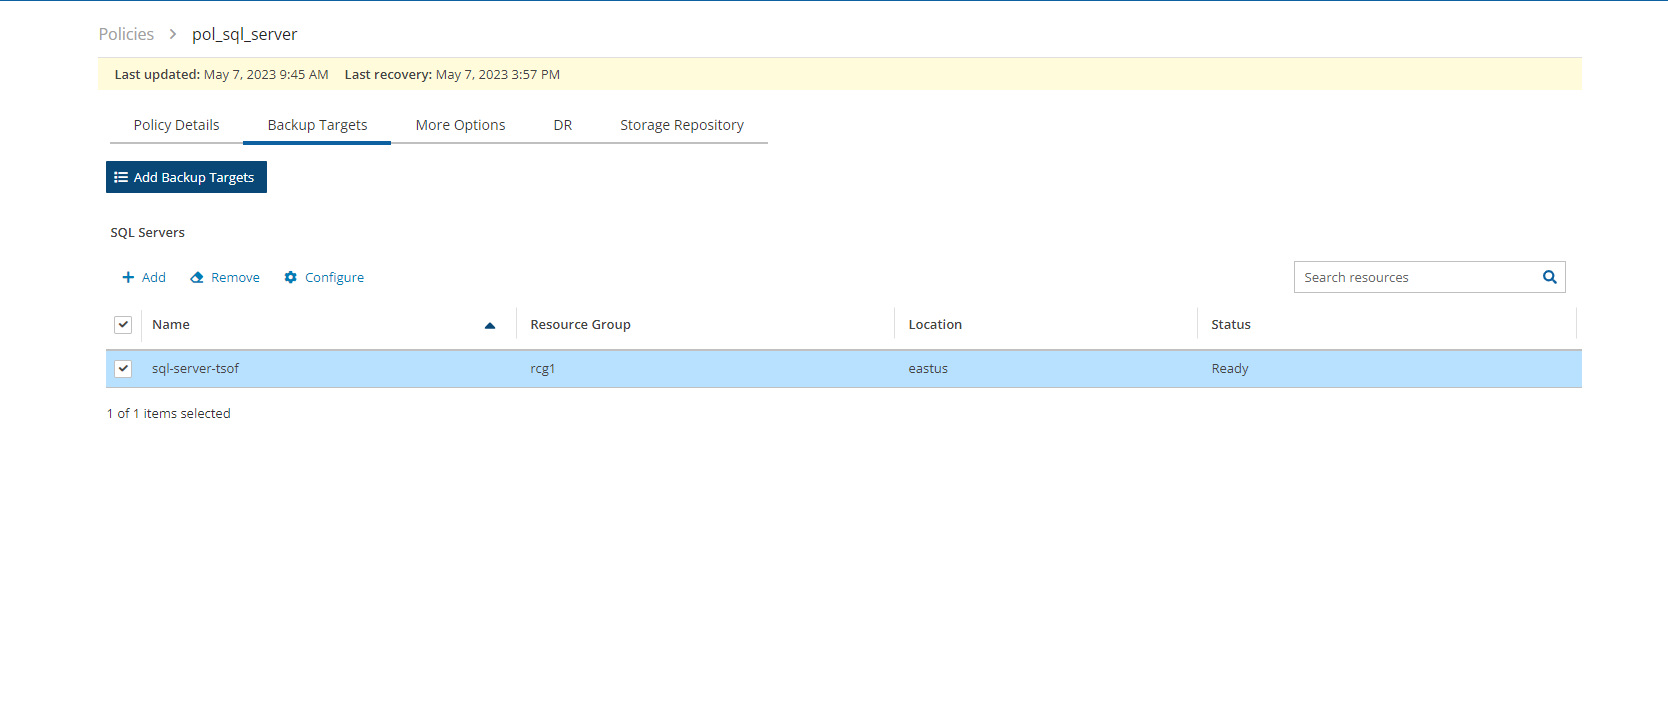
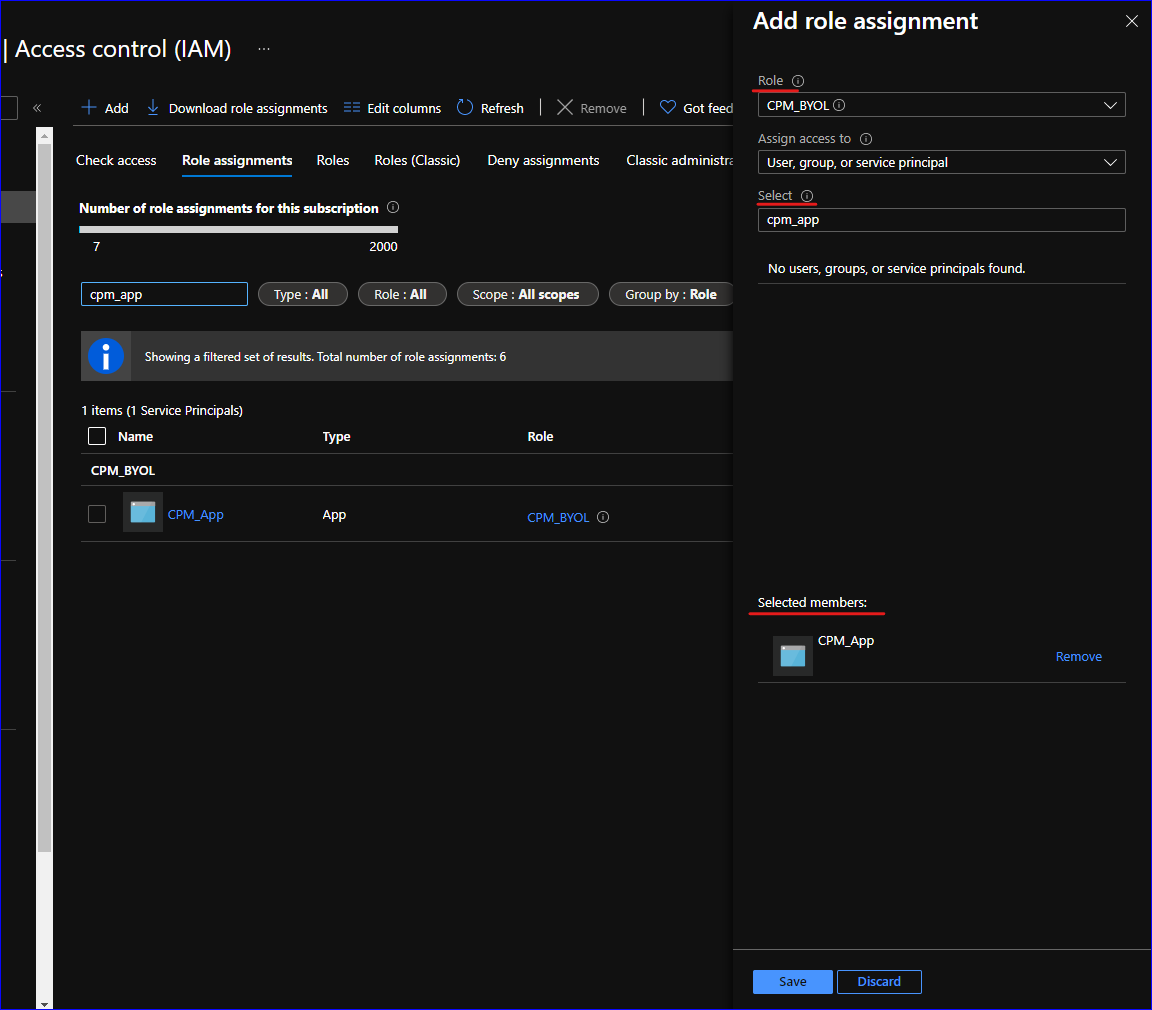
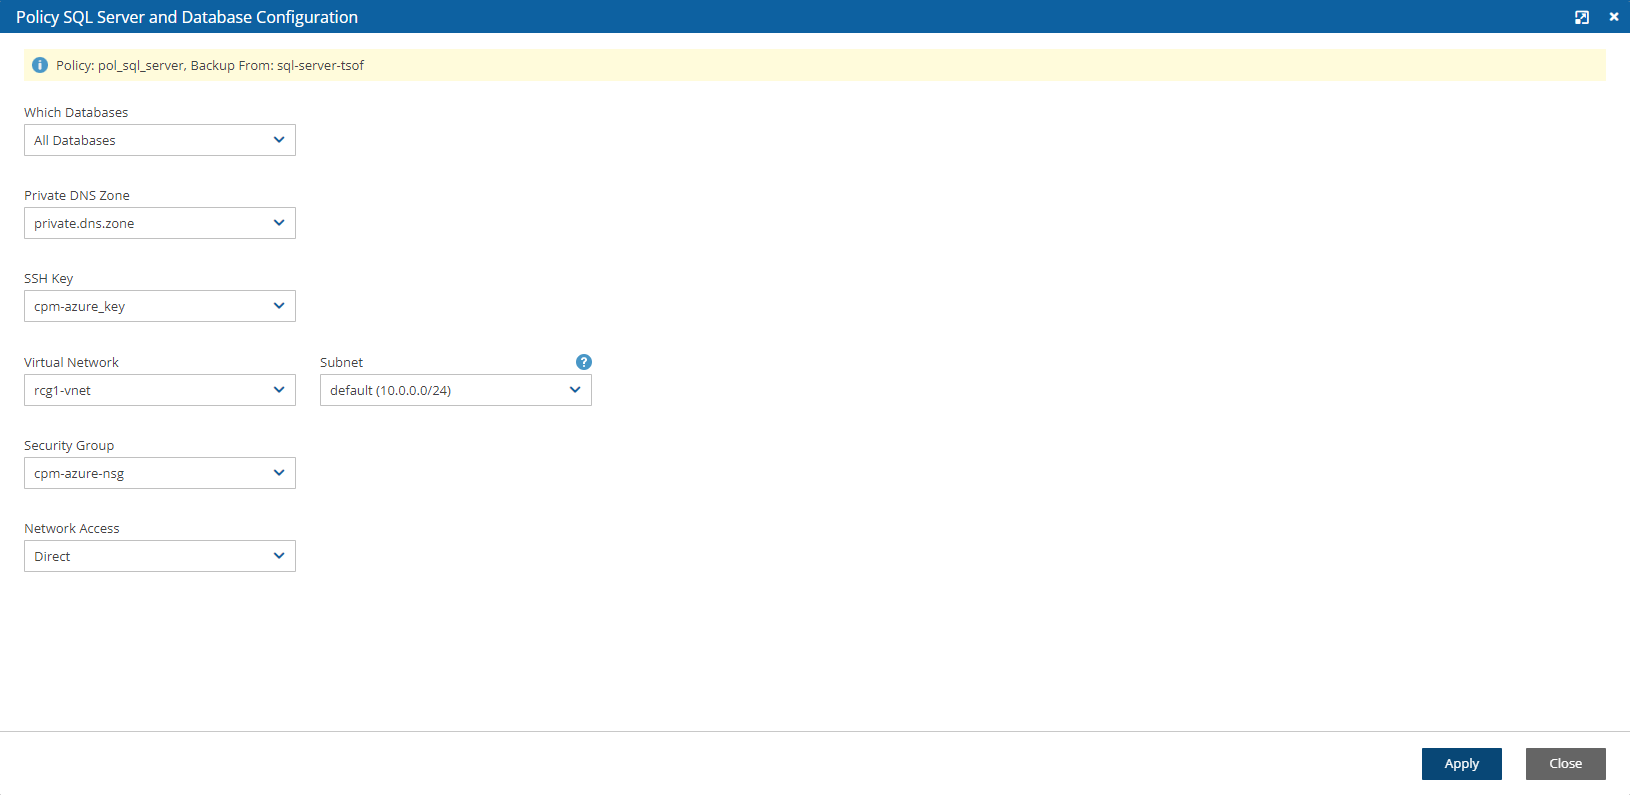
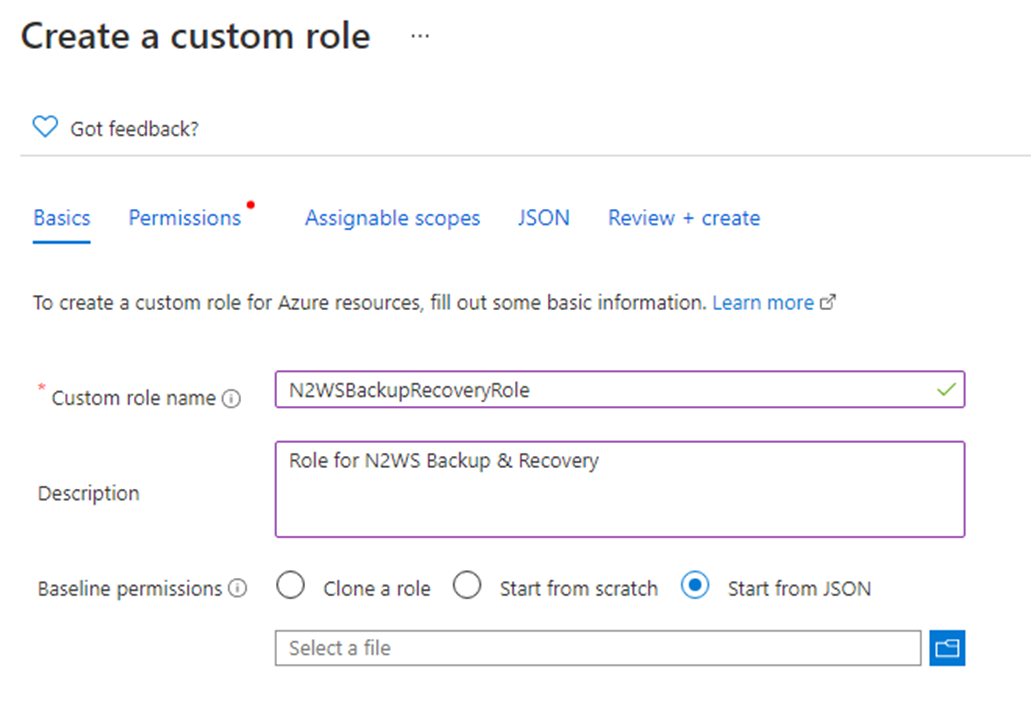
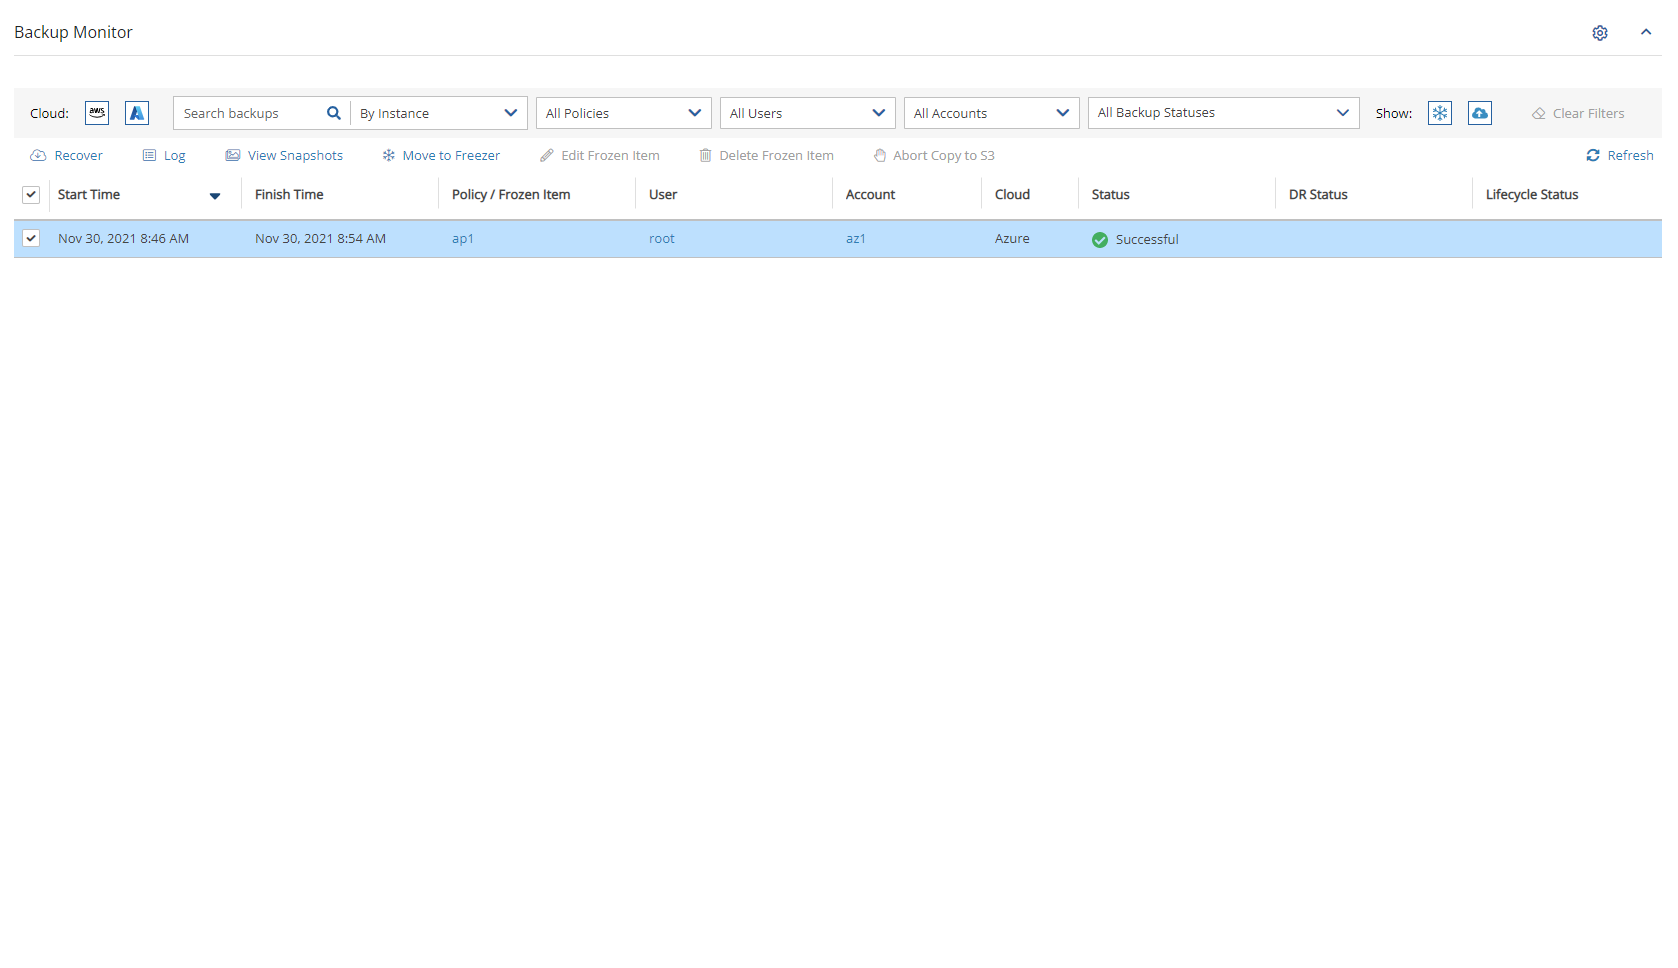
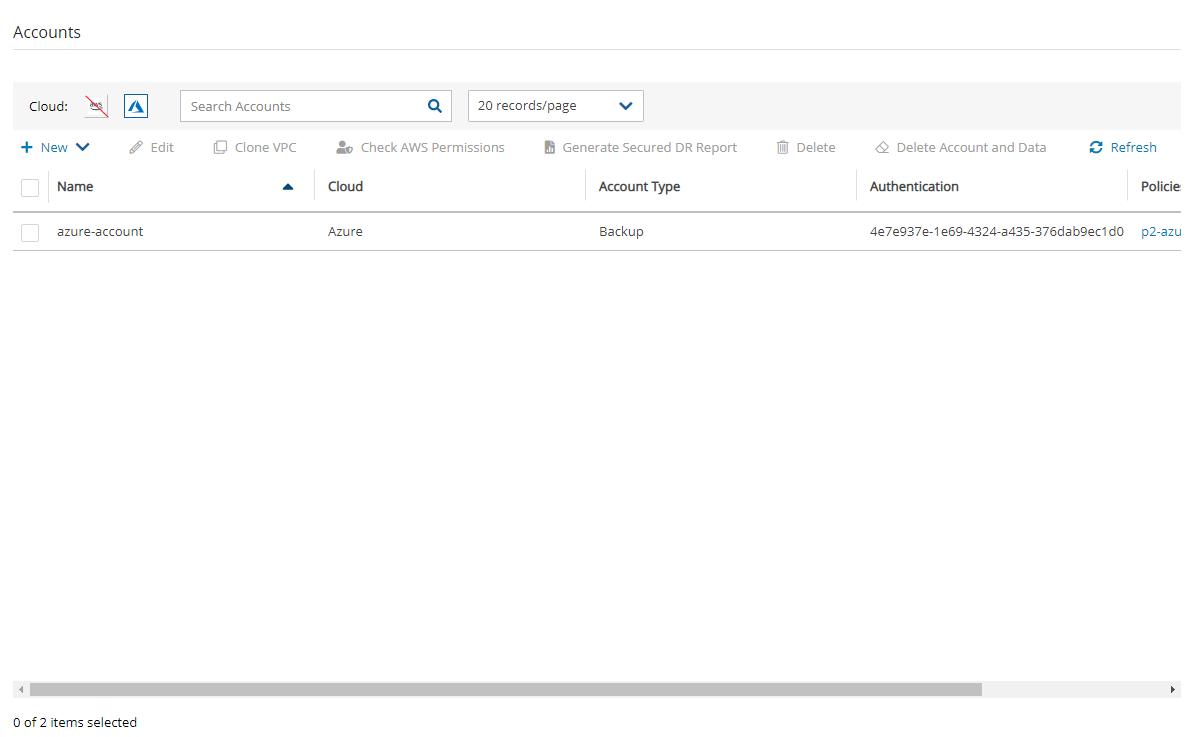
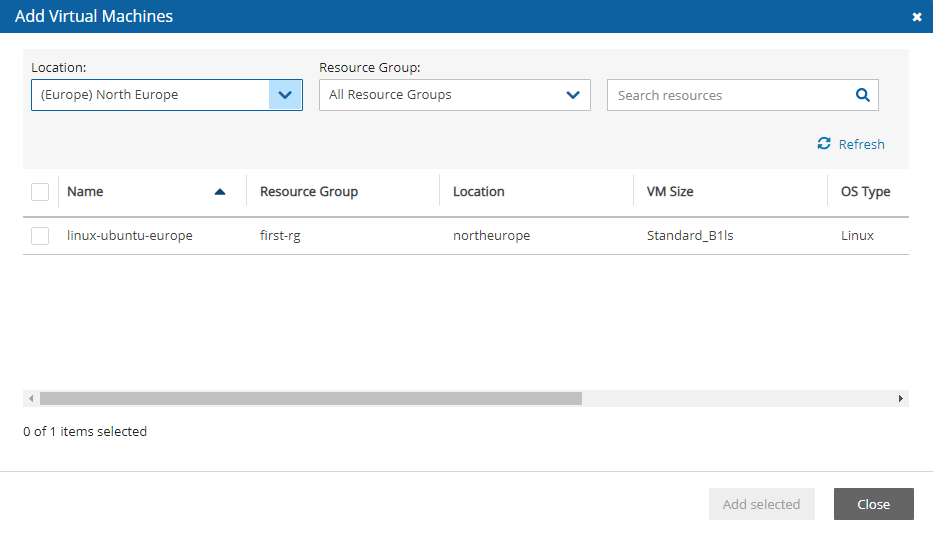
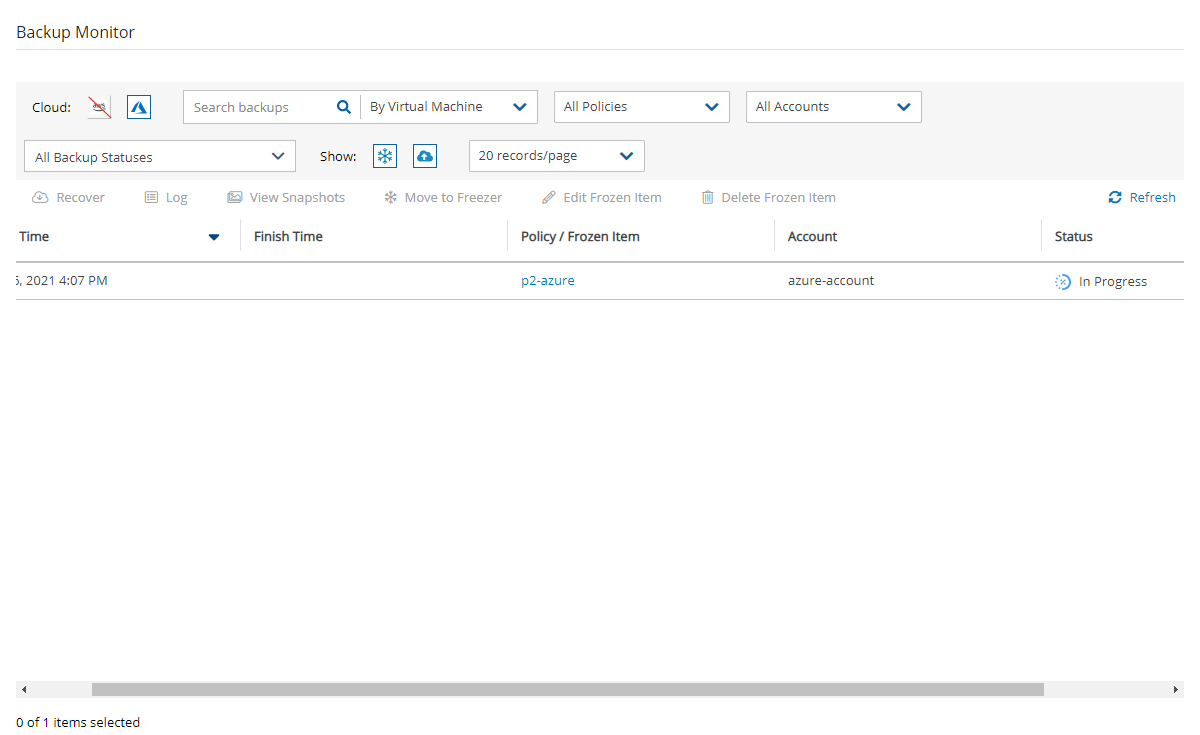
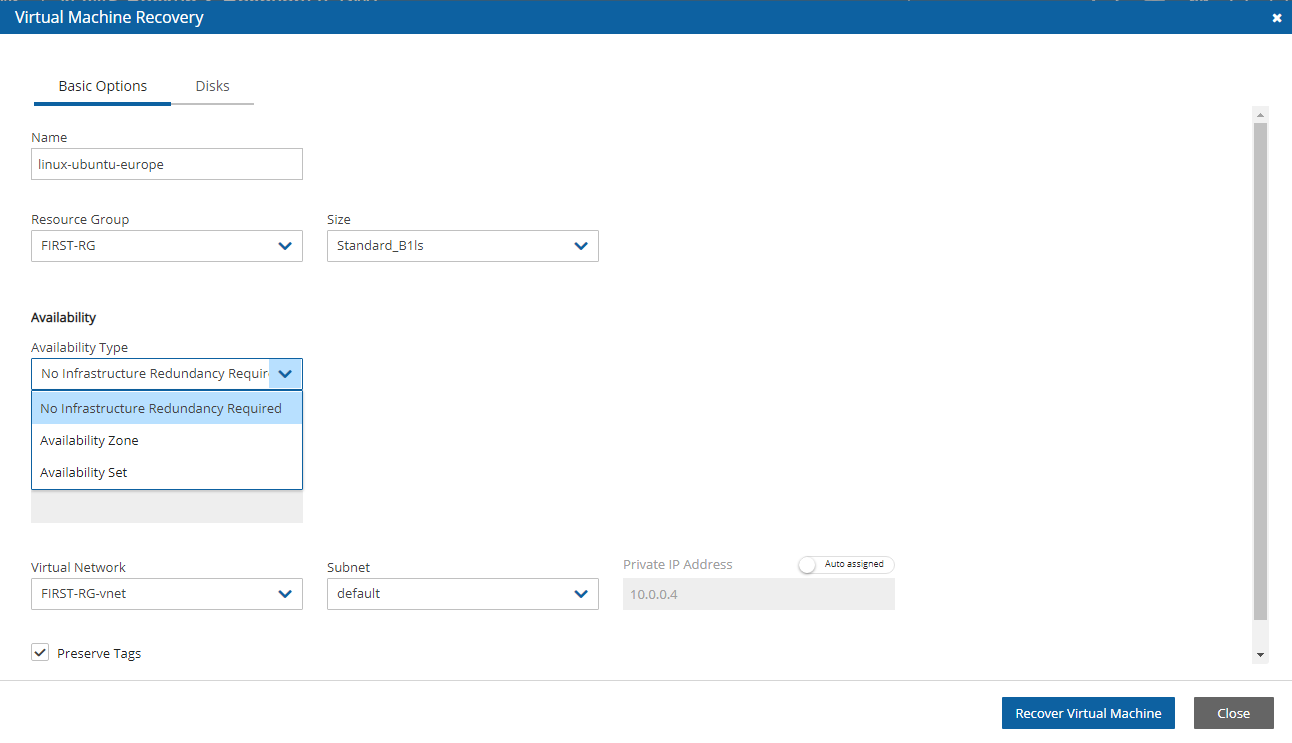
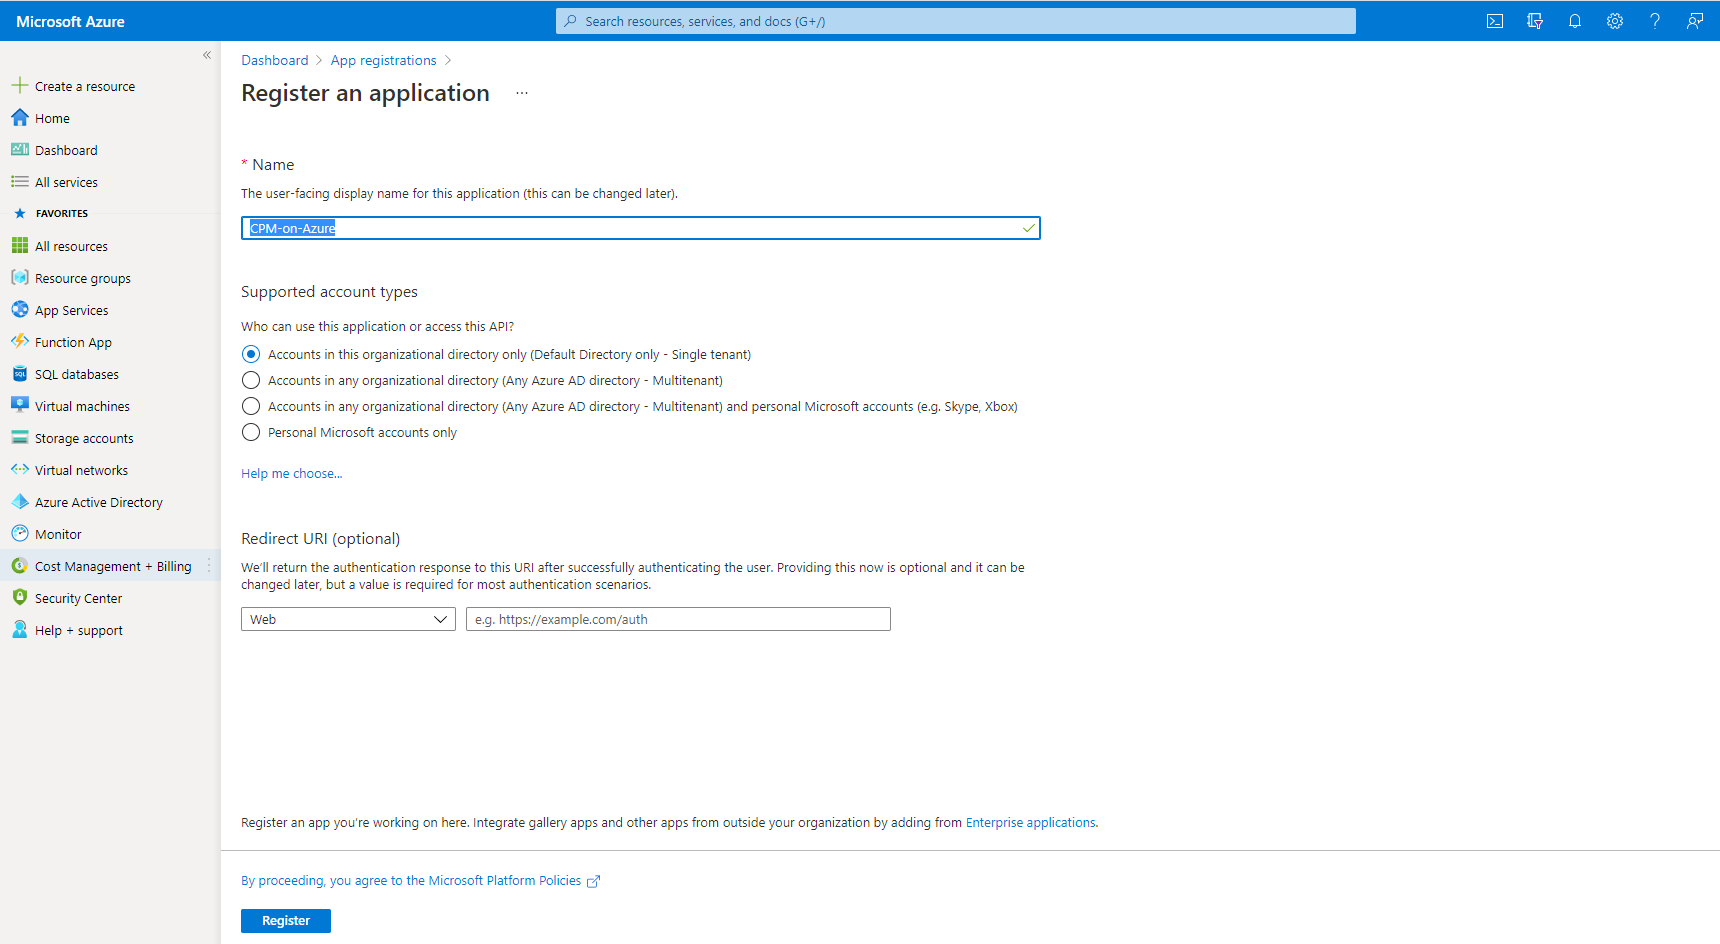
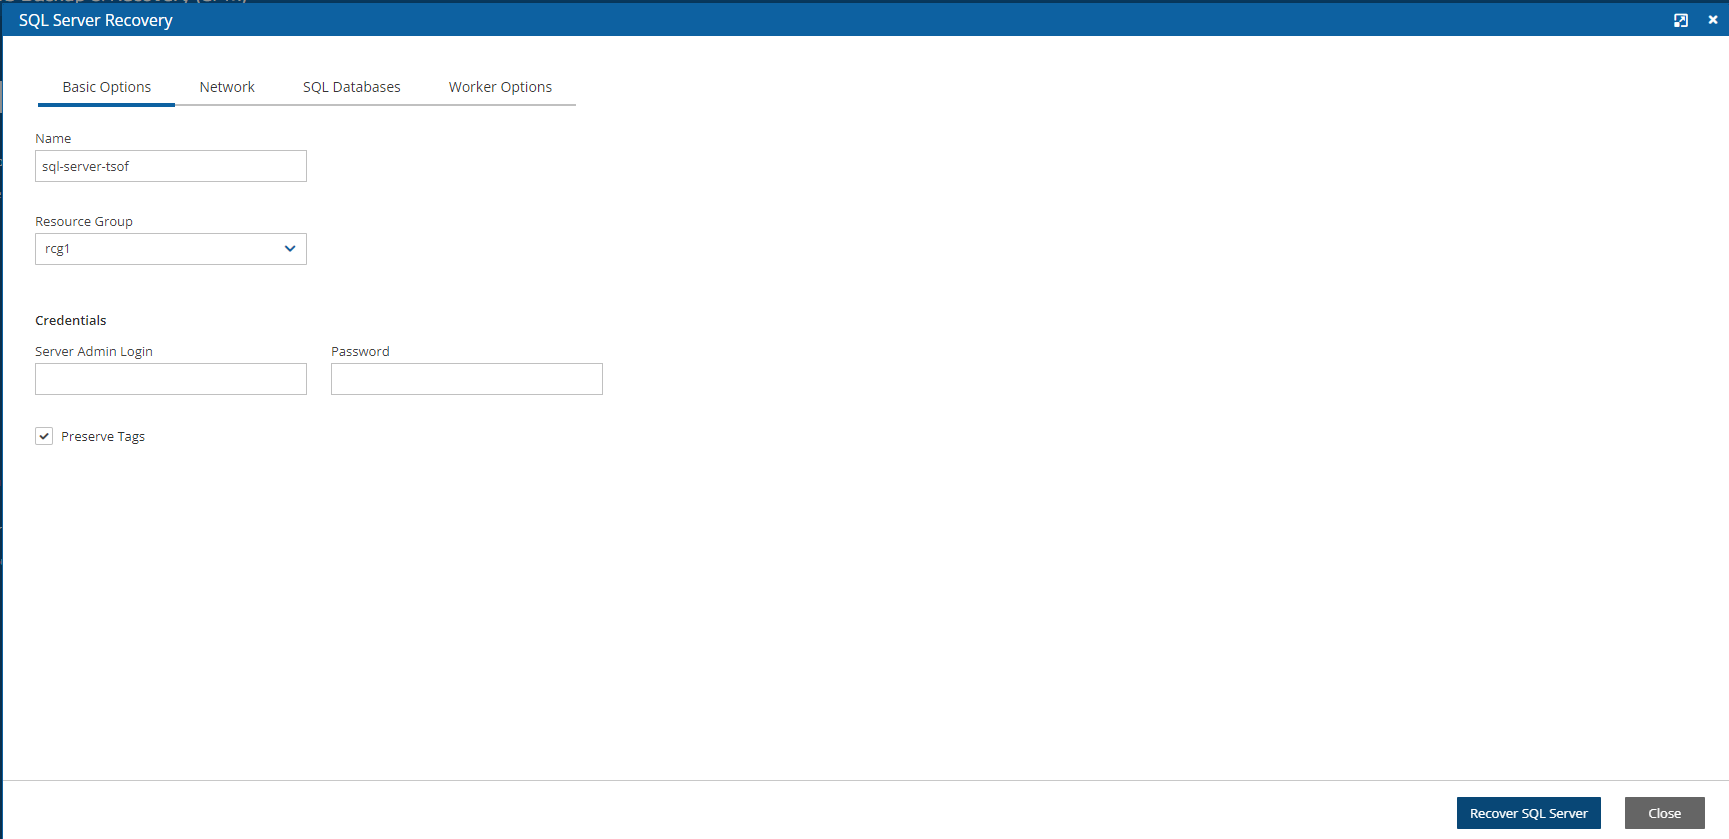
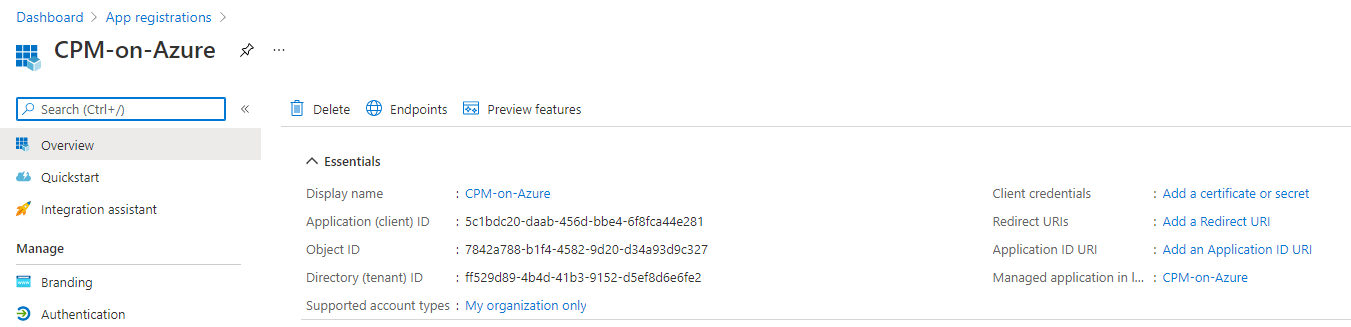
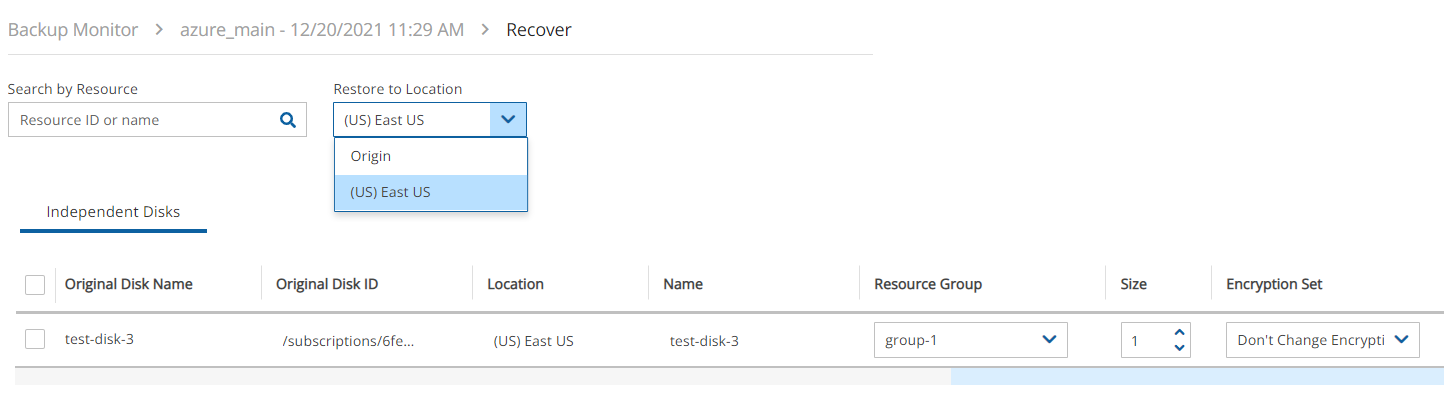
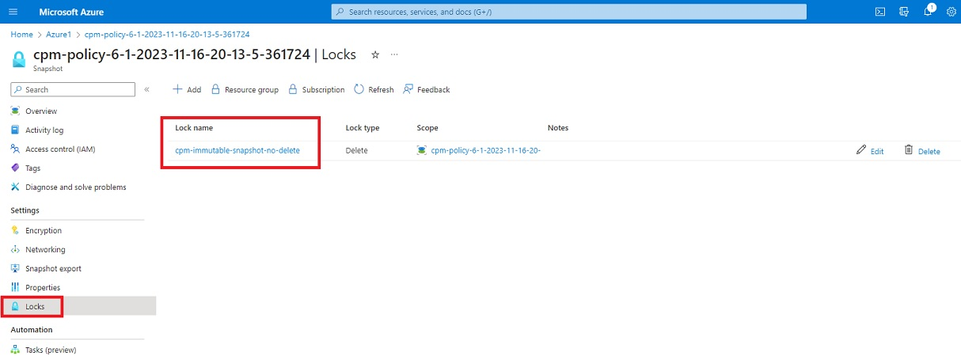
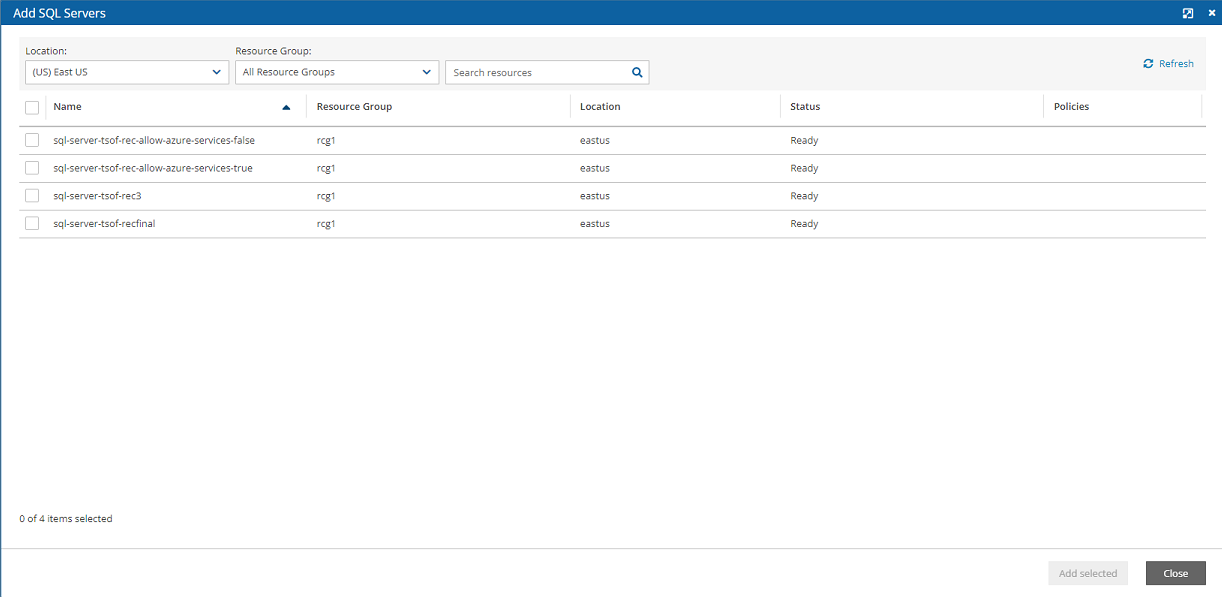
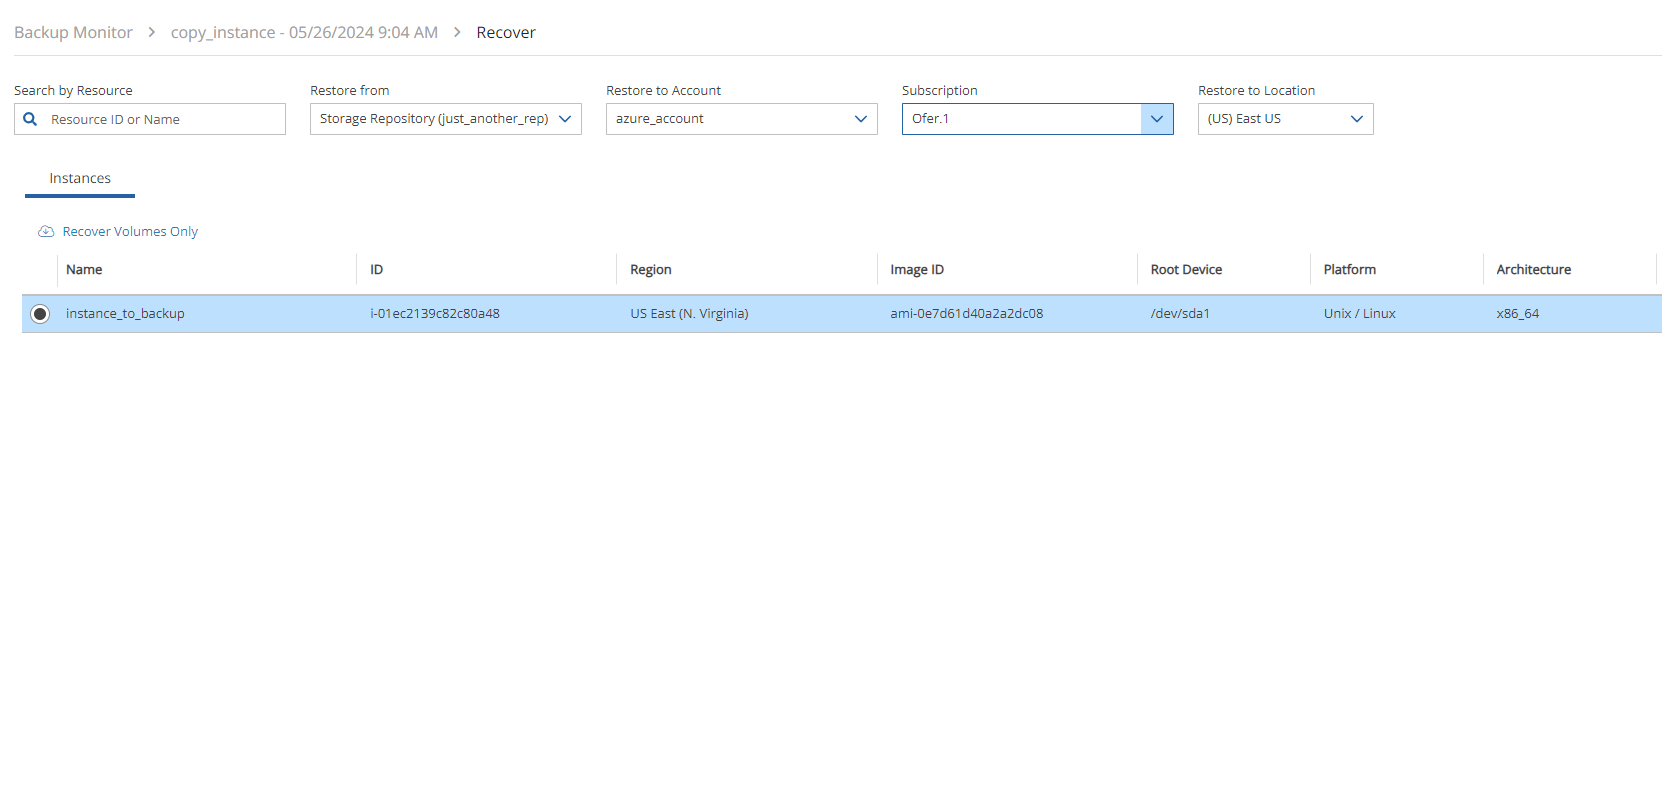
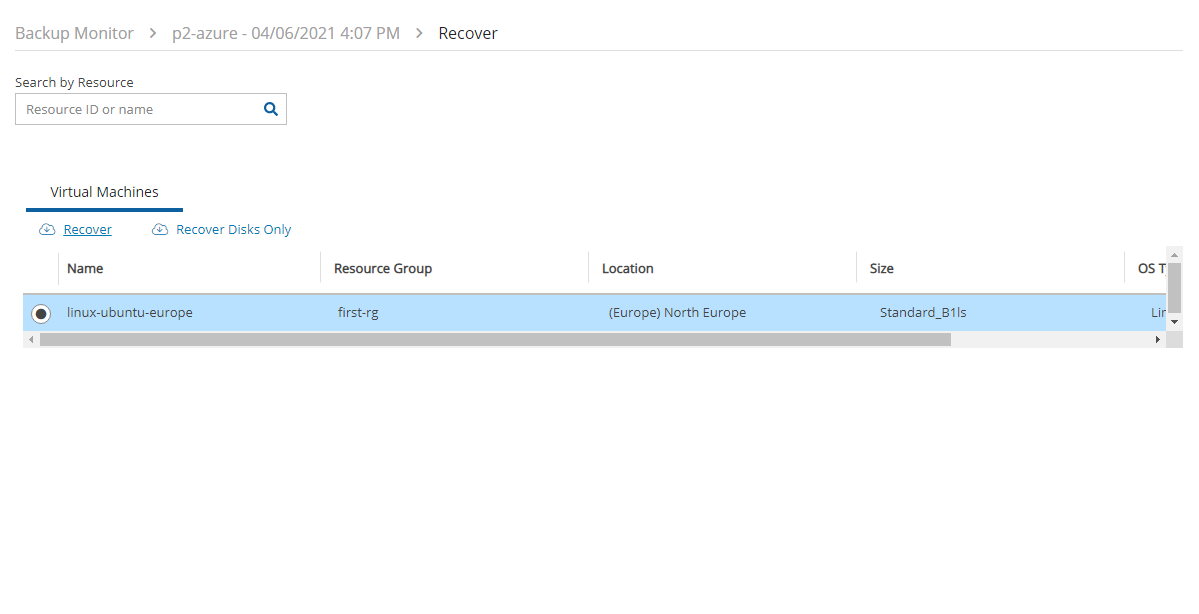
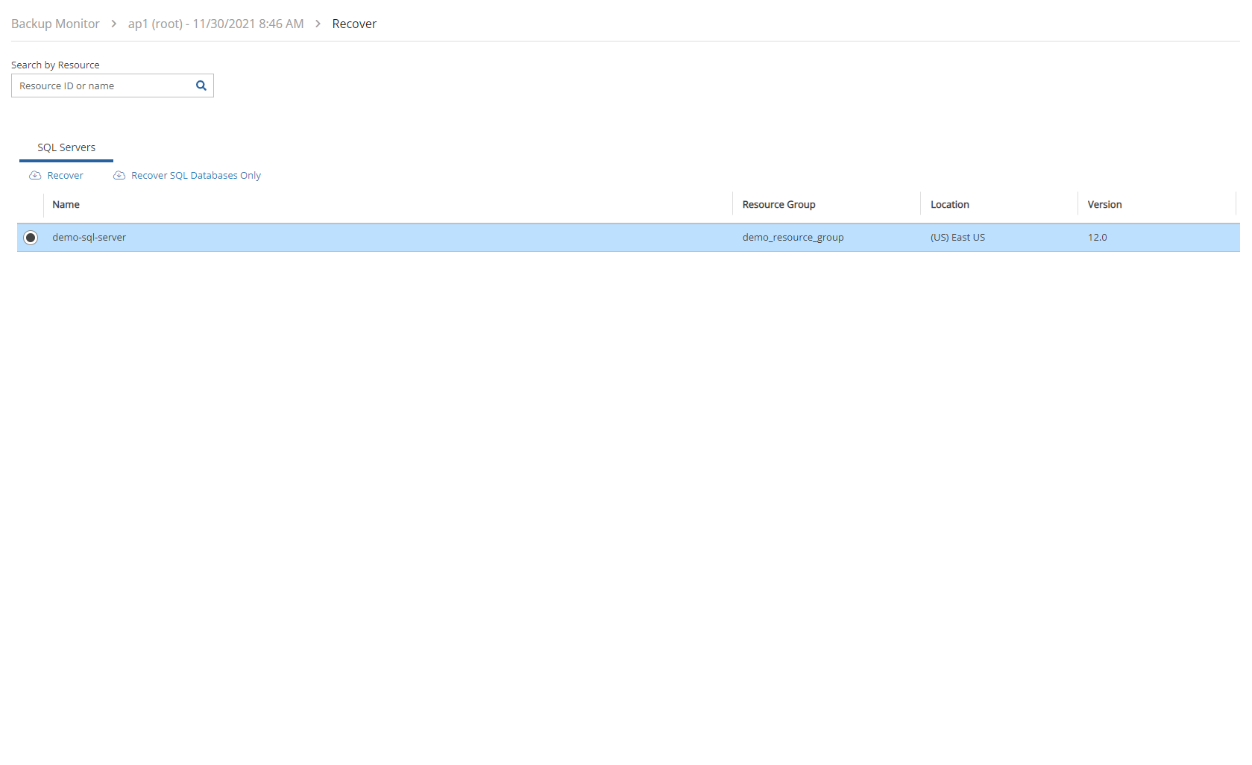
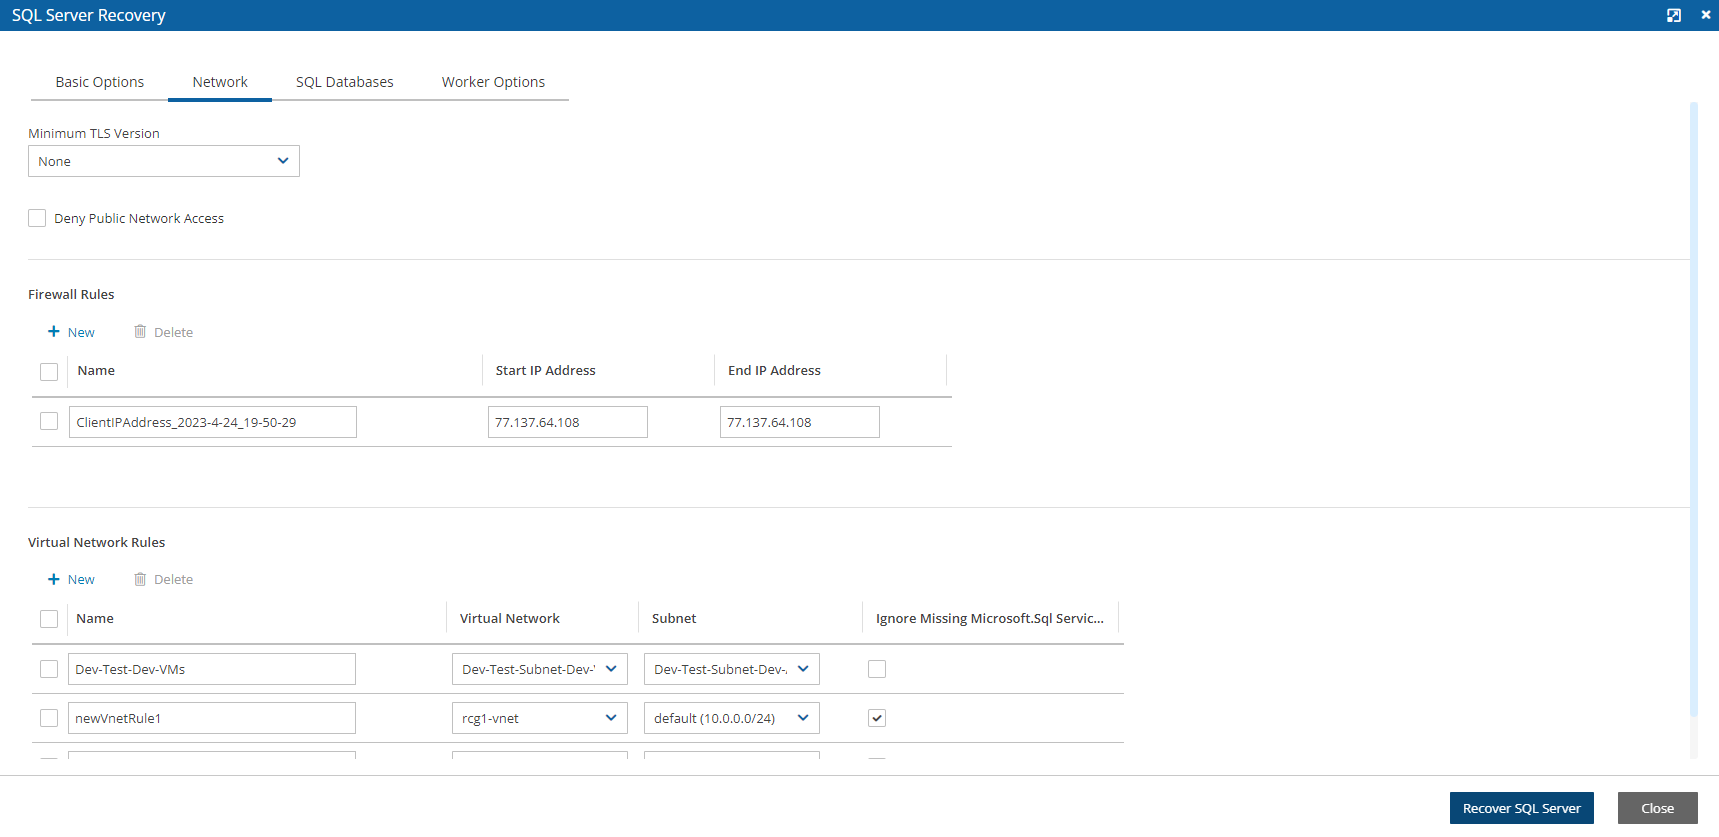
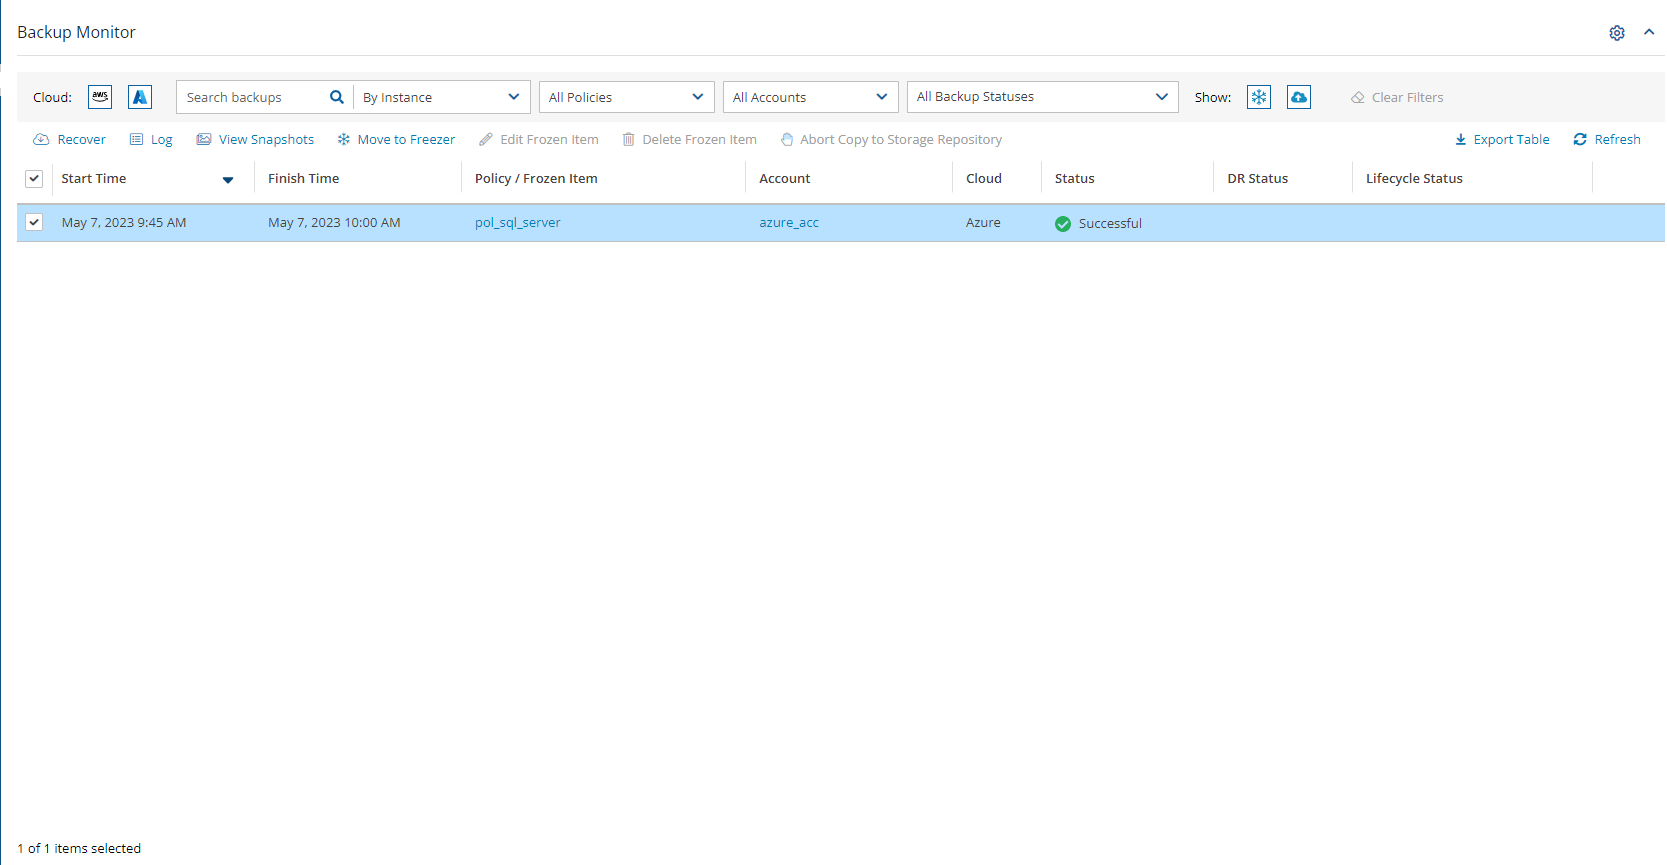
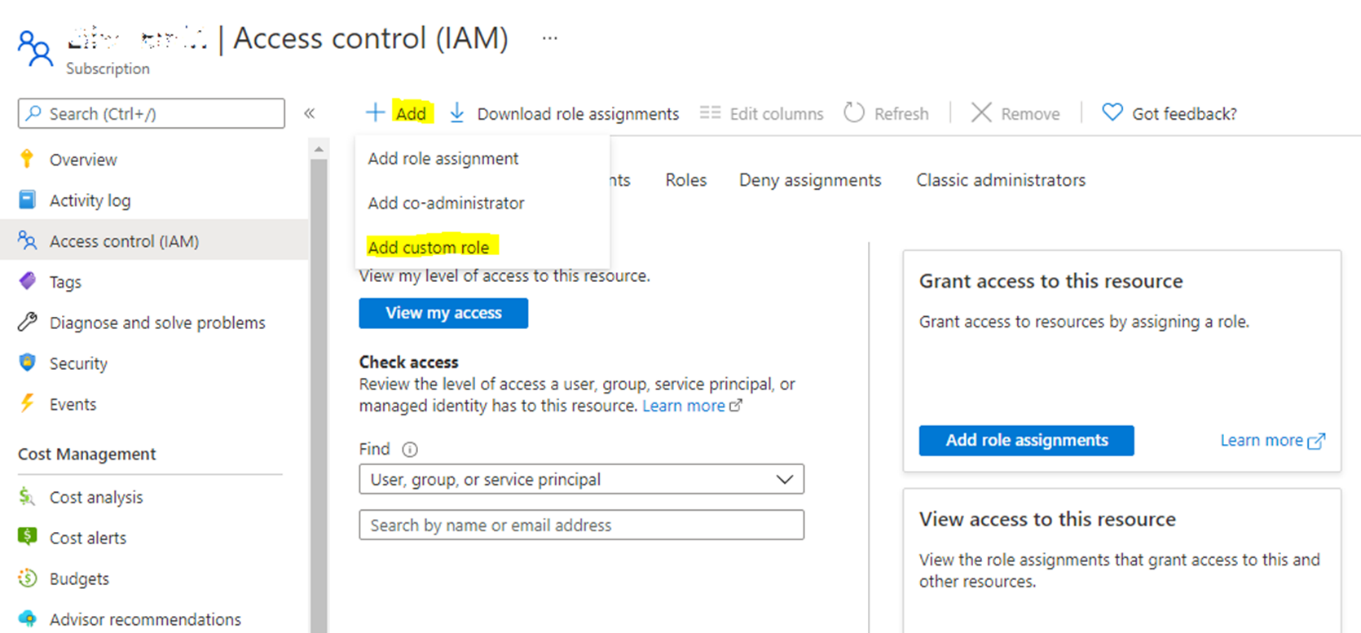
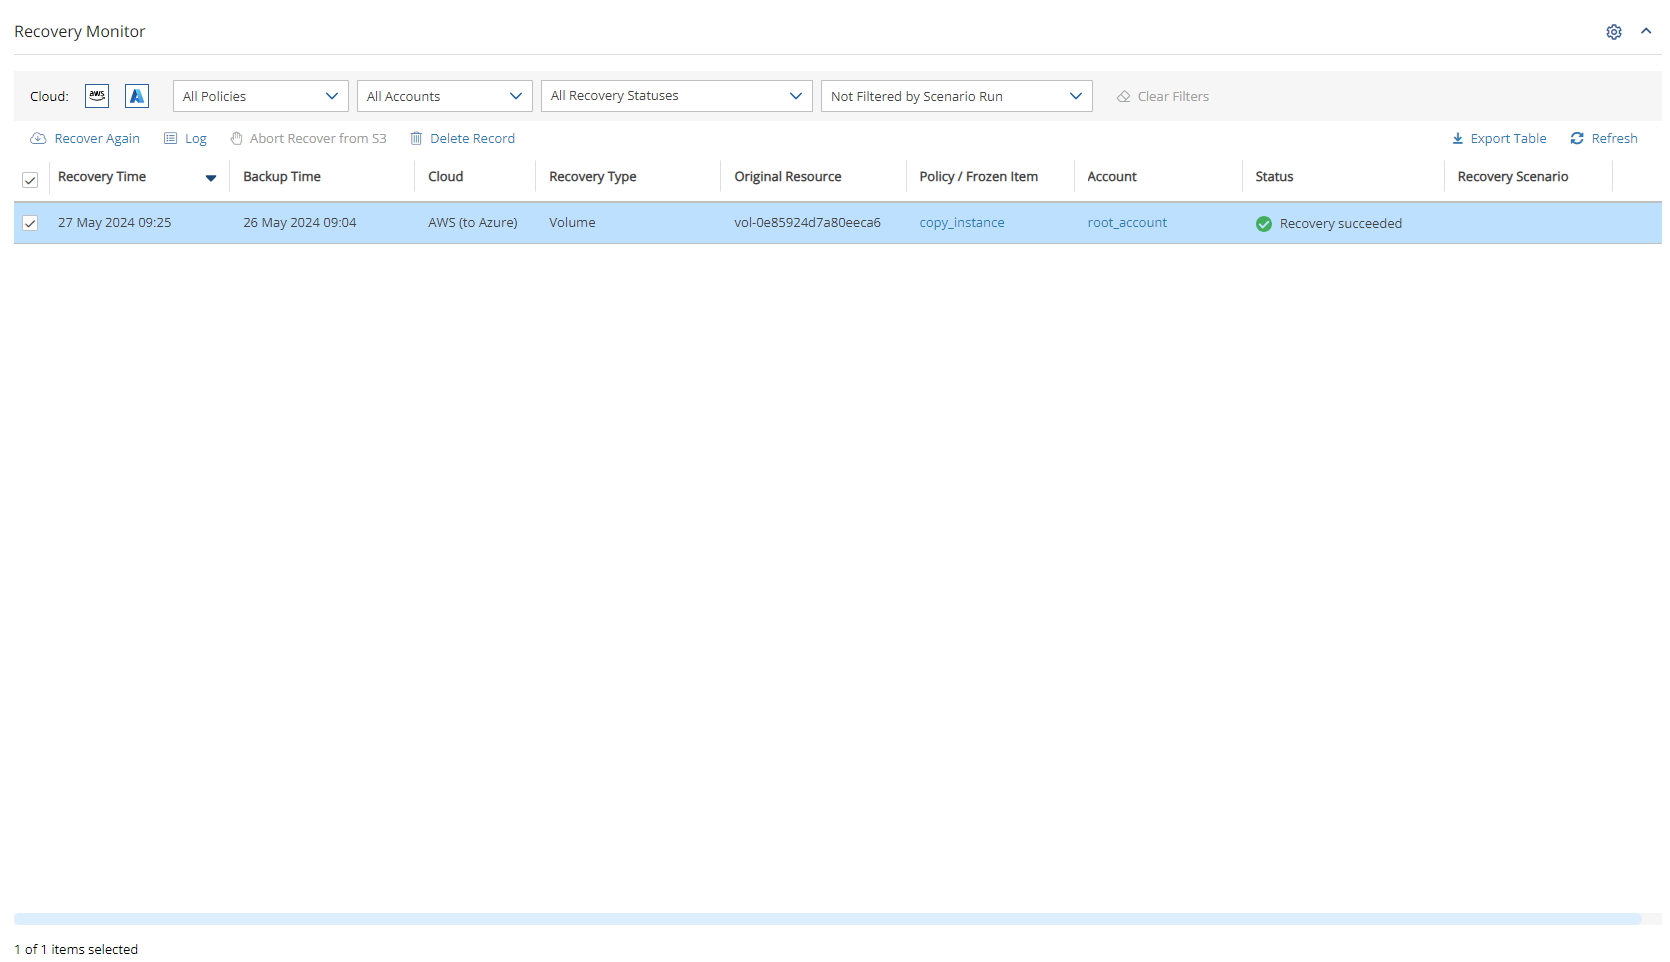
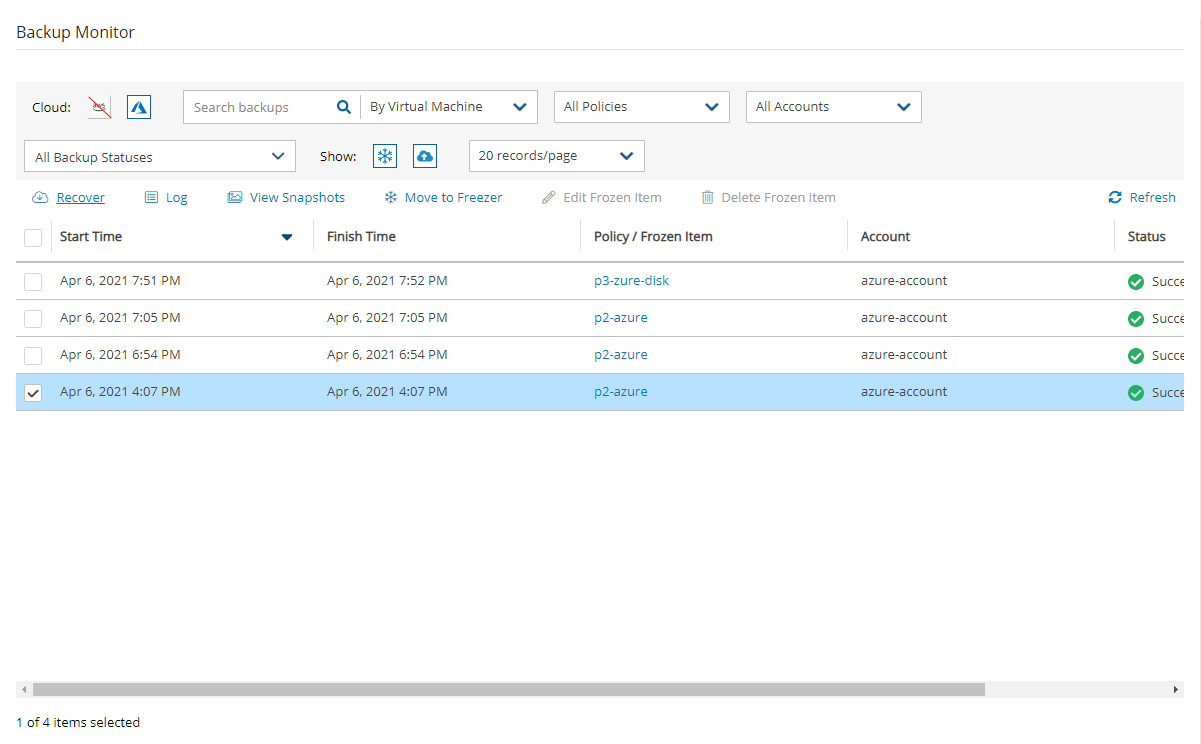
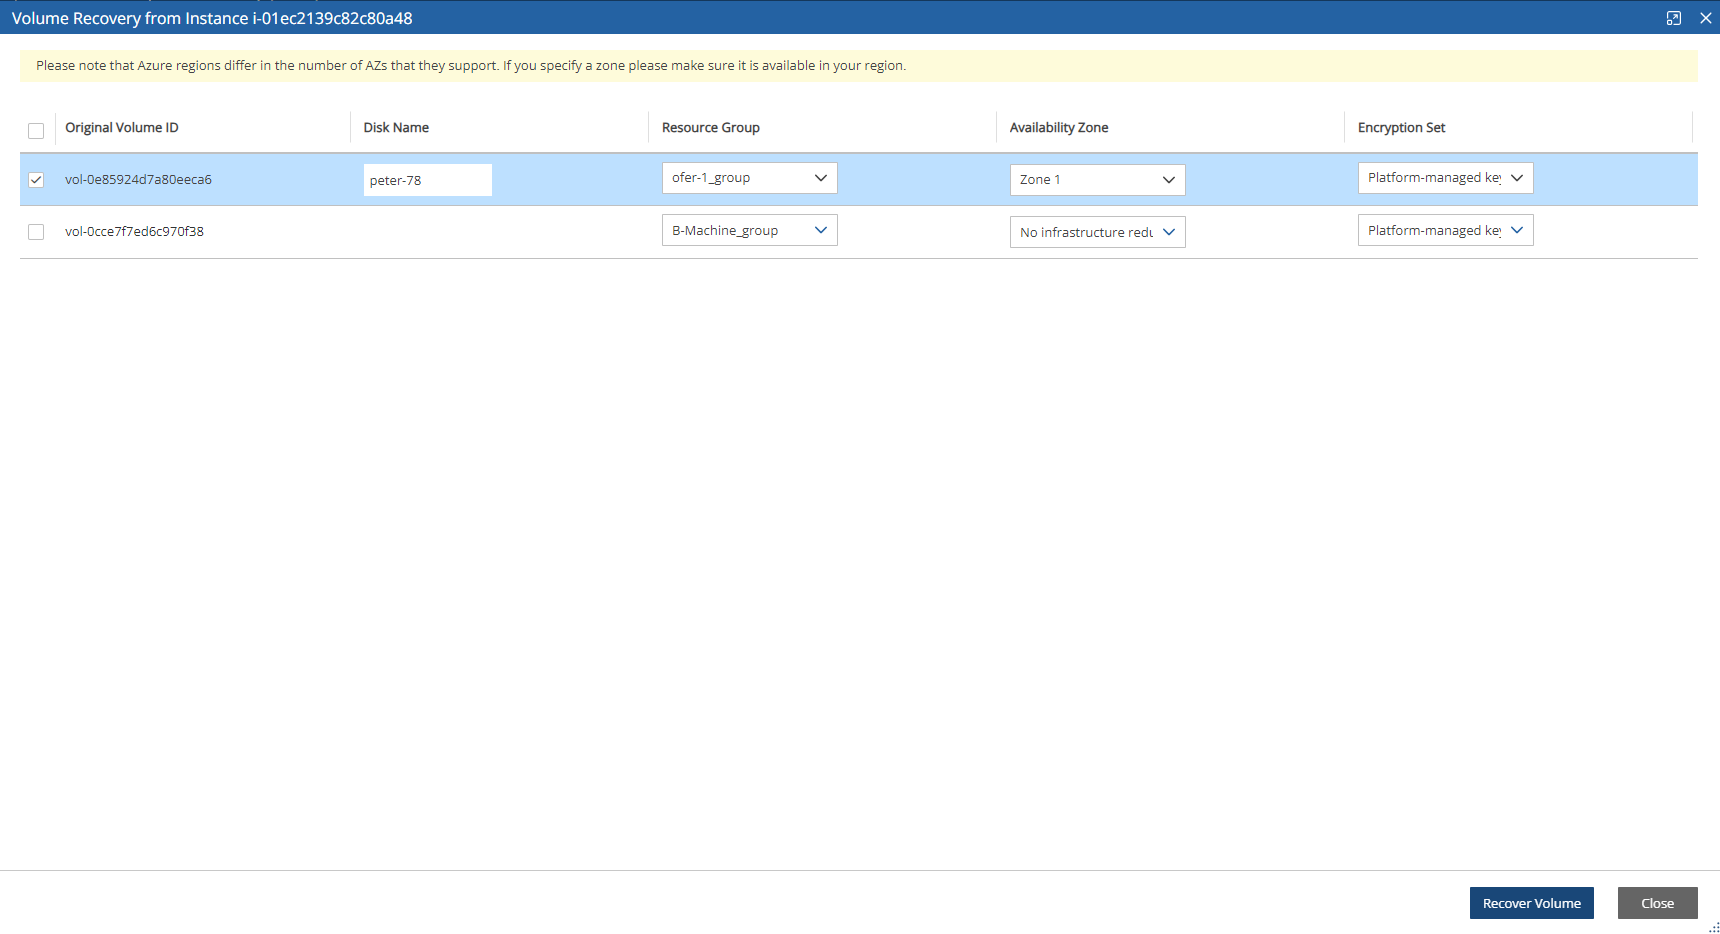
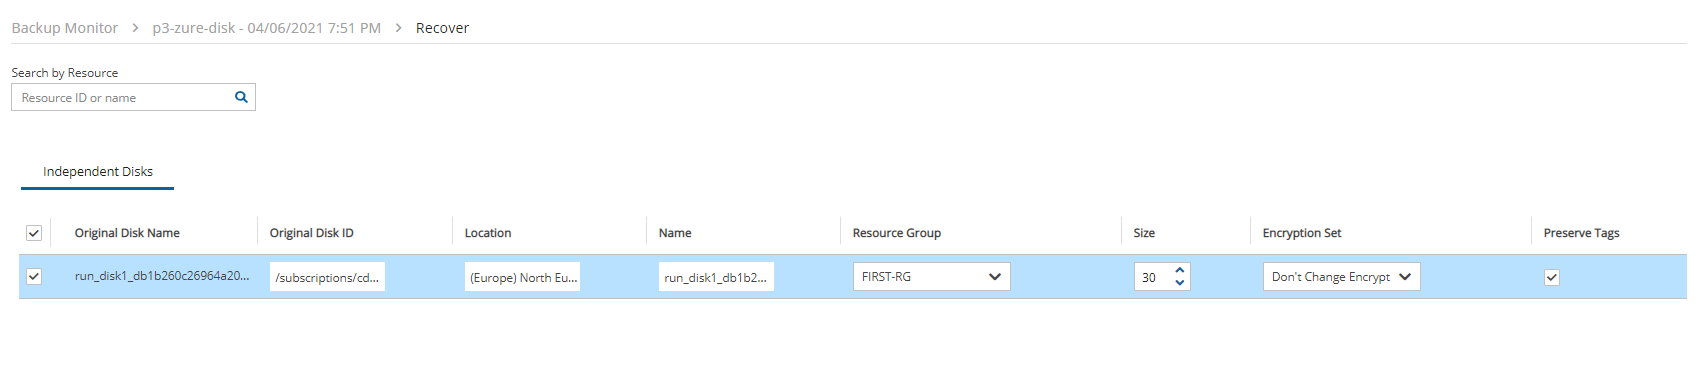
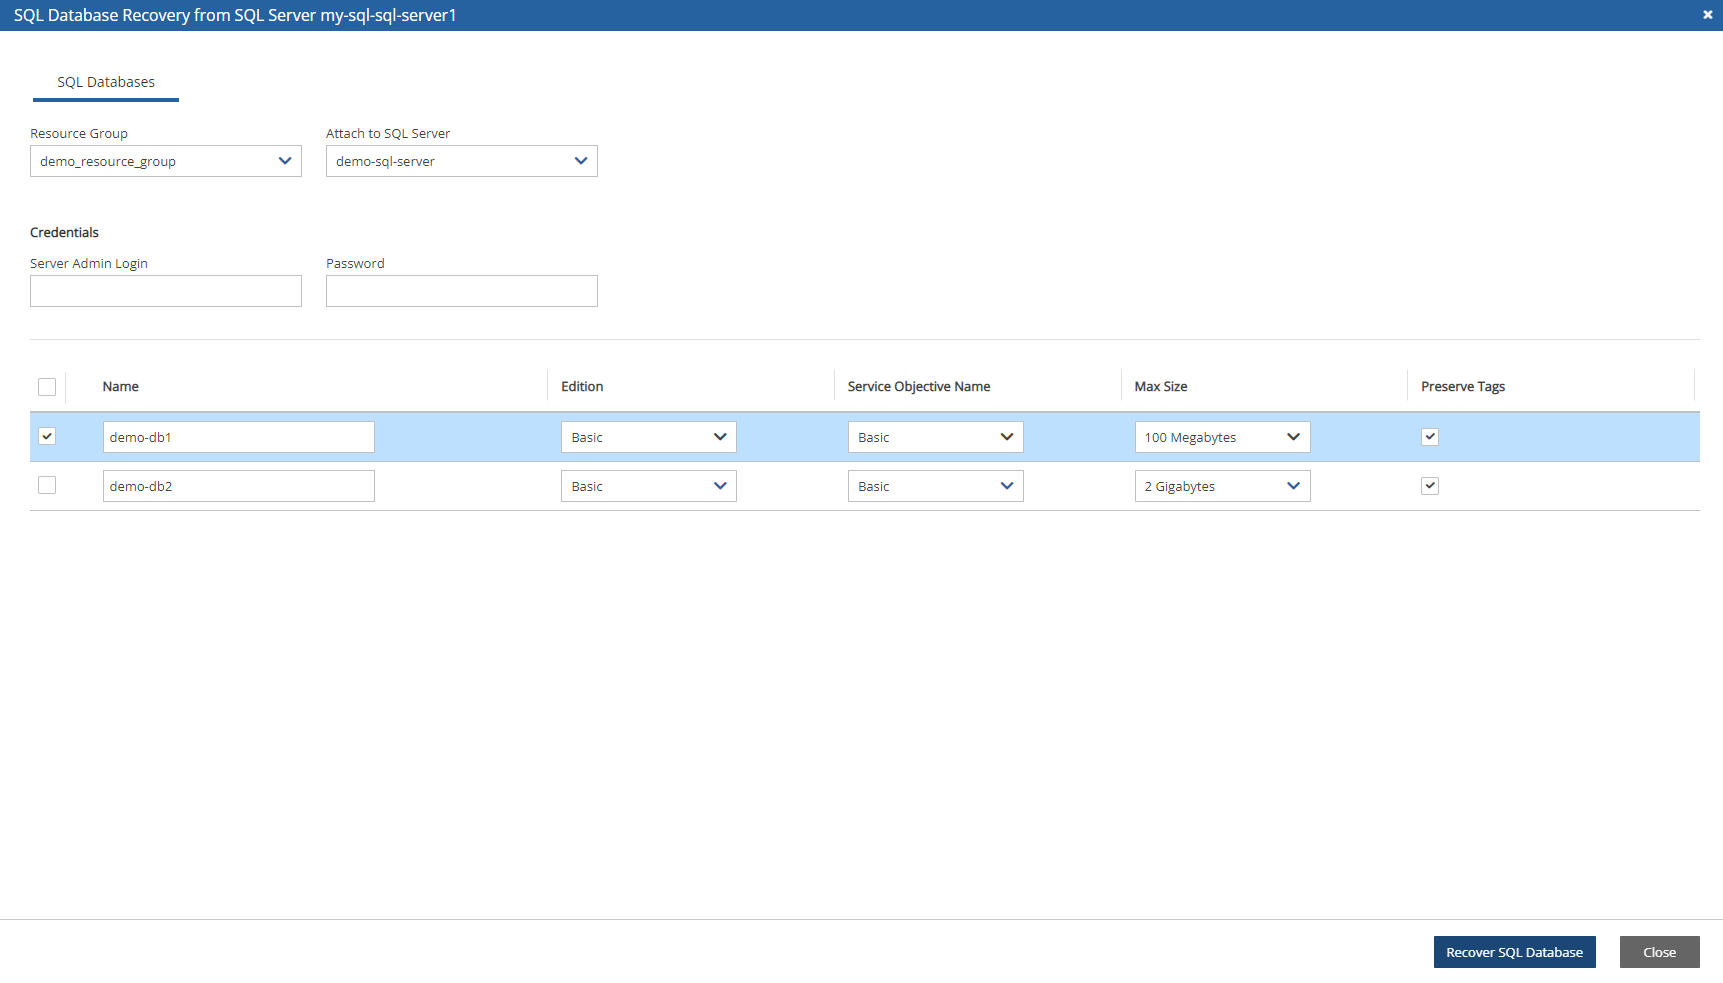
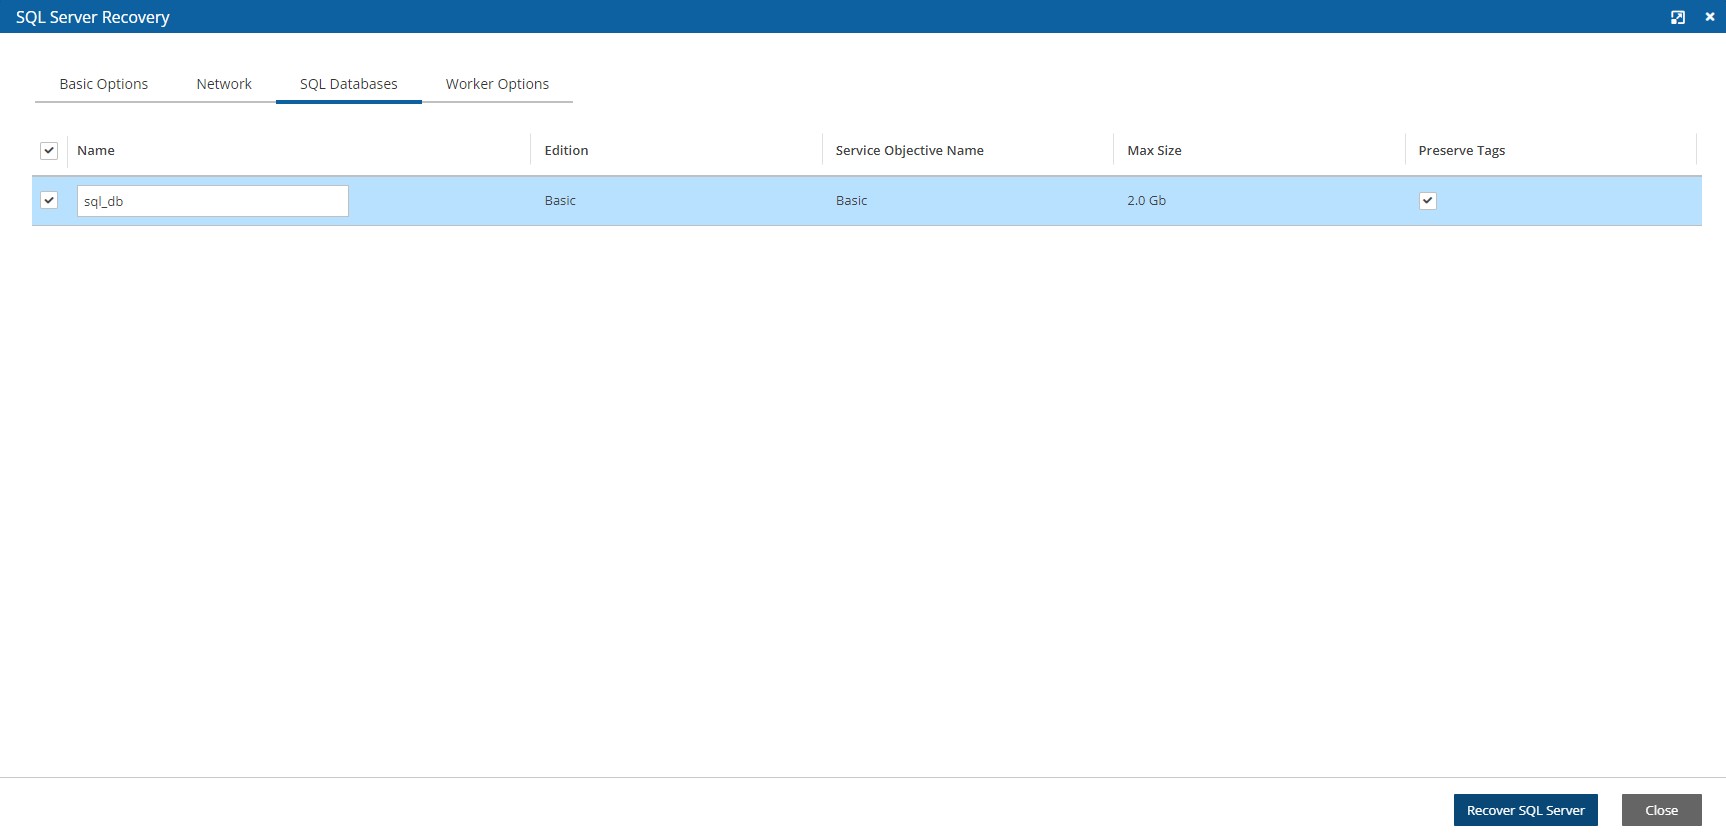
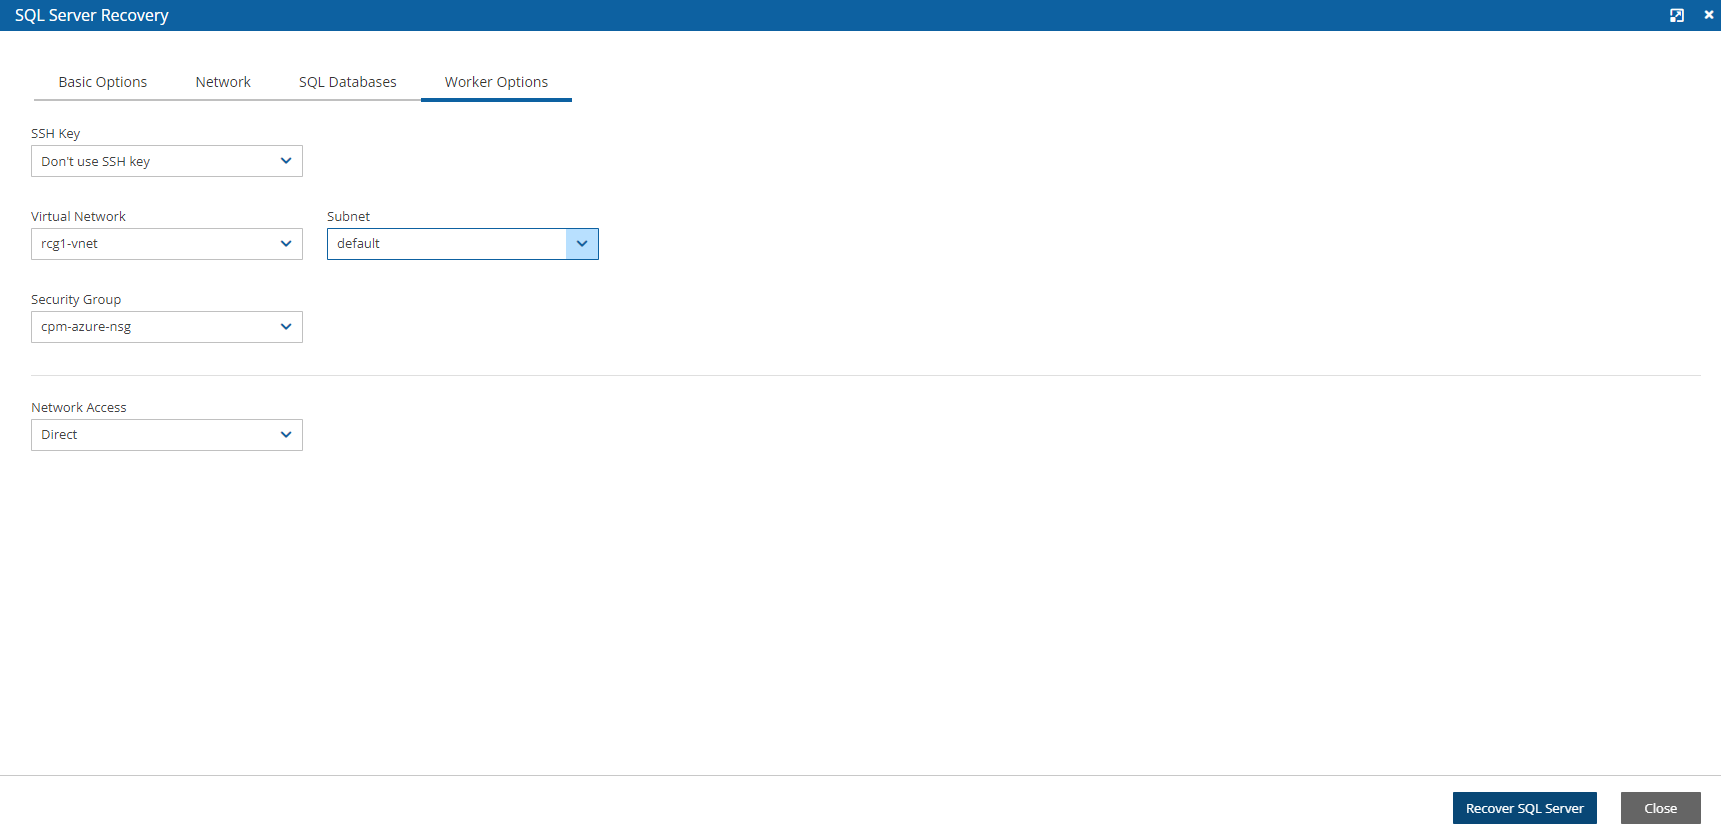
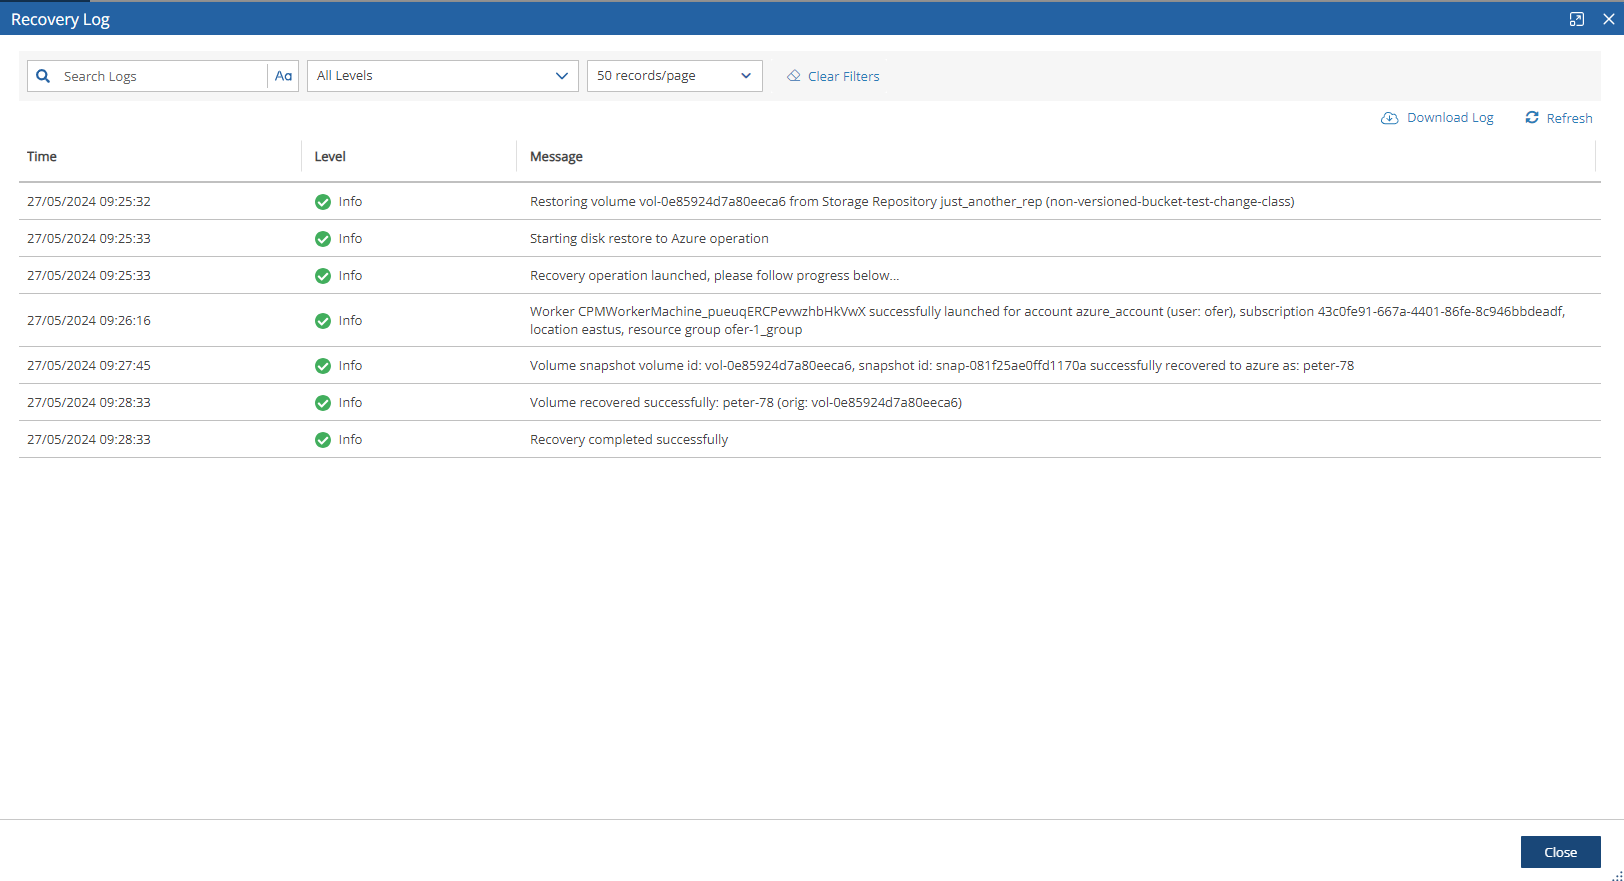

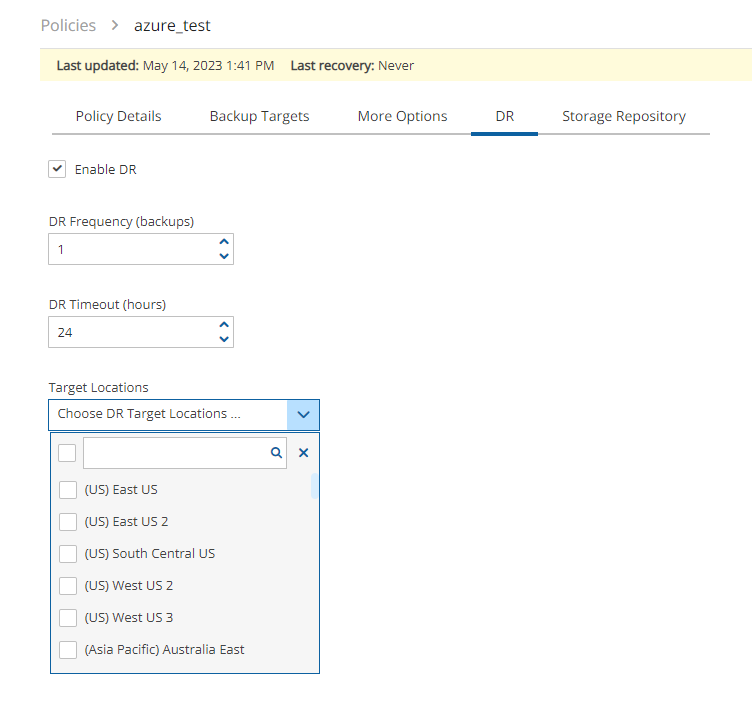
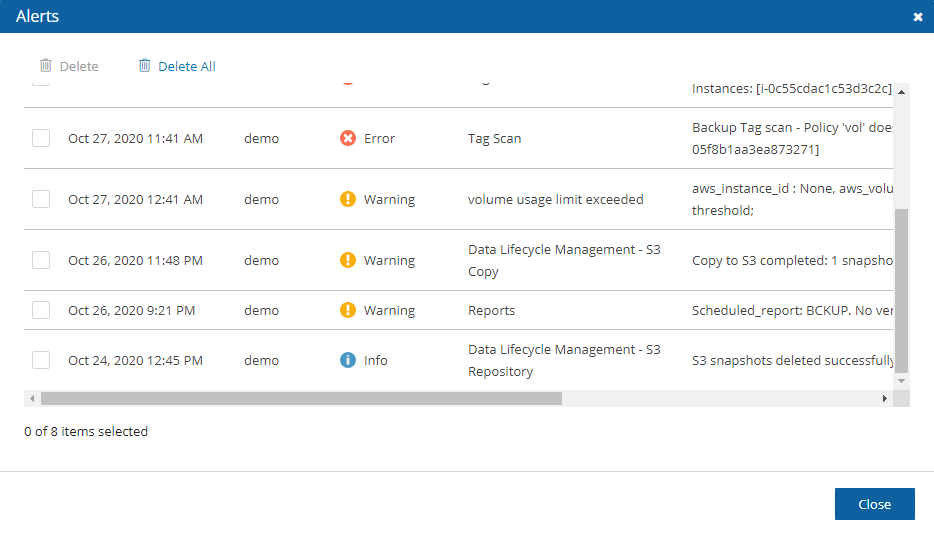
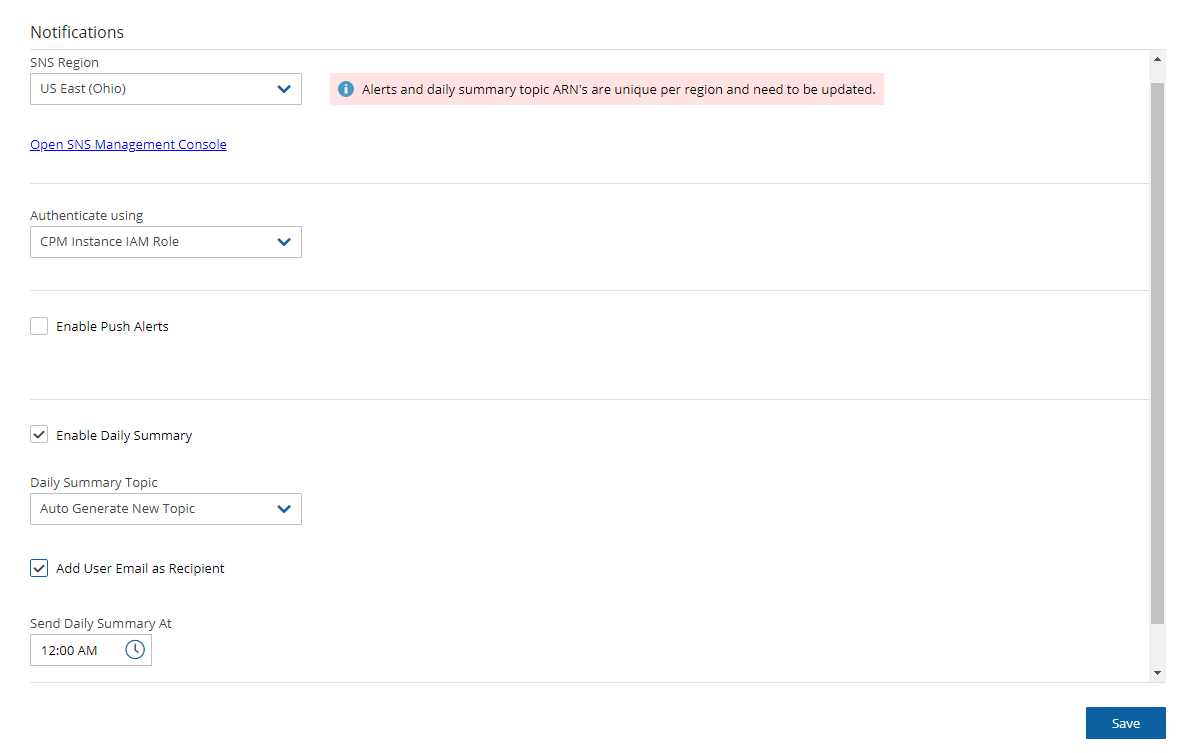
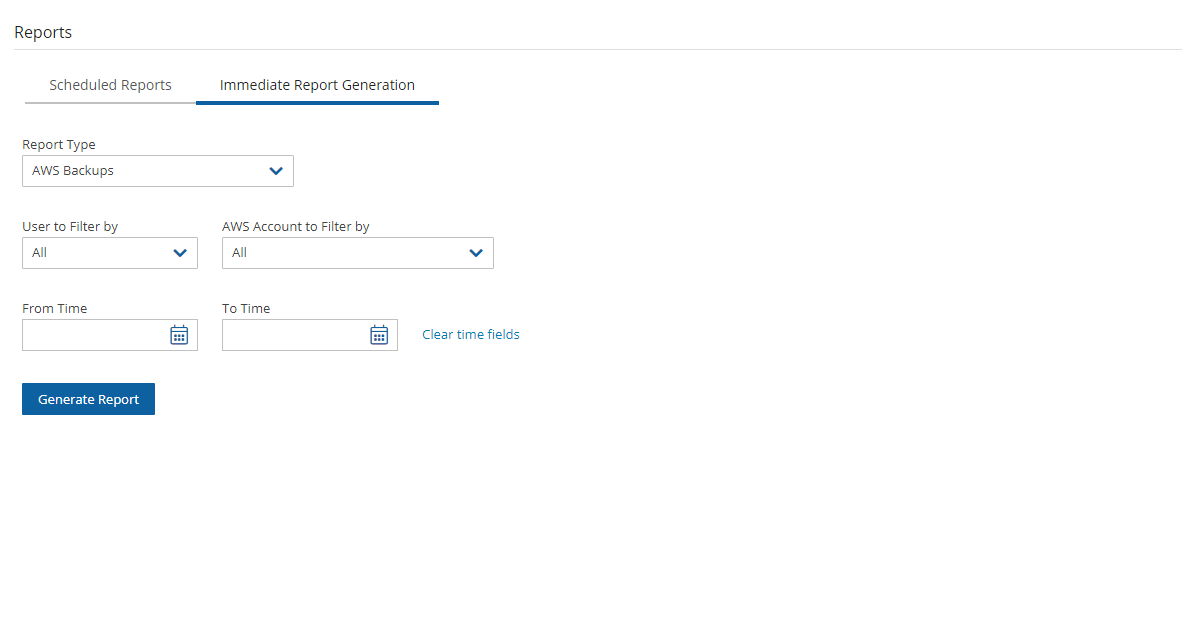
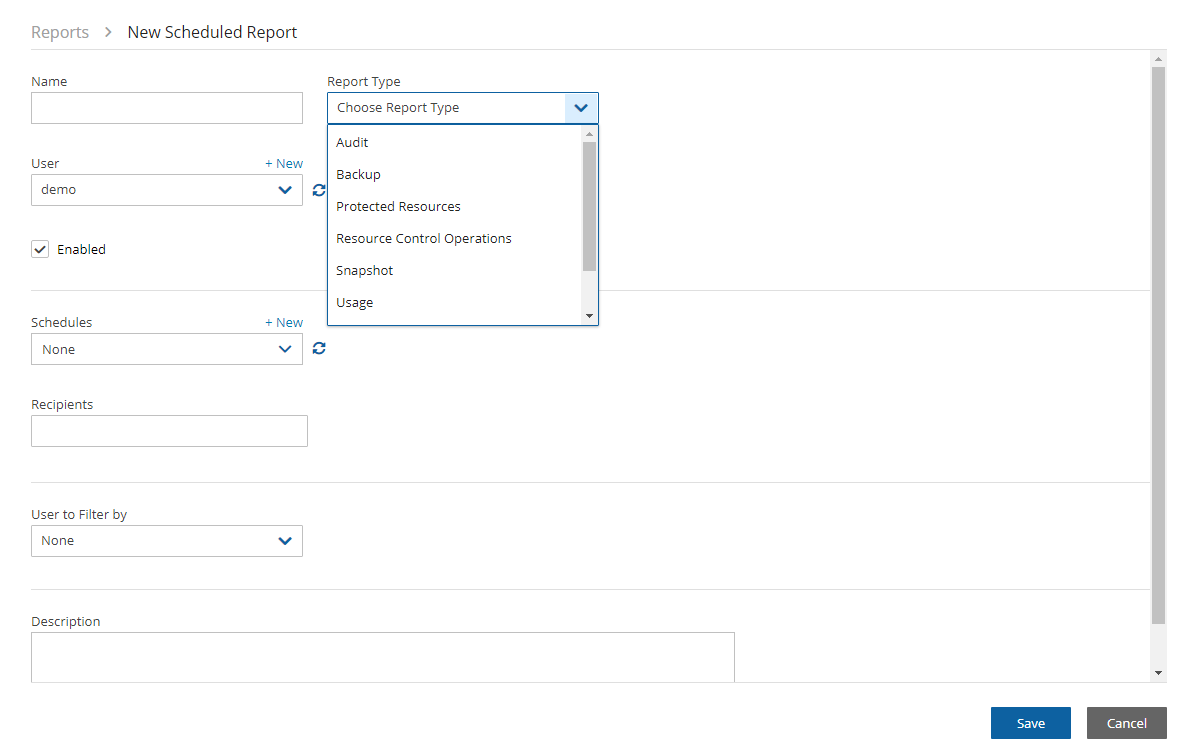
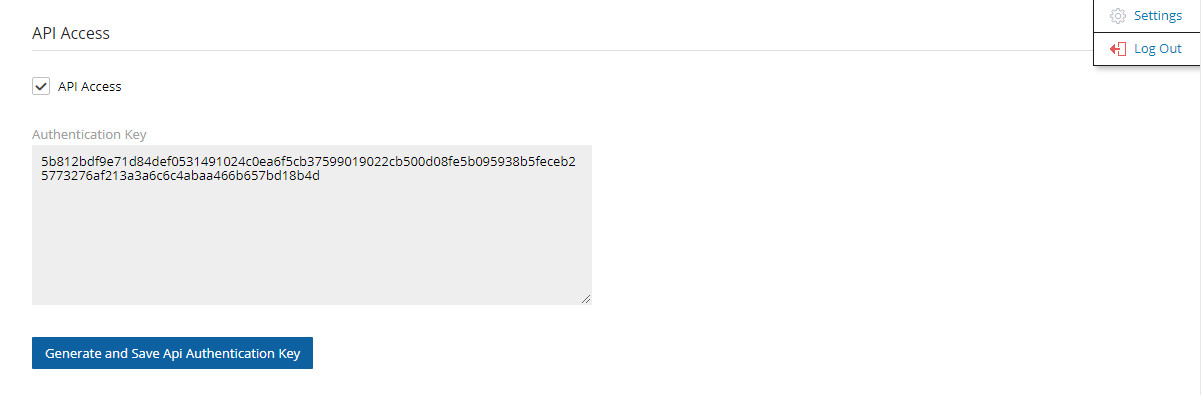

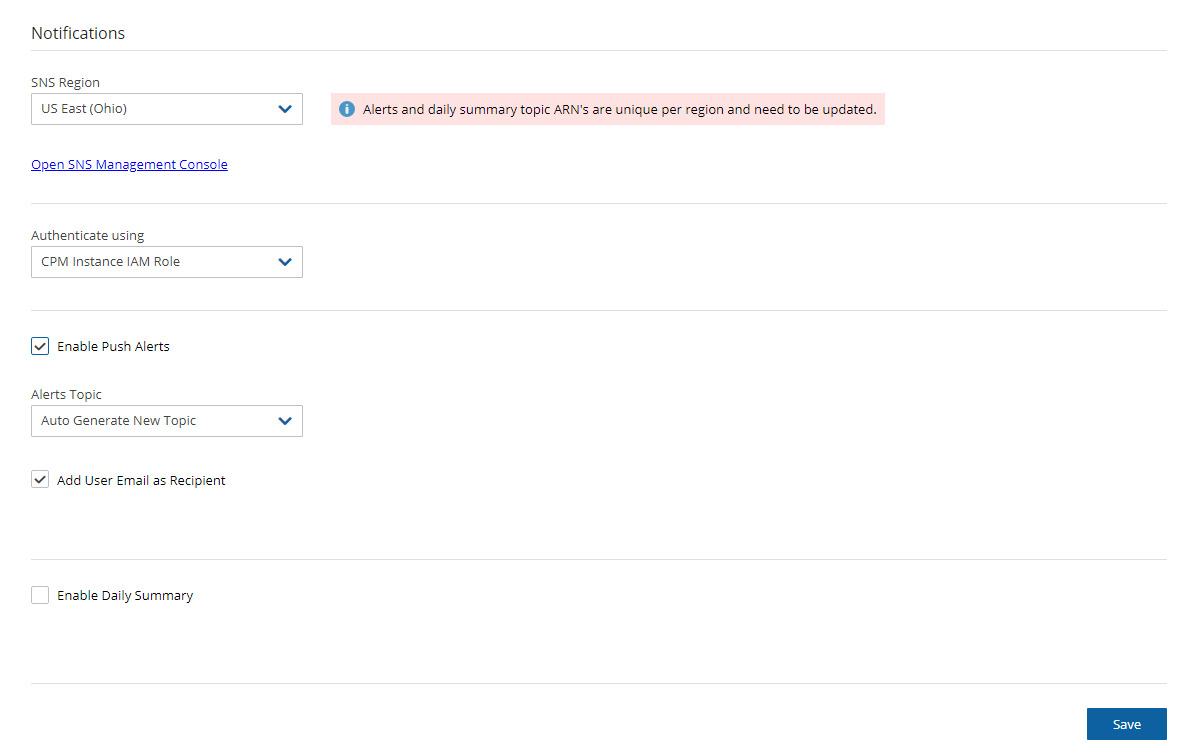
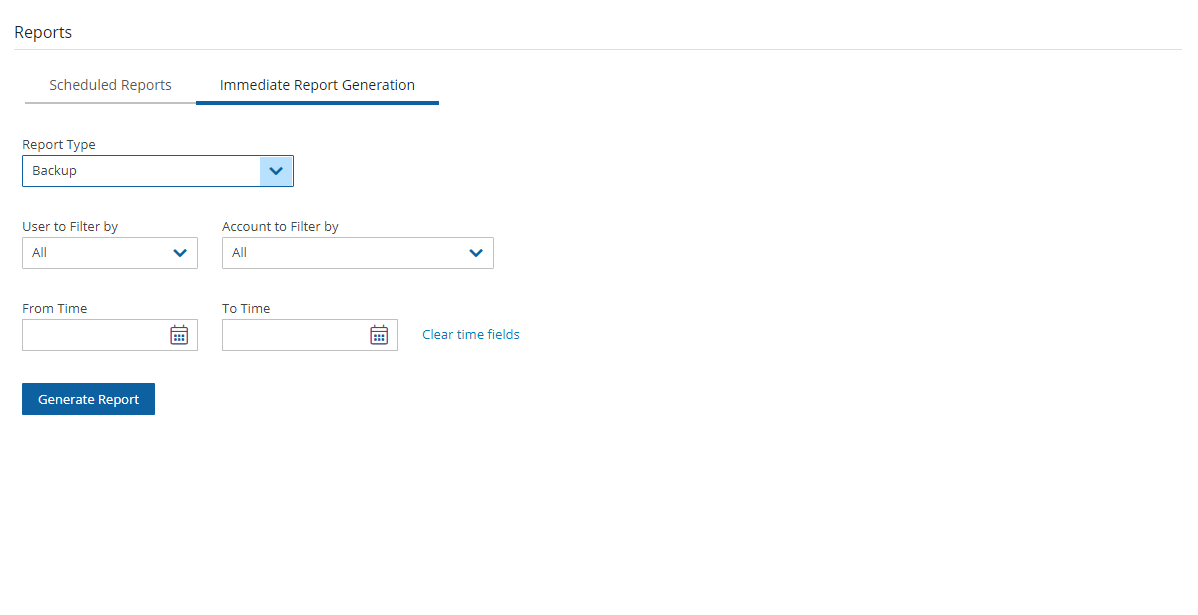
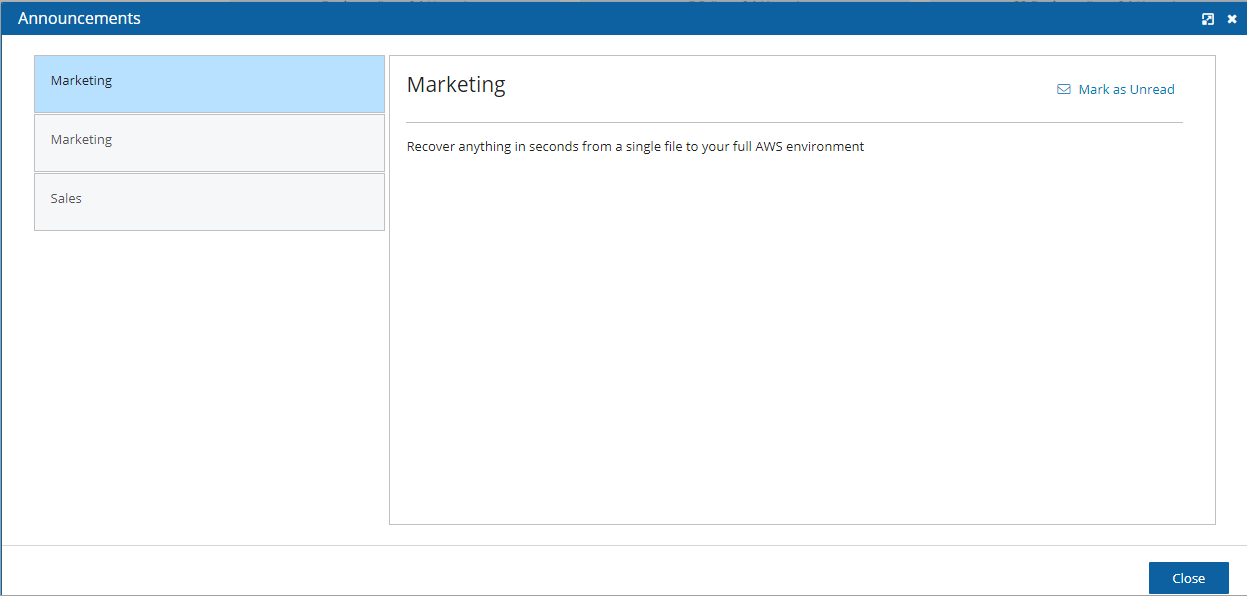

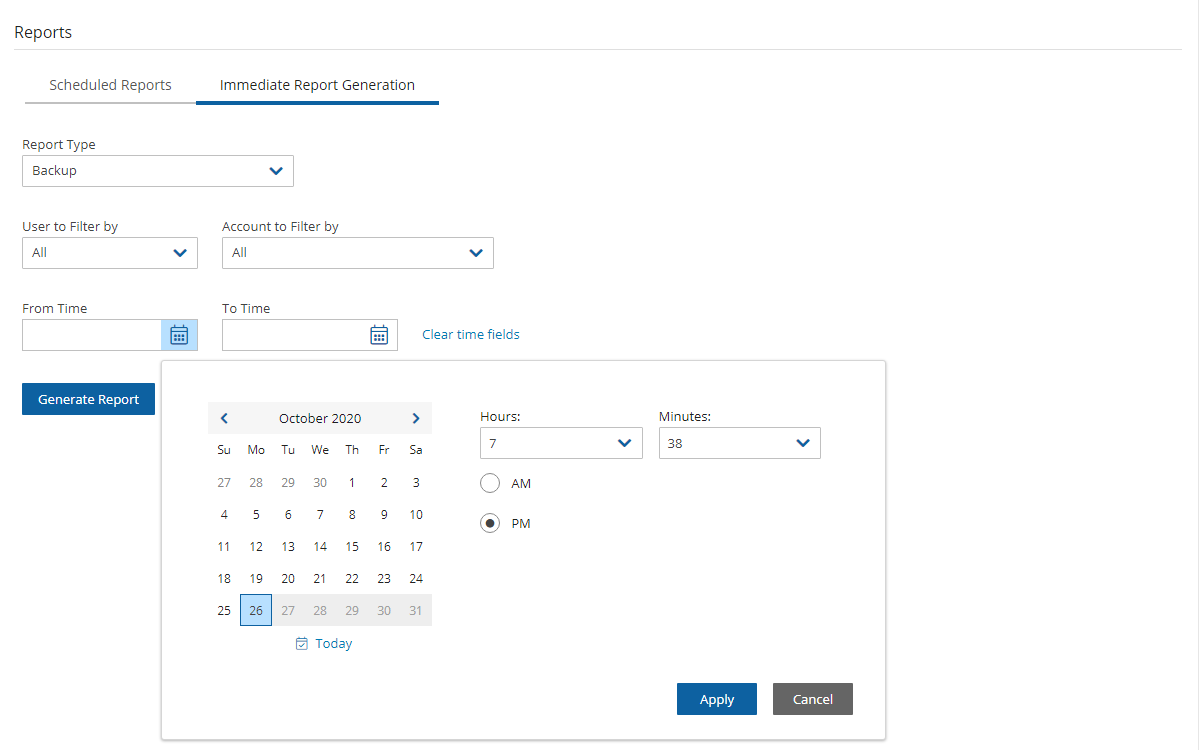
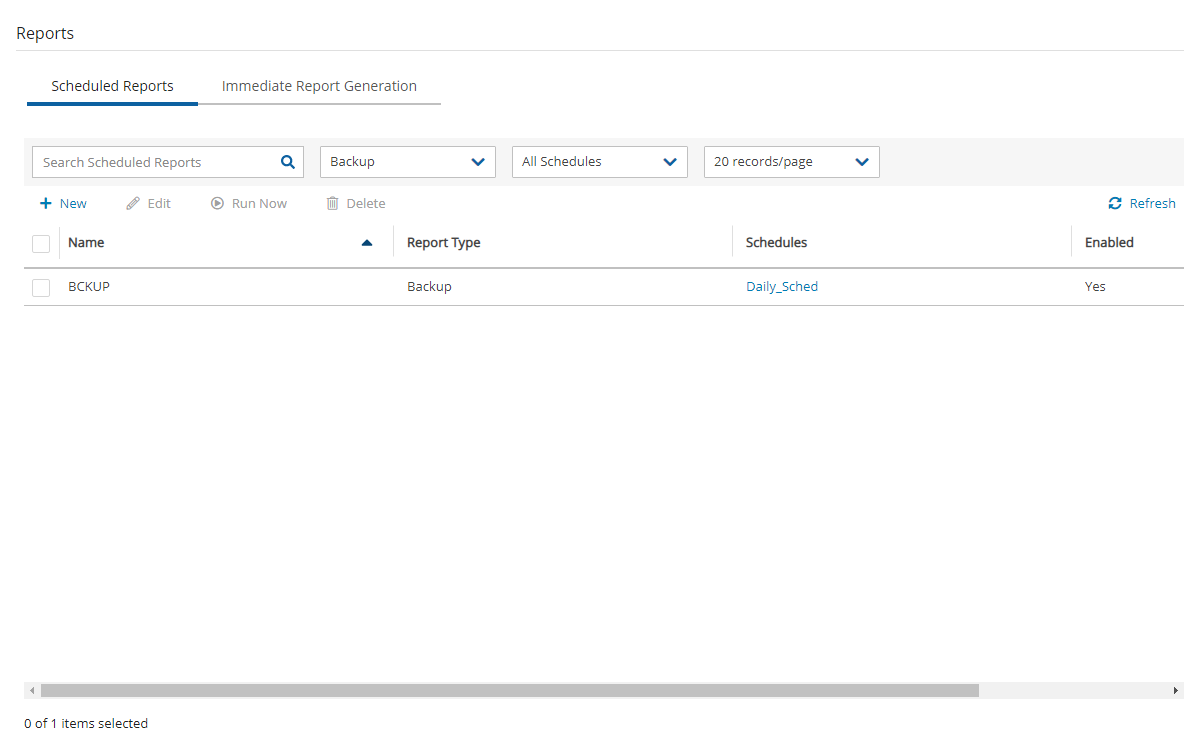


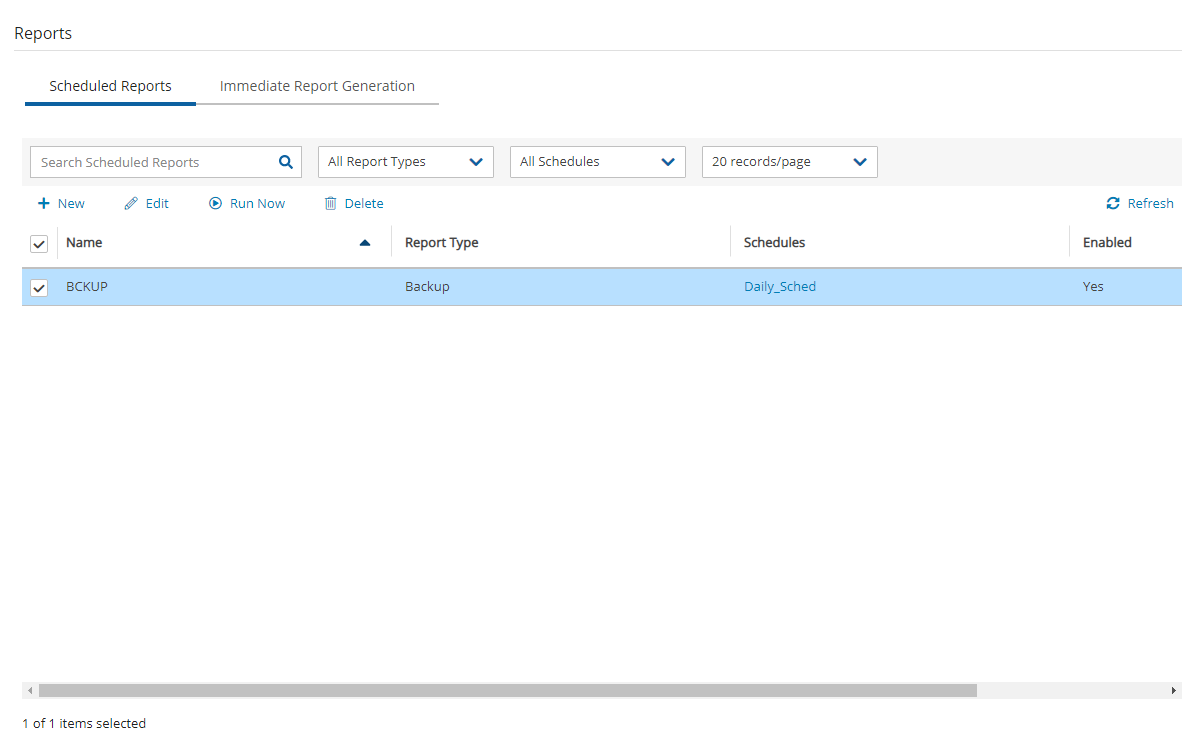


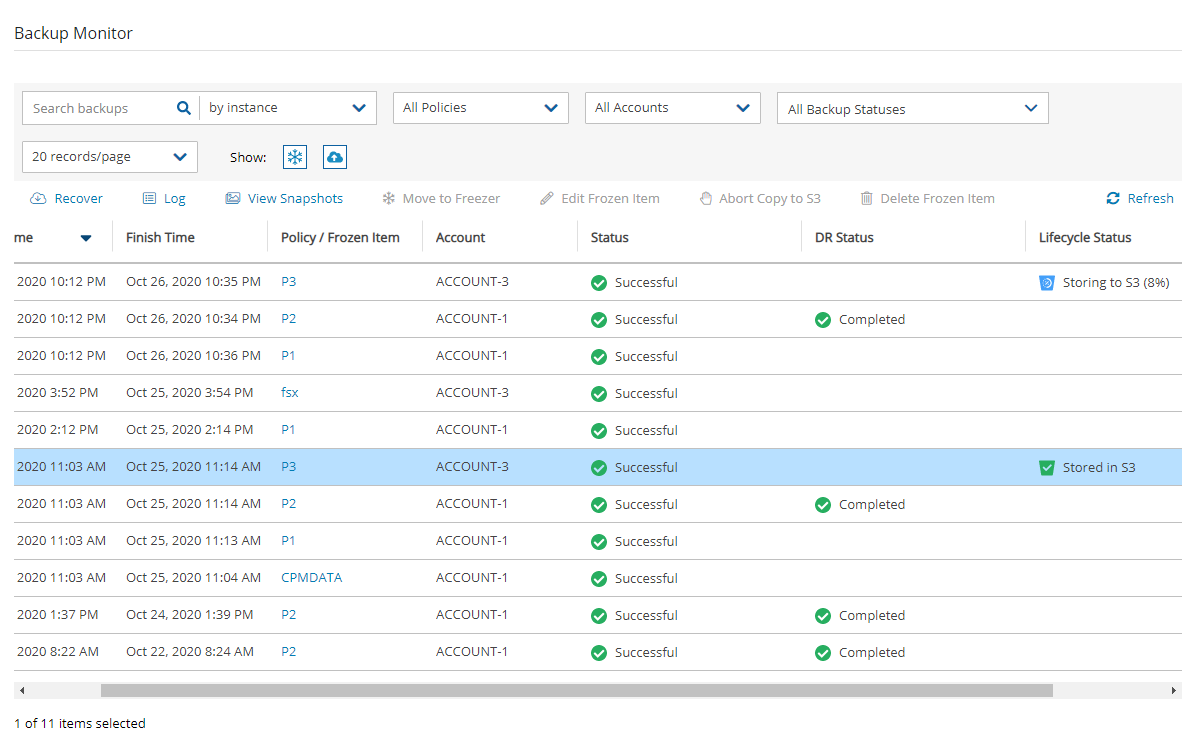


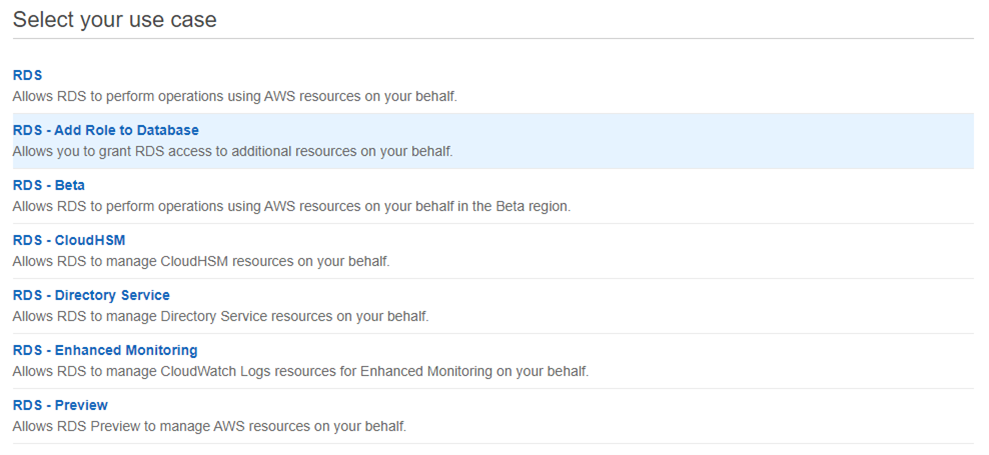
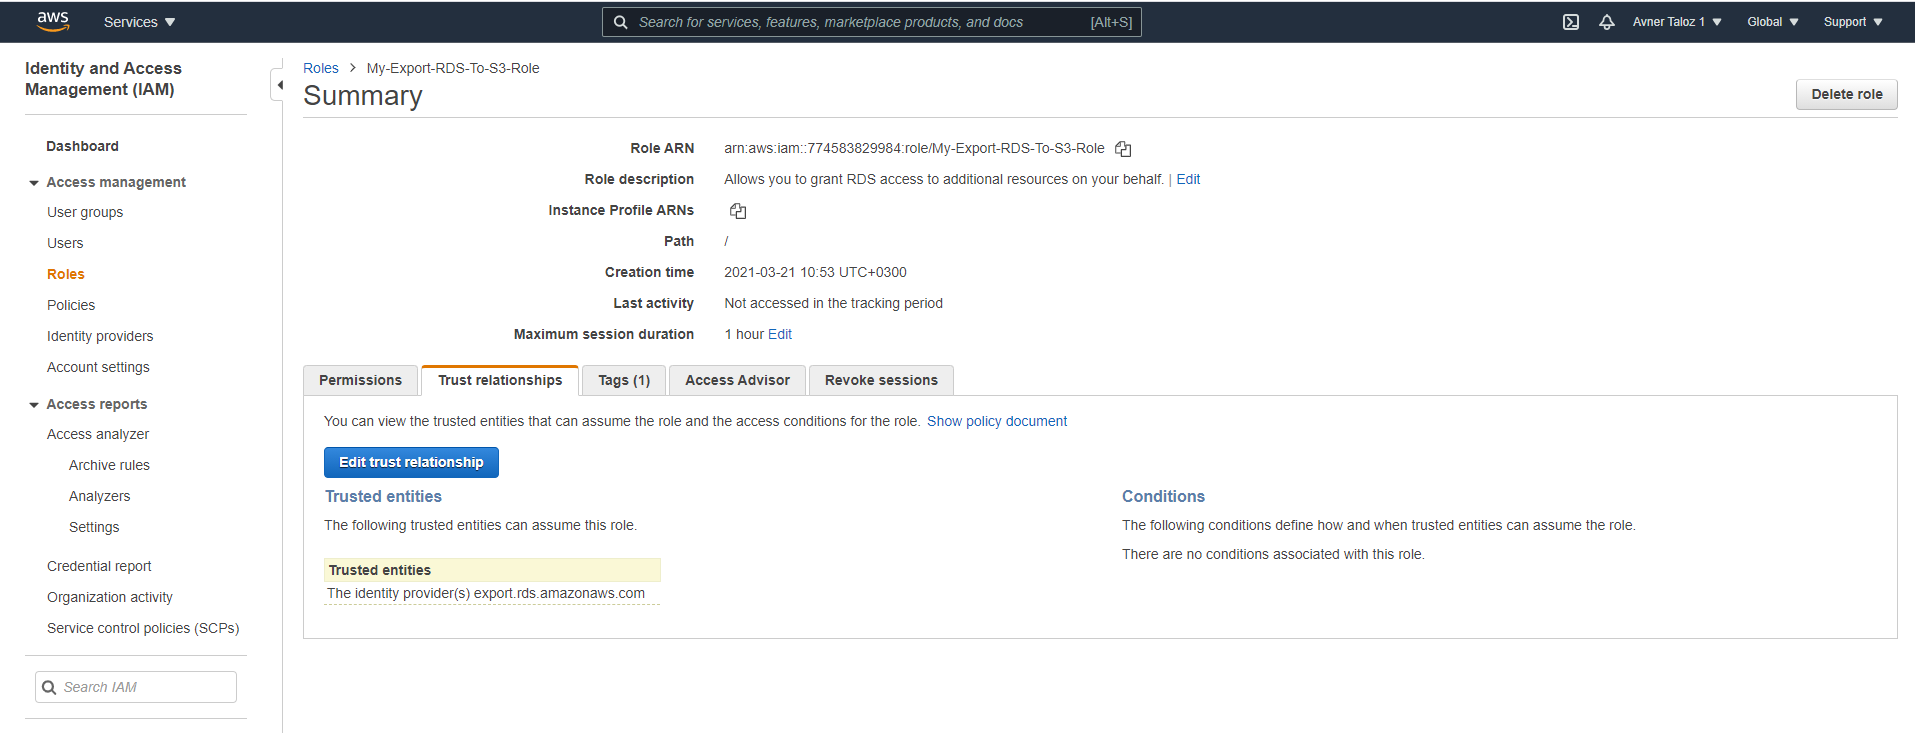
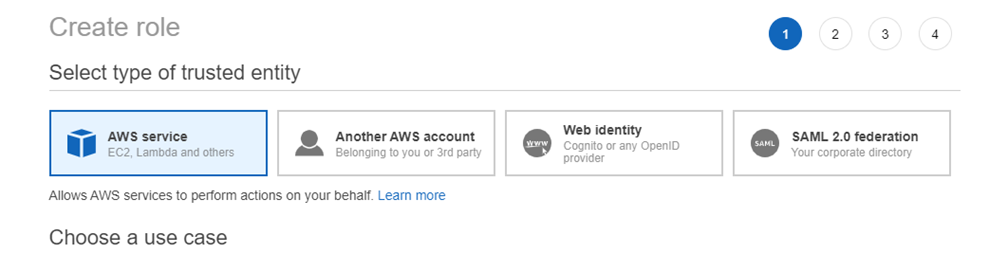
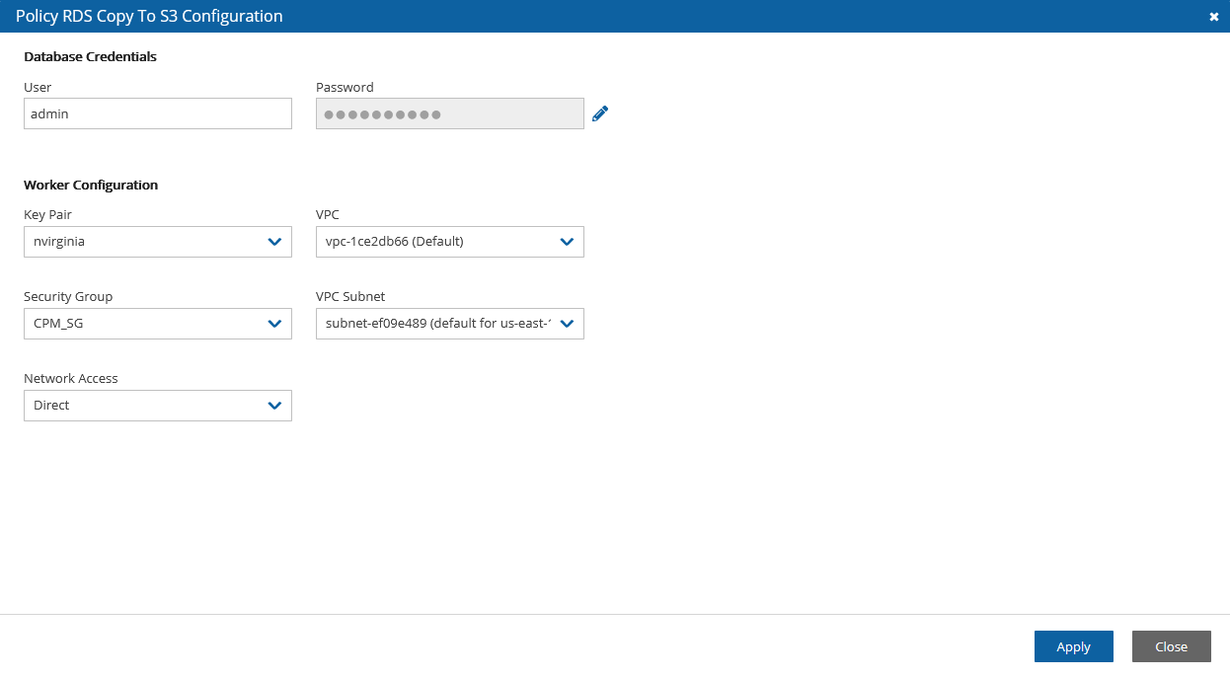
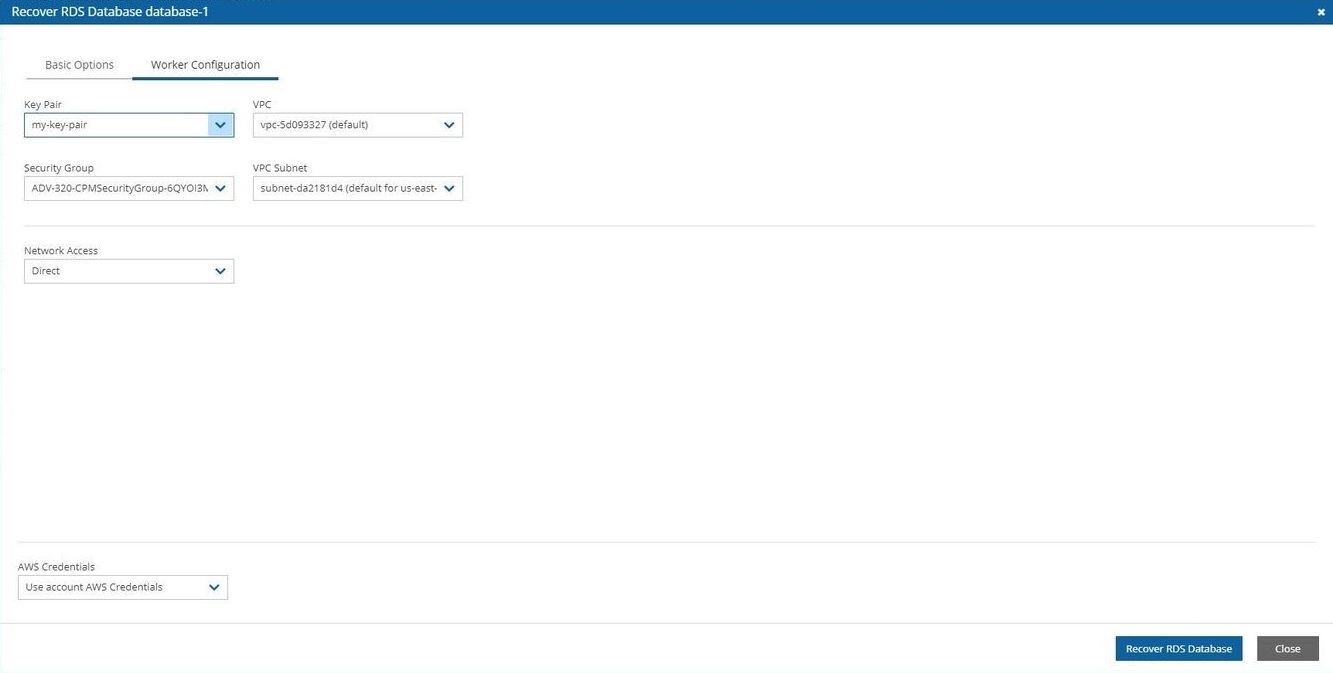
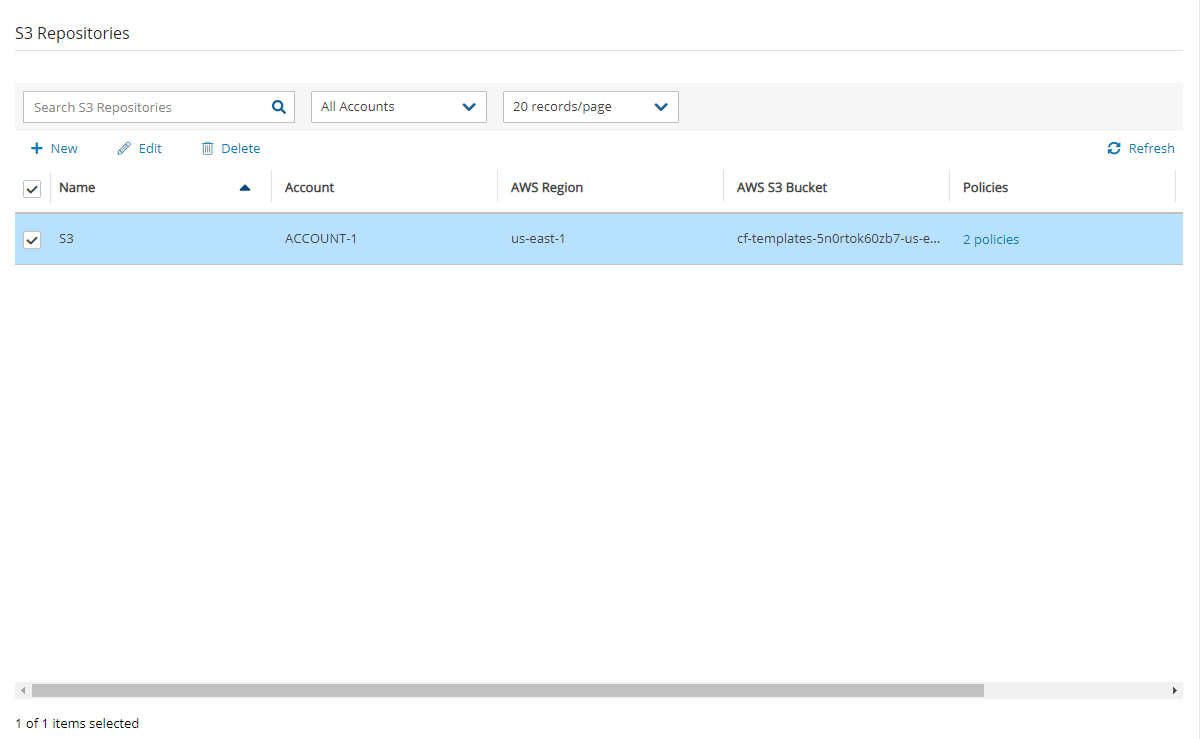
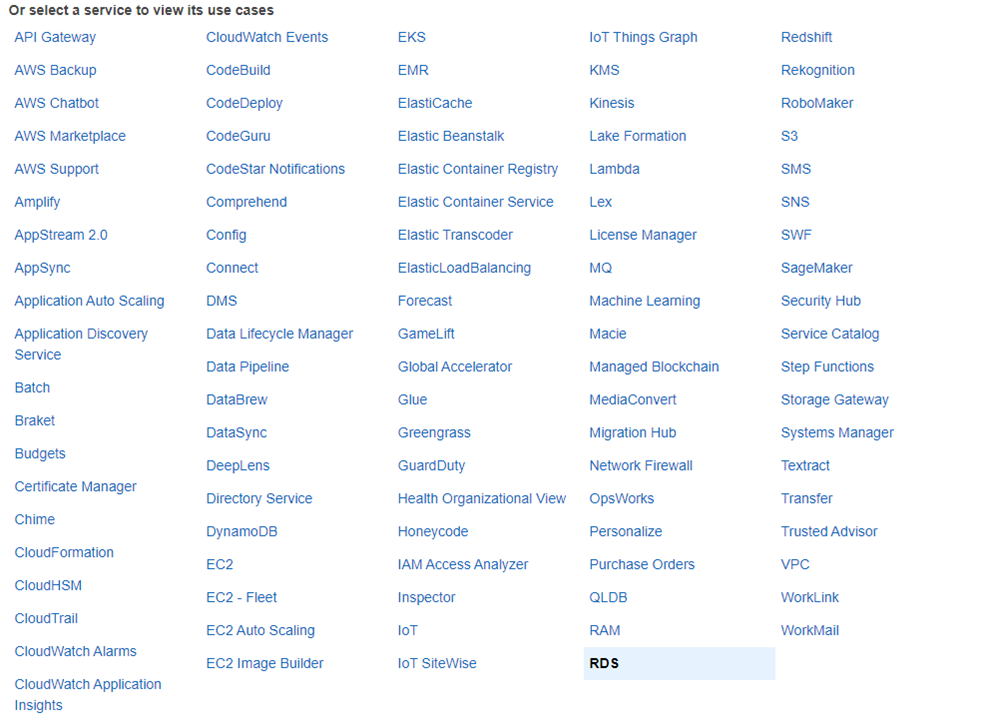
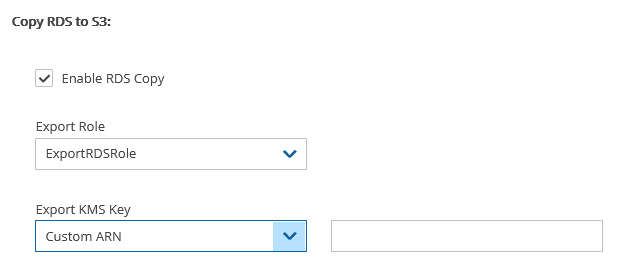
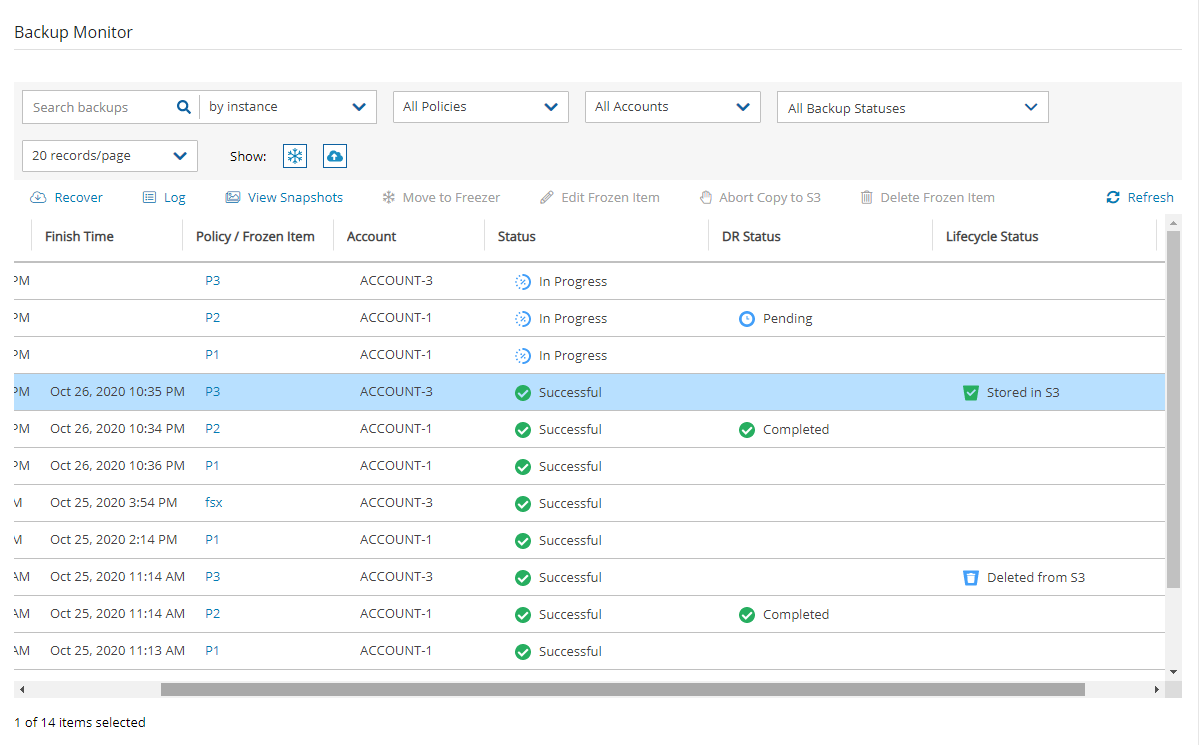

Now that you have created some backups, it is time to perform a recovery.
N2W offers several options for data recovery. Since all N2W backup is based on AWS’s snapshot technology, N2W can offer rapid recovery of instances, volumes, and databases. Since a backup is not created for S3 Bucket Sync targets, recovery is neither needed nor possible.
For the cross-region and account recovery of regular resources, such as Instances and RDS, N2W uses the FSx service so there is no need for specific IAM rolls, as with EFS.
N2W Software strongly recommends that you perform recovery drills occasionally to make sure your recovery scenarios work. It is not recommended that you try it for the first time when your servers are down. Each policy on the policy screen shows the last time recovery was performed on it. Use the last recovery time data to track recovery drills.
N2W provides an enhanced search box to quickly find backup snapshots to recover from.
In the Backup Monitor, you can search for snapshots based on the Backup Target type or policy, including frozen images.
To search for all backup snapshots:
Select Backup Monitor.
Select the relevant Cloud button (AWS, Azure, Wasabi)
In the Search backups box, enter a string to search by. The string can be part of the resource ID or part of the resource tag value.
When you select Recover for a certain backup, you are directed to the Backup Monitor Recover screen. You can Search by Resource using the resource ID or name.
For backups with multiple resource types as targets, the Recover screen will have a separate tab for each type. Select a backup. The Recover screen opens.
To restore from an AWS Storage Repository, select the repository in the Restore From list. For other considerations when recovering from an S3 Repository, see section .
Depending on the specifics of the backup, the Recover screen includes:
A search box for locating a resource by ID or name.
Tabs for recovering the backed-up instances, independent volumes, databases, etc.
Outputs of any backup scripts and VSS if it exists. These reference outputs may be important during a recovery operation.
All the choices about regions and accounts you make in the recover screen apply to all the recovery operations that you initiate from this screen.
Choose the backups to recover and then select the Recover resource type button.
All recovery screens have a drop-down list at the bottom labelled AWS Credentials. By default, the account AWS credentials used for backup are also used for recovery operations. Depending on the backup, you can select Provide Alternate AWS Credentials and fill in different credentials for recovery. This can be useful if you want to use IAM-created backup credentials that do not have permissions for recovery. See section . When using custom credentials, N2W verifies that these credentials belong to the recovery account.
To use custom credentials:
Select Provide Alternate AWS Credentials in the list. The custom credential boxes appear.
In the AWS Access Key box, enter your access key.
In the AWS Secret Key box, enter your secret key.
The default Preserve/Recover Tags action during recovery is Preserve Original tags associated with the recovery target. You can manage the recovery tags by selecting one of the options in the list or section:
Preserve Original (default) - Preserve the existing tags associated with the recovery target.
Clear / No Tags- Do not recover any tags.
Custom - You can add tags or override tags on the version of the resource selected for the recovery.
To make changes in the Recover Tags sections, switch the Auto assigned toggle key to Custom.
With Instance recovery, you can recover a complete instance with its data for purposes, such as:
An instance crashed or is corrupted and you need to create a new one
Creating an instance in a different AZ
Creating an instance in a different region. See section .
When you recover an instance, by default, you recover it with its configuration, tags, and data, as they were at the time of the backup. However, you can change these elements:
Instance type
Placement
Number of CPU cores and threads
You can also choose how to recover the system itself:
For Linux EBS-based instances: if you have a snapshot of the boot device, you will, by default, use this snapshot to create the boot device of the new instance. You can, however, choose to create the new instance from its original image or a different one.
For instance-store-based: you will only have the image option. This means you cannot use the snapshot of the instance’s root device to launch a new instance.
Your data EBS volumes will be recovered by default to create a similar instance as the source. However, you can choose:
N2W knows how to overcome this limitation. You can recover an instance from a snapshot, but you also need an AMI for the recovery process. By default, N2W will create an initial AMI for any Windows instance it backs up and use that AMI for the recovery process. Usually, you do not need to change anything to recover a Windows instance.
The instance recovery screen has tabs for Basic Options, Volumes, and Advanced Options.
At the bottom of each screen, there is an option to change AWS Credentials.
The Basic Options tab is divided into the general section and the Networking section:
AMI Assistant – Select to view the details of the AMI used to launch your instance and find similar AMIs.
Launch from – Whether to launch the boot device (Image) from an existing image, a snapshot, or whether to launch the device using the original root volume configuration (Image (Replace root volume)) which will contain the billing code, if available.
Launching from a snapshot is not available on Windows.
AMI Handling – This option is relevant only if Launch from is set to Snapshot. If this instance is launched from a snapshot, a new AMI image will be registered and defined as follows:
De-Register after Recovery – This is the default. The image will only be used for this recovery operation and will be automatically de-registered at the end. This option will not leave any images behind after the recovery is complete.
Since not all instance types are available in all AWS regions, recovery of an unsupported instance type in a certain region might fail. Where the instance type is not yet supported by AWS, N2W recommends that you configure a supported instance type.
Instance Profile ARN – The ARN of the instance role (IAM Role) for the instance. To find the ARN, select the Role name in the IAM Management Console and then select the Summary tab. The default will be the instance role of the backed-up instance if it had one.
Instances to Launch – Specifies how many instances to launch from the image. The default is one, which is the sensible choice for production servers. However, in a clustered environment you may want to launch more than one. It is not guaranteed that all the requested instances will launch. Check the message at the end of the recovery operation to see how many instances were launched, and their IDs.
Keys cannot be used to decrypt the Windows password of a restored instance.
The main purpose of the Networking section is to define what will be the placement of the instance. By default, it will be the same placement as the backed-up instance. An instance can be placed using three methods which are not all necessarily available.
By VPC – Default placement if you have VPC subnets defined in your account.
By Availability Zone – This is the most basic type and the only one which is always available. You can choose in which AZ to launch the instance. Additional options are:
You can choose a different AZ from the backed-up instance.
For Placement by VPC and Availability Zone, you are asked to select a security group. Learn about AWS Security Groups and settings at
If you chose By VPC in Placement, the following fields are available:
VPC –You can choose the VPC the instance is to be recovered to. By default, it will contain the VPC of the original instance.
Clone VPC - Option to recover to a clone of the selected VPC environment. Control switches to the Account’s Clone VPC screen. Choose the date of the source VPC capture for the clone and an optional new destination name. See section . After the cloning process is completed, the name of the newly cloned VPC will appear in the VPC box.
VPC Subnet
Security groups for VPC instances are different than groups of non-VPC instances. This list has a filter to help you find the security group that you need.
VPC Assign IP – If the backed-up instance was in a VPC subnet, the default value will be the IP assigned to the original instance.
If the assigned IP is still taken, it can fail the recovery operation. You can type a different IP here. When you begin recovery, N2W will verify the IP belongs to the chosen subnet.
If this box is empty, an IP address from the subnet will be automatically allocated for the new instance.
If you chose By Availability Zone in Placement:
Availability Zone - By default, if the backed-up instance was not in a VPC, it will have the same zone as the backed-up instance. However, you can choose a different one from the list.
Security Group - Choose security groups to be applied to the new instance. This is a multiple-choice field. By default, the security groups of the backed-up instance will be chosen.
If you chose By Placement Group:
Placement Group - Choose the placement group from the list.
For all Placement options, the following boxes are also available:
Additional NICs - If you want to add additional NICs.
AWS Credentials - You can choose to use different AWS credentials for the recovery operation.
If the policy contains an instance target that has a volume, the volume is also defined as a volume target:
The volume will not be available under the Independent Volumes tab.
Select the Volumes tab to choose which volumes to recover and how.
All data volumes in the policy except the boot device are listed here. Their default configuration is the same as it was in the backed-up instance at the time of the backup.
Select a volume to include it in the recovery. You can adjust the volume recovery parameters, as follows:
The default Recover Tags action during recovery is Preserve Original for the volumes associated with the instance. To manage tags, see section .
Enlarge capacity of the volume.
Change the device and device type.
It is possible to recover to a different account and region by recovering to a clone of an original VPC environment. See the Clone VPC options in section .
Advanced options include the following:
Architecture – The default will be the architecture of the backed-up instance. Options are:
i386 – which is X86 – 32-bit
x86_64 – which is X86 – 64-bit
Changing the architecture may result in an error if the image is incompatible with the requested architecture. For example, if your image is a native 64-bit image and you choose i386, the recovery operation will fail.
Tenancy – Choose the tenancy option for this instance.
Shutdown Behaviour – The value of the original instance is the default. If the recovered instance is instance-store-based, this option is not used. The choices are:
stop – If the instance is shut down, it will not be terminated and will just move to
Advanced Options include different additional choices depending on whether Placement is By VPC, By Availability Zone or By Placement Group.
To complete the recovery operation, select Recover Instance and then confirm. If there are errors that N2W detects in your choices, you will return to the Recover instance screen with error messages. Otherwise, you will be redirected back to the recovery panel screen, and a message will be displayed regarding the success or failure of the operation.
The AMI Assistant is a feature that lets you view the details of the AMI used to launch your instance, as well as find similar AMIs. N2W will record the details of the AMI when you start backing up the instance. If the AMI is deleted sometime after the instance started backing up, N2W will remember the details of the original AMI.
After selecting AMI Assistant in the instance recovery screen, you will see these details:
AMI ID
Region
Image Name
To find AMIs with properties that are exactly like the original, select the Exact Matches tab. If the Exact Matches search does not find matches, select the Partial Matches tab which will search for AMIs similar to the original.
AMI Assistant searches can be useful in the following scenarios:
You want to recover an instance by launching it from an image, but the original AMI is no longer available.
You want to recover an instance by launching it from an image, but you want to find a newer version of the image. The fuzzy search will help you.
You are using DR (section ) and you need to recover the instance in a different region. You may want to find the matching AMI in the target region to use it to launch the instance, or you may need its kernel ID or ramdisk ID to launch the instance from a snapshot.
When you select Clone VPC in the Basic Options tab, the Clone VPC screen opens.
N2W will have pre-set the following fields according to the selections made in the Advanced Options section:
Capture Source:
Region and VPC
Captured at date and time – You can select a different date and time to clone in the drop-down list of captures.
As part of the cloning process, N2W uses CloudFormation. If the CloudFormation template is over 50 kB, select Cloud Formation Template. It requires an existing S3 bucket for uploading. See section .
When finished, select Clone VPC. If you changed the suggested VPC Name, it will appear in the VPC box.
To view the cloning progress and status, select Background Tasks in the toolbar. Background Tasks only appears after the first Clone VPC or Check Secured DR Account operation.
To view the results of the Clone VPC operation in case manual changes are required, select Download Log.
Volume recovery means creating EBS volumes out of snapshots. In N2W, you can recover volumes that were part of an instance’s backup or recover EBS volumes that were added to a policy as an independent volume. The recovery process is basically the same.
To recover volumes belonging to an instance:
In the left panel, select the Backup Monitor.
In the Backup Monitor tab, select a backup, and then select Recover.
Select an instance, and then select Recover Volumes Only.
Attach Behaviour – This applies to all the volumes you are recovering if you choose to attach them to an instance:
Attach Only if Device is Free – If the requested device is already taken in the target instance, the attach operation will fail. You will get a message saying the new volume was created but was not attached.
Switch Attached Volumes
If you choose Switch Attached Volumes and Delete Old Ones, make sure you do not need the old volumes. N2W will delete them after detaching them from the target instance.
Recover – Enabled by default. Clear Recover if you do not want that volume recovered.
Zone – AZ. The default is the original zone of the backed-up volume.
Original Volume ID – ID of the original volume.
After selecting Recover Volumes and confirming, if there was an error in a field that N2W detected, you will be returned to the screen with an error notification.
To follow the progress of the recovery, select the Open Recovery Monitor link in the ‘Recovery started’ message at the top right corner, or select the Recovery Monitor tab.
To recover independent volumes:
Select a backup, and then select Recover. The recover volumes screen opens.
In the Independent Volumes tab, select a volume or Search by Resource
Complete the From/To options as available.
For RDS Custom database recovery, see section for the required additional permissions.
When backing up Aurora, AWS automatically copies all tags set on resources to the snapshots and does not allow recovering these resources without recovering their tags as well.
When a backup includes snapshots of RDS databases, selecting Recover to bring you to the RDS Databases tab. You will see a list of all RDS databases in the current backup. You can change the following options:
Recover – Clear Recover to not recover the current database.
Zone – The AZ of the database. By default, it will be the zone of the backed-up database, but this can be changed. Currently, recovering a database into a VPC subnet is not supported by N2W. You can recover from the snapshot using AWS Management Console.
DB Instance ID – The default is the ID of the original database. If the original database still exists, the recovery operation will fail. To recover a new database, type a new ID.
As of version 4.4.0, N2W creates the users in a recovered RDS database by calling an SQL command (CREATE USER) instead of rewriting data into the User table of the recovered RDS database server. As a result, some metadata that relates to a MySQL database user may not be recovered.
N2W recovers user and all granted permissions. The properties that are not recovered are typically private properties maintained by RDS that likely will not affect the recovered database usage.
N2W recovery of PostgreSQL RDS database from S3 does not recover the passwords of recovered database users due to the limitation imposed by AWS. The database is recovered with the RDS Admin username and password. The Admin can then set the other users' passwords manually. See
When backing up Aurora, AWS automatically copies all tags set on resources to the snapshots and does not allow recovering these resources without recovering their tags as well.
Aurora recovery is similar to RDS recovery, with a few important differences.
Aurora introduces the concept of clusters to RDS. You no longer launch and manage a DB instance, but rather a DB cluster that contains DB instances.
An Aurora cluster may be created in a single AZ deployment, and the cluster will contain one instance.
Or, as in production deployments, the cluster will be created in a multi-AZ deployment, and the cluster will have reader and writer DB instances.
After selecting a backup with Aurora Clusters, select Recover. The Aurora Clusters Recover screen opens. In this screen, all Aurora clusters that were backed up are listed. You can change the following options:
Recover – Clear to not recover the current Aurora cluster.
RDS Cluster ID – The default will be the ID of the original cluster. If the original cluster still exists, the recovery operation will fail, unless you change the ID.
RDS Instance ID – The default will the ID of the original instance.
Select Recover Aurora Clusters when finished.
When backing up Aurora, AWS automatically copies all tags set on resources to the snapshots and does not allow recovering these resources without recovering their tags as well.
Recovery of Aurora Serverless is somewhat different than for an Aurora Cluster. As part of the recovery, you can define actions for setting capacity:
Force scaling the capacity to the specified values in Minimum/Maximum Aurora capacity unit when the Timeout for force scaling is reached. When you change the capacity, Aurora Serverless tries to find a scaling point for the change.
Enable to force capacity scaling as soon as possible.
After selecting a backup with Aurora Serverless in the Backup Monitor, selectRecover. The Recover screen opens.
2. In the Aurora Clusters tab, select the recovery target. Aurora Serverless can be identified by the value 'Serverless' in the Role column. 3. SelectRecover. The Recovery Aurora Cluster screen opens.
4. Change the default field values as needed. See section for Instance ID and Subnet Group. 5. If you select Force scaling the capacity to the specified values when the timeout is reached or Pause compute capacity after consecutive minutes of inactivity, the Timeout for force scaling list appears. Change the timeout seconds as needed. 6. Select Recover Aurora Cluster when finished.
When a backup to recover includes snapshots of Redshift clusters, the Redshift Clusters tab opens. All Redshift clusters in the current backup are listed. You can change the following options:
Recover – Clear Recover to not recover the current cluster.
Zone – The AZ of the cluster. By default, it will be the zone of the backed-up cluster, but this can be changed.
Currently, recovering a cluster into a VPC subnet is not supported by N2W. You can always recover from the snapshot using AWS Management Console.
Cluster ID – The default will the ID of the original cluster. If the original cluster still exists, the recovery operation will fail. To recover a new cluster, type a new ID.
Cluster Snapshot ID– Displays the snapshot ID.
Node Type and Nodes – For information only. Changing these fields is not supported by AWS.
When a backup to recover includes DynamoDB Table backups, the DynamoDB Tables tab opens.
If you reach the limit of the number of tables that can be recovered at one time, you will need to wait until they have completed before starting the recovery of additional tables.
All DynamoDB tables in the current backup are listed. You can change the following options:
Recover – Clear Recover to not recover a table.
Region – The Region where the table will be recovered, which is the same region as the backup.
Table Name – The default will be the Name of the original table. However, if the original table still exists, the recovery operation will fail. To recover to a new table, type a new Table Name.
During backup, N2W retains the DynamoDB tags at the table level and the Time To Live (TTL) metadata and enables these attributes on recovery.
During the recovery process, a confirmation message appears with a reminder to recreate the following settings on the restored DynamoDB tables MANUALLY: Auto Scaling policies, IAM policies, CloudWatch metrics, and alarms.
When a backup includes EFS backups, the Recover EFS tab is available.
For DR and cross accounts, only recoveries to a new EFS are supported.
The AWS role “AWSBackupDefaultServiceRole” is required for recovery.
In the Backup Monitor screen, select an EFS backup. To search backups, you can enter either the EFS name or AWS ID in the search box, select By Elastic File System in the list, and then select the Search icon.
2. Select Recover.
3. In the Target EFS list, select the target to restore to:
New - Recover to a separate EFS
Original - Recover to the same EFS
Regular recoveries to original and new EFSs are supported. For DR, Target EFS must be 'New'.
When recovering an EFS to the original target, a new folder is created with the the format aws-backup-restore_[date-time].
4. In cases where EFS DR was performed, select the Restore to Region.
5. For a cross-account recovery:
Target EFS must be 'New'.
In the Cross Account Copy IAM Role list of roles from the source account, select the IAM role needed for copying the recovery point to the target account.
To not miss matching an EFS vault name in the target region during a snapshot backup or a copy, in the AWS console, go to AWS Backup > Backup vaults and select the region you would like to back up or copy EFS snapshots to. This action is to be performed only once before running an EFS backup or DR.
6. Select Recover Volumes.
For file-level recovery, see section .
To view the progress of the recovery:
In N2W, select the Recovery Monitor tab.
To view details of the recovery process, select the recovery record, and select Log. Select Refresh as needed.
For Lustre and OpenZFs recovery, see section .
For ONTAP recovery, see section .
To view the contents of a backup for recovery, in the Backup Monitor, select a backup and then selectView Snapshots.
In the Backup Monitor, select an FSx backup for the recovery. Select Recover. The FSx File Systems tab will show the Original FSx Name and ID, Region, and File System Type.
Select an FSx File System, and then select Recover. Parameters are shown depending on whether they are relevant for the type of FSx.
All following parameters are optional except for the password of Win-SMAD, where the original password is the default.
When selecting a Windows FSx with AWS-Managed Active Directory, you can select the Active Directory from the target’s AWS account:
For Self-managed Active Directory, the connection to Active Directory is on the SVM level, not the file system level as in FSx Windows.
Select the SVM tab.
Select an Original SVM ID, and enter an SVM Name.
Select a Volume ID, and enter a Name.
In the Backup Monitor, under the FSx File Systems section, select a backup with the File System Type of ‘LUSTRE’ or ‘OPENZFS’.
Select Recover.
In the Recovery screen, make changes as necessary.
Following are the types of ONTAP recoveries:
To recover all or some volumes to a new ONTAP FSx, select Recover.
To recover selected volumes and attach them to an existing SVM, select Recover Volumes Only.
To view the contents of a snapshot for recovery, useView Snapshots in the Backup Monitor.
To recover an ONTAP backup:
In the Backup Monitor, under the FSx File Systems section, select a backup with the File System Type of 'ONTAP'.
Select Recover. The FSx File System Recovery screen opens.
In the Basic Options tab, modify the options as required for the recovery.
4. In the Subnet ID field, select a single Availability Zone for recovery.
5. The default Recover Tags action during recovery is Preserve Original tags. To manage tags on SVMs and their volumes during recovery, see section .
6. In the Volumes tab, select the volumes to recover and update the volume Name as necessary.
7. In the ONTAP FSx Options tab:
a. Update the Recovered File Name as necessary.
b. If required, enable, and specify a password.
8. Select Recover FSx File System.
To recover ONTAP volumes only and attach to an existing SVM:
In the Backup Monitor, select an FSx backup for the recovery. Select Recover. The FSx File Systems tab will show the Original FSx Name and ID, Region, and File System Type.
Select the ONTAP file system to recover and then select Recover Volumes Only.
3. In the Volume Recovery from FSx File System screen, select the volumes to recover. For each volume, type the Name of the volume and select the SVM to attach the volume to.
4. Select the Recover Volumes Only button.
For managed active directory recovery options, also see sections and .
If a backup holds an instance with an SAP HANA configuration and snapshots, the SAP HANA recovery is available. You can recover SAP HANA snapshots to the original EC2 instance or to a new instance created from the EC2 snapshot.
Following are the recovery options:
Recover – EC2 instance recovery with SAP HANA native recovery performed on a newly recovered instance. Cross–region recovery is supported when selecting another region in the Restore to Region list.
Recover SAP HANA Internal DBs only - Recovering an SAP HANA backup to the original EC2 instance.
Some SAP HANA installations require changing the/etc/hosts file in order to communicate with the database. As part of backup and recovery, the user data attached to the instance changes from the original IP address to 127.0.0.1 to enable communication to the database on localhost.
Cross-account recovery is not currently supported on N2W. It’s possible to run cross-account backup and then perform a cross-account recovery for the EC2 instance only.
In the Backup Monitor, select the SAP HANA backup with the instance for recovery. Select Recover.
In the SAP HANA Instances tab, select an instance and then select a recovery option:
3. Except for SAP HANA Internal DBs, set all tab options as you would for regular EC2 instance recovery. See section .
4. If the Recover option is selected, also select the SAP HANA Internal DBs tab, select all or individual DBs, and then select Recover Instance.
5. If Recover SAP HANA Internal DBs Only is selected, select the internal DBs for recovery, and then select Recover Instance.
6. If Recover Volumes Only is selected, configure as for a regular EC2 volumes only recovery. See section .
With Virtual Machine recovery, you can recover a complete virtual machine with its data for variety of purposes, such as:
A virtual machine crashed or is corrupted and you need to create a new one.
Creating a virtual machine in a different zone.
Creating a virtual machine in a different location.
When you recover a virtual machine, you can change the following elements:
Name
Resource group
Size
Availability
Your data disks will be recovered by default to create a similar virtual machine as the source. However, you can choose:
To recover some or none of the disks.
To enlarge disk size.
To manage tags related to the disks.
The instance recovery screen has tabs for Basic Options and Disks.
The Basic Options tab is divided into the general section, the Availability section and the Networking section:
Name and Resource Group – Enter a name for the recovered virtual machine.
The virtual machine’s name must be unique within the selected resource group.
Preserve Tags - The default action during recovery is Preserve Original for the volumes associated with the virtual machine. To manage tags, see section .
Size - Choose the virtual machine’s size. If the Availability Zone option is selected in the Availability Type list, The virtual machine size determines which Availability Zones are available since some virtual machine sizes are available only in certain zones.·
Availability Type – Choose between No Infrastructure Redundancy Required, Availability Zone, and Availability Set options.
Network Interface Name – Set a name for the Network Interface Name will be created and assigned to the recovered virtual machine.
If the toggle key is set to Auto assigned, a unique name will be generated by N2W for the network interface.
To manually choose a name, switch the toggle key to Custom, and enter a name in the text box.
This section allows configuring the recovered virtual machine disks.
Encryption Set – Choose to keep the same encryption as the backed-up virtual machine or select a different encryption set.
In the Name list, select the disks to be recovered. The OS disk will always be recovered but data disk selections can be cleared.
For each disk, the name and size can be configured, as well as whether to preserve the original virtual machine tags or make changes.
The disk Name must be unique among all resources under the same resource group.
Preserve Tags - The default action during recovery is Preserve Original for the target. To manage tags, see section .
You can recover an SQL Server or only its databases.
To view the recovery progress, select Recovery Monitor. Use the Cloud buttons to display the Azure () recoveries.
To recover an SQL Server:
In the Backup Monitor, select the backup to recover from, and then select Recover.
In the Recover screen, select the SQL Server snapshot that you want to recover from, and then select Recover.
In the SQL Server tab of the Recover screen, select 1 SQL Server, and then select Recover. The Basic Options
To recover only SQL databases:
Select Recover SQL Databases Only.
In the SQL Databases tab, enter a new Name for each database. Similar names will cause the recovery to fail. Change other settings as needed.
Select Recover SQL Database.
To recover a DocumentDB Cluster:
In the Backup Monitor, select the Cluster ID that you want to recover from, and then select Recover.
In the Recover screen, makes changes as necessary.
Select Recover DocumentDB Cluster.
When a backup includes S3 Bucket backups, the Recover S3 Bucket tab is available.
For DR and cross accounts only, recoveries to a new S3 Bucket are supported.
The AWS role “AWSBackupDefaultServiceRole” is required for recovery.
In the Backup Monitor screen, select an S3 Bucket backup. To search backups, you can enter either the S3 Bucket name or AWS ID in the search box, select By S3 Bucket in the list, and then select the Search icon.
Select Recover.
In the Target S3 Bucket list, select the target to restore to:
New - Recover to a separate S3 Bucket
Original - Recover to the same S3 Bucket
Regular recoveries to original and new S3 Buckets are supported. For DR, Target S3 Bucket must be ‘New’.
When recovering an S3 Bucket to the original target, a new folder is created with the format aws-backup-restore_[date-time].
4. In cases where S3 Bucket DR was performed, select the Restore to Region.
To not miss matching an S3 Bucket vault name in the target region during a snapshot backup or a copy, in the AWS console, go to AWS Backup > Backup vaults and select the region you would like to back up or copy S3 Bucket snapshots to. This action is to be performed only once before running an S3 Bucket backup or DR.
Target S3 Bucket must be ‘New’.
In the Cross Account Copy IAM Role list of roles from the source account, select the IAM role needed for copying the recovery point to the target account.
Select Recover Bucket
To recover files and folders, see section .
In N2W, select the Recovery Monitor tab.
To view details of the recovery process, select the recovery record, and select Log. Select Refresh as needed.
To filter by resource type, select a resource type in the By Instance list, such as RDS database.
Select and then choose a backup in the list.
If this backup includes DR to another region, there will be a Restore to Region drop-down menu to choose in which region to perform the recovery.
If you have cross-account functionality enabled for your N2W license, there are two other drop-down menus:
Restore to Account list where you can choose to restore the resources to another account.
If you defined cross-account DR for this policy, you will have the Restore from Account list for choosing from which account to perform recovery.
Creating an instance from a frozen image
User data, etc.
Tags by ignoring, adding, or overriding tag keys and values.
To recover some or none of the volumes.
To enlarge volume capacity, change their device name, or IOPS value.
For EBS-based Windows Servers: there is a limitation in AWS, prohibiting launching a new instance from a snapshot, as opposed to from an AMI.
See table below for all options.
Windows: Default
Other OS: Possible if supply AMI ID
Default
Not possible
Snapshot
[Create AMI from
root snapshot]
Windows: Not possible
Other OS: Default
Windows: Not possible
Other OS: Possible
Not possible
Create AMI without Recovery – This option creates and keeps the image but does not launch an instance from it. This is useful if you want to launch the instance/s from outside N2W. If you wish to keep using this image, move the backup to the Freezer.
Image ID – This is only relevant if Launch from is set to Image or Image (Replace root volume) or if you are recovering a Windows instance. By default, this will contain the initial AMI that N2W created, or if it does not exist, the original AMI ID from which the backed-up instance was launched. You can type or paste a different AMI ID here, but you cannot search AMIs from within N2W. You can search for it with the AWS Management Console.
Instance Type – Choose the instance type of the new instance/s. The instance type of the backed-up instance is the default.
If you choose an instance type that is incompatible with the image or placement method, the recovery operation will fail.
Key Pair – The key pair you want to launch the instance with. The default is the key that the backed-up instance was created with. You can choose a different one from the list. Keys are typically needed to connect to the instance using SSH (Linux).
By default, if the backed-up instance was not in a VPC, it will have the same zone as the backed-up instance. Choose a different AZ from the list.
By Placement Group – If you have placement groups defined, this option is available. This is an instance type that can be placed in a placement group. See AWS documentation for details.
Security Group – Choose security groups to be applied to the new instance. This is a multiple-choice list. By default, the security groups of the backed-up instance will be chosen.
Change IOPS.
By default, the volumes are not deleted on termination of instances recovered from a snapshot. Select Delete on Termination to delete the volume on termination of the instance.
terminate – If the instance is shut down, it will also be terminated.
API Termination – Whether terminating the new instance by API is enabled or not. The backed-up instance value is the default.
Auto-assign Public IP - Whether to assign a public IP to the new instance. This is for public subnets. By default, it will behave as the subnet defines.
Kernel – Will hold the Kernel ID of the backed-up instance. You can type or paste a different one. However, you cannot search for a kernel ID from within N2W. Change this option only if you know exactly which kernel you need. Choosing the wrong one will result in failure.
RAM Disk - Will hold the RAM Disk ID of the backed-up instance. You can type or paste a different one. However, you cannot search for a RAM Disk ID from within N2W. Change this option only if you know exactly which RAM Disk you need. Choosing the wrong one will result in a failure.
Recover Tags - The default Recover Tags action during recovery is Preserve Original for the instance. To manage tags, see section 10.3.
Allow Monitoring – Select if monitoring should be allowed for the new instance. The value in the backed-up instance is the default.
ENA – Select to support Extended Network Adaptor.
EBS Optimized –Select to launch an EBS Optimized instance. The value from the backed-up instance is the default.
Enable User Data – Whether to use user data for this instance launch. If selected, the User Data box opens. Enter the text. The text of the user data. Special encoding or using a file as the source is not currently supported from within N2W.
Owner ID
Root – Device
Type
Virtualization
Hypervisor
Clone to Destination:
Region and Account
VPC Name – You can change the suggested name for the new VPC.
In the Volume Recovery from instance screen, change the recovery fields as needed.
Select Recover Volumes, and confirm.
Switch Attached Volumes and Delete Old Ones – This option will work only on stopped instances. This option will also delete the old volumes that are detached from the instance.
Capacity – Enlarge the capacity of a volume. You cannot make it smaller than the size of the original volume, which is the default.
Type – Type of the EBS volume.
IOPS – Number of IOPS. This value is used only if the type of volume you chose is Provisioned IOPS SSD. The default will be the setting from the original volume. Values for IOPS should be at least 100, and the volume size needs to be at least 1/10 that number in GiBs. For example, if you want to create a 100 IOPS volume, its size needs to be at least 10 GiB. If you will not abide to this rule, the recovery operation will fail.
Encrypted – Whether device is encrypted.
Device – Which device it will be attached as. This is only used if you choose to automatically attach the recovered volume to an instance. If the device is not free or not correct, the attach operation will fail.
Preserve Tags – The default action during recovery is Preserve Original tags for the target. To manage tags, see section 10.3.
Attach to Instance – Whether to attach the newly recovered volume to an instance. Start typing in the list to initiate a filter. The list holds instances that are in the same AZ as the volume. Changing the Zone will refresh the content of this list.
AWS Credentials - As with other recovery screens, you can choose to use different AWS credentials for the recovery operation.
Select Recover Volumes. A screen similar to recover instance volumes opens. See section 10.4.2.
DB Instance Class – The default is the original class, but you can choose another.
Storage Type – Type of storage.
IOPS - Number of IOPS. This field is used only if the type of volume you chose is Provisioned IOPS SSD. The default will be the setting from the original volume. Values for IOPS should be at least 100, and the volume size needs to be at least 1/10 that number in GiBs.
Port –The default is the port of the original backed-up database, but you can choose another.
Multi AZ – Whether to launch the database in a multi-AZ configuration or not. The default is the value from the original backed-up database.
Subnet Group – Subnet to restore to. The default is the value from the original backed-up database.
You can recover a database from outside a VPC to a VPC subnet group, but the other way around is not supported and will return an error.
If you want to recover the database to a different AWS account (DR), make sure that the subnet groups are configured in that destination account, or else the recovery will fail.
Publicly Access. – Whether the database will be publicly accessible or not. The default is the access from the original backed-up database.
AWS Credentials - As in other types of recovery, you can choose to use different AWS credentials and enter your keys.
DB Parameter Group - The default DB parameter group contains the database engine defaults and Amazon RDS system defaults based on the engine, compute class, and allocated storage of the instance. Database parameters specify how the database is configured. You can manage your database configuration by associating your RDS instances with parameter groups.
When recovering an Aurora cluster, N2W will recover the DB cluster and then will create the DB instances for it.
If the original instance still exists, the recovery operation will fail.
Type a new ID to recover a new database. N2W will use this instance ID for the writer, and in the case of multi-AZ, it will create the reader with this name with _reader added at the end.
RDS Cluster Snapshot ID – Displays the snapshot ID.
Instance Type – The type or class of the DB instances.
Port – The port of the database. The default is the port of the original backed-up database.
Zone – The AZ of the cluster in case of single AZ. If using a subnet group, leave as is.
Subnet Group – Whether to launch the cluster in a VPC subnet or not and to which subnet group. The default is the value from the original backed-up cluster.
Publicly Access – Whether the cluster will be publicly accessible or not. The default is the access from the original backed-up instance.
DB Cluster Parameter Group - Every Aurora cluster is associated with a DB cluster parameter group. Each DB instance within the cluster inherits the settings from that DB Cluster Parameter Group and is associated with a DB Parameter Group.
DB Parameter Group - The default DB parameter group contains the database engine defaults and Amazon RDS system defaults based on the engine, compute class, and allocated storage of the instance. Database parameters specify how the database is configured. You can manage your database configuration by associating your RDS instances with parameter groups.
Pause compute capacity after consecutive minutes of inactivity. You are only charged for database storage while the compute capacity is paused.
Specify the amount of time (Timeout for force scaling) with no database traffic to scale to zero processing capacity.
When database traffic resumes, Aurora automatically resumes processing capacity and scales to handle the traffic.
Port – The port of the cluster. The default is the port of the original backed-up cluster.
Subnet Group – Whether to launch the cluster in a VPC subnet or not and to which subnet group. The default will be the value from the original backed-up cluster. You can recover a cluster from outside a VPC to a VPC subnet group, but the other way around is not supported.
AWS Credentials - You can choose to use different AWS credentials and enter your keys.
Backup Name – Displays the name of the backup.
AWS Credentials - You can choose to use different AWS credentials and enter your keys.
Subnet ID
Win-AD, Win-SM
Subnet ID
Active Directory ID
Win-AD
Domain Name
Win-SMAD
IP Addresses
Win-SMAD
User Name
Win-SMAD
Password
Win-SMAD
Mandatory
Select Recover FSx File System.
The default Recover Tags action during recovery is Preserve Original tags. To manage tags, see section 10.3.
Select Recover FSx File System.
Recovering SAP HANA DB to a new EC2 instance might fail. However, N2W runs additional (2) retires on the recovery. The recovery operation fails permanently on the 3rd try.
Network interface
You can choose to manage tags associated with the virtual machine.
If Availability Zone is chosen, select a zone in the Availability Zone list in which to place the virtual machine. Only zones supporting the selected virtual machine Size will be available in the list.
If Availability Set is selected, select a set in the Availability Set list.
Virtual Network and Subnet – Select a virtual network and subnet for the newly created network interface.
Private IP Address – Set the private IP address for the newly created network interface.
When the toggle key is set to Auto assigned, N2W will find a vacant port and assign it to the network interface.
To manually choose an IP address, switch the Auto assigned toggle key to Custom, and enter an IP address into the text box.
Security Group – Select a security group for the newly created network interface.
In the Credentials section, enter the Server Admin Login and Password for the recovered SQL Server.
In the Network tab, select Firewall Rules and Virtual Network Rules or set Deny Public Network Access.
In the SQL Databases tab, select the databases to recover.
In the Worker Options tab, set values so that communication between the worker and the SQL Server is available.
Select Recover SQL Server.
Launch from
Snapshots Only
Snapshots + Initial AMI
AMI Only
Image
Possible if supply AMI ID
Possible
Default
Parameter
FSx Types
Comment
Target VPC
All
AWS Subnet ID of selected VPC
Security Group
All
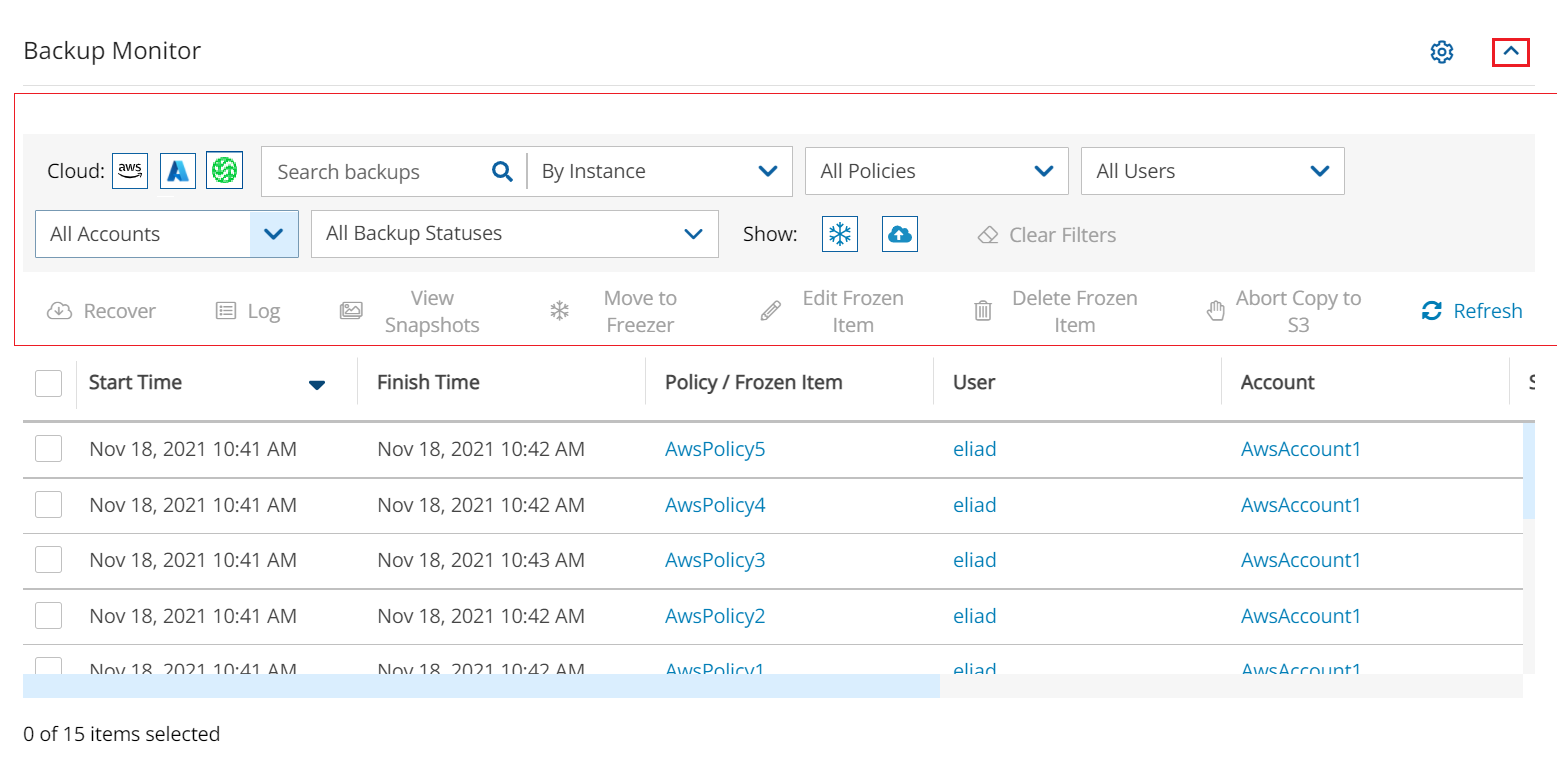

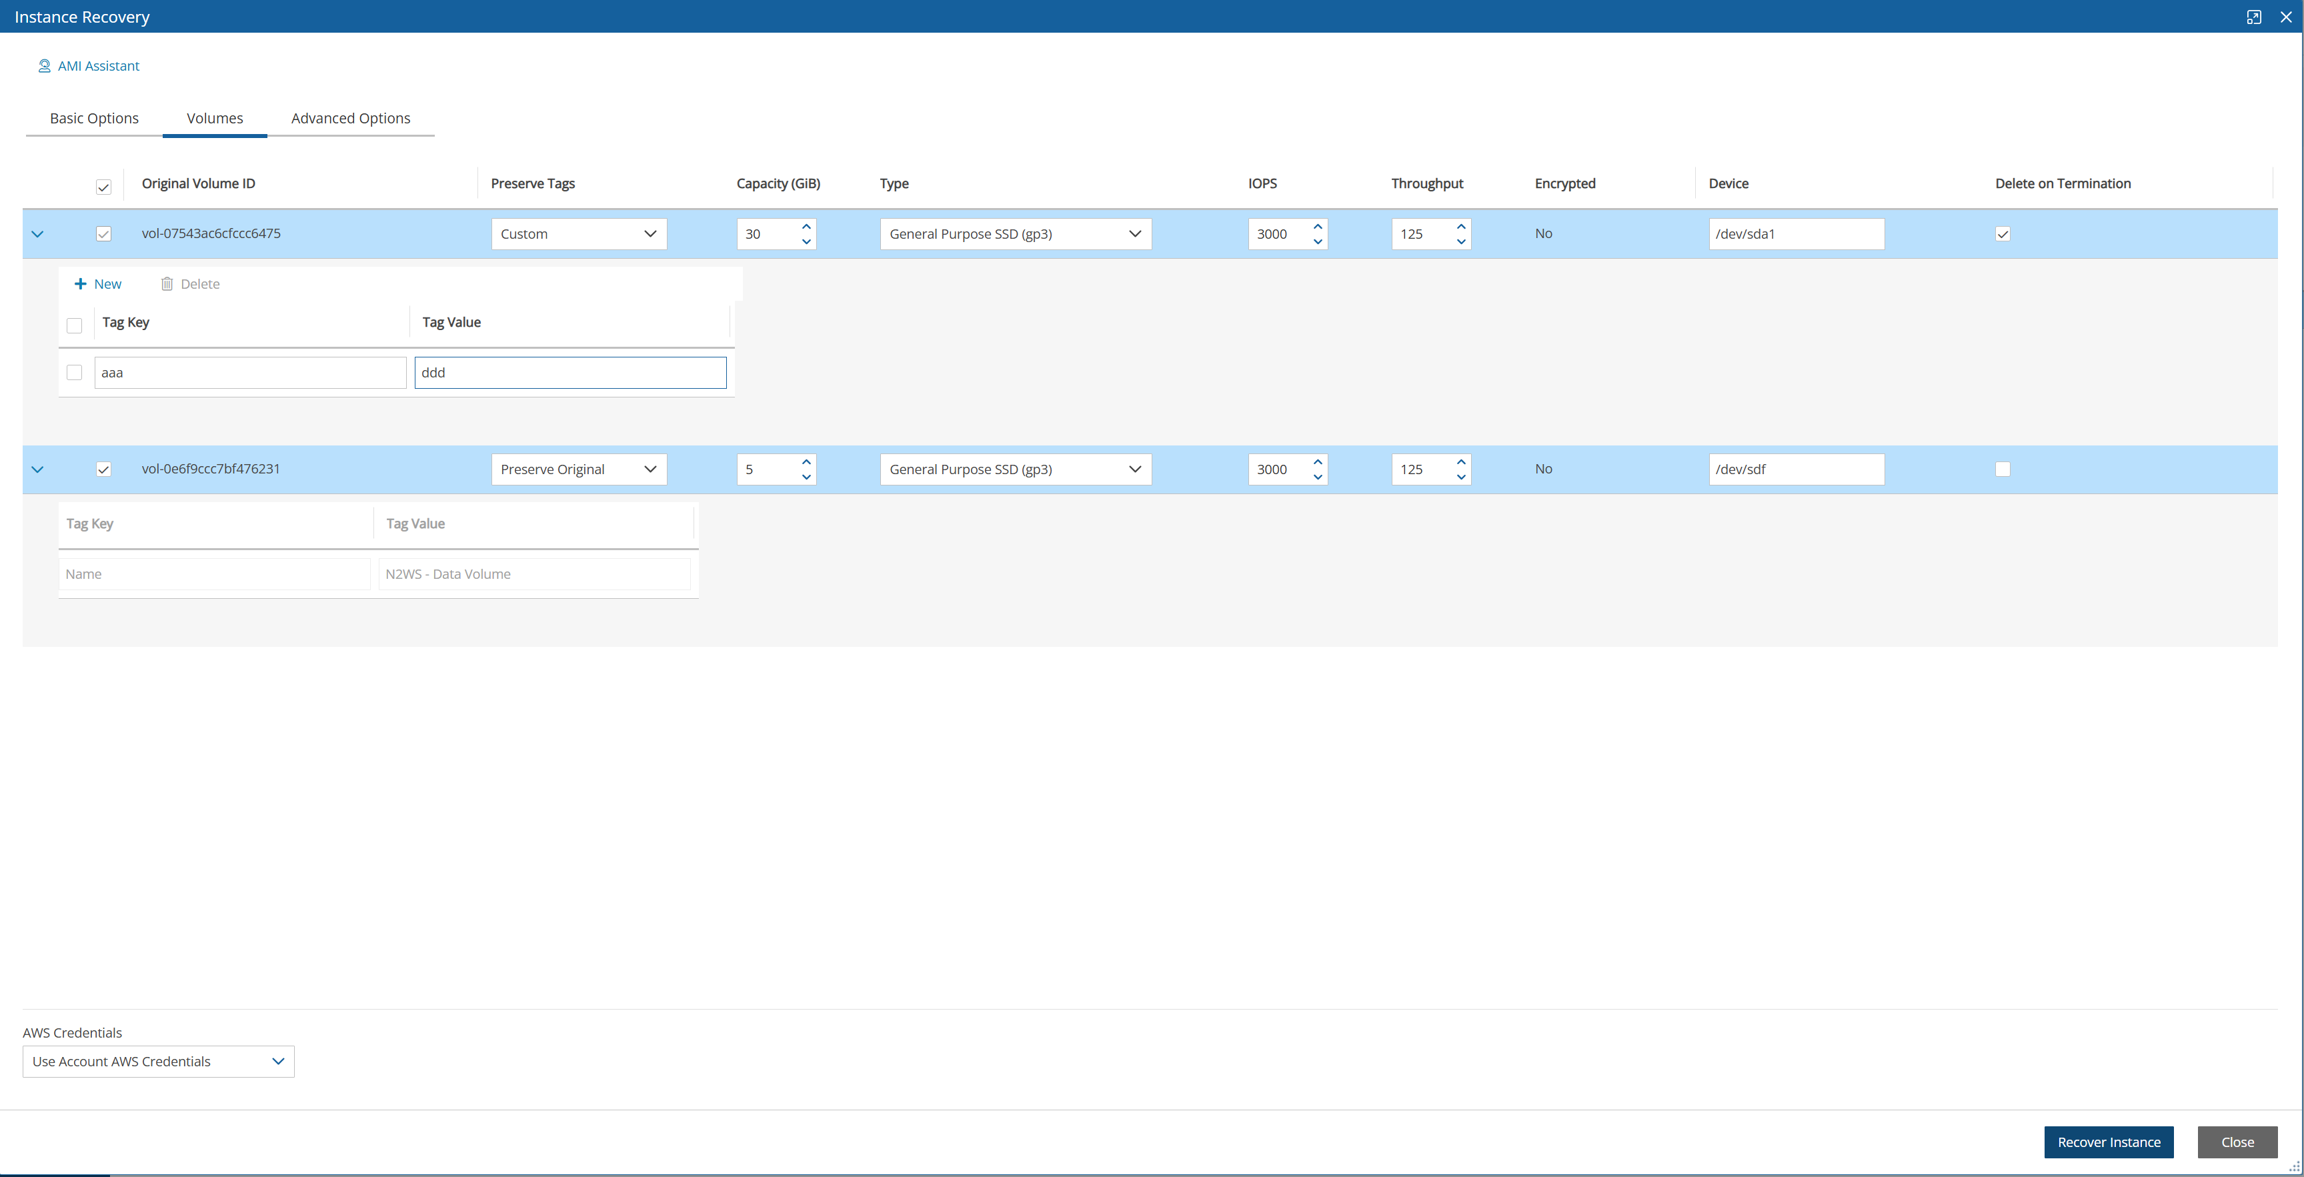
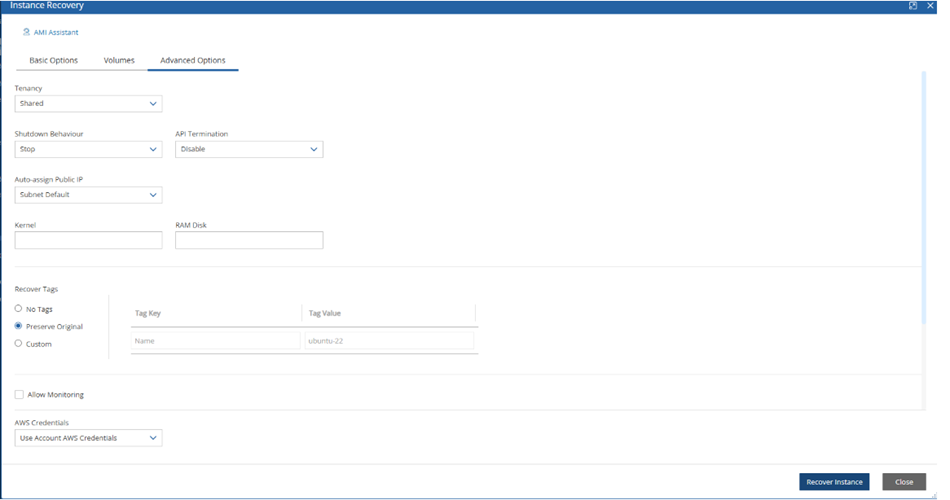
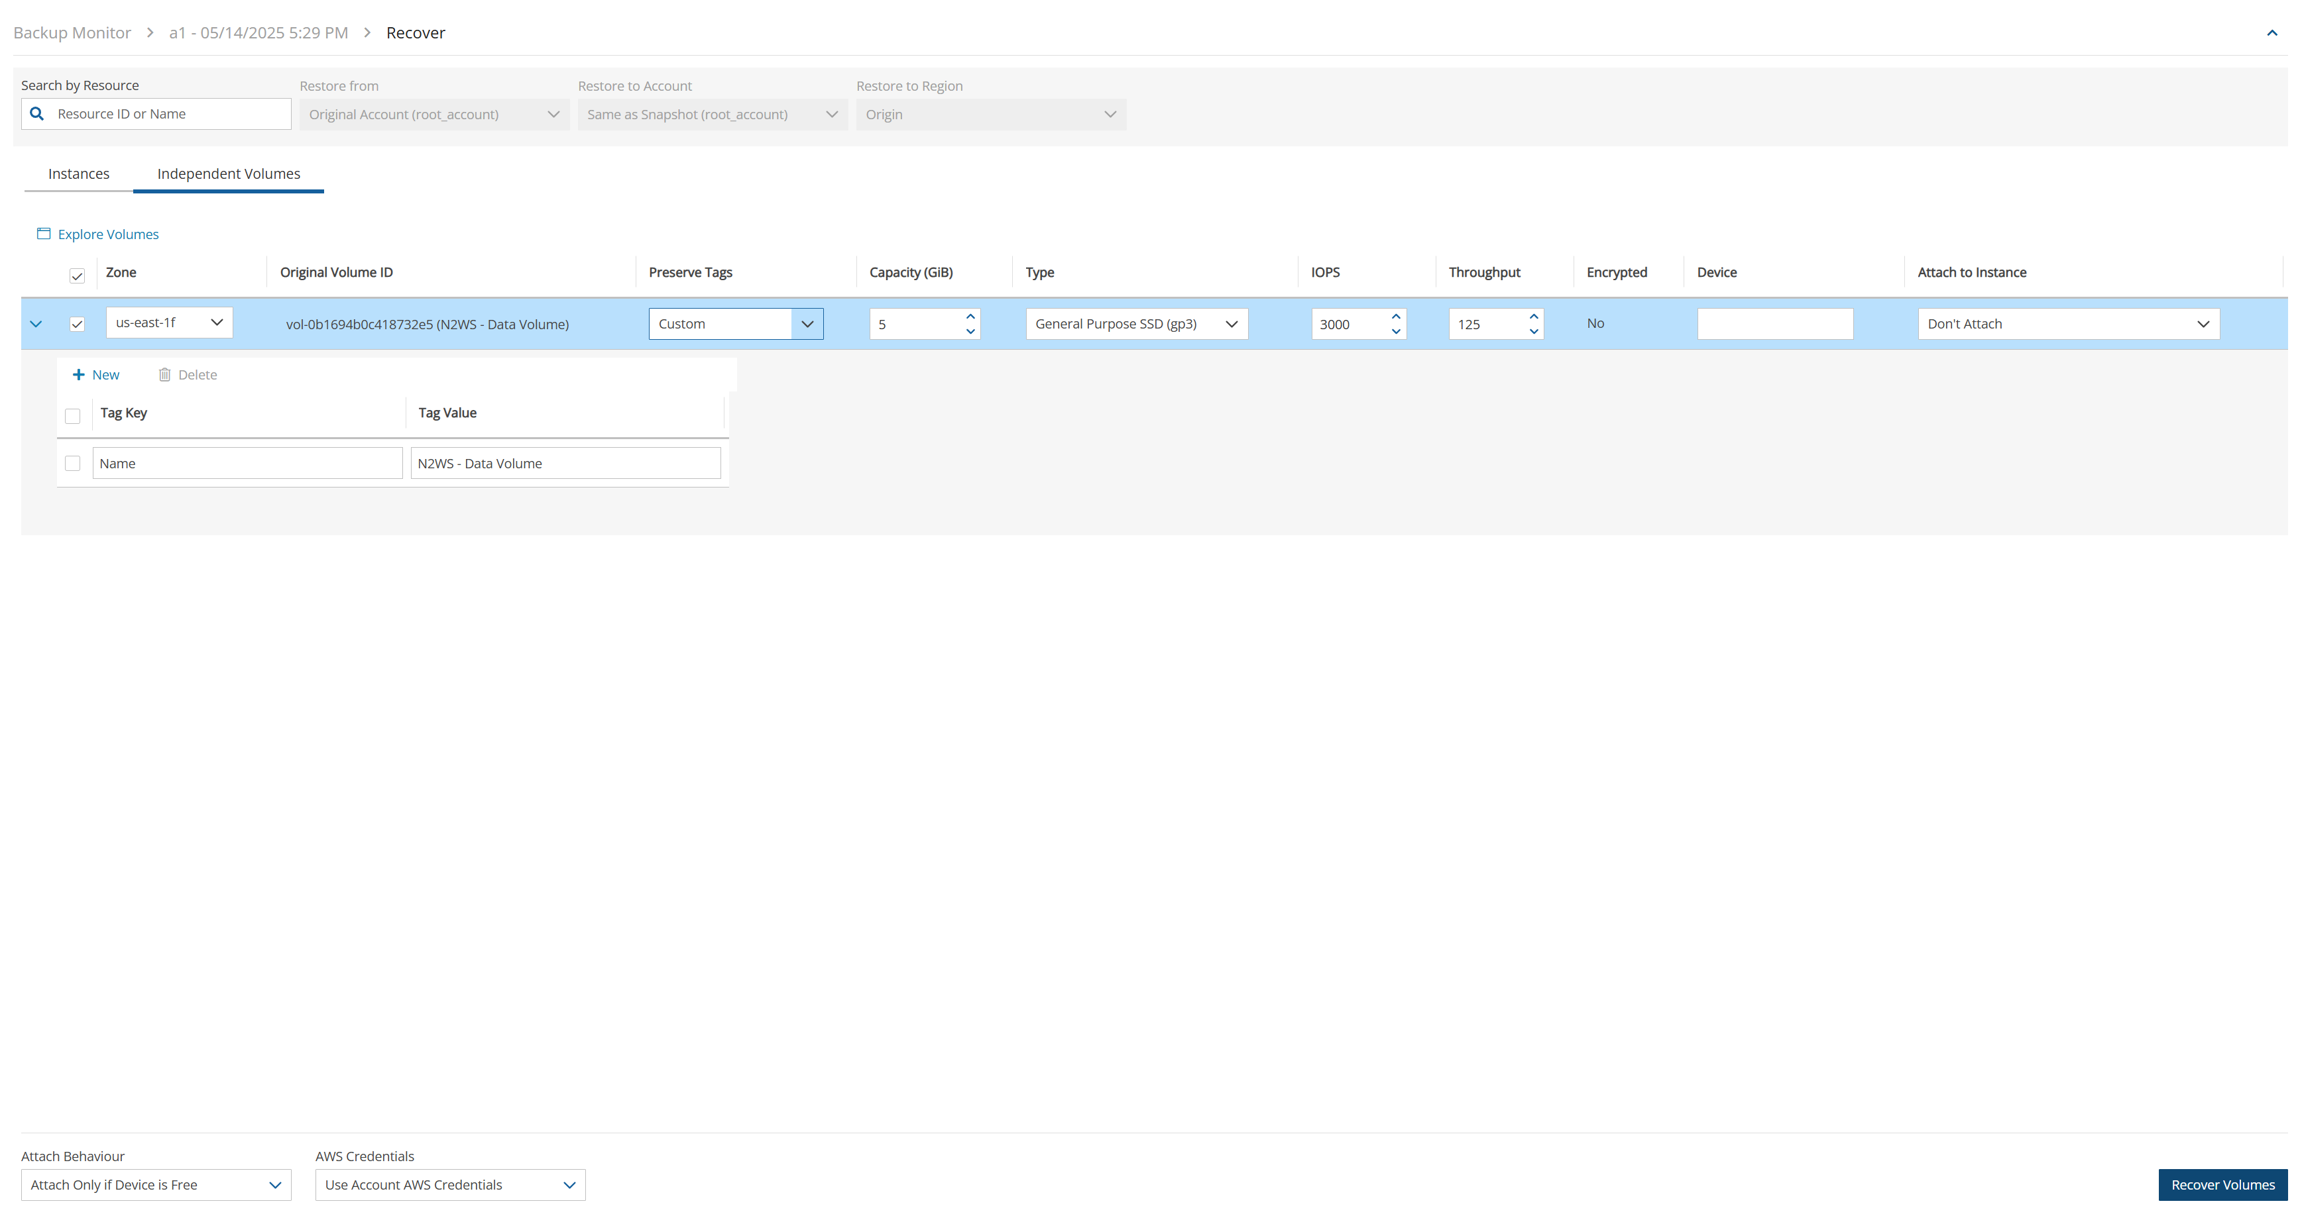
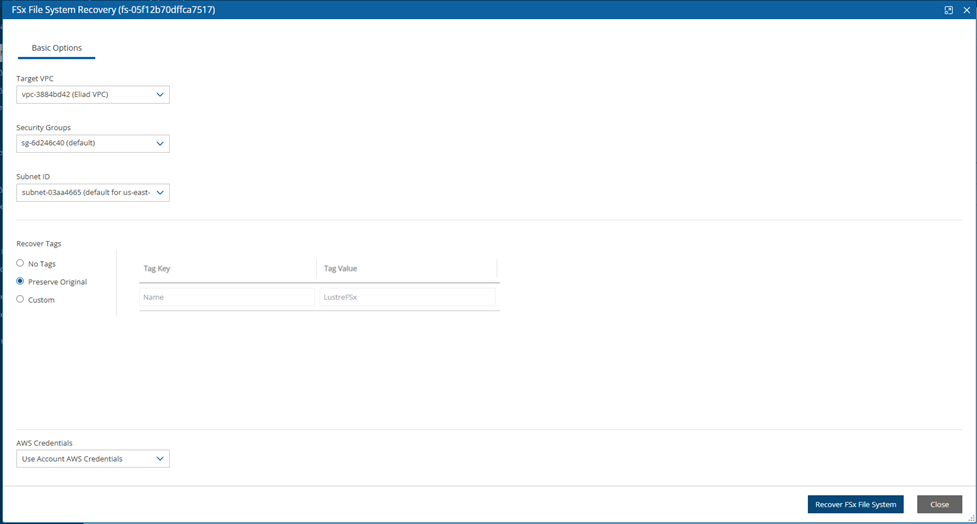
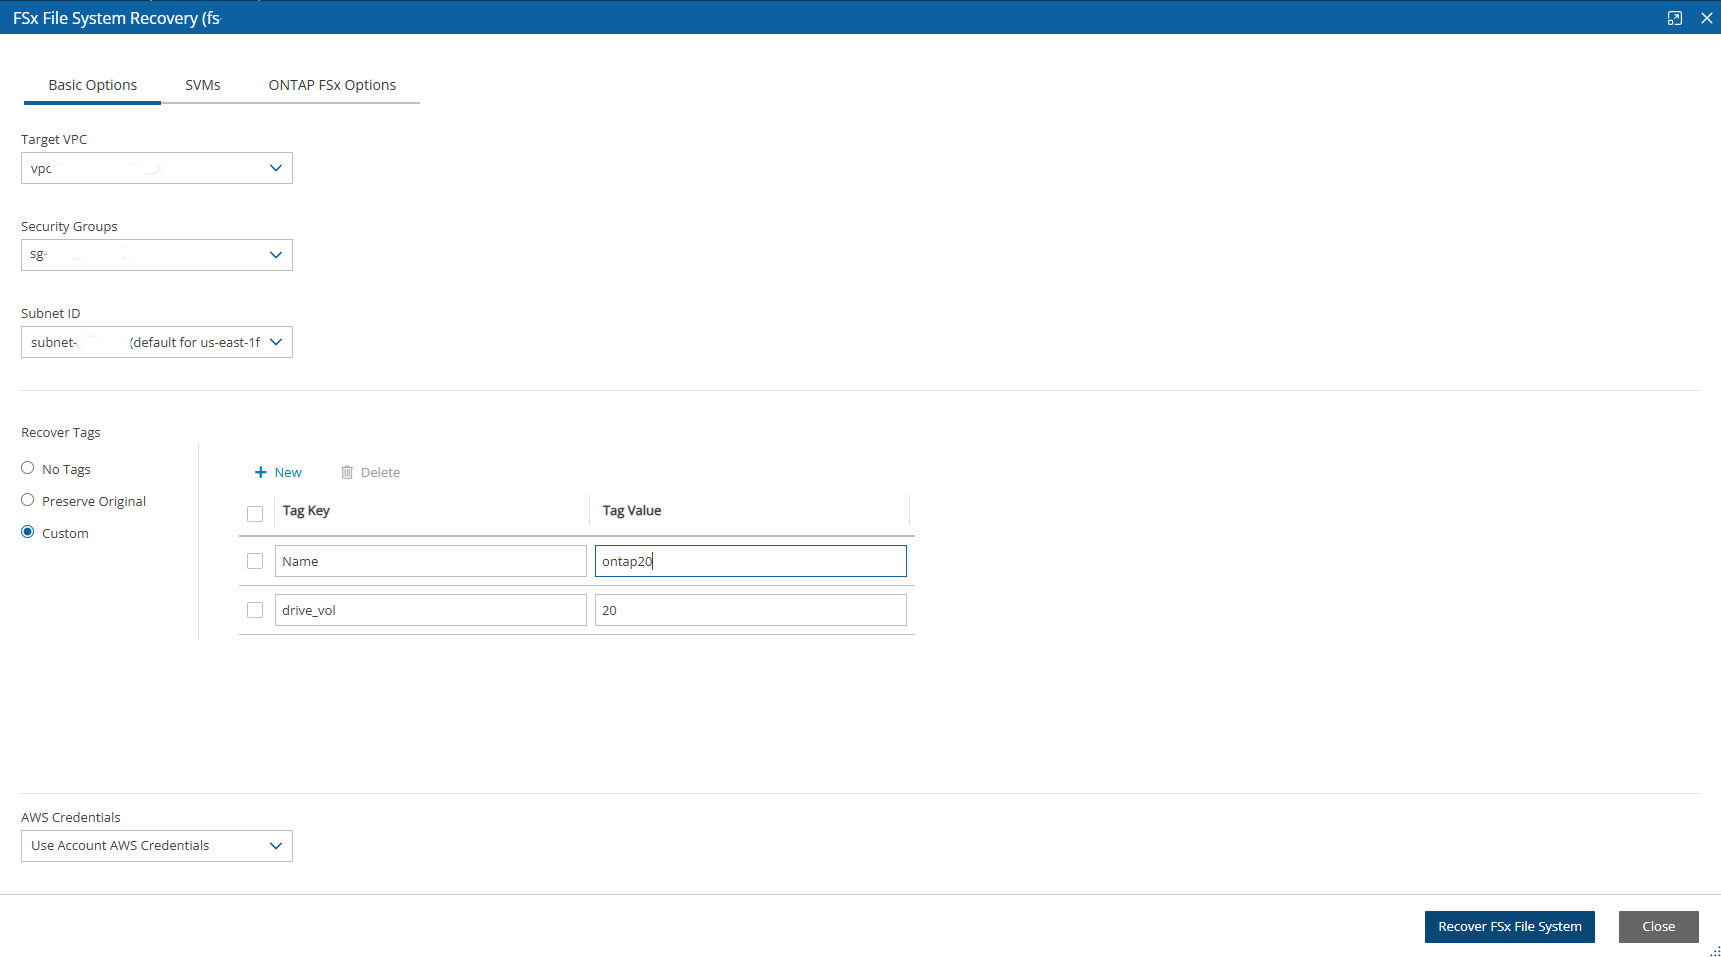
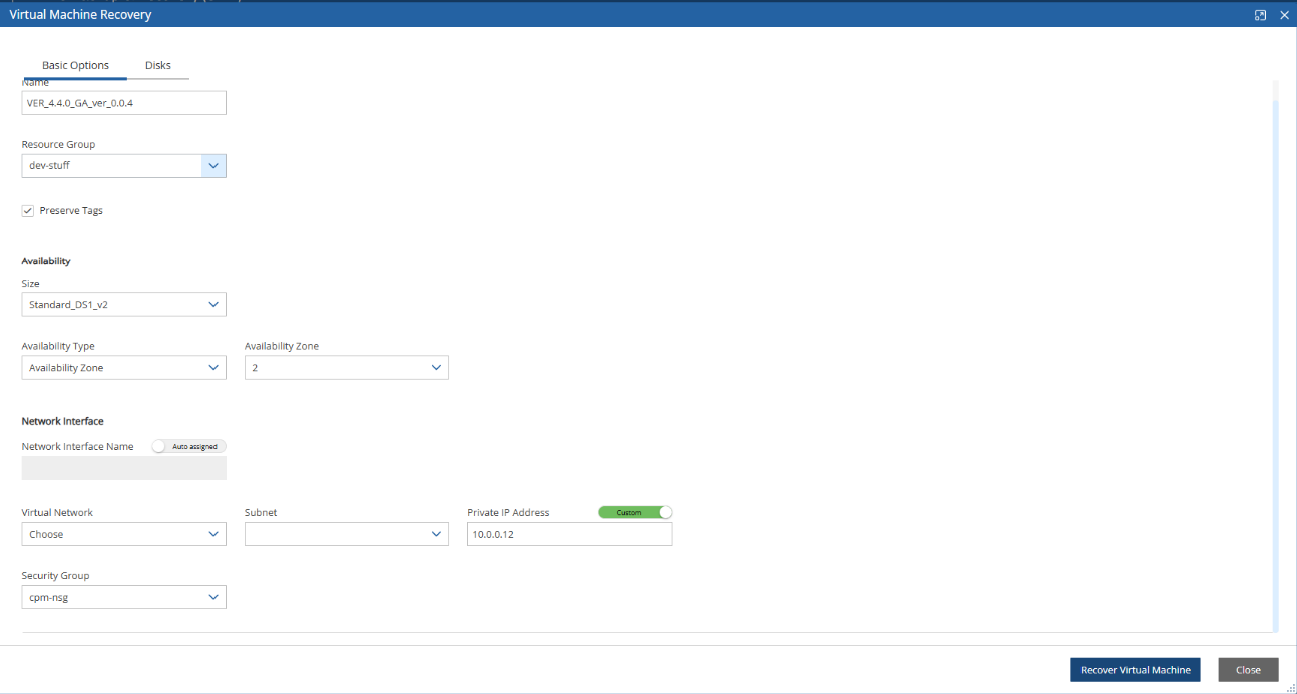
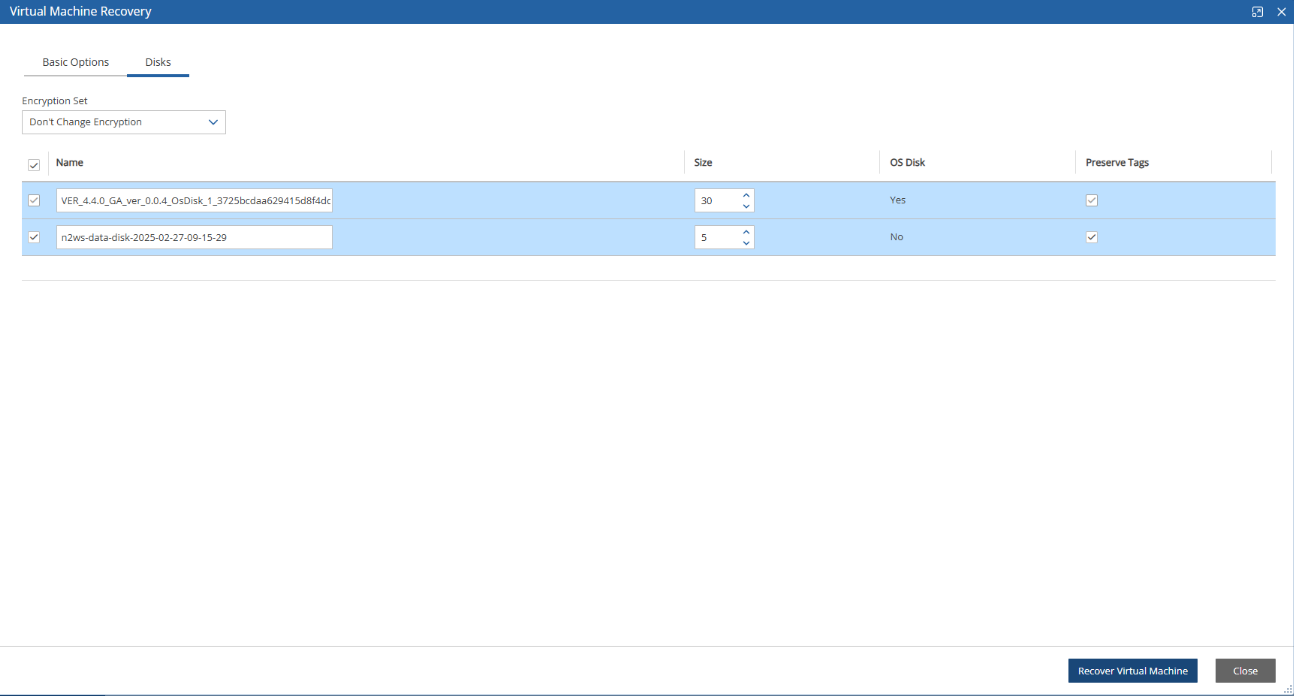
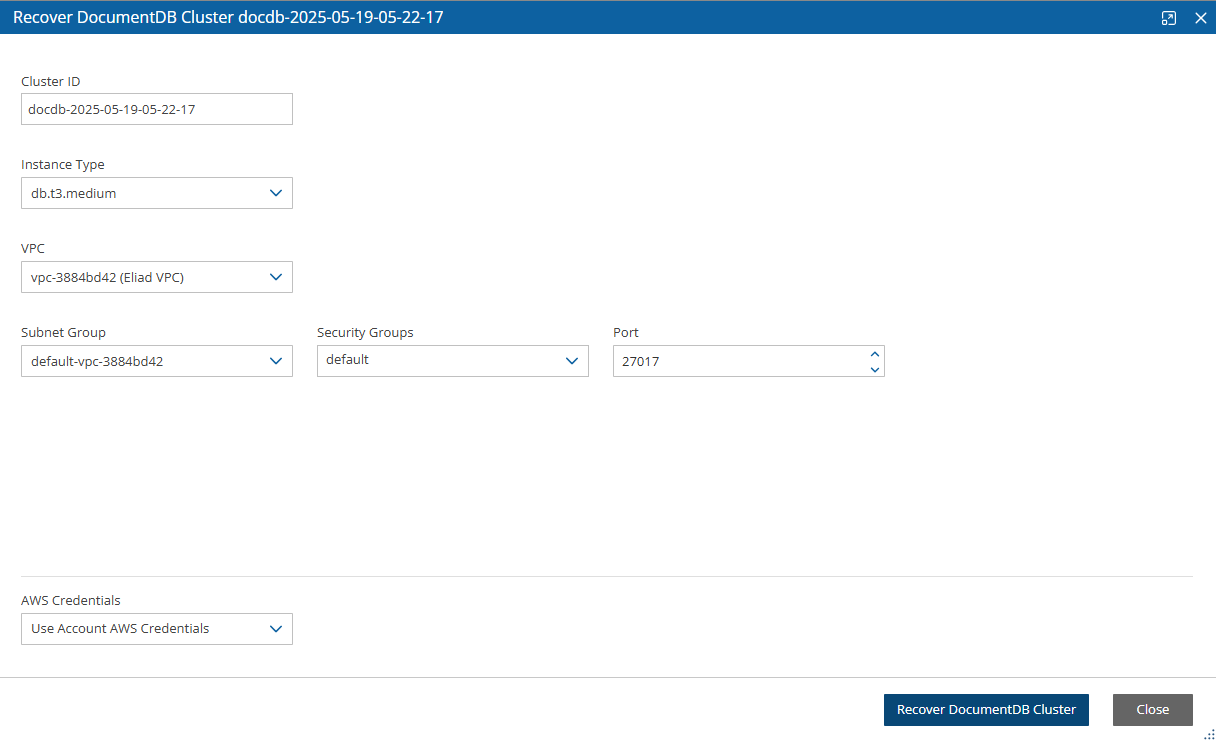
Image (Replace root volume)
AWS Security Group IDs of selected VPC