10 Performing Recovery
Now that you have created some backups, it is time to perform a recovery.
N2W offers several options for data recovery. Since all N2W backup is based on AWS’s snapshot technology, N2W can offer rapid recovery of instances, volumes, and databases. Since a backup is not created for S3 Bucket Sync targets, recovery is neither needed nor possible.
For the cross-region and account recovery of regular resources, such as Instances and RDS, N2W uses the FSx service so there is no need for specific IAM rolls, as with EFS.
N2W Software strongly recommends that you perform recovery drills occasionally to make sure your recovery scenarios work. It is not recommended that you try it for the first time when your servers are down. Each policy on the policy screen shows the last time recovery was performed on it. Use the last recovery time data to track recovery drills.
10.1 Searching for Backups to Recover From
N2W provides an enhanced search box to quickly find backup snapshots to recover from.
In the Backup Monitor, you can search for snapshots based on the Backup Target type or policy, including frozen images.
To search for all backup snapshots:
Select Backup Monitor.
Select the relevant Cloud button (AWS, Azure, Wasabi)
In the Search backups box, enter a string to search by. The string can be part of the resource ID or part of the resource tag value.
To filter by resource type, select a resource type in the By Instance list, such as RDS database.
Select
 and then choose a backup in the list.
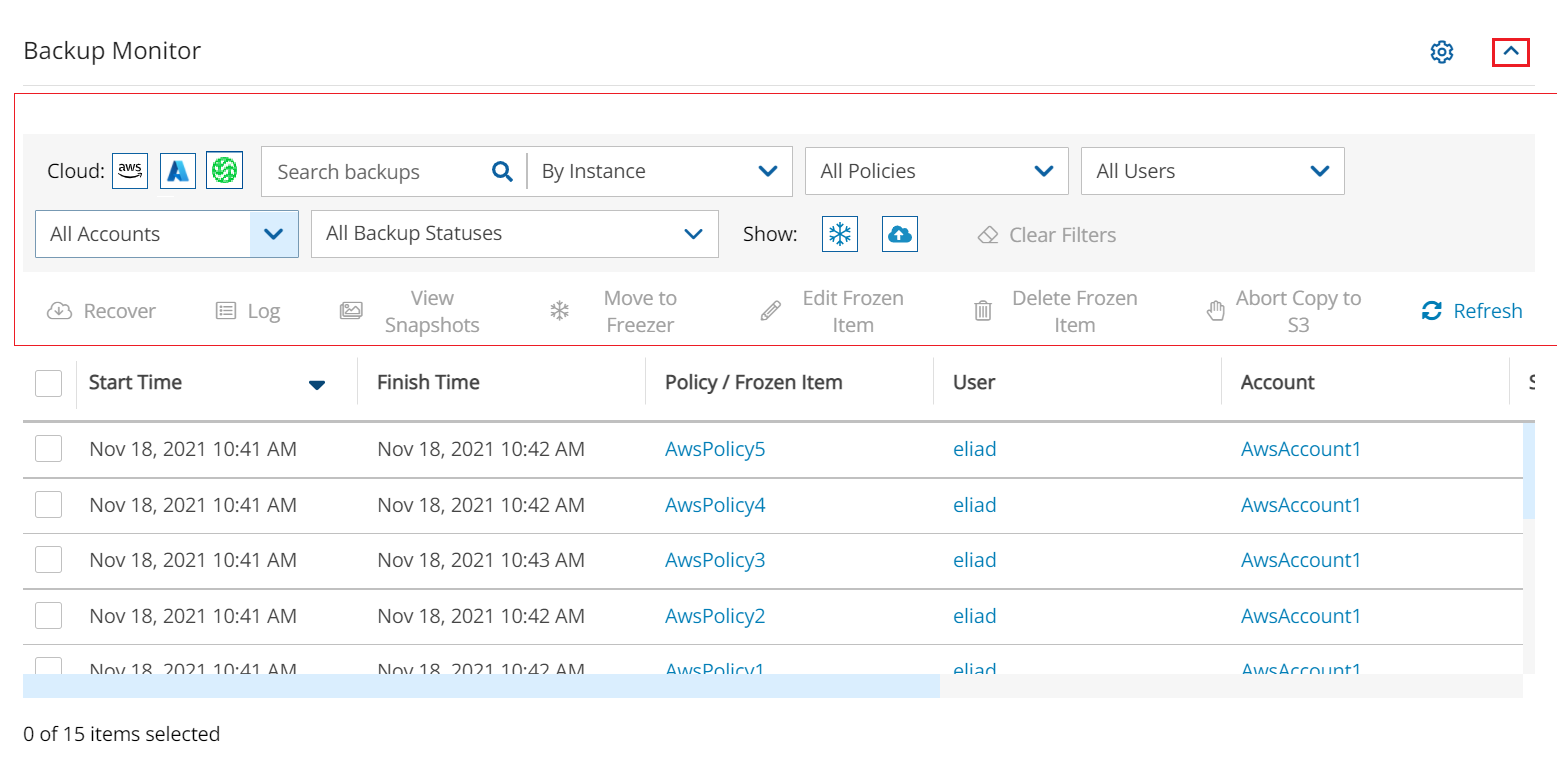
When you select ![]() Recover for a certain backup, you are directed to the Backup Monitor Recover screen. You can Search by Resource using the resource ID or name.
Recover for a certain backup, you are directed to the Backup Monitor Recover screen. You can Search by Resource using the resource ID or name.
For backups with multiple resource types as targets, the Recover screen will have a separate tab for each type. Select a backup. The Recover screen opens.
To restore from an AWS Storage Repository, select the repository in the Restore From list. For other considerations when recovering from an S3 Repository, see section 21.3.2.
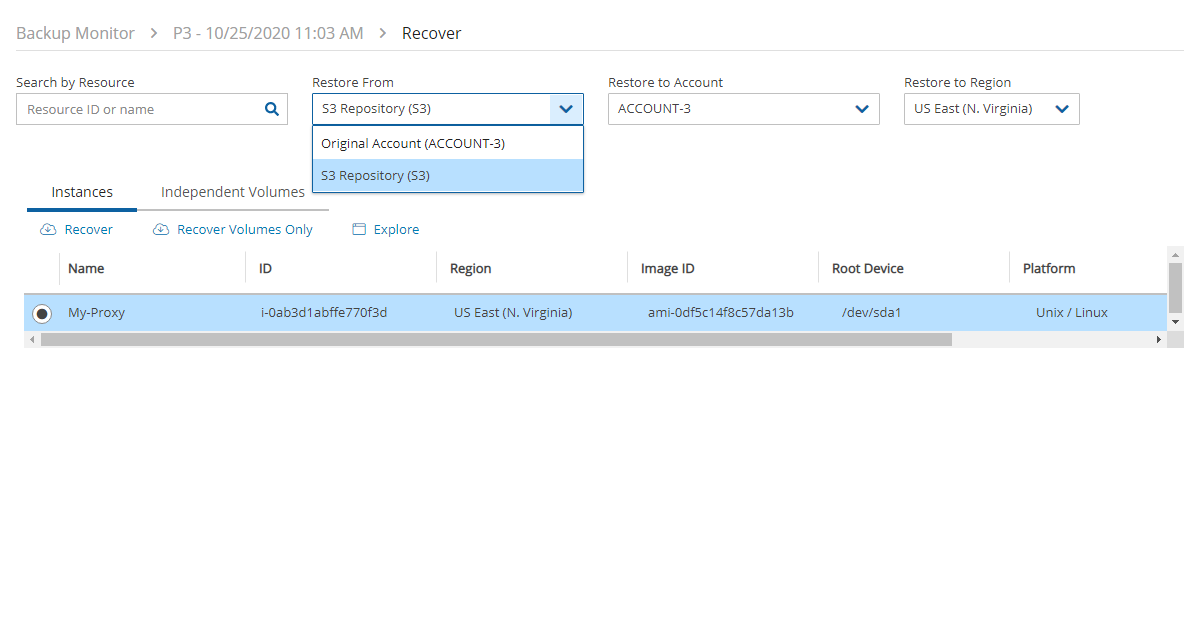
Depending on the specifics of the backup, the Recover screen includes:
A search box for locating a resource by ID or name.
Tabs for recovering the backed-up instances, independent volumes, databases, etc.
Outputs of any backup scripts and VSS if it exists. These reference outputs may be important during a recovery operation.
If this backup includes DR to another region, there will be a Restore to Region drop-down menu to choose in which region to perform the recovery.
If you have cross-account functionality enabled for your N2W license, there are two other drop-down menus:
Restore to Account list where you can choose to restore the resources to another account.
If you defined cross-account DR for this policy, you will have the Restore from Account list for choosing from which account to perform recovery.
All the choices about regions and accounts you make in the recover screen apply to all the recovery operations that you initiate from this screen.
Choose the backups to recover and then select the Recover resource type button.
10.2 Recovery AWS Credentials
All recovery screens have a drop-down list at the bottom labelled AWS Credentials. By default, the account AWS credentials used for backup are also used for recovery operations. Depending on the backup, you can select Provide Alternate AWS Credentials and fill in different credentials for recovery. This can be useful if you want to use IAM-created backup credentials that do not have permissions for recovery. See section 16.3. When using custom credentials, N2W verifies that these credentials belong to the recovery account.
To use custom credentials:
Select Provide Alternate AWS Credentials in the list. The custom credential boxes appear.
In the AWS Access Key box, enter your access key.
In the AWS Secret Key box, enter your secret key.
10.3 Recovery Tags
The default Preserve/Recover Tags action during recovery is Preserve Original tags associated with the recovery target. You can manage the recovery tags by selecting one of the options in the list or section:
Preserve Original (default) - Preserve the existing tags associated with the recovery target.
Clear / No Tags- Do not recover any tags.
Custom - You can add tags or override tags on the version of the resource selected for the recovery.
To make changes in the Recover Tags sections, switch the Auto assigned toggle key to Custom.

10.4 Instance Recovery
With Instance recovery, you can recover a complete instance with its data for purposes, such as:
An instance crashed or is corrupted and you need to create a new one
Creating an instance in a different AZ
Creating an instance in a different region. See section 11.5.1.
Creating an instance from a frozen image
When you recover an instance, by default, you recover it with its configuration, tags, and data, as they were at the time of the backup. However, you can change these elements:
Instance type
Placement
Number of CPU cores and threads
Architecture
User data, etc.
Tags by ignoring, adding, or overriding tag keys and values.
You can also choose how to recover the system itself:
For Linux EBS-based instances: if you have a snapshot of the boot device, you will, by default, use this snapshot to create the boot device of the new instance. You can, however, choose to create the new instance from its original image or a different one.
For instance-store-based: you will only have the image option. This means you cannot use the snapshot of the instance’s root device to launch a new instance.
Your data EBS volumes will be recovered by default to create a similar instance as the source. However, you can choose:
To recover some or none of the volumes.
To enlarge volume capacity, change their device name, or IOPS value.
For EBS-based Windows Servers: there is a limitation in AWS, prohibiting launching a new instance from a snapshot, as opposed to from an AMI.
N2W knows how to overcome this limitation. You can recover an instance from a snapshot, but you also need an AMI for the recovery process. By default, N2W will create an initial AMI for any Windows instance it backs up and use that AMI for the recovery process. Usually, you do not need to change anything to recover a Windows instance.
The instance recovery screen has tabs for Basic Options, Volumes, and Advanced Options.
At the bottom of each screen, there is an option to change AWS Credentials.
10.4.1 Basic Options
The Basic Options tab is divided into the general section and the Networking section:
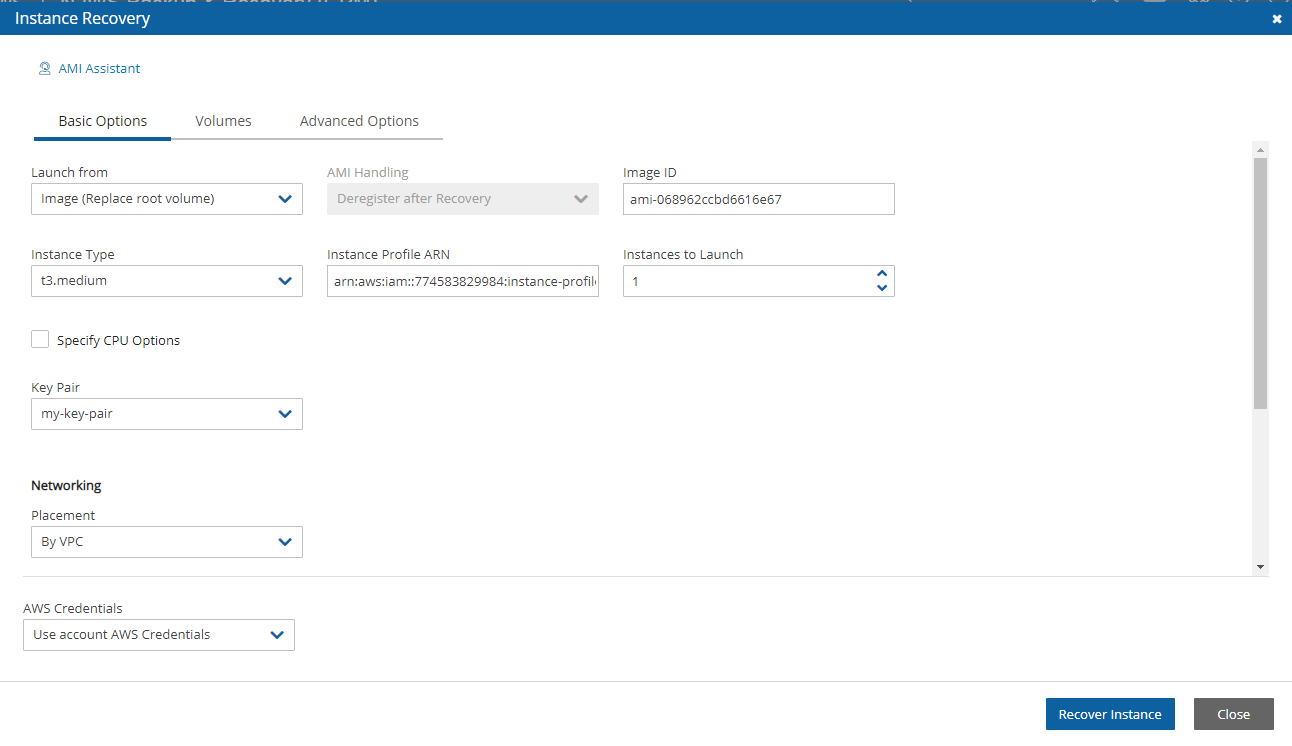
 AMI Assistant – Select to view the details of the AMI used to launch your instance and find similar AMIs.
Launch from – Whether to launch the boot device (Image) from an existing image, a snapshot, or whether to launch the device using the original root volume configuration (Image (Replace root volume)) which will contain the billing code, if available.
The Snapshot option is available only if this is an EBS-based instance, and a snapshot of the boot device is available in this backup.
See table below for all options.
Launching from a snapshot is not available on Windows.
Launch from
Snapshots Only
Snapshots + Initial AMI
AMI Only
Image
Possible if supply AMI ID
Possible
Default
Image (Replace root volume)
Windows: Default
Other OS: Possible if supply AMI ID
Default
Not possible
Snapshot
[Create AMI from
root snapshot]
Windows: Not possible
Other OS: Default
Windows: Not possible
Other OS: Possible
Not possible
AMI Handling – This option is relevant only if Launch from is set to Snapshot. If this instance is launched from a snapshot, a new AMI image will be registered and defined as follows:
De-Register after Recovery – This is the default. The image will only be used for this recovery operation and will be automatically de-registered at the end. This option will not leave any images behind after the recovery is complete.
Leave Registered after Recovery – The newly created image will be left after recovery. This option is useful if you want to hold on to this image to create future instances. The snapshots the image is based on will not be deleted by the automatic retention process. However, if you want to keep this image and use it in the future, move the whole backup to the Freezer. See section 9.3.
Create AMI without Recovery – This option creates and keeps the image but does not launch an instance from it. This is useful if you want to launch the instance/s from outside N2W. If you wish to keep using this image, move the backup to the Freezer.
Image ID – This is only relevant if Launch from is set to Image or Image (Replace root volume) or if you are recovering a Windows instance. By default, this will contain the initial AMI that N2W created, or if it does not exist, the original AMI ID from which the backed-up instance was launched. You can type or paste a different AMI ID here, but you cannot search AMIs from within N2W. You can search for it with the AWS Management Console.
Instance Type – Choose the instance type of the new instance/s. The instance type of the backed-up instance is the default.
If you choose an instance type that is incompatible with the image or placement method, the recovery operation will fail.
Since not all instance types are available in all AWS regions, recovery of an unsupported instance type in a certain region might fail. Where the instance type is not yet supported by AWS, N2W recommends that you configure a supported instance type.
Instance Profile ARN – The ARN of the instance role (IAM Role) for the instance. To find the ARN, select the Role name in the IAM Management Console and then select the Summary tab. The default will be the instance role of the backed-up instance if it had one.
Instances to Launch – Specifies how many instances to launch from the image. The default is one, which is the sensible choice for production servers. However, in a clustered environment you may want to launch more than one. It is not guaranteed that all the requested instances will launch. Check the message at the end of the recovery operation to see how many instances were launched, and their IDs.
CPU Options - Enable to select Core Count and Threads per Core for recovery target.
Key Pair – The key pair you want to launch the instance with. The default is the key that the backed-up instance was created with. You can choose a different one from the list. Keys are typically needed to connect to the instance using SSH (Linux).
Keys cannot be used to decrypt the Windows password of a restored instance.
10.4.1.1 Networking Section
The main purpose of the Networking section is to define what will be the placement of the instance. By default, it will be the same placement as the backed-up instance. An instance can be placed using three methods which are not all necessarily available.
By VPC – Default placement if you have VPC subnets defined in your account.
By Availability Zone – This is the most basic type and the only one which is always available. You can choose in which AZ to launch the instance. Additional options are:
You can choose a different AZ from the backed-up instance.
By default, if the backed-up instance was not in a VPC, it will have the same zone as the backed-up instance. Choose a different AZ from the list.
By Placement Group – If you have placement groups defined, this option is available. This is an instance type that can be placed in a placement group. See AWS documentation for details.
For Placement by VPC and Availability Zone, you are asked to select a security group. Learn about AWS Security Groups and settings at https://docs.aws.amazon.com/vpc/latest/userguide/VPC_SecurityGroups.html
If you chose By VPC in Placement, the following fields are available:
VPC –You can choose the VPC the instance is to be recovered to. By default, it will contain the VPC of the original instance.
Clone VPC - Option to recover to a clone of the selected VPC environment. Control switches to the Account’s Clone VPC screen. Choose the date of the source VPC capture for the clone and an optional new destination name. See section 10.4.5. After the cloning process is completed, the name of the newly cloned VPC will appear in the VPC box.
VPC Subnet – This will hold all the subnets in the currently selected VPC.
Security Group – Choose security groups to be applied to the new instance. This is a multiple-choice list. By default, the security groups of the backed-up instance will be chosen.
Security groups for VPC instances are different than groups of non-VPC instances. This list has a filter to help you find the security group that you need.
VPC Assign IP – If the backed-up instance was in a VPC subnet, the default value will be the IP assigned to the original instance.
If the assigned IP is still taken, it can fail the recovery operation. You can type a different IP here. When you begin recovery, N2W will verify the IP belongs to the chosen subnet.
If this box is empty, an IP address from the subnet will be automatically allocated for the new instance.
If you chose By Availability Zone in Placement:
Availability Zone - By default, if the backed-up instance was not in a VPC, it will have the same zone as the backed-up instance. However, you can choose a different one from the list.
Security Group - Choose security groups to be applied to the new instance. This is a multiple-choice field. By default, the security groups of the backed-up instance will be chosen.
If you chose By Placement Group:
Placement Group - Choose the placement group from the list.
For all Placement options, the following boxes are also available:
Additional NICs - If you want to add additional NICs.
AWS Credentials - You can choose to use different AWS credentials for the recovery operation.
10.4.2 Volumes
If the policy contains an instance target that has a volume, the volume is also defined as a volume target:
The volume will not be available under the Independent Volumes tab.
Recover the volume by selecting the relevant instance in the Instances tab and then selecting Recover Volumes Only. See section 10.5.
Select the Volumes tab to choose which volumes to recover and how.
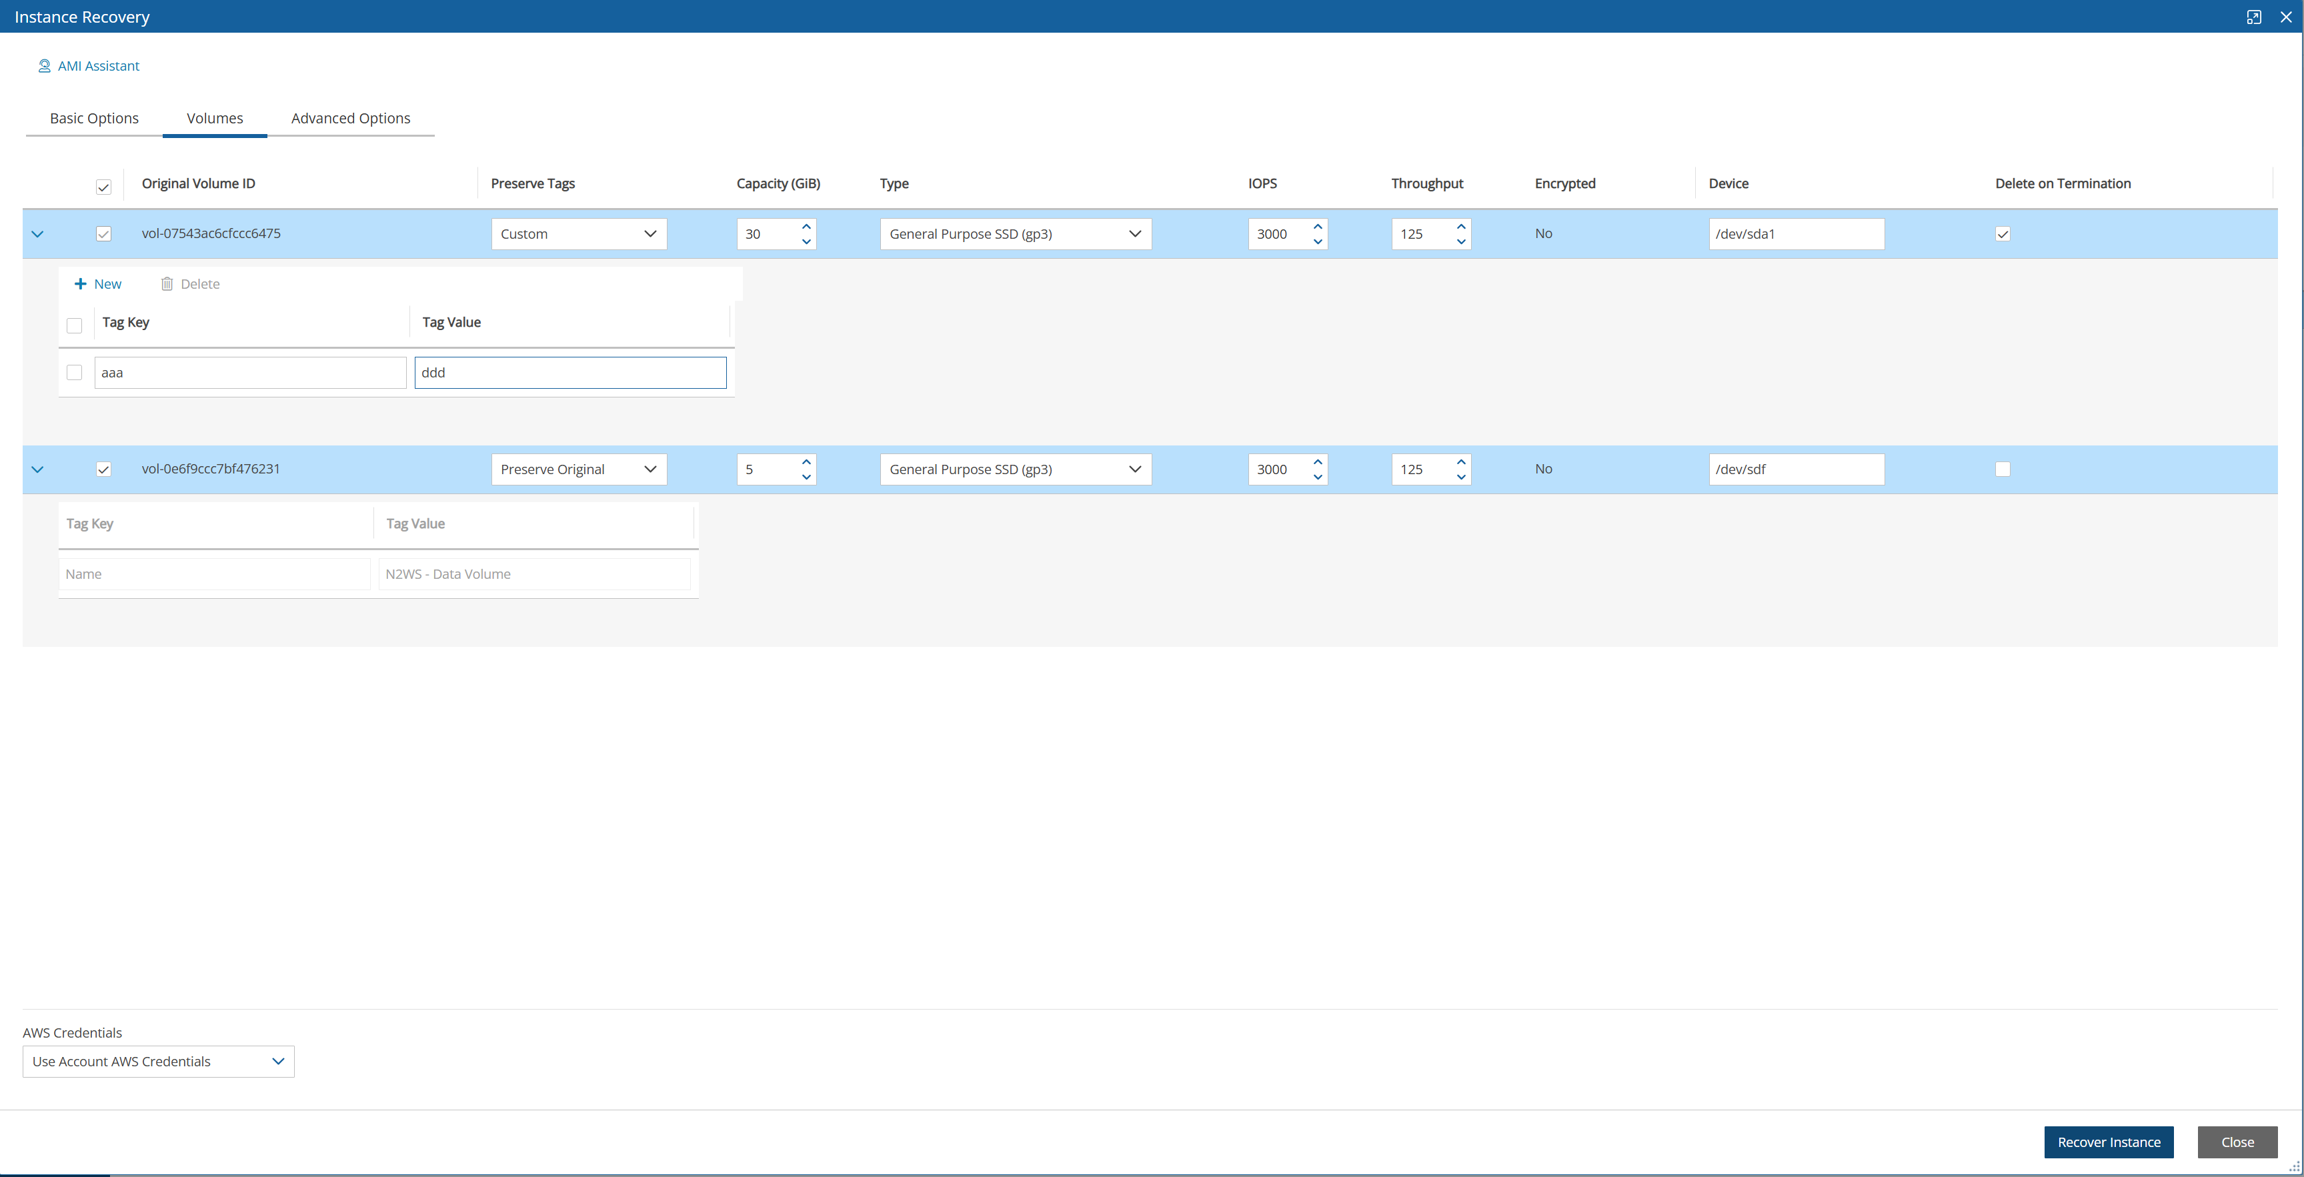
All data volumes in the policy except the boot device are listed here. Their default configuration is the same as it was in the backed-up instance at the time of the backup.
Select a volume to include it in the recovery. You can adjust the volume recovery parameters, as follows:
The default Recover Tags action during recovery is Preserve Original for the volumes associated with the instance. To manage tags, see section 10.3.
Enlarge capacity of the volume.
Change the device and device type.
Change IOPS.
By default, the volumes are not deleted on termination of instances recovered from a snapshot. Select Delete on Termination to delete the volume on termination of the instance.
10.4.3 Advanced Options
It is possible to recover to a different account and region by recovering to a clone of an original VPC environment. See the Clone VPC options in section 10.3.5.
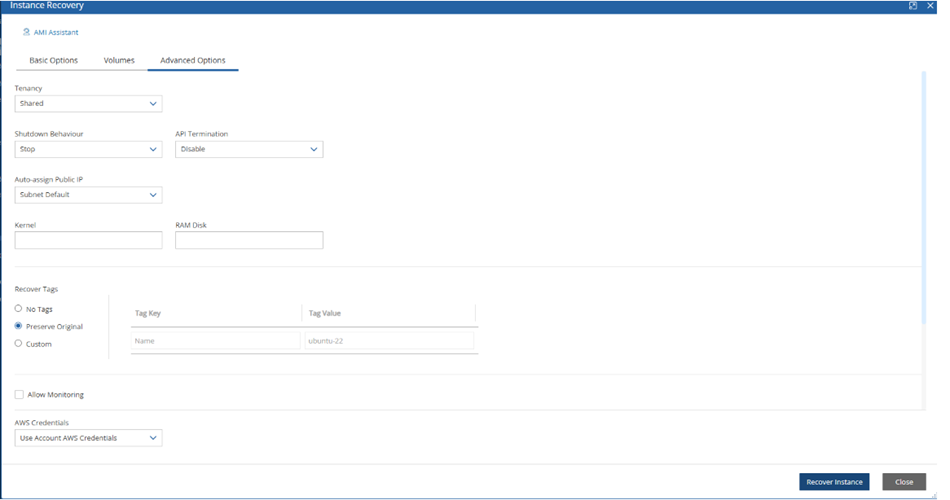
Advanced options include the following:
Architecture – The default will be the architecture of the backed-up instance. Options are:
i386 – which is X86 – 32-bit
x86_64 – which is X86 – 64-bit
Changing the architecture may result in an error if the image is incompatible with the requested architecture. For example, if your image is a native 64-bit image and you choose i386, the recovery operation will fail.
Tenancy – Choose the tenancy option for this instance.
Shutdown Behaviour – The value of the original instance is the default. If the recovered instance is instance-store-based, this option is not used. The choices are:
stop – If the instance is shut down, it will not be terminated and will just move to stopped state.
terminate – If the instance is shut down, it will also be terminated.
API Termination – Whether terminating the new instance by API is enabled or not. The backed-up instance value is the default.
Auto-assign Public IP - Whether to assign a public IP to the new instance. This is for public subnets. By default, it will behave as the subnet defines.
Kernel – Will hold the Kernel ID of the backed-up instance. You can type or paste a different one. However, you cannot search for a kernel ID from within N2W. Change this option only if you know exactly which kernel you need. Choosing the wrong one will result in failure.
RAM Disk - Will hold the RAM Disk ID of the backed-up instance. You can type or paste a different one. However, you cannot search for a RAM Disk ID from within N2W. Change this option only if you know exactly which RAM Disk you need. Choosing the wrong one will result in a failure.
Recover Tags - The default Recover Tags action during recovery is Preserve Original for the instance. To manage tags, see section 10.3.
Allow Monitoring – Select if monitoring should be allowed for the new instance. The value in the backed-up instance is the default.
ENA – Select to support Extended Network Adaptor.
EBS Optimized –Select to launch an EBS Optimized instance. The value from the backed-up instance is the default.
Enable User Data – Whether to use user data for this instance launch. If selected, the User Data box opens. Enter the text. The text of the user data. Special encoding or using a file as the source is not currently supported from within N2W.
Advanced Options include different additional choices depending on whether Placement is By VPC, By Availability Zone or By Placement Group.
To complete the recovery operation, select Recover Instance and then confirm. If there are errors that N2W detects in your choices, you will return to the Recover instance screen with error messages. Otherwise, you will be redirected back to the recovery panel screen, and a message will be displayed regarding the success or failure of the operation.
10.4.4 AMI Assistant
The AMI Assistant is a feature that lets you view the details of the AMI used to launch your instance, as well as find similar AMIs. N2W will record the details of the AMI when you start backing up the instance. If the AMI is deleted sometime after the instance started backing up, N2W will remember the details of the original AMI.

After selecting AMI Assistant in the instance recovery screen, you will see these details:
AMI ID
Region
Image Name
Image Description
Owner ID
Root – Device
Type
Virtualization
Hypervisor
To find AMIs with properties that are exactly like the original, select the Exact Matches tab. If the Exact Matches search does not find matches, select the Partial Matches tab which will search for AMIs similar to the original.
AMI Assistant searches can be useful in the following scenarios:
You want to recover an instance by launching it from an image, but the original AMI is no longer available.
You want to recover an instance by launching it from an image, but you want to find a newer version of the image. The fuzzy search will help you.
You are using DR (section 11) and you need to recover the instance in a different region. You may want to find the matching AMI in the target region to use it to launch the instance, or you may need its kernel ID or ramdisk ID to launch the instance from a snapshot.
10.4.5 Recovering to a Cloned VPC
When you select Clone VPC in the Basic Options tab, the Clone VPC screen opens.
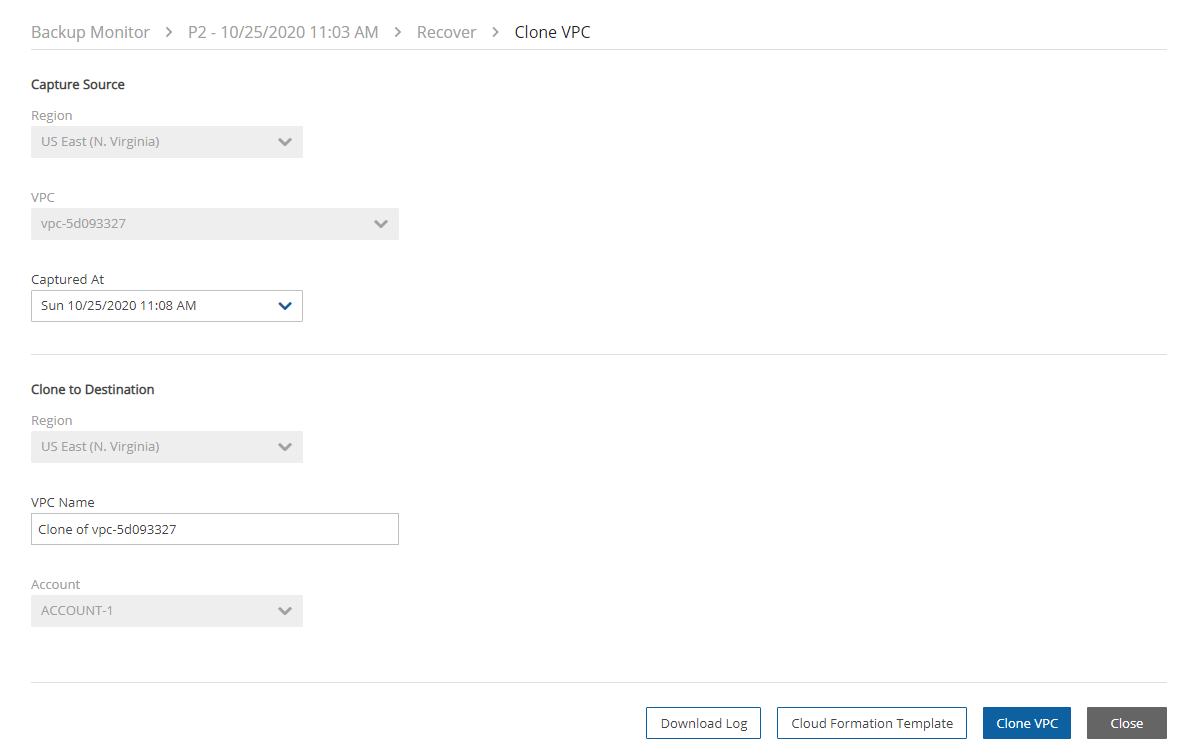
N2W will have pre-set the following fields according to the selections made in the Advanced Options section:
Capture Source:
Region and VPC
Captured at date and time – You can select a different date and time to clone in the drop-down list of captures.
Clone to Destination:
Region and Account
VPC Name – You can change the suggested name for the new VPC.
As part of the cloning process, N2W uses CloudFormation. If the CloudFormation template is over 50 kB, select Cloud Formation Template. It requires an existing S3 bucket for uploading. See section 23.5.
When finished, select Clone VPC. If you changed the suggested VPC Name, it will appear in the VPC box.
To view the cloning progress and status, select Background Tasks
 in the toolbar. Background Tasks only appears after the first Clone VPC or Check Secured DR Account operation.

To view the results of the Clone VPC operation in case manual changes are required, select Download Log.
10.5 Volume Recovery
Volume recovery means creating EBS volumes out of snapshots. In N2W, you can recover volumes that were part of an instance’s backup or recover EBS volumes that were added to a policy as an independent volume. The recovery process is basically the same.
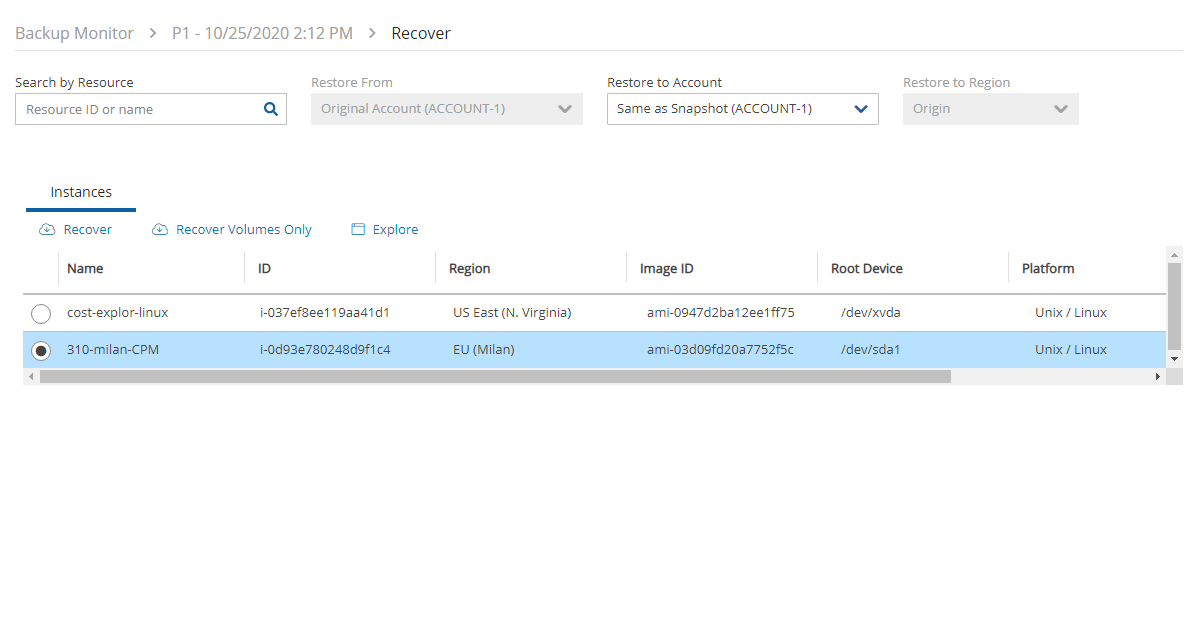
To recover volumes belonging to an instance:
In the left panel, select the Backup Monitor.
In the Backup Monitor tab, select a backup, and then select
 Recover.
Select an instance, and then select
 Recover Volumes Only.
In the Volume Recovery from instance screen, change the recovery fields as needed.
Select Recover Volumes, and confirm.
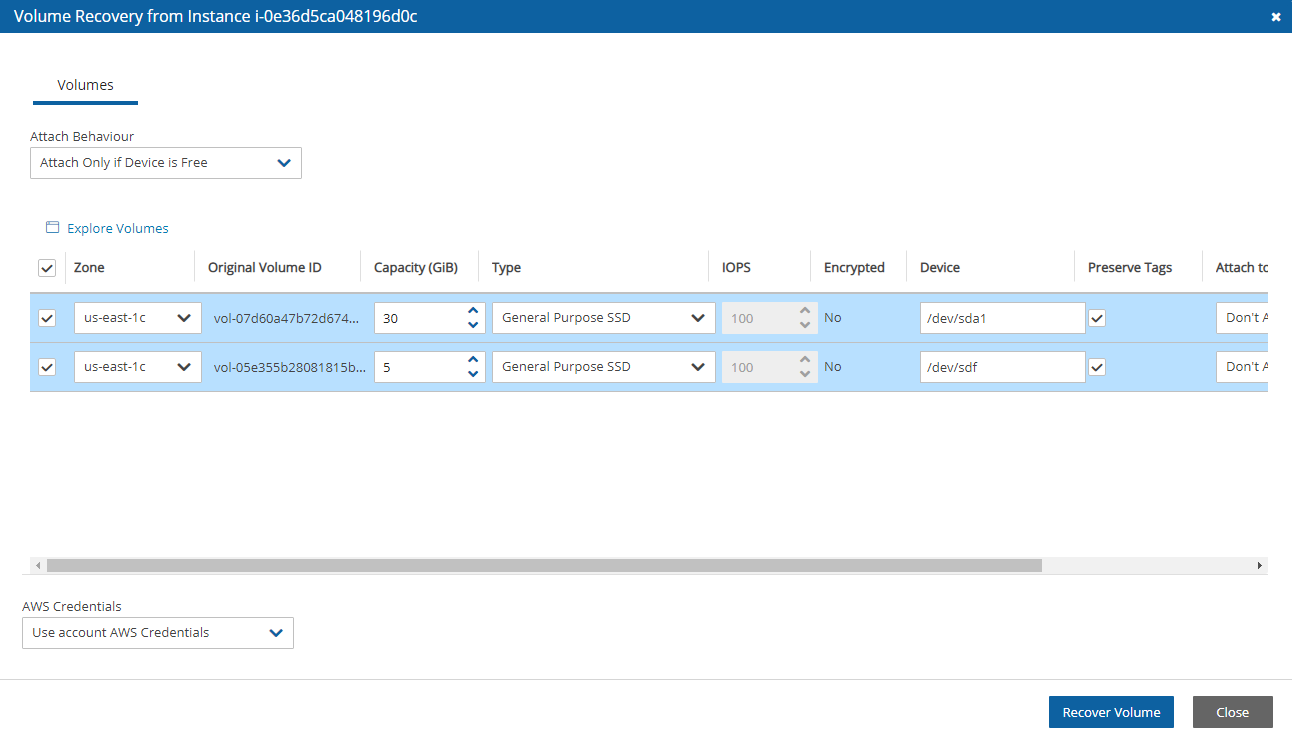
Attach Behaviour – This applies to all the volumes you are recovering if you choose to attach them to an instance:
Attach Only if Device is Free – If the requested device is already taken in the target instance, the attach operation will fail. You will get a message saying the new volume was created but was not attached.
Switch Attached Volumes – This option will work only if the target instance is in stopped state. If the instance is running, you will get an error message. N2W will not try to forcefully detach volumes from a running instance since this can cause systems to crash.
Switch Attached Volumes and Delete Old Ones – This option will work only on stopped instances. This option will also delete the old volumes that are detached from the instance.
If you choose Switch Attached Volumes and Delete Old Ones, make sure you do not need the old volumes. N2W will delete them after detaching them from the target instance.
Recover – Enabled by default. Clear Recover if you do not want that volume recovered.
Zone – AZ. The default is the original zone of the backed-up volume.
Original Volume ID – ID of the original volume.
Capacity – Enlarge the capacity of a volume. You cannot make it smaller than the size of the original volume, which is the default.
Type – Type of the EBS volume.
IOPS – Number of IOPS. This value is used only if the type of volume you chose is Provisioned IOPS SSD. The default will be the setting from the original volume. Values for IOPS should be at least 100, and the volume size needs to be at least 1/10 that number in GiBs. For example, if you want to create a 100 IOPS volume, its size needs to be at least 10 GiB. If you will not abide to this rule, the recovery operation will fail.
Encrypted – Whether device is encrypted.
Device – Which device it will be attached as. This is only used if you choose to automatically attach the recovered volume to an instance. If the device is not free or not correct, the attach operation will fail.
Preserve Tags – The default action during recovery is Preserve Original tags for the target. To manage tags, see section 10.3.
Attach to Instance – Whether to attach the newly recovered volume to an instance. Start typing in the list to initiate a filter. The list holds instances that are in the same AZ as the volume. Changing the Zone will refresh the content of this list.
AWS Credentials - As with other recovery screens, you can choose to use different AWS credentials for the recovery operation.
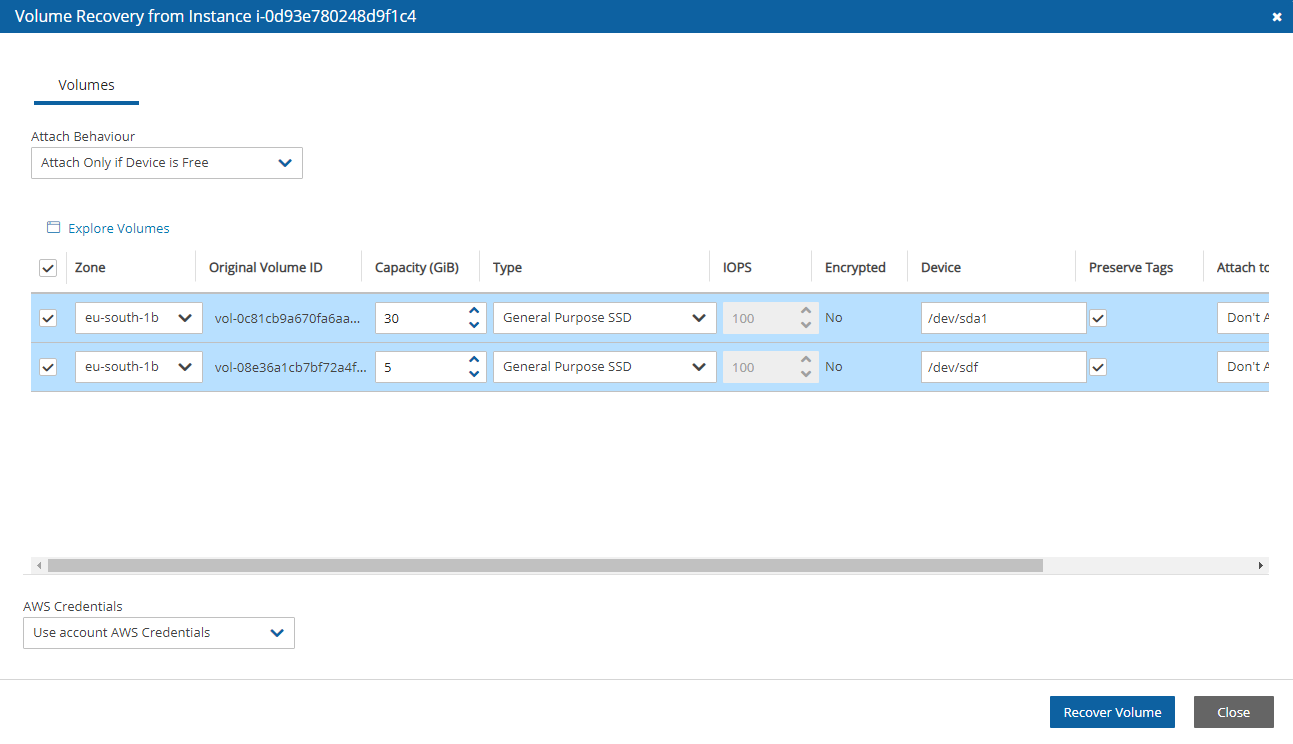
After selecting Recover Volumes and confirming, if there was an error in a field that N2W detected, you will be returned to the screen with an error notification.
To follow the progress of the recovery, select the Open Recovery Monitor link in the ‘Recovery started’ message ![]() at the top right corner, or select the Recovery Monitor tab.
at the top right corner, or select the Recovery Monitor tab.
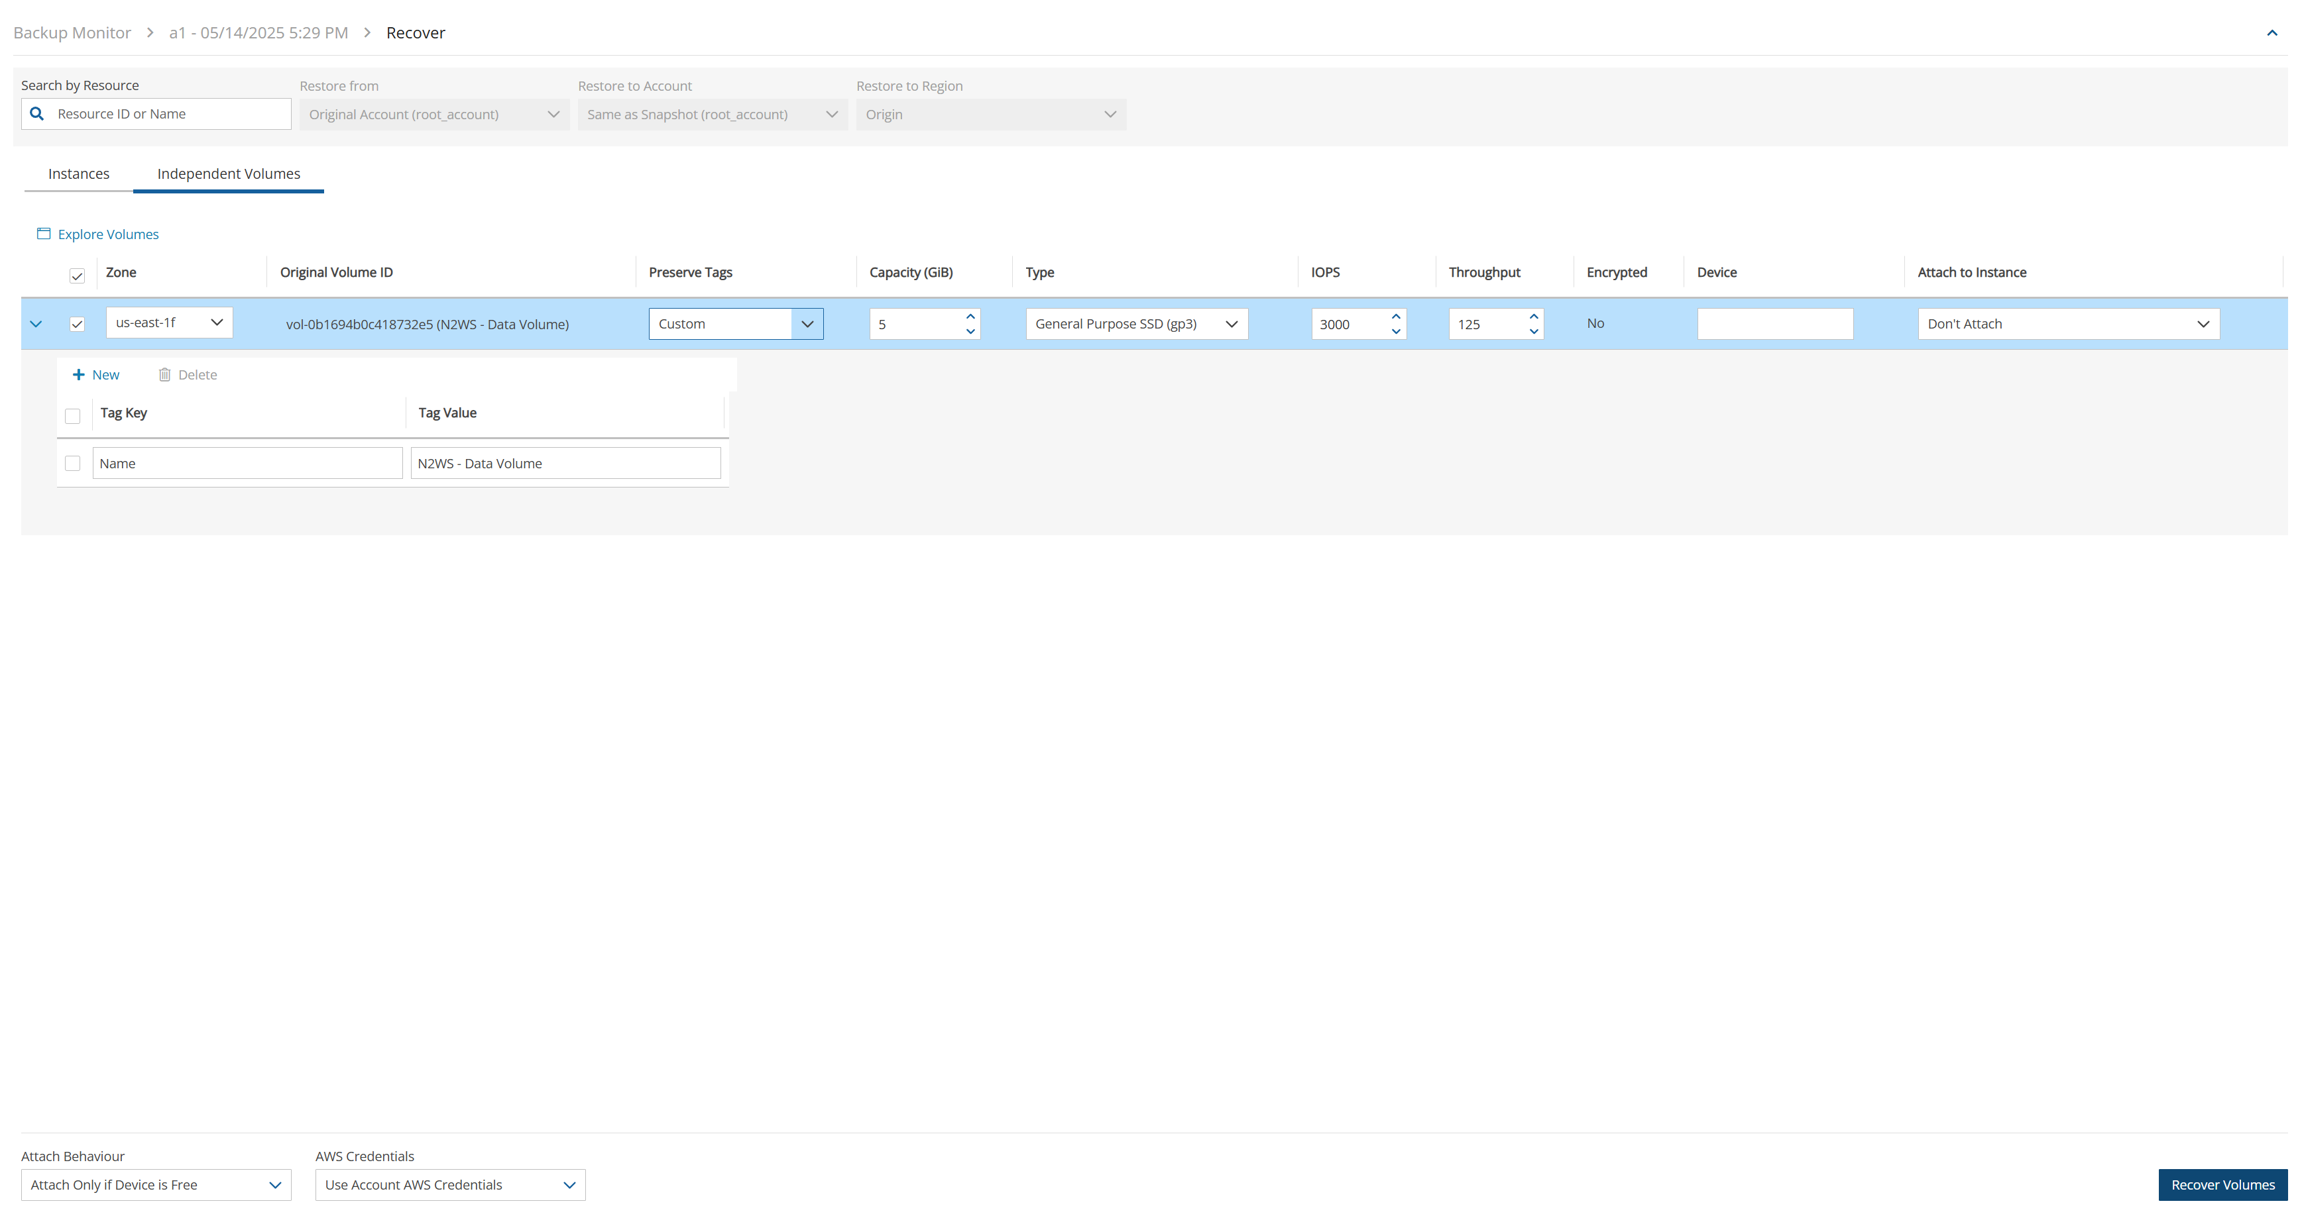
To recover independent volumes:
Select a backup, and then select
 Recover. The recover volumes screen opens.
In the Independent Volumes tab, select a volume or Search by Resource
Complete the From/To options as available.
Select Recover Volumes. A screen similar to recover instance volumes opens. See section 10.4.2.
10.6 RDS Database Recovery
For RDS Custom database recovery, see section 9.10 for the required additional permissions.
When backing up Aurora, AWS automatically copies all tags set on resources to the snapshots and does not allow recovering these resources without recovering their tags as well.
When a backup includes snapshots of RDS databases, selecting ![]() Recover to bring you to the RDS Databases tab. You will see a list of all RDS databases in the current backup. You can change the following options:
Recover to bring you to the RDS Databases tab. You will see a list of all RDS databases in the current backup. You can change the following options:
Recover – Clear Recover to not recover the current database.
Zone – The AZ of the database. By default, it will be the zone of the backed-up database, but this can be changed. Currently, recovering a database into a VPC subnet is not supported by N2W. You can recover from the snapshot using AWS Management Console.
DB Instance ID – The default is the ID of the original database. If the original database still exists, the recovery operation will fail. To recover a new database, type a new ID.
DB Instance Class – The default is the original class, but you can choose another.
Storage Type – Type of storage.
IOPS - Number of IOPS. This field is used only if the type of volume you chose is Provisioned IOPS SSD. The default will be the setting from the original volume. Values for IOPS should be at least 100, and the volume size needs to be at least 1/10 that number in GiBs.
Port –The default is the port of the original backed-up database, but you can choose another.
Multi AZ – Whether to launch the database in a multi-AZ configuration or not. The default is the value from the original backed-up database.
Subnet Group – Subnet to restore to. The default is the value from the original backed-up database.
You can recover a database from outside a VPC to a VPC subnet group, but the other way around is not supported and will return an error.
If you want to recover the database to a different AWS account (DR), make sure that the subnet groups are configured in that destination account, or else the recovery will fail.
Publicly Access. – Whether the database will be publicly accessible or not. The default is the access from the original backed-up database.
AWS Credentials - As in other types of recovery, you can choose to use different AWS credentials and enter your keys.
DB Parameter Group - The default DB parameter group contains the database engine defaults and Amazon RDS system defaults based on the engine, compute class, and allocated storage of the instance. Database parameters specify how the database is configured. You can manage your database configuration by associating your RDS instances with parameter groups.
10.6.1 RDS Database Recovery from S3
As of version 4.4.0, N2W creates the users in a recovered RDS database by calling an SQL command (CREATE USER) instead of rewriting data into the User table of the recovered RDS database server. As a result, some metadata that relates to a MySQL database user may not be recovered.
N2W recovers user and all granted permissions. The properties that are not recovered are typically private properties maintained by RDS that likely will not affect the recovered database usage.
N2W recovery of PostgreSQL RDS database from S3 does not recover the passwords of recovered database users due to the limitation imposed by AWS. The database is recovered with the RDS Admin username and password. The Admin can then set the other users' passwords manually. See https://www.postgresql.org/docs/8.0/sql-alteruser.html
10.7 Aurora Cluster Recovery
When backing up Aurora, AWS automatically copies all tags set on resources to the snapshots and does not allow recovering these resources without recovering their tags as well.
Aurora recovery is similar to RDS recovery, with a few important differences.
Aurora introduces the concept of clusters to RDS. You no longer launch and manage a DB instance, but rather a DB cluster that contains DB instances.
An Aurora cluster may be created in a single AZ deployment, and the cluster will contain one instance.
Or, as in production deployments, the cluster will be created in a multi-AZ deployment, and the cluster will have reader and writer DB instances.
When recovering an Aurora cluster, N2W will recover the DB cluster and then will create the DB instances for it.
After selecting a backup with Aurora Clusters, select ![]() Recover. The Aurora Clusters Recover screen opens. In this screen, all Aurora clusters that were backed up are listed. You can change the following options:
Recover. The Aurora Clusters Recover screen opens. In this screen, all Aurora clusters that were backed up are listed. You can change the following options:
Recover – Clear to not recover the current Aurora cluster.
RDS Cluster ID – The default will be the ID of the original cluster. If the original cluster still exists, the recovery operation will fail, unless you change the ID.
RDS Instance ID – The default will the ID of the original instance.
If the original instance still exists, the recovery operation will fail.
Type a new ID to recover a new database. N2W will use this instance ID for the writer, and in the case of multi-AZ, it will create the reader with this name with
_readeradded at the end.
RDS Cluster Snapshot ID – Displays the snapshot ID.
Instance Type – The type or class of the DB instances.
Port – The port of the database. The default is the port of the original backed-up database.
Zone – The AZ of the cluster in case of single AZ. If using a subnet group, leave as is.
Subnet Group – Whether to launch the cluster in a VPC subnet or not and to which subnet group. The default is the value from the original backed-up cluster.
Publicly Access – Whether the cluster will be publicly accessible or not. The default is the access from the original backed-up instance.
DB Cluster Parameter Group - Every Aurora cluster is associated with a DB cluster parameter group. Each DB instance within the cluster inherits the settings from that DB Cluster Parameter Group and is associated with a DB Parameter Group.
DB Parameter Group - The default DB parameter group contains the database engine defaults and Amazon RDS system defaults based on the engine, compute class, and allocated storage of the instance. Database parameters specify how the database is configured. You can manage your database configuration by associating your RDS instances with parameter groups.
Select Recover Aurora Clusters when finished.
10.8 Aurora Serverless Recovery
When backing up Aurora, AWS automatically copies all tags set on resources to the snapshots and does not allow recovering these resources without recovering their tags as well.
Recovery of Aurora Serverless is somewhat different than for an Aurora Cluster. As part of the recovery, you can define actions for setting capacity:
Force scaling the capacity to the specified values in Minimum/Maximum Aurora capacity unit when the Timeout for force scaling is reached. When you change the capacity, Aurora Serverless tries to find a scaling point for the change.
Enable to force capacity scaling as soon as possible.
Disable to cancel the capacity changes when the timeout is reached.
Pause compute capacity after consecutive minutes of inactivity. You are only charged for database storage while the compute capacity is paused.
Specify the amount of time (Timeout for force scaling) with no database traffic to scale to zero processing capacity.
When database traffic resumes, Aurora automatically resumes processing capacity and scales to handle the traffic.
After selecting a backup with Aurora Serverless in the Backup Monitor, select
 Recover. The Recover screen opens.
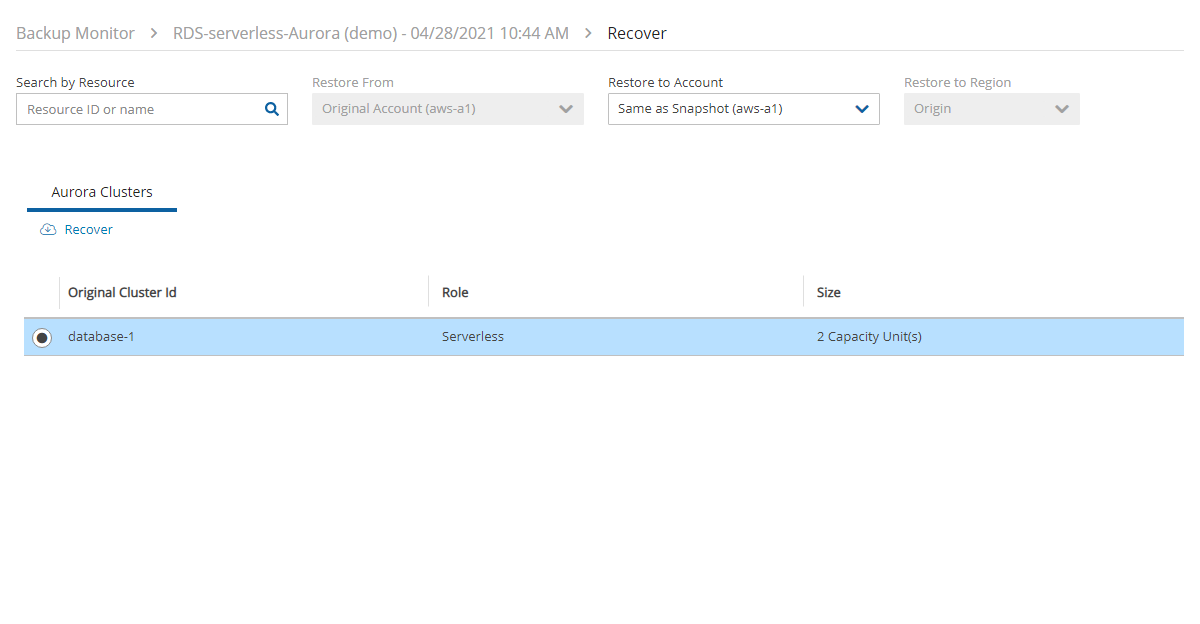
2. In the Aurora Clusters tab, select the recovery target. Aurora Serverless can be identified by the value 'Serverless' in the Role column.
3. Select![]() Recover. The Recovery Aurora Cluster screen opens.
Recover. The Recovery Aurora Cluster screen opens.
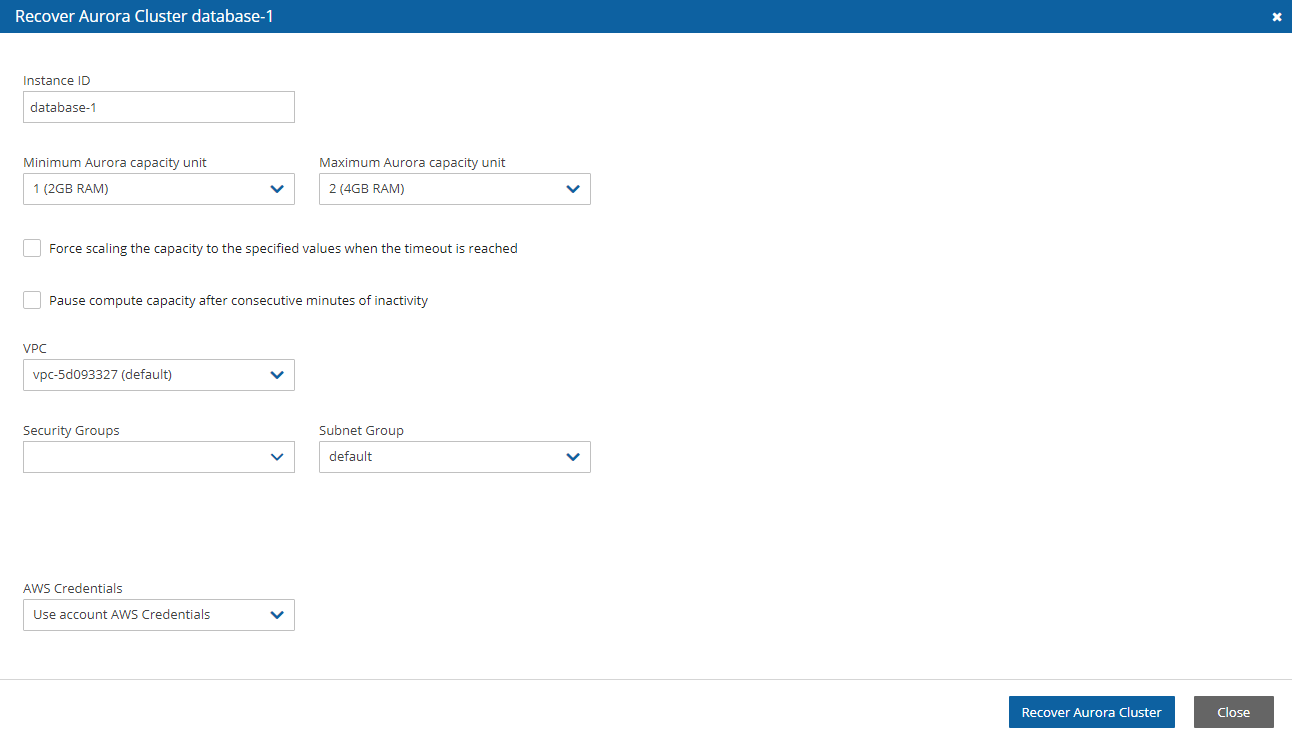
4. Change the default field values as needed. See section 10.7 for Instance ID and Subnet Group. 5. If you select Force scaling the capacity to the specified values when the timeout is reached or Pause compute capacity after consecutive minutes of inactivity, the Timeout for force scaling list appears. Change the timeout seconds as needed. 6. Select Recover Aurora Cluster when finished.
10.9 Redshift Cluster Recovery
When a backup to recover includes snapshots of Redshift clusters, the Redshift Clusters tab opens. All Redshift clusters in the current backup are listed. You can change the following options:
Recover – Clear Recover to not recover the current cluster.
Zone – The AZ of the cluster. By default, it will be the zone of the backed-up cluster, but this can be changed.
Currently, recovering a cluster into a VPC subnet is not supported by N2W. You can always recover from the snapshot using AWS Management Console.
Cluster ID – The default will the ID of the original cluster. If the original cluster still exists, the recovery operation will fail. To recover a new cluster, type a new ID.
Cluster Snapshot ID– Displays the snapshot ID.
Node Type and Nodes – For information only. Changing these fields is not supported by AWS.
Port – The port of the cluster. The default is the port of the original backed-up cluster.
Subnet Group – Whether to launch the cluster in a VPC subnet or not and to which subnet group. The default will be the value from the original backed-up cluster. You can recover a cluster from outside a VPC to a VPC subnet group, but the other way around is not supported.
AWS Credentials - You can choose to use different AWS credentials and enter your keys.
10.10 DynamoDB Table Recovery
When a backup to recover includes DynamoDB Table backups, the DynamoDB Tables tab opens.
If you reach the limit of the number of tables that can be recovered at one time, you will need to wait until they have completed before starting the recovery of additional tables.
All DynamoDB tables in the current backup are listed. You can change the following options:
Recover – Clear Recover to not recover a table.
Region – The Region where the table will be recovered, which is the same region as the backup.
Table Name – The default will be the Name of the original table. However, if the original table still exists, the recovery operation will fail. To recover to a new table, type a new Table Name.
Backup Name – Displays the name of the backup.
AWS Credentials - You can choose to use different AWS credentials and enter your keys.
During backup, N2W retains the DynamoDB tags at the table level and the Time To Live (TTL) metadata and enables these attributes on recovery.
During the recovery process, a confirmation message appears with a reminder to recreate the following settings on the restored DynamoDB tables MANUALLY: Auto Scaling policies, IAM policies, CloudWatch metrics, and alarms.

10.11 EFS Recovery
When a backup includes EFS backups, the Recover EFS tab is available.
For DR and cross accounts, only recoveries to a new EFS are supported.
The AWS role “AWSBackupDefaultServiceRole” is required for recovery.
In the Backup Monitor screen, select an EFS backup. To search backups, you can enter either the EFS name or AWS ID in the search box, select By Elastic File System in the list, and then select the Search
 icon.
icon.
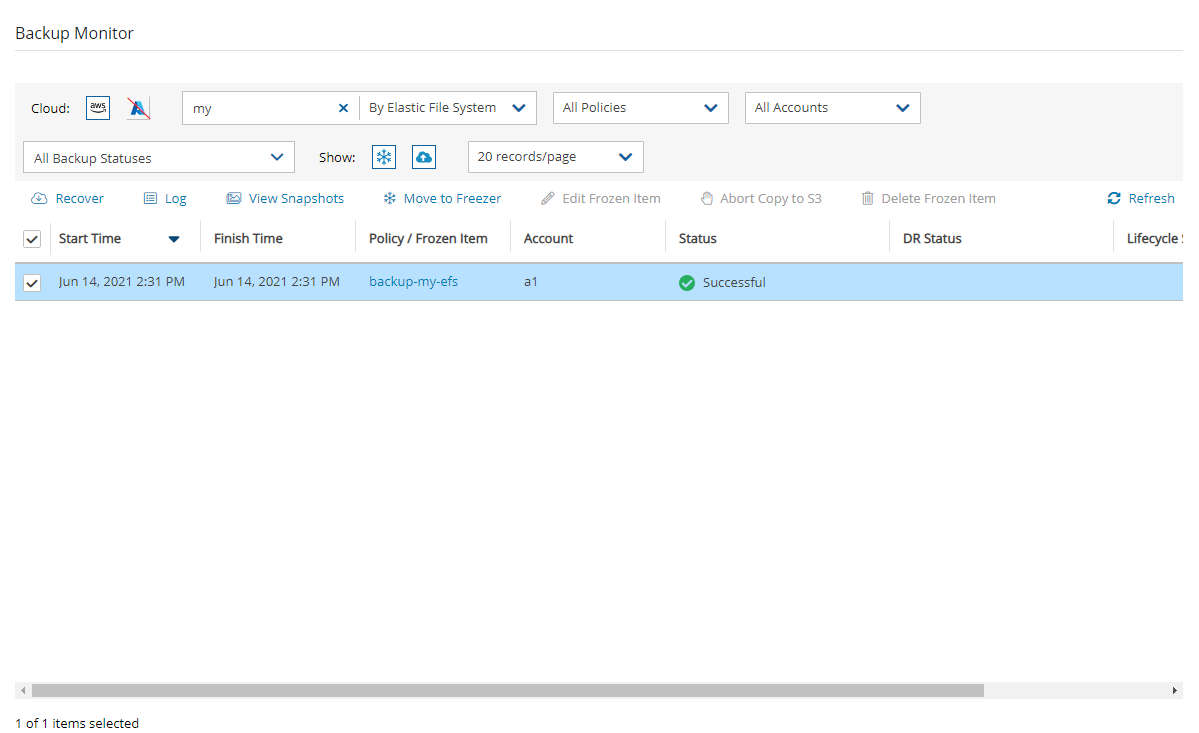
2. Select![]() Recover.
Recover.
3. In the Target EFS list, select the target to restore to:
New - Recover to a separate EFS
Original - Recover to the same EFS
Regular recoveries to original and new EFSs are supported. For DR, Target EFS must be 'New'.
When recovering an EFS to the original target, a new folder is created with the the format
aws-backup-restore_[date-time].
4. In cases where EFS DR was performed, select the Restore to Region.
5. For a cross-account recovery:
Target EFS must be 'New'.
In the Cross Account Copy IAM Role list of roles from the source account, select the IAM role needed for copying the recovery point to the target account.
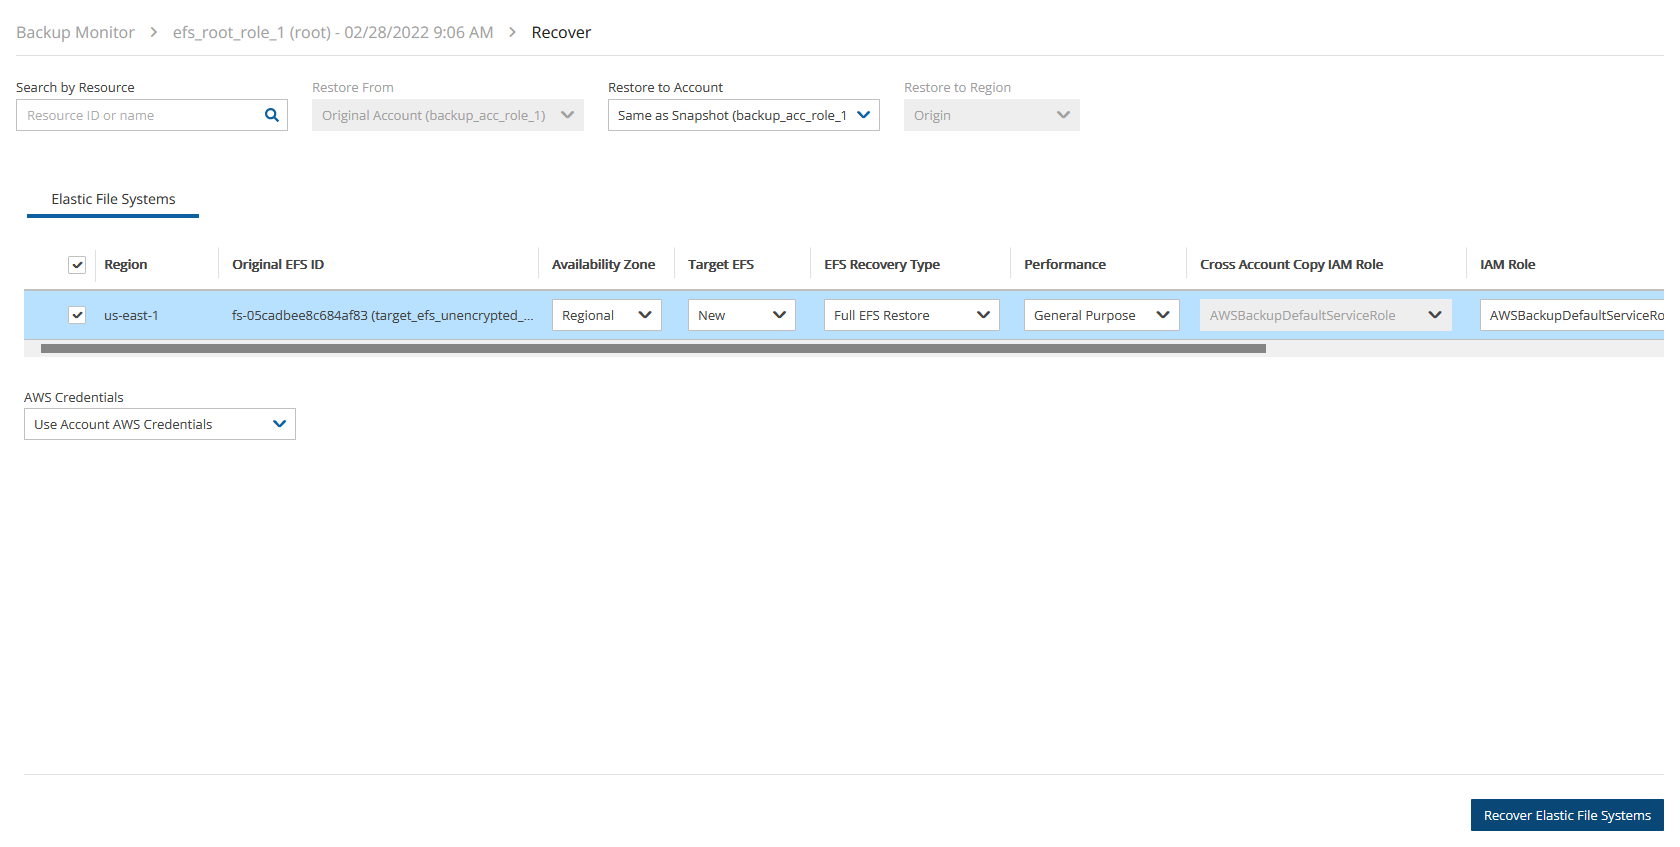
To not miss matching an EFS vault name in the target region during a snapshot backup or a copy, in the AWS console, go to AWS Backup > Backup vaults and select the region you would like to back up or copy EFS snapshots to. This action is to be performed only once before running an EFS backup or DR.
6. Select Recover Volumes.
For file-level recovery, see section 13.3.
To view the progress of the recovery:
In N2W, select the Recovery Monitor tab.
To view details of the recovery process, select the recovery record, and select
 Log. Select
  Refresh as needed.
10.12 FSx Recovery
To view the contents of a backup for recovery, in the Backup Monitor, select a backup and then select![]() View Snapshots.
View Snapshots.
In the Backup Monitor, select an FSx backup for the recovery. Select ![]() Recover. The FSx File Systems tab will show the Original FSx Name and ID, Region, and File System Type.
Recover. The FSx File Systems tab will show the Original FSx Name and ID, Region, and File System Type.
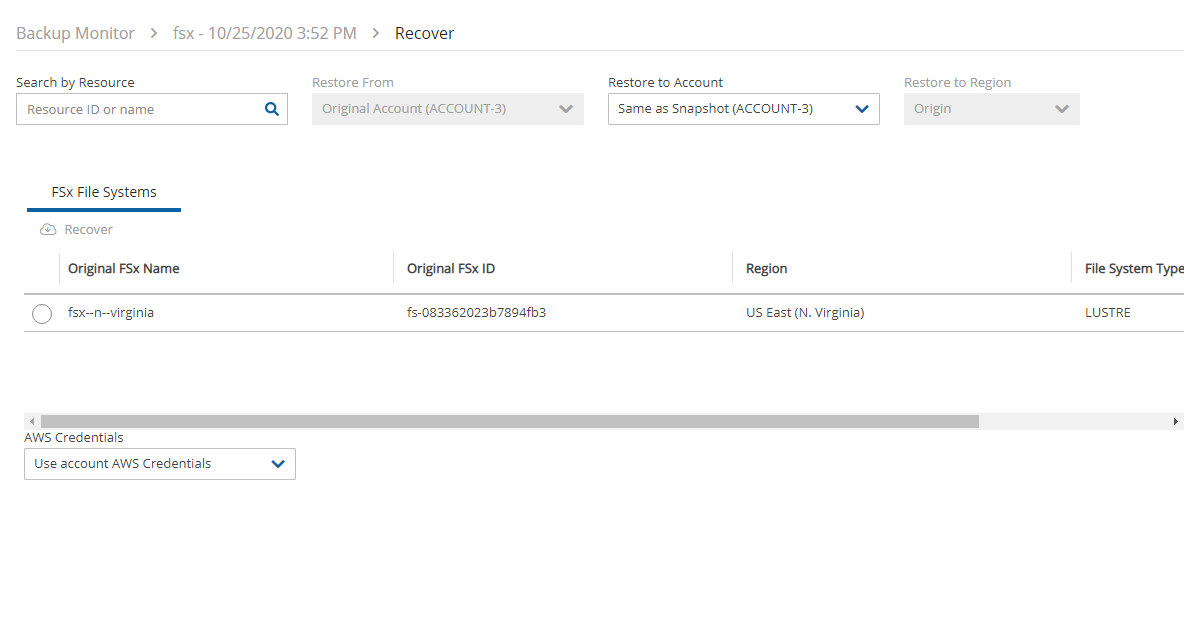
Select an FSx File System, and then select ![]() Recover. Parameters are shown depending on whether they are relevant for the type of FSx.
Recover. Parameters are shown depending on whether they are relevant for the type of FSx.

All following parameters are optional except for the password of Win-SMAD, where the original password is the default.
Parameter
FSx Types
Comment
Target VPC
All
AWS Subnet ID of selected VPC
Security Group
All
AWS Security Group IDs of selected VPC
Subnet ID
Win-AD, Win-SM
Subnet ID
Active Directory ID
Win-AD
Domain Name
Win-SMAD
IP Addresses
Win-SMAD
User Name
Win-SMAD
Password
Win-SMAD
Mandatory
10.12.1 AWS-managed Active Directory
When selecting a Windows FSx with AWS-Managed Active Directory, you can select the Active Directory from the target’s AWS account:
10.12.2 Self-managed Active Recovery Options
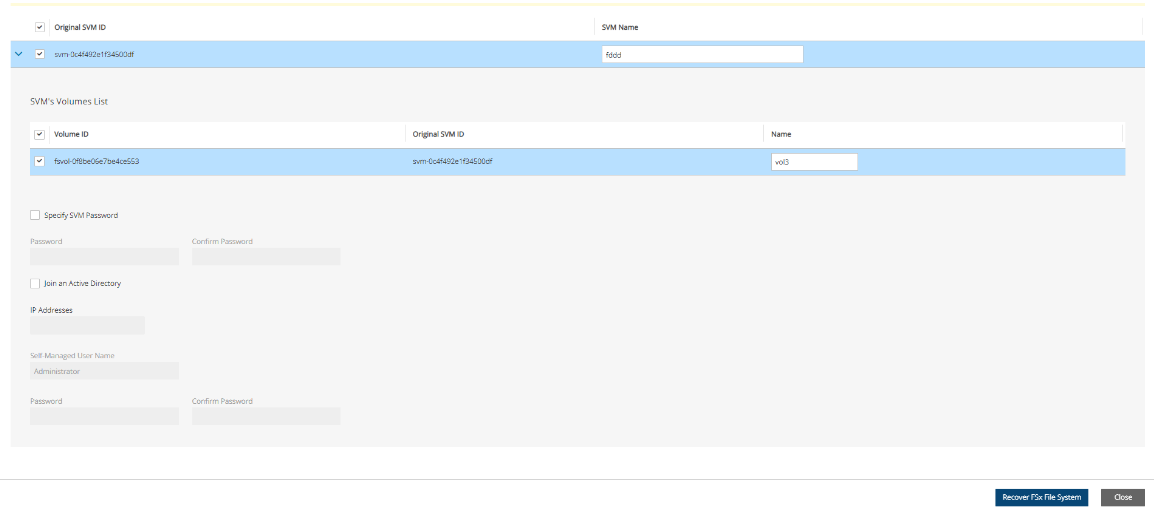
For Self-managed Active Directory, the connection to Active Directory is on the SVM level, not the file system level as in FSx Windows.
Select the SVM tab.
Select an Original SVM ID, and enter an SVM Name.
Select a Volume ID, and enter a Name.
Select and complete Specify SVM Password, and Join an Active Directory.
Select Recover FSx File System.
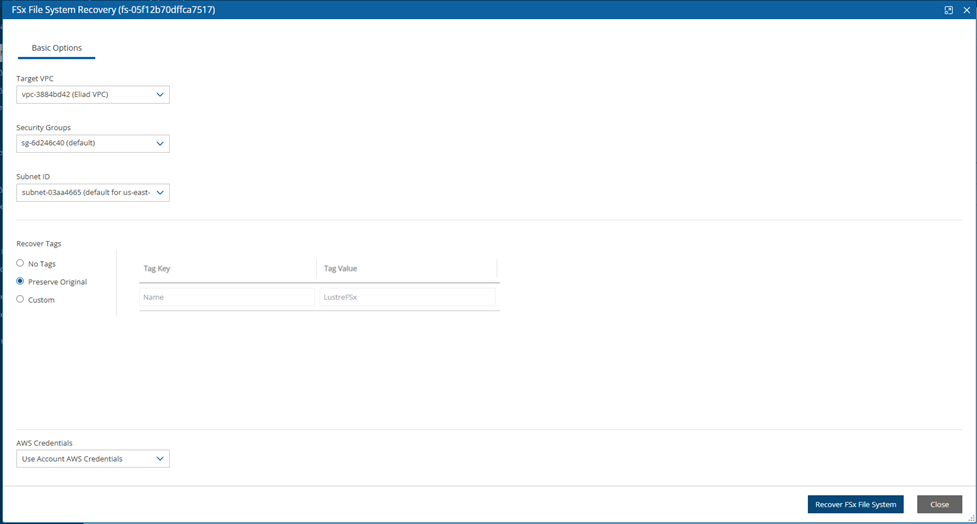
10.13 FSx for Lustre and OpenZFs Recovery
In the Backup Monitor, under the FSx File Systems section, select a backup with the File System Type of ‘LUSTRE’ or ‘OPENZFS’.
Select Recover.
In the Recovery screen, make changes as necessary.
The default Recover Tags action during recovery is Preserve Original tags. To manage tags, see section 10.3.
Select Recover FSx File System.
10.14 FSx for NetApp ONTAP Recovery
Following are the types of ONTAP recoveries:
To recover all or some volumes to a new ONTAP FSx, select
 Recover.
To recover selected volumes and attach them to an existing SVM, select
 Recover Volumes Only.
To view the contents of a snapshot for recovery, use
 View Snapshots in the Backup Monitor.
To recover an ONTAP backup:
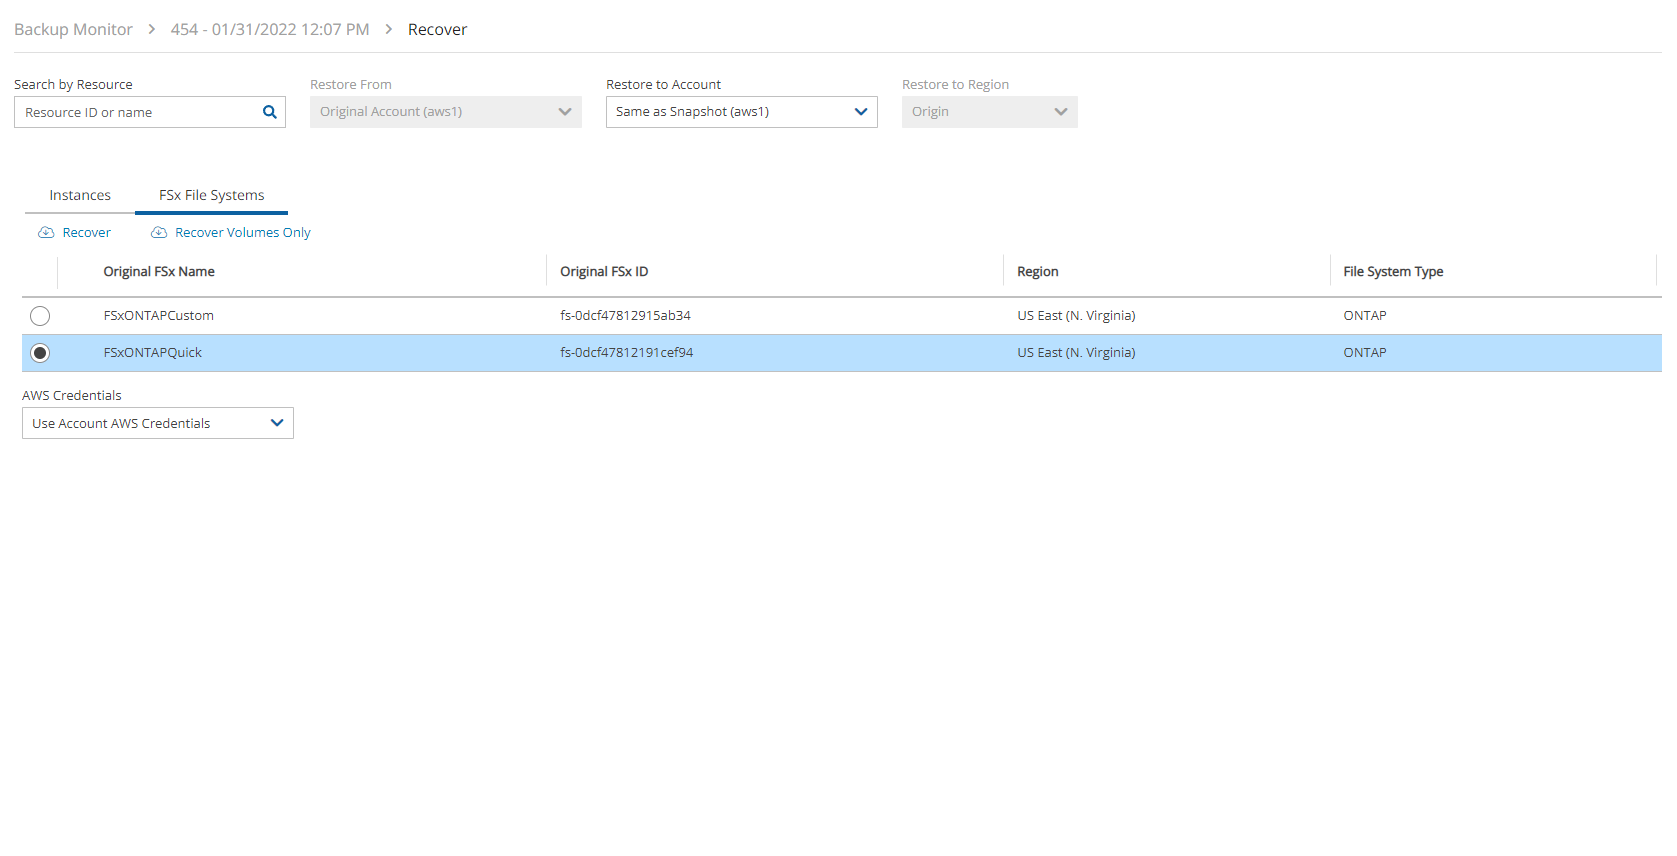
In the Backup Monitor, under the FSx File Systems section, select a backup with the File System Type of 'ONTAP'.
Select
 Recover. The FSx File System Recovery screen opens.
In the Basic Options tab, modify the options as required for the recovery.
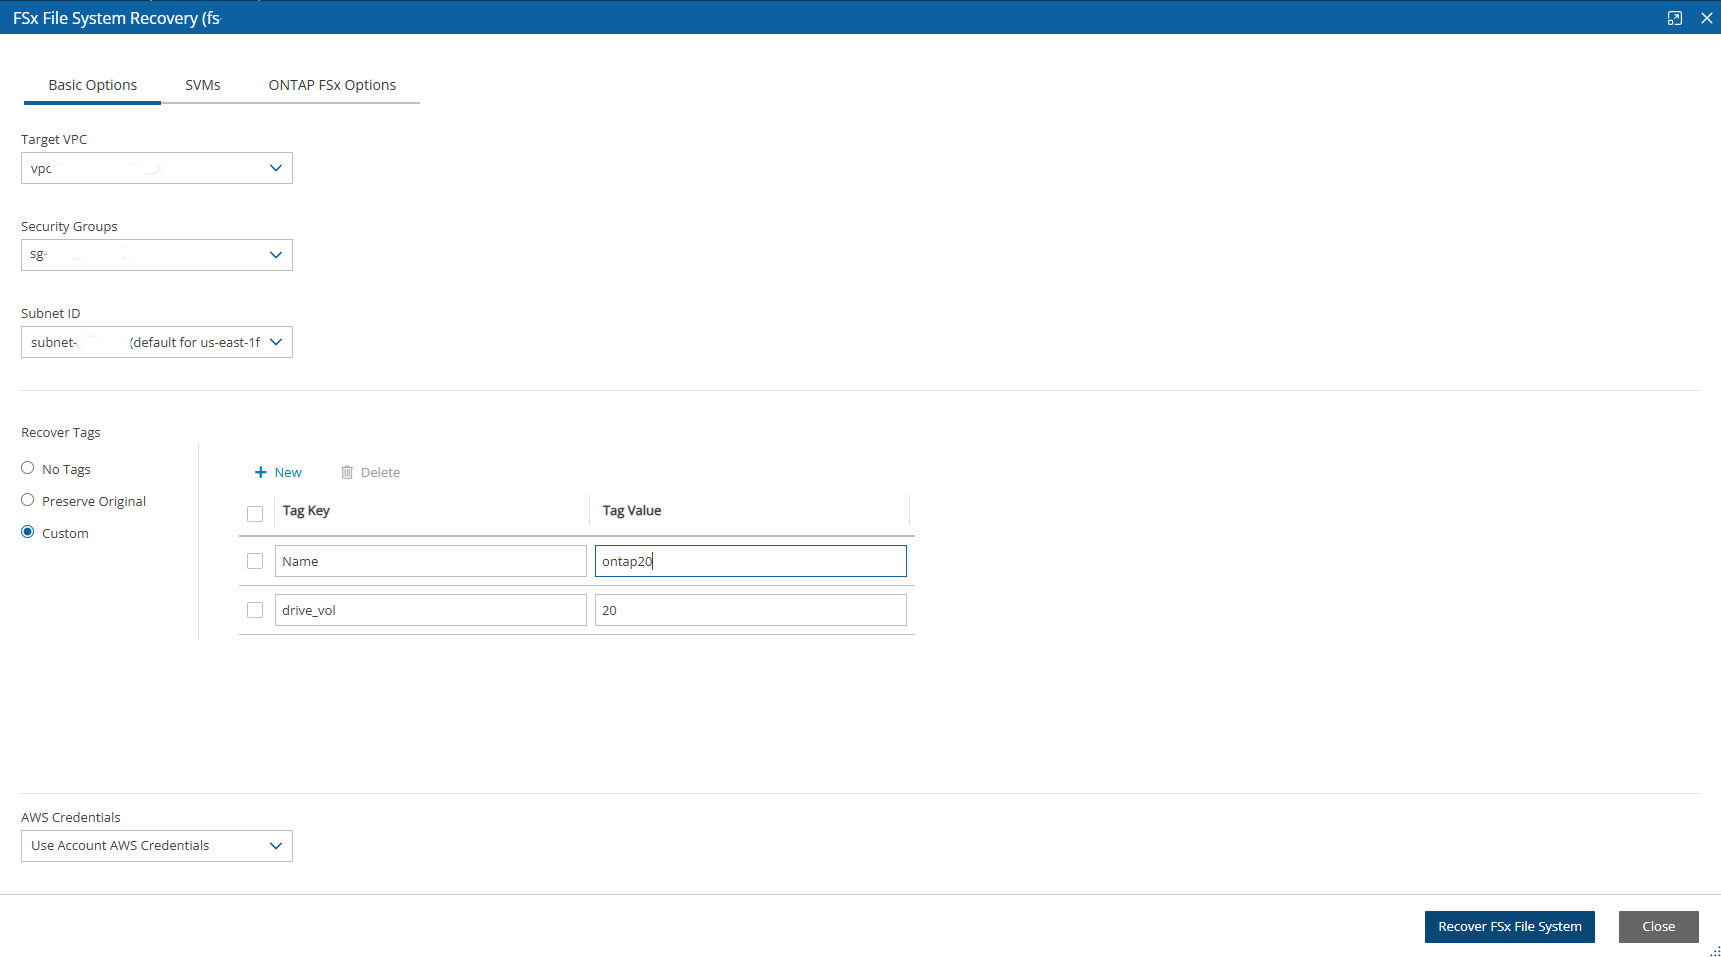
4. In the Subnet ID field, select a single Availability Zone for recovery.
5. The default Recover Tags action during recovery is Preserve Original tags. To manage tags on SVMs and their volumes during recovery, see section 10.3.
6. In the Volumes tab, select the volumes to recover and update the volume Name as necessary.
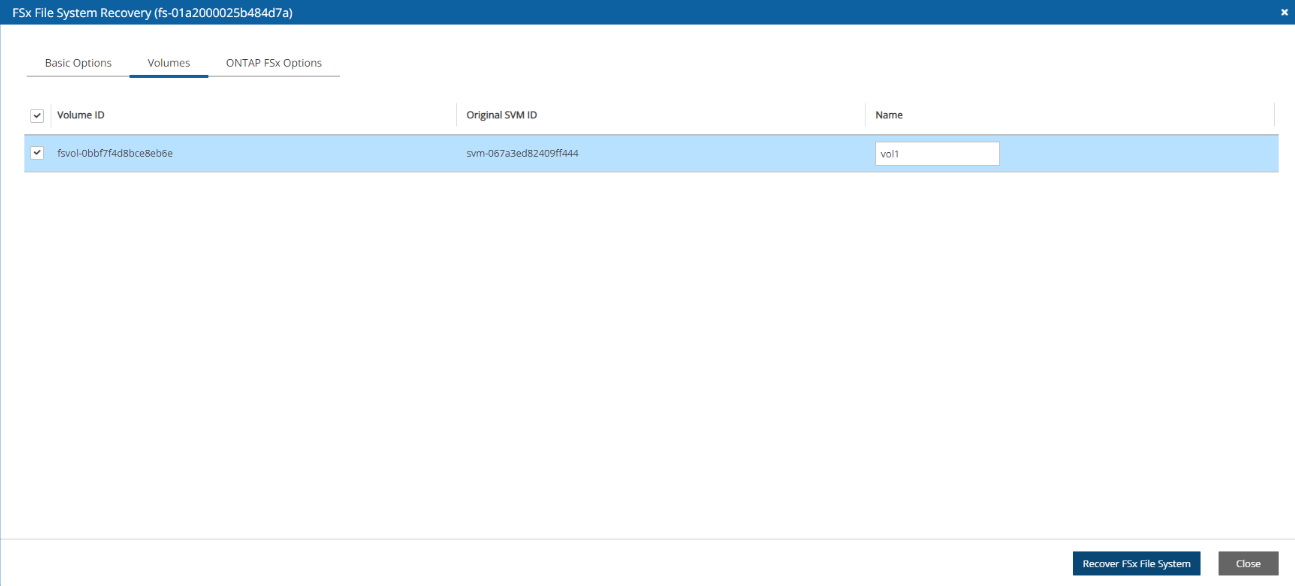
7. In the ONTAP FSx Options tab:
a. Update the Recovered File Name as necessary.
b. If required, enable, and specify a password.
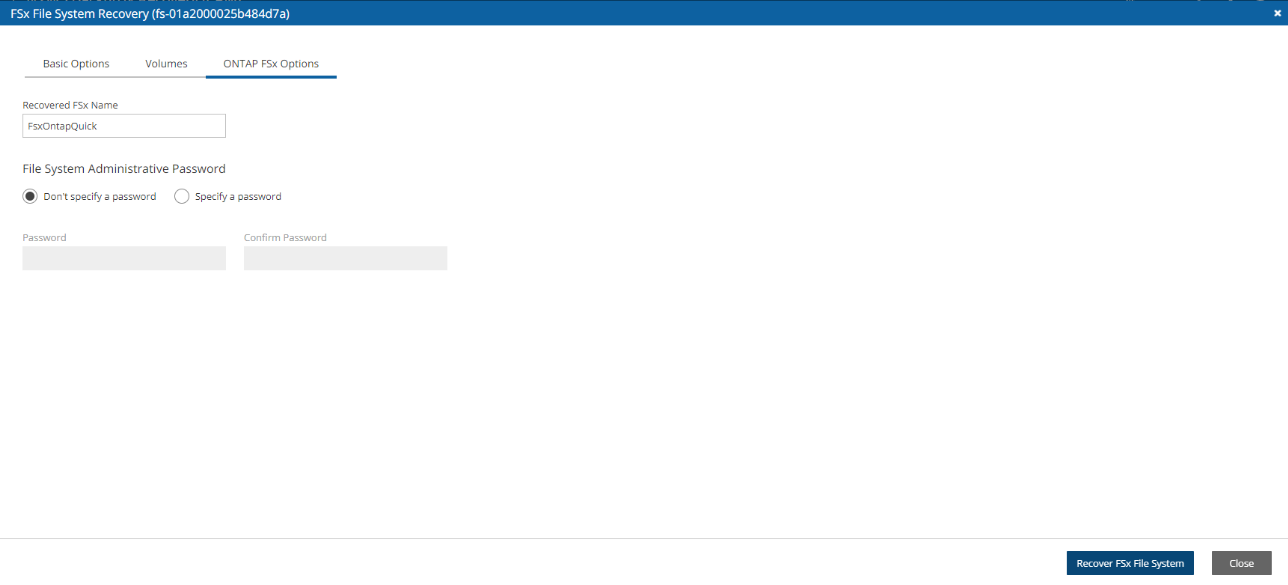
8. Select Recover FSx File System.
To recover ONTAP volumes only and attach to an existing SVM:
In the Backup Monitor, select an FSx backup for the recovery. Select
 Recover. The FSx File Systems tab will show the Original FSx Name and ID, Region, and File System Type.
Select the ONTAP file system to recover and then select
 Recover Volumes Only.

3. In the Volume Recovery from FSx File System screen, select the volumes to recover. For each volume, type the Name of the volume and select the SVM to attach the volume to.
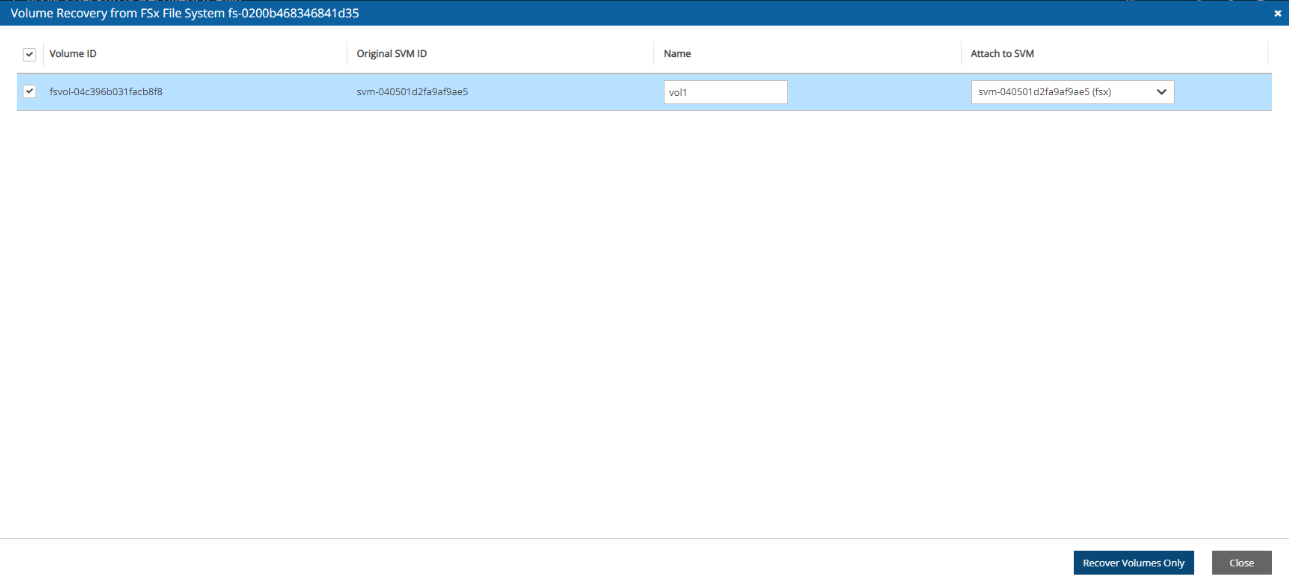
4. Select the Recover Volumes Only button.
For managed active directory recovery options, also see sections 10.12.1 and 10.12.2.
10.15 SAP HANA Database Recovery
If a backup holds an instance with an SAP HANA configuration and snapshots, the SAP HANA recovery is available. You can recover SAP HANA snapshots to the original EC2 instance or to a new instance created from the EC2 snapshot.
Following are the recovery options:
Recover – EC2 instance recovery with SAP HANA native recovery performed on a newly recovered instance. Cross–region recovery is supported when selecting another region in the Restore to Region list.
Recover SAP HANA Internal DBs only - Recovering an SAP HANA backup to the original EC2 instance.
Some SAP HANA installations require changing the
/etc/hostsfile in order to communicate with the database. As part of backup and recovery, the user data attached to the instance changes from the original IP address to127.0.0.1to enable communication to the database on localhost.Cross-region recovery might fail on communication issues. Validate that communication is possible between N2W and the SAP HANA instance on designated ports.
Recovering SAP HANA DB to a new EC2 instance might fail. However, N2W runs additional (2) retires on the recovery. The recovery operation fails permanently on the 3rd try.
Cross-account recovery is not currently supported on N2W. It’s possible to run cross-account backup and then perform a cross-account recovery for the EC2 instance only.
In the Backup Monitor, select the SAP HANA backup with the instance for recovery. Select
 Recover.
In the SAP HANA Instances tab, select an instance and then select a recovery option:
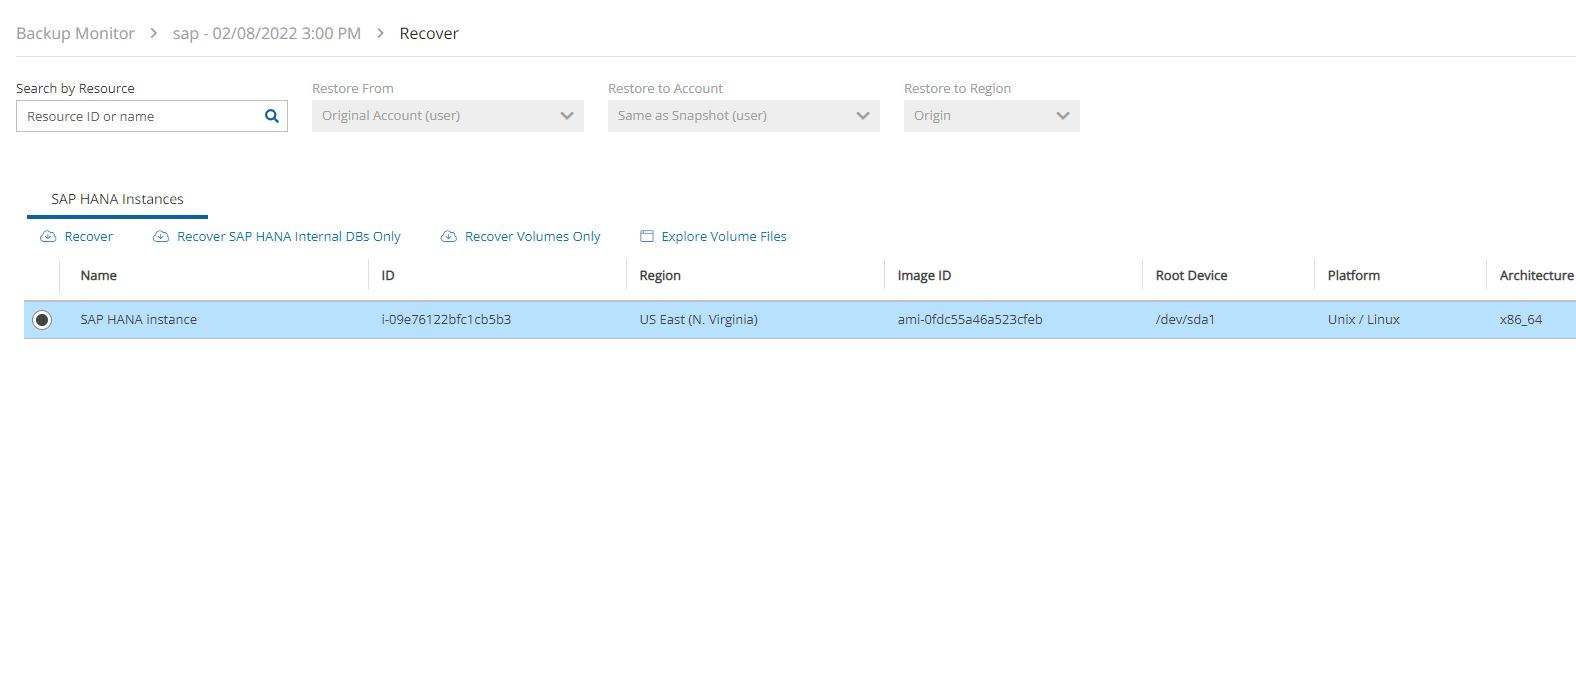
3. Except for SAP HANA Internal DBs, set all tab options as you would for regular EC2 instance recovery. See section 10.4.
4. If the Recover option is selected, also select the SAP HANA Internal DBs tab, select all or individual DBs, and then select Recover Instance.
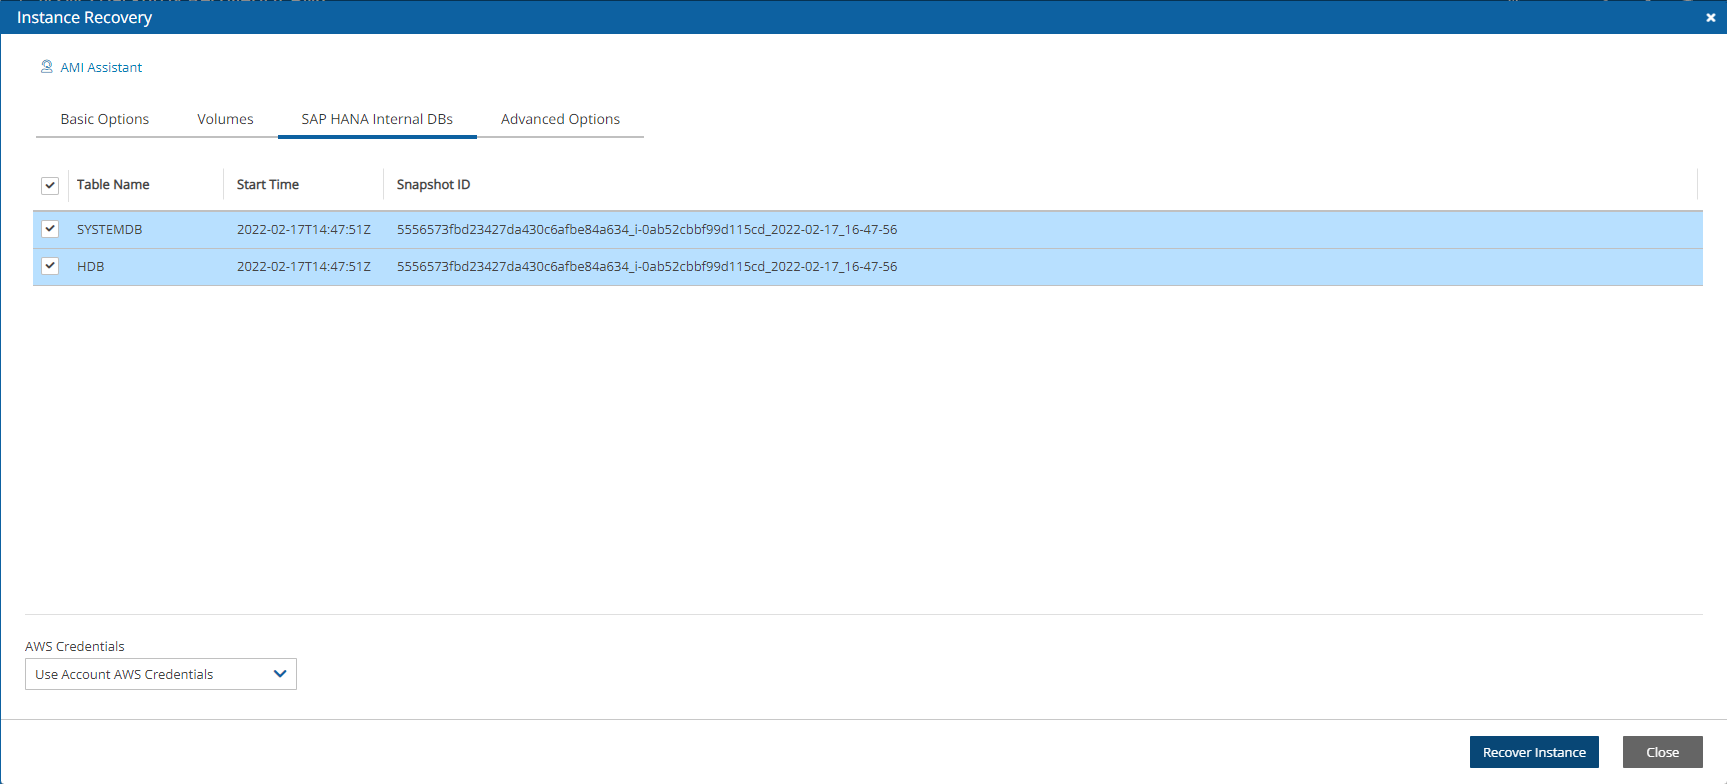
5. If Recover SAP HANA Internal DBs Only is selected, select the internal DBs for recovery, and then select Recover Instance.
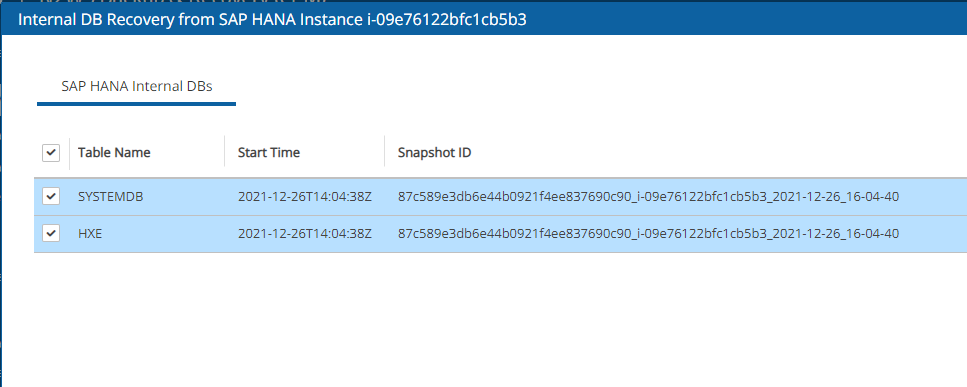
6. If Recover Volumes Only is selected, configure as for a regular EC2 volumes only recovery. See section 10.4.2.
10.16 Virtual Machine Recovery
With Virtual Machine recovery, you can recover a complete virtual machine with its data for variety of purposes, such as:
A virtual machine crashed or is corrupted and you need to create a new one.
Creating a virtual machine in a different zone.
Creating a virtual machine in a different location.
When you recover a virtual machine, you can change the following elements:
Name
Resource group
Size
Availability
Network interface
You can choose to manage tags associated with the virtual machine.
Your data disks will be recovered by default to create a similar virtual machine as the source. However, you can choose:
To recover some or none of the disks.
To enlarge disk size.
To manage tags related to the disks.
To choose a different encryption set.
The instance recovery screen has tabs for Basic Options and Disks.
10.16.1 Basic Options
The Basic Options tab is divided into the general section, the Availability section and the Networking section:
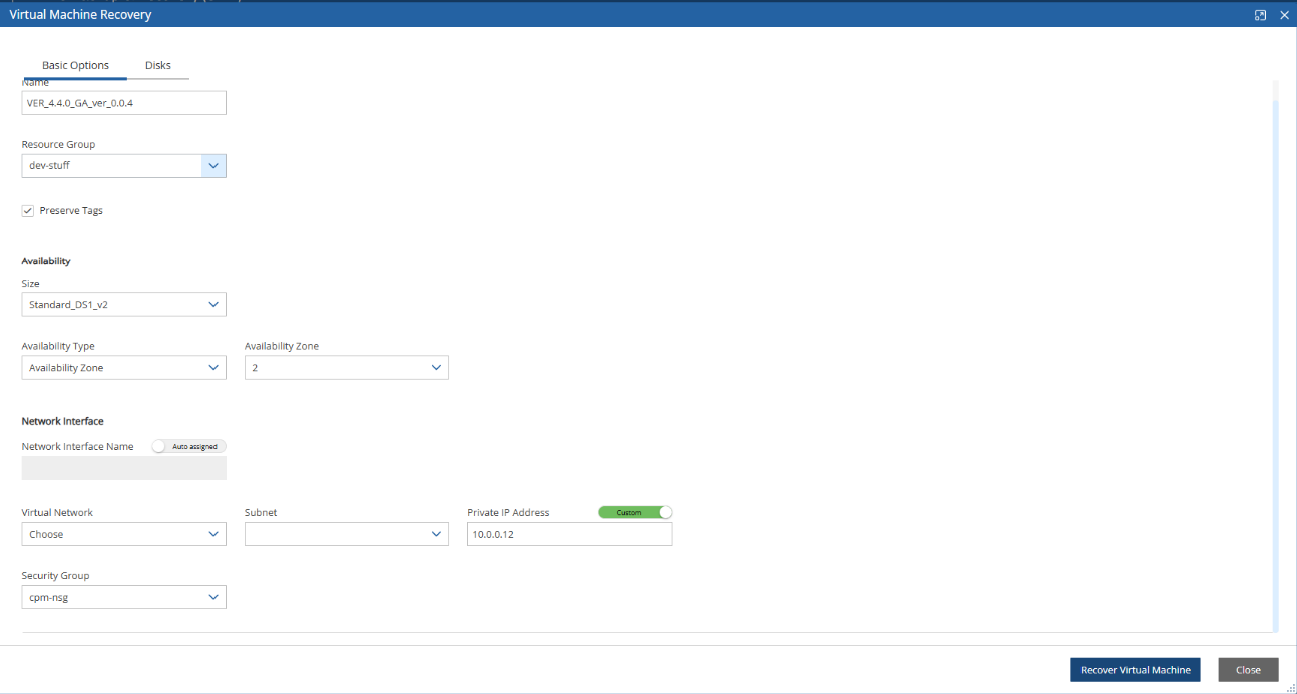
Name and Resource Group – Enter a name for the recovered virtual machine.
The virtual machine’s name must be unique within the selected resource group.
Preserve Tags - The default action during recovery is Preserve Original for the volumes associated with the virtual machine. To manage tags, see section 10.3.
10.16.1.1 Availability Section
Size - Choose the virtual machine’s size. If the Availability Zone option is selected in the Availability Type list, The virtual machine size determines which Availability Zones are available since some virtual machine sizes are available only in certain zones.·
Availability Type – Choose between No Infrastructure Redundancy Required, Availability Zone, and Availability Set options.
If the selected recovery location does not support availability zones, the Availability Zone option is disabled.
If Availability Zone is chosen, select a zone in the Availability Zone list in which to place the virtual machine. Only zones supporting the selected virtual machine Size will be available in the list.
If Availability Set is selected, select a set in the Availability Set list.
10.16.1.2 Network Interface Section
Network Interface Name – Set a name for the Network Interface Name will be created and assigned to the recovered virtual machine.
If the toggle key is set to Auto assigned, a unique name will be generated by N2W for the network interface.
To manually choose a name, switch the toggle key to Custom, and enter a name in the text box.
Virtual Network and Subnet – Select a virtual network and subnet for the newly created network interface.
Private IP Address – Set the private IP address for the newly created network interface.
When the toggle key is set to Auto assigned, N2W will find a vacant port and assign it to the network interface.
To manually choose an IP address, switch the Auto assigned toggle key to Custom, and enter an IP address into the text box.
Security Group – Select a security group for the newly created network interface.
10.16.2 Disks
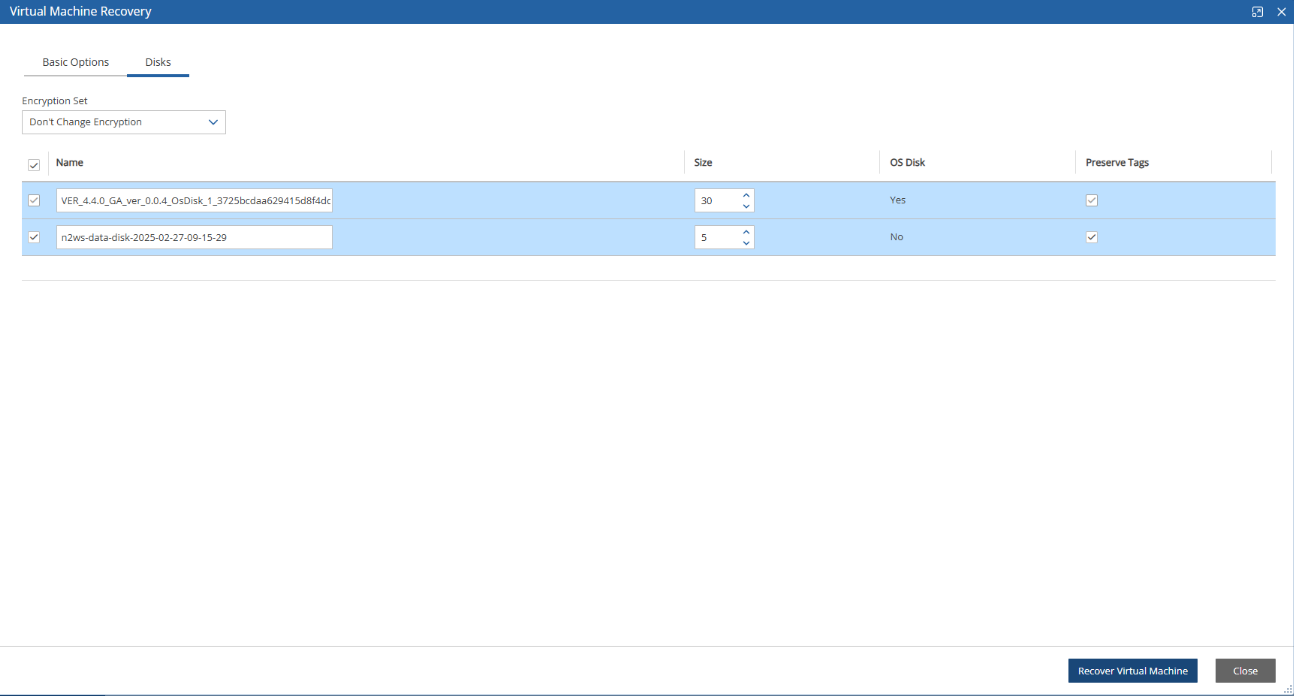
This section allows configuring the recovered virtual machine disks.
Encryption Set – Choose to keep the same encryption as the backed-up virtual machine or select a different encryption set.
In the Name list, select the disks to be recovered. The OS disk will always be recovered but data disk selections can be cleared.
For each disk, the name and size can be configured, as well as whether to preserve the original virtual machine tags or make changes.
The disk Name must be unique among all resources under the same resource group.
Preserve Tags - The default action during recovery is Preserve Original for the target. To manage tags, see section 10.3.
10.17 SQL Server Recovery
You can recover an SQL Server or only its databases.
To view the recovery progress, select Recovery Monitor. Use the Cloud buttons to display the Azure (![]() ) recoveries.
) recoveries.
To recover an SQL Server:
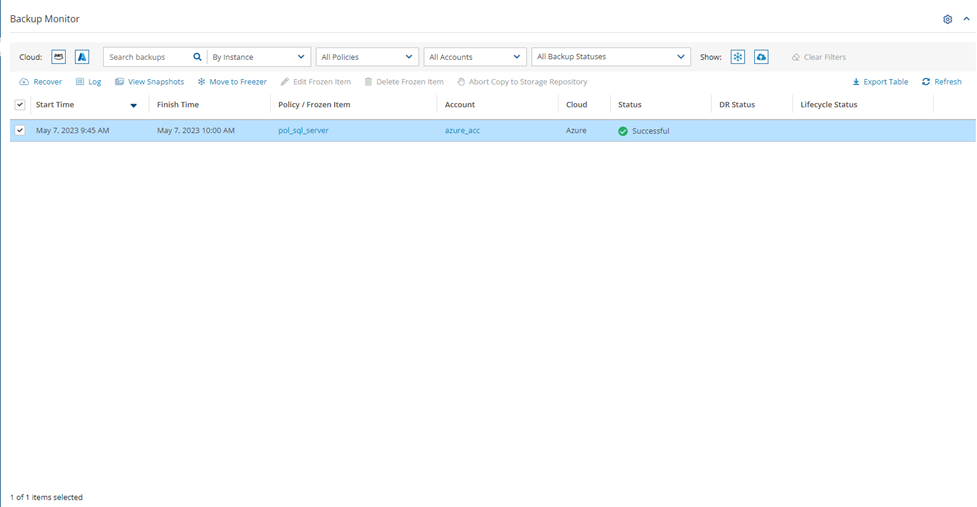
In the Backup Monitor, select the backup to recover from, and then select
 Recover.
In the Recover screen, select the SQL Server snapshot that you want to recover from, and then select
 Recover.
In the SQL Server tab of the Recover screen, select 1 SQL Server, and then select
 Recover. The Basic Options tab opens.
In the Credentials section, enter the Server Admin Login and Password for the recovered SQL Server.
In the Network tab, select Firewall Rules and Virtual Network Rules or set Deny Public Network Access.
In the SQL Databases tab, select the databases to recover.
In the Worker Options tab, set values so that communication between the worker and the SQL Server is available.
Select Recover SQL Server.
To recover only SQL databases:
Select
 Recover SQL Databases Only.
In the SQL Databases tab, enter a new Name for each database. Similar names will cause the recovery to fail. Change other settings as needed.
Select Recover SQL Database.
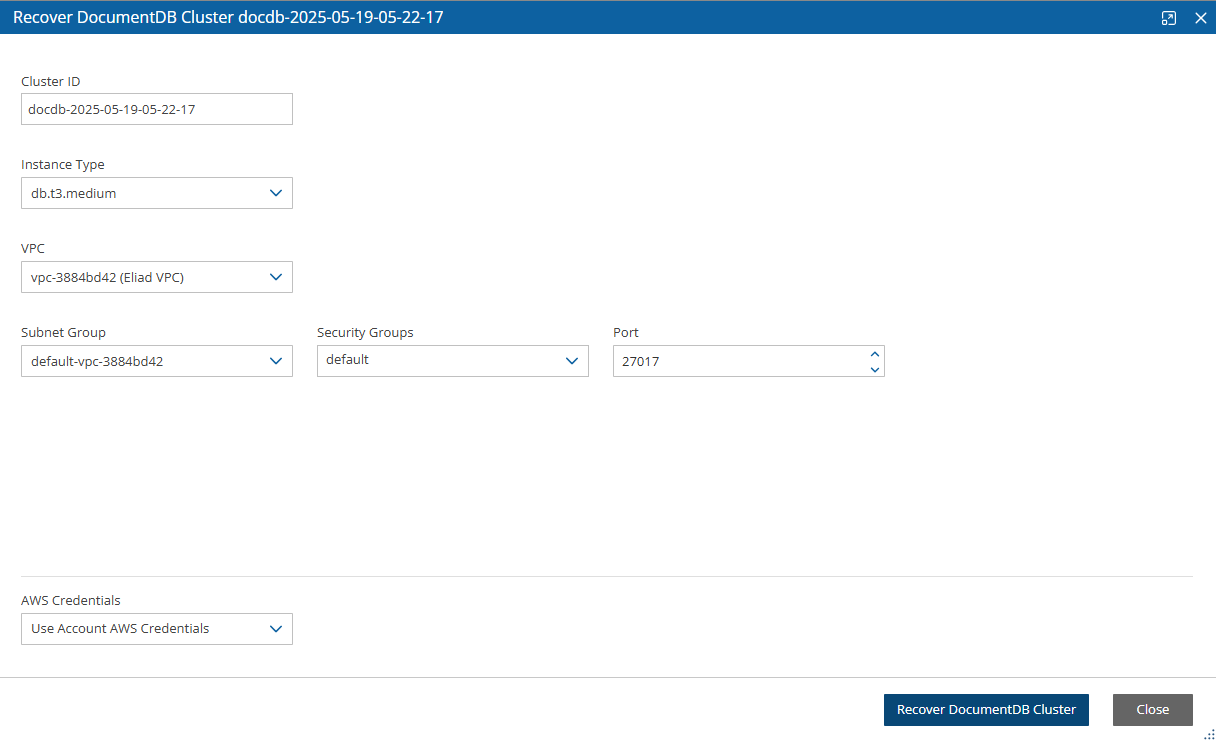
10.18 DocumentDB Cluster Recovery
To recover a DocumentDB Cluster:
In the Backup Monitor, select the Cluster ID that you want to recover from, and then select
 Recover.
In the Recover screen, makes changes as necessary.
Select Recover DocumentDB Cluster.
10.19 S3 Bucket Recovery
When a backup includes S3 Bucket backups, the Recover S3 Bucket tab is available.
For DR and cross accounts only, recoveries to a new S3 Bucket are supported.
The AWS role “AWSBackupDefaultServiceRole” is required for recovery.
In the Backup Monitor screen, select an S3 Bucket backup. To search backups, you can enter either the S3 Bucket name or AWS ID in the search box, select By S3 Bucket in the list, and then select the Search icon.
Select Recover.
In the Target S3 Bucket list, select the target to restore to:
New - Recover to a separate S3 Bucket
Original - Recover to the same S3 Bucket
Regular recoveries to original and new S3 Buckets are supported. For DR, Target S3 Bucket must be ‘New’.
When recovering an S3 Bucket to the original target, a new folder is created with the format aws-backup-restore_[date-time].
4. In cases where S3 Bucket DR was performed, select the Restore to Region.
To not miss matching an S3 Bucket vault name in the target region during a snapshot backup or a copy, in the AWS console, go to AWS Backup > Backup vaults and select the region you would like to back up or copy S3 Bucket snapshots to. This action is to be performed only once before running an S3 Bucket backup or DR.
For cross-account recovery:
Target S3 Bucket must be ‘New’.
In the Cross Account Copy IAM Role list of roles from the source account, select the IAM role needed for copying the recovery point to the target account.
Select Recover Bucket
For item-level recovery:
To recover files and folders, see section 13.4.
To view the progress of the recovery:
In N2W, select the Recovery Monitor tab.
To view details of the recovery process, select the recovery record, and select Log. Select Refresh as needed.
Last updated
Was this helpful?

