18 N2W User Management
In this section, you will learn about the different types of users and the variety of user-related reporting from N2W.
N2W is built for a multi-user environment. At the configuration stage, you define a user that is the root user. The root user can create additional users, depending on the edition of N2W you are subscribed to. Additional users are helpful if you are a managed service provider, in need of managing multiple customers from one N2W server or if you have different users or departments in your organization, each managing their own AWS resources. For instance, you may have a QA department, a Development Department, and an IT department, each with their own AWS accounts. Select ![]() Server Settings > Users.
Server Settings > Users.
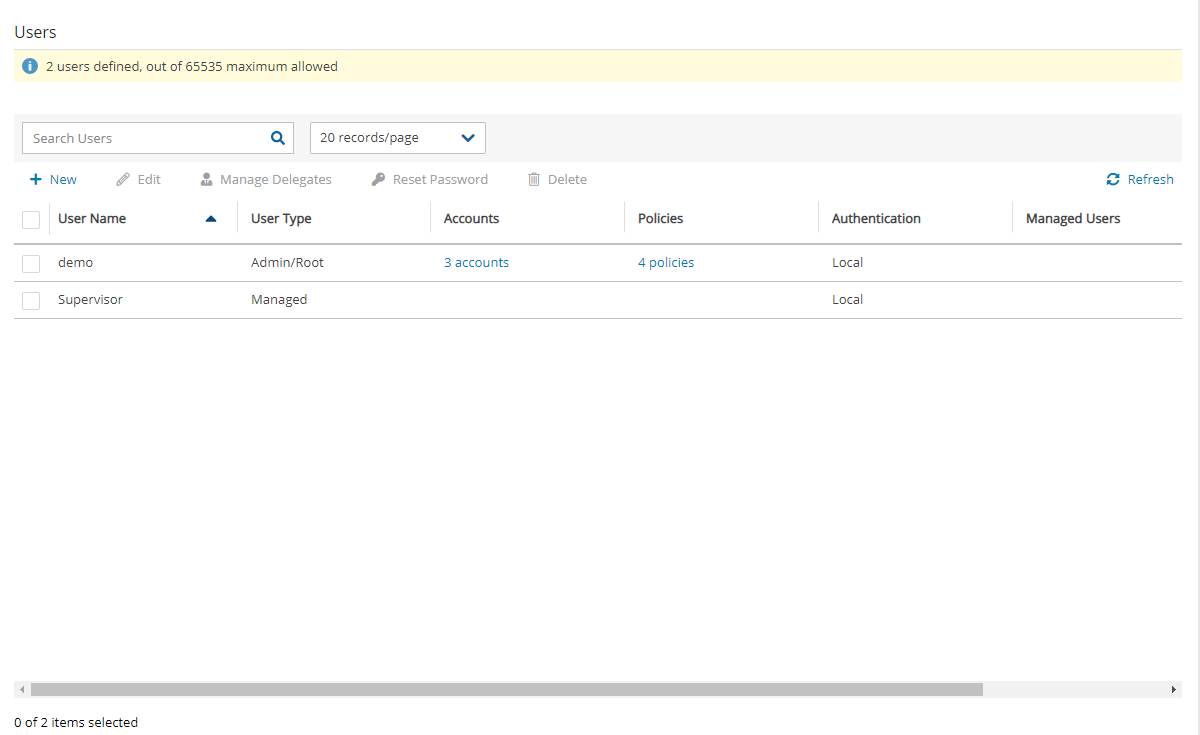
The Accounts column reflects all account types, including:
Licensed accounts (AWS, Azure)
Non-licensed accounts (Wasabi)
The following are the types of users you can define. Delegate users are typed after users are created.
Independent
Managed
Delegate
18.1 Independent Users
Independent users are separate users. The root user can create such a user, reset its password, and delete it with all its data, but it does not manage this user’s policies and resources. Independent users can:
Log-in to N2W
Create their own accounts
Manage their backup
Mange policies and resources of managed users that were assigned to them
Independent users can have Managed users assigned to them by the root/admin in the Users management screen. An Independent user can log on, manage the backup environment of their assigned Managed users, and receive alerts and notifications on their behalf.
18.2 Managed Users
Managed Users are users who can log on and manage their backup environment, or the root/admin user or independent user can do it for them. The root user can perform all operations for managed users: add, remove, and edit accounts, manage backup policies, view backups, and perform recovery. Furthermore, the root user, or independent user, can receive alerts and notifications on behalf of managed users. The root/admin user can also configure notifications for any managed user and independent users can configure notifications for their managed users (section 17.3.1.) To create a managed user, select![]() New and choose Managed as the User Type. If the root user does not want managed users to log in at all, they should not receive any credentials.
New and choose Managed as the User Type. If the root user does not want managed users to log in at all, they should not receive any credentials.
Managed users may be managed by Independent users. See section 18.1.
18.3 User Definitions
When editing a user, the root user can modify email, password, type of user, and resource limitations.
The username cannot be modified once a user is created.
Users who are created in N2W via IdP integration (section 19) cannot be edited, only deleted.
To define a user:
If you are the root or admin user, in the toolbar, select
 Server Settings.
In the left panel, select the Users tab. The Users screen opens.
Select
 New.
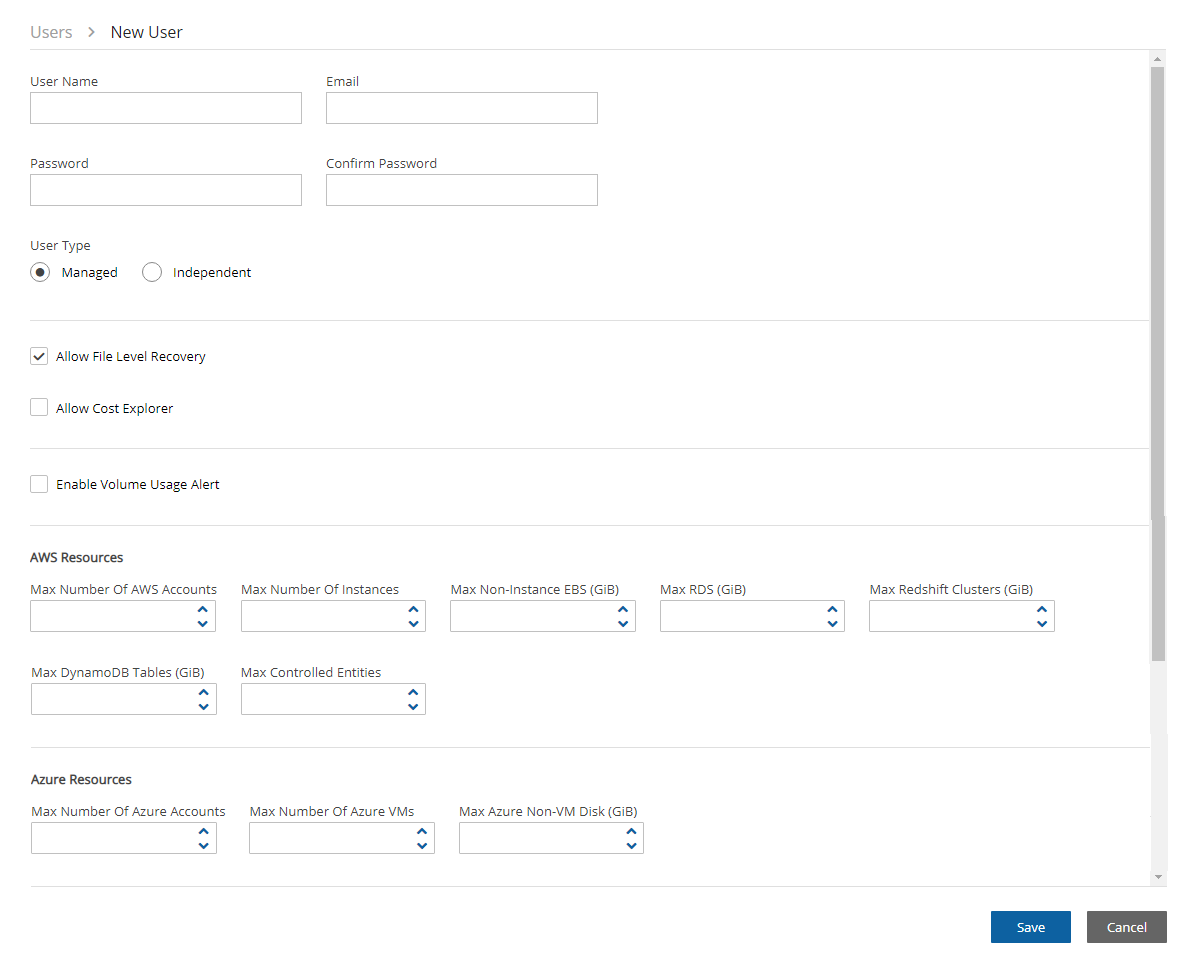
New.In the User name, Email, and Password boxes, type the relevant information.
If the user can recover at the file level, select Allow File Level Recovery.
In the Max Number of Accounts, Max Number of Instances, Max Non-instance EBS (GiB), Max RDS (GiB), Max Redshift Clusters, Max DynamoDB Tables (GiB), and Max Controlled Entities boxes, select the value for the respective resource limitation from its list.
The value for Max Controlled Entities is the maximum number of allowed instances and RDS database resources.
For Users that will have Azure accounts, in the Azure Resources section, select the value for the respective resource limitations for Max Number of Azure Account, Max Number of Azure VMs, and Max Azure Non-VM Disk (GiB).
If the resource limitation fields are left empty, there is no limitation on resources, except the system level limitations that are derived from the licensed N2W edition used.
18.4 Delegates
Delegates are a special kind of user, which is managed via a separate screen. Delegates are like IAM users in AWS:
They have credentials used to log on and access another user’s environment.
The access is given with specific permissions. By default, if no permissions are allowed, the delegate will only have permissions to view the settings and environment and to monitor backups.
Allowing all permissions will allow the non-root delegate the permissions of the original user except for notification settings.
Using IAM User credentials is not recommended as they are less secure than using IAM roles.
For each user, whether it is the root user, an independent user, or a managed user, the ![]() Manage Delegates command in the Users list screen that opens the Delegates screen for that user. Selecting an existing entry in the Delegates column also opens the Delegates screen for that user.
Manage Delegates command in the Users list screen that opens the Delegates screen for that user. Selecting an existing entry in the Delegates column also opens the Delegates screen for that user.
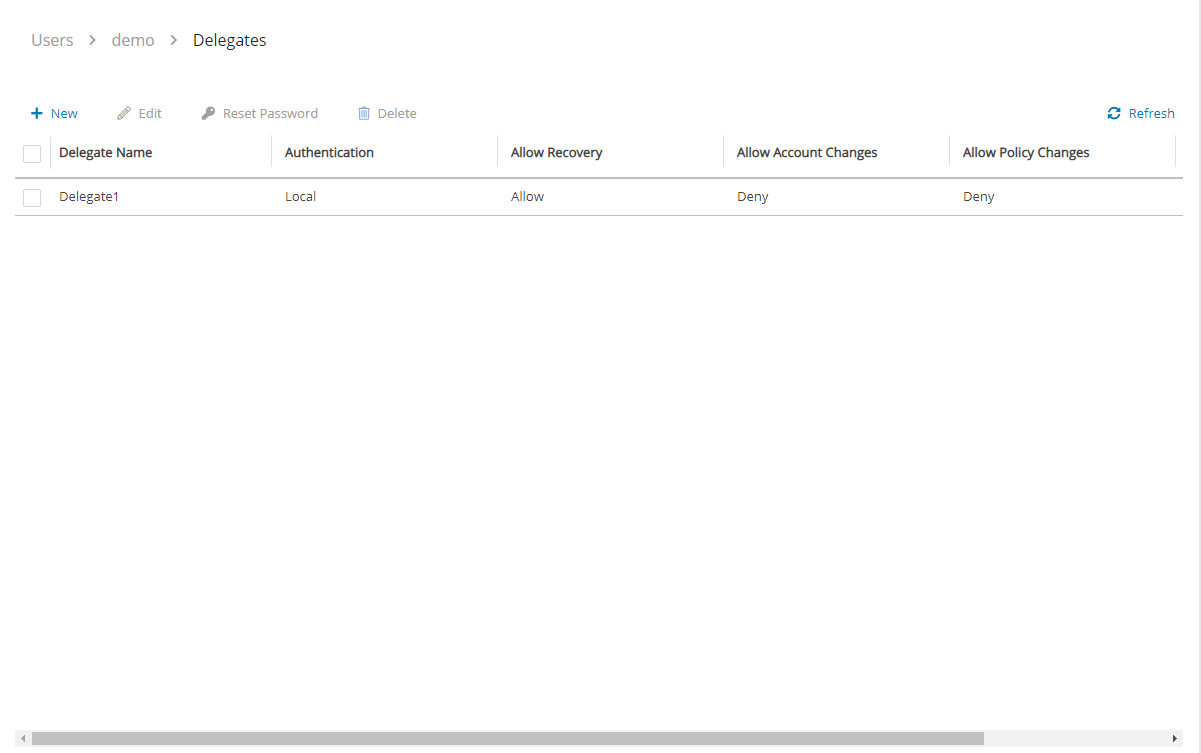
You can add as many delegates as needed for each user and edit any delegate’s settings.
To add a delegate:
Once a user is defined as a delegate, the name cannot be changed.
Select a user.
Select
 Manage Delegates and then select
 New.
New.In the Delegate Name box, type the name of the new delegate.
Enter a valid Email and set the Password.
Permissions are denied by default. To allow permissions, select the relevant ones for this delegate:
Perform Recovery – Can perform recovery operations.
Change Accounts and S3 Repositories – Can add and remove AWS accounts, edit accounts, and modify credentials, as well as add, edit, and remove S3 Repositories.
Change Backup - Can change policies: adding, removing, and editing policies and schedules, as well as adding and removing backup targets.
Change Settings – Root delegates can change Notifications, Users, and General Settings.
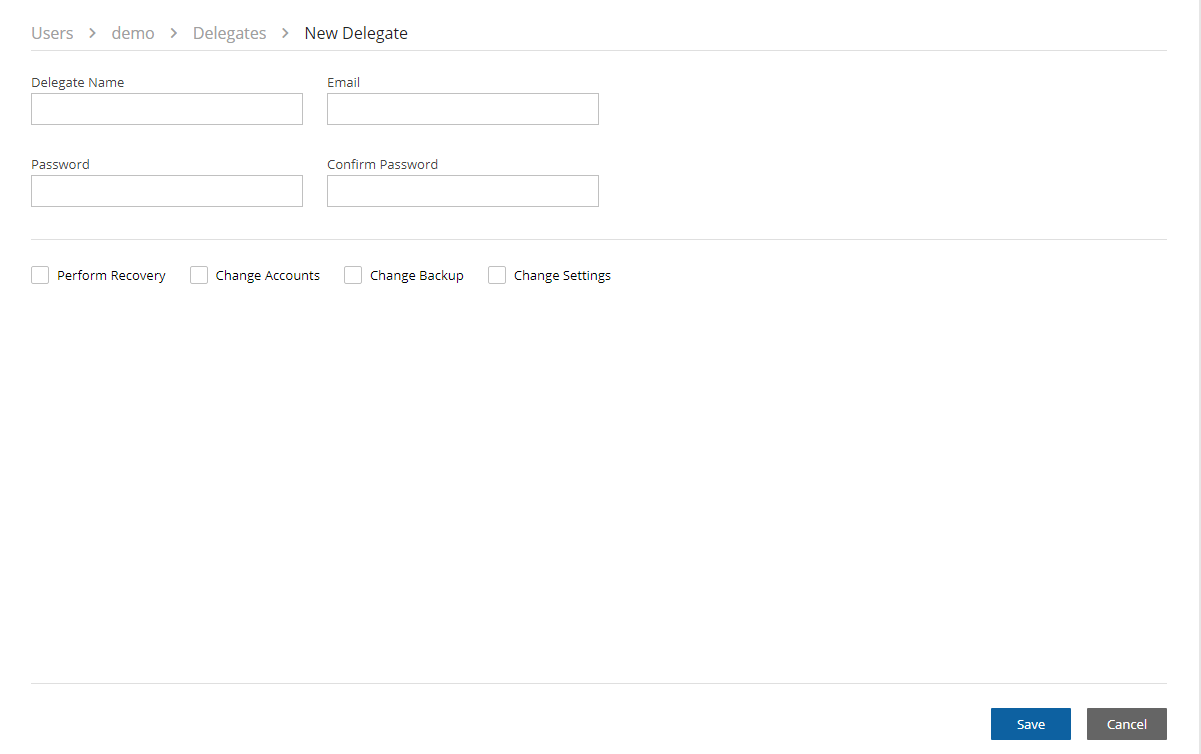
By default, the delegate will only have permissions to view the settings and environment and to monitor backups.
Allowing all permissions will grant the non-root delegate the permissions of the original user except for notification settings.
When in Edit mode, the root user can reset passwords for delegates.
18.5 Usage Reports
The root user can also use the user management screen to download CSV usage reports for each user, which can be used for accounting and billing. The usage report will state how many accounts this user is managing, and for each account, how many instances and non-instance storage is backed up.
Reporting is now available for daily tracking of resources that were configured as a backup target on each policy. The Reports tab contains two levels of detail for Usage Reports. Users can download the following Usage Reports, both of which are filterable by user and time frame. The report can be created as a Scheduled Report or for Immediate Report Generation. In each case, select Detailed for usage per account or Anonymized for aggregated account usage per user. See sections 17.8 and 17.10.2.
Data saved to the reports is compliant with the EU’s General Data Protection Regulation (GDPR).
18.6 Audit Reports
N2W will record every operation initiated by users and delegates. This is important when the admin needs to track who performed an operation and when. By default, audit logs are kept for 30 days. The root user can:
Modify the audit log retention value in the Cleanup tab of the General Settings screen. See section 9.4.
Download audit reports for specific users or delegates. See section 17.10.
Included in the audit reports are:
A timestamp
The event type
A description of the exact operation.
In the report of all users, the user with delegate information, if any
18.7 Email Configuration
N2W uses the following email services to effortlessly distribute reports:
Amazon Simple Email Service (SES) is a cloud-based email sending service required for AWS accounts.
Simple Mail Transport Protocol (SMTP) is an Internet standard communication protocol for non-AWS accounts.
As of version 4.3.1, you can use SMTP as the email service without providing a password. Add a new configuration as follows:
1. Connect via SSH to CPM as cpmuser
2. Edit or create the file /cpmdata/conf/cpmserver.cfg
3. Add the parameters secure and authenticate, and set them to False. Secure=False is intended for cases where the SMTP server should be connected over a non-secure transport layer, i.e., not using the TLS or STARTTLS options.
[smtp]
secure=False
authenticate=False
Setting to True will require a password as before 4.3.1.
4. Restart Apache. This is best done when no important backups are running.
sudo service apache2 restart
Currently, the only regions that are available for the AWS SES service are Asia Pacific (Mumbai), Asia Pacific (Sydney), EU (Frankfurt), EU (Ireland), US East (N. Virginia), US West (Oregon).
To allow N2W to configure the email parameters:
In the toolbar, select
 Server Settings > General Settings.
Select the Email Configuration tab.
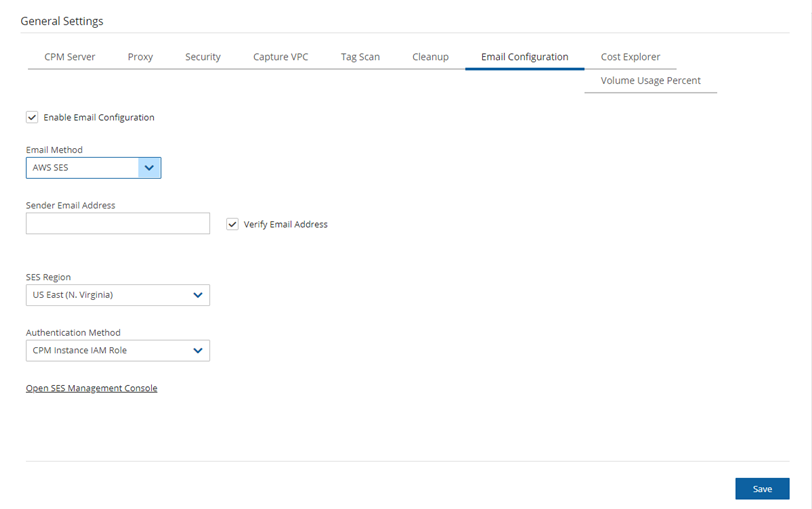
Select Enable Email Configuration.
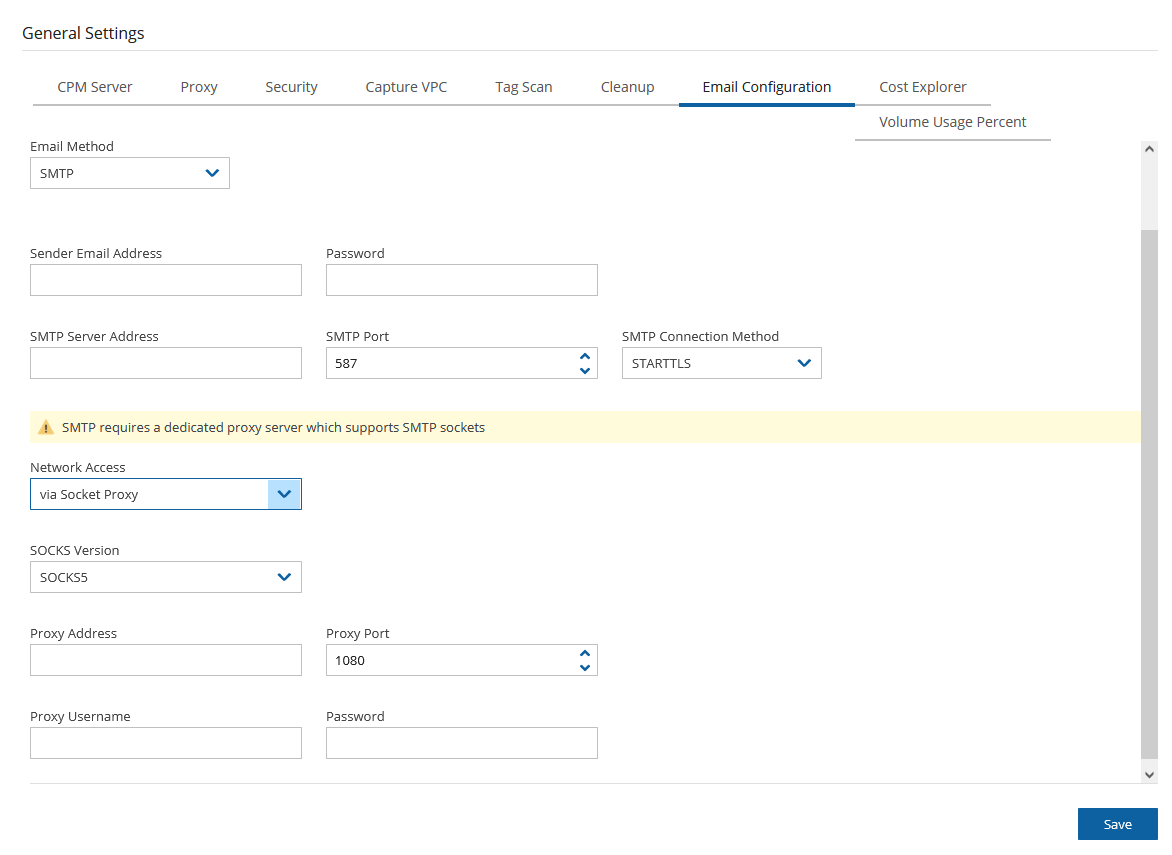
In the Email Method list, select AWS SES or SMTP for other accounts.
If you selected AWS SES, complete the following parameters:
Sender Email Address – The ‘From’ e-mail address.
Verify Email Address – Select to verify address.
SES Region – Select the region for the SES service.
Authentication Method – Select a method and supply additional information if prompted:
IAM User Credentials – Enter AWS Access Key ID and Secret Access Key.
CPM Instance IAM Role – Additional information is not needed.
Account – In the Account list, select one of the CPM accounts defined in the Accounts tab.
6. If you selected SMTP, complete the following:
SMTP requires a dedicated proxy server that supports SMTP sockets.
Sender Email Address – The ‘From’ e-mail address.
Password - A non-ASCII password results in an exception on update.
SMTP Server Address
SMTP Port - Default is 587.
SMTP Connection Method - Select STARTTLS or TLS.
Network Access - Select via Socket Proxy.
SOCKS Version - Select SOCKS4 or SOCK5.
Proxy Address and Proxy Port
Proxy Username and Password
7. When finished, select Save to confirm the parameters.
Amazon will respond with an Email Address Verification Request for the region to the defined address. The Amazon verification e-mail contains directions for completing the verification process, including the amount of time the confirmation link is valid.
Currently, the Scheduled Reports are sent using the defined email identity if the reports are run with Schedules or the Run Now option.
18.8 Multi-factor Authentication
Users and administrators can each manage their own Multi-factor Authentication (MFA) by using one of the following methods to provide an MFA token or secret code to supplement their password access.·
Email
Token generation by an Authenticator App
The Email account or Authenticator app should only be accessible to the user
Failure to enter the correct verification code or to not finish the setup correctly will result in MFA NOT BEING SETUP ON YOUR ACCOUNT.
The time in which the code is valid for entry into the logon screen is short.
For token generation, the validity time is 30 seconds.
For email, the validity time is 5 minutes.
If an incorrect code is entered, a new token will be required.
For token generation by an app, a new token is created when the QR code is rescanned or the TOTP code is entered manually.
For email, the user must request a new token by selecting the ‘resend’ option. After 5 additional resend requests, email token generation is blocked.
Every failed attempt to enter the correct token doubles the amount of time that is required to wait before you can try entering another token. This makes it nearly impossible to access your account using ‘brute force’.
To select the MFA method for your account:
On your User menu, select Settings, and then choose Multi Factor Authentication on the left panel.
Select Click here to configure MFA for this user. The method preference window opens.
Choose Email or Token Generator for an Authenticator App, and then select Next.
Follow the relevant procedure below.
To use an authenticator app:
Before MFA setup, install Google Authenticator or another alternative TOTP token authenticator on the same device where the app registration secret key will be stored, such as your cellphone.
On your device, open the authenticator app and choose to add a new device by scanning the displayed QR code or by entering the displayed TOTP secret code if the camera or scanner is not available.
Enter the code generated by the authenticator in the Token box.
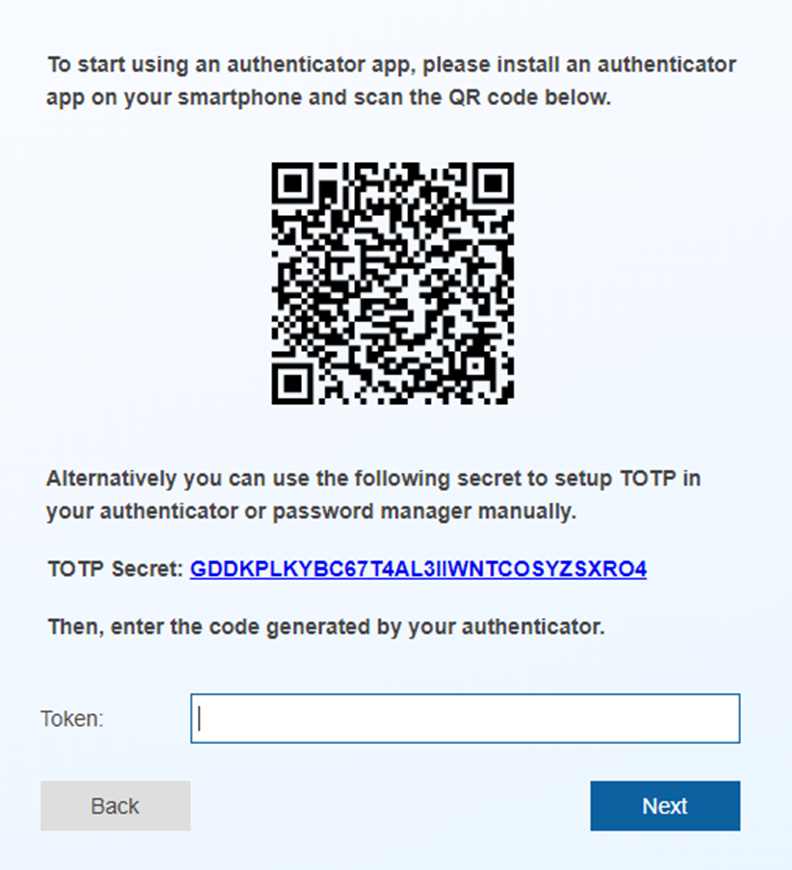
4. In subsequent usage, scan the QR code or enter the TOTP secret, and then enter the generated code in the Token box.
To use email for sending authentication tokens:
With this method, only people with access to the user’s email can complete the MFA token login phase.
Verify that a working email address is registered for that user.
Verify that the SES or SMTP Email Method was enabled in the General Settings by the administrator. See section 18.7.
No additional registration is required.
1. After choosing Email, a notification specifying the user’s registered email for the tokens opens. If the email address is correct, select Next. N2W will attempt to send email to the address shown.

2. If the email was successful, you will be forwarded to the next screen where you will be required to enter the code from the email in the Token box.
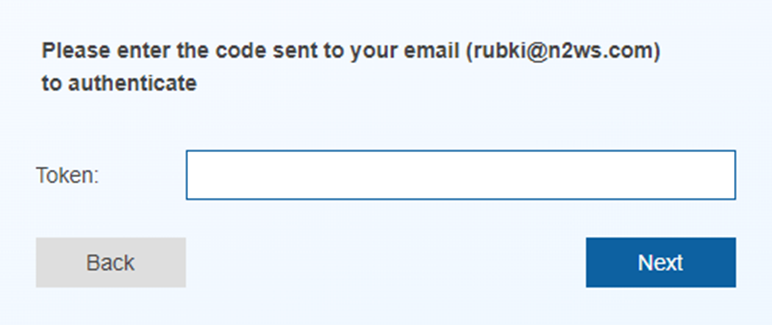
3. In subsequent usage, the login process will display the email address to use. Confirm by selecting Next, and then enter the confirmation email code in the Token box.
Once MFA is configured for email, the token login screen provides a ‘resend’ button that allows you to receive a new token 5 more times before the process is blocked.
To disable MFA:
Users: Select Multi Factor Authentication in User Settings, and select Disable MFA.
Administrators: To disable MFA for other users, go to the Users list in Server Settings, select a user, and then select Disable MFA.

Administrators who are accidentally locked out of the system can go to: https://n2ws.zendesk.com/hc/en-us/articles/28810354116125-How-to-reset-the-admin-root-password-or-MFA-in-N2W-4-2-x-and-above
Was this helpful?

