4 Defining Backup Policies
In this section, you will learn how to build the foundations for your backup and recovery management program.
The backbone of the N2W solution is the backup policy. A backup policy defines everything about a logical group of backed-up objects. A policy defines:
What will be backed up - Backup Targets.
How many generations of backup data to keep.
When to back up – Schedules.
Whether to use backup scripts.
Whether VSS is activated (Windows Servers 2016, 2019, 2022, and 2025 only).
Whether backup is performed via a backup agent (Windows only).
The retry policy in case of failure.
DR settings for the policy.
Lifecycle events: Number of backup generations, retention duration, lock application, Copy to Storage Repository (AWS S3, Azure Storage Repository, Wasabi Storage Repository), Transition to Cold Storage (Glacier)
The following sections explain the stages for defining an N2W policy and its schedule. Schedule definition is addressed first as it one of the attributes of a policy and Scheduled Reports.
For Azure account and policy definition, backup and recovery, see section 26.
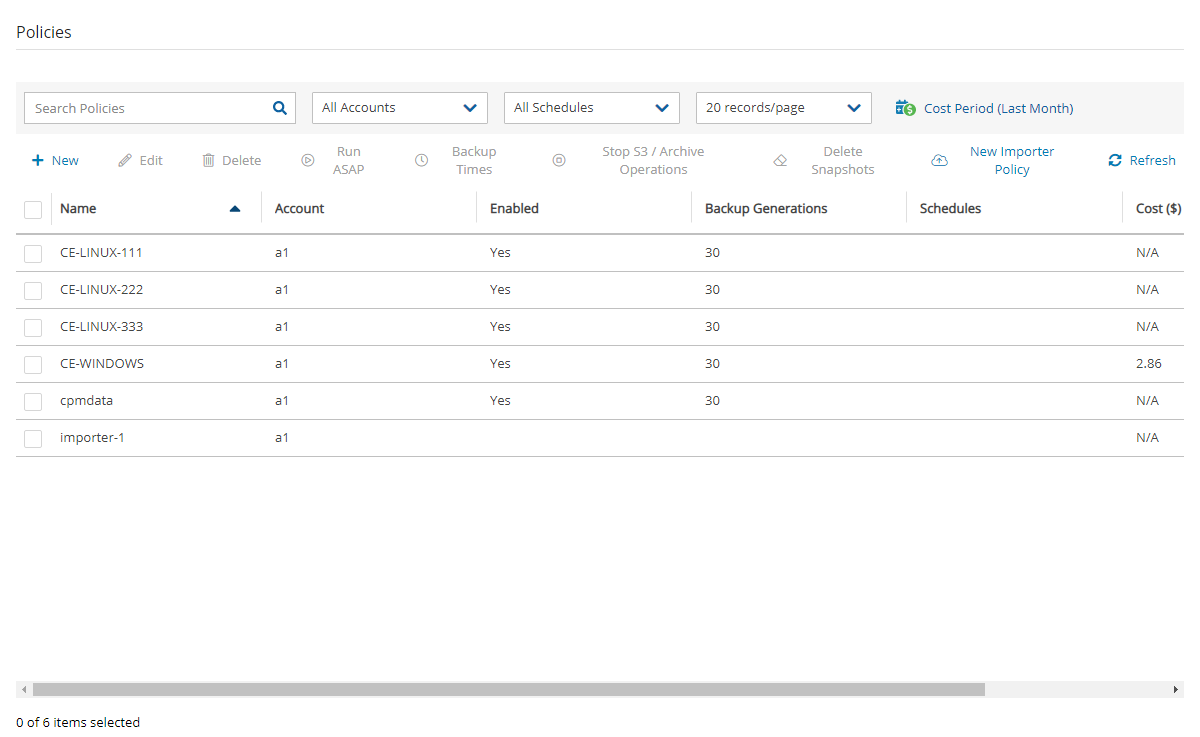
4.1 Schedules
Schedules are the objects defining when to perform a backup
Schedules are defined separately from policies and Scheduled Reports.
One or more schedules can be assigned to both policies and Scheduled Reports.
Schedules can be managed in the Schedules tab found in the left panel. They can be added also during the creation of a new Policy.
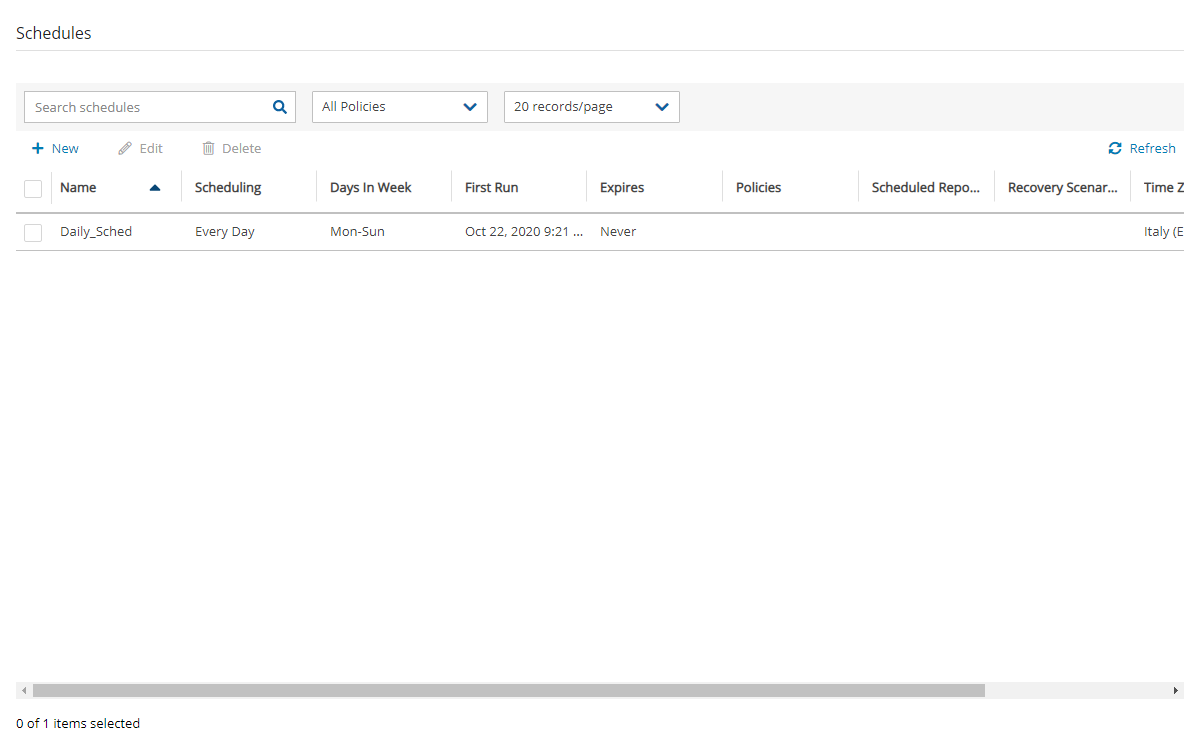
Or, added when creating a new scheduled report in the Scheduled Reports tab of the Reports tab in the left panel.
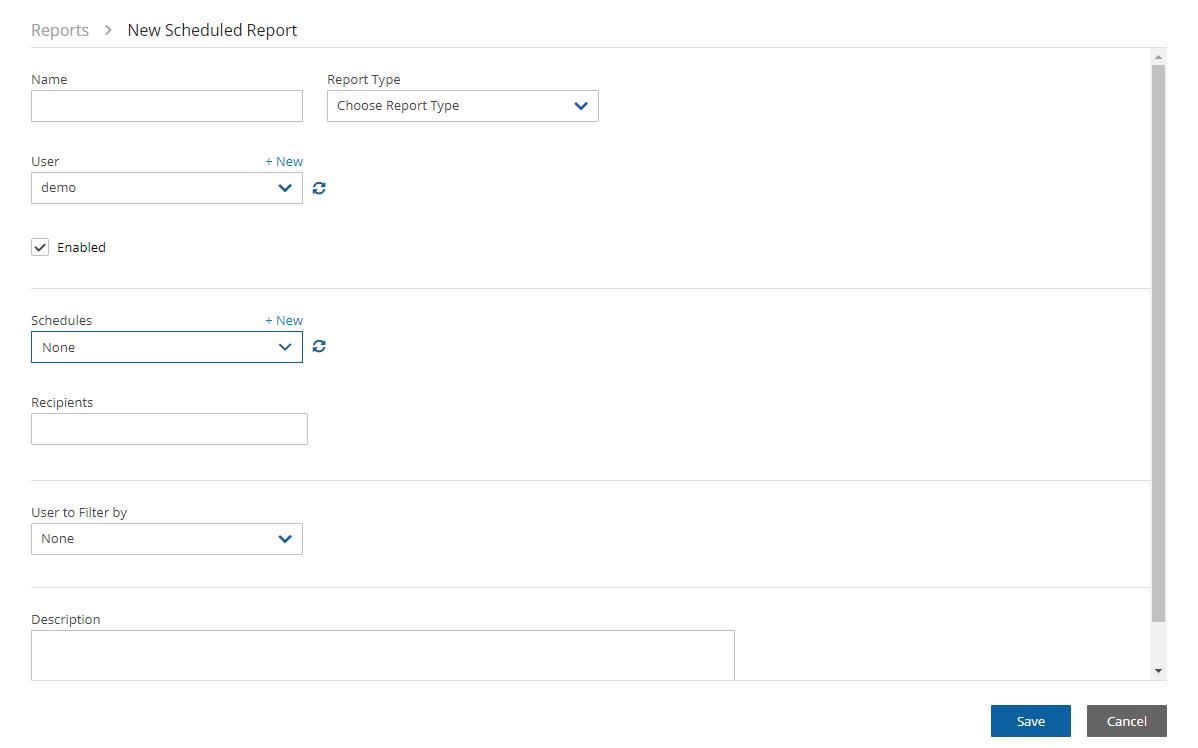
Both interfaces include all defined schedules and the same definition options.
You can define schedules to:
Run for the first time at a date and time in the future.
Run forever or have a specific date and time to stop.
Repeat every ‘n’ minutes, hours, days, weeks, months.
Selectively enable for certain minutes, hours, and days of the week, but not for weeks and months.
Repeat every day of the week, or only run on certain days.
Exclude running a report or policy during certain time ranges within the scheduled times.
For the root/admin user, if you have created additional managed users, you can select the user to whom the schedule belongs.
For weekly or monthly backups and report generation, the start time will determine the day of the week of the schedule and not the days of week check boxes.
4.1.1 Defining Schedules
The same schedule can be used in the following:
Policy backup operations.
Recovery Scenarios for policies with schedules.
Generating Scheduled Reports.
You can add a schedule from several places:
In the Schedules tab, select
 New.
New.While creating or editing a policy in the Policies tab, in the Policy Details tab, select
 New above the Schedules list.
While creating or editing a scheduled report in the Scheduled Reports tab of the Reports tab, select
 New above the Schedules list.
All start times are derived from the First Run time. The time set in First Run becomes the regular start time for the defined schedule.
To define a schedule:
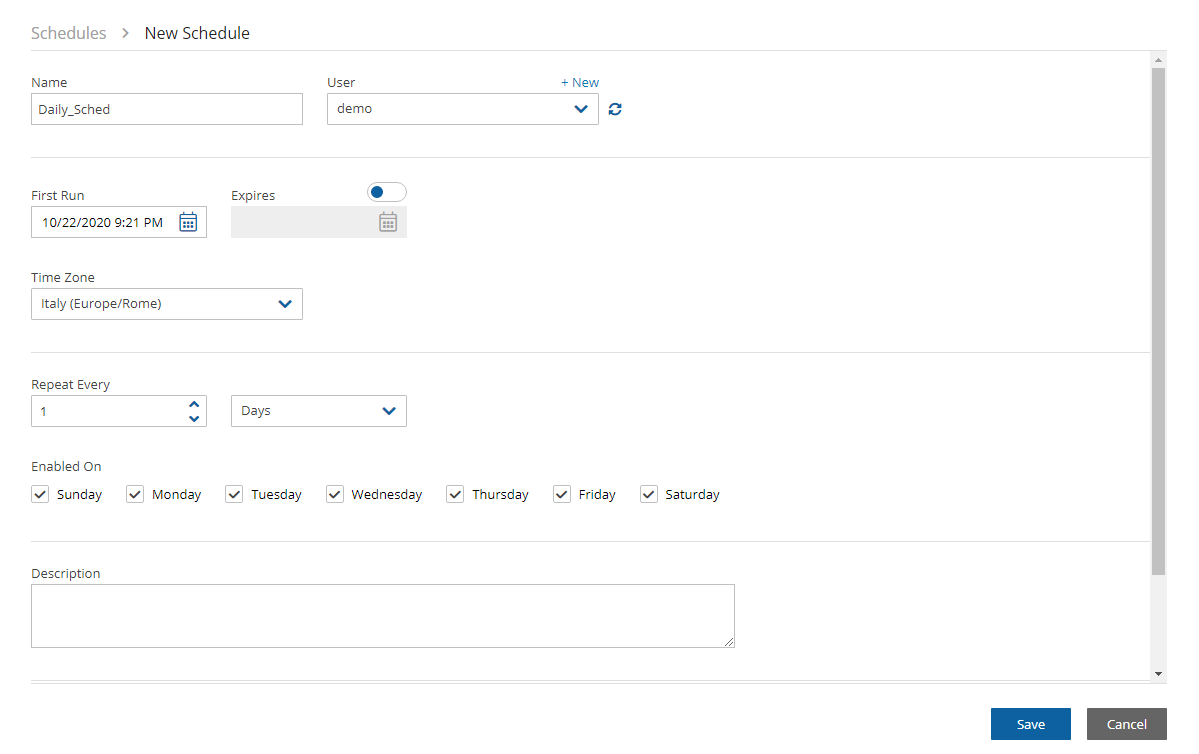
Type a name for the schedule and an optional description.
In the First Run box, if the First Run is other than immediately, select Calendar
 to choose the date and time to first run this schedule.
If you want a daily backup to run at 10:00 AM, set Repeats Every to one day and the start time to 10:00 AM.
If you want an hourly backup to run at 17 minutes after the hour, set Repeats Every to one hour and First Run to
nn:17, wherennis the hour of the First Run.
If this schedule expires, turn on the Expires toggle and select the date and time the schedule ends. By default, schedules never expire.
In the Repeats Every list, select the frequency of the backups for this schedule. The possible units are months, weeks, days, hours, and minutes.
In the Enabled On section, select the day-of-week check boxes on which to run the schedule.
To exclude time ranges within the defined schedule, turn on the Exclude Time Ranges toggle. See section 4.1.4.
Select Save.
4.1.2 Overriding Schedules
You can override existing schedules and run backups and Scheduled Reports immediately:
Ad hoc backups are initiated by the
 Run ASAP command in the Policies tab. See section 4.3.2.
Ad hoc generation of Scheduled Reports is initiated by the
 Run Now command in the Reports tab. See section 17.10.3.
4.1.3 Scheduling and Time Zones
When you configure an N2W server, its time zone is set. See section 2.1.3. In the N2W management application, all time values are in the time zone of the N2W server. Schedule times, however, may be set and executed according to a specific time zone. A policy’s Backup Times will be according to the time zone.
Even when you are backing up instances that are in different time zones, the backup time that is shown on the monitor and Backup Log is always according to the N2W server’s local time.
In the N2W database, times are saved in UTC time zone (Greenwich). So, if, at a later stage, you start a new N2W server instance, configure it to a different time zone, and use the same CPM data volume as before, it will still perform backup at the same times as before.
4.1.4 Disabled Times
While or after defining a schedule, you can set specific times when the schedule should not start a backup or generate a Scheduled Report. For example, you want a backup or report to run every hour, but not on Tuesdays between 01:00 PM and 3:00 PM. You can define that on Tuesdays, between these hours, the schedule is disabled.
You can define a disabled time where the finish time is earlier than the start time. The meaning of disabling the schedule on Monday between 17:00 and 8:00 is that it will be disabled every Monday at 17:00 until the next day at 8:00. The meaning of disabling the schedule for All days between 18:00 and 6:00 will be that every day the schedule will be disabled after 18:00 until 6:00.
Be careful not to create contradictions within a schedule’s definition:
It is possible to define a schedule that will never start backups or generate a report.
You can define a weekly schedule which runs on Mondays, and then deselect Monday from the weekdays.
It is also possible to create different “disabled times”, which would effectively mean that the schedule is always disabled.
4.1.4.1 Defining Disabled Times
For each schedule, you can define as many excluded time ranges as you need.
To define disabled times:
In the New Schedule screen, turn on the Exclude Time Ranges toggle.
In the Day list, select a day of the week to exclude from the schedule.
In the Start Time and End Time lists, select the start and end time of the exclusion.

Select Apply after each definition. To add another time range, select
 New.
New.Select the check boxes of the excluded time ranges to enable, and then select Save.
4.2 AWS Policies
Policies are the main objects defining backups. A policy defines:
What to back up
How to back it up
When to perform the backup by assigning schedules to the policy
Policy definitions are spread among the following tabs:
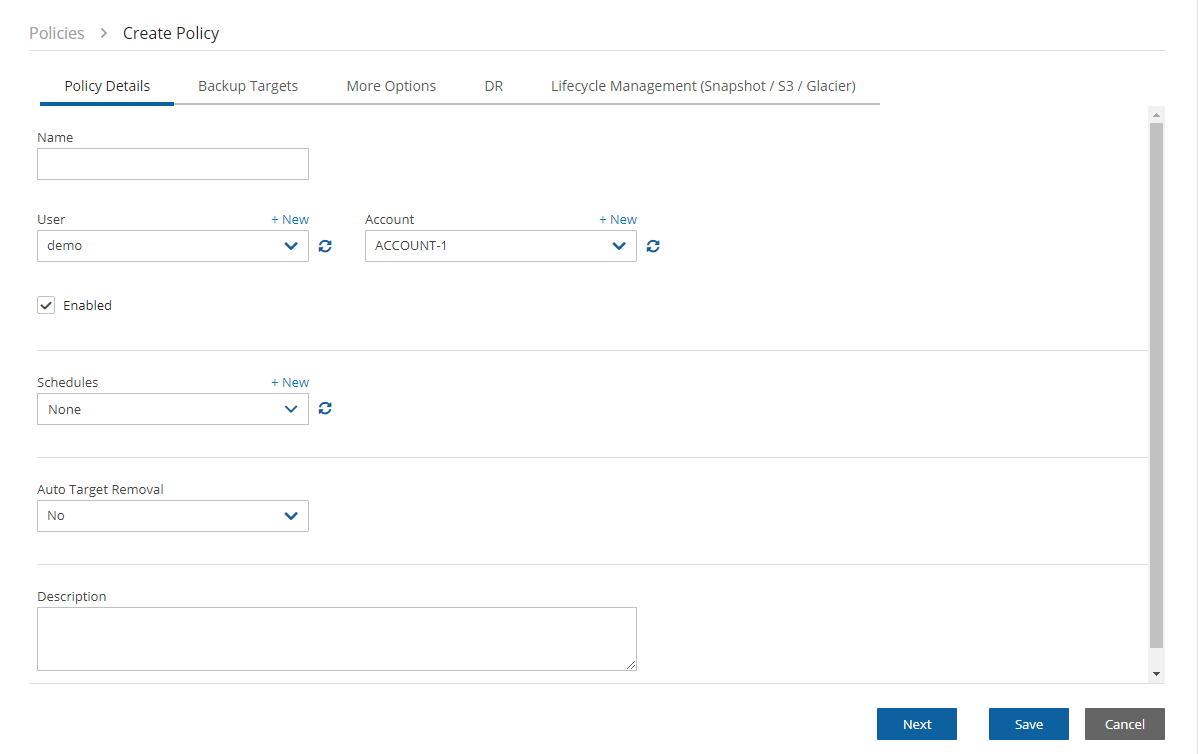
Policy Details – Basic policy details: name, user, account, enabled, schedules, auto-target removal, and description.
Backup Targets – Choose and configure backup targets. Application consistency is applied at the instance level.
More Options – Backup options, such as activate Linux backup scripts, define successful backup, retry parameters, and number of failures to trigger an alert
DR – Enable DR
Lifecycle Management – Configure Lifecycle operations, including the number of backup generations, retention duration and multiple retention periods, lock application, Copy to Storage Repository (S3 and Azure Storage Account), and Transition to Cold Storage (Glacier).
A policy named cpmdata must exist for backing up Windows instances and the N2W server, DR, and Copy to S3. For the cpmdata policy, the relevant tabs are Policy Details and DR.
4.2.1 Creating an AWS Policy
The cpmdata policy does not use scripts as the default. Users can enable application-consistent scripts for cpm data by selecting Application Consistent for the cpmdata policy in the Policy Details tab.
To define a new policy:
To avoid a Policy creation error, if the Account does not exist yet, select![]() New to create the account and then return to the Policy creation.
New to create the account and then return to the Policy creation.
In the left panel, select Policies.
In the
 New menu, select AWS. The Policy Details tab opens.
In the Name box, type a name for the policy.
For the root/admin user, if you have created additional managed users, select the policy owner in the User box.
If you have more than one account, in the Account list, select the account that the policy is associated with. The account cannot be modified after the policy has been created.
Select Enabled to use the Copy to Storage functionality.
In the Auto Target Removal list, specify whether to automatically remove resources that no longer exist. If you enable this removal, if an instance is terminated, or an EBS volume deleted, the next backup will detect that and remove it from the policy. Choose yes and alert if you want the backup log to include a warning about such removal.
To use application-consistent scripts as the default for CPM data, in the
cdatapolicy, select Application Consistent.In the Description box, optionally type a description.
To add Backup Targets now, select the Backup Targets tab. See section 4.2.2. The policy will be saved when you save the Backup Targets definition.
To add Backup Targets later, in the Policy Details tab, select Save. The new policy is included in the list of policies in the Policies screen. To add Backup Targets, select the new policy, select
 Edit and then select the Backup Targets tab.
4.2.2 Adding AWS Backup Targets
N2W recommends that you NOT place all your backup targets under a single policy, as a failure in one instance can impact the overall success of the policy. Instead, we advise that you divide a large policy into several smaller ones.
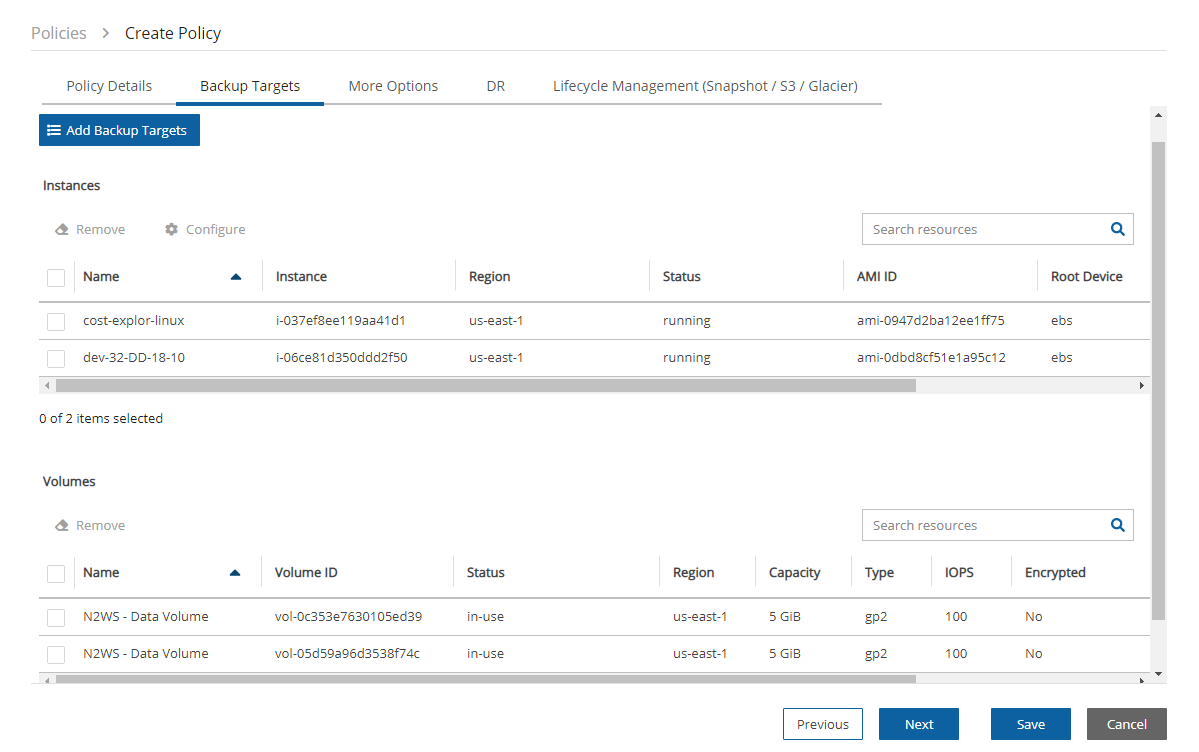
Backup targets define what a policy is going to back up. You define backup targets by selecting the Backup Targets tab of the Create Policy screen.

Following are the types of backup targets:
Instances – This is the most common type. You can choose as many instances as you wish for a policy up to your license limit. For each instance, allowed under your license, define:
Whether to back up all its attached volumes, some, or none.
Whether to take snapshots (default for Linux), take snapshots with one initial AMI (default for Windows), or just create AMIs.
See section 4.2.3.
EBS Volumes – If you wish to back up volumes, not depending on the instance they are attached to, you can choose volumes directly. This can be useful for backing up volumes that may be detached part of the time or moved around between instances (e.g., cluster volumes).
RDS Databases – You can use N2W to back up RDS databases using snapshots. There are advantages to using the automatic backup AWS offers. However, if you need to use snapshots to back up RDS, or if you need to back up databases in sync with instances, this option may be useful.
AWS automatically copies all tags set on resources to the RDS snapshots and does not allow recovering these resources without the tags.
RDS Custom Databases - With Amazon RDS Custom, you can customize the database, OS, and infrastructure.
When creating an RDS Custom instance, AWS also creates automatically an EC2 instance with the data volume associated with this RDS instance.
When creating an RDS Custom snapshot, AWS creates automatically an EBS volume snapshot from this data volume.
All automatically created resources are managed and deleted by AWS. The EBS snapshots associated with RDS snapshots are deleted as are the EC2 instances associated with RDS instances.
See section 9.10 for information on the additional permissions that are required for backup and restore of RDS Custom databases.
AWS automatically copies all tags set on resources to the RDS snapshots and does not allow recovering these resources without the tags.
Aurora Clusters – Even though Aurora is part of the RDS service, Aurora is defined in clusters rather than in instances. Use this type of backup target for your Aurora clusters and Aurora Serverless.
Aurora cluster storage is calculated in increments of 10 GiB with the respect to the license. For example, if you have over 10 GiB of data but less than 20 GiB, your data is computed as 20 GiB.
Keep in mind that clusters can grow dynamically and may reach the storage limits of your license. If the total storage is approaching your license limit, N2W will issue a warning.
For Aurora Serverless, capacity units will appear in the Class column when adding RDS Clusters as Backup Targets.
AWS automatically copies all tags set on resources to the Aurora snapshots and does not allow recovering these resources without the tags.
Redshift Clusters – You can use N2W to back up Redshift clusters. Similar to RDS, there is an automatic backup function available, but using snapshots can give an extra layer of protection.
License capacity metrics for Redshift are only updated if the cluster is in an 'available' state. Use Amazon CloudWatch metrics.
DynamoDB Tables – You can use N2W to back up DynamoDB tables. The recommended best practice is a backup limit of 10 DynamoDB tables per policy.
When defining your backup targets, keep in mind that DynamoDB table storage is calculated in increments of 10 GiB with the respect to the license. For example, if you have over 10 GiB of data but less than 20 GiB, your data is computed as 20 GiB.
Tables can grow dynamically and may reach the storage limits of your license. If the total storage is approaching your license limit, N2W will issue a warning.
If DR is enabled, configure Backup Vault and IAM Role.
Elastic File Systems (EFS) – You can use N2W to back up and restore your EFS snapshot data to AWS using AWS Backup service. Configuration options include backup vault, IAM role, transition to cold storage, and expiration.
If DR is enabled, configure Backup Vault and IAM role.
See section 8.1 for information on permissions and other details.
FSx File Systems – Use N2W to back up and restore your FSx File Systems to the same region and the same account. Following are the FSx types:
Lustre (Linux) file system
Windows file system with managed Active Directory (Win-AD)
Windows file system with self-managed Active Directory (Win-SMAD)
NetApp ONTAP file system
OpenZFS Cloud file system, backup of all volumes using AWS service
For AWS FSx backup limitations, see section 4.2.7.
For recovery options, see section 10.12.
Also, see https://aws.amazon.com/fsx.
S3 Bucket Sync – You can use N2W to synchronize a source S3 bucket to a destination bucket. Since a snapshot is not created, there is no recovery or movement to the Freezer. The buckets require configuration. See section 9.8.
S3 Bucket - You can use N2W to back up and restore your S3 Bucket using AWS Backup service. Configuration options include backup vault, IAM role, and expiration (AWS prerequisites).
If DR is enabled, configure Backup Vault and IAM Role.
See section 8.1 for information on permissions and other details.

EKS Clusters and EKS Namespaces - See Working with Elastic Kubernetes Service (EKS) in section 28.
In the Add Backup Targets drop-down menu, select the relevant resource type. A window containing a list of the available resources for the selected type and region opens. To view additional columns and rows, move the scroll bars as needed.
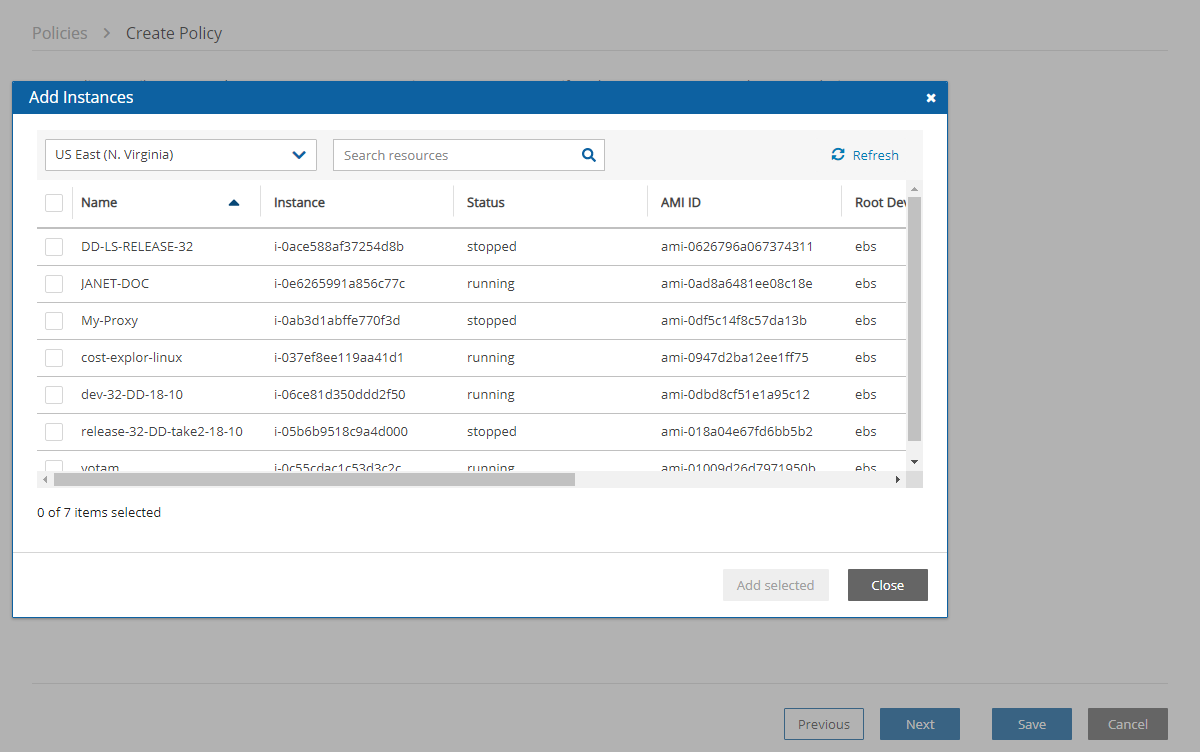
When adding backup targets of the resource type to the policy:
You will see all the backup targets of the requested type that reside in the current region, except the ones already in the policy.
You can select targets in another region by choosing from the region drop-down list.
If there are many targets, you can:
Filter by typing part of a resource name in the search box and select Search
 . To clear a search, select x.
Sort by a column by selecting its heading. Select it again to change the sort direction.
Scroll between pages.
For each backup target, the Policies column shows the policy, or the number of policies, the target is already in. Select the link to see which policies the target is in.

To add a backup target to the policy:
Select a region in the drop-down list. The resources in the selected region are shown.
To filter the resources in the region, enter all or part of a resource name in the Search resources box and select
 Search.
Select the check box of the desired target resources.
Select Add selected. The selected objects are added to the policy’s backup target list.
Repeat as many times as needed, from multiple regions if relevant.
Select Close when finished. The selected targets are listed in the Backup Targets tab.
For Instances, Volumes, EFS, and S3 Bucket Sync targets, select
 Configure and complete the backup options.
In the Backup Targets screen, select Save to save the listed selections to the policy.
4.2.3 Instance Configuration
With N2W you can now create multi-volume snapshots, which are point-in-time snapshots for all EBS volumes attached to a single EC2 instance. After it's created, a multi-volume snapshot behaves like any other snapshot. You can perform all operations, such as restore, delete, and copy across Regions and Accounts. After creating your snapshots, they appear in your EC2 console created at the exact point-in-time.
In the case of EC2 instances, you can set options for any instance.
By default, Copy to S3 is performed incrementally. To ensure the correctness of your data, you can force a copy of the full data for a single iteration to your AWS Storage Repository. While defining the Backup Targets for a policy with Copy to S3, select Force a single full copy to S3.
To configure an instance:
Select a policy, select the Backup Targets tab, and then select an instance.
Select
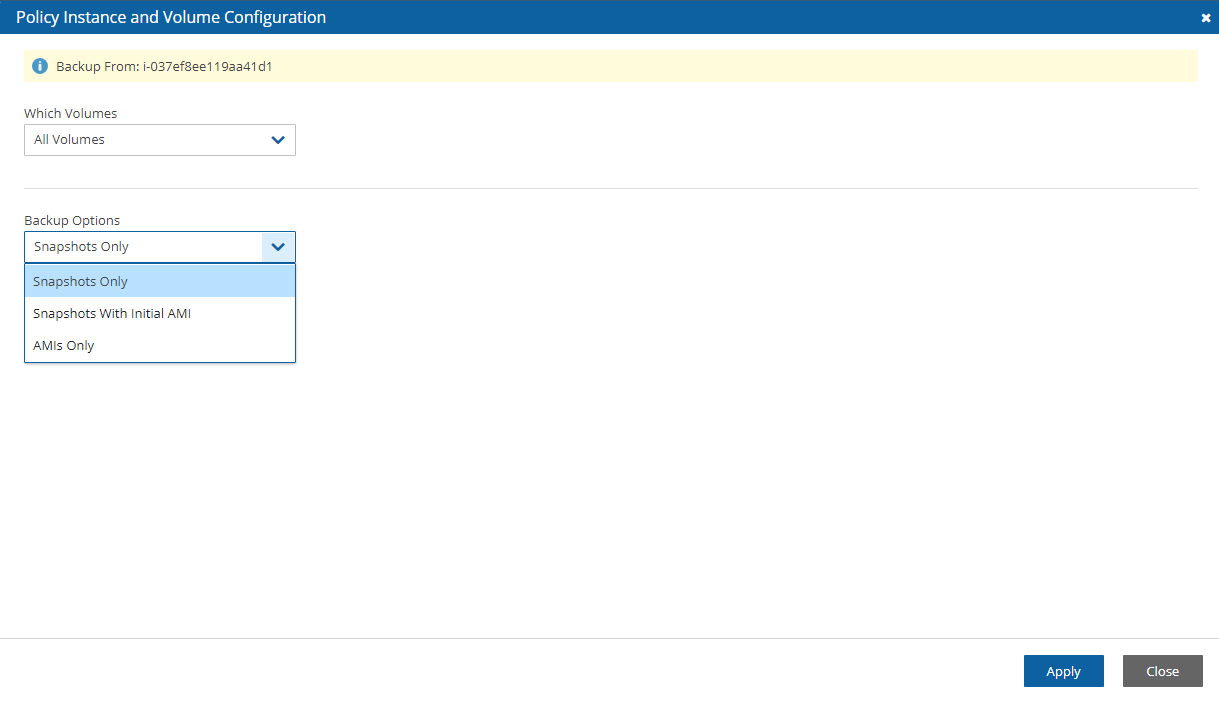
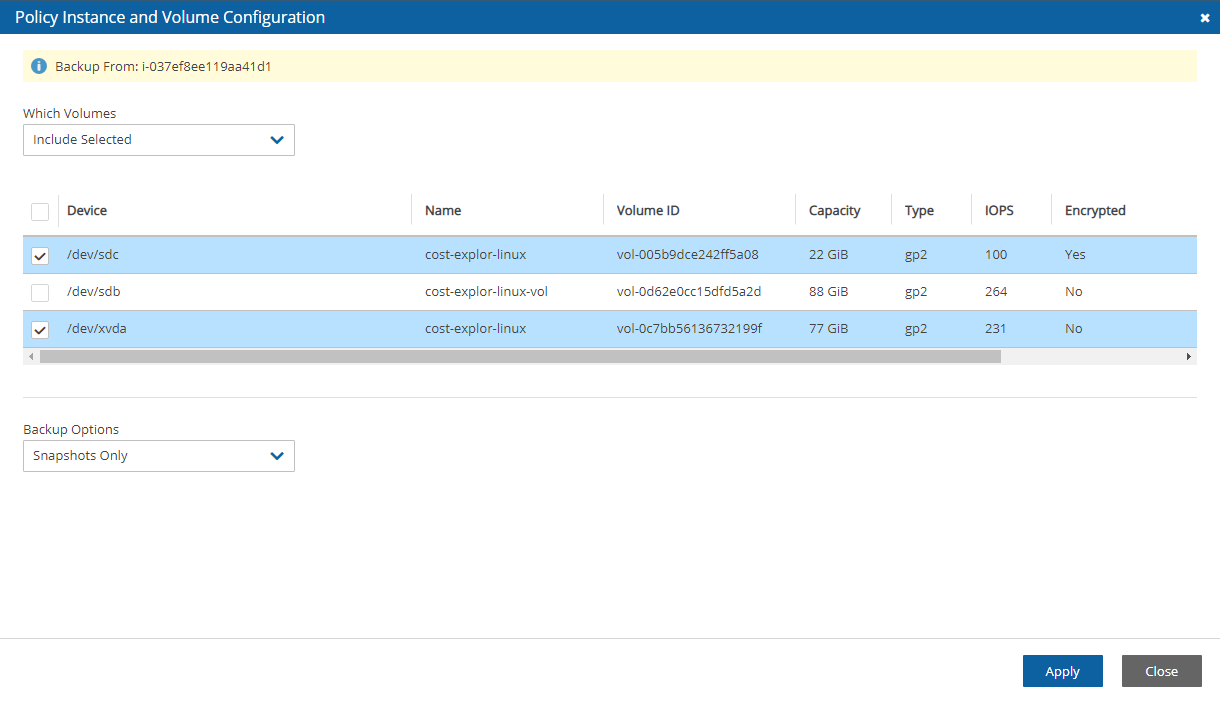
 Configure. The Policy Instance and Volume Configuration screen opens.
In the Which Volumes list, choose whether to back up All Volumes attached to this instance, or include or exclude some of them. By default, N2W will back up all the attached storage of the instance, including volumes that are added over time.
If All Volumes is selected, the Remote Agent list is enabled. Select N2W Thin Backup Agent or Simple System Manager (SSM) depending on what you have configured. See section 6.
If All Volumes was not selected, in the volumes table, clear or select the volume check boxes.
In the Backup Options list, select one of the following:
Snapshots Only - Default for Linux-based instances.
Snapshots with Initial AMI - Take an initial AMI and then snapshots. Default for Windows-based instances.
AMIs Only - Just schedule AMI creation. If a reboot is required after the backup, select Reboot. See section 4.2.3.1.
When Copy to S3 is enabled for the policy, to have a full copy of the data copied to your AWS Storage Repository, select Force a single full copy to S3.
Select Apply.
Continue to add instances from other regions, and select Close when finished with the resource type. Control returns to the Backup Targets tab list.
At the bottom of the Backup Targets tab list, select Save to update the policy for all listed targets.
4.2.3.1. AMI Creation
If you choose to just create AMIs:
N2W will create AMIs for that instance instead of taking direct snapshots. App-aware backup per agent does not apply for AMI creation.
You can choose whether to reboot the instance during AMI creation or not to reboot, which leaves a risk of data corruption. As opposed to AMI creation in the EC2 console, the default in N2W is no reboot.
Try not to schedule AMI creations of an instance in one policy, while another policy running at the same time backs up the same instance using snapshots. This will cause the AMI creation to fail. N2W will overcome this issue by scheduling a retry, which will usually succeed. However, N2W recommends that you avoid such scheduling conflicts.
4.2.3.2. Initial/Single AMI
Single or Initial AMIs are meant to be used mainly for Windows instance recovery.
N2W will keep a single AMI for each instance with this setting. A single AMI will contain only the root device (boot disk).
N2W will rotate single AMIs from time to time. It will create a new AMI and delete the old one. N2W aims to optimize costs by not leaving very old snapshots in your AWS account.
By default, N2W will rotate single AMIs every 90 days. That value can be configured in the
 Server Settings > General Settings > Cleanup tab to any number of days, or to '0' if you prefer no rotation at all.
4.2.3.3. Limitations with AMI creation
AMIs will be copied across regions and accounts for DR.
If you use cross-account backup, be aware that if you need to recover the instance at the remote account, you need to make sure you have an AMI ready in that account.
4.2.4 More Options
To see more policy options, select the More Options tab for a policy in the Policies tab. The options consist of:
Activating Linux backup scripts and defining script timeout and output. Backup scripts refer to those running on the N2W server. See section 7.2.
Defining backup success, retries, and failures for alerting.
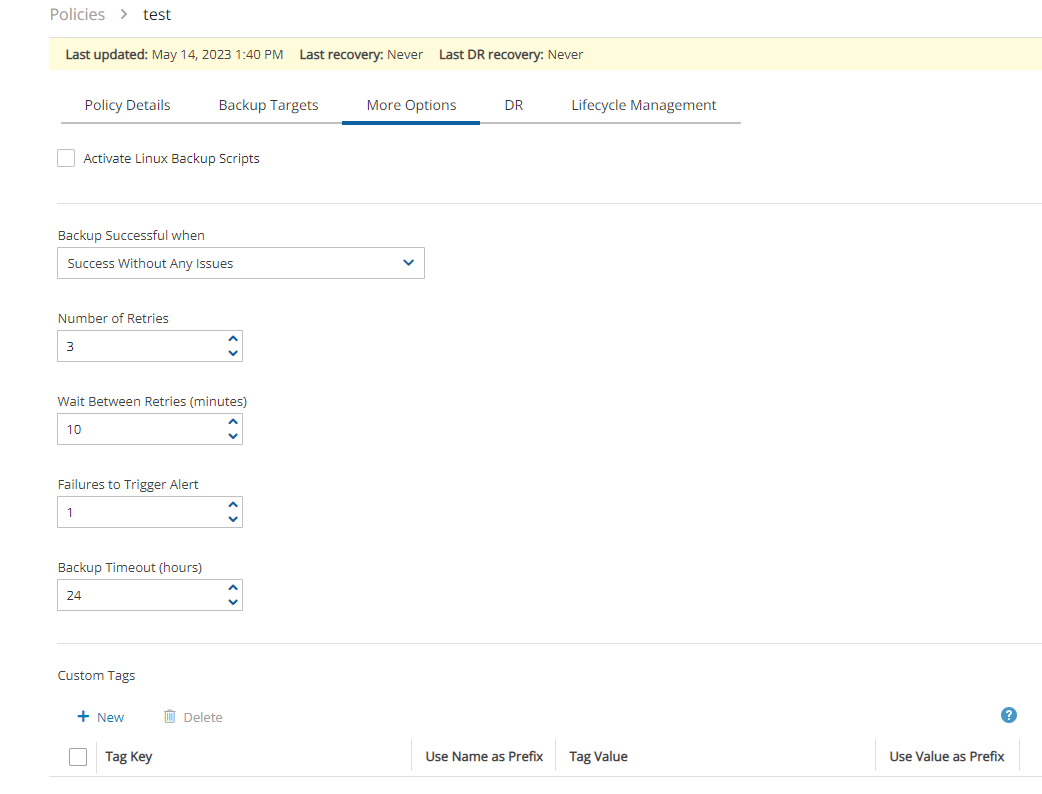
Activate Linux Backup Scripts – This option is turned off by default. If you select Activate Linux Backup Scripts, the following options appear:
Scripts Timeout – Timeout (in seconds) to let each script run. When a backup script runs, after the timeout period, it will be killed, and a failure will be assumed. The default is 30 seconds.
Collect Scripts Output – N2W can collect the output of backup scripts to the standard error (
stderr). This may be useful for debugging. It can also be used by a script to log the operations it is performing and write useful information. This output is captured, saved in the N2W database, and can be viewed from the Recovery Panel screen. To turn this option on, choose Collect. The default option is Ignore.
The output of a script is typically a few lines. However, if it gets big (MBs), it can affect the performance of N2W. If it gets even larger, it can cause crashes in N2W processes. To avoid the risk of too much data going to stderr, redirect the output elsewhere.
Backup Successful when - This indicates whether a backup needs its scripts/VSS to complete, to be considered a valid backup. This has a double effect:
For retries, a successful backup will not result in a retry;
For the automatic retention management process, a backup that is considered successful is counted as a valid generation of data.
The possible values are:
Success Without Any Issues – If scripts and/or VSS are defined for this policy, the backup will be considered successful only if everything succeeds. If backup scripts or VSS fails and all snapshots succeed, the backup is not considered successful. You can still recover from it, but it will cause a retry (if any are defined), and the automatic retention management process will not count it as a valid generation of data. This is the stricter option and is also the default.
Snapshot Succeeded with Possible VSS or Script Failure – This is the less strict option and can be useful if scripts or VSS fail often, which can happen in a complex environment. Choosing this option accepts the assumption that most applications will recover correctly even from a crash-consistent backup.
Retry information - The next options deal with what to do when a backup fails:
Backup Retry Policy – Select one of the retry policy options:
Full –
Perform retry on all policy targets even if only some of them have failed (as in previous version).
The failure triggering the retry can be at any point during the backup session.
Partial (Only Failed Targets) –
Perform retry ONLY on failed targets. For example, if there are 10 targets and 3 backups failed, only retry on the 3 backups that failed.
Only ‘start snapshot creation’ failure triggers a retry for the target. If the failure occurs after the snapshot creation started but before it was completed, there will not be a retry for the target. Most failures occur during ‘start snapshot creation’.
N2W versions 4.4.0 doesn’t support partial retry for S3 Sync targets.
Number of Retries – The maximal number of retries that can be run for each failed backup. The default is three. After the retries, the backup will run again at the next scheduled time.
Wait Between Retries (minutes) – Determines how much time N2W will wait after a failure before retrying. Backup scripts and VSS may sometimes fail or timeout because the system is busy. In this case, it makes sense to substantially extend the waiting time until the next retry when the system may be more responsive.
Alert Trigger Failures – The minimum number of failures to trigger an alert.
Backup Timeout (hours) - Select the backup timeout period for this policy. Restarting Apache is not necessary.
Custom Tags - You can add custom tags for the policy. Define the Tag Name and Tag Value. if the Name and/or Value is a prefix, select Name is Prefix. For details about Custom Tags, see section 14.2.
4.2.5 Enabling Disaster Recovery
If the DR To Account does not exist yet, select ![]() New to create the account and then return to the policy creation.
New to create the account and then return to the policy creation.
To enable Disaster Recovery for the policy:
Select the DR tab for a policy in the Policies tab screen.
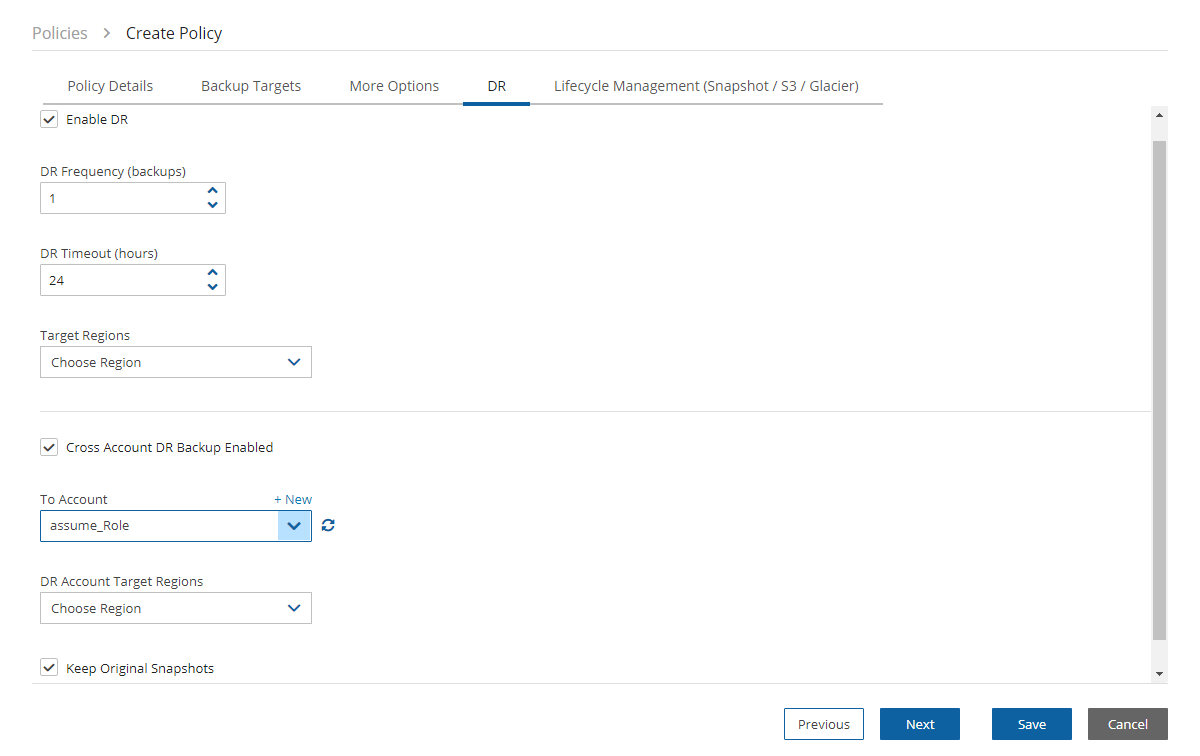
Select Enable DR.
Select the DR Frequency for backups, DR Backup Timeout, and Target Regions.
To enable Cross Account DR Backups, select the check box, and:
Choose the To Account and DR Account Target Regions in the lists.
To Keep Original Snapshots, select the check box.
4.2.6 Managing Lifecycles
EBS Immutable Backup
While EBS supports different types of immutability, N2W is focusing on compliance locking which is impervious to ransomware.
Besides setting the mandatory generations retention, it is required that you set a time retention period before you can select Apply compliance lock for the specified duration.
After applying the compliance lock on a snapshot, it can’t be deleted until the lock expires.
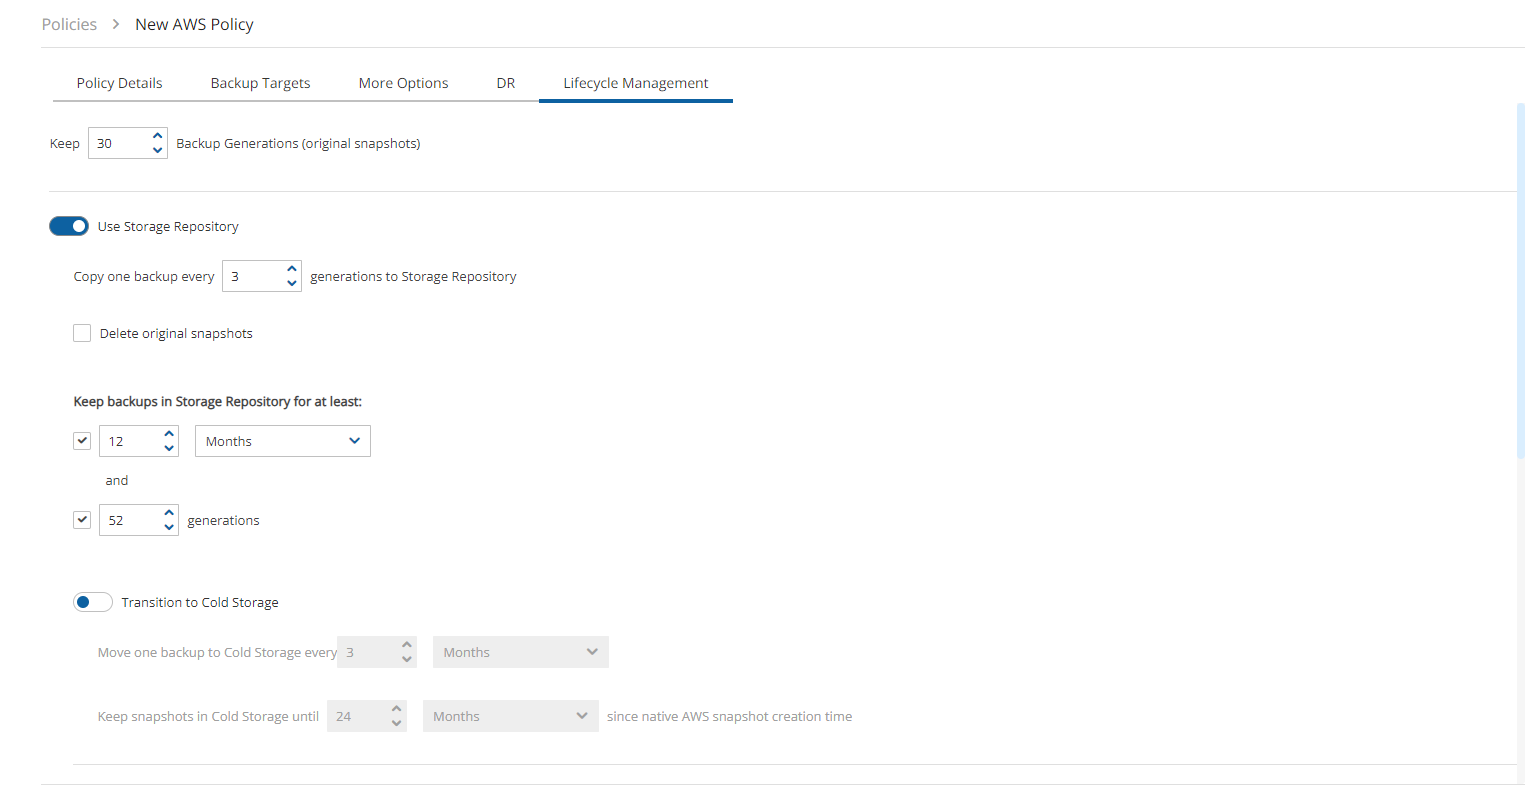
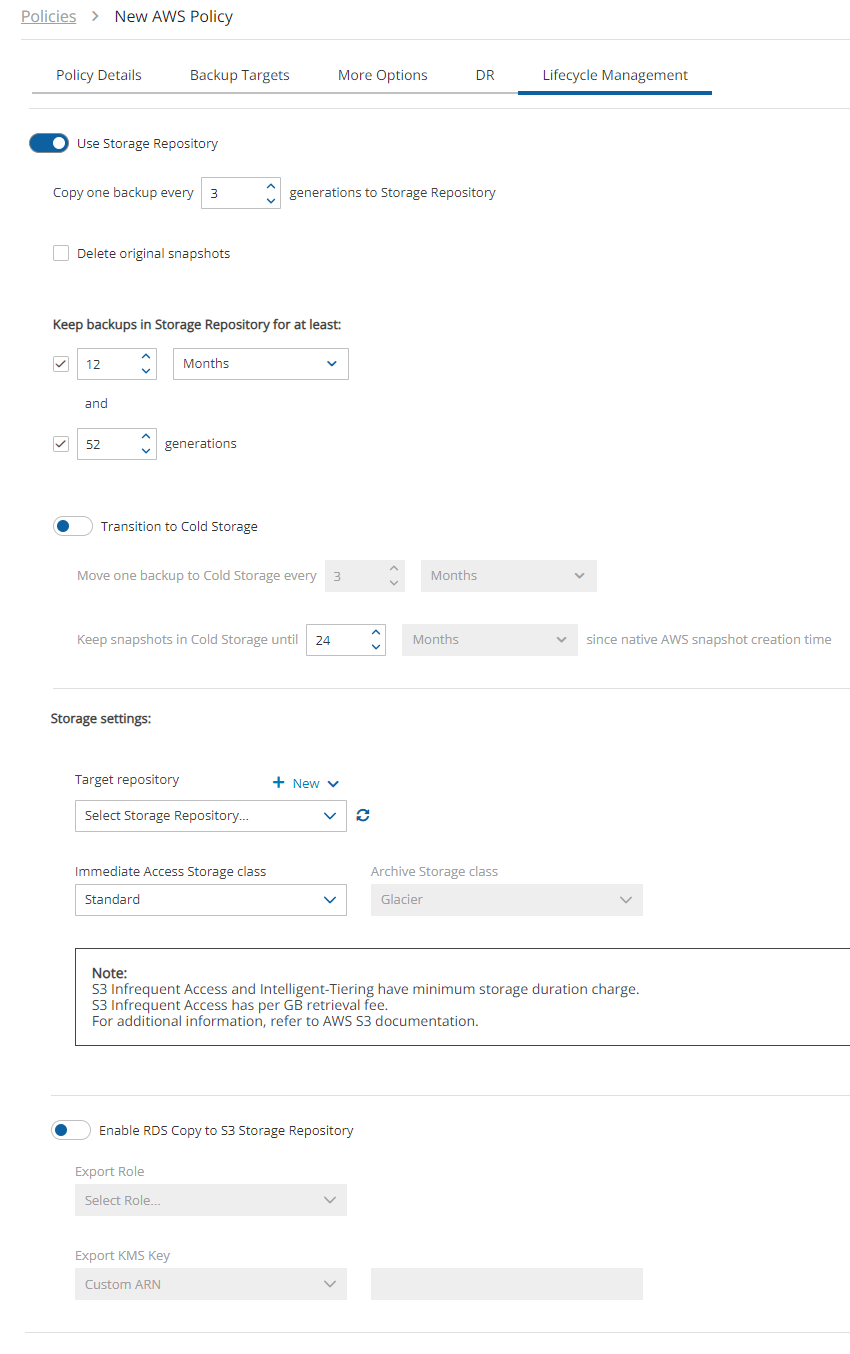
The Lifecycle Management tab for a policy allows you to do the following:
For native snapshots:
Set multiple retention periods for snapshots: Backup (Original snapshots) Retention.
For DR snapshots, you can set a different number of generations and multiple retention periods.
Optionally, for both original and backup snapshots, you can set the retention time in terms of duration in addition to the required number of generations
If applicable, when setting a retention duration, you can enable Apply compliance lock for the specified duration.
After applying a compliance lock on a snapshot, it can’t be deleted until the lock expires.
The number of successful backups after cleanup will be at least the number of generations.
For Storage Repository:
Use Storage Repository – Enable, set copy and retention policies, choose storage options, and optionally delete backup snapshots after a backup to S3. See section 21.3.
Transition to Cold Storage - Enable, set copy and retention policies, and choose the Glacier Archive Storage Class. See section 21.5.3.
Transition to Cold Storage requires that the Use Storage Repository option is enabled first.
Storage settings - Enable the Use Storage Repository, define the Target repository, and Transition to Cold Storage, if relevant. See section 21.3.1.
4.2.7 FSx for NetApp ONTAP
FSx for NetApp ONTAP can be configured to back up only part of volumes, for example an EC2 instance, regardless of the owner Storage Virtual Machine (SVM).
The root volume of the SVM is not backed up.
To configure a file system:
Select a policy and then select the Backup Targets tab.
In the Add Backup Targets menu, select FSx File Systems.
Select an ONTAP policy.
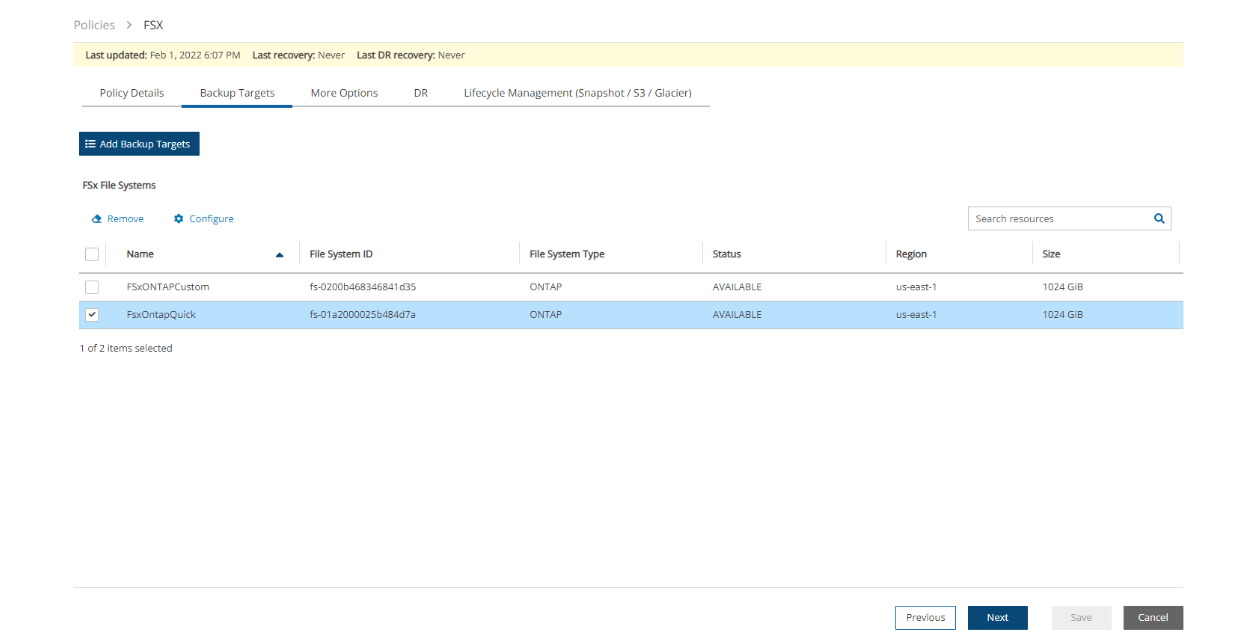
4. Select![]() Configure. The ONTAP FSx and Volume Configuration screen opens.
Configure. The ONTAP FSx and Volume Configuration screen opens.
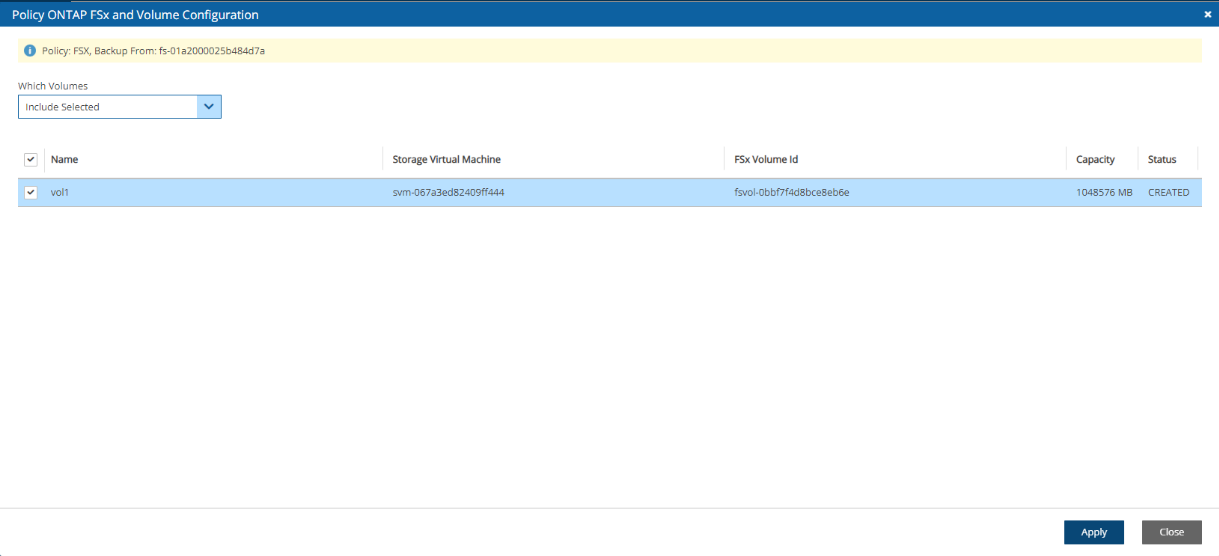
5. In the Which Volumes list, choose whether to back up All Volumes attached to this instance, or include or exclude individual volumes.
6. Select Apply and then Save.
A remote agent is not required.
4.2.8 AWS Backup Limitations to FSx
FSx is not currently supported in AWS GovCloud (US) regions.
Following are limitations on backups of FSx for Lustre:
Backups are not supported on scratch file systems because these file systems are designed for temporary storage and shorter-term processing of data.
Backups are not supported on file systems linked to an Amazon S3 bucket because the S3 bucket serves as the primary data repository, and the Lustre file system does not necessarily contain the full data set at any given time. For further information, see https://docs.aws.amazon.com/fsx/latest/LustreGuide/using-backups-fsx.html
4.2.9 Using Multiple Retentions for Specific Backups
Multiple-Retention allows you to automatically retain specific backups for longer periods based on when the backup occurs. This backup rotation allows you to easily comply with retention requirements.
A key feature is that three backup types have completely independent retention settings:
Native Cloud Snapshots - The original backups in AWS/Azure
DR (Disaster Recovery) Copies - Cross-region snapshot copies
Repository Copies - Backups stored in S3/Azure Blob storage
This means you can configure:
Snapshots: 7 days daily, 4 weeks weekly, 12 months monthly
DR Copies: 14 days daily, 8 weeks weekly, 24 months monthly
Repository: 30 days daily, 12 weeks weekly, 36 months monthly
Selection Logic
Weekly Selection: The first successful backup on or after your selected day of the week becomes the weekly backup for that week
Monthly Selection: The weekly backup from your selected week of the month becomes the monthly backup
One backup per period: Only ONE backup per week is marked weekly, and only ONE per month is marked monthly
Monthly overrides weekly: If a backup qualifies as both weekly and monthly, it's stored as monthly (with the longer retention)
Default (before version 4.5)
All backups not selected as weekly/monthly
Short-term recovery (7-30 days)
Weekly
First successful backup on a selected day of the week
Medium-term recovery (4-12 weeks)
Monthly
Weekly backup from a selected week of the month
Long-term/compliance retention (2-36 months)
In the Lifecycle Management tab, enable Multi-Retentions.
For all backup types, in the Select your Weekly/Monthly backups section, choose from the Day of the Week and Week of Month lists to trigger backup selection.
Day of Week - Which day triggers weekly selection (e.g., Sunday)
Week of Month - Which week triggers monthly selection (e.g., First week, or Last week)

3. For each of the backup types, there is a different additional section that addresses each backup type. Configure Retention Periods for each backup type and choose relevant options.
Weekly Schedule Enabled - Turn on weekly retention
Keep Weekly Backups For - Duration (e.g., 12 weeks)
Monthly Schedule Enabled - Turn on monthly retention
Keep Monthly Backups For - Duration (e.g., 36 months)
Configure native retention:

Set compliance lock:
Select Apply compliance lock.

Configure Multi-Retention for DR:
Select Choose different retention for DR snapshots.

Configure Storage Repository:
Enable Use Storage Repository.

4.3 Managing Policies
The following actions are available for both AWS and Azure policies.
4.3.1 Viewing Policy Backup Times
In the Policies tab, select a policy, and then select ![]() Backup Times to open the Planned Backups window, which is ordered by Time Zone. You can change the Time Period from the default ‘Next Day’ to several days, weeks, or the next month.
Backup Times to open the Planned Backups window, which is ordered by Time Zone. You can change the Time Period from the default ‘Next Day’ to several days, weeks, or the next month.

Backup Times are relevant to the schedules of the selected policy.
4.3.2 Running an Ad Hoc Backup
An ad hoc backup will execute the selected Policy and create backups of all its targets.
An ad hoc backup counts as another generation if it completes successfully.
To run a backup immediately:
In the left panel, select the Policies tab and then select a policy in the list.
To start the backup, select
 Run ASAP.
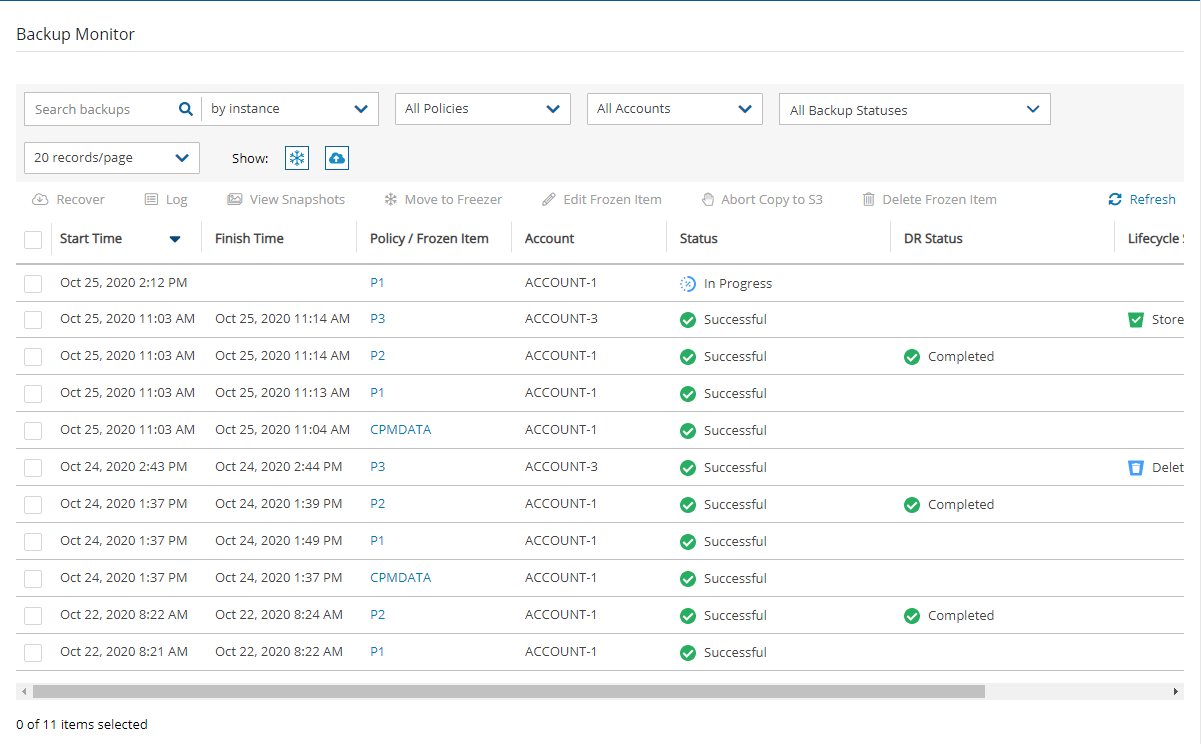
To follow the progress of the backup, select the Open Backup Monitor link in the ‘Backup started’ message
 at the top right corner, or select the Backup Monitor tab.
To update the list, select
 Refresh.
You can switch between showing backup records 'in the Freezer' by turning on and off the
 toggle key and backup records 'not in the Freezer' by turning on and off the
  toggle key in the Show
  area to the right of the filters.
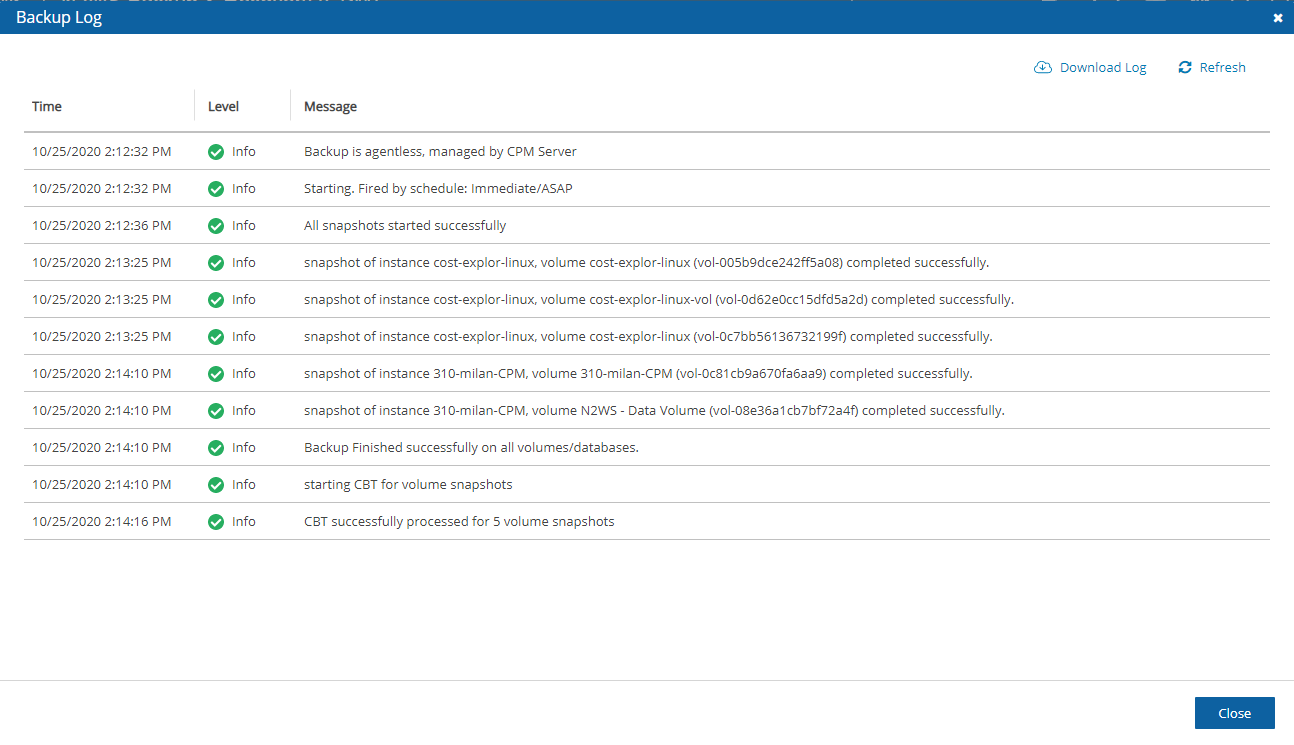
To view or download backup details, select
 Log. Select
  Refresh as needed.
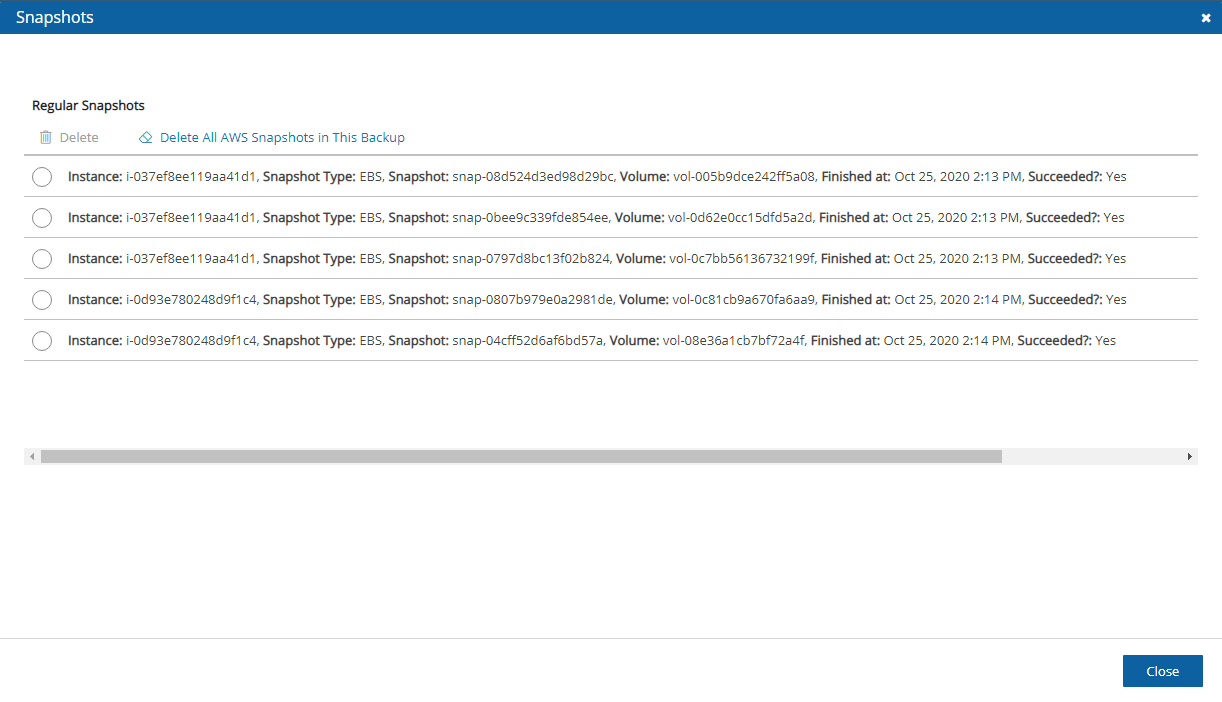
To delete a particular snapshot in AWS or to delete all AWS snapshots after a successful run:
Select
 View Snapshots.
Select one or more backups, and then select Delete.
4.3.3 Deleting a Policy
When deleting a policy, all related snapshots and data are deleted.
To delete a policy, select it in the Policies table, and then select Delete. In the Delete Policy confirmation dialog box, type ‘delete all’ and then select Delete.
Last updated
Was this helpful?

