8 Using Elastic File System (EFS)
In this section, you will learning about working with Amazon Elastic File System.
Configuring EFS on N2W allows you to determine backup:
Schedule and frequency
Retention
Lifecycle policy, including moving backups to cold storage, defining expiration options, and deleting them at end of life.
Whether to use AWS Backup Vault Lock. See section 8.4.
With AWS Backup, you pay only for the backup storage you use and the amount of backup data you restore in the month. There is no minimum fee and there are no set-up charges.
EFS Backup and Restore is performed by AWS Backup Service. When adding an EFS target for the first time in a region, you must create the default backup vault in AWS. Go to the AWS Backup console and choose Backup vaults. For more information regarding the AWS Backup Service, refer to https://docs.aws.amazon.com/efs/latest/ug/awsbackup.html
Before continuing, consider the following:
Check AWS for regions that are available for EFS backup on the AWS Backup service. Currently, regions EU (Milan) and Africa (Cape Town) are not supported by AWS for cross-region DR.
AWS Backup is not available for EFS in the following regions: Asia Pacific (Hong Kong), Europe (Stockholm), South America (Sao Paulo), and Middle East (Bahrain).
Backup transitions and expirations are performed automatically according to the configured lifecycle.
A default or custom IAM role must exist in AWS to create and manage backups on behalf of N2W. The IAM identity contains the backup and restore policies allowing operations on EFS. If a default was not automatically created, or you prefer to use a custom IAM role, see section 8.2.
8.1 Configuring EFS
Permissions required to get the relevant information about mounted targets and access points are optional. Backup and recovery will not fail if no permissions are granted to get/set mounted targets or access points.
In the AWS Console, create the EFS in one of the available regions. See section 8 for regions not supported for EFS.
In N2W, in the Backup Targets tab of a Policy, select Elastic File Systems in the Add Backup Targets menu.
In the Add Elastic File System screen list, select one or more EFS targets and then select Add selected.
In the Backup Targets tab, select an EFS target and then select
 Configure.
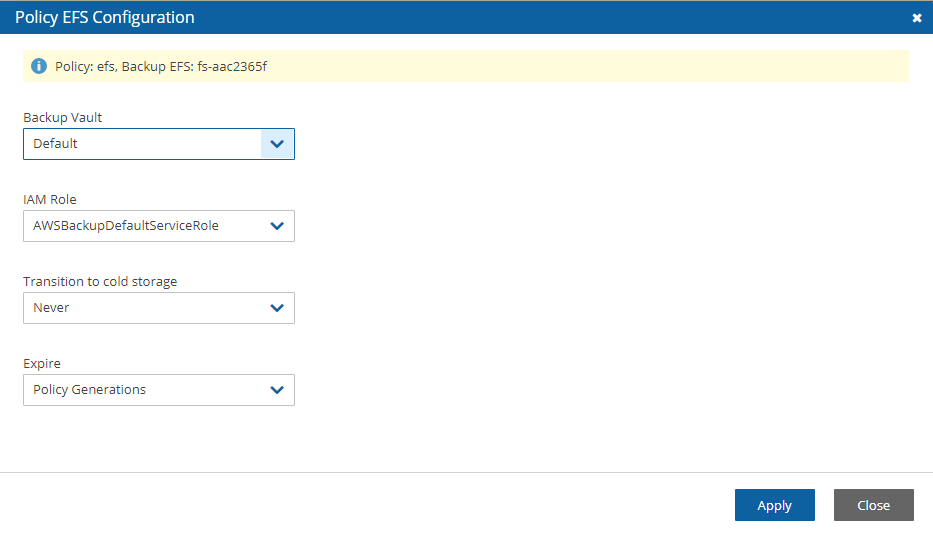
Configure the EFS backup and restore options described in section 8.1.1.
When finished, select Apply.
Select Save in the Backup Targets screen to save the configuration to the policy.
8.1.1 EFS Backup and Restore Options
Backup Vault – A logical backup container for your recovery points (your EFS snapshots) that allows you to organize your backups.
Default Backup vaults are created in AWS: AWS Backup > Backup vaults.
Prerequisite for Cross-Account EFS backup: In AWS, for each target vault (backup and DR account), update the target access policy to enable the copy of recovery points. See the Access Policy section on the vault’s properties page.
IAM Role – An IAM identity that has specific permissions for all supported AWS backup services. The following AWS backup permissions should be attached to your IAM role:
AWSBackupServiceRolePolicyForBackup - Create backups on your behalf across AWS services.
AWSBackupServiceRolePolicyForRestores - Perform restores on your behalf across AWS services.
If a default IAM role was not automatically created by AWS, or you require a custom IAM role, see section 8.2. Selecting the preferred IAM role is only required during the EFS policy configuration.
If adding or removing IAM Role permissions for immediate use, reboot the instance to have the change take effect quickly.
Transition to cold storage– Select the transition lifecycle of a recovery point (your EFS snapshots). The default is Never.
Expire – When does a protected resource expire. The default is Policy Generations.
Moving a backup to the Freezer will set Expire to Never.

8.2 Creating IAM Roles in AWS
A default or custom IAM role is necessary for AWS to perform EFS operations on behalf of N2W.
If adding or removing IAM Role permissions for immediate use, reboot the instance to have the change take effect promptly.
To create a default IAM Role:
Go to the AWS Backup Service: https://us-east-1.console.aws.amazon.com/backup/
Select Create an on-demand backup.
For Resource type, select EBS.
For Volume ID, select any EBS volume to backup.
Select Default IAM Role.
Select Create on-demand backup. Ignore the error provided by AWS.
Verify that the following role was created on AWS IAM Service:

To create a custom IAM Role:
Go to AWS IAM Service: https://console.aws.amazon.com/iam/home#/roles
Select Create role.
Select AWS Backup and then select Next: Permissions.
Search for BackupService.
Select the following AWS managed policies:
AWSBackupServiceRolePolicyForBackup
AWSBackupServiceRolePolicyForRestores
Select Next: Tags and then select Next: Review.
Enter a Role name and select Create role.

8.3 Backup Options for EFS Instances
EFS can be configured by creating the cpm backup or cpm_backup tag. In this case, N2W will override the EFS configuration with the tag values. See section 14.1.4 for keys and values.
8.4 Support for AWS Backup Vault Lock
For complete details on using AWS Backup Vault Lock for EFS, see https://docs.aws.amazon.com/aws-backup/latest/devguide/vault-lock.html
The lock is created using an AWS API, not the AWS console.
N2W supports AWS Backup Vault Lock by setting the expiration time on an EFS target.
N2W cleanup will work correctly.
User-initiated deletions of a backup, such as delete a specific recovery point, delete all backup record and policy snapshots, will fail.
Important: You cannot change the lock’s retention after the AWS ‘cooling period’ has passed. The default ‘cooling period’ is a minimum of 72 hours but is extendable by setting the AWS parameter ChangeableForDays.
To configure N2W to support AWS Backup Vault Lock:
If configured with minimum/maximum retention period, the stored recovery points (created or copied) must also have a matching expiration time.
In the EFS Policy Configuration screen, select the Expire time on the EFS target. When selecting the Expire time, consider that AWS may have a vault lock on the backup.
Was this helpful?

