2 Installing and Upgrading N2W
Be sure to review this entire section before starting an N2W installation (section 2.1) or an upgrade (section 2.2).
The primary differences between an installation and an upgrade are:·
In an upgrade, you use an existing CPM data volume, rather than creating a new volume.
In an upgrade, for each version you are upgrading from, there are specific steps to follow before performing the actual upgrade.
The N2W management console is accessed via a web browser over HTTPS.
When a new N2W Server is launched, the server will automatically generate a new self-signed SSL certificate. This certificate will be used for the web application in the configuration step.-
If no other SSL certificate is uploaded to the N2W Server, the same certificate will be used also for the main N2W application.
Every N2W Server will get its own certificate.
Since the certificate is not signed by an external Certificate Authority, you will need to approve an exception in your browser to start using N2W.
For complete details about securing default certificates on N2W server, see Appendix G – Securing Default Certificates on N2W Server.
When configuring the N2W server, define the following settings:
AWS Credentials for the N2W root user.
Time zone for the server.
Whether to create a new CPM data volume or attach an existing one from a previous N2W server.
Whether to create an additional N2W server from an existing data volume during Force Recovery Mode.
Proxy settings. Configure proxy settings in case the N2W server needs to connect to the Internet via a proxy. These settings will also apply to the main application.
The port the web server will listen on. The default is 443. See section 2.1.4.2.
Whether to upload an SSL certificate and a private key for the N2W server to use. If you provide a certificate, you will also need to provide a key, which must not be protected by a passphrase.
Register the AWS account with N2W Software. This is mandatory only for free trials but is recommended for all users. It will allow N2W to provide quicker and enhanced support. Registration information is not shared.
For the configuration process to work, as well as for normal N2W operations, N2W needs to have outbound connectivity to the Internet, for the HTTPS protocol. Assuming the N2W server was launched in a VPC, it needs to have:
A public IP, or
An Elastic IP attached to it, or
Connectivity via a NAT setup, Internet Gateway, or HTTP proxy.
If an access issue occurs, verify that the:
Instance has Internet connectivity.
DNS is configured properly.
Security groups allow outbound connections for port 443 (HTTPS) or other (if you chose to use a different port).
Following are the configuration steps:
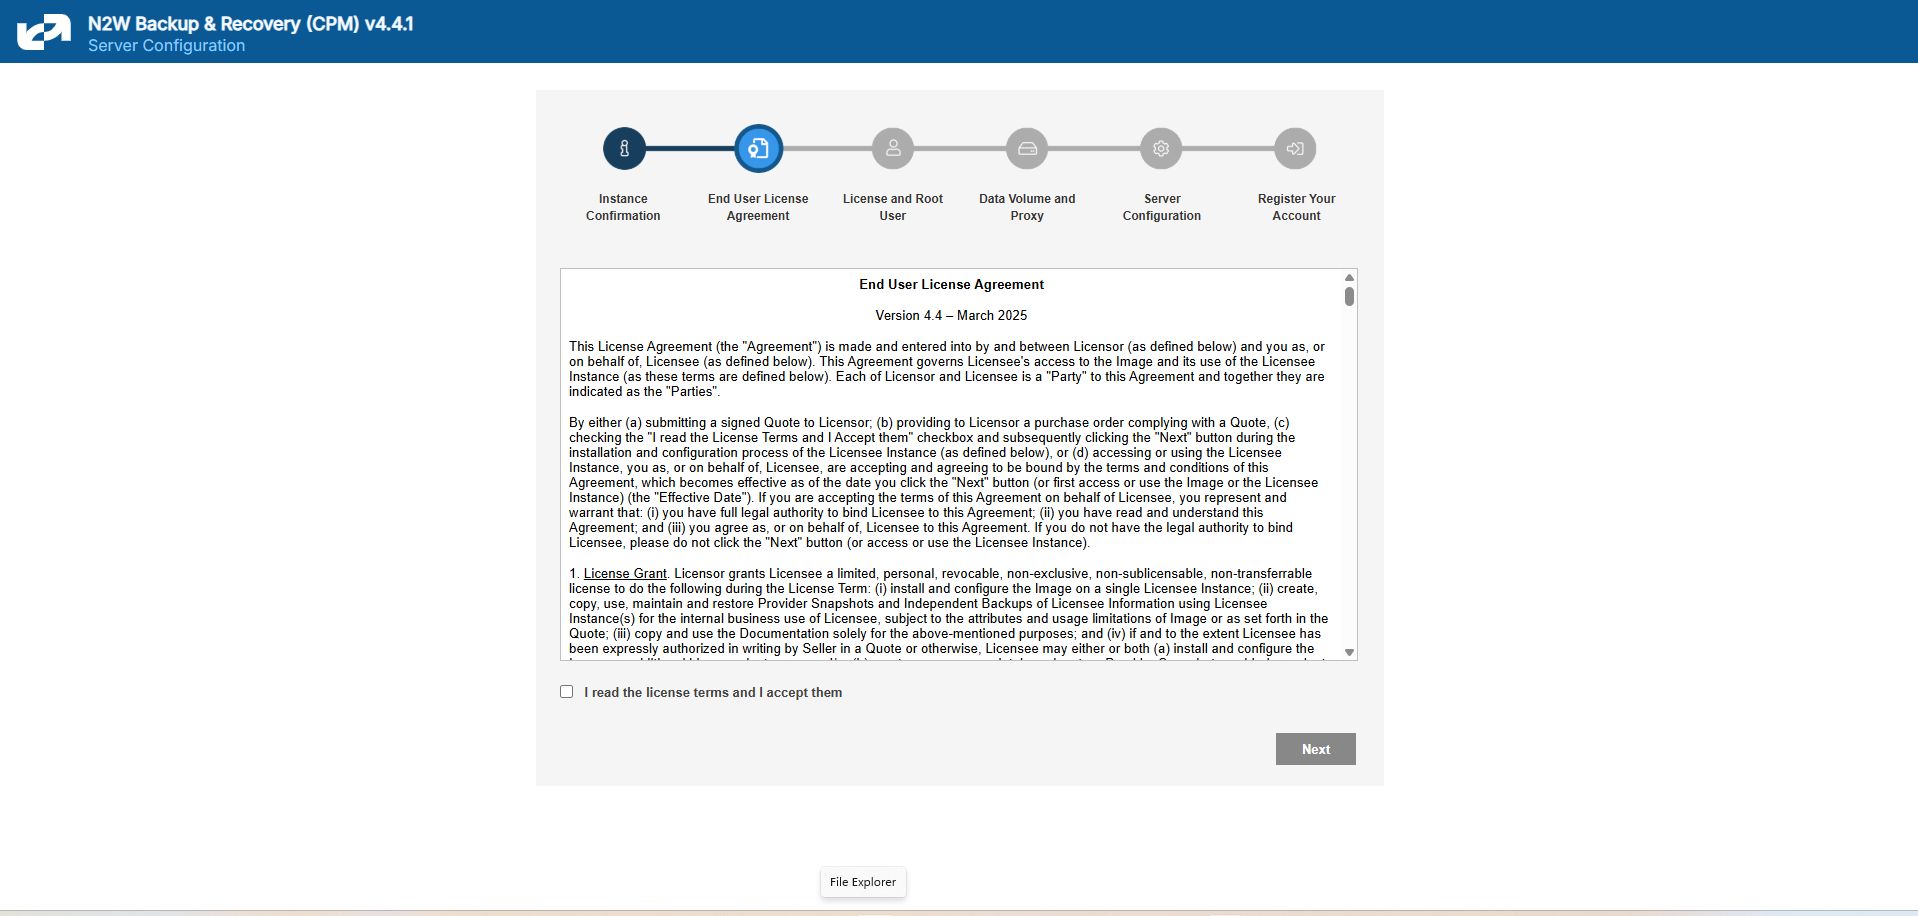
Approve the end-user license agreement.
Define the root username, email, and password.
The admin/root username CAN'T be changed after setting it.
3. Define the time zone of the N2W Server and usage of data volume.
4. Fill in the rest of the information needed to complete the configuration process.
2.1 Installing New N2W Server
N2W Server Sizing Guidelines
Following are the recommended instance type sizes to consider when deploying your N2W server:
Up to 200 instances - T3.medium
Up to 500 instances - M5.large, C5.large, R5.large, C6i.large, R6i.large, M6i.large, C7i.large, M7i.large
Up to 1000 instances - M5.xlarge, C5.xlarge,R5.xlarge,C6i.xlarge, R6i.xlarge, M6i.xlarge, C7i.xlarge, M7i.xlarge
Up to 2000 instances - M5.2xlarge, C5.2xlarge, R5.2xlarge, C6i.2xlarge, R6i.2xlarge, M6i.2xlarge, C7i.2xlarge, M7i.2xlarge
Up to 4000 instances - M5.4xlarge, C5.4xlarge, R5.4xlarge, C6i.4xlarge, R6i.4xlarge, M6i.4xlarge, C7i.4xlarge, M7i.4xlarge
Over 4000 instances – Move additional instances to a new CPM Server
When using the S3 Backup feature, upgrade to the next available instance size listed above but not smaller than 'large'.
2.1.1 Instance ID and End-User License Agreement
To initially be identified as the owner of this instance, you are required to type or paste the N2W server instance ID. This is just a security precaution.
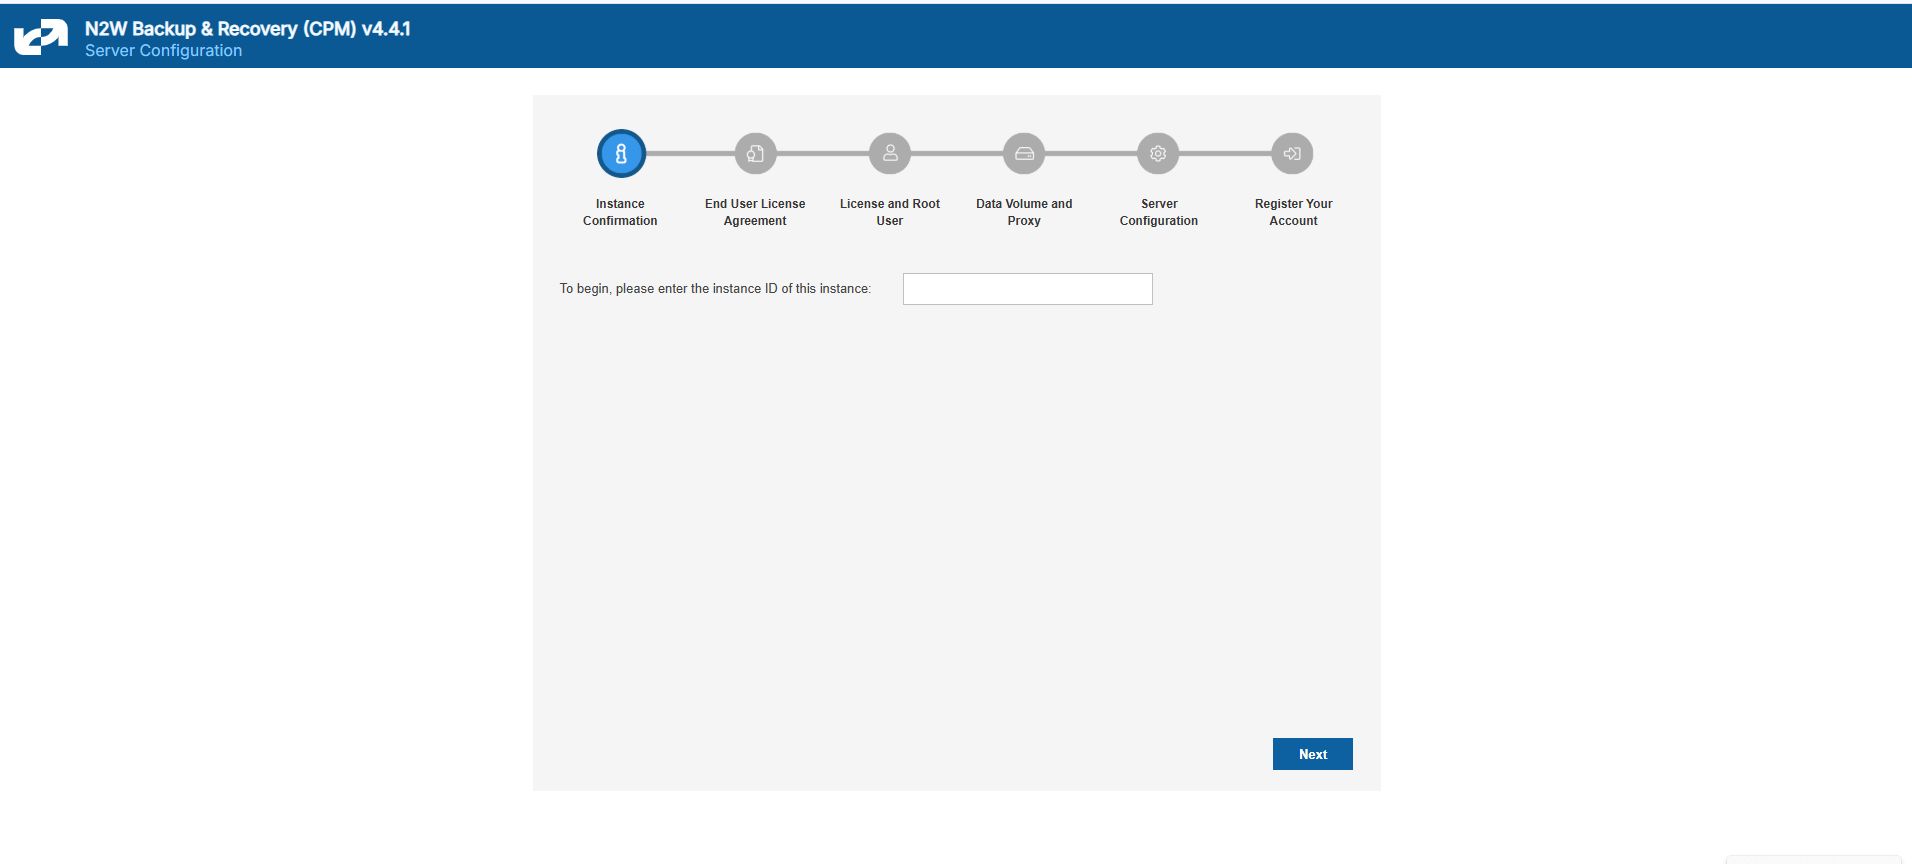
In the next step of the configuration process, you will also be required to approve the end-user license agreement.
2.1.2 License Agreement and Root User
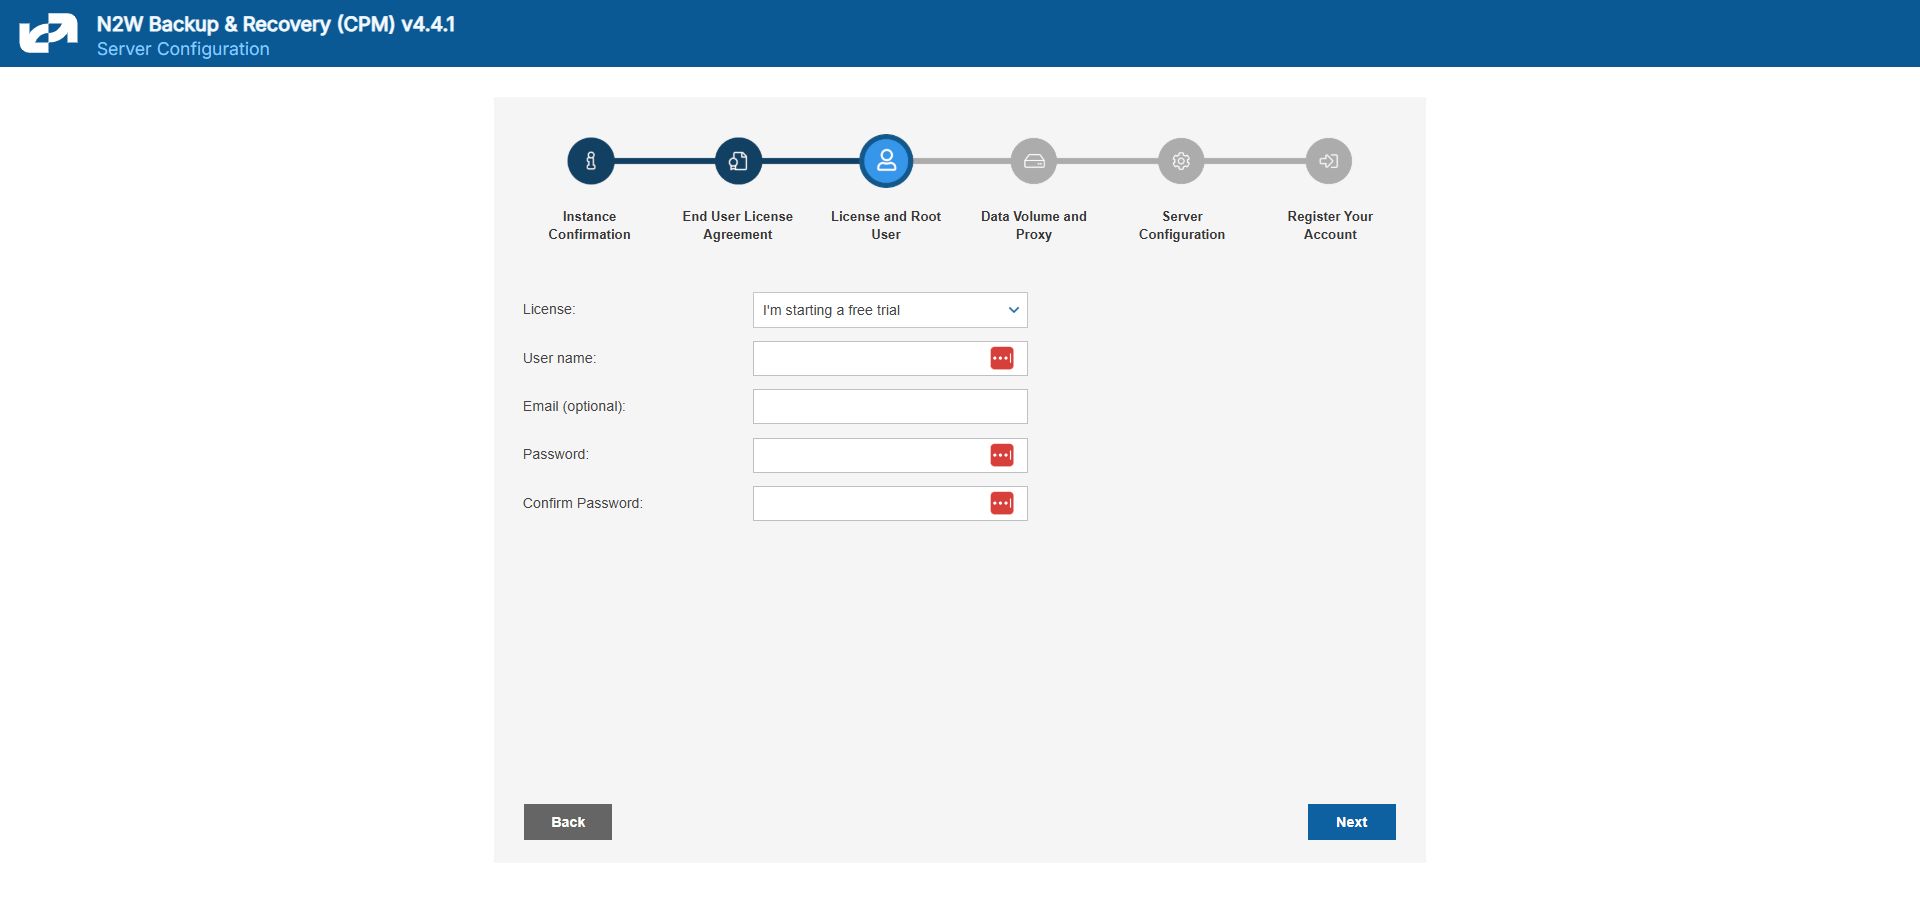
The End User License Agreement field is presented. Select I’m starting a free trial for a free trial. Otherwise, select the appropriate license option in the list, such as Bring Your Own License (BYOL) Edition. Alternatively, if your organization purchased a license directly from N2W Software, additional instructions are shown.
The AWS root user (IAM User) is no longer allowed to control the operation of the N2W server. A user with the Authentication credentials for N2WS Instance IAM Role is the only user allowed to install N2W, log on to the system server, and operate it. As shown below, you need to define the root username, email, and password. This is the third step in the configuration process. The email may be used when defining Amazon Simple Notification Service (SNS) based alerts. Once created, choose to automatically add this email to the SNS topic recipients.
Passwords: N2W recommends that you use passwords that are difficult to guess and that are changed from time to time. For the password rules that N2W enforces, see section 16.2.3.
2.1.3 Defining Time Zone, Data Volume, Force Recovery Mode, Web Proxy
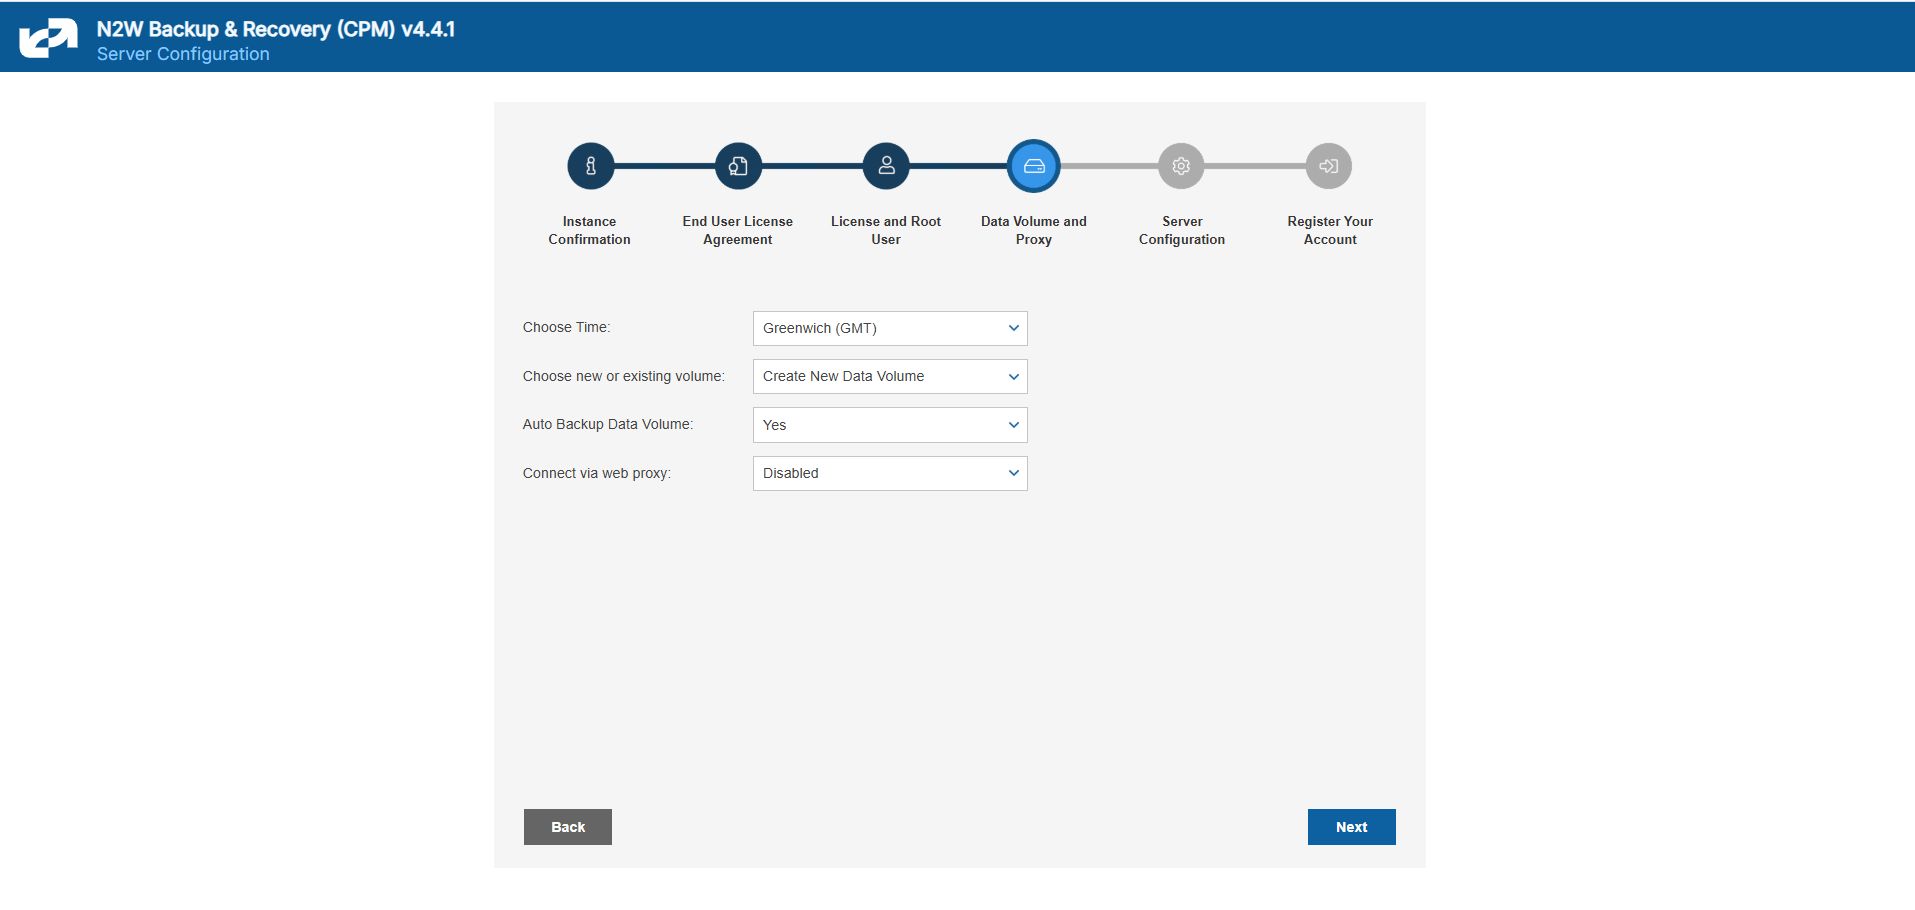
In the fourth step of the configuration process, you can:
Set the time zone of the N2W Server.
If using a paid license, choose whether to create a new data volume or to use an existing one. Your AWS credentials will be used for the data volume setup process.
Create an additional N2W server in recovery mode only, by choosing an existing data volume and set Force Recovery Mode.
Configure proxy settings for the N2W server. See section 2.1.3.2.
As you will see in section 4.1.3, all scheduling of backup is performed according to the local time of the N2W Server. You will see all time fields displayed by local time; however, all time fields are stored in the N2W database in UTC. This means that if you wish to change the time zone later, all scheduling will still work as before.
Here, you choose to use a new or existing data volume. Actual configuration of the volume, including encryption, will be accomplished at the next step. See section 2.1.4.1.
AWS credentials are required to create a new Elastic Block Storage (EBS) data volume if needed and to attach the volume to the N2W Server instance.
If you are using AWS Identity and Access Management (IAM) credentials that have limited permissions, these credentials need to have permissions to view EBS volumes in your account, to create new EBS volumes, and to attach volumes to instances. See section 16.3. These credentials are kept for file-level recovery later and are used only for these purposes.
If you assigned an IAM Role to the N2W Server instance, and this role includes the needed permissions, select Use Instance’s IAM Role, and then you will not be required to enter credentials
2.1.3.1 Proxy Settings
If the N2W server needs an HTTP proxy to connect to the Internet, define the proxy address, port, user, and password. The proxy settings will be kept as the default for the main application. In the N2W UI, proxy settings are made in the Proxy tab of ![]() Server Settings > General Settings.
Server Settings > General Settings.
Make sure to enable SSH connections (port 22) through your proxy.
2.1.4 Complete Remaining Fields in N2W Configuration
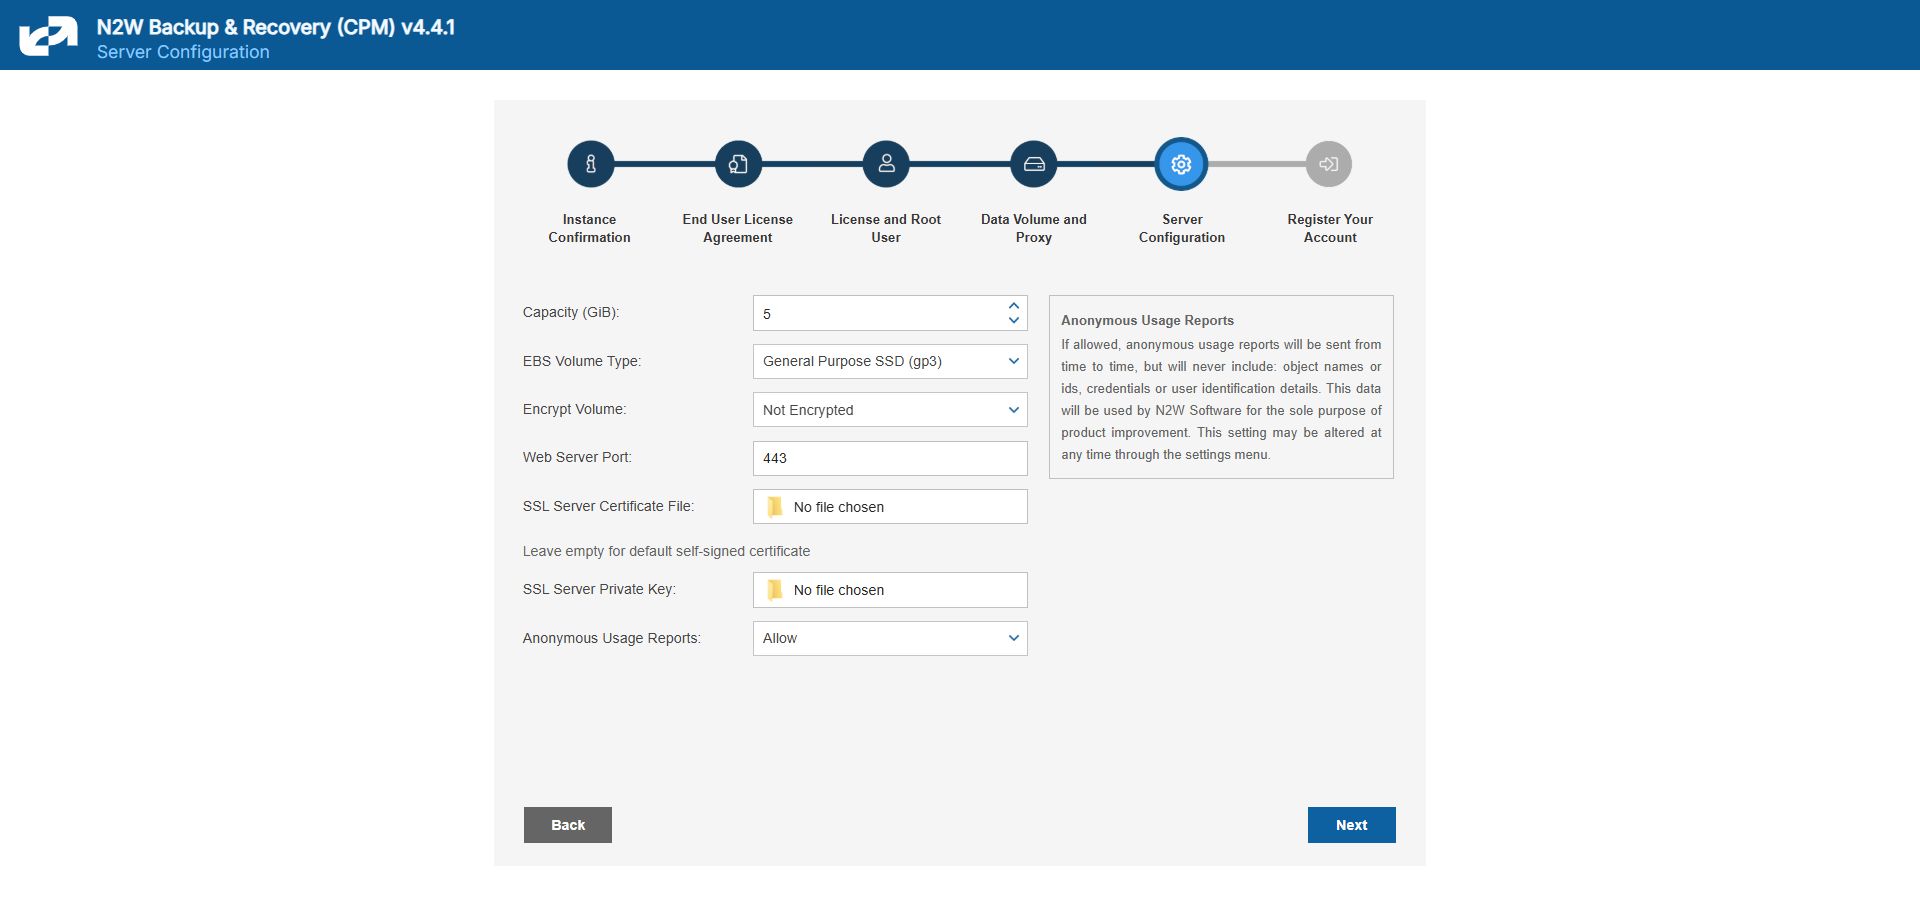
In the fifth step, you will fill in the rest of the information needed for the configuration of the data volume for the N2W Server.
2.1.4.1 Configuring a New Data Volume
When creating a new data volume, the only thing you need to define is the capacity of the created volume at this step. The default size of the data volume is 10 GiB.
The volume is going to contain the database of N2W’s data, plus any backup scripts or special configuration you choose to create for the backup of your servers. The backup itself is stored by AWS, so normally the data volume will not contain a large amount of data.
Volume Recommendations
Volume size should be at least 10 GB, which is large enough to manage roughly 50 instances and about 3 times as many EBS volumes.
If your environment is larger than 50 instances, increase the volume at about the ratio of 1 GB per 10 backed-up instances·
Volume type should be at least GP3.
For Azure, Volume Type defaults to Premium LRS.
GP3 volume types are cheaper and deliver better performance than GP2 volume types. For details, see https://docs.aws.amazon.com/emr/latest/ManagementGuide/emr-plan-storage-compare-volume-types.html
The new volume will be automatically created in the same AZ as the N2W instance. It will be named N2W Data Volume. During the configuration process, the volume will be created and attached to the instance. The N2W database will be created on it.
2.1.4.2 Encrypting Volume
Select Encrypted in the Encrypt Volume drop-down list and choose a key in the Encryption Key list. You have the option to use a custom ARN.
2.1.4.3 Web Server Settings
Port 443 is the default port for the HTTPS protocol, which is used by the N2W manager. If you wish, you can configure a different port for the web server. But, keep in mind that the specified port will need to be open in the instance’s security groups for the management console to work, and for any Thin Backup Agents that will need to access it.
The final detail you can configure is an SSL certificate and private key.
If you leave them empty, the main application will continue to use the self-signed certificate that was used so far.
If you choose to upload a new certificate, you need to upload a private key as well. The key cannot be protected by a passphrase, or the application will not work.
If a corrupted SSL certificate is installed, it will prevent the N2W server from starting.
2.1.4.2 Anonymous Reports Setting
Leaving the Anonymous Usage Reports value as Allow permits N2W to send anonymous usage data to N2W Software. This data does not contain any identifying information:
No AWS account numbers or credentials.
No AWS objects or IDs like instances or volumes.
No N2W names of objects names, such as policy and schedule.
It contains only details like:
How many policies run on an N2W server
How many instances per policy
How many volumes
What the scheduling is, etc.
2.1.5 Registering and Finalizing the Configuration
After filling in the details in the last step, you are prompted to register. This is mandatory for free trials and optional for paid products.
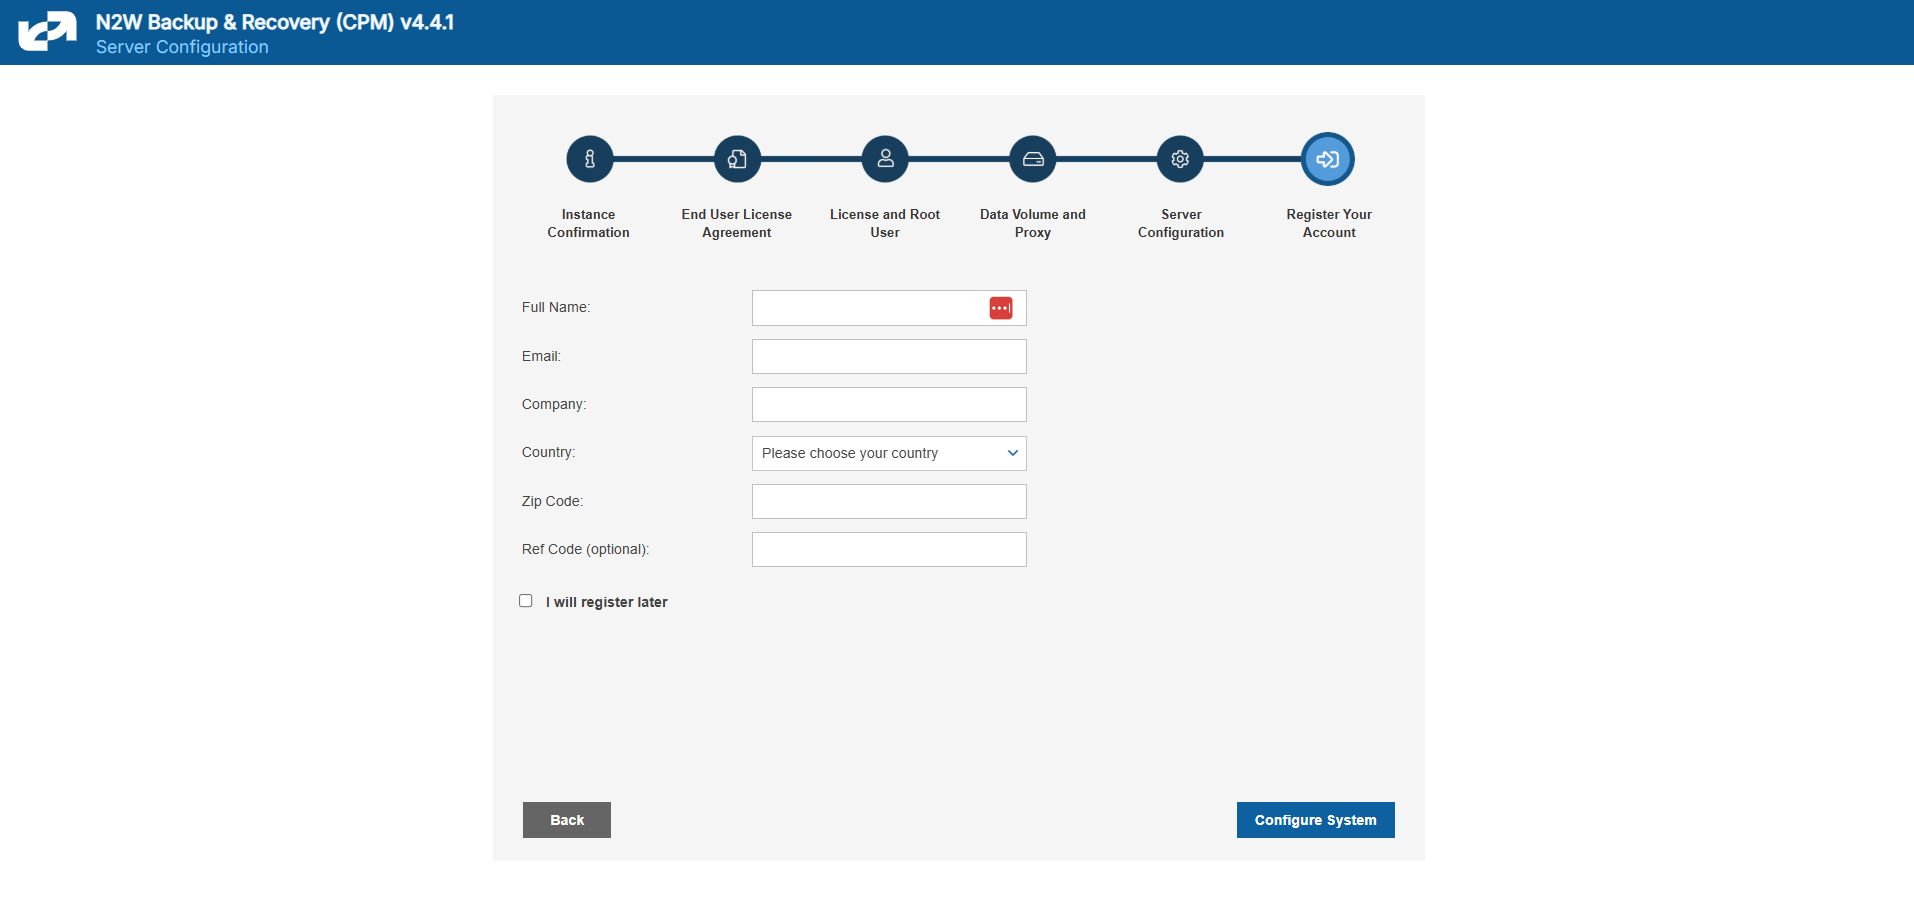
Select Configure System to finalize the configuration. The configuration will take between 30 seconds and 3 minutes for new volumes, and usually less for attaching existing volumes. After the configuration is complete, a ‘Configuration Successful – Starting Server …’ message appears. It will take a few seconds until you are redirected to the login screen of the N2W application.

If you are not redirected, refresh the browser manually. If you are still not redirected, reboot the N2W server via AWS Management Console, and it will come back up, configured, and running.
2.1.6 Configuration Troubleshooting
Most inputs you have in the configuration steps are validated when you select Next. You will get an informative message indicating what went wrong.
A less obvious problem you may encounter is if you reach the third step and get the existing volume select box with only one value in it: No Volumes found. This can arise:
If you chose to use an existing volume and there are no available EBS volumes in the N2W Server’s AZ, you will get this response. In this case, you probably did not have your existing data volume in the same AZ. To correct this:
Terminate and relaunch the N2W server instance in the correct zone and start over the configuration process, or
Take a snapshot of the data volume, and create a volume from it in the zone the server is in.
If there is a problem with the credentials you typed in, the “No Instances found” message may appear, even if you chose to create a new data volume. This usually happens if you are using invalid credentials, or if you mistyped them. To fix, go back and enter the credentials correctly.
In rare cases, you may encounter a more difficult error after you configured the server. In this case, you will usually get a clear message regarding the nature of the problem. This type of problem can occur for several reasons:
If there is a connectivity problem between the instance and the Internet (low probability).
If the AWS credentials you entered are correct, but lack the permissions to do what is needed, particularly if they were created using IAM.
If you chose an incorrect port, e.g., the SSH port which is already in use.
If you specified an invalid SSL certificate and/or private key file.
If the error occurred after completing the last configuration stage, N2W recommends that you:
Terminate the N2W server instance.
Delete the new data volume (if one was already created).
Try again with a fresh instance.
If the configuration still fails, the following message will display. If configuring a new instance does not solve the problem, contact the N2W Software Support Team. To access configuration error details, select Download Configuration Logs.

2.1.7 Using AWS Key Management Service
The AWS Key Management Service (KMS) allows you to securely share custom encryption keys between accounts. For details on enabling shared custom keys, see https://aws.amazon.com/blogs/security/share-custom-encryption-keys-more-securely-between-accounts-by-using-aws-key-management-service/.
The use of custom keys is required in the following cases:
Authentication of
cpmuserto N2W server using a non-default certificate with a private key.Encrypting new volumes.
Associating an account for File Level Recovery.
Authentication of IAM User.
Running scripts.
Performing Recoveries, DR, and Cross-Account activities for RDS, EC2, and EFS resources.
2.1.8 Securing Default Certificates on N2W Server
See Appendix G – Securing Default Certificates on N2W Server.
2.2 Upgrading N2W
Important: Choose the right upgrade method and sequence.
There are 3 upgrade paths depending on the version from which you are upgrading:
For versions 4.2 onward, you can upgrade by installing a patch. See section 2.4.
For versions 2.6 onward, you can use Amazon Machine Images (AMI).
For versions older than 2.6, you must first upgrade to 4.2 using an Amazon Machine Image (AMI), and then upgrade from 4.2 to 4.3.0.
The following diagram shows the major steps and considerations in an N2W upgrade. The upgrade flow is the same as the installation flow with the addition of using an existing CPM data volume (section 2.2.2).
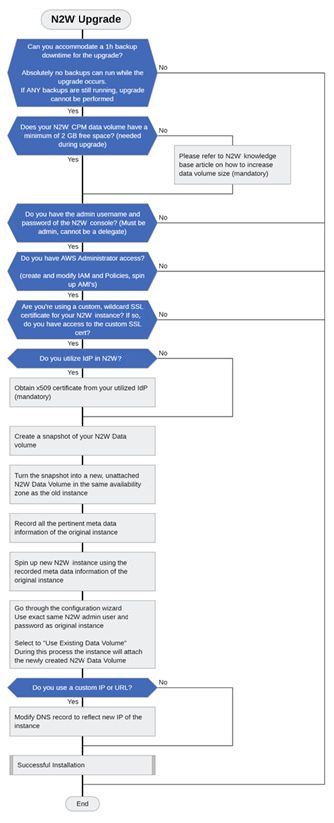
We strongly recommend that you read this entire section BEFORE starting the upgrade.
The upgrade process consists of the following phases:
Before starting the upgrade, refer to instructions specific to your current version in section 2.2.
Stop the current CPM instance.
Select the existing data volume from the snapshot to be used in the upgrade.
Configure the new version instance according to instructions in section 2.2.3.
Terminate the old version instance, and launch the new version as described in section 2.2.4.
After the upgrade, there are still a few steps to ensure a complete transition. See section 2.2.5.
If you have any questions or encounter issues, visit the N2W Support Center where you will find helpful resources in a variety of formats or can open a Support Ticket.
2.2.1 Before Upgrading to the Latest N2W Version
The following sections outline the steps required to upgrade to the latest N2W Backup & Recovery version.
2.2.1.1 IAM Permissions
Due to new functionality in v4.4.x, you may need to update your permission policies. If you have more than one AWS Account added to the N2W console, you will have to update the IAM Policies for each account.
For AWS: See https://n2ws.zendesk.com/hc/en-us/articles/33252616725533--4-5-0-Required-Minimum-AWS-permissions-for-N2W-operations
For Azure: See https://n2ws.zendesk.com/hc/en-us/articles/33252710830109--4-5-0-Required-Minimum-Azure-permissions-for-N2W-operations
Collecting Information Before Starting Upgrade
Following is the important information you must have ready before starting:
Verify that there are no backups, DRs, or Cleanups running or scheduled to run within the next 15-30 minutes.
If the only thing processing is an S3 archive, you are able to abort it if you want.
Have the username and password for the root/admin user ready.
If you are using a proxy in the N2W settings, write down the details.
Take a screenshot of the N2W EC2 instance network settings: IP, VPC, Subnet, Security Groups, and IAM Role and Keypair name.
Take a screenshot of the Tags if you have more than a few.
Terminate the N2W EC2 instance.
Terminating is only necessary BEFORE launching the new AMI if it is a Marketplace Subscription.
If you are using BYOL, you can keep the old server until the new upgrade is complete and tested for an easy rollback if necessary.
Take a snapshot of the N2W Data Volume. Only the Data Volume is important, as it contains all your settings, backup entries, etc.
Download the latest IAM permissions (section 2.2.1.1) and update the IAM Policies from your role.
If you are using a custom SSL certificate, make sure you have the .CRT and .KEY files available in a place where you can easily add them during the configuration process.
2.2.2 Configurating the New N2W Server Instance
The new CPM instance needs to be in the same Availability Zone as the cpmdata EBS volume.
Use the cpmdata volume created from the snapshot, and leave the original volume attached to the stopped instance.
If your data volume is very big, wait 10 minutes before starting the upgrade, as AWS is creating new volumes from snapshots. The Ready message may show before the volume is actually ready.
To upgrade/redeploy the N2W Server Instance:
About 1 minute after launching the new instance, it should in the running state. Connect to the user interface (UI) with a browser using
https://[ip-of-your-new-instance].Confirm the Instance ID of your newly launched instance.
Accept the Terms and Conditions.
Enter the username and password of the admin/root user.
The admin/root username CAN'T be changed after setting it.
5. Approve the exception to the SSL certificate.
6. Choose the time zone and select Use Existing Data Volume in step #4, “Data Volume and Proxy”.
7. Select your old data volume in the Existing CPM Data Volume list in step #5, “Server Configuration”.
8. Select Configure System in step #6, “Register Your Account”. N2W will automatically resume operations. Wait until the login mask appears.
See section 2 for complete details for the Server Configuration.
2.2.3 Terminating the Old Instance and Launching the New Instance
If you have a Marketplace instance, after a successful upgrade, the new CPM will automatically detect the existence of the old instance and will launch in recovery mode. You will need to terminate the old CPM and perform a failover.
Terminate the existing CPM instance.
Launch a new N2W Server instance in the same region and AZ as the old one. You can launch the instance using the Your Marketplace Software page on the AWS web site.
To determine the AZ of the new instance, launch the instance using the EC2 console rather than using the 1-click option.
Wait until the old CPM instance is in the terminated state.
5. Confirm Perform Failover prompt.

6. Wait 5 minutes for the ‘Operation Succeeded’ message.

Reboot.
2.2.4 Existing Data Volume
The Existing data volume option is used if:
You have already run N2W and terminated the old N2W server, but now wish to continue where you stopped.
You are upgrading to new N2W releases.
You are changing some of the configuration details.
You want to configure an additional N2W server in recovery mode only. See section 2.2.6.
The select box for choosing the volumes will show all available EBS volumes in the same AZ as the N2W Server instance. When choosing the volumes, consider the following:
It is important to create the instance in the AZ your volume was created in the first place.
Another option is to create a snapshot from the original volume, and then create a volume from it in the AZ you require.
Although CPM data volumes typically have a special name, it is not a requirement. If you choose a volume that was not created by an N2W server for an existing data volume, the application will not work.
2.2.5 Completing the Upgrade
After upgrading:
If you were using N2W Thin Backup Agents to perform app-consistent backups:
Check the Agents tab and see if “last heard from” is updated with a recent date and time.
If not, you may have to download and install the N2W Thin Backup Agent on your Windows EC2 instances.
If you were using the AWS SSM Remote Agent to perform app-consistent backups, note that the SSM Agent will not appear in the Agents tab. You will need to verify the SSM Agent separately.
If you were using backup scripts that utilize SSH, you may need to log in to the N2W Server once and run the scripts manually so that the use of the private key will be approved.
If you have more than one AWS Account added to the N2W console:
2.2.6 Force Recovery Mode
You can configure an additional N2W server, in recovery mode only, by choosing an existing data volume:
In step 4, choose to use an existing volume and in the Force Recovery Mode, select Yes.
In step 5, in the Existing CPM Data Volume list, select the volume that holds your backup records.
The N2W server configured for recovery mode will NOT:
Perform backups.
Perform data Lifecycle Management operations.
Have Resource Control management.
Perform any scheduled operations.
2.3 Automate Configuration with Silent Mode Installation
Configuring N2W in silent mode is available using AWS user data, using AWS Secrets Manager, and for Azure.
2.3.1 AWS Configuration
Launching an EC2 instance in AWS can optionally be set with User Data. See the description of how such user data can be utilized at https://docs.aws.amazon.com/AWSEC2/latest/UserGuide/user-data.html.
The N2W instance can also use this user data when launching.
If the string
CPMCONFIGexists in the user data text, then the text following it is used for the CPM configuration.The extraction is until the string
CPMCONFIGENDor the end of the data.The extracted text is assumed to be in
.inifile format.The extracted configuration text of the new N2W instance should start with a
[SERVER]section, followed by the configuration details.For the relevant
time_zoneparameter value, see Appendix C.
Following is an example of the whole script:
To use AWS Secrets Manager in Silent Mode for AWS, also see 2.3.2.
Additionally, if you need the N2W server to connect to the Internet via an HTTP proxy, add a [PROXY] section:
The snapshot option does not exist in the UI. It can be used for the automation of a Disaster Recovery (DR) server recovery. Additionally, if you state a volume ID from another AZ, N2W will attempt to create a snapshot of that volume and migrate it to the AZ of the new N2W server. This option is for DR only.
You are not required to select the license terms when using the silent configuration option, since you already approved the terms when subscribing to the product on AWS Marketplace.
After executing the configuration, on the AWS Instances page, select the Tags tab. If the CPM_Silent_Configuration key value equals ‘succeeded’, then the CPM instance was successfully launched with the user data configured in silent mode.

To verify configuration user data:
In AWS, select the CPM instance.
In the right-click menu, select Instance Settings, and then select View/Change User Data.


2.3.2 Silent Mode Using AWS Secrets Manager
You can keep Silent Configuration values, such as username and password, on AWS Secrets Manager. Secrets Manager can be used on any textual (not numeric or Boolean) field value in the configuration file. Secrets Manager is:
Not available for proxy settings
Available only for AWS.
The format is <silent config key>=@<Secret name>#<key in secret>@
Different secrets may be used within a configuration file, such as a user's password from another secret.
2.3.3 Configuring in Silent Mode for Azure
Silent configuration for Azure can only be executed programmatically using the Azure CLI, not through the Azure Portal.
The Azure Portal has a limitation whereby a User Managed Identity is not associated with a Virtual Machine until after its creation.
An existing Managed Identity with predefined permissions must be assigned to the Virtual Machine immediately upon its creation in order to perform various operations.
To deploy N2W using the Azure CLI:
In the Azure Portal, accept the license terms for N2W Backup & Recovery for Azure one time.
Select the Get Started link.
In the Configure Programmatic Deployment screen, Enable the Subscription for the image you are deploying.
Create a text file containing the following configuration parameters, including the Managed Identity Client ID, in the indented format shown:
5. Pass the file to the Azure CLI VM creation command as follows:
2.4 Patch Installation
To keep your N2W running at its highest efficiency, N2W will occasionally send you notification of the existence of a patch through an Announcement or an email. Download the patch according to the notification instructions.
To install patches:
In the top right toolbar, select
 Server Settings and then select Patches.
Select Choose file to select the patch file.
Select Upload and Install.

Last updated
Was this helpful?

