26 Using N2W with Azure
Manage the backup and recovery of your Azure resources.
Following are the steps for setup, backup, and recovery of Azure VMs, Disks, and SQL Servers:
Before starting, configure N2W Backup & Recovery according to section 2.
After the final configuration screen, prepare your Azure Subscription by adding the required permissions and custom IAM role in Azure. See section 26.1.
Enable Azure Cloud as one of your UI defaults in N2W Server Settings > General Settings > User UI Default.
Register the CPM app in Azure. See section 26.2.
Create an N2W account user as usual and configure resource limitations for Azure as described in section 18.3.
Assign a custom role to your app. See section 26.3.
In N2W, add an Azure account with the custom N2W role. See section 26.4.
Create a Storage Account Repository for your data objects. See section 26.5.
Create an Azure policy in N2W with Azure backup targets. See section 26.6.
Configure Azure Disaster Recovery. See section 26.7.
Back up the policy. See section 26.8.
Recover from a backup, including file-level recovery. See section 26.9.
You can design a Recovery Scenario to automatically coordinate sequential recoveries for several or all backup target types in a single Azure policy during one recovery session. See section 24.3.
For Recovery Scenarios, it is important to configure the recovery details for each VM and SQL Server target.
26.1 Setting Up Your Azure Subscription
N2W Backup and Recovery needs the following permissions to perform backup and recovery actions.
For the minimal permissions for Azure, see https://n2ws.zendesk.com/hc/en-us/articles/33252710830109--4-5-0-Required-Minimum-Azure-permissions-for-N2W-operations
Add your subscription ID value to the
subscriptionsattribute in the minimal permissions JSON.
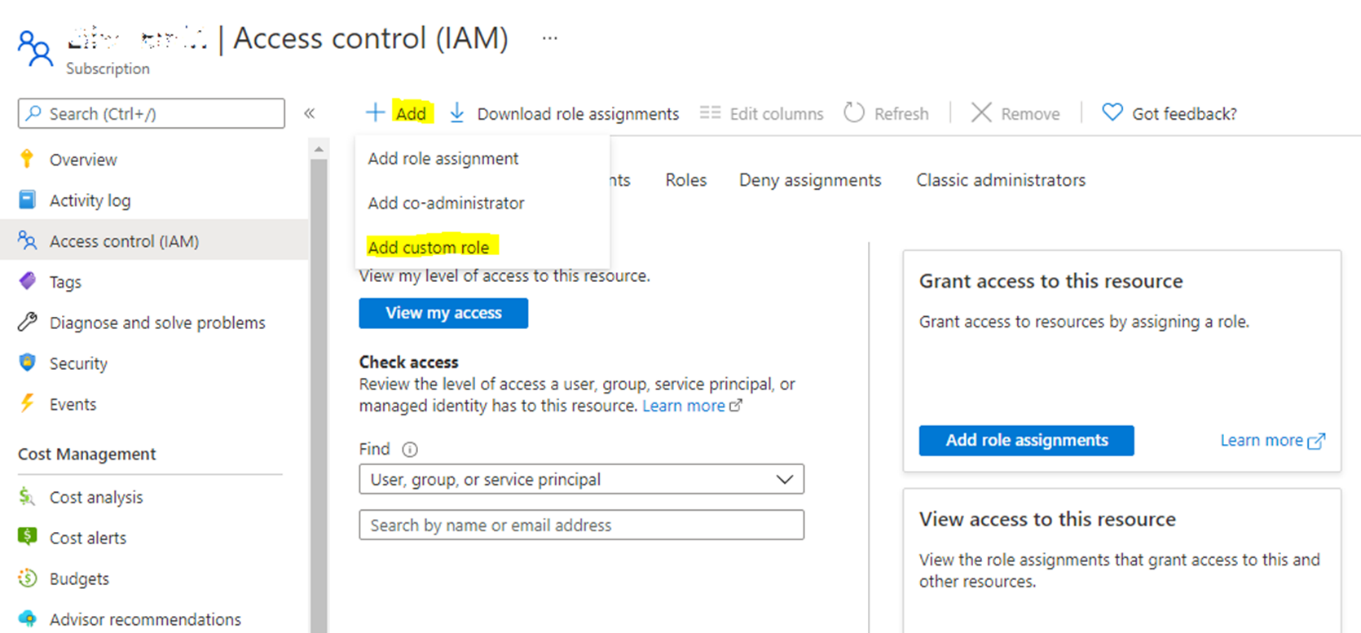
2. Log on to the Azure Portal, https://portal.azure.com, and go to your subscription. Select a subscription that you want to use with N2W Backup & Recovery.  3. Select Access control (IAM), select +Add, and then select Add custom role.
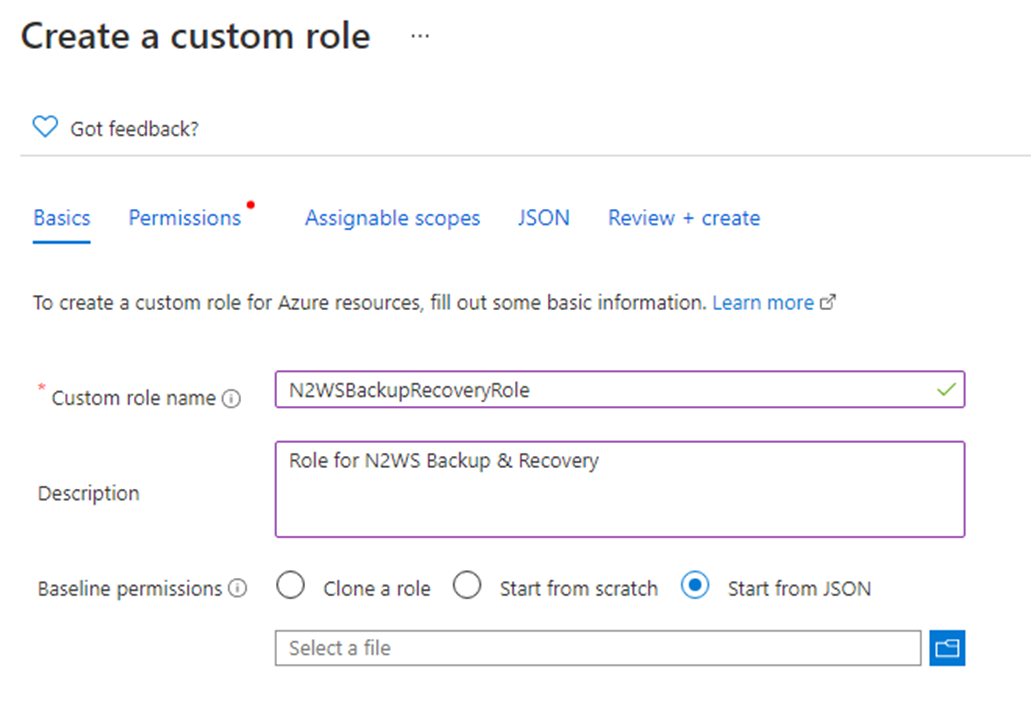
4. Complete the form adding a name for the custom role, and then select the JSON file saved in step 1. 5. Create the role with the new JSON file.
26.2 Registering Your Azure App
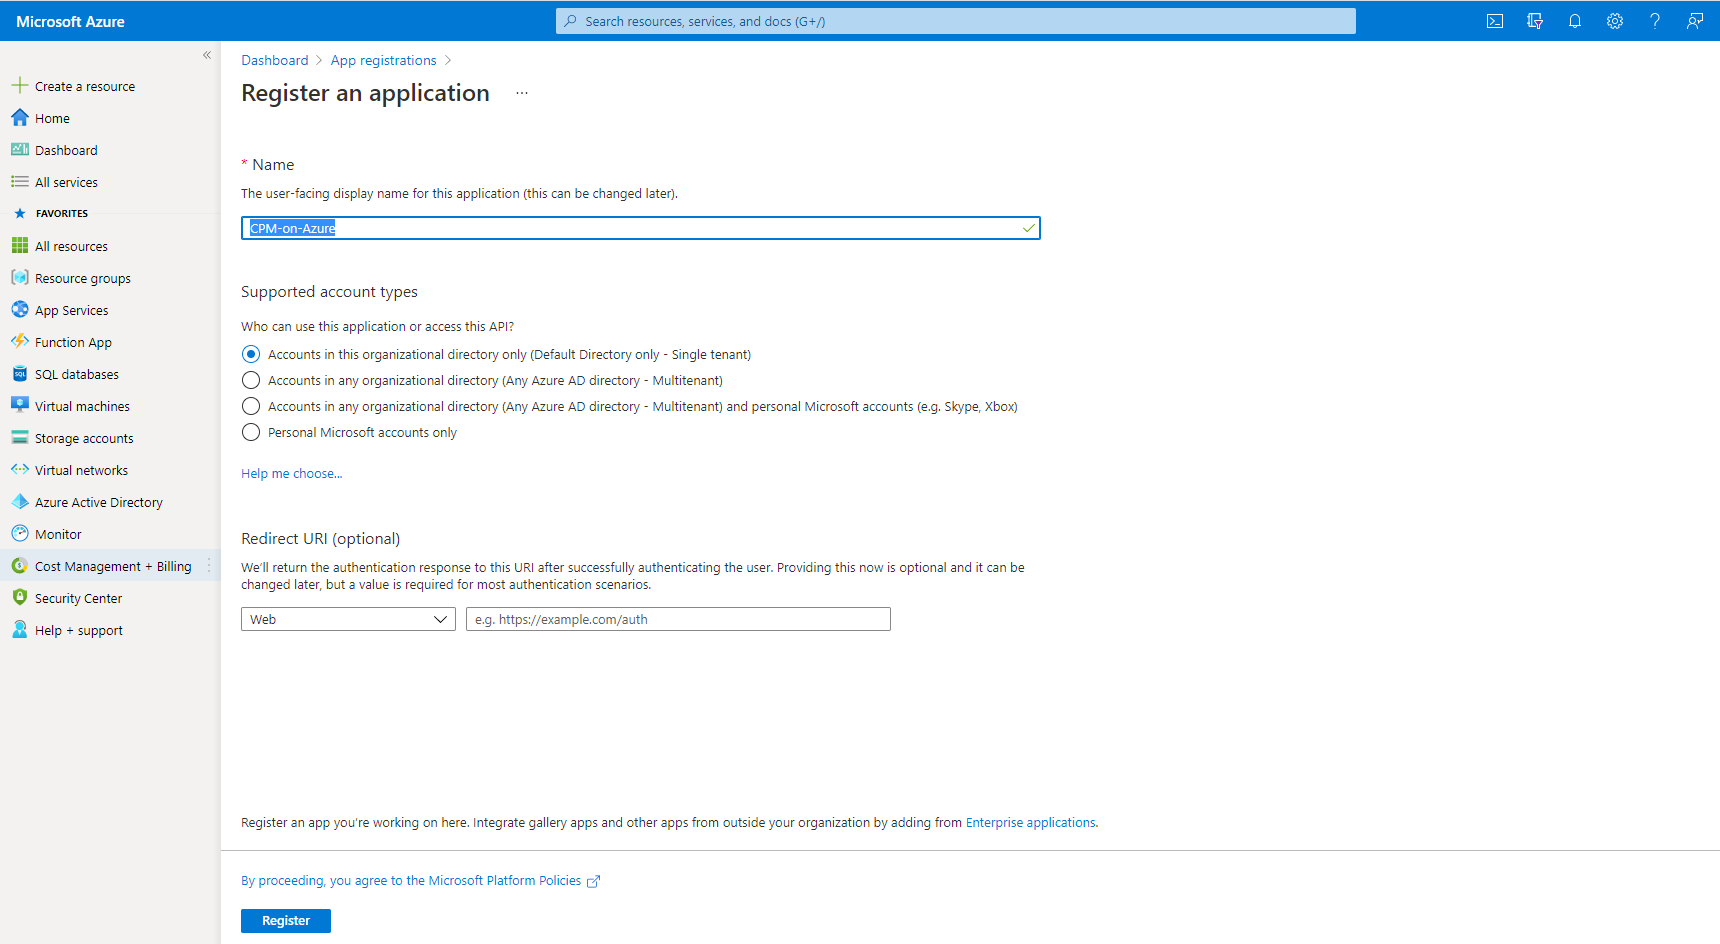
In the Azure portal Dashboard section, go to the App registrations service.
In the Name box, type CPM-on-Azure and select Register.
3. Select the app. 4. Save the Application (client) ID and Directory (tenant) ID for use when adding the Azure account to N2W.

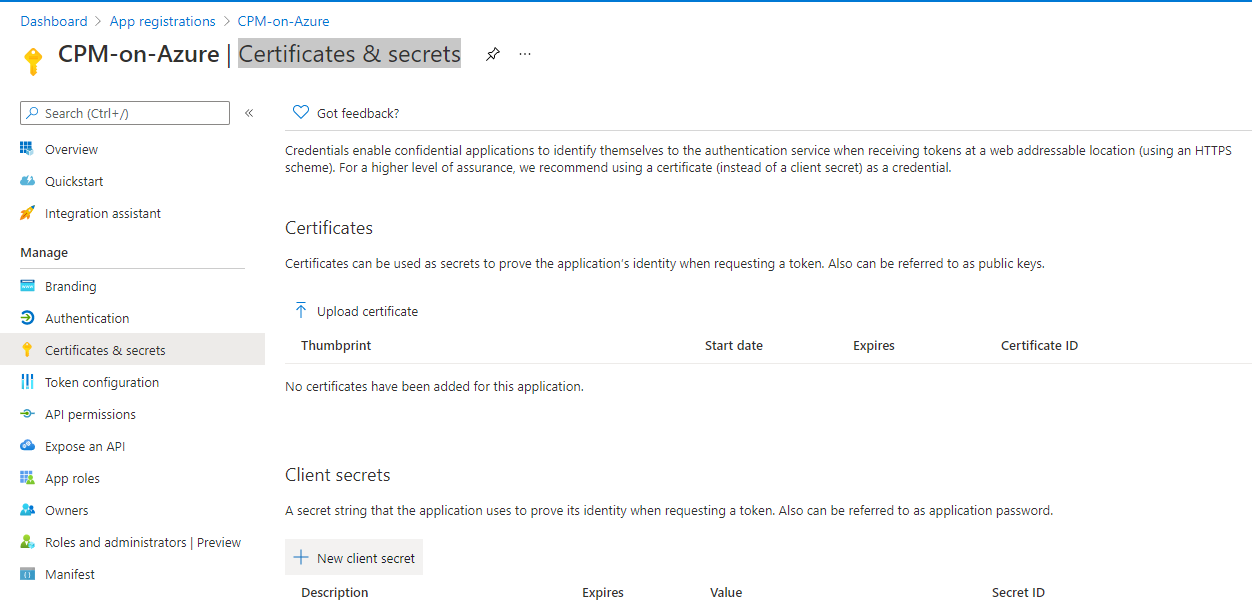
5. Select Add a certificate or secret.
6. Select![]() New client secret.
7. Complete the secret values, and save.
New client secret.
7. Complete the secret values, and save.
26.3 Assigning the Custom Role to your App
In Azure, go to the Subscription service and select your subscription.
Select Access control (IAM).
Select Add and then select Add role assignment.
In the Role list, select your custom role.
In the Select list, select the app that you created.
Select Save.
In the Role assignments tab, verify that the custom role is assigned.
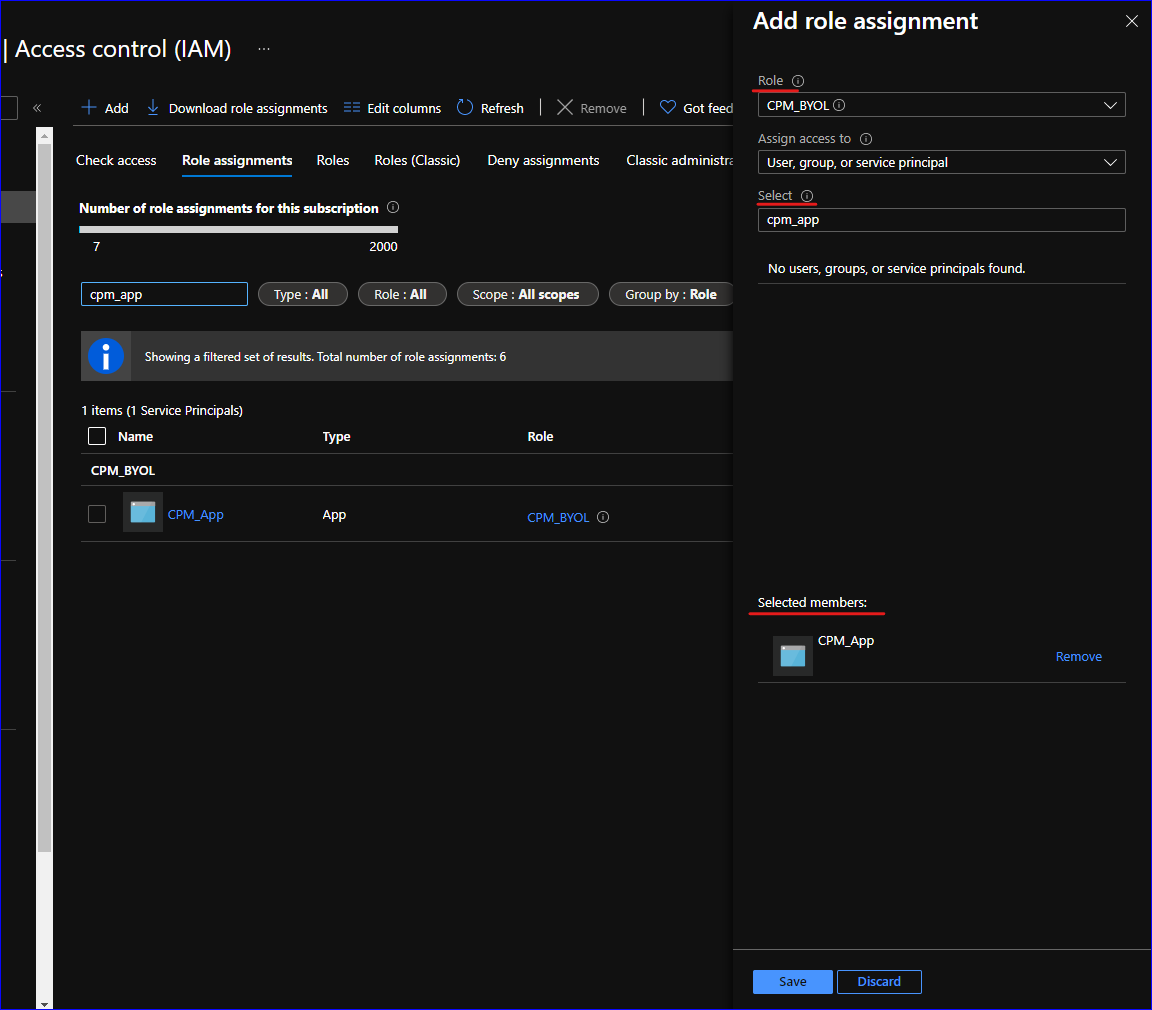
It might take time for Azure to propagate the changes in IAM.
26.4 Adding an Azure Account to N2W
Log on to N2W using the root username and password used during the N2W configuration.
Select the Accounts tab.
If you have a license for Azure cloud, select Azure account in the + New menu.
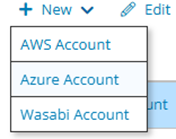
Complete the New Azure Account screen using the App registration view information in the Azure portal as needed.
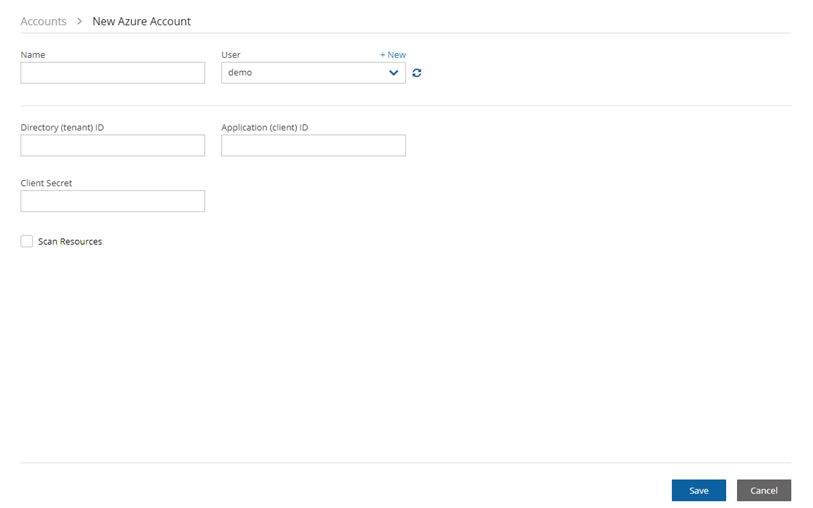
Name - Copy from your App registration name.
In the User list, select your username. Or, select
 New to add a new user. See section 18.
Directory (tenant) ID – Copy from your App registration.
Application (client) ID – Copy from your App registration.
Client Secret – Copy from your App registration Certificates & secrets in the App registration view, or set a new secret.
Scan Resources - Select to include the current account in tag scans performed by the system. The scan will cover all VMs and disks in all locations.
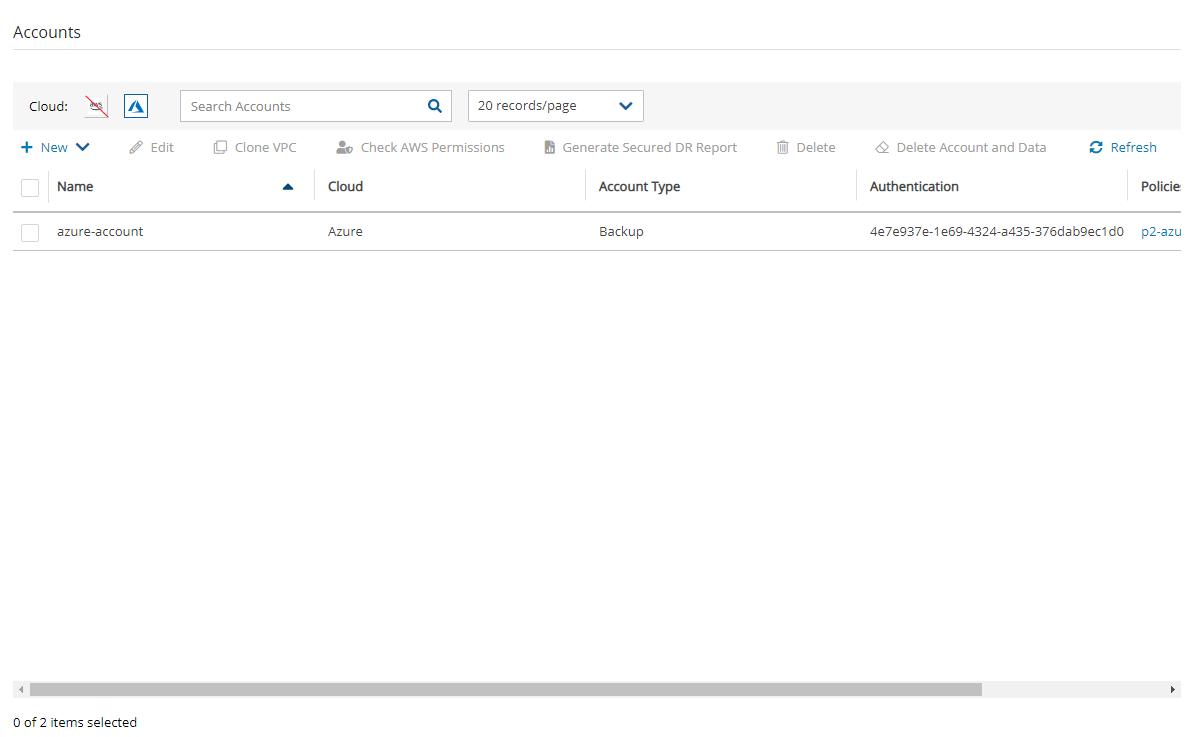
5. Select Save. The new account appears in the Accounts list as an Azure Cloud account.
26.5 The Storage Account Repository
Storage Account repositories are where backups of SQL servers are stored. Storage Account repositories can also be used to store disk snapshots via Lifecycle policy or serve as cross-cloud storage for AWS volume snapshots via a Lifecycle policy. For more details, see section 21.
A single Azure Storage Account container can have multiple repositories.
26.5.1 Configuring an Azure Storage Repository
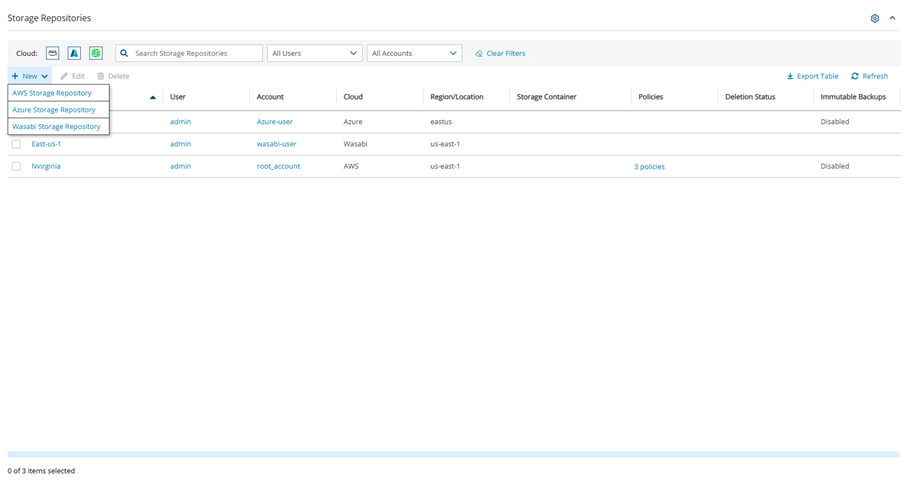
In N2W, select the Storage Repositories tab.
In the
 New menu, select Azure Storage Repository.
In the Storage Repositories screen, complete the following fields, and select Save when complete.
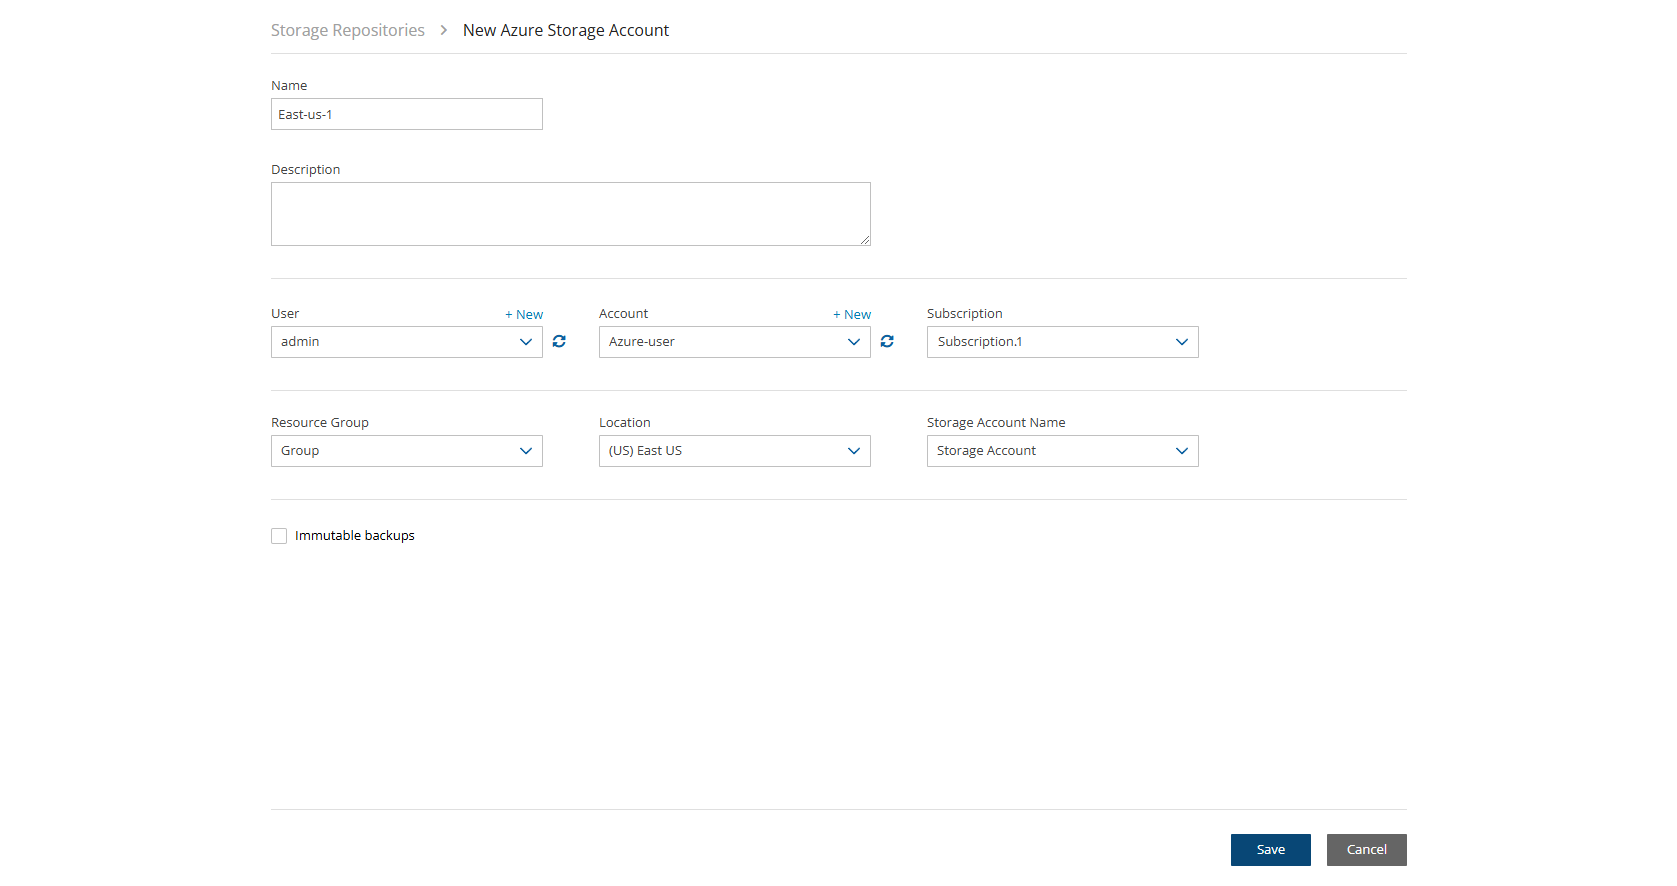
Name - Type a unique name for the new repository, which will also be used as a folder name in the Azure Storage Repository container. Only alphanumeric characters and the underscore are allowed.
Description - Optional brief description of the contents of the repository.
User – Select the user in the list.
Account - Select the account that has access to the Storage Repository.
Subscriptions – Select the subscription that owns the Storage Repository.
Resource Group – Select the Storage Repository's resource group.
Location – Select the Storage Repository’s location.
Storage Account Name – Select the name of the Storage Account from the list.
Immutable backups - Select to protect data stored in the repository from accidental deletion or alteration. When enabled, the N2W server puts a Lease on every object stored in the Storage Repository. A leased object cannot be deleted or modified until the Lease is cancelled. You can specify the string that will be used as the Lease (in a UUID format), or let N2W create one for you.
26.5.2 Deleting a Storage Repository
You can delete all snapshots copied to a specific Storage Repository.
Deleting a repository is not possible when the repository is used by a policy. You must change the policy's repository to a different one before you can delete the Target repository.
Select the Storage Repositories tab.
Use the Cloud buttons to display the Azure
 repositories.
Select the repository to delete.
Select
 Delete.
26.6 Creating an Azure Policy
To back up resources in Azure, create an N2W Azure policy.
Before saving a policy with an SQL Server backup target, the policy must have a Storage Repository. To create a Storage Repository, see section 26.5.
In N2W, select the Policies tab.
On the
 New menu, select Azure policy.
In the New Azure Policy screen, complete the fields:
Name – Enter a name for the policy.
User – Select from the list. Or, select
 New to add a user. See section 18.
Account – Select from the list. Or, select
 New to add an account. See section 26.2.
Enabled – Clear to disable the policy.
Subscription – Select from the list.
Schedules – Optionally, select one or more schedules from the list, or select
 New to add a schedule. See section 4.1.1.
Auto Target Removal – Select Yes to automatically remove a non-existing target from the policy.
4. Select the Backup Targets tab. 5. For each resource type to back up, in the Add Backup Targets menu, select a target. The applicable screen opens.
For Virtual Machines, see section 26.6.2.
For SQL Servers and their databases, see section 26.6.1.
For Azure disks, see section 26.6.3.
6. Before completing a policy with SQL Server backup targets, select a Target repository for the policy in the Storage Repository tab, and then select Save.
7. In the Backup Targets tab, review the selected targets, and then select Save.
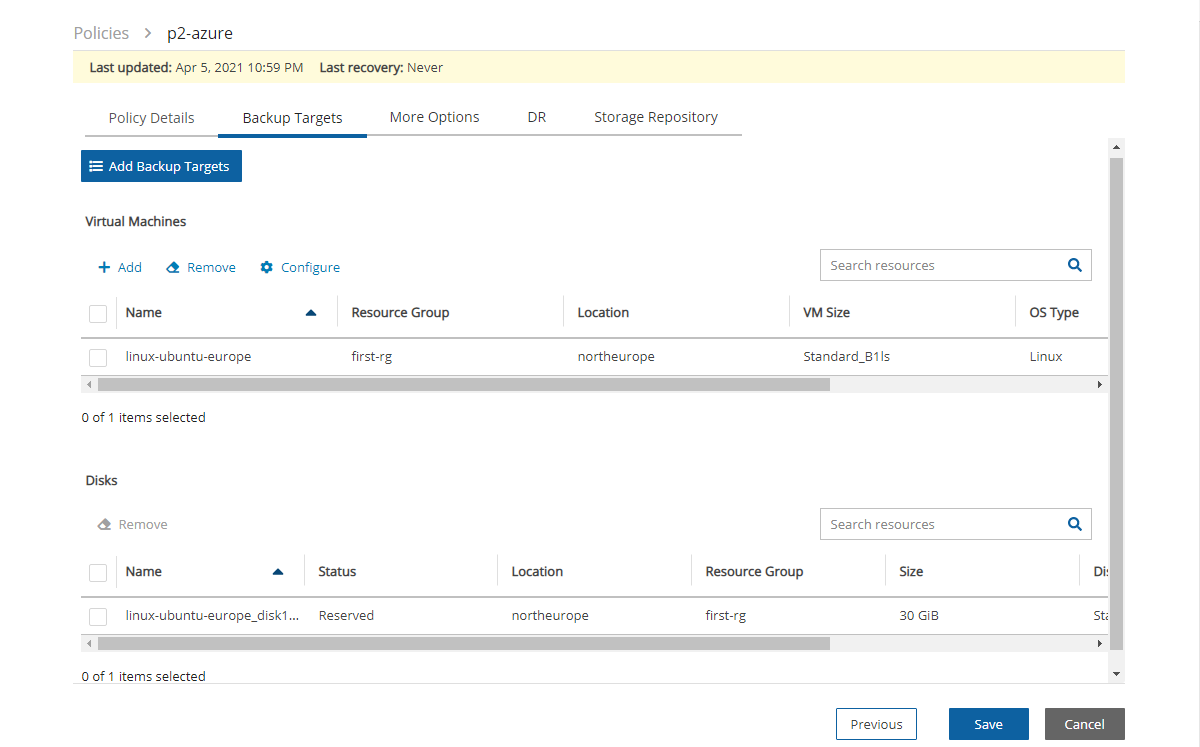
26.6.1 Adding an SQL Server Target
An SQL Server backup is performed by a worker. The worker parameters for each SQL Server target are configured in the Policy SQL Server and Database Configuration screen, as shown in step 3 below.
Backups are always full to enable fast restores.
Backups are kept in an Azure Repository.
The default behavior for workers has changed in 4.3.0. The worker used for SQL Backup & Recover now uses a private IP instead of a public IP. To change:
1. Connect to your N2W Backup and Recovery Instance with SSH Client.
2. Type sudo su.
3. Add the following lines to /cpmdata/conf/cpmserver.cfg:
[azure_worker]
assign_public_ip_to_public_sql_server_workers=True
4. Run service apache2 restart
5. Choose the worker’s Vnet and subnet as the SQL Server.
Following are possible backup configurations for an SQL Server target:
Back up all databases
Include or Exclude only pre-selected databases in the backup process
Before selecting individual SQL Servers, it is required to filter by the Location of the target resources using the list in the upper left corner. Filtering by Resource Group is optional.
To add an SQL Server target:
In the Add Backup Targets menu, select SQL Servers. The Add SQL Servers table opens.
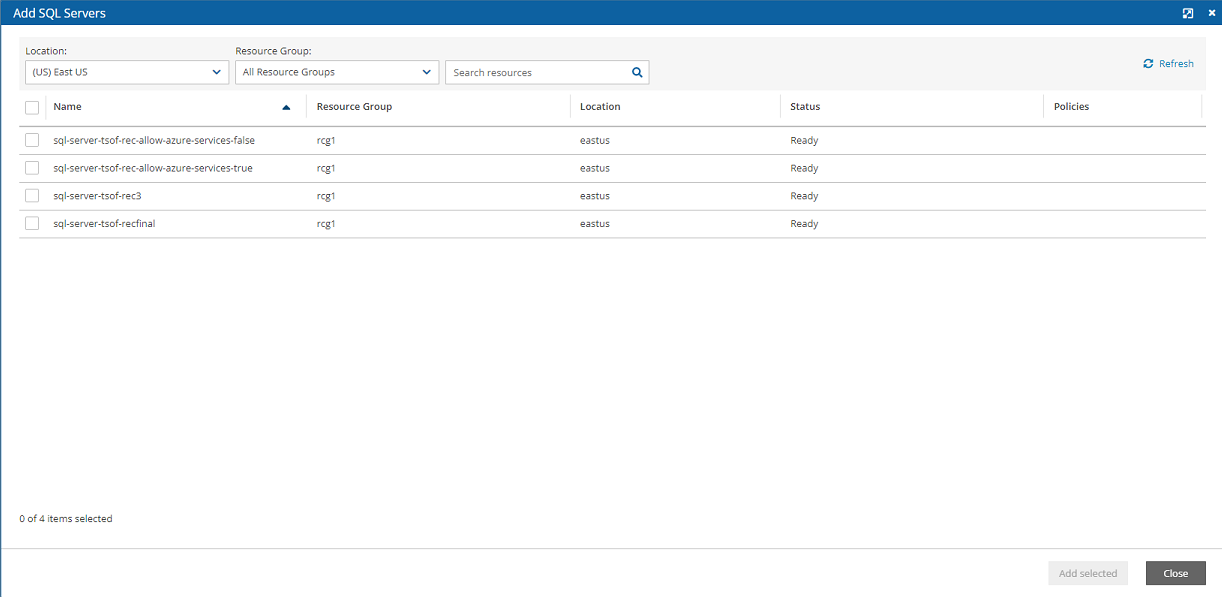
2. When finished selecting targets, select Add selected. The Backup Targets tab lists the selected targets.
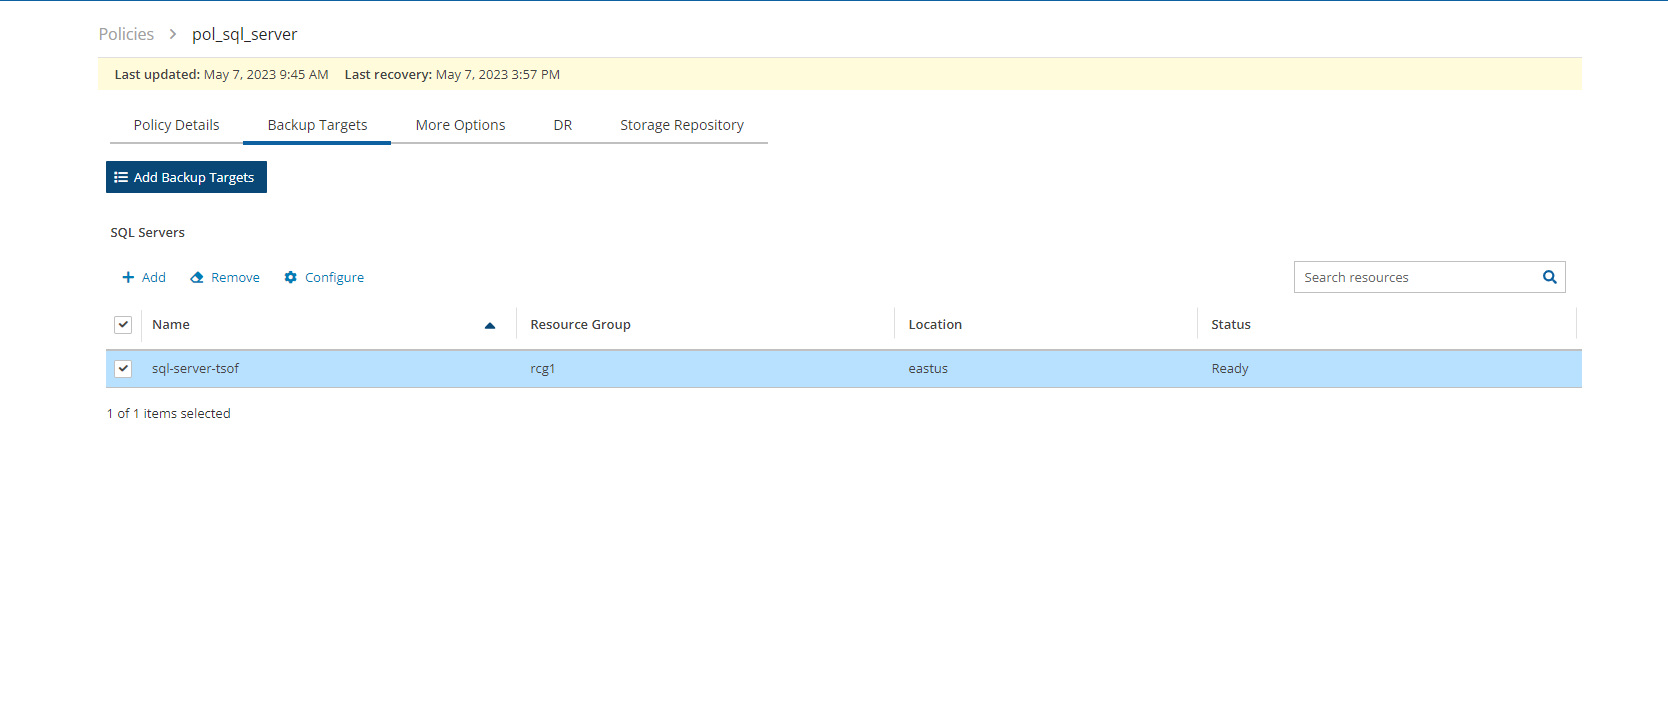
3. To choose which databases to back up for each SQL Server, select a server, and then select ![]() Configure. The Policy SQL Server and Database Configuration screen opens.
Configure. The Policy SQL Server and Database Configuration screen opens.
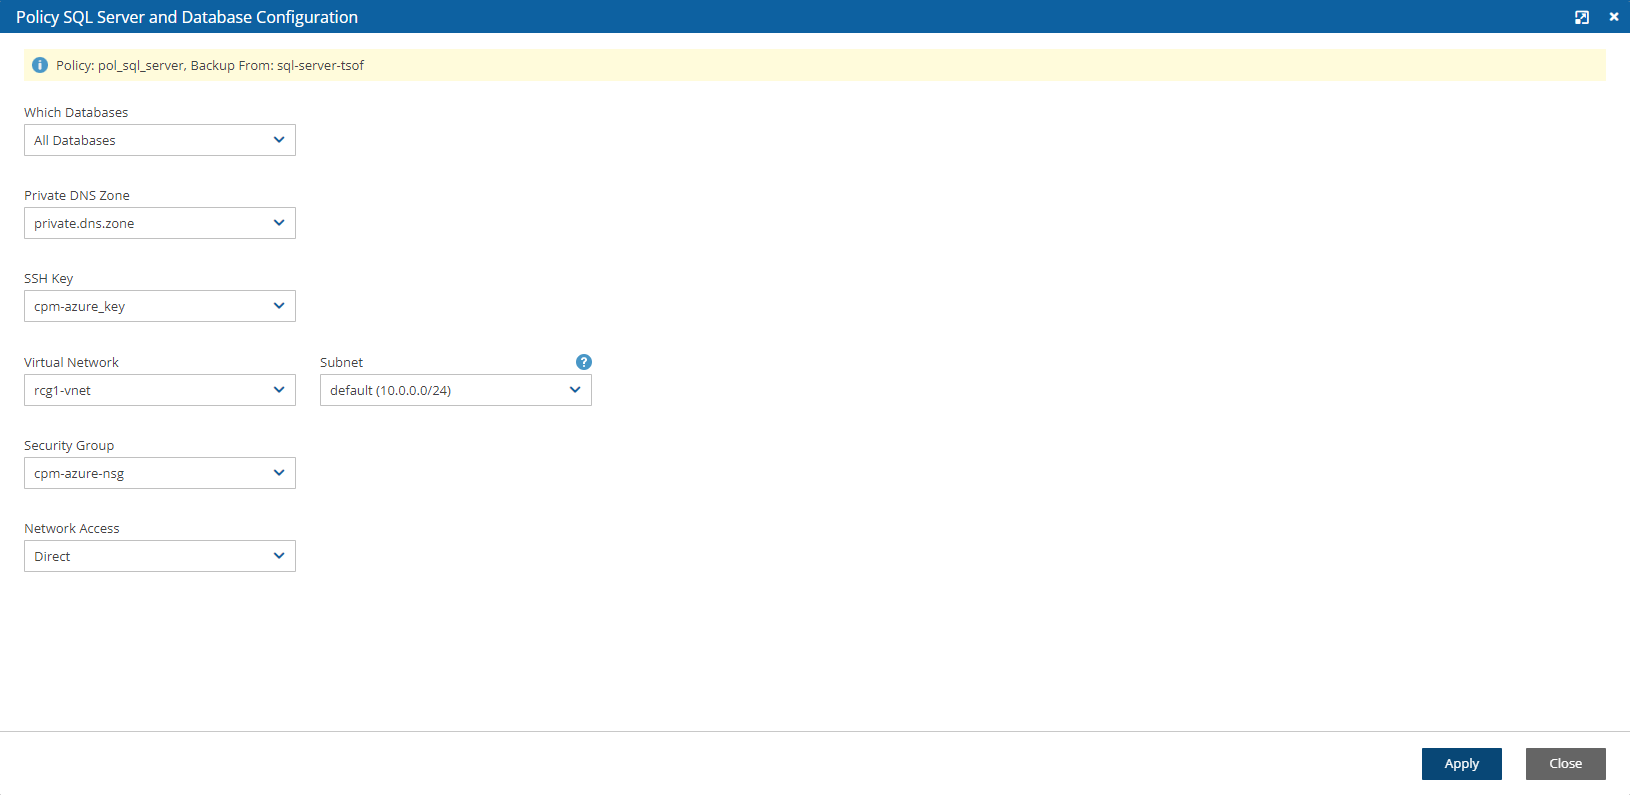
4. In the Which Databases list, choose whether to back up All Databases on this server, or select databases, and then choose Include Selected or Exclude Selected.
5. For each database, change Private DNS Zone, SSH Key, Virtual Network, Subnet, Security Group, and Network Access as needed, and then select Apply.
6. In the Storage Repository tab, select the Target repository for the SQL Server backup, and then select Save.
26.6.2 Adding an Azure Virtual Machine
Before selecting individual Virtual Machine targets, it is required to filter by the Location of the target resources using the list in the upper left corner. Filtering by Resource Group is optional.
On the Add Backup Targets menu, select Virtual Machines. The Add Virtual Machines table opens.
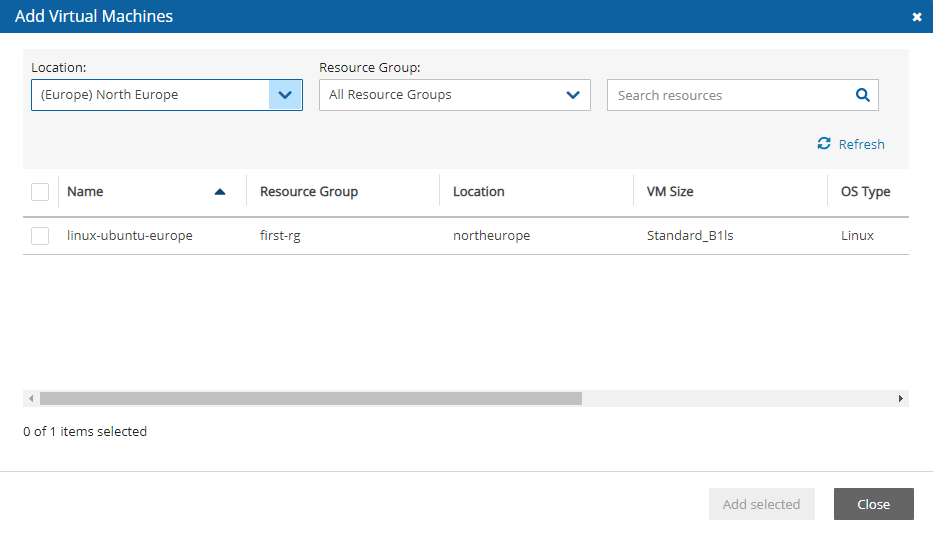
2. Select the virtual machines for backup, and then select Add selected. The Backup Targets tab lists the selected targets.

3. To choose which disks to back up for each Virtual Machine target, select a machine, and then select ![]() Configure. The Policy Virtual Machine and Disk Configuration screen opens.
Configure. The Policy Virtual Machine and Disk Configuration screen opens.
4. In the Which Disks list, select the disks to Include or Exclude in the backup. Change additional information as needed, and then select Apply.
26.6.3 Adding an Azure Disk Backup Target
To define backup success, retries, and failures for alerting:
In the Add Backup Targets menu, select Disks.
Select the Disks to back up, and then select
 Configure for each target.
Configure disk information, such as Encryption Set. To expand the configuration section for a disk, select the right arrow
 . Change the Name to the desired name for the recovered disk, and then select Close.
26.6.4 Setting Backup Success and Retry Policy
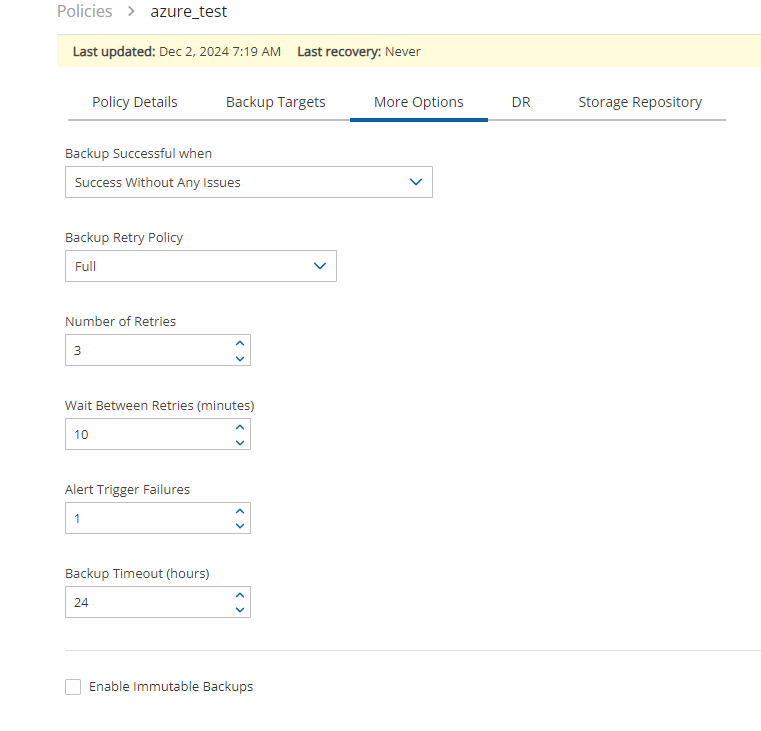
To define backup success, retries, and failures for alerting:
Select the relevant policy.
In the More Options tab, complete the backup, retry, and alert options as described in section 4.2.4.
N2W version 4.4.0 does not support 'partial retry' for SQL Server targets.
26.6.5 Enabling Immutable Backups
Enabling Immutable Backups will prevent the unauthorized deletion of Azure VM and disk snapshots. When a policy is enabled for Immutable Backups, a ‘Delete’ lock type is assigned to a disk snapshot until the lock is removed. The lock is removed by N2W before Cleanup or by user-initiated deletion.
To enable immutable backups:
Select the relevant policy.
In the More Options tab, select Enable Immutable Backups.
To view the Lock Type in Azure:
On the Azure console, go to the Snapshot page and select Locks.
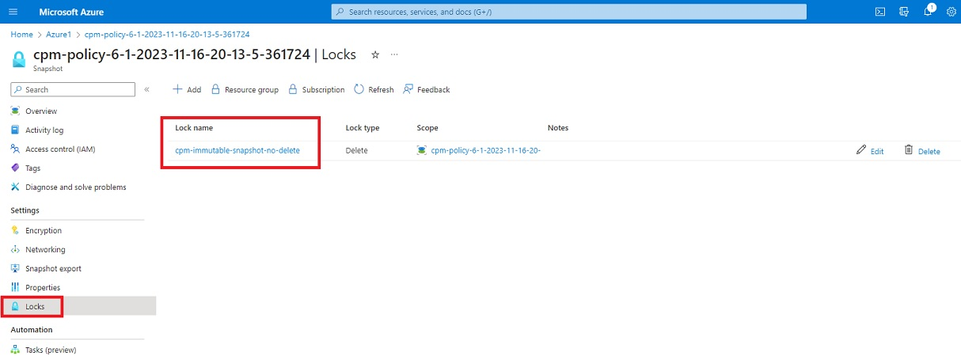
The following permissions are required:
o Microsoft.Authorization/locks/read
o Microsoft.Authorization/locks/write
o Microsoft.Authorization/locks/delete
26.7 Configuring Azure DR
The DR operation copies managed disk snapshots to selected locations. Policies may be enabled for cross-location and cross-subscription DR.
In the DR tab, select Enable DR.
Complete DR Frequency and DR Timeout.
Select Cross-Location Backup (DR) or Cross-Subscription Backup (DR).
If you selected Cross-Location Backup (DR), select the DR target locations in the Target Locations list.
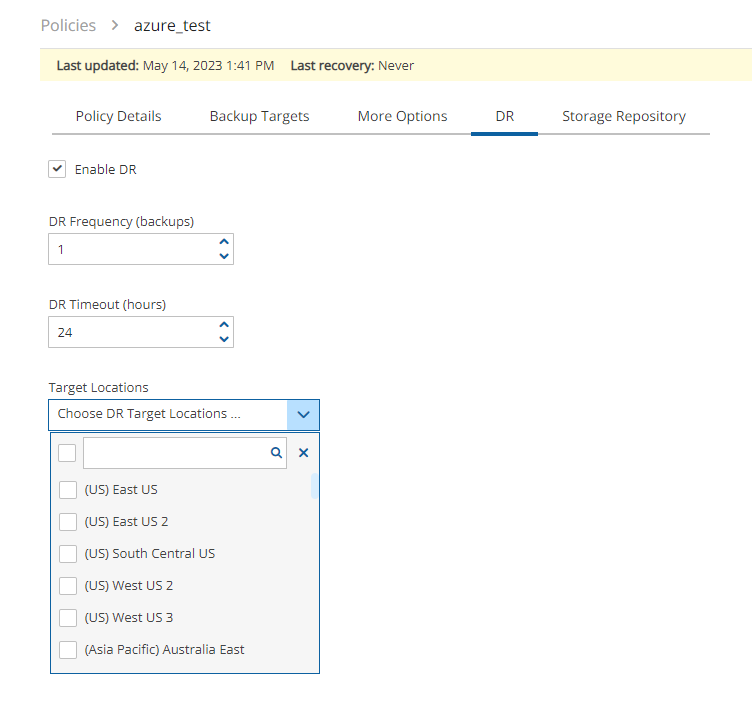
5. If you selected Cross-Subscription Backup (DR), complete the following:
To Subscription – Select the subscription to copy the snapshots to. All policy account subscriptions can be the DR subscription target, except for the subscription of the policy (the original subscription).
DR Subscription Target Locations – Select the location (or locations) you want to copy the snapshots of the policy to. To include all Target locations selected for backup, select Original Location(s) in the list. Select additional locations as needed.
Keep Original Snapshots – By default, the original snapshot from the source location is kept. If disabled, once the snapshot is copied to the DR subscription, it will be deleted from the source location.

To use a different Resource Group on the target location/subscription for copied snapshot, add a tag to the backup target resource (disk or VM):
· Tag key - cpm_dr_resource_group
· Tag value - TARGET_RESOURCE_GROUP_NAME
26.7.1 Setting a Tag for Managed Disks with Disk Access
Azure can manage private access disks using a Disk Access resource, which is based on subscription and location. For disk targets using private access, provide a tag with the ID of the Disk Access resource on the selected DR locations.
To provide a Disk Access ID, add a tag to the resource as follows:
Key: ‘cpm_dr_disk_access’ or ‘cpm_dr_disk_access:<LOCATION>’; Value: ‘<Disk Access ID>’
If disks are attached to a Virtual Machine target and same Disk Access is used for all backed up disks, it is sufficient to add the tag to the Virtual Machine and not each disk.
If a single DR location is selected, there is no need for ‘:
<LOCATION>’ in the tag key.
26.8 Backing Up an Azure Policy
If the policy has a schedule, the policy will backup automatically according to the schedule.
To run a policy as soon as possible, select the policy and select
 Run ASAP in the Policies view.
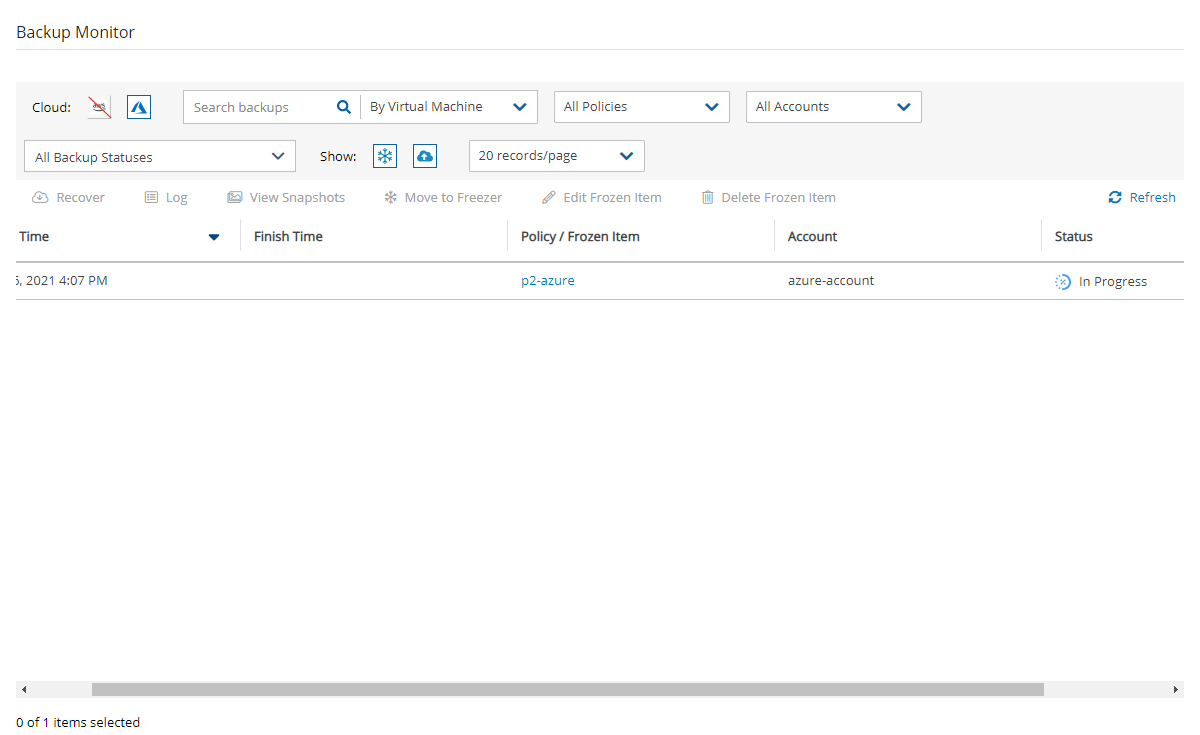
To view the policy progress and backups, select Backup Monitor, and use the Cloud button to display the Azure (
 ) policies. The backup progress is shown in the Status column.
26.9 Recovering from an Azure Backup
To recover from a Wasabi Repository, see section 27.3.
To orchestrate recovery scenarios with Azure targets, see section 24.
Only one VM is recoverable during a recovery operation.
After creating a backup, you can recover it from the Backup Monitor.
After choosing the objects to recover, you can view the recovery process by selecting Recovery Monitor. Use the Cloud buttons to display the Azure (![]() ) recoveries.
) recoveries.
In the VM recovery Basic Options, there are Azure options for replicating data to additional locations
to protect against potential data loss and data unavailability:
Availability Zone – A redundant data center (different building, different servers, different power, etc.) within a geographical area that is managed by Azure.
Availability Set – A redundant data center (different building, different servers, different power, etc.) that can be launched and fully configured by the customer and managed by the customer.
No Redundancy Infrastructure Required – By selecting this option, the customer can choose not to replicate its data to an additional (redundant) location in another zone or set. By choosing this option, the customer would save some money, but in rare cases (usually 11 9s of durability and 99.9% of availability), the customer can experience some degree of data loss and availability.
In the Disk Recovery screen, you may be presented with an option to change the encryption when recovering certain disks.
To add an additional layer of encryption during the recovery process, see https://docs.microsoft.com/en-us/azure/virtual-machines/disks-enable-customer-managed-keys-portal.
Disk encryption settings can be changed only when the disk is unattached or the owner VM is deallocated.
After choosing the objects to recover, you can view the recovery process by selecting Recovery Monitor. Use the Cloud buttons to display the Azure (![]() ) recoveries.
) recoveries.
26.9.1 Recovering a VM and Disks
To recover a VM and/or attached disks:
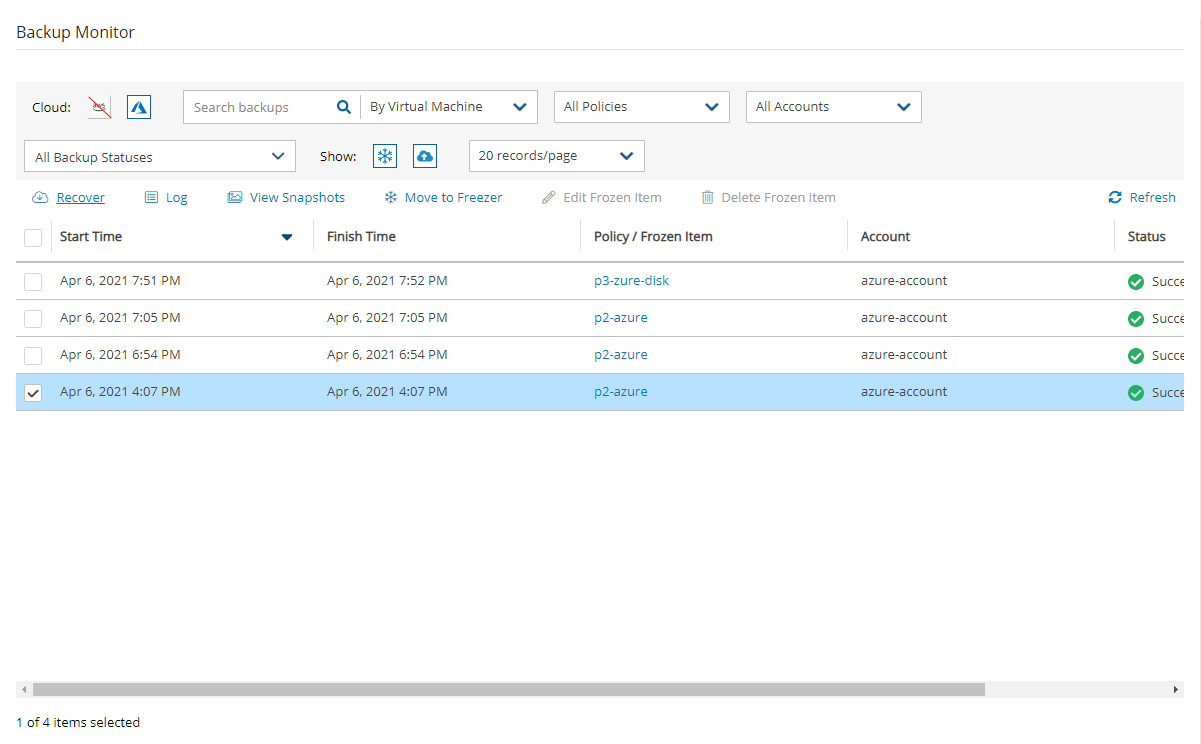
In the Backup Monitor, select the backup and then select
 Recover.
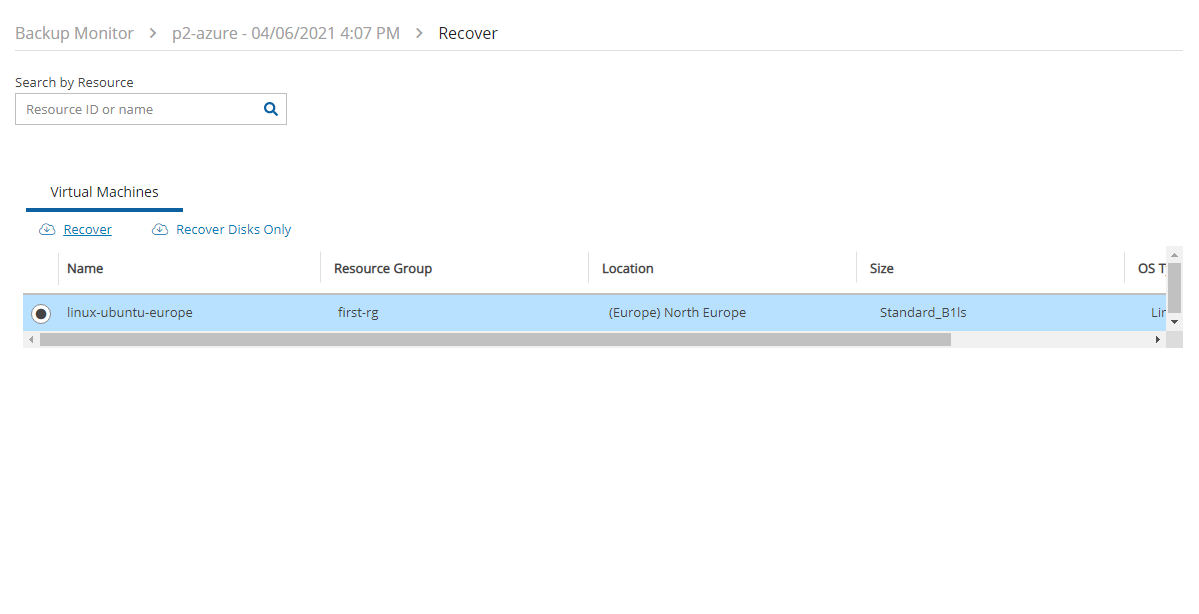
2. To recover a VM, with or without its attached disks, select the VM snapshot that you want to recover from, and then select ![]() Recover.
Recover.
a. In the Virtual Machines tab of the Recover screen, select 1 VM, and then select ![]() Recover. The Basic Options tab opens.
Recover. The Basic Options tab opens.
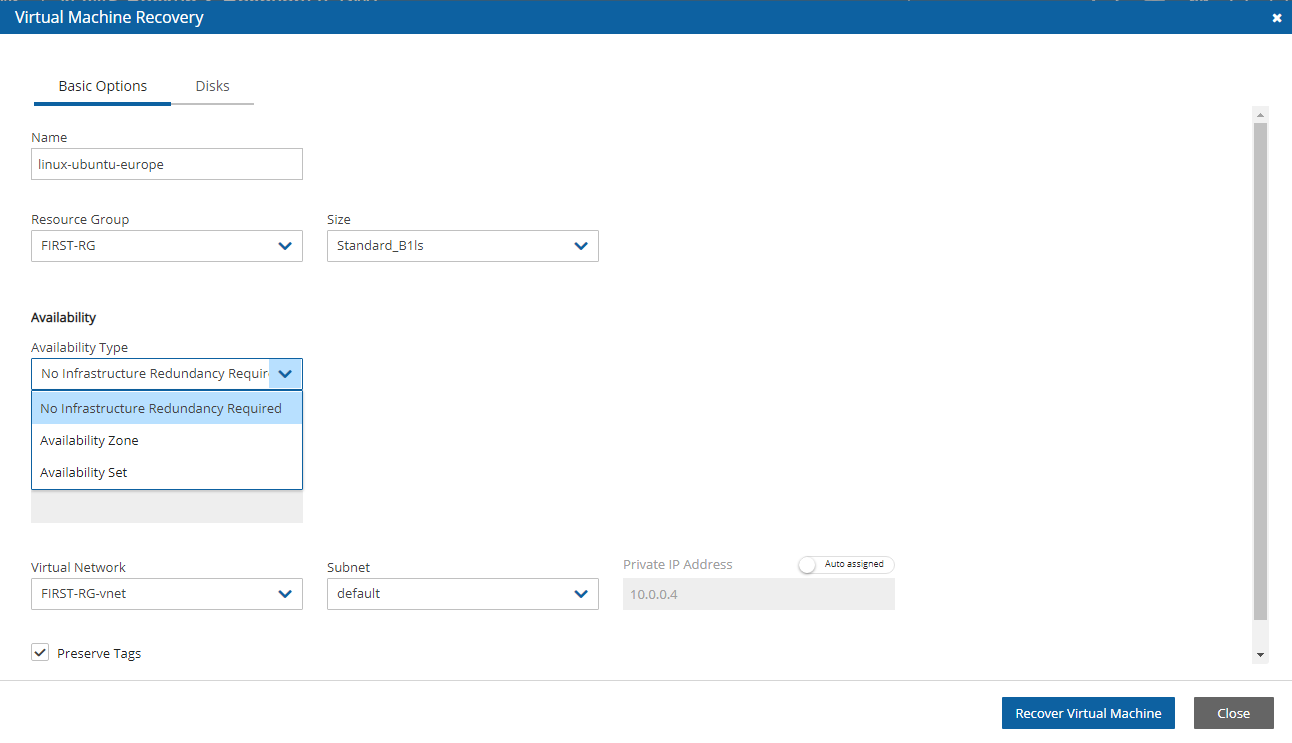
b. In the Availability Type list, select one of the following:
No Infrastructure Redundancy Required – Select to not replicate data at a redundant location in another zone or set.
Availability Zone – Select a zone in the Availability Zone list.
Availability Set – Select a set in the Availability Set list.
c. In the Private IP Address box, assign an available IP address or switch the Custom toggle key to Auto assigned.
d. The default Preserve Tags action during recovery is Preserve Original for the virtual machine. To manage tags, see section 10.3. e. In the Disks tab, enter a new Name for each disk. Similar names will cause the recovery to fail.
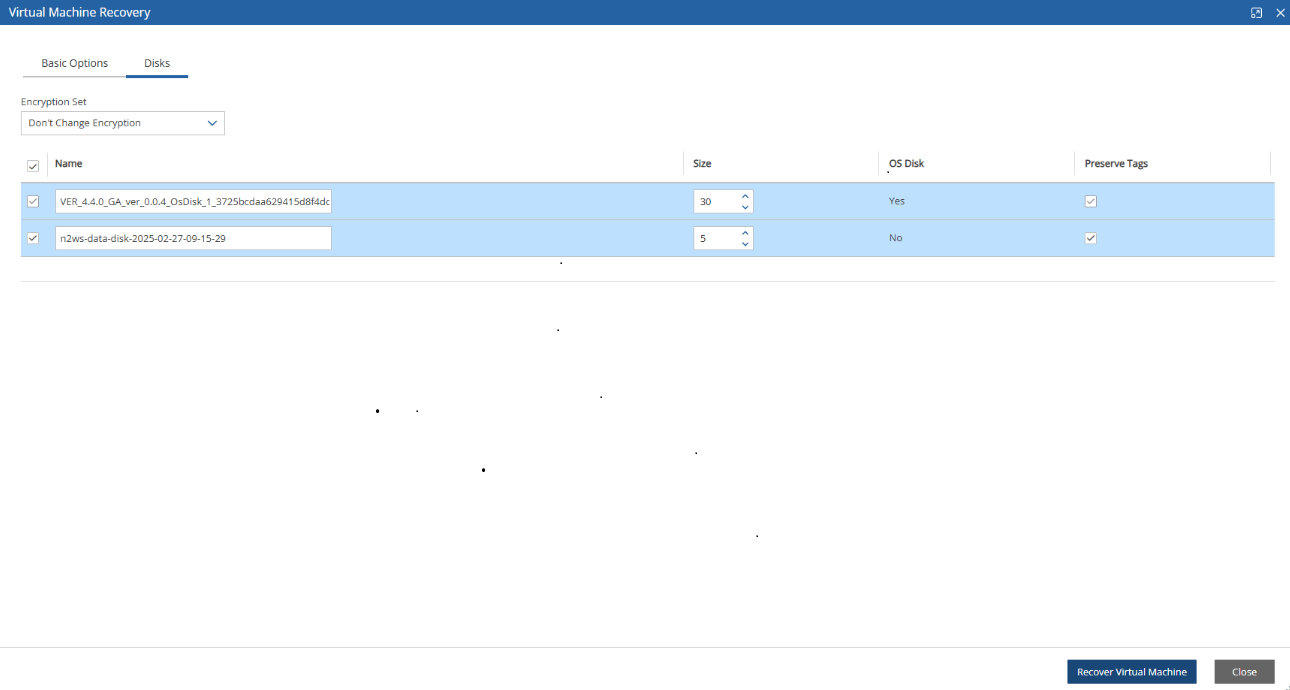
f. Select Recover Virtual Machine.
3. To recover only Disks attached to the VM, select Recover Disks Only. a. In the Disks tab, enter a new Name for each disk. Similar names will cause the recovery to fail. b. See Note in section 26.5 about changing the Encryption Set for certain disks. c. Change other settings as needed. d. Select Recover Disk.
26.9.2 Recovering a VM with Virtual Machine Scale Set
Following are the basic steps in recovering a VM with a Virtual Machine Scale set:
In AWS, create a backup and recover disks.
In Azure, create and configure a VM, and then attach the recovered disks.
To recover a VM with a Virtual Machine Scale Set:
Select a successful backup, and then select Recovery.
Select the VM, and choose Recovery only Disks.
Select the disks to recover, and then select Recover Disk.
After the disks are successfully recovered, go to the Azure portal, and locate the recovered root disk.
Select "+ Create VM".
Configure the VM:
In Availability Options, select Virtual Machine Scale Set, and then proceed with the setup.
In the Disks tab, make sure to attach the existing recovered disks.
26.9.3 Recovering Independent Disks
To recover from backups with independent disks:
Select the backup and then select
 Recover as in step 1 of the VM recovery.
In the Independent Disks tab:
Enter a new Name for each disk to recover as similar names will cause failure.
See section 26.10 about changing the Encryption Set for certain disks.
The default Preserve Tags action during recovery is Preserve Original for the independent disks associated with the virtual machine. To manage tags, see section 10.3.
Change other settings as needed.
Select Recover Disk.

26.9.4 DR Recovery
When recovering from a backup that includes DR (DR is in Completed state), the same Recover screen opens but with the addition of the Restore to Location drop-down list.
Default location is Origin, which will recover all the objects from the original backup. It will perform the same recovery as a policy with no DR.
When choosing one of the other regions, the objects are listed and are recovered in the selected location.

For cross DR policies:

If cross-subscription DR was set in policy, Restore From dropdown list contains backup target’s (original) and DR subscriptions.
To perform cross-subscription recovery, select a different target subscription from Restore to Subscription dropdown list, which contains all subscriptions of the selected backup policy’s account.
If multiple locations were set for cross-location DR, Restore to Location contains original location and DR locations.
26.9.5 Recovering an SQL Server and Databases
You can recover an SQL Server and some of or all its databases or just the SQL databases.
For Recover SQL Databases Only, enable Allow Azure services and resources to access this server.
In the Backup Monitor, select the backup, and then select ![]() Recover.
Recover.
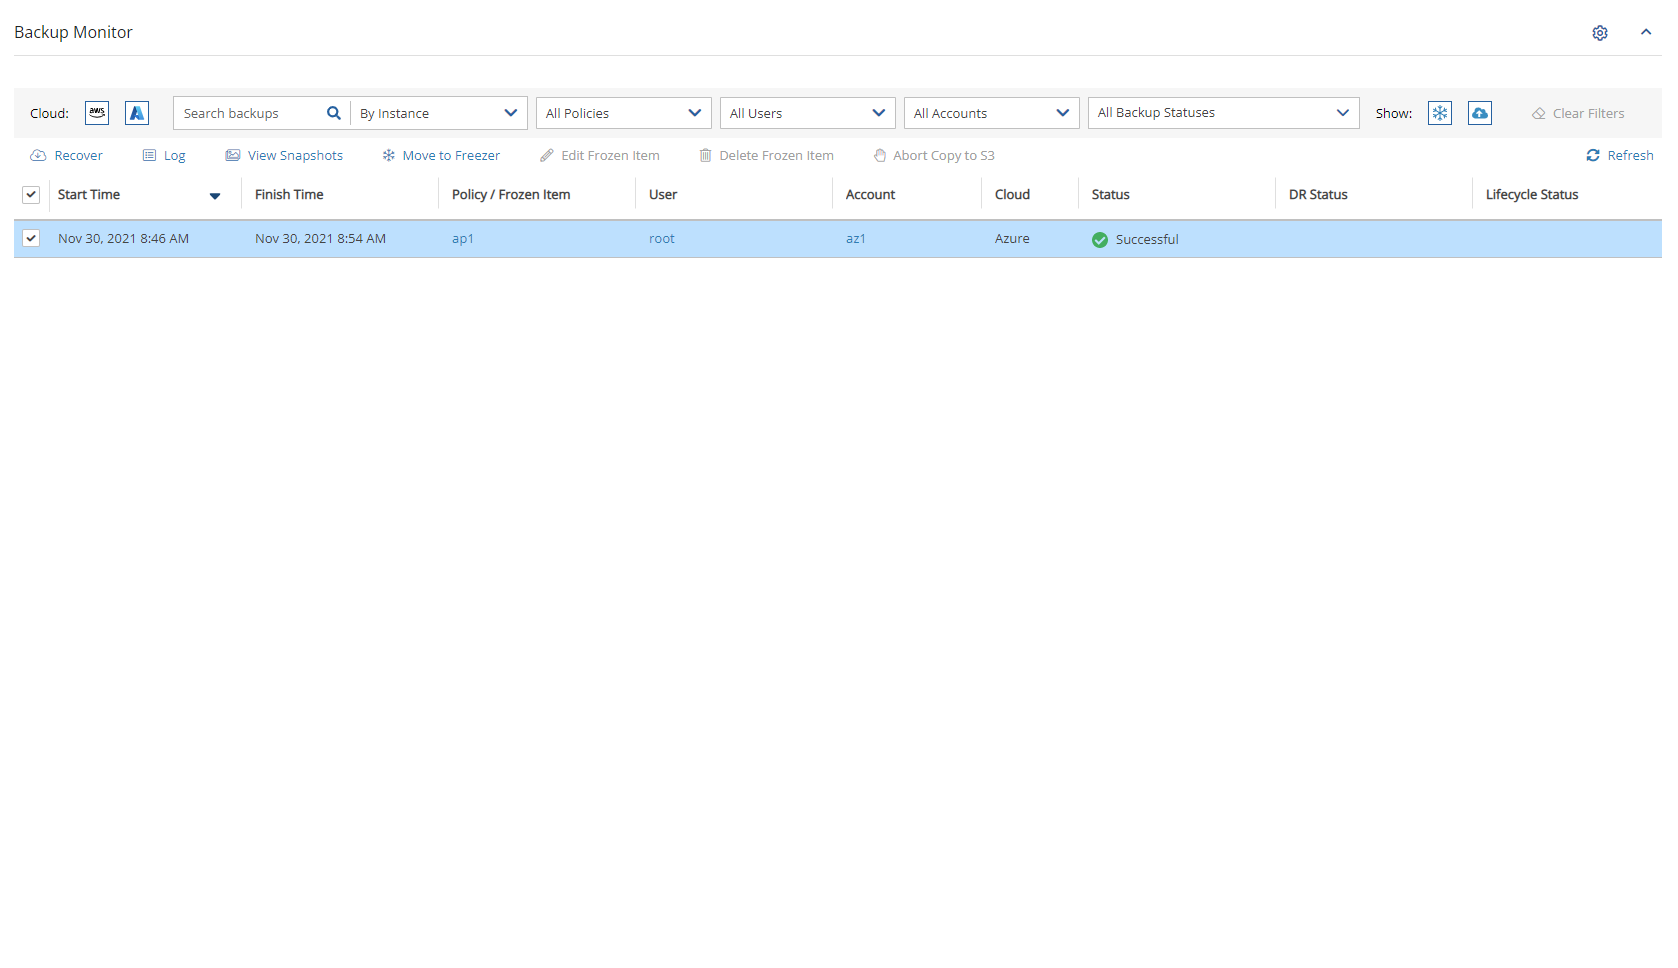
To recover an SQL Server with some or all its databases:
Select the SQL Server snapshot that you want to recover from and then select
 Recover.
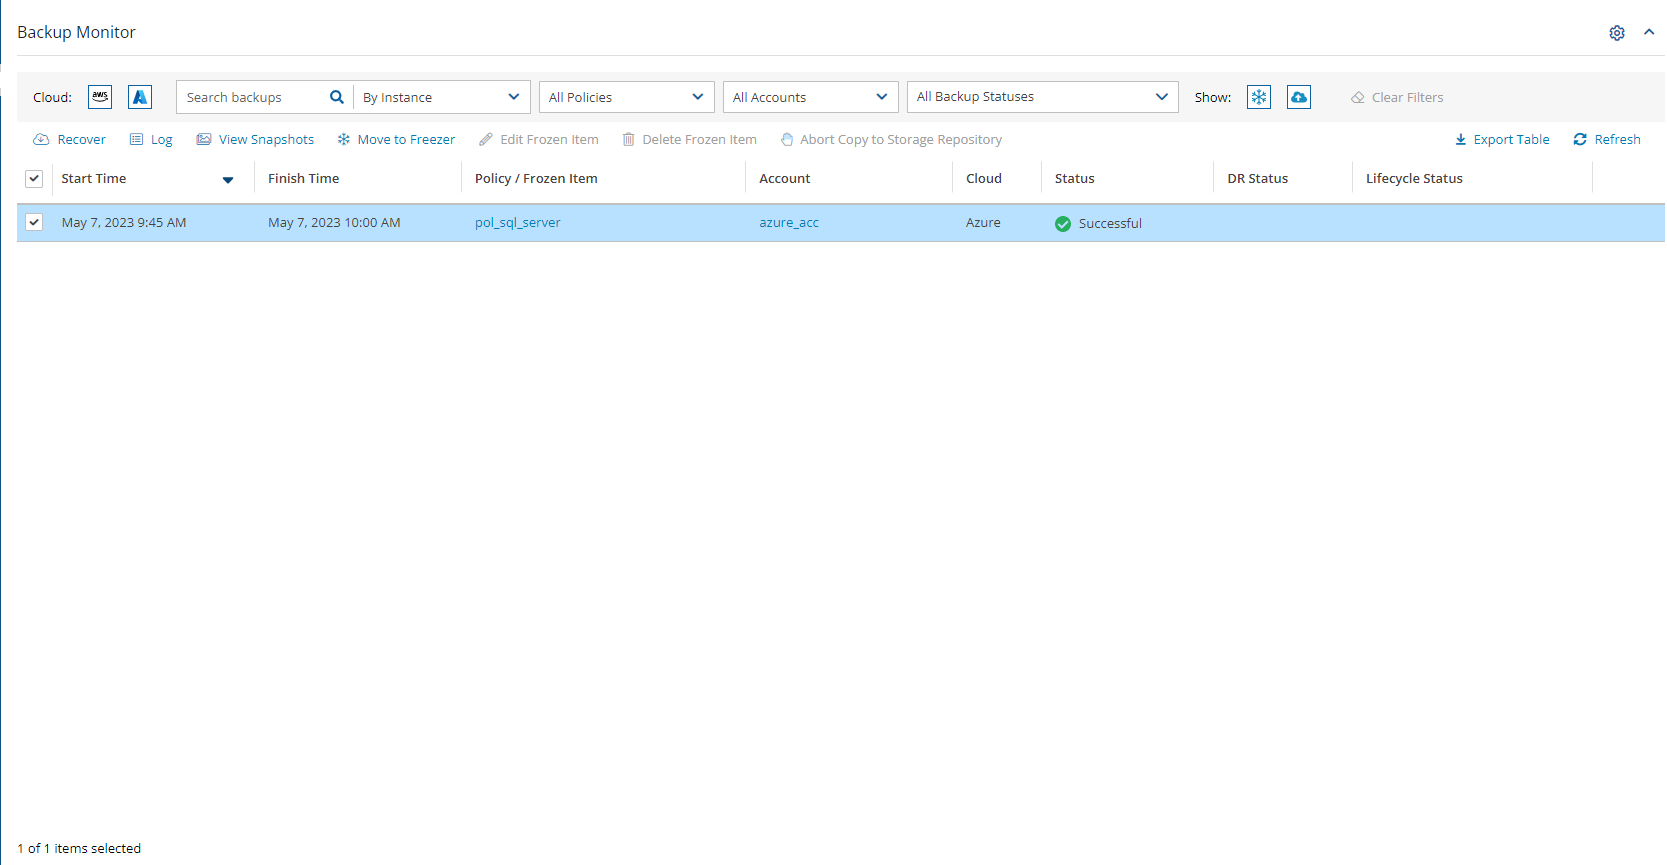
2. In the SQL Servers tab of the Recover screen, select 1 SQL Server, and then select ![]() Recover. The Basic Options tab opens.
Recover. The Basic Options tab opens.
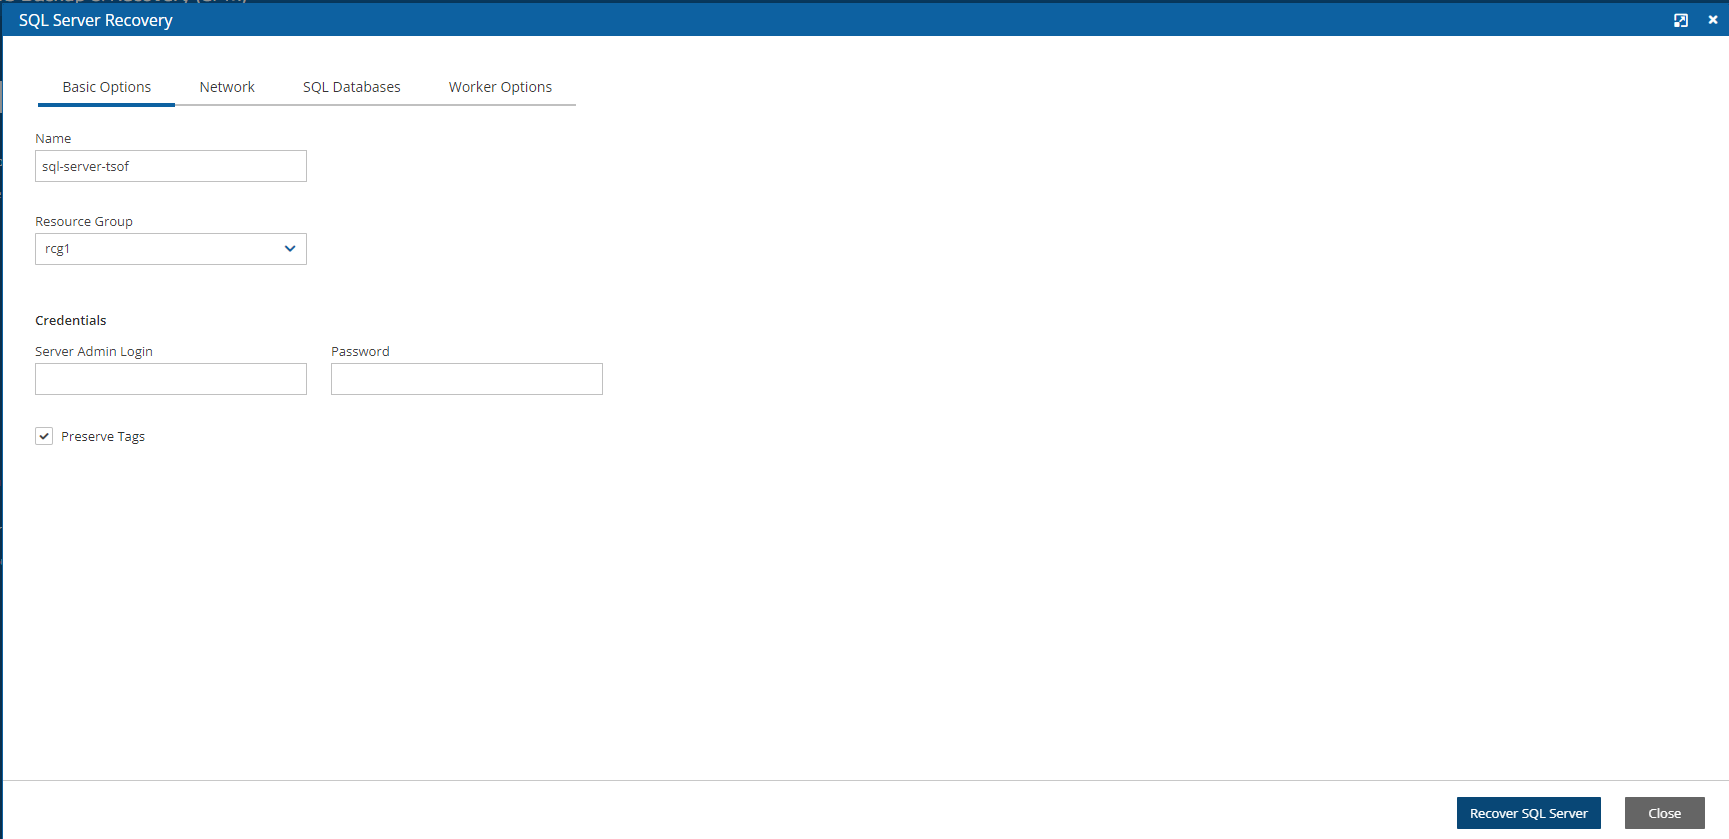
3. In the Server Admin Login and Password boxes, provide the credentials to use in the recovered SQL Server.
4. The default Preserve Tags action during recovery is Preserve Original for the servers. To manage tags, see section 10.3.
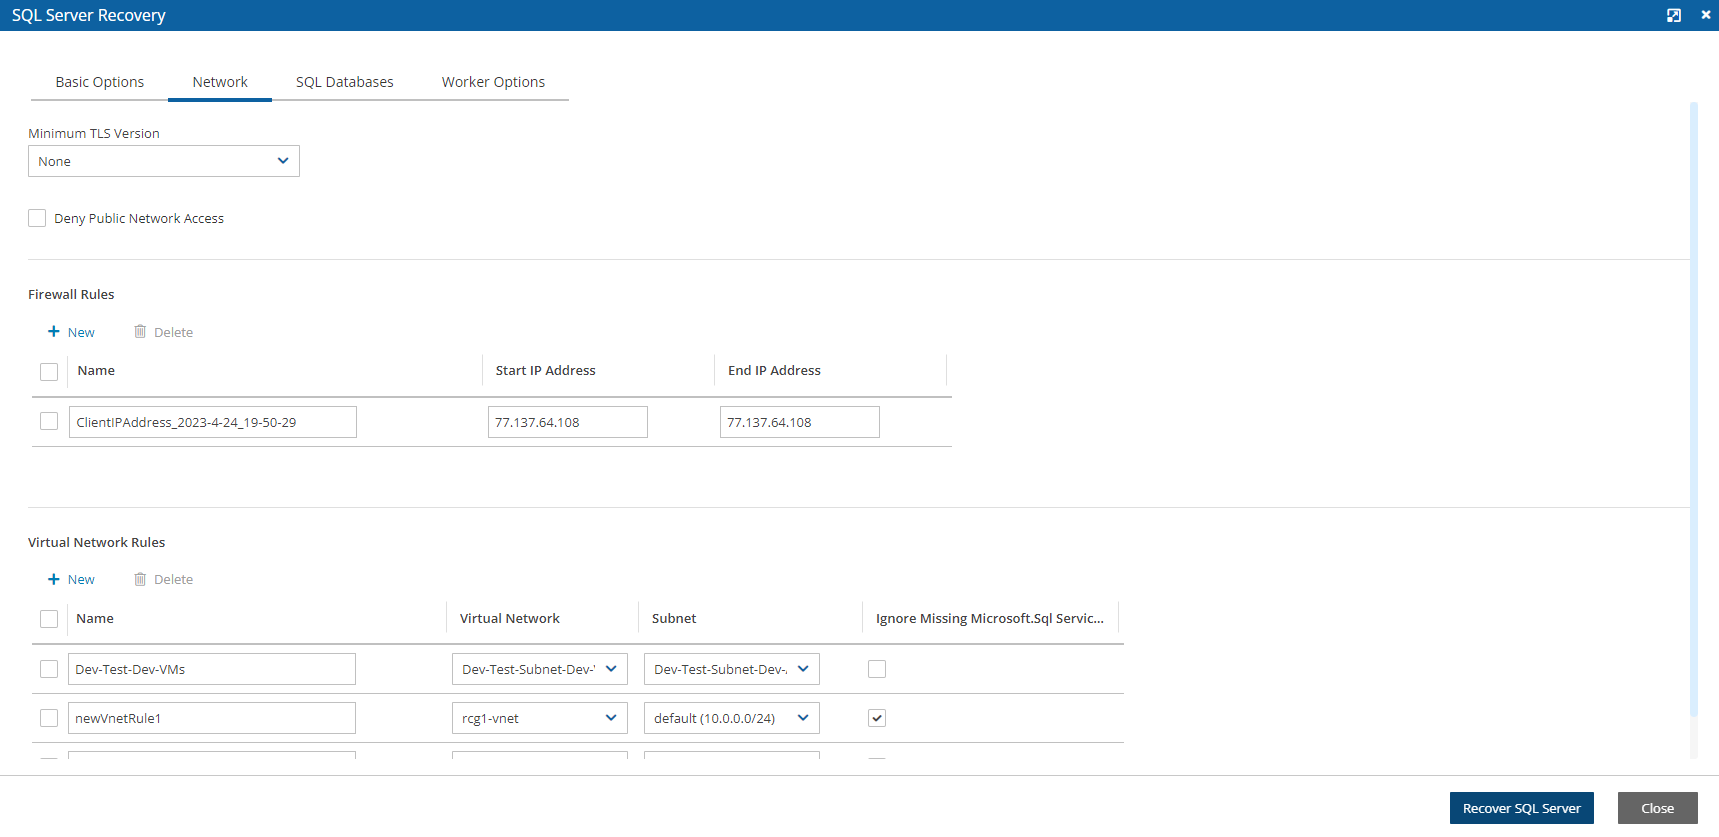
5. In the Network tab:
a. Select the Minimum TLS Version in the list.
b. Select Firewall Rules and Virtual Network Rules, or select Deny Pubic Network Access.
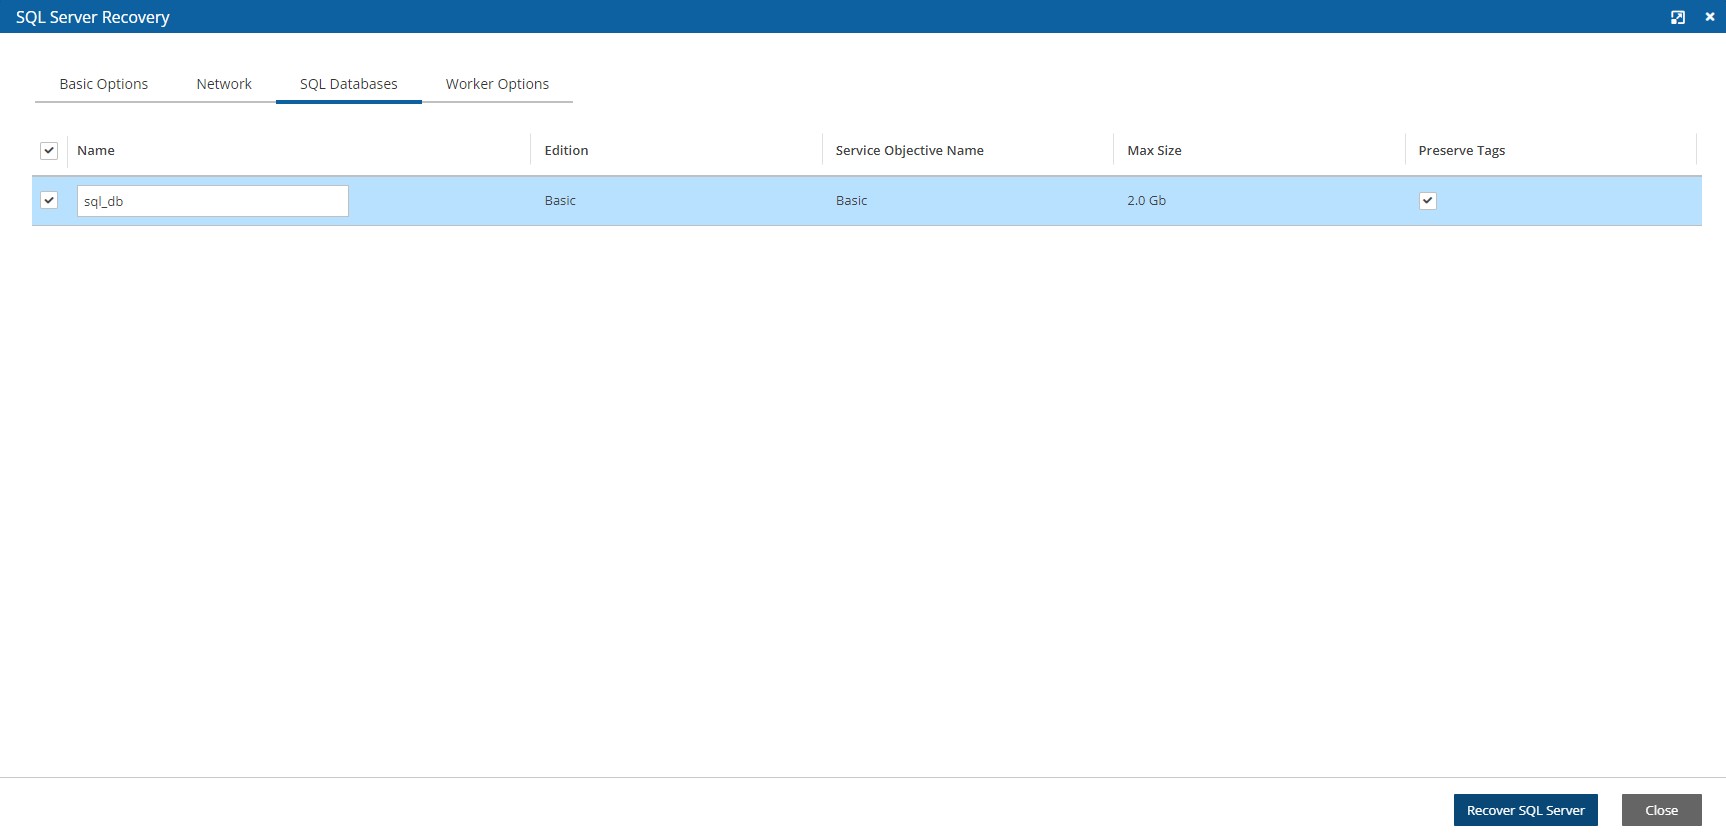
6. In the SQL Databases tab, select the databases to recover.
The default Preserve Tags action during recovery is Preserve Original for the database. To manage tags, see section 10.3.
7. In the Worker Options tab, set values to enable communication between the Worker and the SQL Server.
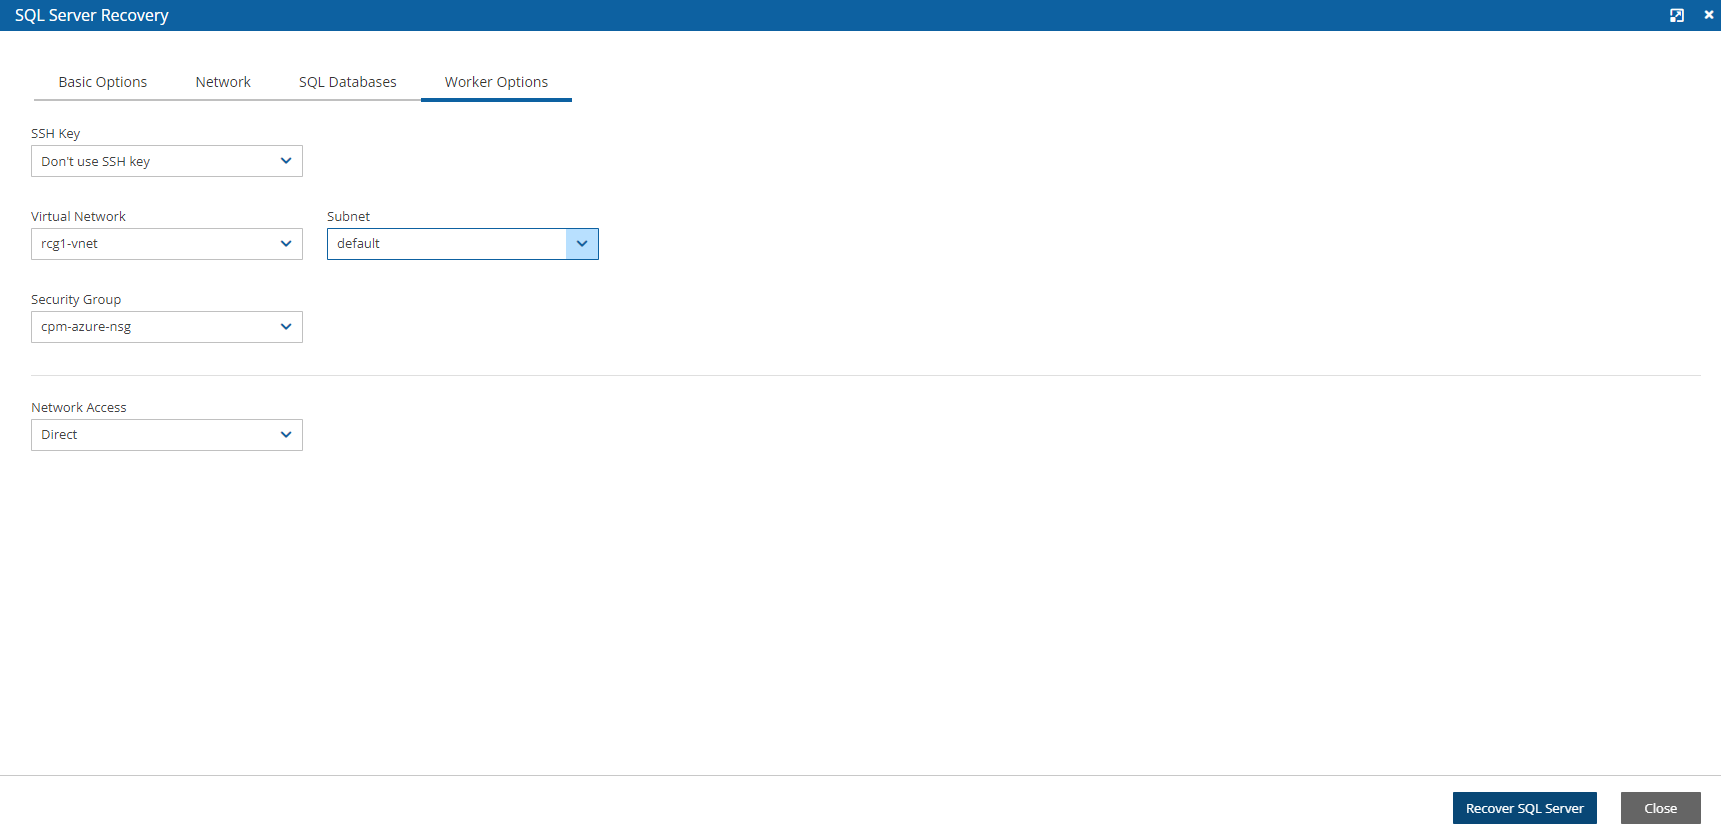
7. Select Recover SQL Server.
To recover SQL Databases only:
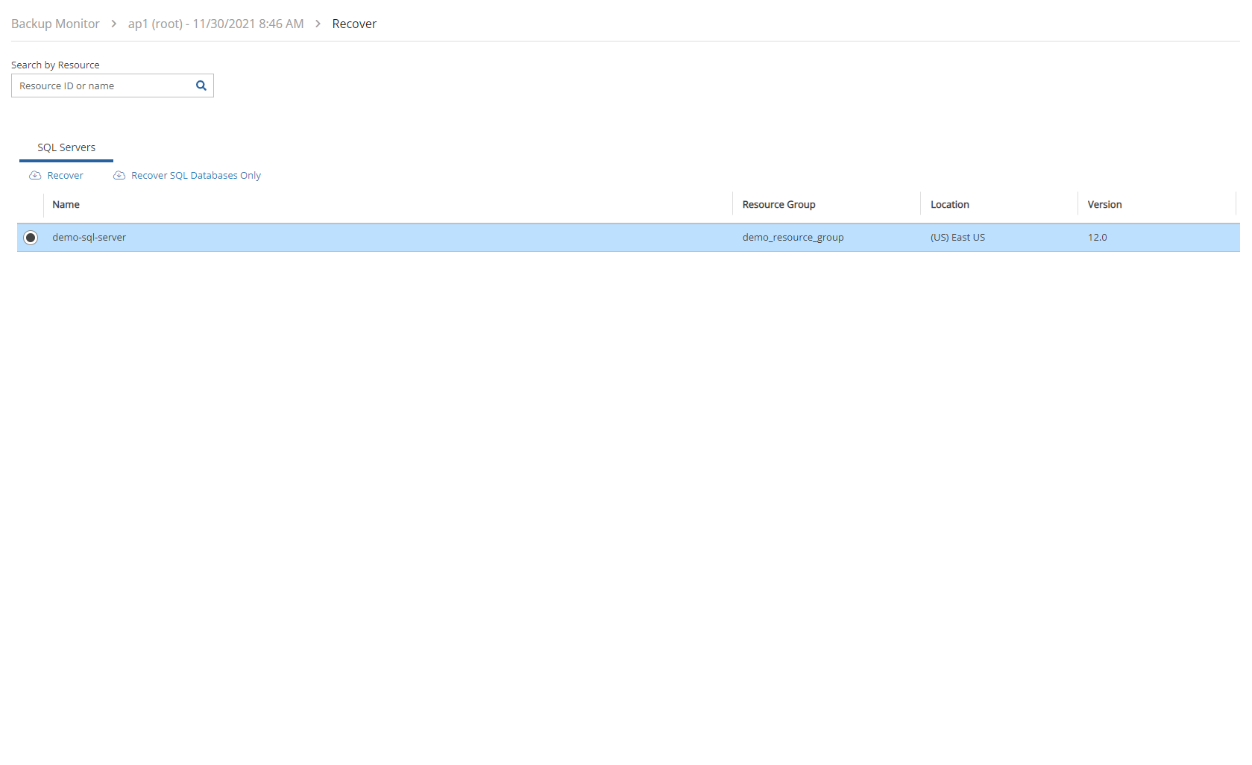
Select the SQL Server snapshot that you want to recover from and then select
 Recover SQL Databases Only.
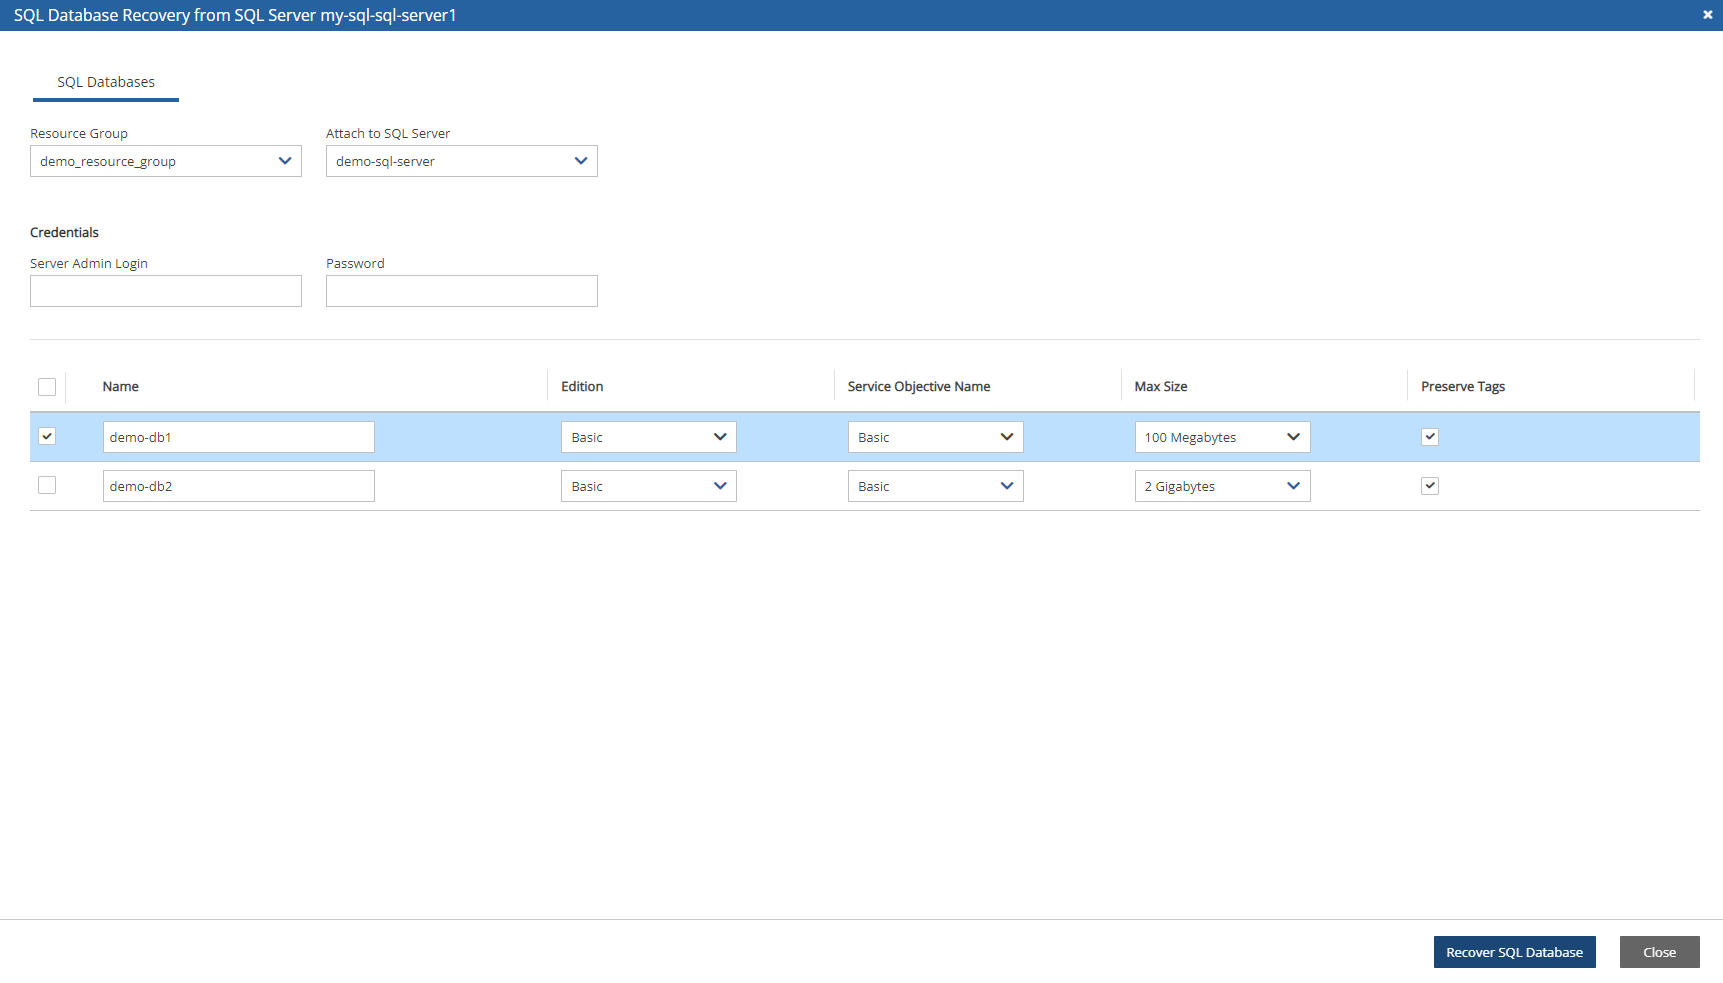
In the SQL Databases tab, enter a new Name for each database. Similar names will cause the recovery to fail.
The default Preserve Tags action during recovery is Preserve Original for the database. To manage tags, see section 10.3.
Change other settings as needed.
Select Recover SQL Database.
26.9.6 File-level Recovery from a Snapshot of an Azure Disk or Virtual Machine
When you back up an Azure Virtual Machine or disks, you can recover individual files from the backup without having to recover the entire Virtual Machine or all disks.
To recover individual files from a snapshot of an Azure disk or Virtual Machine:
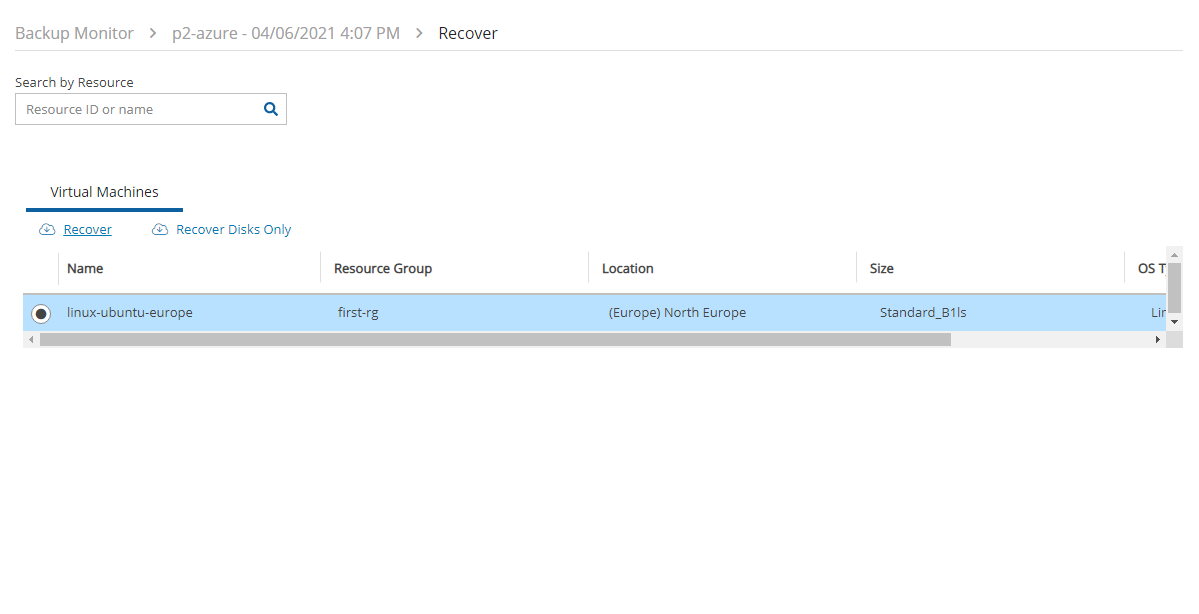
Complete the steps required to configure a worker to be launched in the account, subscription, and location of the source snapshot. See section 22.
In the Backup Monitor, select the backup, and then select
 Recover.
To explore files from an entire virtual machine, go to the Virtual Machine tab, select the virtual machine, and then select Explore Disks Files.
To explore files from one or more disks belonging to a virtual machine, go to the Virtual Machine tab, select the virtual machine, then select Recover Disks Only. Select one or more disks, and then select Explore Disks.
To explore files from an independent disk, go to the Independent Disks tab, select the disk, and then select Explore Disks.
If multiple backups of the chosen target exist, you will be prompted to select the number of different backups to explore. Select the desired number, and then select Start Session.
26.10 Cross-Cloud Recovery of AWS Volume from S3 to Azure
N2W allows recovering an AWS volume backup to Azure.
Limitations:
Cross-cloud recovery is supported only for Instance Volume backups copied to S3.
From the UI, such recovery can only be initiated for one volume at a time chosen from the Volume Recovery from Instance screen.
OS\root disk functionality doesn’t migrate from AWS to S3. If N2W recovers an AWS root volume to Azure, an Azure VM can’t be spined up from that disk.
To recover a volume from S3 to Azure:
Worker configuration is required. The recovery process uses a worker machine launched in Azure to write the required data to the volume.
In the Backup Monitor, select an Instance backup that was copied to S3, and then select Recover.
In the Recover screen, select the instance from which the volume is to be recovered.
In the Restore from list, choose the repository to which the volume was copied.
In the Restore to Account list, choose the Azure account to restore to.
In the Subscription list, choose the subscription to restore to.
Select Recover volumes only.
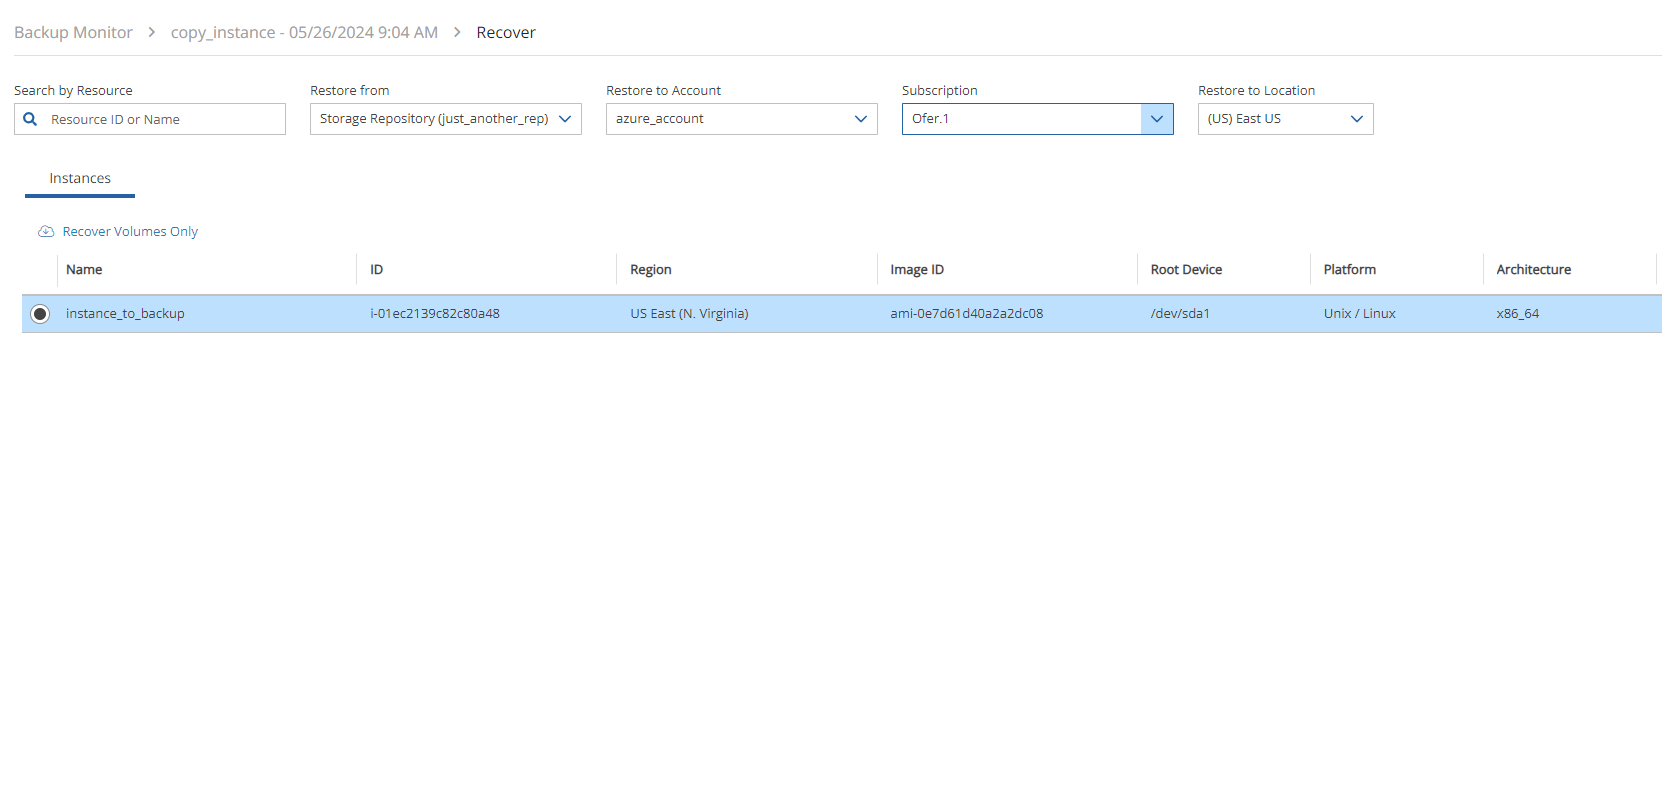
7. In the Volume Recovery from Instance screen, select one volume to recover.
8. In the Disk Name box, type the name of the disk to be recovered in Azure.
9. In the Resource Group list, choose the resource group to which the disk will be recovered.
10. Optionally, choose an Availability Zone to recover to and the Encryption Set to use on the recovered disk.
11. Select Recover Volume.
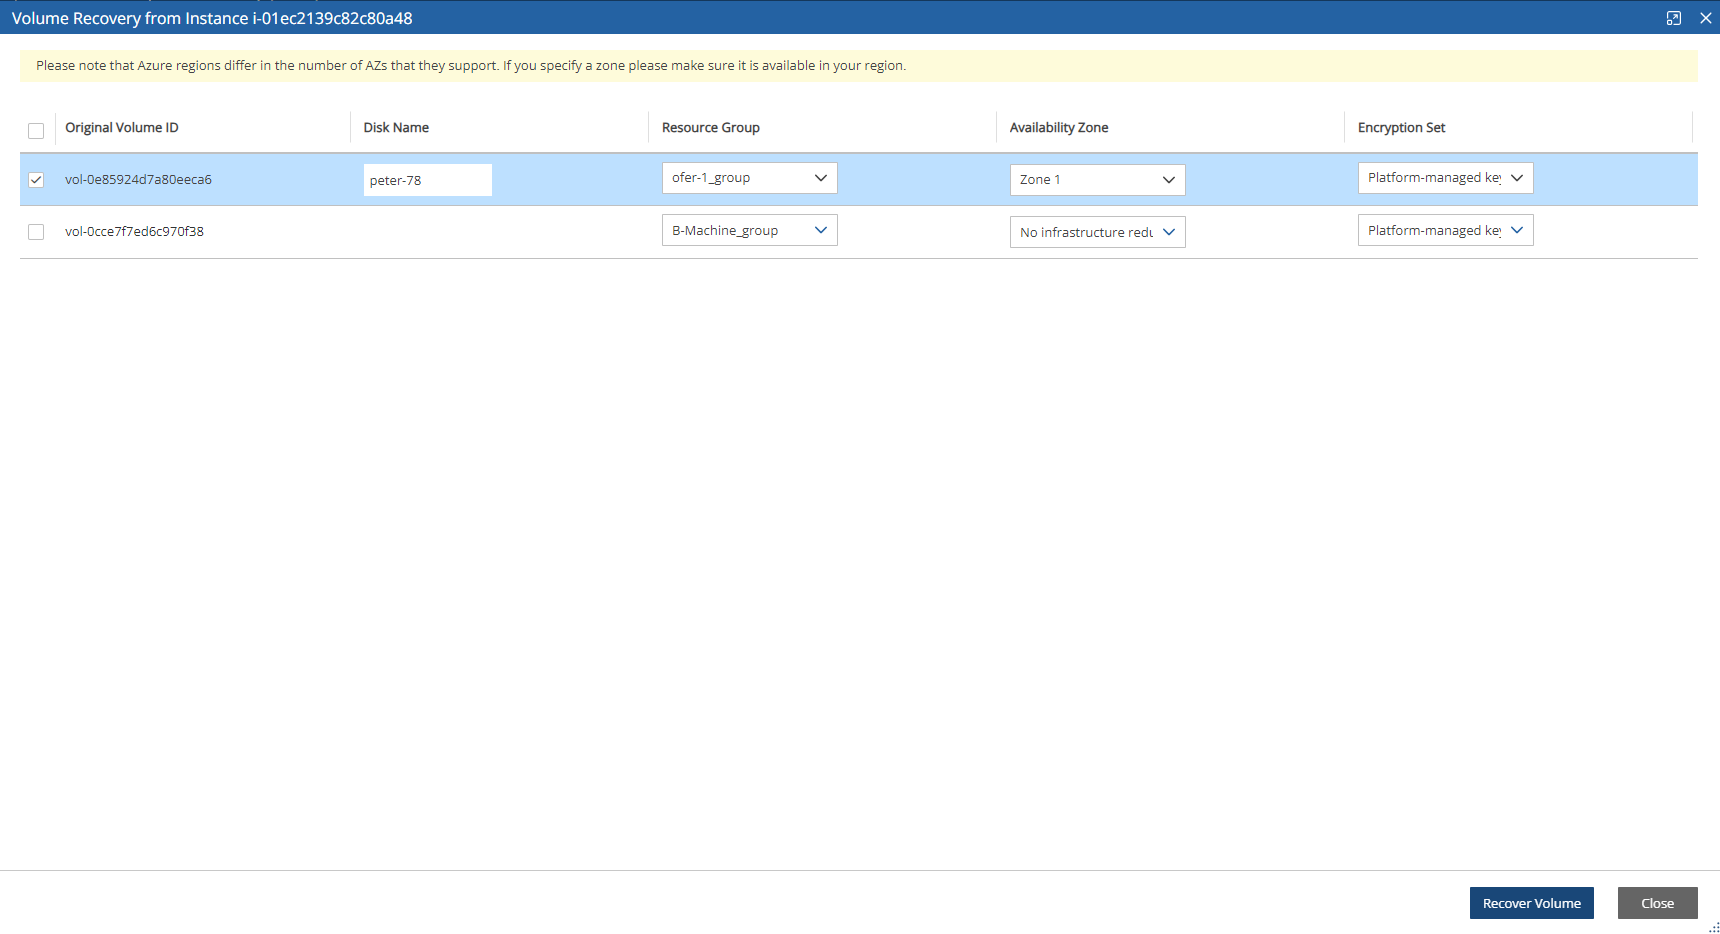
12. To follow the progress of the recovery, select the Open Recovery Monitor link in the ‘Recovery started’ message ![]() at the top right corner, or select the Recovery Monitor tab.
at the top right corner, or select the Recovery Monitor tab.
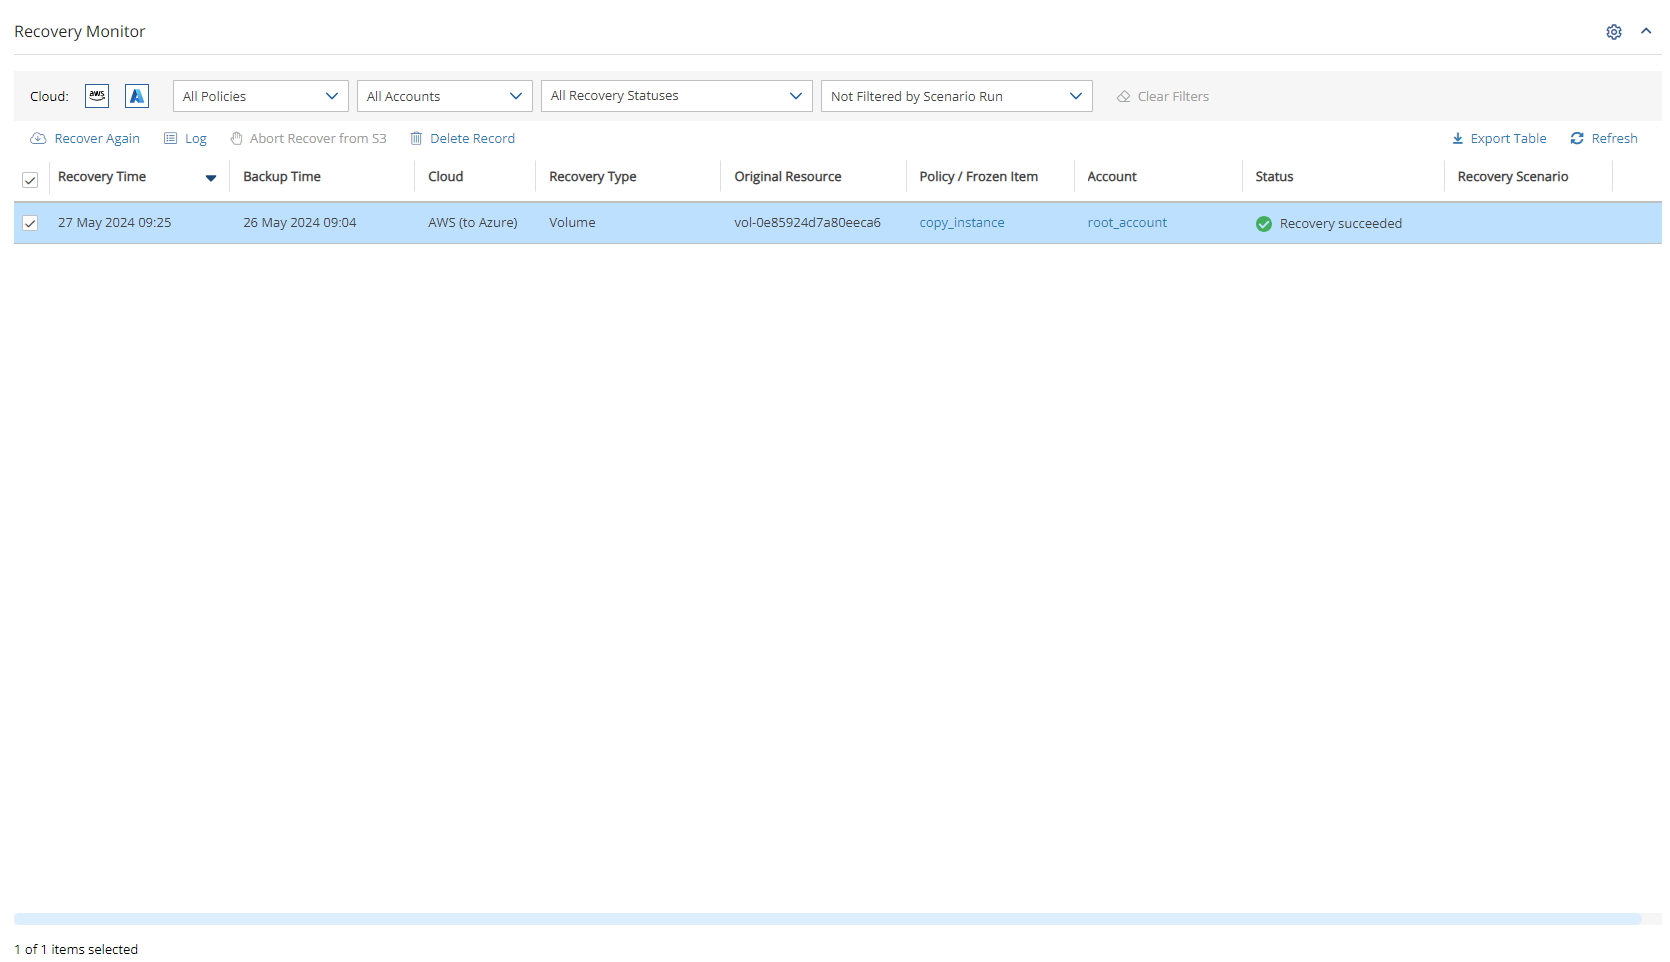
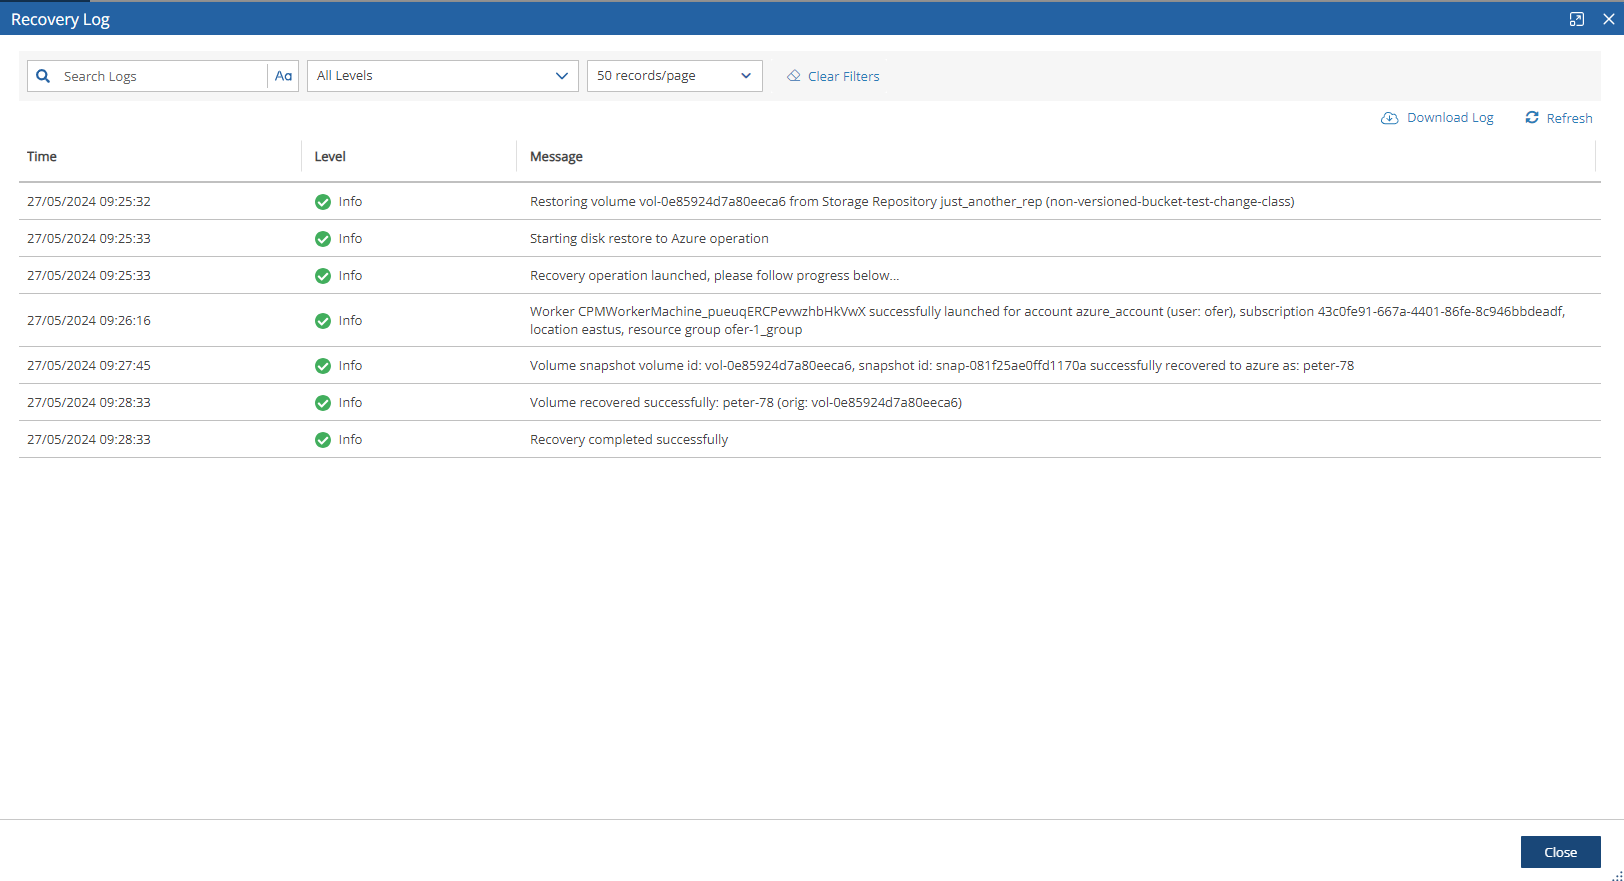
13. To view details of the recovery process, select the recovery record, and select ![]() Log. Select
Log. Select ![]() Refresh as needed.
Refresh as needed.
26.11 Using Lifecycle Management to Lower Cost of Managed Disk Snapshots
Snapshots of Azure Managed Disks can be stored in a Storage Repository at a lower cost.
N2W allows creation of lifecycle policies. In lifecycle policies, older snapshots are automatically moved from high-cost to low-cost storage tiers. The snapshots can be stored in any Storage Repository supported by your N2W license:
AWS Storage (S3) Repository
Azure Storage Repository
Wasabi Repository
Moving data out of the cloud incurs additional costs associated with the network traffic.
26.11.1 Limitations
Life-cycle policy applies only to Managed Disk snapshots, whether they are backed up as independent disks, or as part of a virtual machine backup. If a policy contains resources other than virtual machine or Disks, these resources will not be affected by the lifecycle policy.
Backups copied to Storage Repository cannot be moved to the Freezer.
To use the Lifecycle Policy functionality, the
cpmdatapolicy must be enabled. See section 4.2.1 for details on enabling thecpmdatapolicy.Due to the incremental nature of the snapshots, only one backup of a policy can be copied to Storage Repository at any given time. A backup will not be copied to the repository if the previous backup in the same policy is still being copied. Recovery from the repository is always possible unless the backup itself is being cleaned up.
Lifecycle operations, such as Snapshot Copy and Cleanup, are performed by Workers. For Copy operations, the worker is always launched in the account, subscription, and location of the disk whose snapshot is being copied. A Worker configuration must be created for every such combination. To speed up the operations, N2W will attempt to launch 2 workers per policy. Your Virtual machine quotas must be large enough to allow launching the required number of workers. For more information about workers, see section 26.12.
Copy and Restore of data to/from a repository outside of the Azure cloud, such as AWS Storage (S3) Repository, or Wasabi Repository, may incur additional network charges.
26.11.2 Enabling and configuring Lifecycle rules for an Azure Policy
In the N2W left panel, select the Policies tab.
Select a Policy, and then select
 Edit.
Edit.Select the Lifecycle Management tab.
Turn on the Use Storage Repository toggle switch.
Choose the interval between backups that are to be moved to the Storage Repository. For example, to move a weekly backup of a policy that runs daily backups, choose 7.
Choose whether to delete the original Disk Snapshots after they are copied to the Storage Repository.
When enabled, snapshots are deleted regardless of whether the copy to Storage Repository operation succeeded or failed.
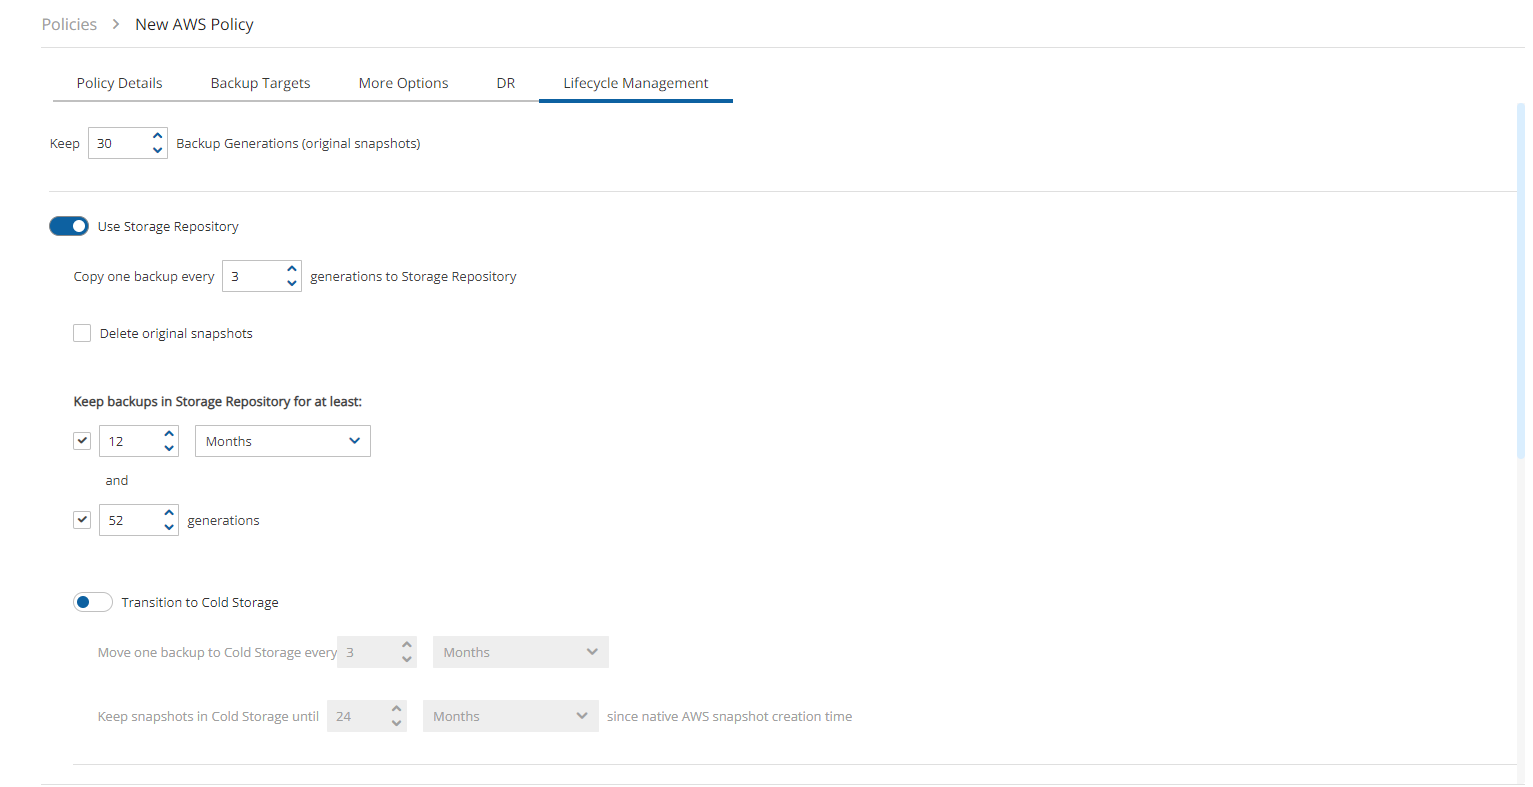
7. Select the retention settings for the snapshots in the repository. Retention can be specified in terms of the number of backups (generations), backup age, or a combination of the two. If generations and age are enabled, a backup will be deleted only if both criteria have been met.
8. Select the Target repository, or select![]() New to define a new repository. If you define a new repository, select
New to define a new repository. If you define a new repository, select ![]() Refresh before selecting.
Refresh before selecting.
26.11.3 Recovering from Storage Repository
You can recover a backup from Storage Repository to the original location or to a different one.
‘Marked for deletion’ snapshots can no longer be recovered.
To recover a backup from Storage Repository:
Make sure a Worker Configuration exists for the location where the resource is to be recovered. See section 26.12 for more information.
In the Backup Monitor tab, select a relevant backup that has a Lifecycle Status of ‘Stored in Storage Repository’, and then select
 Recover.
In the Restore from drop-down list of the Recover screen, select the name of the Storage Repository to recover from.
In the Restore to Location drop-down list, select the Location to restore to.
Select the resource to recover (either a Virtual Machine or a Disk) from the list and select Recover. If you wish to recover only selected disks from a Virtual machine backup, select the Virtual machine, select Recover Disks Only, and then select the desired disks.
In the dialog, complete the relevant recovery parameters. See section 26.9.1 for more details.
In the Recovery From Repository Options tab, choose a Storage Account that will be used to store temporary data during the recovery process.
Select Recover Virtual Machine / Recover Disks to start the recovery process.
You can follow the process in the Recovery Monitor.
To abort a recovery in progress, in the Recovery Monitor, select the recovery item, and then select ![]() Abort Recover from Repository.
Abort Recover from Repository.
26.12 Configuring Azure Workers
Workers are used by N2W for Lifecycle operations, such as copying Azure Disk Snapshots to a Repository, as well as for Cleanup and Recovery of these snapshots. A Worker Configuration specifies the parameters required for launching a worker instance for a specific combination of account/subscription/location. Whenever a worker is required, N2W will look for a Worker Configuration according to the operation’s account, subscription, and location.
26.12.1 Worker Parameters
To configure Azure worker parameters:
Select the Worker Configuration tab.
On the
 New menu, select Azure Worker.
In the User, Account, Subscription, and Location lists, choose the values you are creating the configuration for. The configuration will be applied to all workers launched in the selected location, account, and subscription.
Select a Resource Group where the worker will be created.
Choose an SSH Key to be associated with the worker. If you leave the default, don’t use key pair as you will not be able to use key-based authentication for SSH connections to this worker.
Select a Virtual Network from the list. The selected network must allow workers to access the subnet where N2W is running as well as the Azure Blob services and the repository.
Select a Subnet from the list.
Select a Security Group to be applied to the workers.
In the Network Access list, select a network access method. Direct network access or indirect access via an HTTP proxy is required:
Direct - Select a Direct connection if no HTTP proxy is required.
via HTTP proxy -
–If an HTTP proxy is required, select, and fill in the proxy values.
Select Save.
Test the new worker. See section 22.3.
To edit or delete a worker configuration:
In the Worker Configuration tab, select a worker.
Select
 Delete or
  Edit.
Edit.
Last updated
Was this helpful?

