24 Orchestrating Recovery Scenarios
Design a procedure to execute multiple recoveries within one recovery session.
Recovery Scenarios are available for:
AWS and Azure policies
Aurora Clusters
All Azure targets (Virtual Machines, Disks, and SQL Servers)
DocumentDB
DynamoDB
EFS
FSx (including Lustre, OpenZFS, AWS-Managed and Self-Managed Windows FSx, ONTAP)
Instance
RDS (including recovery from Repository)
RedShift
Volume
24.1 Overview
The Recovery Scenarios feature allows N2W Software users to design an object that will automatically coordinate a sequence of recoveries for several or all backup targets of a single policy during one recovery session.
A Recovery Scenario object is created with the saved configurations of successful backups for the policy.
Depending on the target type, the user can configure how to handle tags during a recovery scenario. The default is to preserve existing tags.
The user will save the recovery configuration for each selected backup target and add it to the Recovery Scenario object.
At runtime, the user selects a successful backup record to use in the recovery.
Following are the options for executing a Recovery Scenario:
Test the success of the Recovery Scenario configuration using the Dry Run command.
Execute an ad hoc run of the Recovery Scenario using the Run Scenario command.
Execute the Recovery Scenario on a schedule. The last successful backup is automatically selected as input. Assign or create a schedule in the Recovery Scenario Details tab.
Backups in the Freezer are not recoverable as part of a Recovery Scenario.
24.2 Conditions
During the Recovery Process:
All Recovery Scenario targets share the same destination account and destination region, which are set as part of the Recovery Scenario parameters.
Recovery Scenarios can have pre- and post-scripts which will run, respectively, before recovery execution and after recovery completion.
In case of a pre-script failure, the Recovery Scenario will not execute.
In case of a Recovery Scenario failure or pre-script failure, the post-script will not run.
Every Recovery Scenario target has a sequential Recovery Order value within the Recovery Scenario which determines the order in which each target is recovered.
Execution of a target recovery within the recovery scenario is sequenced using the target's Recovery Order value. The target with the lowest Recovery Order value runs first.
All recovery targets sharing the same Recovery Order value will run in an arbitrary sequence.
If the recovery of a target fails, the targets next in sequential order will not run, unless Recovery Scenario’s Continue recovering ignoring failures parameter is enabled.
Testing: You can verify the Recovery Scenario input parameters, such as key pair, security groups, and VPC, by selecting the
 Dry Run link. You will be prompted to select a successful backup for the Dry Run just as with an actual Run Scenario.
24.3 Creating a Recovery Scenario
Be sure to execute a successful Dry Run of the Recovery Scenario before assigning a schedule.
The configuration Auto assigned values may be different at run time than the values that are shown as grayed-out. To be sure about a value, switch its Auto-assigned toggle key to Custom, and enter the desired value.
To add the details for a recovery scenario:
Select the Recovery Scenarios tab.
On the
 New menu, select AWS Recovery Scenario or Azure Recovery Scenario.
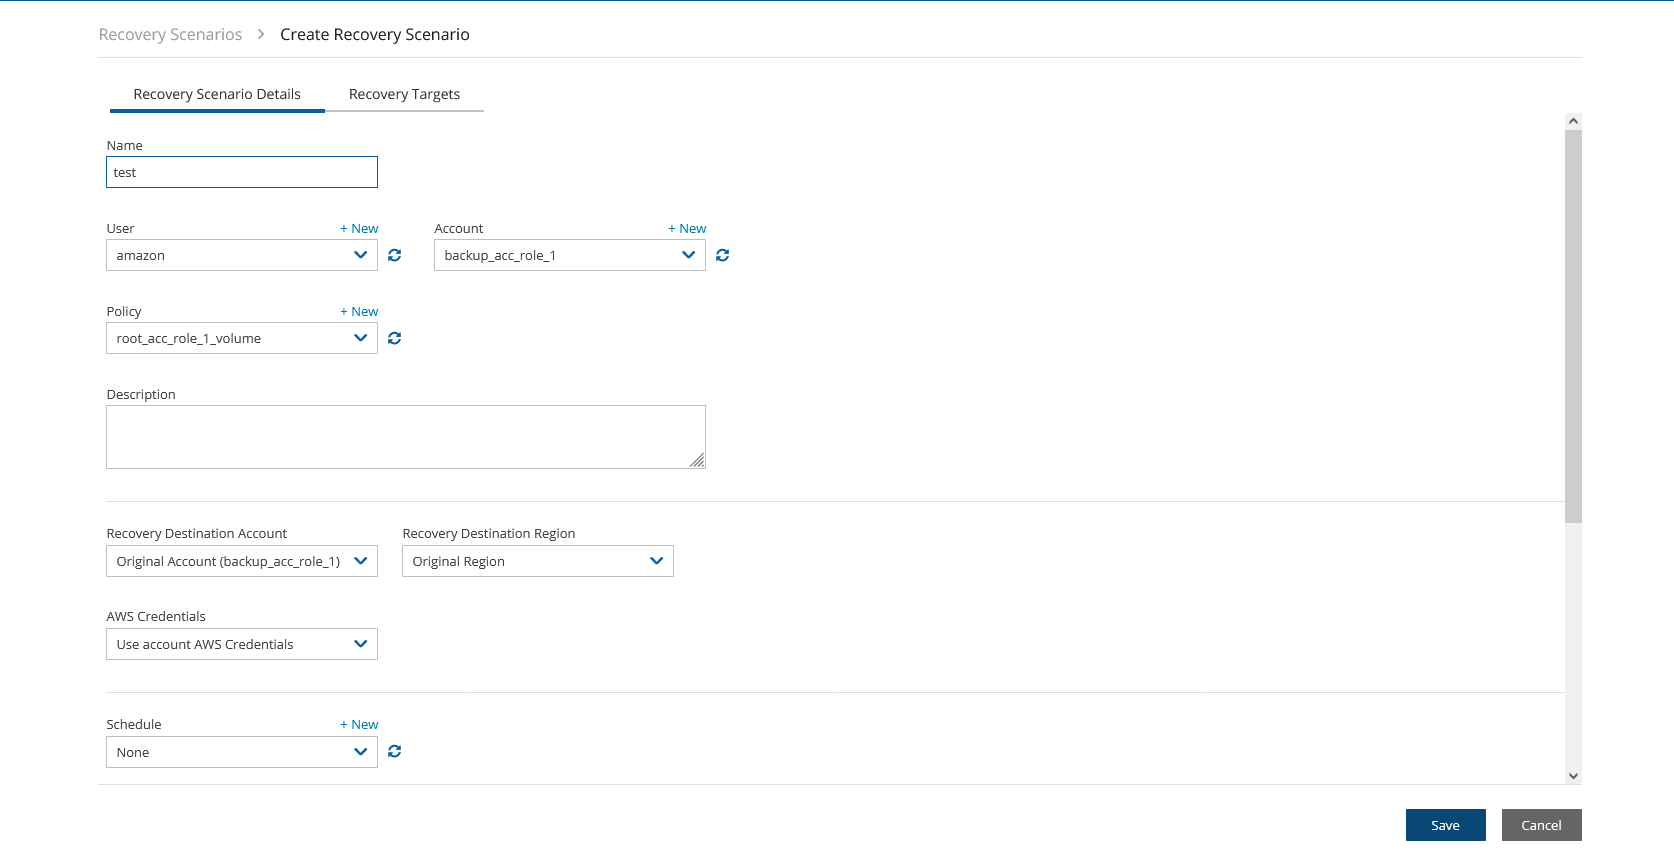
In the Recovery Scenario Details tab, complete the fields as follows, and then select Save:
Name - Enter a unique name.
User, Account, Policy - Select from the lists or select
 New. After the addition, select
  Refresh. Select the policy for which the Recovery Scenario is defined.
Recovery Destination Account and Recovery Destination Region - Select from the lists.
AWS Credentials - Select Use account AWS Credentials or Provide Alternate AWS Credentials.
The AWS credentials are per Recovery Scenario and not per target. All targets within the Recovery Scenario will use the selected credentials.
Schedule - Optionally select a schedule from the list, or select
 New to create a new schedule, for running the Recovery Scenario. N2W highly recommends executing a Dry Run before assigning a schedule.
Recipients - Enter the email addresses of users to receive notification of Scenario Run Scenario / Dry Run status.
If SES is disabled, emails are not sent to recipients.
Enable Agent Scripts – Select if the Recovery Scenario will be run by a custom script. The default is not to run user scripts. See section 24.7.
Select Agent Script Timeout in seconds from the list. When the timeout is reached, N2W will skip the script and continue with the recovery scenario.
Collect Script Output – Whether to collect script output in a log. Default is to collect.
Continue recovering ignoring failures – Whether to continue the sequence of recoveries in the scenario if there is a failure. The default is to not continue the script on the failure of recovery.
Select Save.
To add the recovery targets:
Select the Recovery Targets tab. The available resources for each type from the policy are shown.
Select one or more Recovery Targets from each type to add to the scenario. Reminder: S3 Bucket Sync is not an option since it is not a backup action.
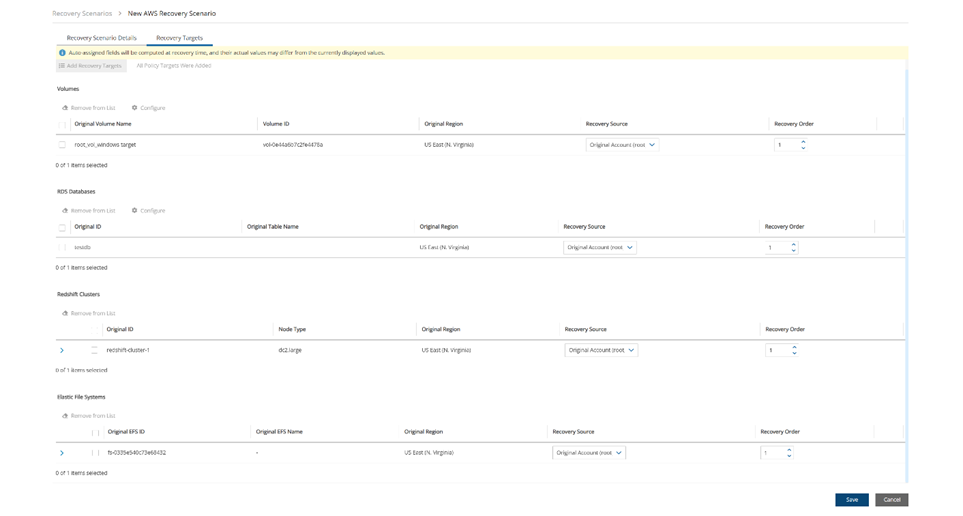
Every Recovery Scenario target has a number identifying the sequential Recovery Order of execution within the Recovery Scenario. The execution of the Recovery Source within the Recovery Scenario is sequenced using the target’s Recovery Order value. The recovery of the target with the lowest value runs first.
3. To change the Recovery Source or Recovery Order for a target, select a value from its list.
4. For each target, it is important to configure the recovery details. Follow the configuration instructions for the target:
For each target, the Auto assigned values may be different than the values shown as grayed-out in the Configuration screen at run time. To ensure a correct value, switch the Auto assigned toggle key to Custom, and assign the correct value.
For Instance targets, see section 24.3.1.
For Aurora Cluster targets, see section 24.3.2.
For Azure Virtual Machine targets, see section 24.3.3.
For Azure SQL Server targets, see section 24.3.4.
For Azure Disk targets, see section 24.3.5.
For DocumentDB targets, see section 24.3.6.
For DynamoDB targets, see section 24.3.7.
For EFS targets, see section 24.3.8.
For all FSx targets, see section 24.3.9.
For RDS targets see section 24.3.10.
For RDS recovery from a repository, see section 24.3.11.
For RedShift targets, see section 24.3.12.
For Volumes targets, see section 24.3.13.
For manage the recovery of target tags, see section 24.3.14.
6. When all details are complete, select Save in the Create Recovery Scenario screen.
24.3.1 Configuring an Instance Recovery Target
See section 24.3 for instructions on how to create a Recovery Scenario and Add Recovery Targets.
The Configuration screen opens with additional tabs:
Basic Options
A tab for the resource type, such as Volumes
Advanced Options
For each data item in a configuration tab, assign the appropriate value. Depending on the tab's data item:
Select a different value from a drop-down list when the Auto assigned toggle key is switched to Custom.
Enable or disable a feature.
Enter a new value.
When finished with each tab, select Close.
When selecting a Custom VPC and leaving the VPC Subnet toggle key on Auto assigned, you must ensure that this VPC has a subnet. If you leave the VPC Subnet toggle key on Auto assigned and the selected VPC does not have at least one subnet, the recovery scenario will fail.
If VPC is Auto assigned and a scheduler is used to automatically run the recovery scenario, N2W may choose a VPC without subnets, if one exists, and the recovery scenario may fail.
In the Basic Options tab, you can configure basic recovery actions, such as whether to launch from a snapshot or image, which key pair to use, and network placement.
Since not all instance types are available in all AWS regions, recovery of an instance type to a region where the type is unsupported may fail. Where the instance type is not supported yet in an AWS region, N2W recommends configuring a supported Instance Type in the Basic Options parameters. See section 10.4.1.
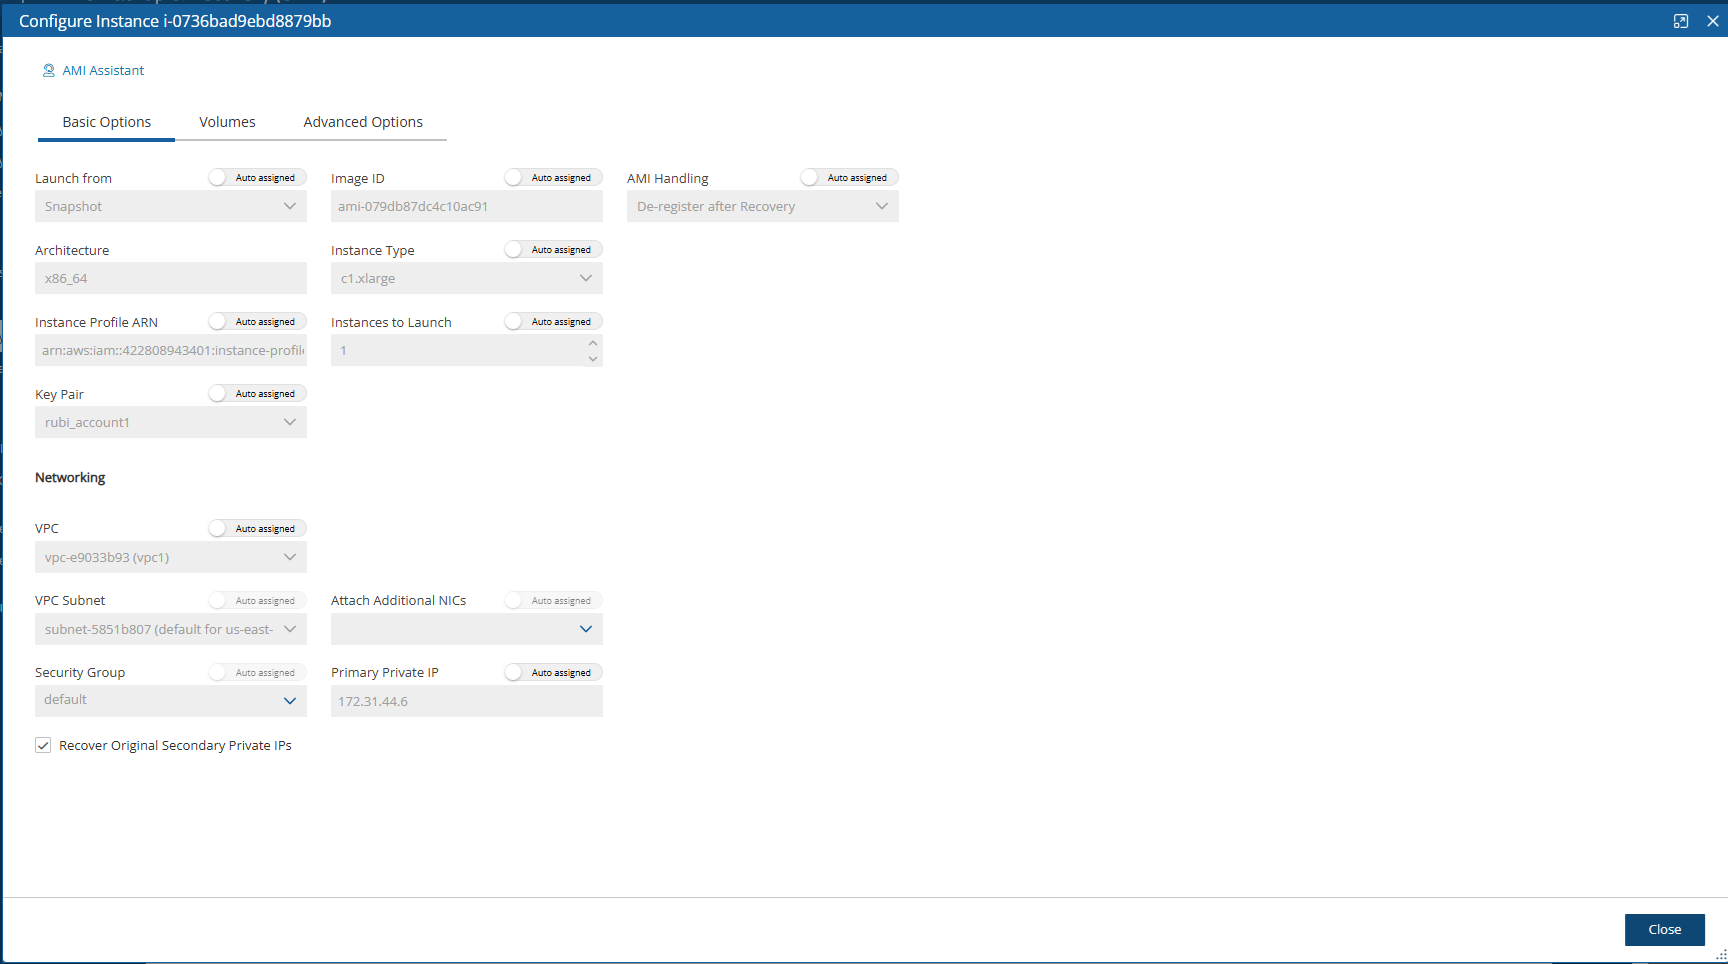
In the Volumes tab, you can configure device information, such as capacity, type, and whether to preserve tags and delete on termination. To expand the configuration section for a volume, select the right arrow![]() .
.
In the Advanced Options tab for an instance, you can customize recovery target features, such as Tenancy, Shutdown Behaviour, API Termination, Auto-assign Public IP, Kernel, and RAM Disk, tags, and whether to Allow Monitoring, enable ENA, EBS Optimized, and User Data.
The Recover Tags default is to preserve the existing tags. To manage the recovery of tags, see section 24.3.14.
To make changes, switch the Auto assigned toggle key to Custom, enter a new value, and then select Close.
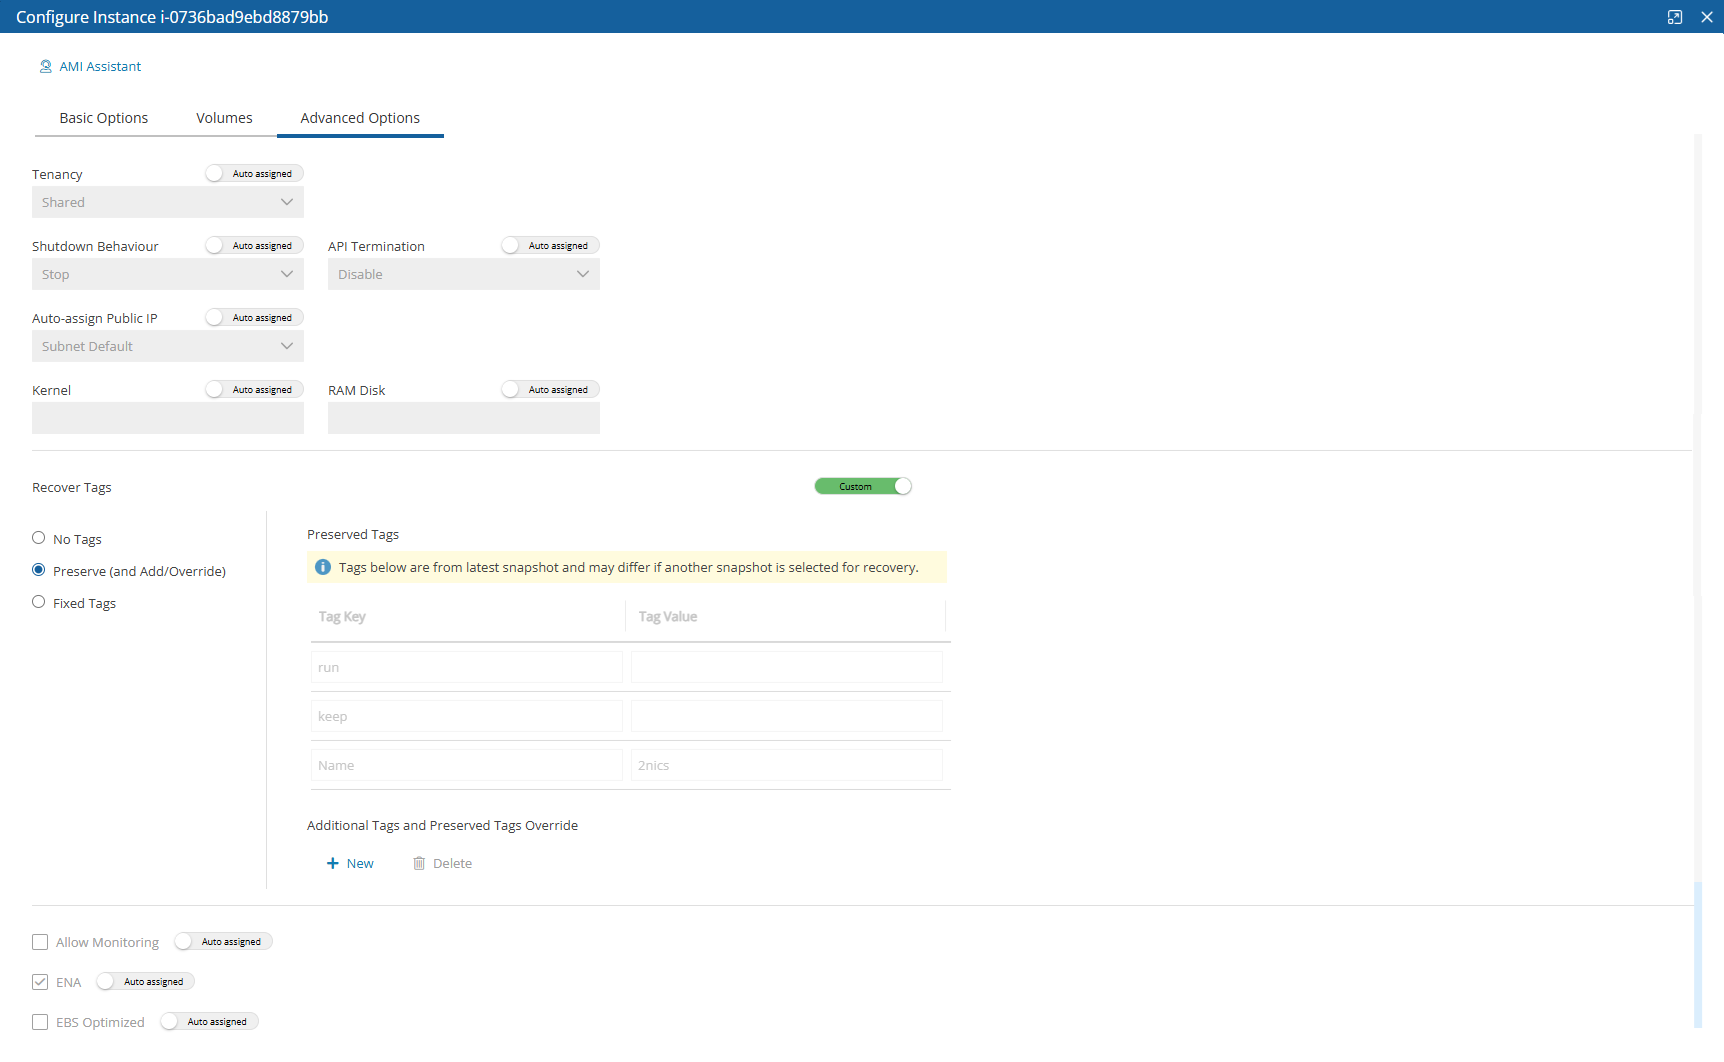
For complete details about performing an instance recovery, see section 10.4.
24.3.2 Configuring an Aurora Cluster Recovery Target
See section 24.3 for instructions on how to create a Recovery Scenario and Add Recovery Targets.
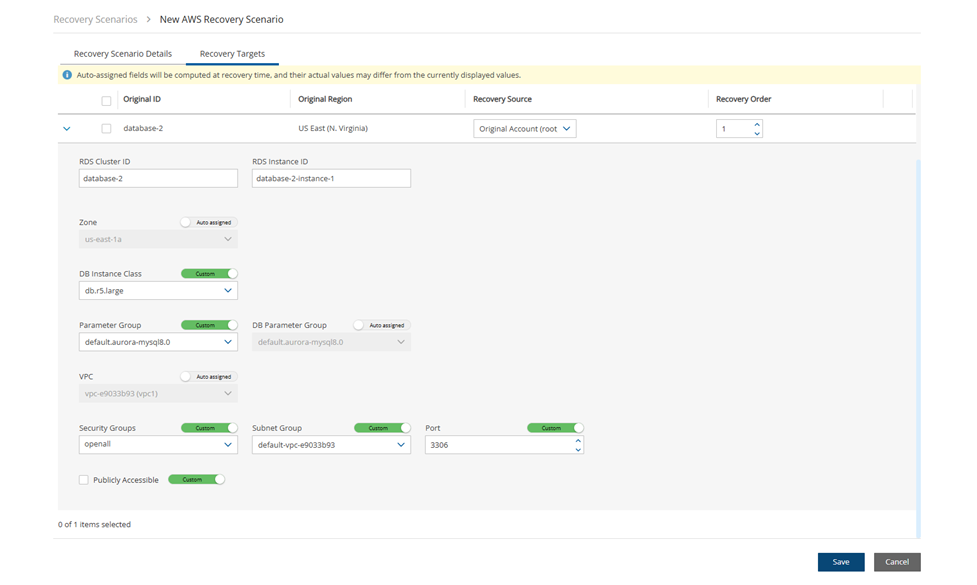
In the Recovery Targets tab, select a cluster, and change the Recovery Source and Recovery Order as needed.
Expand the details for a cluster by selecting the right arrow (
 ) next to it. To make changes, switch the Auto assigned toggle key to Custom, and enter a new value.
Select Save.
24.3.3 Configuring an Azure Virtual Machine Recovery Target
See section 24.3 for instructions on how to create a Recovery Scenario and Add Recovery Targets.
After adding the Recovery Targets, select a Virtual Machine target, and then select![]() Configure.
Configure.
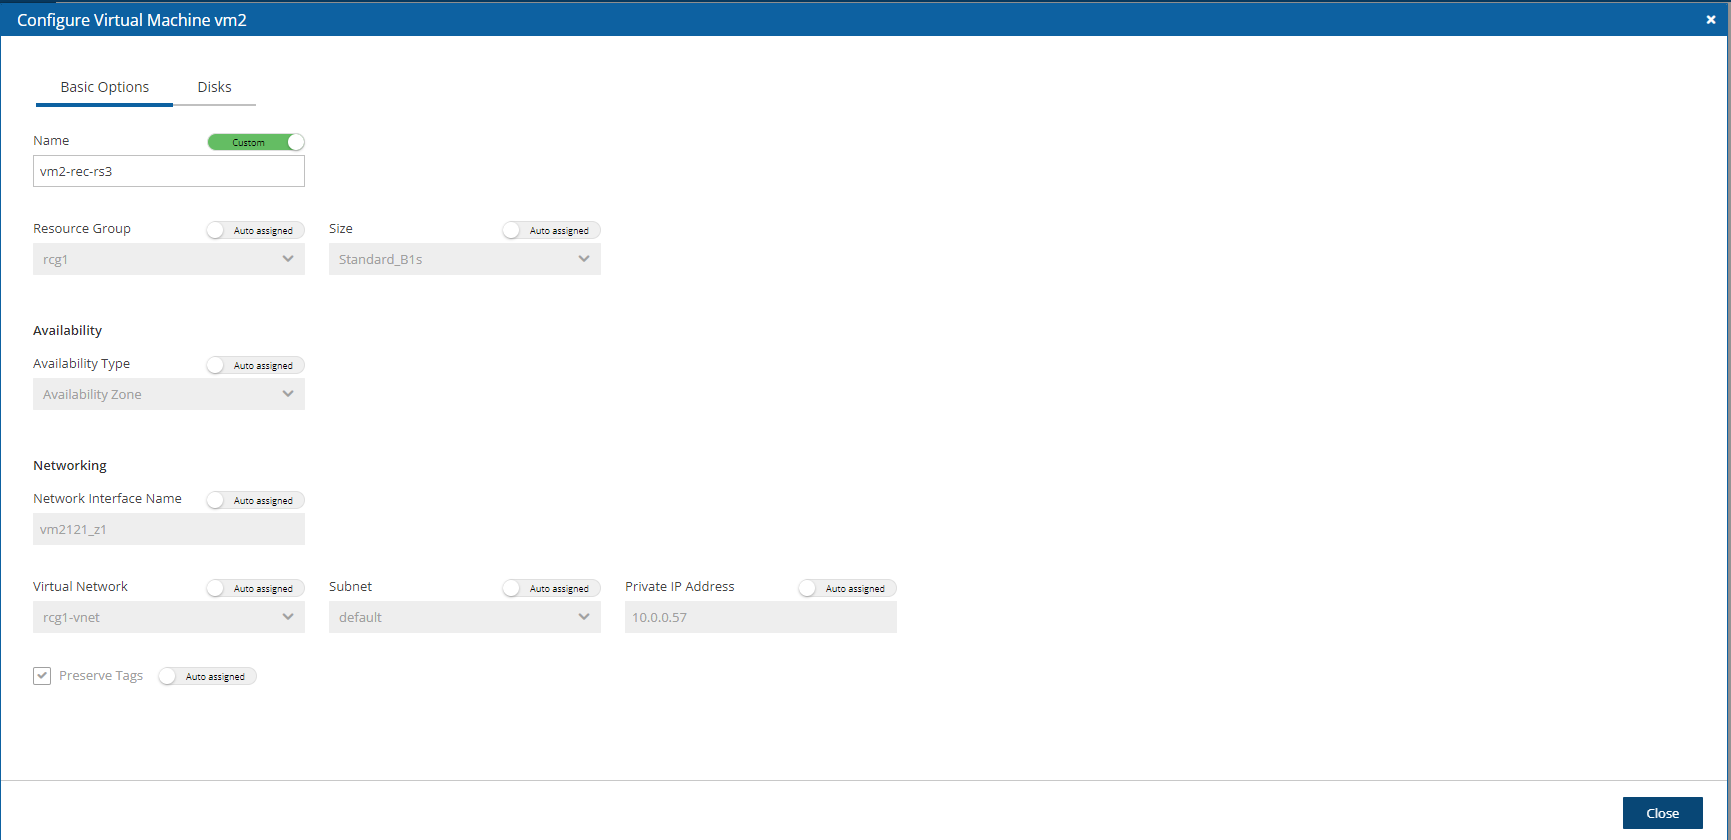
When configuring a Virtual Machine target, the Configuration screen opens with tabs for Basic Options and Disks.
In the Basic Options tab, configure basic recovery actions by selecting a Resource Group, Availability Type, and Networking details.
The Preserve Tags default is to preserve the existing tags. To manage the recovery of tags, see section 24.3.14.
Select Close.
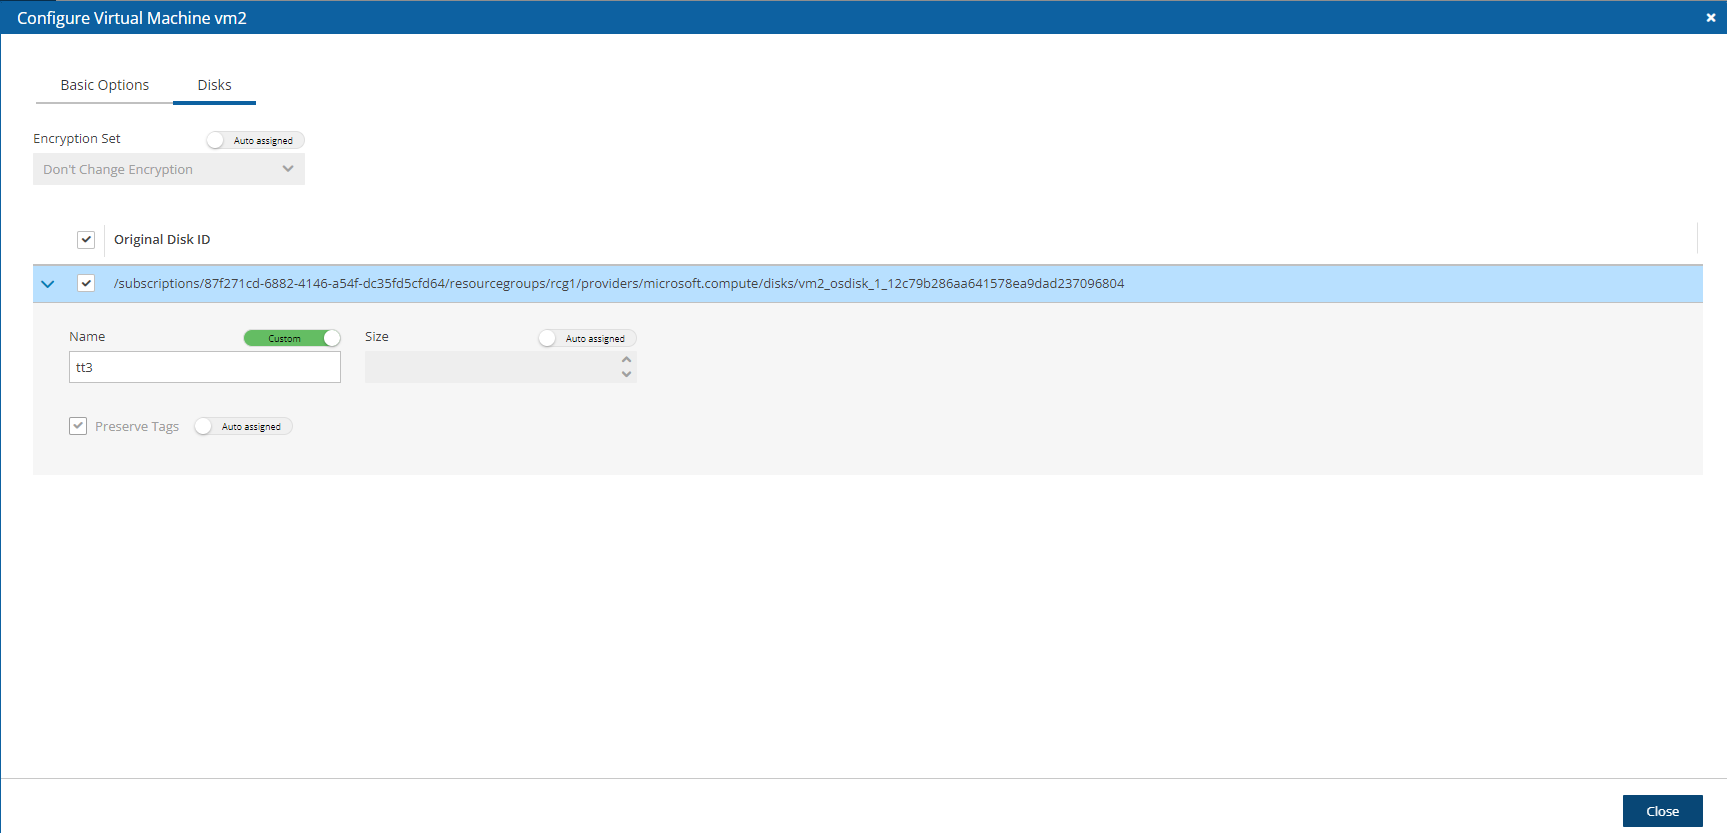
2. In the Disks tab, configure disk information, such as Encryption Set.
3. To expand the configuration section for a disk, select the right arrow (![]() ).
).
1. Change Name to the desired name for the recovered disk.
2. The Preserve Tags default is to preserve the existing tags. To manage the recovery of tags, see section 24.3.14.
4. Select Close.
24.3.4 Configuring an Azure SQL Server Recovery Target
See section 24.3 for instructions on how to create a Recovery Scenario and Add Recovery Targets.
After adding the Recovery Targets, select an SQL Server target, and then select![]() Configure.
Configure.
When configuring an SQL Server target, the Configuration screen opens with tabs for Basic Options, Network, SQL Server's Databases, and Worker Options. See section 26.9.5.

24.3.5 Configuring an Azure Disk Recovery Target
See section 24.3 for instructions on how to create a Recovery Scenario and Add Recovery Targets.
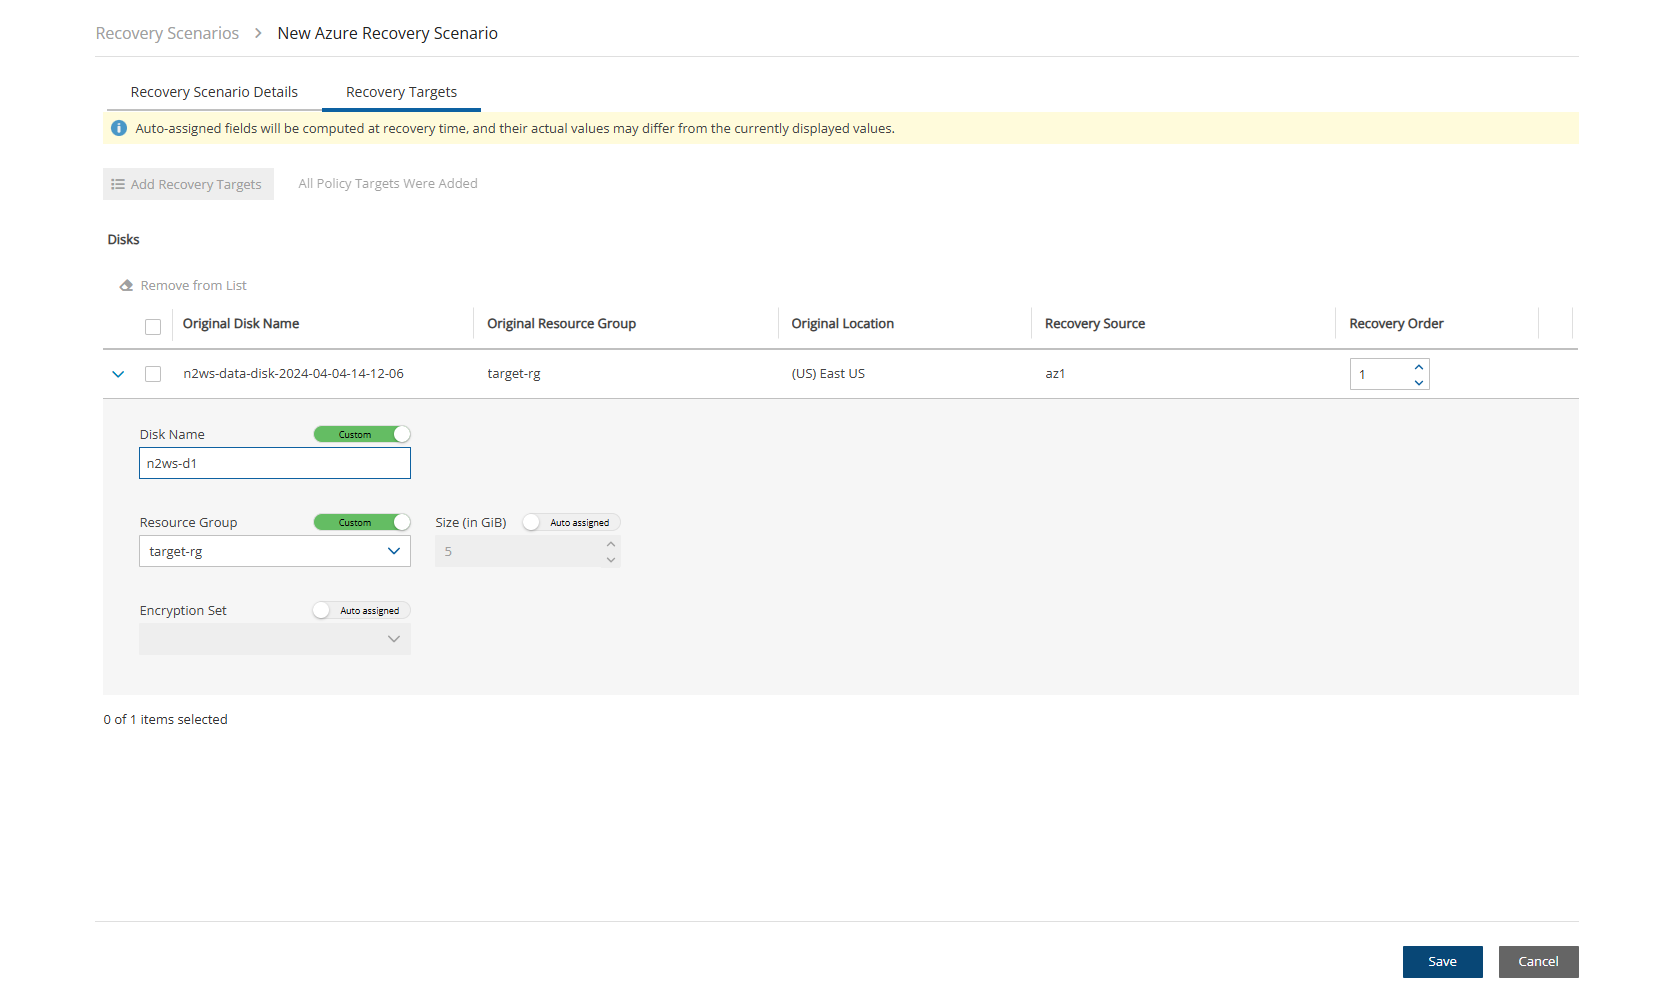
In the Recovery Targets tab, select a disk, and change the Recovery Source and Recovery Order as needed.
Expand the details for a disk by selecting the right arrow (
 ) next to it. Change Name to the desired name for the recovered disk. Update other fields as needed.
Select Save.
24.3.6 Configuring a DocumentDB Recovery Scenario
See section 24.3 for instructions on how to create a Recovery Scenario and Add Recovery Targets.
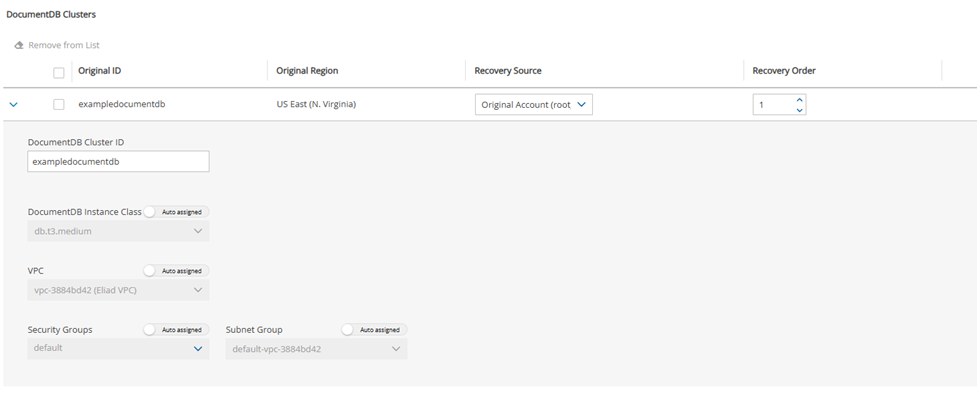
In the DocumentDB section, select a cluster, and change the Recovery Source and Recovery Order as needed.
Expand the details for a cluster by selecting the right arrow (
 ) next to it. You can change Cluster ID, Instance Class, VPC, Security Groups, and Subnet Group.
Select Save.
24.3.7 Configuring a DynamoDB Recovery Scenario
See section 24.3 for instructions on how to create a Recovery Scenario and Add Recovery Targets.
In the DynamoDB Tables section, select a table and change the Recovery Source and Recovery Order as needed.
Expand the details for a table by selecting the right arrow (
 ) next to it. Change Name to the desired name for the recovered table. Update IAM Role as needed.
Select Save.

24.3.8 Configuring an EFS Recovery Scenario
See section 24.3 for instructions on how to create a Recovery Scenario and Add Recovery Targets.
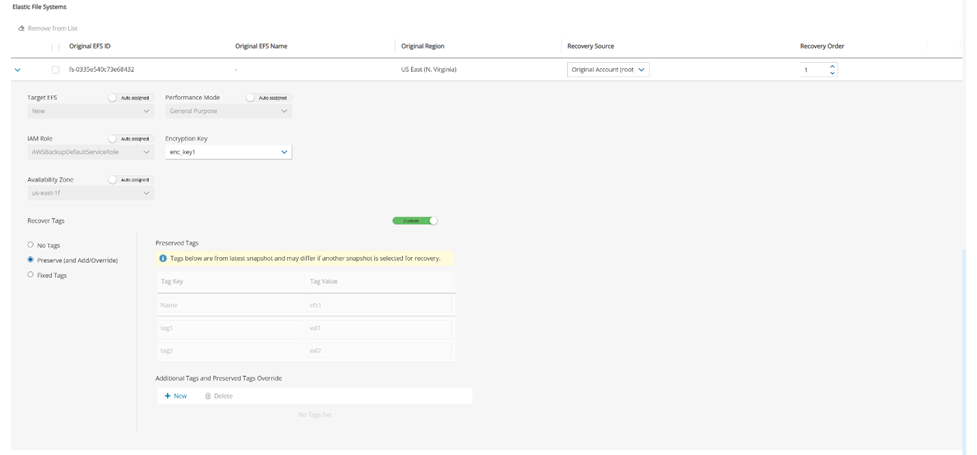
In the Elastic File Systems section, select an EFS, and change the Recovery Source and Recovery Order as needed.
Expand the details for an EFS by selecting the right arrow (
 ) next to it. You can change Encryption Key and tags. The Recover Tags default is to preserve the existing tags. To manage the recovery of tags, see section 24.3.14.
Select Save.
24.3.9 Configuring an FSx Recovery Scenario
See section 24.3 for instructions on how to create a Recovery Scenario and Add Recovery Targets.
Recovery Scenario is possible for the following types of FSx:
Lustre (section 24.3.9.1)
NetApp ONTAP (section 24.3.9.3)
OpenZFS (section 24.3.9.1)
Windows File Server (section 24.3.9.2)
Each FSx type has different configuration settings.
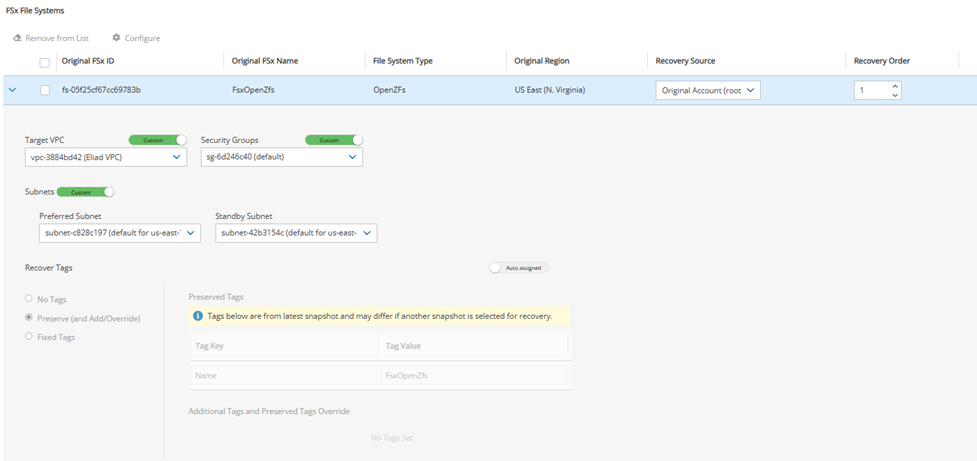
24.3.9.1 Lustre and OpenZFs FSx Recovery Scenario
In the FSx File Systems section, select an FSx, and change the Recovery Source and Recovery Order as needed.
Expand the details for an FSx by selecting the right arrow (
 ) next to it. You can make changes as needed. The Recover Tags default is to preserve the existing tags. To manage the recovery of tags, see section 24.3.14.
If there are Windows managed Active Directories, update as described below.
Select Save.
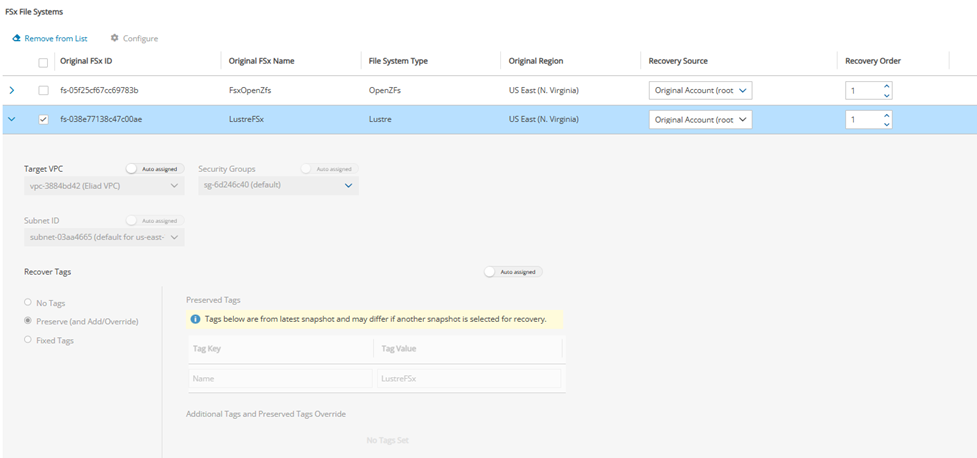
Customizing a target VPC allows for customizing and Subnets, as shown below.
24.3.9.2 Windows FSx Recovery Scenario
N2W supports the following types of Windows FSx file systems:
Windows with Self-Managed Active Directory
Windows with AWS-Managed Active Directory
AWS-Managed Active Directory
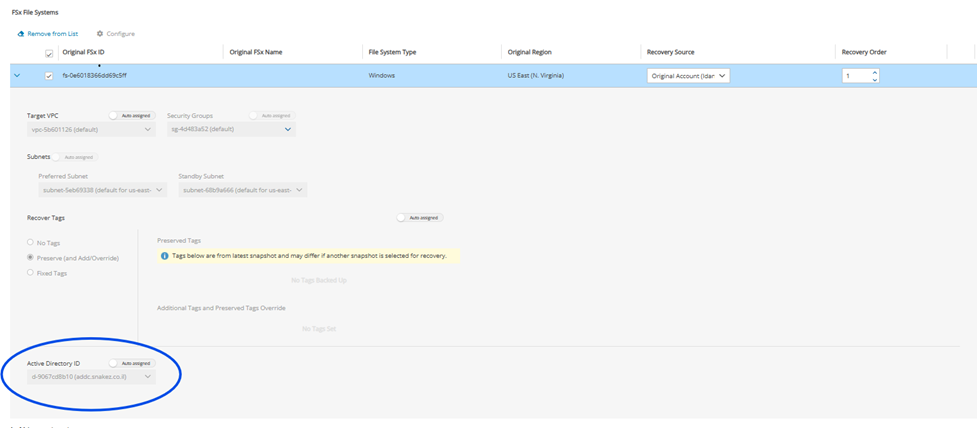
When selecting a Windows FSx with AWS-Managed Active Directory, you can select the Active Directory from the target’s AWS account and manage recovery tags.
The Recover Tags default is to preserve the existing values. To manage the recovery of tags, see section 24.3.14.
Self-Managed Active Directory
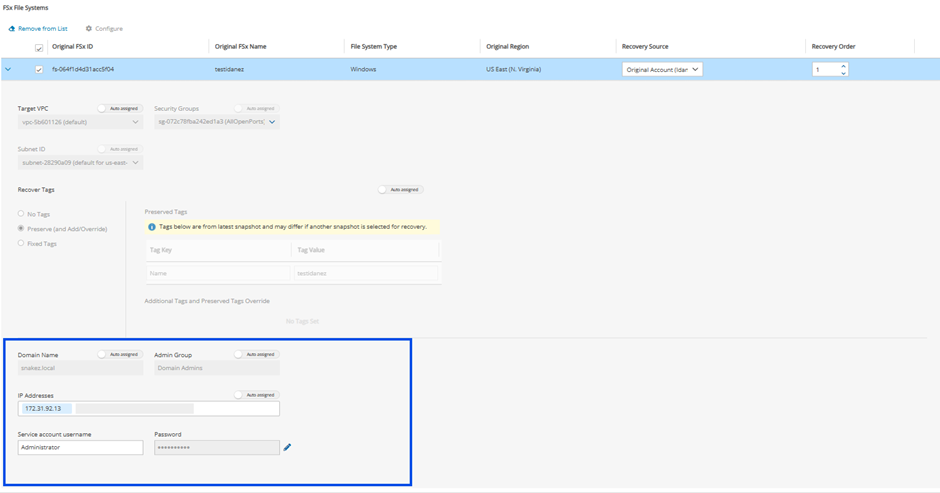
For Self-Managed Active Directory Windows FSx, user can manage recovery tags and add the self-managed Active Directory settings to the Recovery Scenario:
Domain Name
Admin Group
Service account username and password
24.3.9.3 ONTAP FSx Recovery Scenario
The ONTAP FSx Recovery Scenario has a configuration window. To open the configuration window, select an ONTAP FSx, and select the ![]() Configure button:
Configure button:

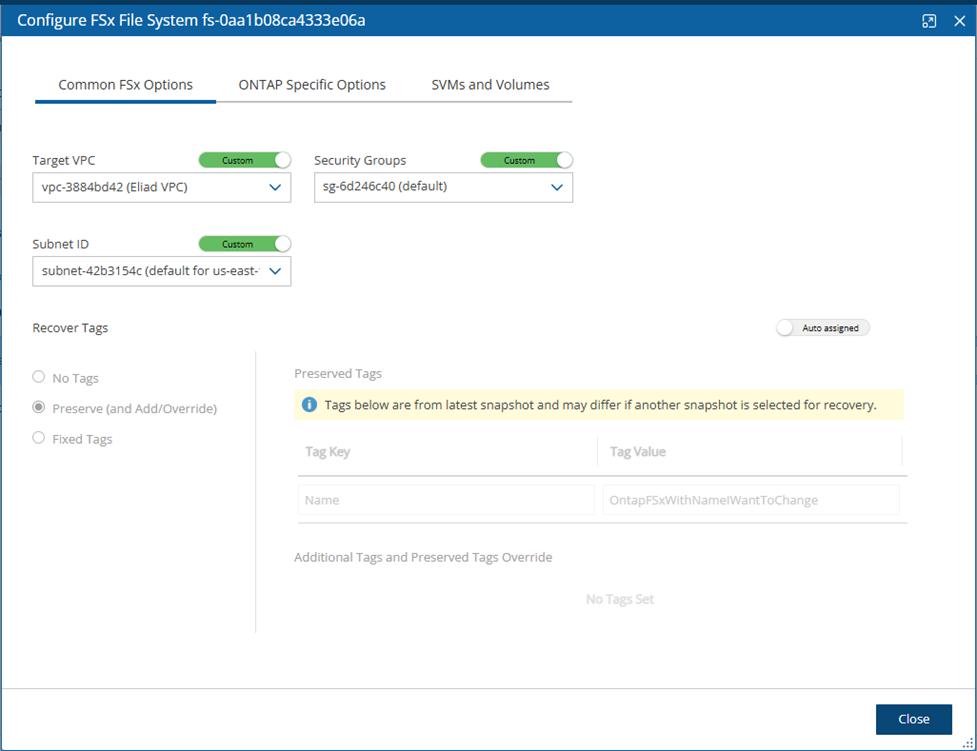
After selecting Configure, the Configure FSx File System box opens with 3 tabs.
The Common FSx Options tab includes Target VPC, Security Groups, Subnet ID, and Recover Tags options. The Recover Tags default is to preserve the existing tags. To manage the recovery of tags, see section 24.3.14.
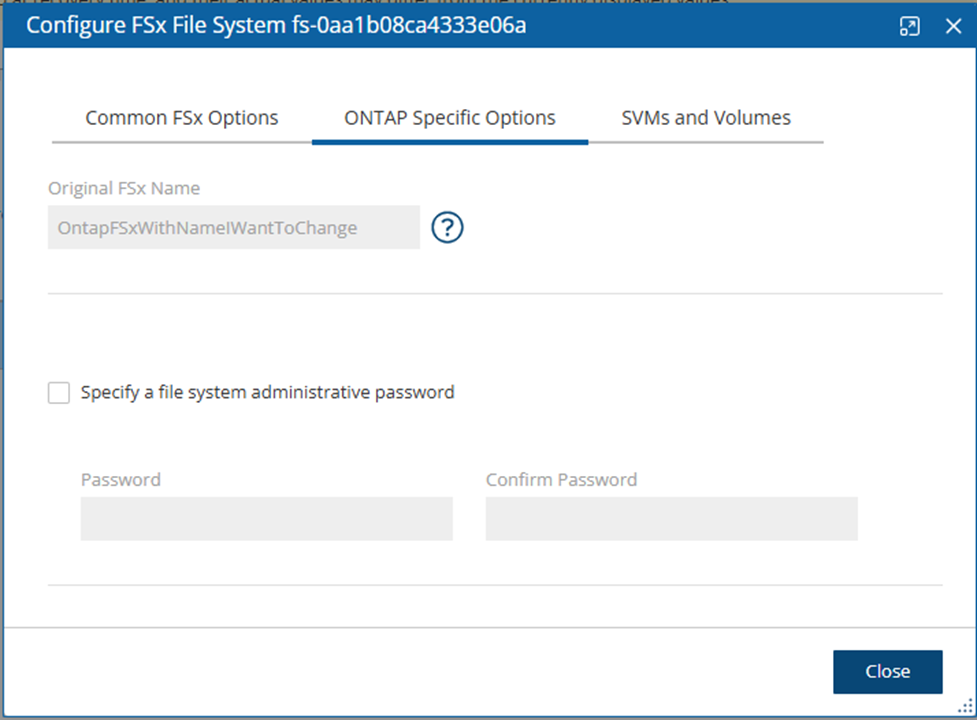
The ONTAP Specific Options tab includes Original FSx Name and an option for a file system administrative password.
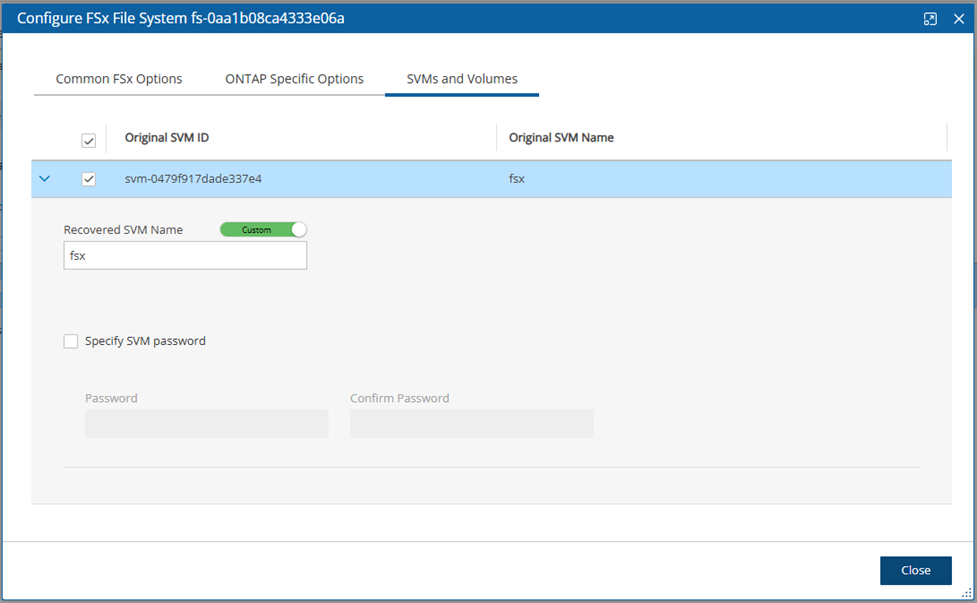
The SVMs and Volumes tab currently allows only Support Vector Machines (SVMs). All volumes will be selected with default settings.
To change the name of the SVM, switch the toggle key to Custom, and enter a new Recovered SVM Name. Select Specify SVM password to enter a password.
24.3.10 Configuring an RDS Recovery Scenario
See section 24.3 for instructions on how to create a Recovery Scenario and Add Recovery Targets.
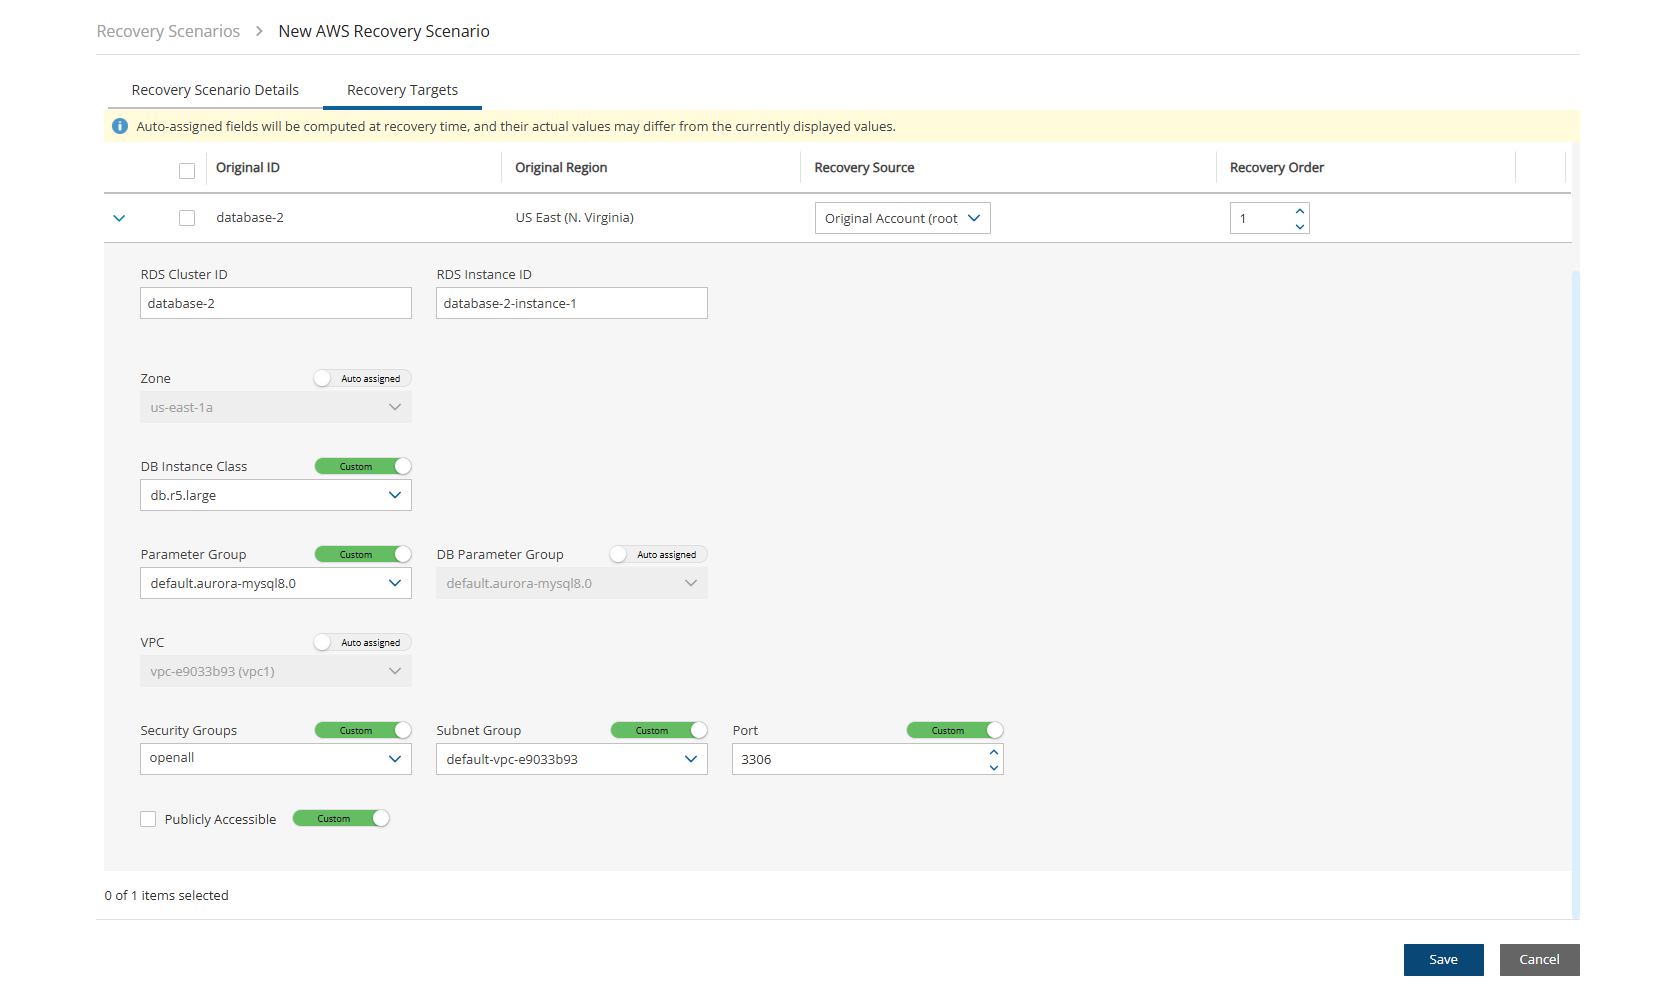
In the Recovery Targets tab, select an RDS cluster, and change the Recovery Source and Recovery Order as needed.
Select the right arrow (
 ) to show the details for a resource.
Make changes as necessary, and then select Save.
24.3.11 Configuring an RDS Recovery from a Repository
See section 24.3 for instructions on how to create a Recovery Scenario and Add Recovery Targets.
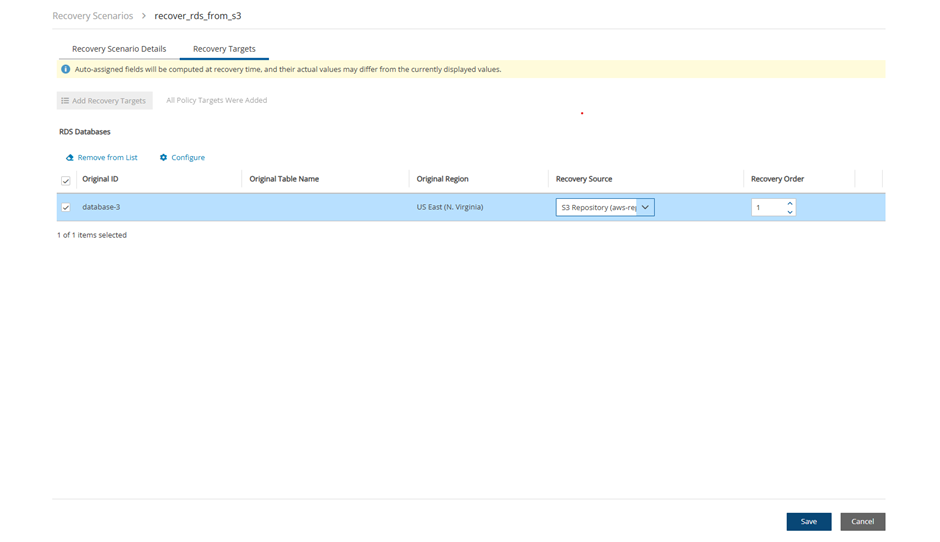
After configuring the RDS Recovery Scenario in the Recovery Scenario Details tab, select the Recovery Targets tab.
In the Recovery Source drop-down list, choose the repository to recover from.
Select
 Configure.
4. In the Basic Options tab, set additional parameters related to the recovery of RDS from the repository. Use the RDS Admin credentials for Username and Password.
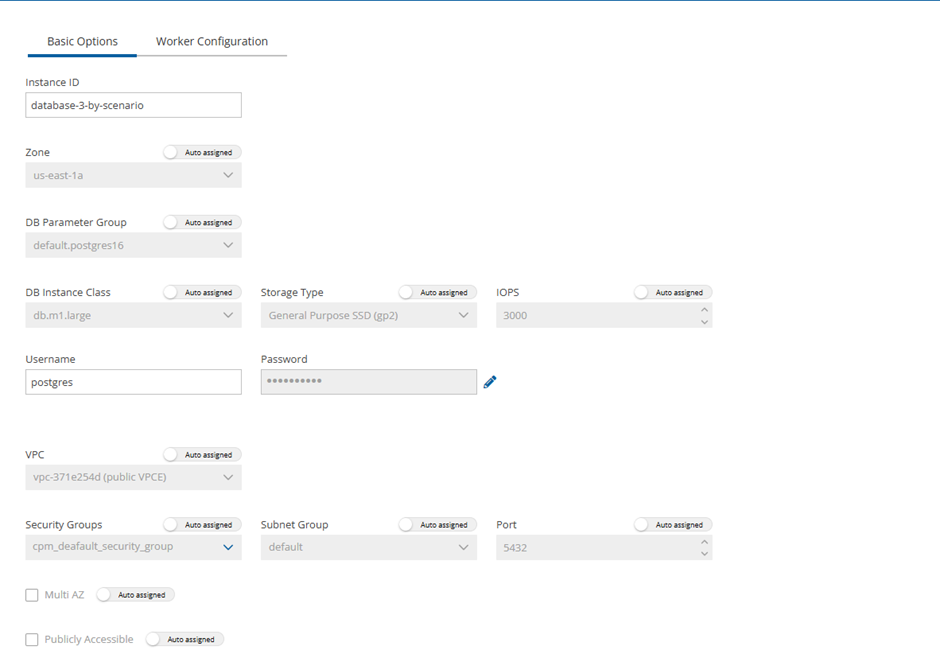
5. In the Worker Configuration tab, set the parameters for the worker that will be launched for the recovery.
24.3.12 Configuring a RedShift Recovery Scenario
See section 24.3 for instructions on how to create a Recovery Scenario and Add Recovery Targets.
In the Redshift Clusters section, select a cluster, and change the Recovery Source and Recovery Order as needed.
Select the right arrow (
 ) to show the details for resource, and make changes as necessary.
Select Save.
The RedShift Recovery Scenario has basic options to configure: Cluster ID, Zone, Port, and Subnet Group.

24.3.13 Configuring a Volumes Recovery Scenario
See section 24.3 for instructions on how to create a Recovery Scenario and Add Recovery Targets.
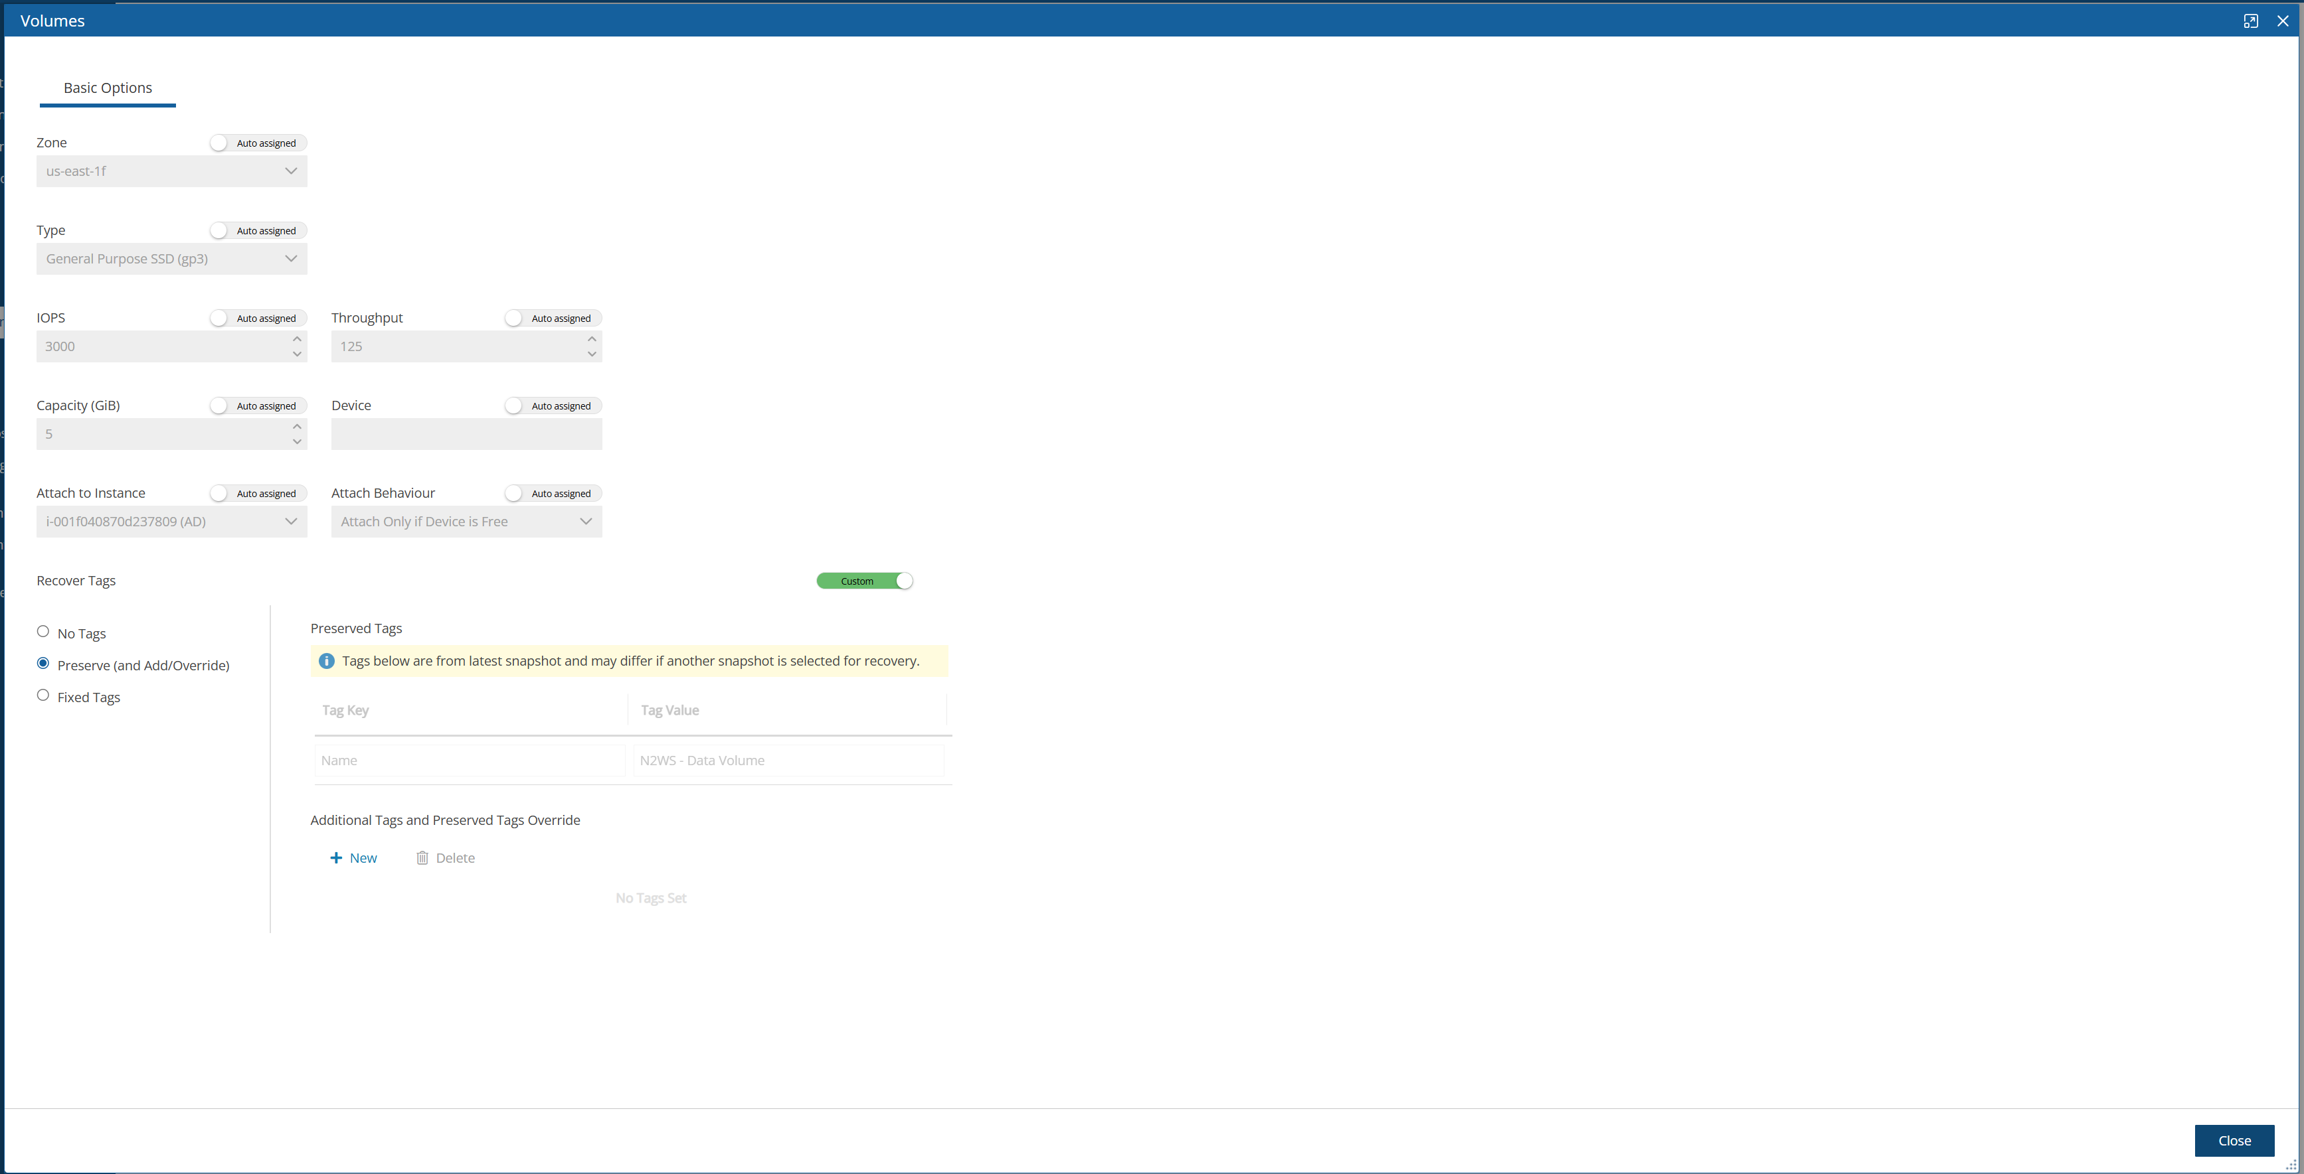
The Volumes Recovery Scenario screen has only the Basic Options tab.
The Recover Tags default is to preserve the existing tags. To manage the recovery of tags, see section 24.3.14.
24.3.14 Managing Tag Recovery
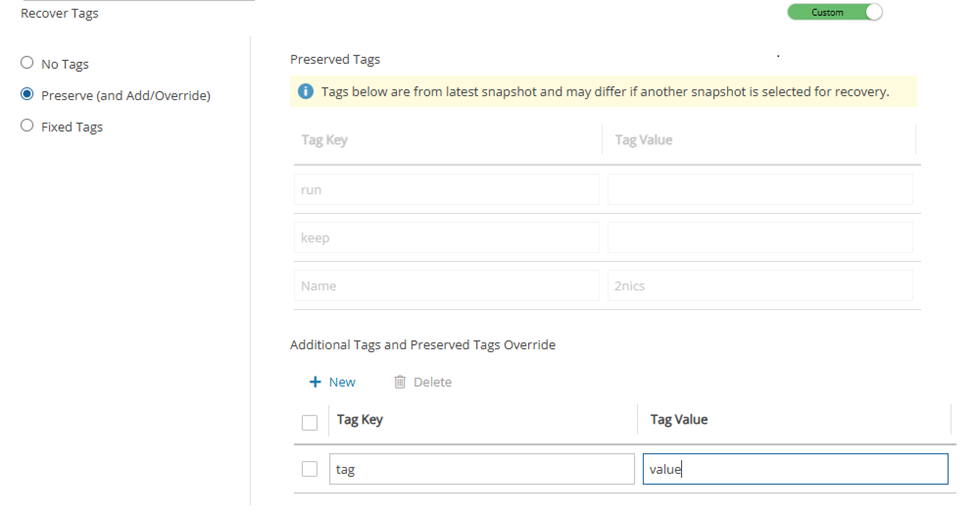
You have the option to change tags and tag values. In the Recover Tags section, switch the Auto assigned toggle key to Custom, and select a tag option:
No Tags – Do not recover tags.
Preserve (and Add/Override) – You can preserve (default), add to, or override the tags on the version of the resource selected for the recovery.
Fixed Tags – Initial display is current list of tags on resource. Set the tags to be used during recovery even if the user has subsequently changed the tags on the resource.
24.4 Testing a Recovery Scenario
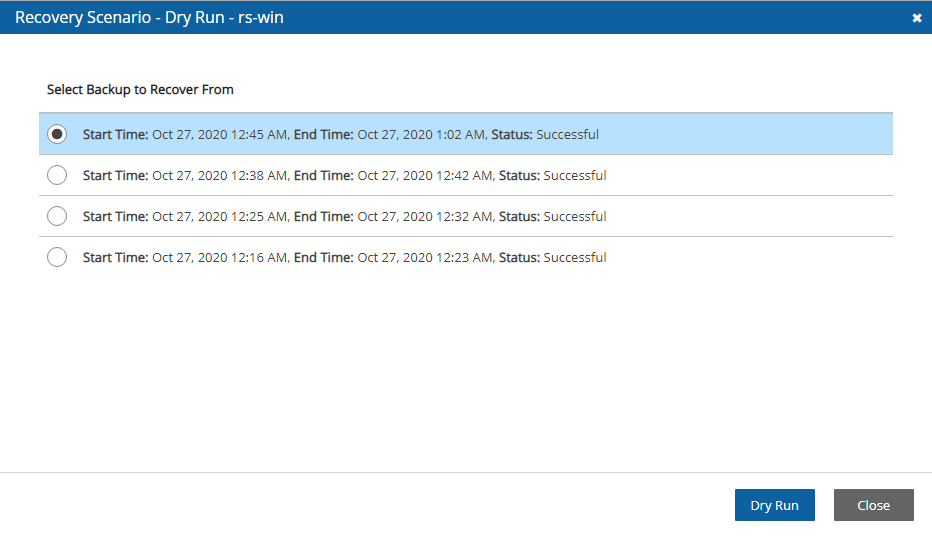
The Dry Run option allows you to determine whether the input parameters, such as key pair, security groups, and VPC, are correct for the recovery.
To test a Recovery Scenario:
In the Recovery Scenarios tab, select a Recovery Scenario and then select
 Dry Run.
In the list of successful backups, select one backup to perform the test with, and then select Dry Run.
Open the Recovery Scenario Monitor.
In the Status column for the Recovery Scenario, you will see a success message for the test:

Selecting
 Recoveries brings you to the regular Recovery Monitor.
24.5 Managing Recovery Scenarios and Targets
To manage a Recovery Scenario object:
In the Recovery Scenarios tab, select a scenario.
Select
 Edit,
Edit,  Delete,
  Run Scenario, or
  Dry Run, as needed.
To manage targets in the scenario:
In the Recovery Scenarios tab, select a scenario, and then select
 Edit.
Edit.To delete a target, select the Recovery Targets tab, select a target, and then select
 Remove from List.
Depending on the resource type, the action
 Configure is available. Configure opens tabs for Basic Options, resource type details, and Advanced Options.
24.6 Running and Monitoring a Recovery Scenario
A Recovery Scenario can also be run on a schedule using the last successful backup. To assign or create a schedule, see section 24.3.
In the Recovery Scenarios tab, select a Recovery Scenario and then select
 Run Scenario. A list of backups, successful and unsuccessful, opens.
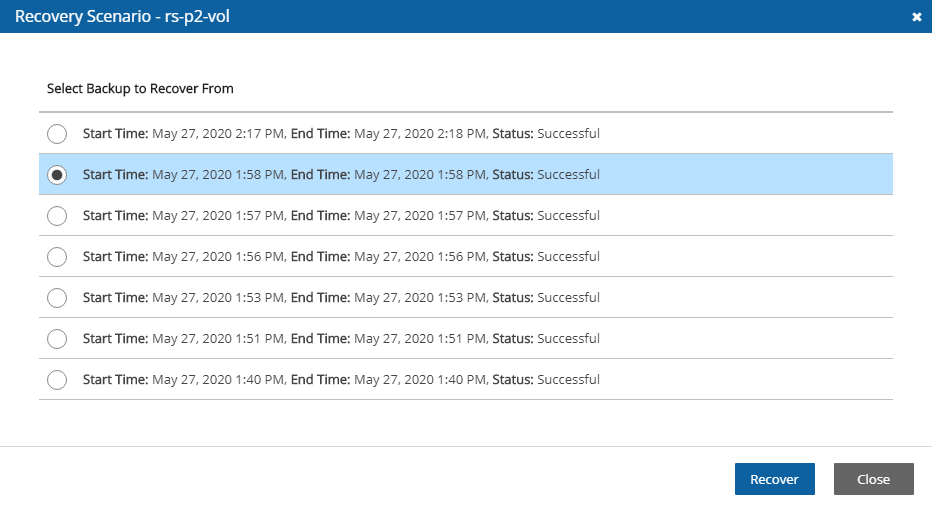
2. Select one successful backup to recover from and then select Recover. The started message opens in the top right corner:![]()
3. To open the Recovery Scenario Monitor, select the link, or select the Recovery Scenario Monitor tab.
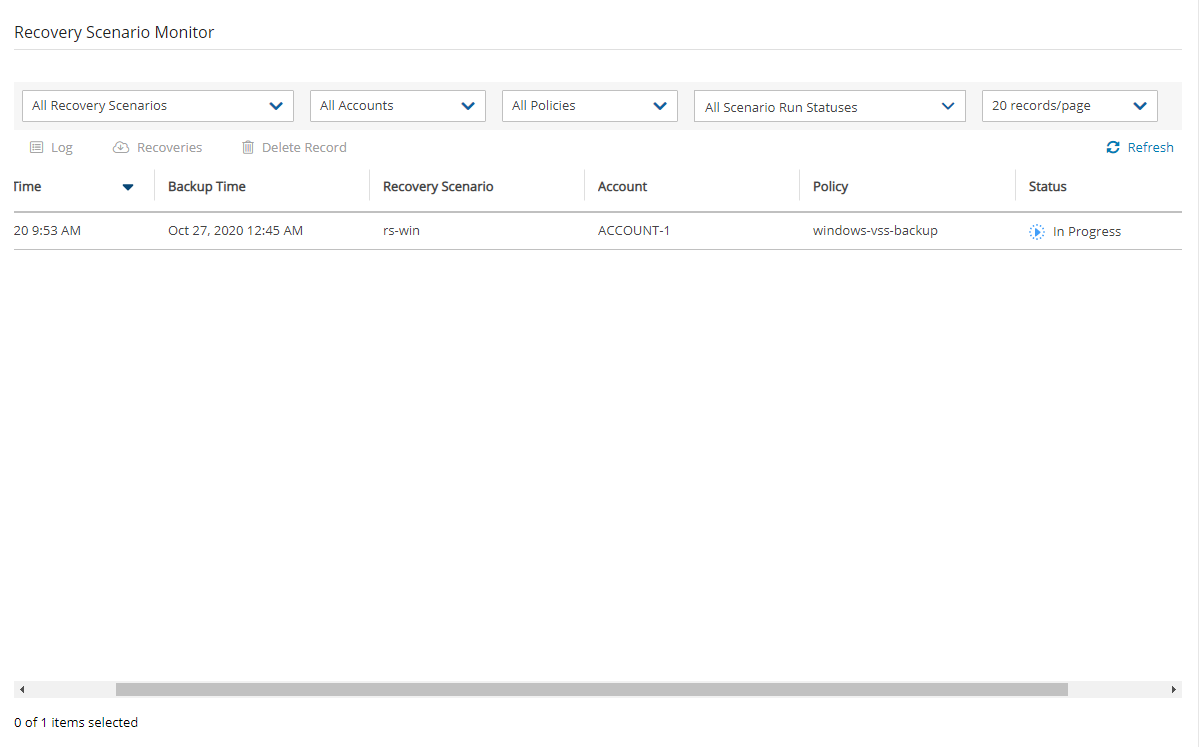
A Status of ‘Recovery succeeded’ with a test tube symbol
 next to it indicates that the recovery was a Dry Run.
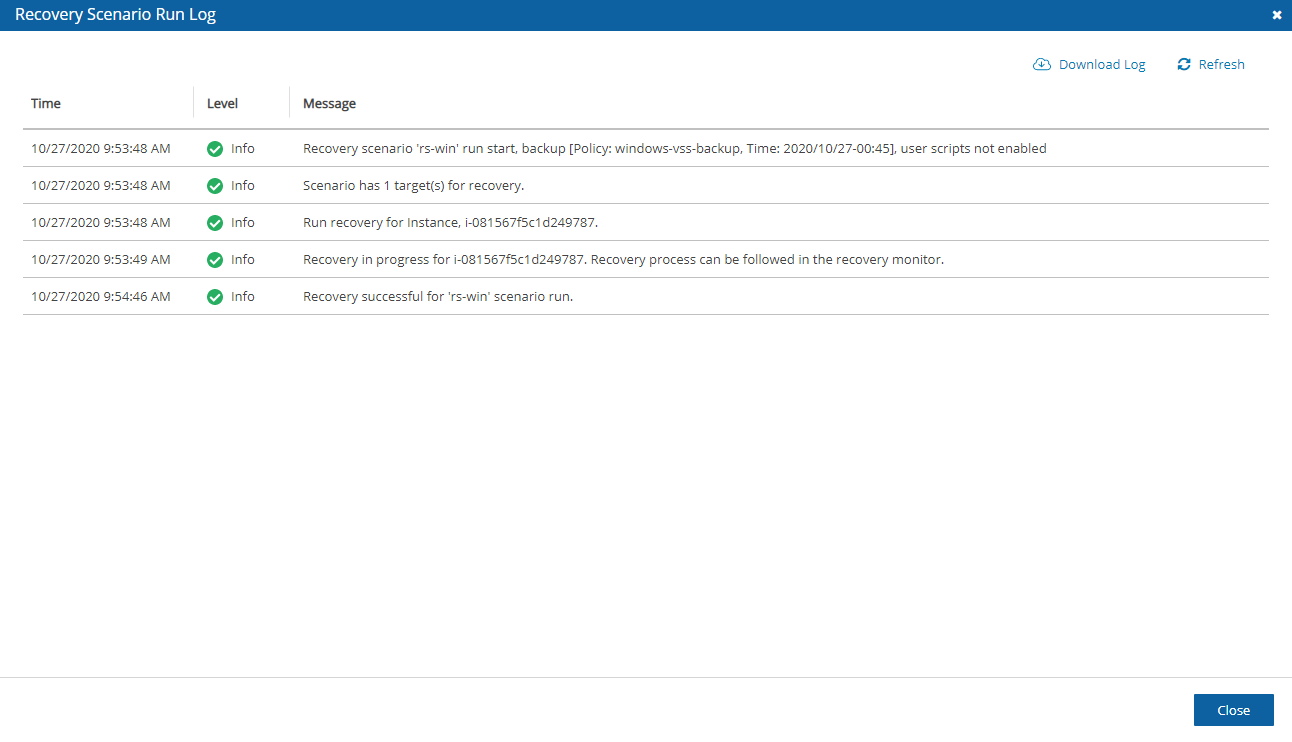
4. To view details of the recovery in the Run Log, select a Recovery Scenario and then select ![]() Log.
Log.
5. To delete a run record, select a scenario, and then select ![]() Delete Record.
Delete Record.
Deleting a run record will trigger the deletion of all its target recovery records.
6. To view a live recovery, in the Recovery Scenario Monitor, select a scenario, and then select ![]() Recoveries. The Recovery Monitor opens.
Recoveries. The Recovery Monitor opens.
24.7 Recovery Scenario User Scripts
When Enable Agent Scripts is set in the Recovery Scenario Details tab, N2W will run two scripts, one before and one after the recovery run:
before_<recovery-scenario-name>after_<recovery-scenario-name>
A file extension is optional and, if added, may be for any interpreter.
These scripts must be located on the N2W server in the following folders:
For root user:
/cpmdata/scripts/scenarioFor non-root user: /
cpmdata/scripts/scenario/user_names
24.7.1 Before Script
The before script passes the following parameters, in the following order:
#
Parameter
Notes
1
Scenario Id
2
Account Id
May be null, if the value is NULL.
3
Policy account Id
4
Destination region
May be null, if the value is NULL.
24.7.2 After Script
The after script passes the same parameters as the before with the addition of parameters for the scenario’s recovery targets:
#
Param.
Notes
1-4
...
Same as before_ parameters
5
Target lists
Each target is in colon-separated format:
RecoveryType:OriginalAwsResourceId:
OriginalRegion:RecoveredAwsResourceId
RecoveryType
Single character identifying resource type:
I - Instance
V - Volume
R - RDS Database
A - RDS (Aurora) Cluster
C - Redshift Cluster
D - DynamoDB
E - EFS
F - FSX
OriginalAwsResourceID
AWS ID of the original resource
OriginalRegion
AWS region of the original resource
RecoveredAwsResourceID
AWS ID of the recovered resource. If not recovered, then 'null'.
Following is an example of an after_ script for a Recovery Scenario that was defined with 2 targets: an EC2-instance and an EC2-volume. The after_ script passes 6 parameters, 2 of which are for the targets. In the following example, the instance recovery target was not recovered:
Last updated
Was this helpful?

