6 Windows Instances Backup
When working with Windows, it is important to understand some of its basic features.
From the point of view of the AWS infrastructure, there is not much difference between backing up Linux/Unix instances or Windows instances. You can still run snapshots on EBS volumes. However, there is one substantial difference regarding recovering instances:
In Unix/Linux instances, you can back up system volumes (root devices), and later launch instances based on the snapshot of the system volume. You can create an image (AMI) based on the system volume snapshot and launch instances.
This option is currently not available for Windows Servers. Although you can take snapshots of the system volume of a Windows Server, you cannot create a launchable image (AMI) from that snapshot.
Because of this limitation, N2W needs an AMI to start the recovery of a Windows instance. N2W will still make sure all the volumes, including the root device (OS volume), will be from the point-in-time of the recovered backup. By default, N2W will create an initial AMI when you start backing up a Windows instance. That AMI will be used as the default when recovering this instance.
If crash-consistent backup is sufficient for your needs, you do not need to install any agent. However, to use VSS for application-consistent backups or to run backup scripts, you will need to install N2W proprietary Thin Backup Agent or the AWS SSM Agent. AWS’s SSM Agent can be installed and configured for EC2 instances, on-premise servers, or virtual machines (VMs).
When using SSM for VSS:·
Certain AWS roles are required. See section 6.2.
SSM is only applicable for Windows instances with the ‘All Volumes’ option.
Upon success, the description ‘VSS snapshot’ is added to the snapshot. For example, '
CPM policy p3|instance: i0a9ebd86122a0eab2| VSS snapshot'If SSM is not configured, the agent will get an exception from AWS and will back up using ‘multi-volume' but without our VSS agent.
If
ec2-vss-agent.exeis not configured, it will be detected too late and the backup of that target will fail.The SSM Agent does not appear in the Agents tab. Check the system directly to verify installation and status.
6.1 Configuring N2W Thin Backup Agents
If a crash-consistent backup is sufficient for your needs, you do not need to install any agent. However, to use VSS or run backup scripts, you will need to install an N2W Thin Backup Agent.
The N2W Thin Backup Agent is used for Windows instances that need to perform application quiescence using VSS or backup scripts.
The agent communicates with the N2W Server using the HTTPS protocol.
No sensitive information passes between the backup agent and the N2W Server.
Any Windows instance in a policy can have a backup agent associated with it.
6.1.1 Associating an Agent with a Policy
After adding your Windows instance to the backup targets page (section 4.2.2), the next step is to configure its agent by associating it with a policy.
To associate an agent with a policy:
In the Policies tab, select the policy and then select
 Edit.
Edit.In the Backup Targets tab, select the Windows instance and select
 Configure.
In the configuration screen, select Application Consistent Backup.
Select the Remote Agent Type: AWS SSM or N2W Thin Backup Agent
6.1.2 Downloading and Distributing an N2W Thin Backup Agent Configuration
You can download the installation package of the agent from the Agents tab in the left panel. Select
 Download Thin Backup Agent to download a standard Windows package (
CPMAgentService.msi) to the Downloads folder.After downloading the agent installation package, select
 Server Settings and then select Agents Configuration.
Enter the configuration syntax as described in Appendix B, and select Publish.
6.1.3 Installing an N2W Thin Backup Agent
The agent can be installed on any Windows 2016, 2019, 2022, or 2025 instance, 32 or 64-bit. After accepting the license agreement, the Setup screens open.
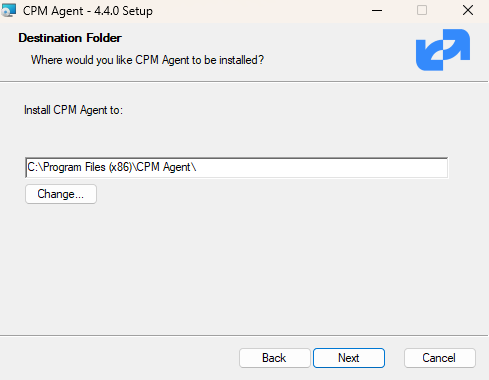
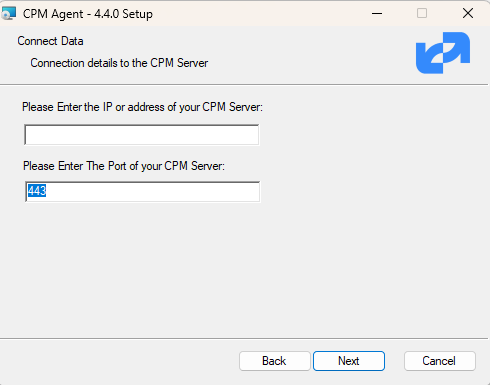
The required fields are:
The address of the N2W server that is reachable from this instance.
The default port is 443 for HTTPS communication. Change it if you are using a custom port.
After finishing the installation, the N2W agent will be an automatic service in your Windows system.
The N2W Thin Backup Agent is known as CPM Agent Service in the Windows Task Manager.
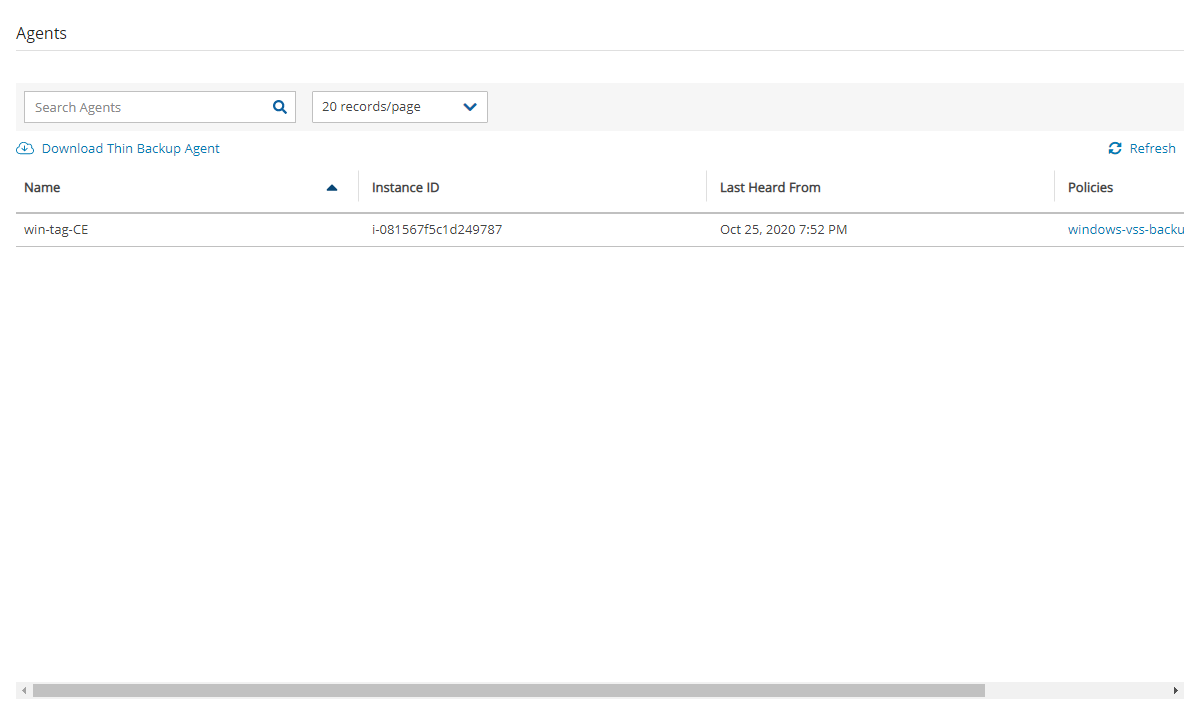
After the N2W Thin Backup Agent is installed and configured and a policy with a target that points at it is configured and enabled, the users must wait to see it registered in the remote Agents screen in the N2W. It may take a few minutes until the N2W connects.
6.1.4 Changing an N2W Thin Backup Agent Configuration
To change the configuration of the backup agent after installation, edit the backup agent configuration file.
To change the agent configuration file:
Before proceeding, N2W recommends that you make a copy of the
cpmagent.cfgfile, which resides in the N2W Agent installation folder.If the address or port of the N2W Server had changed, edit the agent configuration file manually. Make the change after the equation sign.
After making the changes, restart the CPM Agent Service, in the Windows Service Manager console.
As an alternative, you could uninstall and reinstall the agent.
6.1.5. Using the N2W Thin Backup Agent with an HTTP Proxy
N2W supports configurations where the backup agent for a Windows instance can reach the CPM server only through a proxy.
To configure the agent with an HTTP proxy:
See section 6.1.4 about editing
cpmagent.cfg, and:Add the following lines under the General section:
3. If your proxy server requires authentication, add the following two lines as well:
4. Restart the CPM Agent Service from the Windows Service Manager.
6.2 Configuring Simple System Manager (SSM) Agents
Following are the general steps to run a VSS snapshot backup:
Define an SSM IAM Role.
Define a VSS IAM Role.
Associate an SSM Agent with an N2W policy
Install the latest SSM Agent.
Install and run the latest VSS app.
Backup scripts for Windows targets must be PowerShell scripts.
To use the SSM agent with VSS, the following AWS permissions are required:
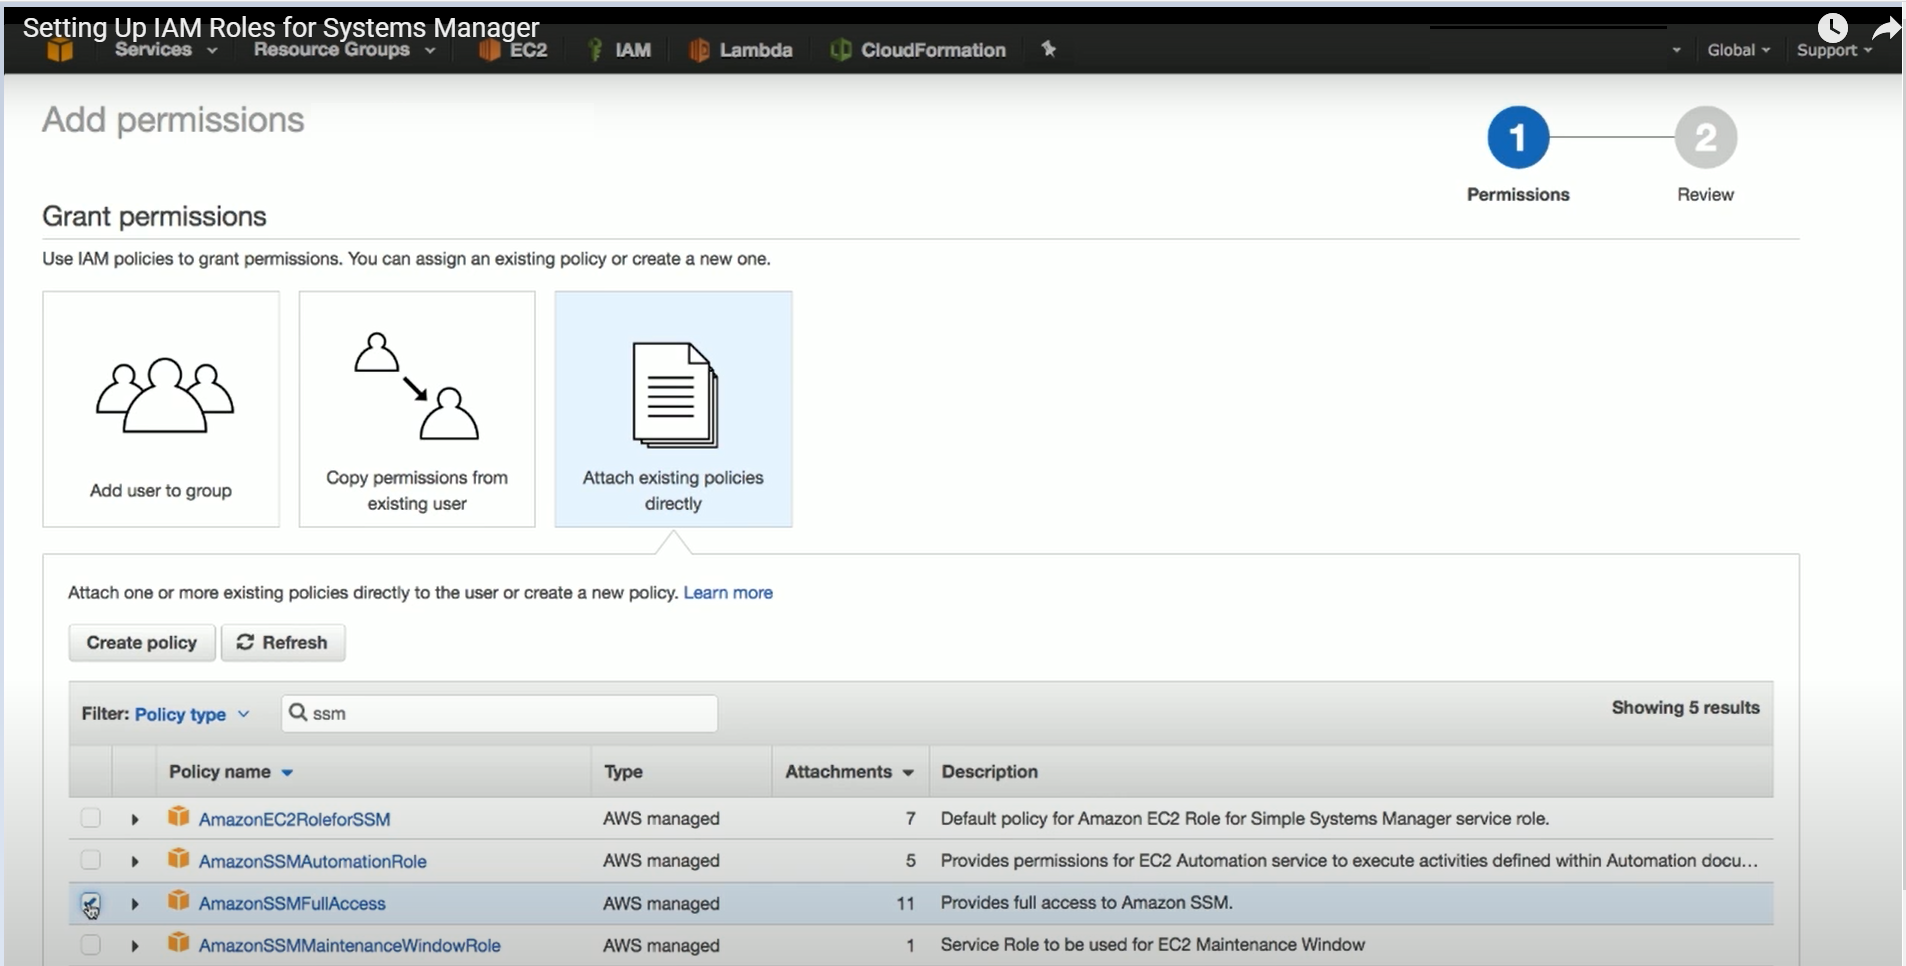
AmazonSSMFullAccess – For N2W and the instance to use the SSM remote agent for VSS and scripts.
AmazonSSMFullAccess and CreateVssSnapshot - For creating VSS.
6.2.1 Associating an SSM Agent with a Policy
To enable SSM in an N2W policy, when configuring a Windows instance in the Policy Instance and Volume Configuration screen, select All Volumes in the Which Volumes list and Simple Systems Manager (SSM) in the Remote Agent Type list. See section 4.2.3.
6.2.2 Defining and Attaching an IAM Instance Profile for SSM
To create an IAM instance profile for SSM, see https://docs.aws.amazon.com/systems-manager/latest/userguide/setup-instance-profile.html
To attach an IAM instance profile to an EC2 instance, see https://docs.aws.amazon.com/systems-manager/latest/userguide/setup-launch-managed-instance.html
Following is an example of adding SSM permissions to an IAM policy on AWS:
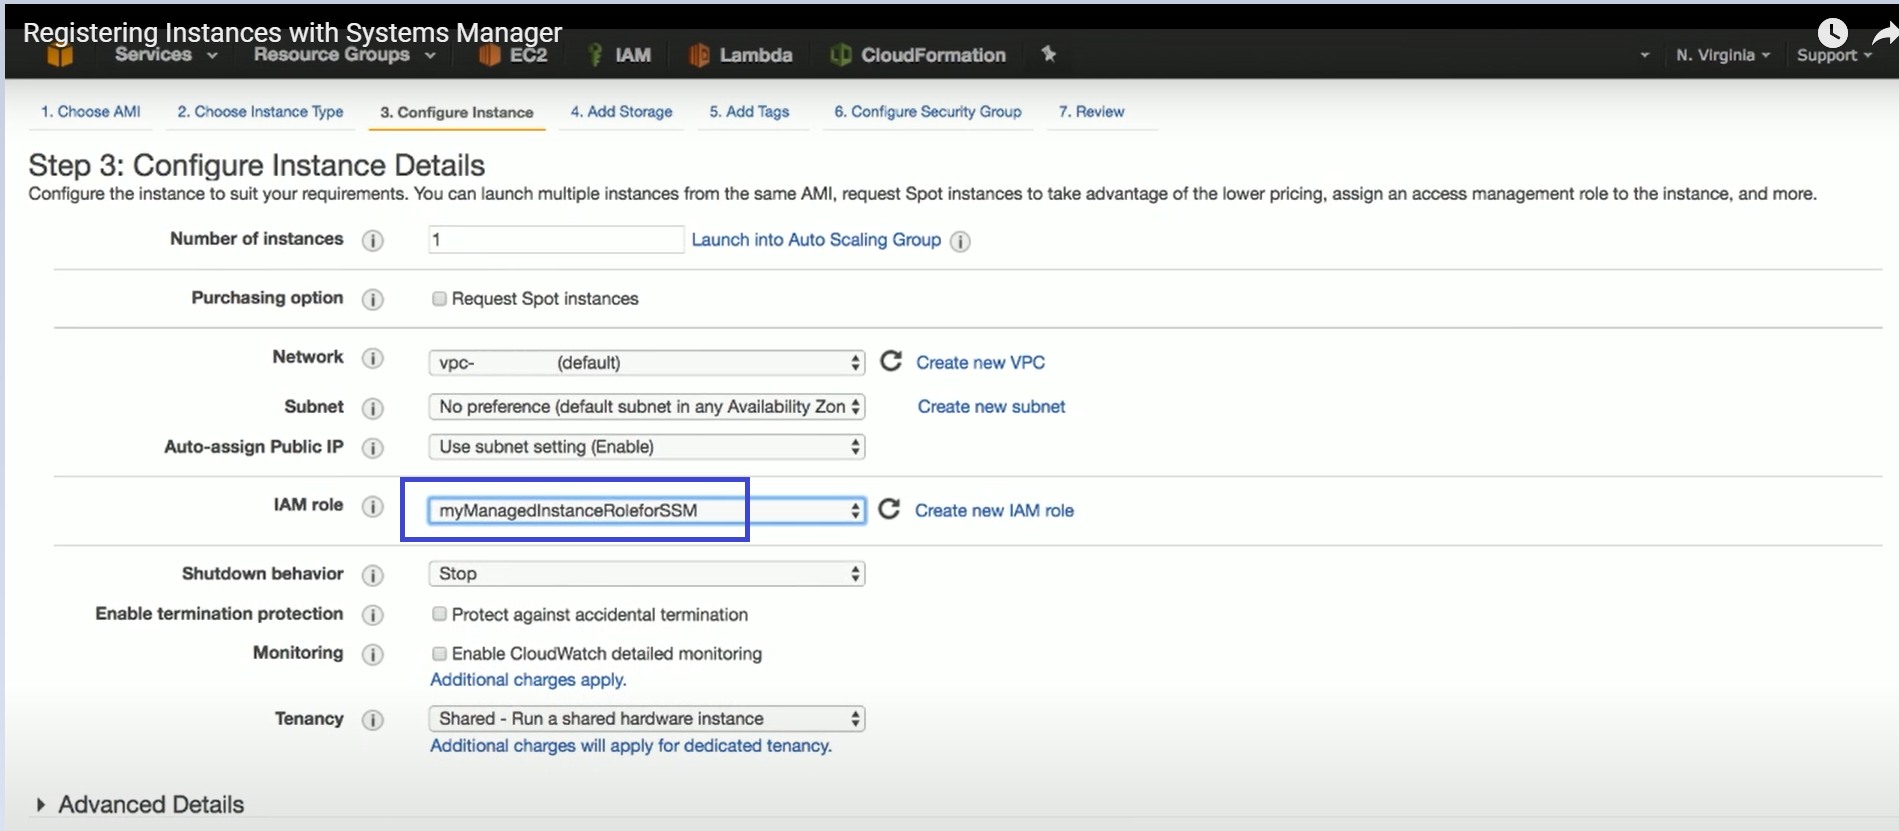
Following is an example of attaching an SSM role to an EC2 Instance on AWS:
6.2.3 Installing SSM Agents
To manually install an SSM Agent on EC2 instances:
For Windows Servers, see https://docs.aws.amazon.com/systems-manager/latest/userguide/sysman-install-win.html
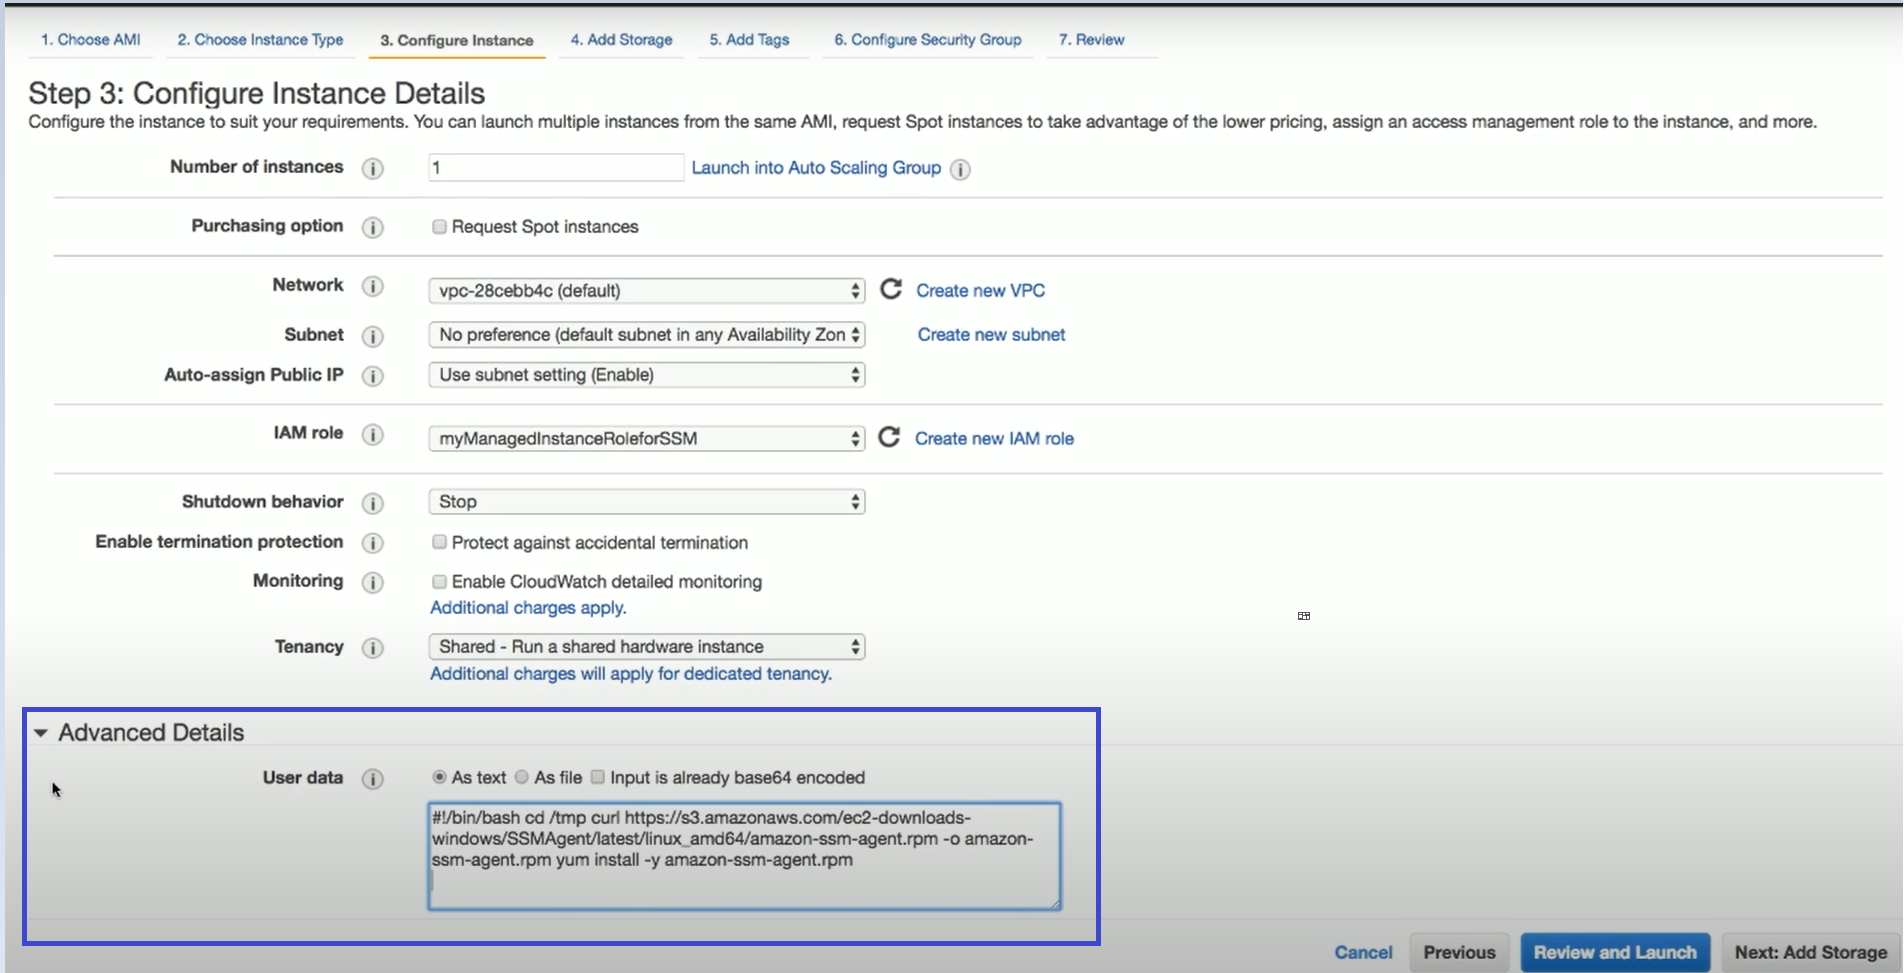
Following is an example of how to install an SSM Agent during EC2 launch:
6.2.4 Defining an IAM VSS Role and Installing VSS App
To create an IAM role for VSS-enabled snapshots and to download and install VSS components on Windows for an EC2 instance, except for US government cloud regions, see https://docs.aws.amazon.com/AWSEC2/latest/WindowsGuide/application-consistent-snapshots-getting-started.html#run-command-vss-role
For US government cloud regions, update the IAM role with 'aws-us-gov' as shown below:
6.2.5 Using Backup Scripts on Windows Targets
When using an SSM remote agent for Windows instance targets, all 'before' or 'after' backup scripts must be PowerShell scripts. Each script’s content must consist of valid PowerShell commands. Saving the files with the ‘.ps’ extension is not necessary.
6.3 Using VSS
VSS, or Volume Shadow Copy Service, is a backup infrastructure for Windows Servers. It is beyond the scope of this guide to explain how VSS works. You can read more at http://technet.microsoft.com/en-us/library/cc785914%28v=WS.10%29.aspx. However, it is important to state that VSS is the standard for Windows application quiescence, and all recent releases of many of the major applications that run on Windows use it, including Microsoft Exchange, SQL Server, and SharePoint. It is also used by Windows versions of products not developed by Microsoft, like Oracle.
N2W supports VSS for backup on Windows Servers 2016, 2019, 2022, and 2025 only. Trying to run VSS on other Windows OSs will always fail. VSS is turned on by default for every Windows agent. For unsupported OSs, you will need to disable it yourself. This can be done in the instance configuration screen, see section 6.1.1.
Any application that wishes to be backup aware has a component called VSS Writer. Every vendor who would like to support copying the actual backup data (making shadow copies) provides a component called a VSS Provider. The operating system comes with a System Provider, which knows how to make shadow copies to the local volumes. Storage hardware vendors have specialized Hardware Providers that know how to create shadow copies using their own hardware snapshot technology. Components that initiate an actual backup are called VSS Requestors.
When a requestor requests a shadow copy, the writers flush and freeze their applications. At the point of time of the shadow copy, all the applications and the file systems are frozen. They all get thawed after the copy is started (copy-on-write mechanisms keep the point in time consistent, similar to EBS snapshots). When the backup is complete, the writers get notified that they have a consistent backup for the point in time of the shadow copy. For example, Microsoft Exchange automatically truncates its transaction logs when it gets notified that a backup is complete.
6.3.1 How N2W Uses VSS
The N2W Agent or SSM Agent performs under the role of a VSS Requestor to request the VSS System Provider to perform shadow copies. The process is:
When N2W initiates a backup, it requests an agent to invoke a backup of all relevant volumes. The agent then requests the VSS System Provider to start the shadow copy.
VSS only creates differential copies, which means that for the N2W to fully backup each volume, a few extra MBs are needed for the backup to complete. The amount of MBs depends on the size of the volume and the amount of data written since the last backup. Once the backup is complete, the backup agent will request the VSS Provider to delete the shadow copies. The agent will notify all relevant VSS writers that the backup is complete, only after making sure all the EBS snapshots are completed successfully.
You can see the process depicted below.

6.3.2 Configuring VSS
By default, VSS is enabled when a backup agent is associated with an instance in a policy. In many cases, you will not need to do anything. By default, VSS will take shadow copies of all the volumes. However, you may want to exclude some volumes. For example, since the system volume (typically C:\) cannot be used to recover the instance in a regular scenario, you may want to exclude it from the backup.
To make shadow copies of only some of the volumes:
In the Instance and Volume configuration screen, change the value of Volumes for shadow copies.
Type drive letters followed by a colon, and separate volumes with a comma, e.g., D:, E:, F:.
6.3.3 Excluding and Verifying VSS Writers
Writer exclusions and inclusions are configured using a text file, not the UI.
You may wish to exclude VSS Writers from the backup process in cases where the writer is:
Failing the backup.
Consuming too many resources.
Not essential for the backup’s consistency.
To exclude VSS writers:
In the subfolder scripts under the installation folder of the backup agent (on the backed-up instance), create a text file named vss_exclude_writers_<policy-name>.txt. with the following structure:
Each line will contain a writer ID, including the curly braces.
If you write in one of the lines all, all writers will be excluded. This can be handy sometimes for testing purposes.
In some cases, you want to make sure that certain writers are included (verified) in the shadow copy, and if not, fail the operation.
To verify writers:
In the subfolder scripts under the installation folder of the Thin Backup Agent (on the backed-up instance), create a text file named vss_verify_writers_<policy-name>.txt with the following structure:
Each line will contain a writer ID, including the curly braces.
allis not an option.
An example of a line in either of the files is:
{4dc3bdd4-ab48-4d07-adb0-3bee2926fd7f}
6.3.4 Troubleshooting VSS Issues
When a VSS-enabled policy runs, you will see its record in the Backup Monitor tab.
If it finished with no issues, the status of the record will be Backup Successful.
If there were issues with VSS, the status will be Backup Partially Successful.
To troubleshoot:
To view the errors that VSS encountered, look in the backup log.
To view the output of the exact VSS error, select
 Recover.
To view the VSS Disk Shadow log, select its link in the recovery panel. There is a link for each of the agents in the policy, with the instance ID stated.
In most cases, VSS will work out of the box with no issues. There can be a failure from time to time in stressed system conditions.
If the writers do not answer the freeze request fast enough, the process times out and fails. Often, the retry will succeed.
When VSS is constantly failing, it is usually a result of problems with one of the writers. This could be due to some misconfiguration in your Windows system.
In most cases, the problem is out of the scope of N2W. The best way to debug such an issue is to test VSS independently. You can run the Diskshadow utility from a command line window and use it to try and create a shadow copy. Any issue you have with VSS using N2W should also occur here.
To learn how to use the Diskshadow utility, see: https://docs.microsoft.com/en-us/windows-server/administration/windows-commands/diskshadow
You may see failures in the backup because VSS times out or is having issues. You will see that the backup has status Backup Partially Successful. Most times you will not notice it since N2W will retry the backup and the retry will succeed.
If the problem repeats frequently, check that your Windows Server is working properly. You can check the application log in Window’s Event Log. If you see VSS errors reported frequently, contact N2W Software support.
6.3.5 VSS Recovery
Recovering instances using N2W is covered in section 10. When recovering a Windows Server that was backed up with VSS, you need to revert to the shadow copies in the recovery volumes to get the consistent state of the data.
To revert to shadow copies after VSS recovery:
Connect to the newly recovered instance.
Stop the services of your application, e.g., SQL Server, Exchange, SharePoint, etc.
Open an administrator command line console and type
diskshadow.In the recovery panel screen, select the VSS DiskShadow Data link to find the IDs of the shadow copies made for the required backup.
Type
revert {shadow id}for each of the volumes you are recovering, except for the system volume (C: drive). After finishing, the volumes are in a consistent state.Turn the services on and resume work.
If you wish to recover a system disk, it cannot be reverted to the shadow copy using this method. The system volume should not contain actual application data as it is not a recommended configuration, and, therefore, you should be able to skip this revert operation. However, you can expose the system disk from the shadow and inspect its contents.
To expose the system disk from the shadow:
In the Diskshadow utility, type:
expose {shadow id} volletter:After finishing, remember to unexpose the disk.
To avoid unnecessary resource consumption, delete the shadow: (
delete shadow {shadow id}).
To revert to a shadow copy for a system volume:
If you have a strict requirement to recover the consistent shadow copy for the system volume as well, do the following:
Before reverting for other volumes, stop the instance; wait until it is in stopped state.
Using the AWS Console, detach the EBS volume of the C: drive from the instance and attach it to another Windows instance as an “additional disk”.
Using the Windows Disk Management utility, make sure the disk is online and exposed with a drive letter.
Go back to the process in the previous section (VSS Recovery), and revert to the snapshot of drive C which will now have a different drive letter. Since it is no longer a system volume, it is possible to do so.
Detach the volume from the second Windows instance, reattach to the original instance using the original device, which is typically
/dev/sda1, and turn the recovered instance back on.
Shadow copy data is stored by default in the volume that is being shadowed. However, in some cases, it is stored on another volume. To be able to recover, you need to make sure that the volume the shadow copy is on is included in the backup and the recovery operation.
If you revert a volume that contains another volume’s shadow data, the reversion will take the volume to a state where it no longer contains the second volume’s backup data, as the second volume would need to be reverted before the first volume can be reverted. If you accidentally restore the shadow copies in the wrong order, just delete the recovered instance and its data volumes and begin the recovery operation again from N2W, taking care to revert the shadow copies in the correct order.
6.4 Using Backup Scripts on Windows
Besides VSS, there is also the option to run backup scripts to achieve backup consistency. It is also possible to add backup scripts in addition to VSS.
PowerShell backup scripts for use with an SSM agent do not require the 'ps' file extension.
You enable backup scripts in the Instance and Volume Configuration screen of the instance in the policy and select the type of agent that you want to execute the scripts.
All scripts are named with a prefix plus the name of the policy.
There are 3 types of events. If scripts are used, a script must be provided for each of these events. If any script is not defined, N2W will treat the missing script as a failing script.
Before the VSS backup -
BEFORE_<policy-name>.<ext>After the VSS backup started -
AFTER_<policy-name>.<ext>After the VSS backup has completed -
COMPLETE_<policy-name>.<ext>
Scripts can have any extension if they are executable. They can be batch scripts, VBS scripts, PowerShell, or even binary executables. However, N2W cannot run PowerShell scripts directly as Windows scripts.
All scripts must be set with exit code zero
0.
6.4.1 Location and Execution of Scripts
When using the N2W Thin Backup Agent:
As opposed to Linux, Windows backup scripts run directly on the agent. All the scripts are in the subfolder scripts under the installation folder of the N2W Thin Backup Agent.
If the N2W user that owns the policy is not the root user, the scripts will be under another subfolder with the username (e.g.,
…\scripts\cpm_user1).Scripts are launched by N2W Thin Backup Agent, so their process is owned by the user that runs the agent service. By default, this is the local system account. However, if you need to run it under a different user you can use the service manager to change the logged-on user to a different one. For example, you might want to run it with a user who has administrative rights in a domain.
When using the SSM Agent:
Scripts are saved locally on the N2W server and invoked remotely.
Scripts must be saved in
/cpmdata/scripts/<username>/<instance_id>/Script names are the same as for the N2W Thin Backup Agent. The PowerShell file extension is not required.
6.4.2 Before Script
The before_<policy-name>.<ext> runs before the backup begins. Typically, this script is used to move applications to backup mode. The before script leaves the system in a frozen state. This state will stay for a very short while, until the snapshots of the policy start, which is when the after script is started.
6.4.3 After Script
The after_<policy-name>.<ext> script runs after all the snapshots of the policy start. It runs shortly after the before script, generally less than 2-3 seconds. This script releases anything that may have been frozen or locked by the before script.
This script accepts the success status of the before script. If the before script succeeded, the argument will be one 1. If it failed, crashed, or timed out, the argument will be zero 0.
This is the opposite of the exit status. Think of it as an argument that is true when the before script succeeded.
6.4.4 Complete Script
The complete_<policy-name>.<ext> script runs after all snapshots are completed. Usually, the script runs quickly since snapshots are incremental. This script can perform clean-up after the backup is complete and is typically used for transaction log truncation.
The script accepts one argument. If the entire backup was successful and all the previous scripts were successful, it will be one 1. If any issues or failures happened, it will be zero 0. If this argument is one 1, truncate logs.
When you enable backup scripts, N2W assumes you implemented all three scripts. Any missing script will be interpreted as an error and be reflected in the backup status. Sometimes the complete script is often not needed. In this case, write a script that just exits with the code zero 0, and the policy will not experience errors.
6.4.5 Capturing the Output of Backup Scripts
You can have the output of backup scripts collected and saved in the N2W Server. See section 4.2.4.
Was this helpful?

