21 Managing Snapshots with Lifecycle Policies
Manage the destination and costs associated with backup storage by using Lifecycle Policies.
In addition to creating and managing EBS snapshots, N2W can store backups in a Storage Repository in Simple Storage Service (S3) and S3 Glacier, allowing you to lower backup costs when storing backups for a prolonged amount of time. In addition, you can store snapshots of AWS volumes in an Azure Storage Account repository, thereby gaining an additional level of protection. N2W allows you to create a lifecycle policy, where older snapshots are automatically moved from high-cost to low-cost storage tiers.
Snapshots are operational backups designed for day-to-day and urgent production recoveries.
S3 and Azure Storage archives are designed for long-term retention.
A typical lifecycle policy would consist of the following sequence:
Store daily EBS snapshots for 30 days.
Store one out of seven (weekly) snapshots in S3 for 3 months.
Finally, store a monthly snapshot in S3 Glacier for 7 years, as required by regulations.
Storing snapshots in Storage Repository is not supported for periods of less than 1 week.
Configuring a lifecycle management policy in N2W generally consists of the following sequence:
Defining how many mandatory original and DR snapshot generations to keep.
Optionally, defining how long original and DR snapshot retention periods should be, and applying compliance locks.
Enabling and configuring backup to Storage Repository.
Optionally, enabling and configuring Archive to Cold Storage, such as S3 Glacier.
For detailed S3 storage class information, refer to https://aws.amazon.com/s3/storage-classes.
21.1 Using Storage Repository with N2W
N2W currently supports the copy of the following services to S3:
EBS
EC2
RDS MySQL – Supported versions are 5.6.40 and up, 5.7.24 and up, and 8.0.13 and up
RDS PostgreSQL – Supported versions are 9.6.6 – 9.6.9, 9.6.12 and up, 10.7 and up, 11.2 and up, 12.0 and up, and 13.1 and up
Using the N2W Copy to Storage Repository feature, you can:
Define multiple folders, known as repositories, within a single S3 bucket or an Azure Storage Account.
Define the frequency with which N2W backups are moved to a Repository, similar to DR backup. For example, copy every third generation of an N2W backup to Storage Repository.
Define backup retention based on time and/or number of generations per Policy.
N2W stores backups in Storage Repository as block-level incremental backups.
Only one backup of a policy can be copied at a time. A copy operation must be completed before a copy of another backup in the same policy can start.
In addition, the Cleanup and Archive operations cannot start until the previous backup in the policy has completed.
When choosing a copy frequency, make sure that there will be enough time for one set of operations to complete before the next ones are scheduled to start.
Important:
Avoid changing the bucket settings after Repository creation, as this may cause unpredictable behavior.
AWS Encryption at the bucket-level must be enabled. Bucket versioning must be disabled, unless Immutable Backups is enabled. See section 21.2.1.
Bucket settings are only verified when a Repository is created in the bucket.
Strongly Recommended:
S3 buckets configured as a Storage Repository should not be used by other applications.
Before continuing, consider the following:
Backups of instances and volumes can be copied to any Storage Repository.
RDS backups can be exported to AWS Storage (S3) repositories but not to an Azure Storage Account repository.
N2W stores backups in Storage Repository as block-level incremental backups.
Most N2W operations related to the Storage Repository (e.g., writing objects to S3, clean up, restoring, etc.) are performed by launching N2W worker instances in AWS. The worker instances are terminated when their tasks are completed.
21.1.1 Limitations
Only the copy of instances, independent volumes, and RDS backups is supported.
Copy to Storage Repository is supported for weekly and monthly backup frequencies only. Daily backup copies to Storage Account are not supported.
Copy is not supported for other AWS resources that N2W supports, such as Aurora.
Snapshots consisting of ‘AMI-only’ cannot be copied to a Storage Repository.
Due to AWS service restrictions in some regions, the root volume of instances purchased from Amazon Marketplace, such as instances with product code, may be excluded from Copy to Storage Repository. The data volumes of such instances, if they exist, will be copied.
Backup records that were copied to Storage Repository cannot be moved to the Freezer.
A separate N2W server, for example, one with a different “CPM Cloud Protection Manager Data” volume, cannot reconnect to an existing Storage Repository.
To use the Copy to Storage Repository functionality, the
cpmdatapolicy must be enabled. See section 4.2.1 for details on enabling thecpmdatapolicy.Due to the incremental nature of the snapshots, only one backup of a policy can be copied to Storage at any given time. Additional executions of Copy to S3 backups will not occur if the previous execution is still running. Restore from S3 is always possible unless the backup itself is being cleaned up.
AWS accounts have a default limit to the number of instances that can be launched. Copy to Storage launches extra instances as part of its operation and may fail if the AWS quota is reached. See AWS for details.
Copy and Restore of volumes to/from regions different from where the S3 bucket resides or to an Azure Storage Account repository may incur long delays and additional bandwidth charges.
Instance names may not contain slashes (/) or backslashes (\) or the copy will fail.
S3 Sync operation may time out and fail if copy operation takes more than 12 hours.
21.1.2 Cost Considerations
N2W Software has the following recommendations to N2W customers for help lowering transfer fees and storage costs:
When an ‘N2WSWorker’ instance is using a public IP (or NAT/IGW within a VPC) to access an S3 bucket within the same region/account, it results in network transfer fees.
Using a VPC endpoint instead will enable instances to use their private IP to communicate with resources of other services within the AWS network, such as S3, without the cost of network transfer fees.
For further information on how to configure N2W with a VPC endpoint, see section Appendix A.
21.1.3 Overview of Storage Repository and N2W
The Copy to Storage Repository feature is similar in many ways to the N2W Disaster Recovery (DR) feature. When Copy to Storage Repository is enabled for a policy, copying EBS snapshot data to the repository begins at the completion of the EBS backup, similar to the way DR works. Copy to Storage Repository can be used simultaneously with the DR feature.
21.1.4 Storing RDS Databases in AWS Storage (S3) Repositories
N2W can store certain RDS databases in an AWS S3 Repository. This capability relies on the AWS ‘Export Snapshot’ capability, which converts the data stored in the database to Parquet format and stores the results in an S3 bucket. In addition to the data export, N2W stores the database schema, as well as data related to the database’s users. This combined data set allows complete recovery of both the database structure and data.
RDS databases cannot be stored in Azure Storage Account Repository.
21.1.5 Workflow for Using S3 with N2W
Define a Storage Repository.
Define a Policy with a Schedule, as usual.
Configure the policy to include copy to Storage repository by selecting the Lifecycle Management tab. Turn on the Use Storage Repository toggle, and complete the parameters.
If you are going to back up and restore instances and volumes not residing in the same region and/or not belonging to the same account as the N2W server, prepare a Worker using the Worker Configuration tab. See section 22.
Use the Backup Monitor and Recovery Monitor, with additional controls, to track the progress of operations on a Storage Repository.
21.1.6 Workflow for Copying RDS to S3
In AWS, create an Export Role with required permissions. See section 21.4.1.
In N2W, define an AWS Storage (S3) Repository. See section 21.2.2.
In N2W, add required permissions to user. See https://n2ws.zendesk.com/hc/en-us/articles/28878303166365--AWS-Read-Only-user-for-RDS-to-S3-feature
For each RDS server included in the policy, select the target, select
 Configure, and then complete the required parameters.
Prepare a Worker using the Worker Configuration tab. See section 22.
21.2 The Storage Repository
For an Azure Storage Account Repository, also see section 26.5.
For a Wasabi Repository, also see section 27.2.
21.2.1 Immutable Backups
AWS Storage (S3) Repositories offer an option to protect the data stored in the bucket against deletion or alteration using S3 Object Locks. There are 2 types of locks available:
Legal Hold is put on each object upon creation, remaining in place until explicitly removed. Protected objects can’t be deleted or modified while the lock exists.
During Cleanup, the server identifies objects to be deleted and removes their locks before deleting them.
Usage of Object Locks will slightly increase total cost, because there is an additional cost associated with putting and removing the locks and with the handling of object versions.
Compliance Lock is put on an object for a pre-defined duration, preventing deletion or alteration of the protected object until the lock expires.
Because it is not possible to remove a compliance lock before expiration, the expected lifespan of a locked object must be known in advance. Therefore, it’s only possible to use Compliance Lock with policies whose retention is specified in terms of duration (time-based retention) and not generations.
Because snapshots are incrementally stored in S3, objects created by one snapshot are often re-used by later snapshots, thus extending their original lifespan. When this happens, the lock duration of the objects is automatically extended.
There is an additional cost involved with creation and extension of the locks.
When Compliance Lock is enabled for a repository, it’s not possible to delete snapshots stored in that repository before their pre-defined expiration, as determined by the retention rule that existed when the snapshot was stored in the repository.
21.2.1.1 Prerequisites for Enabling Immutable Backups
To use the Immutable Backup option, an S3 bucket must be created with the following requirements:
The S3 bucket containing the repository must be created with the Object Lock option enabled.
Versioning must be enabled.
The bucket must be encrypted.
The bucket Default retention must be disabled.
AWS does not support enabling this option for an existing bucket, so it is not possible to enable Immutable Backup for existing repositories.
21.2.2 Configuring an AWS Storage (S3) Repository
The cpmdata policy must exist before configuring an AWS Storage (S3) Repository.
There can be multiple repositories in a single AWS S3 bucket.
AWS encryption must have been enabled for the bucket.
Versioning must be disabled if Immutable Backup is not enabled.
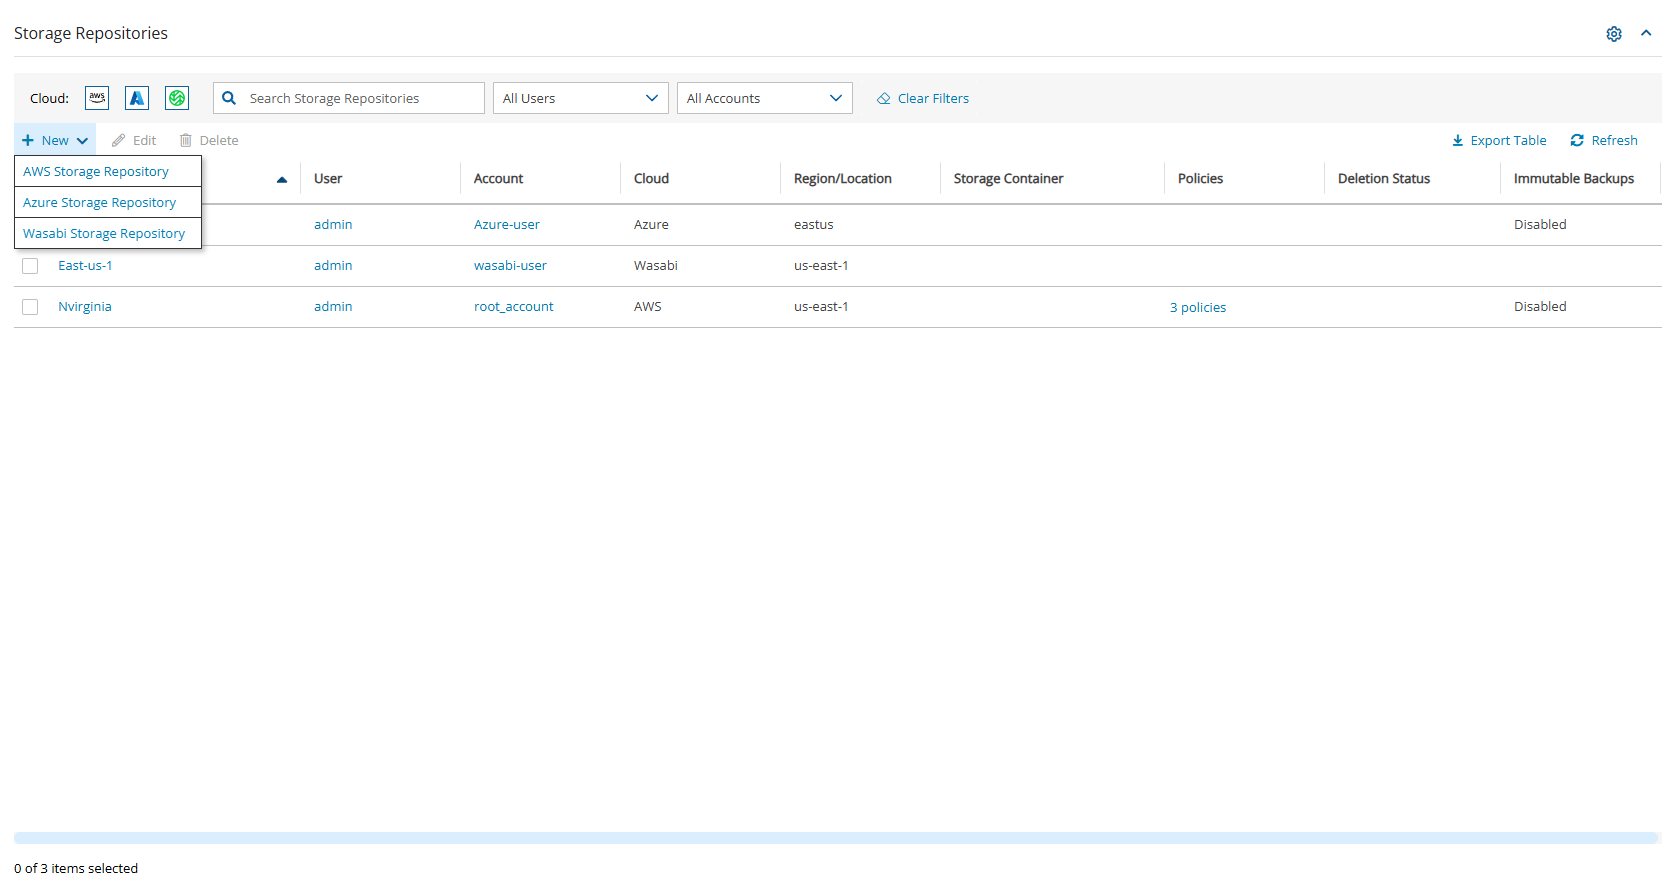
In N2W, select the AWS Storage Repositories tab.
In the
 New menu, select AWS Storage Repository.
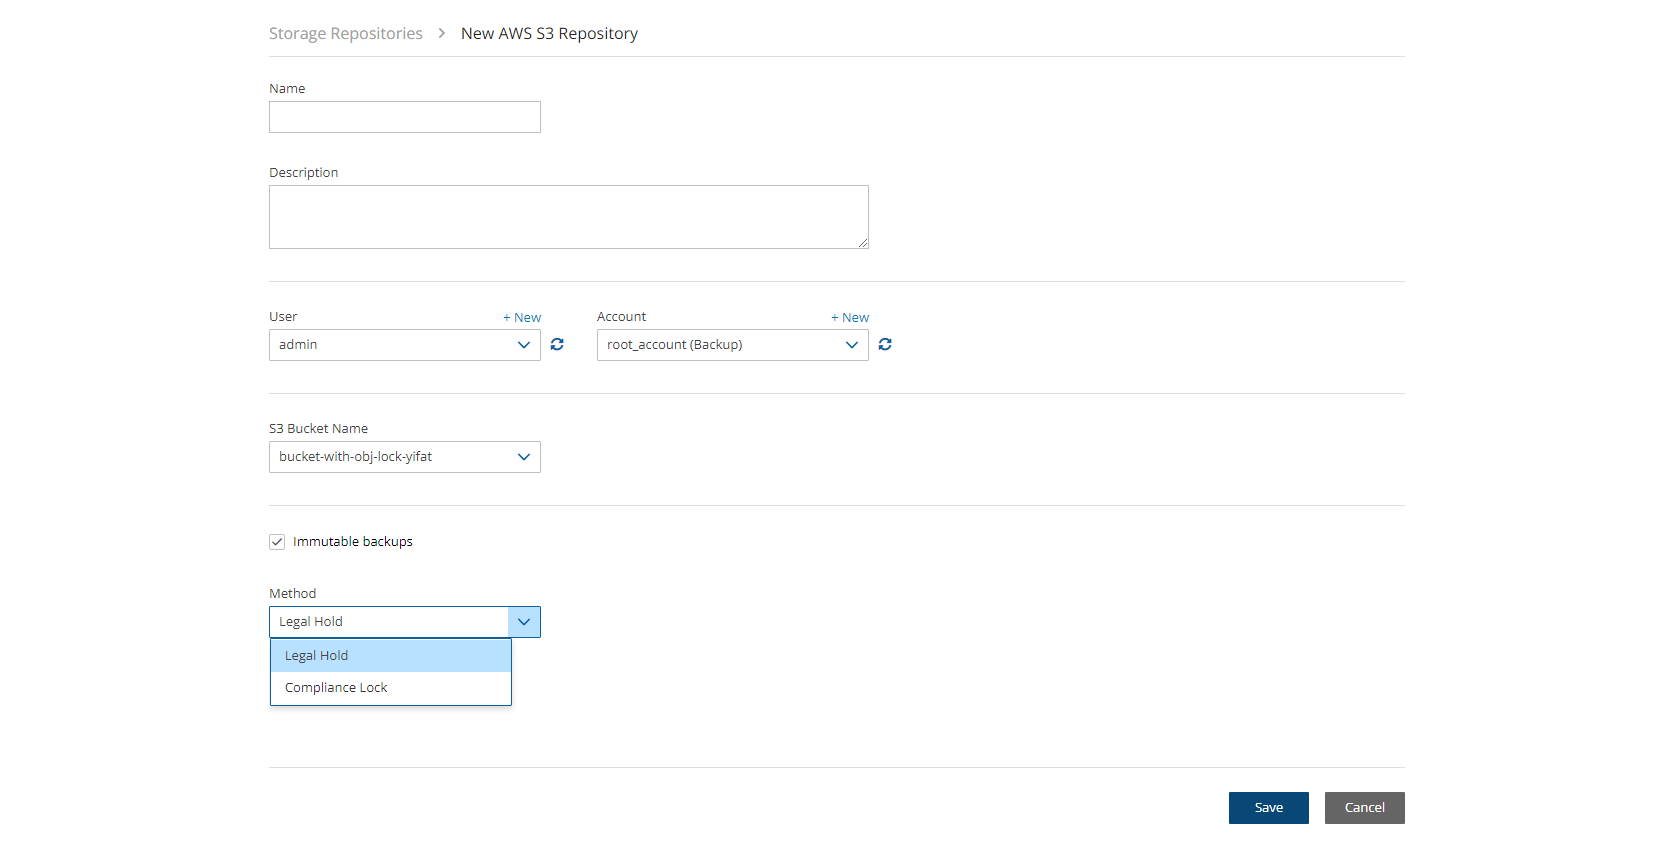
In the Storage Repositories screen, complete the following fields, and select Save when finished.
Name - Type a unique name for the new repository, which will also be used as a folder name in the AWS bucket. Only alphanumeric characters and the underscore are allowed.
Description - Optional brief description of the contents of the repository.
User – Select the user in the list.
Account - Select the account that has access to the S3 bucket.
S3 Bucket Name - Type the name of the S3 bucket. The region is provided by the S3 Bucket.
Immutable Backup - Select to enable data protection by S3 Object Locks, and then choose Legal Hold or Compliance Lock in the Method list.
21.2.3 Deleting an AWS Storage (S3) Repository
You can delete all snapshots copied to a specific AWS S3 repository.
Deleting a repository is not possible when the repository is used by a policy. You must change any policy using the repository to a different repository before the repository can be deleted.
Select the Storage Repositories tab.
Use the Cloud buttons to display the AWS Storage Repositories.
Select a repository.
Select
 Delete.
Deleting a large number of objects from an S3 bucket may take up to several hours, especially if Immutable Backup is enabled. A notification alert is created when the deletions have completed.
21.2.4 Running a Storage Repository Cleanup Manually
N2W allows you to manually trigger a storage repository cleanup operation for one or more backup policies. This feature enables immediate execution of lifecycle operations without waiting for the scheduled cleanup cycle.
Overview
The Run Storage Repository Cleanup process performs the following storage repository lifecycle operations on demand:
Identifies and removes expired backup data from a storage repository (AWS S3, Azure Storage Account, or Wasabi) based on the policy's retention settings.
For AWS policies with Glacier archiving enabled, identifies and moves eligible expired backups to S3 Glacier or S3 Glacier Deep Archive before cleanup.
As part of cleanup, removes expired backup data from the storage repository based on retention settings.
Manual cleanup is useful when you need to:
Free up storage space immediately.
Trigger lifecycle operations before a scheduled maintenance window.
Verify that lifecycle operations are working correctly.
Prerequisites
Before running storage repository cleanup, ensure the following:
The policy has S3 Repository (AWS), Storage Account (Azure), or Wasabi Repository enabled.
The policy contains backups in the storage repository.
You have appropriate permissions to manage the policy.
To run storage repository cleanup for one or more policies:
In the main navigation menu, select Policies.
Select one or more policies from the policies list.
You can select multiple policies to run cleanup as a batch operation.
3. In the toolbar, select Run Storage Repository Cleanup.

4. To confirm and run, select Run Cleanup.

21.3 The Lifecycle Policy
To keep transfer fee costs down when using Copy to S3, create an S3 endpoint in the worker's VPC.
21.3.1 Configuring a Lifecycle Policy for Backup to Storage Repository
Configuring a Lifecycle Policy for Copy to Storage repository includes definitions for the following:
Name of the Storage Repository defined in N2W.
Interval of AWS snapshots to copy.
Snapshot retention policy.
Selecting the Delete original snapshots option minimizes the time that N2W holds any backup data in the snapshots service. N2W achieves that by deleting any snapshot immediately after copying it to S3.
If Delete original snapshots is enabled, snapshots are deleted regardless of whether the copy to Storage Repository operation succeeded or failed.
It is possible to retain a backup based on both time and number of generations copied. If both Time Retention (Keep backups in Storage Repository for at least x time) and Generation Retention (Keep backups in Storage Repository for at least x generations) are enabled, both constraints must be met before old snapshots are deleted or moved to Glacier, if enabled.
For example, when the automatic cleanup runs:
If Time Retention is enabled for 7 days and Generation Retention is disabled, snapshots older than 7 days are deleted or archived.
If Run ASAP is executed 10 times in one day, none of the snapshots would be deleted until they are more than 7 days old.
If Generation Retention is enabled for 4 and Time Retention is disabled, the 4 most recent snapshots are saved.
If Time Retention is enabled for 7 days and Generation Retention is enabled for 4 generations, a single snapshot would be deleted, or archived, after 7 days if the number of generations had reached 5.
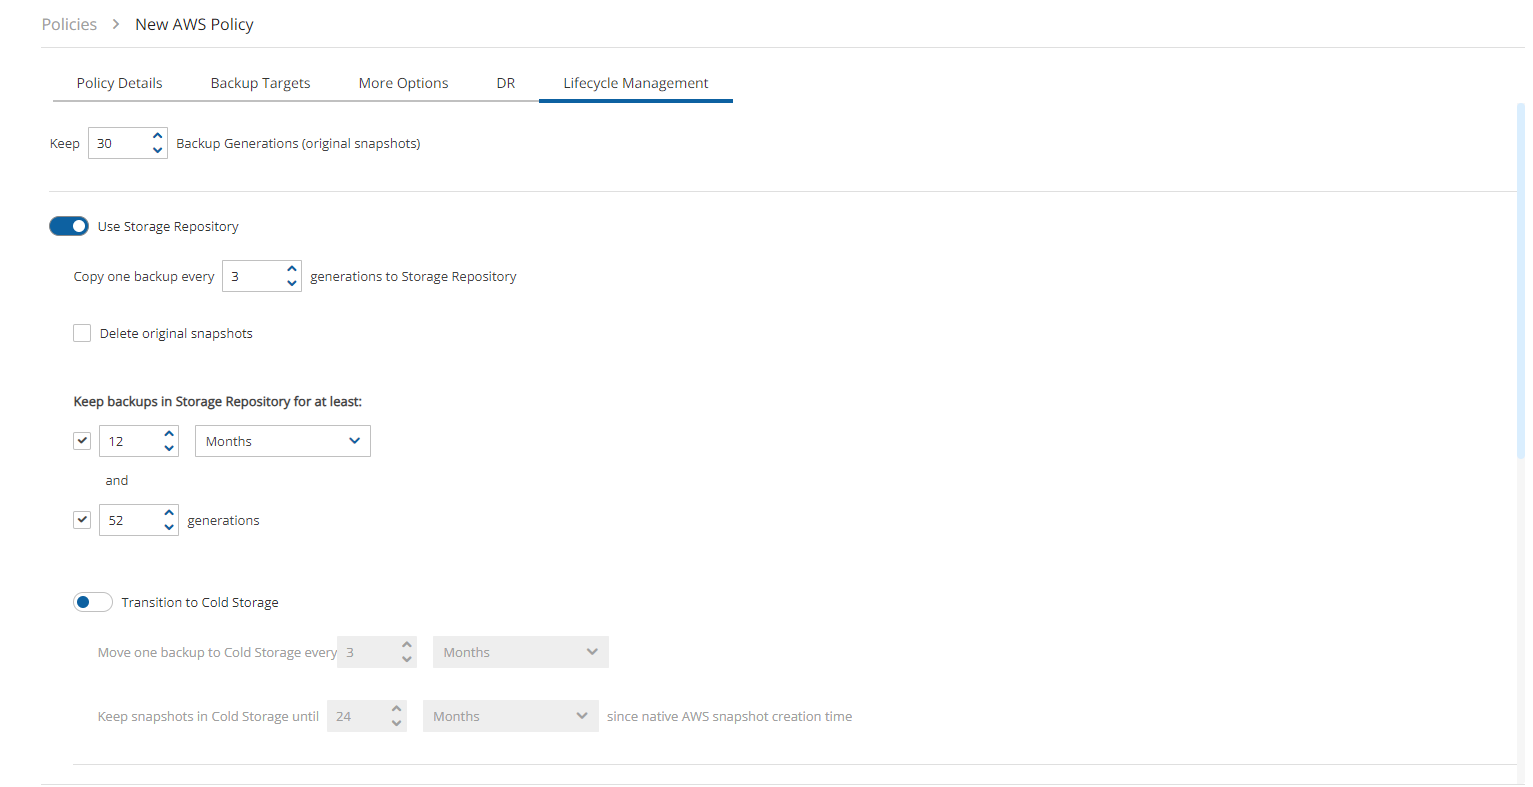
In the left panel, select the Policies tab.
Select a Policy, and then select
 Edit.
Edit.Select the Lifecycle Management tab.
Select the number of Backup Generations (original snapshots) to keep in the list.
Complete the following fields:
Use Storage Repository – By default, Use Storage Repository is disabled. Turn the toggle on to enable.
Store snapshots in Storage Repository is based on the following settings:
Delete original snapshots
If selected, N2W will automatically set the Copy one backup every n generations to Storage Repository to 1 and will delete snapshots after performing the copy to Storage Repository operation.
When enabled, snapshots are deleted regardless of whether the Copy to Storage repository operation succeeded or failed.
Copy one backup every n generations to Storage Repository – Select the maximum number of backup snapshot generations to keep. This number is automatically set to 1 if you opted to Delete original snapshots after attempting to store in Storage Repository.
In the Keep backups in Storage Repository for at least lists, select the duration and/or number of backup generations to keep.
To Transition to Cold Storage, see section 21.5.
In the Storage settings section, choose the following parameters:
Select the Target repository, or select
 New to define a new repository. If you define a new repository, select
  Refresh before selecting.
Choose an Immediate Access Storage class that meets your needs:
Standard - (Frequent Access) for Frequent access and backups.
Infrequent Access - For data that is accessed less frequently.
Intelligent Tiering - Automatic cost optimization for S3 copy. Intelligent Tiering incorporates the Standard (Frequent Access) and Infrequent Access tiers. It monitors access patterns and moves objects that have not been accessed for 30 consecutive days to the Infrequent Access tier. If the data is subsequently accessed, it is automatically moved back to the Frequent Access tier.
Glacier Instant Retrieve - Slightly more expensive than Glacier Flexible Retrieve (formerly known simply as Glacier) but allows for much faster retrieval and recovery.
For complete information, https://aws.amazon.com/s3/storage-classes/.
If Transition to Cold Storage (Glacier) is enabled, select the Archive Storage class.
Select Save.
Storage Class charges:
S3 Infrequent Access and Intelligent Tiering have minimum storage duration charges.
S3 Infrequent Access has a per GB retrieval fee.
For complete information, refer to AWS S3 documentation.
21.3.2 Recovering from Storage Repository
You can recover a backup from Storage Repository to the same or different regions and accounts.
If you Recover Volumes Only, you can:
Select volumes and Explore folders and files for recovery.
Explore fails on non-supported file systems. See section 13.1.
Define Attach Behavior
Define the AWS Credentials for access
Configure a Worker in the Worker Configuration tab.
Clone a VPC
If you recover an Instance, you can specify the recovery encryption key:
If Use Default Volume Encryption Keys is enabled, the recovered volumes will have the default key of each encrypted volume.
If Use Default Volume Encryption Keys is disabled, all encrypted volumes will be recovered with the same key that was selected in the Encryption Key list.
‘Marked for deletion’ snapshots can no longer be recovered.
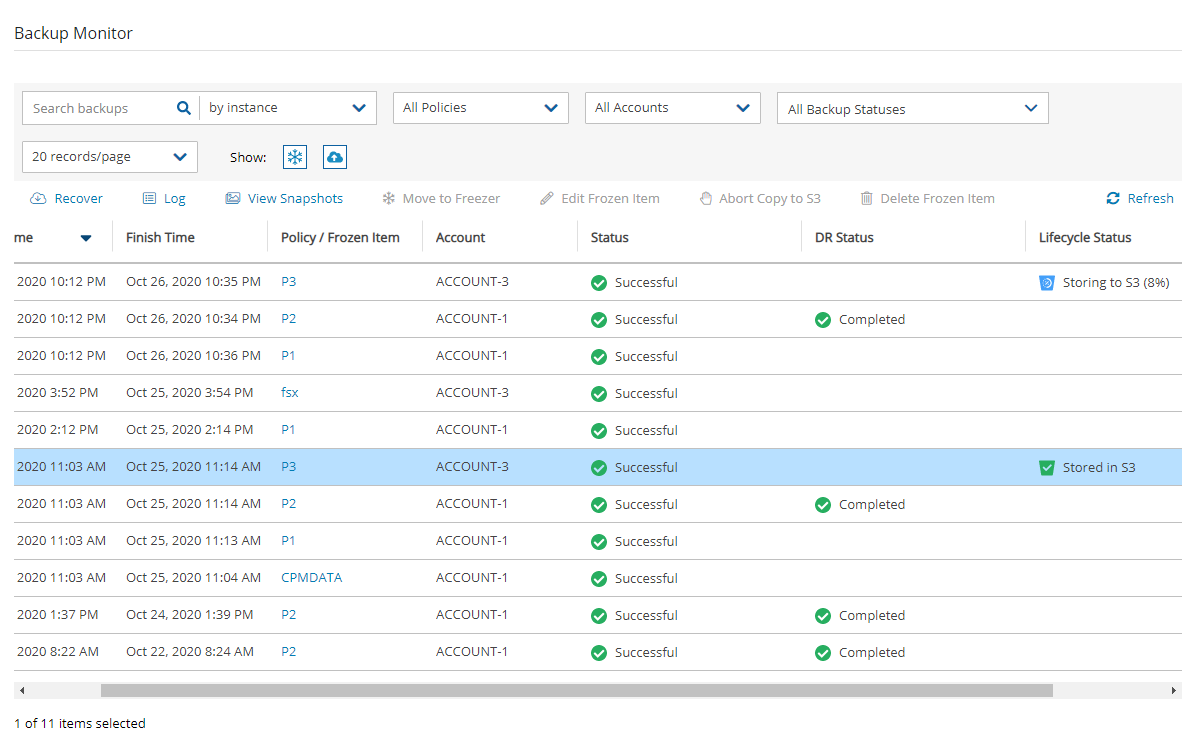
To recover a backup from Storage repository:
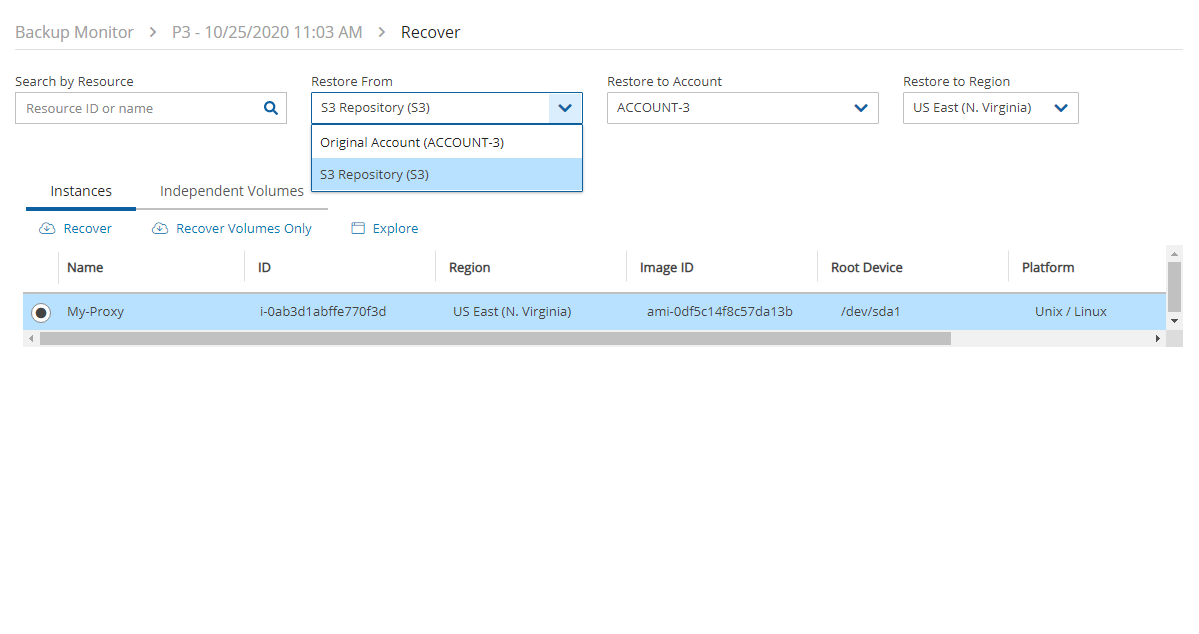
In the Backup Monitor tab, select a relevant backup that as a Lifecycle Status of 'Stored in Storage Repository', and then select
 Recover.
In the Restore from drop-down list of the Recover screen, select the name of the Storage Repository to recover from. If you have multiple N2W accounts defined, you can choose a different target account to recover to.
In the Restore to Region drop-down list, select the Region to restore to.
5. To follow the progress of the recovery, select Open Recovery Monitor in the ‘Recovery started’ message ![]() at the top right corner, or select the Recovery Monitor tab.
at the top right corner, or select the Recovery Monitor tab.
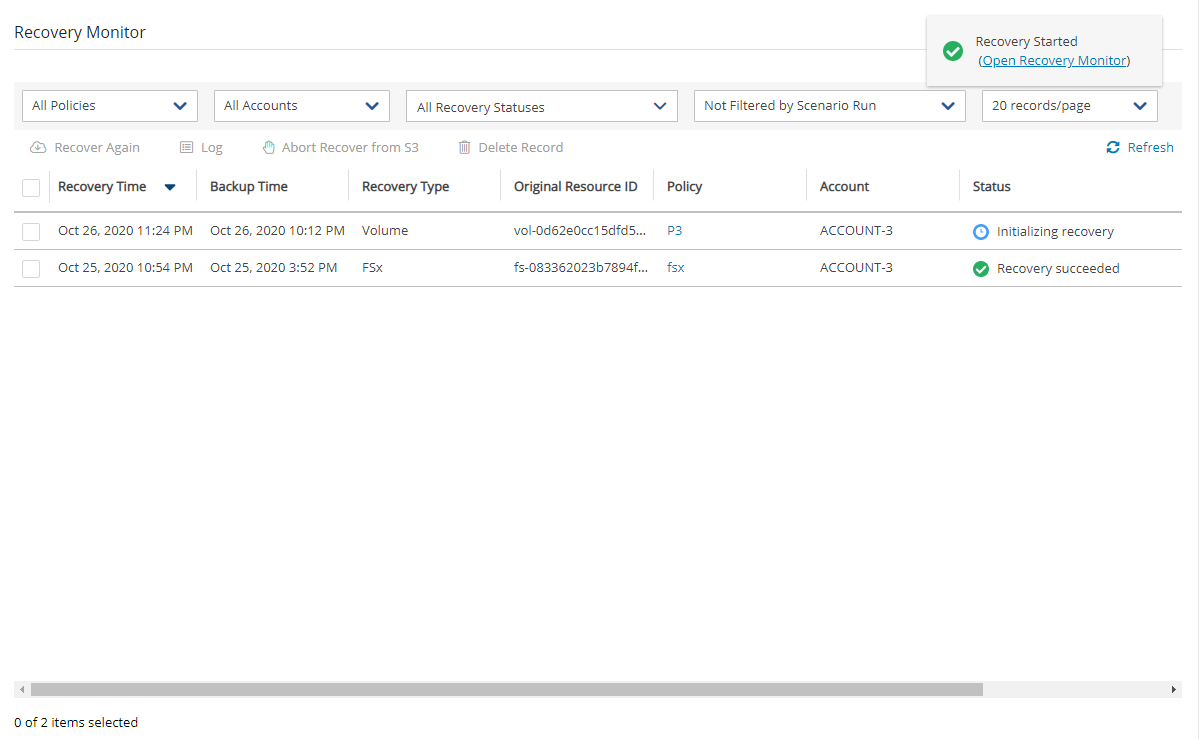
To abort a recovery in progress, in the Recovery Monitor, select the recovery item and then select ![]() Abort Recover from S3.
Abort Recover from S3.
21.3.3 Forcing a Single Full Copy
By default, Copy to Storage Repository is performed incrementally for data modified since the previous snapshot was stored. However, you can force a copy of the full data for a single iteration to your Storage Repository. While configuring the Backup Targets for a policy with Copy to Storage Repository, select Force a single full Copy. See section 4.2.3.
This option is only available for Copy to S3.
21.3.4 Changing the Storage Repository Retention Rules for a Policy
You can set different retention rules in each Policy.
To update the Storage Repository retention rules for a policy:
In the Policies column, select the target policy.
Select the Lifecycle Management tab.
Update the Keep backups in Storage Repository for at least lists for time and generations, as described in section 21.3, and select Save.
21.4 The Copy RDS to S3 Policy
N2W strongly advises that before deleting any original snapshots, you perform a test recovery and verification of the recovered data/schema.
Backups are always full to enable fast restores.
Limitations:
RDS snapshots can only be exported to an AWS S3 repository, not to an Azure Storage Account repository.
Exporting RDS databases to S3 is currently not supported by AWS for Osaka and GOV regions.
Default encryption keys for RDS export tasks are not supported.
RDS Export to S3 is currently not supporting Shared CMK encryption keys.
Currently, only MySQL and PostgreSQL databases are supported for copying RDS to S3.
RDS Export to S3 is supported for databases residing in the same region where the S3 bucket is located.
AWS export Parquet format might change some data, such as date-time.
AWS does not support RDS export with stored procedure triggers.
Magnetic storage type export is not supported.
21.4.1 Configuring an AWS Export Role
In the AWS IAM Management Console, select Roles and then select Create role.
For the type of trusted entity, select AWS service.
In the Create role section, select the type of trusted entity: AWS service.

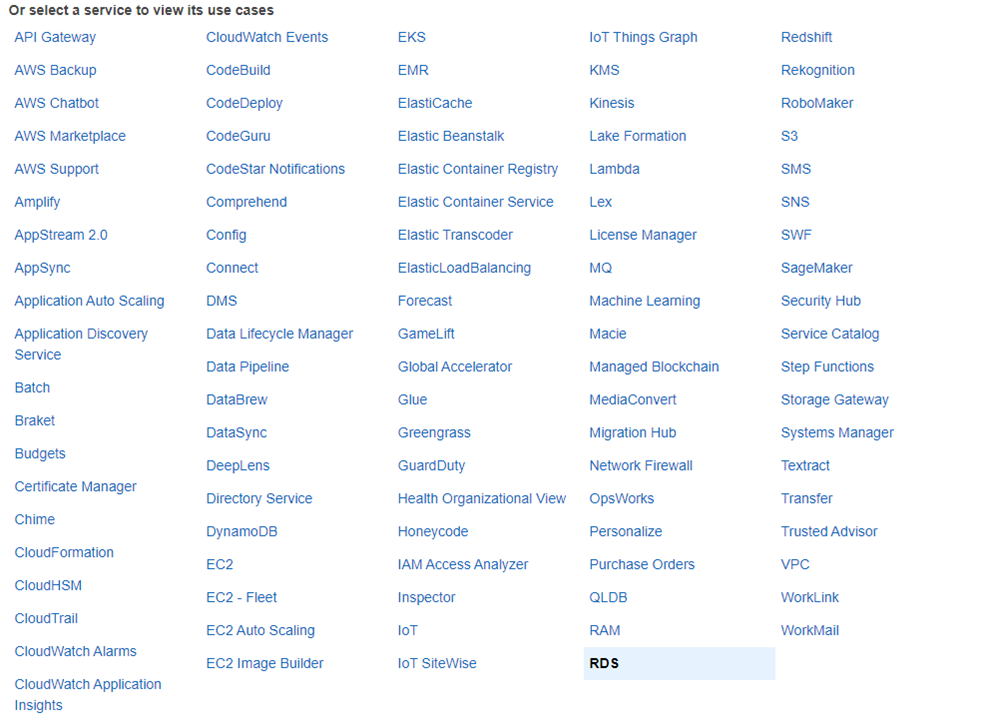
4. In the Choose a use case section, select RDS.
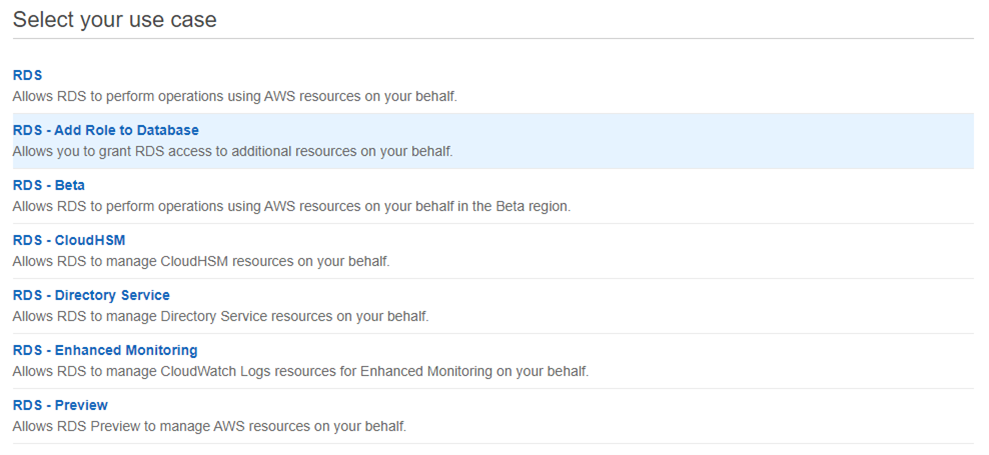
5. To add the role to the RDS database, in the Select your use case section, select RDS - Add Role to Database.
6. In the Review screen, enter a name for the role and select Create policy. 7. Create a policy and add the following permissions to the JSON:
8. After saving the role, in the Trust relationships tab: a. Select Edit trust relationship.
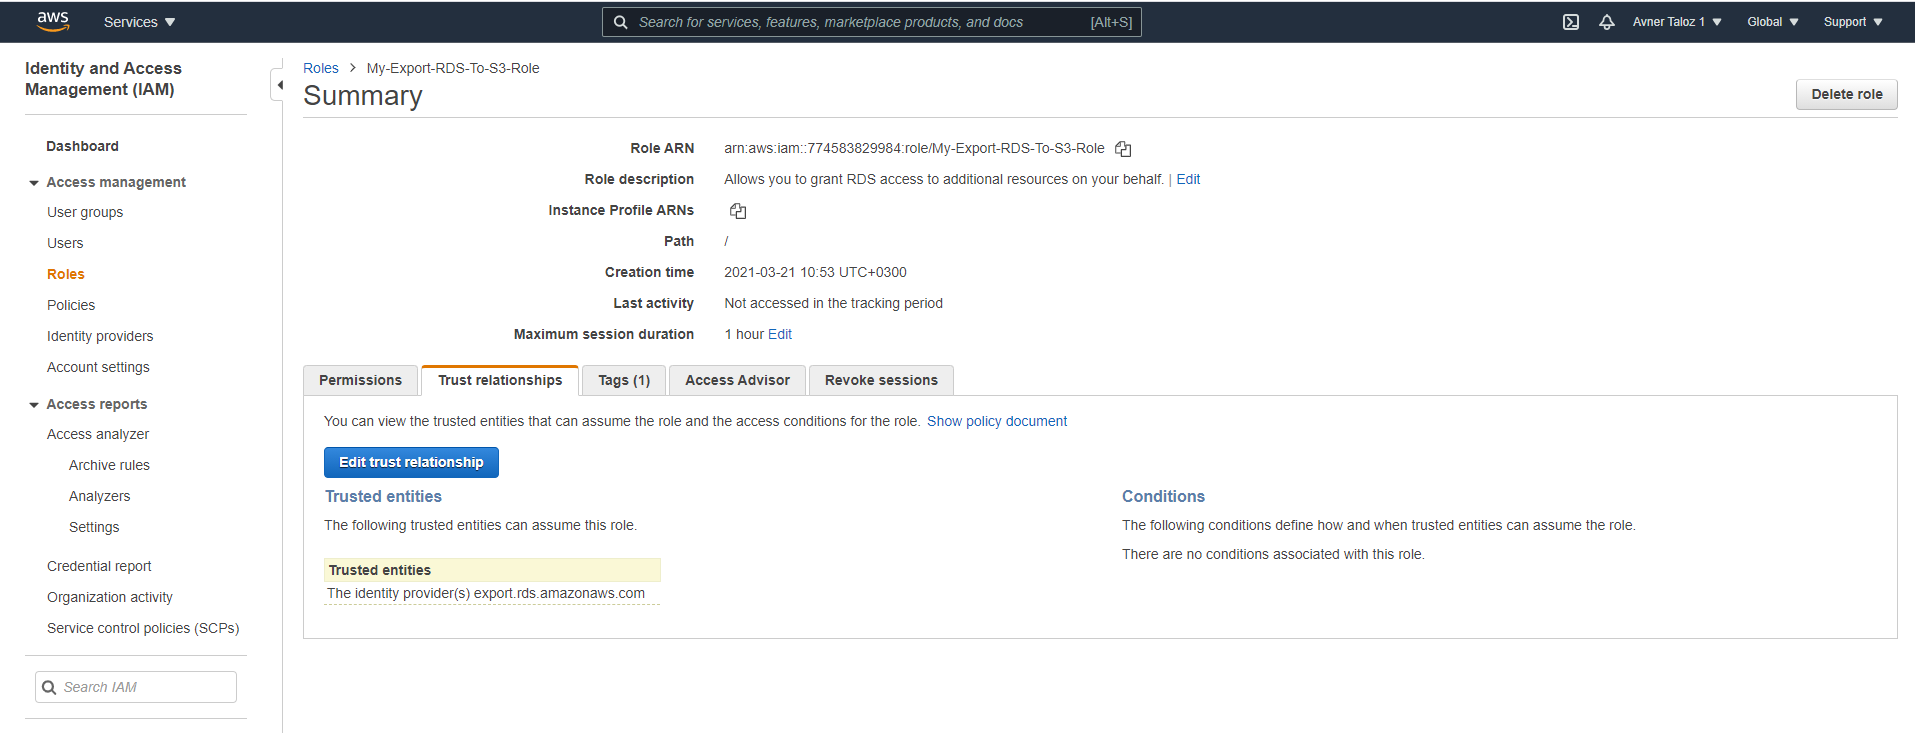
b. Edit the Trust Relationship.
If there are multiple trust relationships, the code must be exactly as follows or the role will not appear in the Export Role list.
9. To the CPM role policy, add the following required permissions under Sid "CopyToS3":
rds:StartExportTaskrds:DescribeExportTasksrds:CancelExportTask
If you want to use the CPM role as the ExportRDS role, you can use the CPM Role Minimal Permissions and also add the Trust Relationship. For AWS: https://n2ws.zendesk.com/hc/en-us/articles/33252616725533--4-5-0-Required-Minimum-AWS-permissions-for-N2W-operations For Azure: https://n2ws.zendesk.com/hc/en-us/articles/33252710830109--4-5-0-Required-Minimum-Azure-permissions-for-N2W-operations
21.4.2 Creating an N2W Policy to Copy RDS
Create a regular S3 policy as described in section 21.3.1, and select the RDS Database as the Backup Target.
The RDS Database security group must allow the default ports, or any non-default port the database is using, in the inbound rules.
Connection parameters are required and must be valid for backup. If not specified, the database will not be copied to S3.
2. In the Lifecycle Management tab: a. Turn on the Use Storage Repository toggle. b. In the Storage settings section, select the Target repository. c. Select Enable RDS Copy to S3 Storage Repository. d. In the Export Role list, select the AWS export role that you created. e. In the Export KMS Key list, select an export KMS encryption key for the role.
The custom ARN KMS key must be on the same AWS account and region.
f. Select Save.
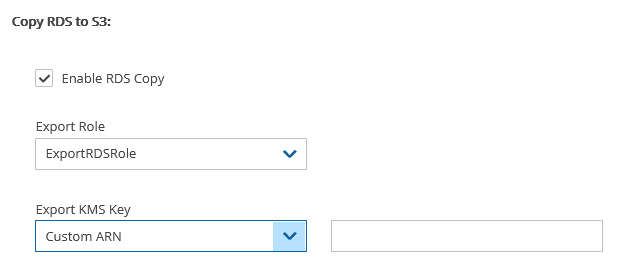
Only roles that include the export RDS Trusted Service, as created in section 21.4.1, are shown in the Export Role list.
3. In the Backup Targets tab, select the RDS Database, and then select![]() Configure.
Configure.
The policy can be saved without the complete configuration, but the copy will fail if the configuration is not completed before the policy runs.
If the target is added using a tag scan, the User name, Password, and Worker Configuration must be added manually afterward.
If the configuration is left blank, the target will not be copied, and a warning will appear in the backup log.
The username and password configured are for read-only access.
4. In the Policy RDS Copy to S3 Configuration screen, enter the following: 1. In the Database Credentials section, enter the database User name and Password. 2. Complete the Worker Configuration section.
If the database is private, you must choose a VPC and subnet that will allow the worker to connect to the database.
3. Select Apply.
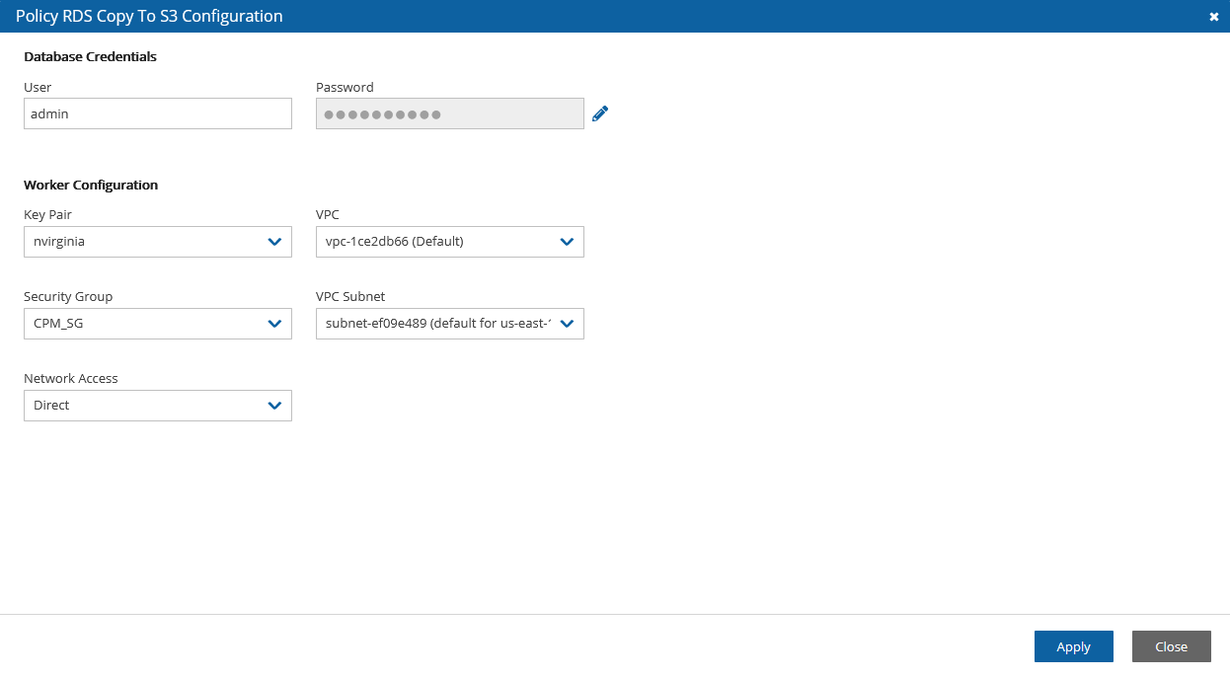
21.4.3 Recovering RDS from S3
When recovering RDS to a different subnet group or VPC, verify that the source AZ also exists in the recovery target. If not, the recovery will fail with an invalid zone exception.
When recovering RDS from an original snapshot, using a different VPC and a subnet group that does not have a subnet in the target AZ, the recovery will also fail.
To recover an RDS database from S3:
In the Backup Monitor, select a backup and then select Recover.
In the Recover screen, select a database and then select Recover.
In the Basic Options tab, modify default values as necessary. Take into consideration any identified issues such as changing AZ, subnet, or VPC.
Select the Worker Configuration tab within the Recover screen.
Modify Worker values as necessary, making sure that the VPC, Security Group, and VPC Subnet values exist in the recovery target.
Select Recover RDS Database.
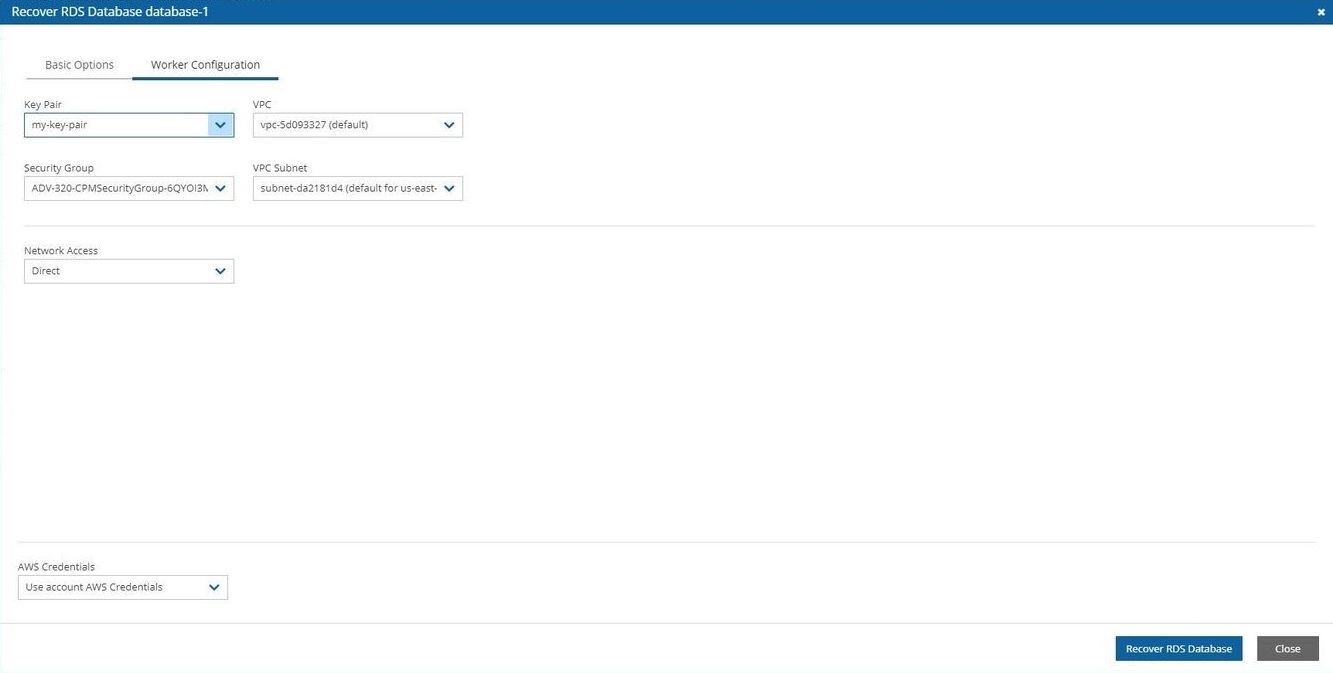
Follow the recovery process in the Recovery Monitor.
21.5 Archiving Data to Cold Storage
21.5.1 Archiving Snapshots to S3 Glacier
Amazon S3 Glacier and S3 Glacier Deep Archive provide comprehensive security and compliance capabilities that can help meet regulatory requirements, as well as durable and extremely low-cost data archiving and long-term backup.
N2W allows customers to use the Amazon Glacier low-cost cloud storage service for data with longer retrieval times.
N2W can now backup your data to a cold data cloud service on Amazon Glacier by moving infrequently accessed data to archival storage to save money on storage costs.
S3 is a better fit than AWS' Glacier storage where the customer requires regular or immediate access to data.
Use Amazon S3 if you need low latency or frequent access to your data.
Use Amazon S3 Glacier if low storage cost is paramount, you do not require millisecond access to your data, and you need to keep the data for a decade or more.
21.5.2 Pricing
Following are some of the highlights of the Amazon pricing for Glacier:
Amazon charges per gigabyte (GB) of data stored per month on Glacier.
Objects that are archived to S3 Glacier and S3 Glacier Deep Archive have a minimum of 90 days and 180 days of storage, respectively.
Objects deleted before 90 days and 180 days incur a pro-rated charge equal to the storage charge for the remaining days.
For more information about S3 Glacier pricing, refer to sections ‘S3 Intelligent – Tiering’ / ‘S3 Standard-Infrequent Access’ / ‘S3 One Zone - Infrequent Access’ / ’S3 Glacier’ / ’S3 Glacier Deep Archive’ at https://aws.amazon.com/s3/pricing/
21.5.3 Configuring a Policy to Archive to Cold Storage
To configure archiving backups to Cold Storage:
From the left panel, in the Policies tab, select a Policy and then select
 Edit.
Edit.Select the Lifecycle Management tab. See section 21.3.
Follow the instructions for backup to Storage Repository. See section 21.3.1.
Turn on the Transition to Cold Storage toggle.
Complete the following parameters:
Move one backup to Cold Storage every X period – Select the time interval between archived backups. Use this option to reduce the number of backups as they are moved to long-term storage (archived). If a backup stored in a Storage Repository has reached its expiration (as defined by the Retention rules) and the interval between its creation time and that of the most recently archived backup is below the specified Interval period, the backup will be deleted from the repository and not archived.
Keep snapshots in Cold Storage until X since native AWS snapshot creation time – Select how long to keep data in Cold Storage.
If storing to an AWS S3 repository, select the Archive Storage class:
Glacier - Designed for archival data that will be rarely, if ever, accessed.
Deep Archive - Solution for storing archive data that only will be accessed in rare circumstances.
The duration is measured from the creation of the original snapshot, not the time of archiving.
21.5.4 Recovering Snapshots from Cold Storage
Archived snapshots cannot be recovered directly from Cold Storage. The data must first be copied to a 'hot tier' (‘retrieved’) before it can be accessed.
Once retrieved, objects will remain in the hot tier for the period specified by the Days to keep option. If the same snapshot is recovered again during this period, retrieved objects will be re-used and will not need to be retrieved again. However, attempting to recover the same snapshot again while the first recovery is still in the ‘retrieve’ stage will fail. Wait for the retrieval of objects to complete before attempting to recover again.
The process of retrieving data from a cold to hot tier is automatically and seamlessly managed by N2W. However, to recover an archived snapshot, the user should specify the following parameters:
Retrieval tier
Days to keep
Duration and cost of Instance recovery are determined by the retrieval tier selected. In AWS, depending on the Retrieval option selected, the retrieve operation completes in:
Expedited - 1-5 minutes
Standard - 3-5 hours
Bulk - 5-12 hours
A typical instance backup that N2W stores in a Storage Repository is composed of many data objects and will probably take much longer than a few minutes.
To restore data from S3 Glacier:
Follow the steps for Recovering from Storage Repository. See section 21.3.2.
In the Backup Monitor, select a backup that was successfully archived, and then select
 Recover.
In the Restore from drop-down list, select the Repository where the data is stored.
In the Restore to Region list, select the target region.
Select the resource to recover and then select Recover.
Review and update the Resource Parameters as needed for recovery.
In the Archive Retrieve tab, select a Retrieval tier (Bulk, Standard, or Expedited), Days to keep, and then select Recover. N2W will copy the data from Glacier to S3 and keep it for the specified period.
File-level recovery from archived snapshots is not possible.
21.6 Monitoring Lifecycle Activities
After a policy with backup to Storage repository starts, you can:
Follow its progress in the Status column of the Backup Monitor.
Abort the copy of snapshots to Storage Repository.
Stop Cleanup and Archive operations.
Delete snapshots from the Storage Repository.
21.6.1 Viewing Status of Backups in Storage Repository
You can view the progress and status of Copy to Storage Repository in the Backup Monitor.
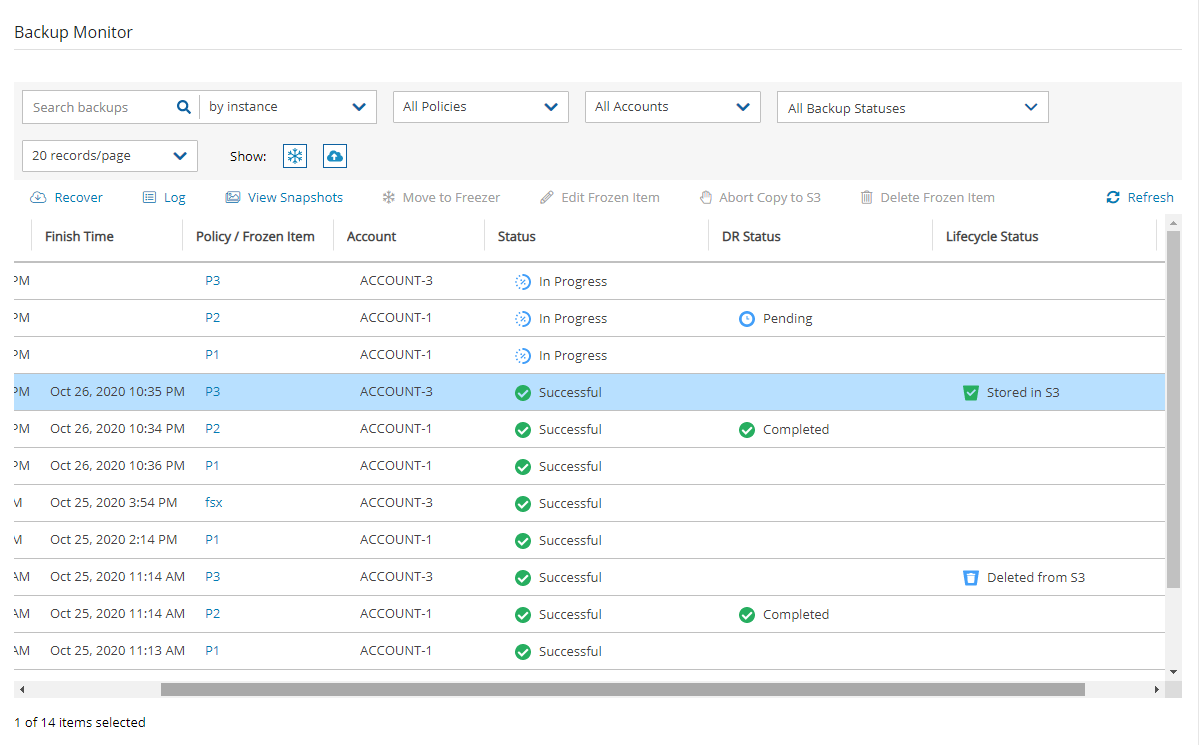
Select the Backup Monitor tab.
In the Lifecycle Status column, the real-time status of a Copy is shown. Possible lifecycle statuses include:
Storing to Storage Repository (n%)
Stored in Storage Repository
Not stored in Storage Repository – Operation failed or was aborted by user.
Archiving
Archived
Marked as archived – Some or all the snapshots of the backup were not successfully moved to Archive storage, either due to the user aborting the operation or an internal failure. However, the snapshots in the backup will be retained according to Archive retention policy, regardless of their actual storage.
Deleted from Storage Repository/Archive – Snapshots were successfully deleted from either Storage Repository or Archive. See section 21.5.4.
Retrieving
Marked for deletion – The backup was scheduled for deletion according to the retention policy and will be deleted shortly.
‘Marked for deletion’ snapshots can no longer be recovered.
21.6.2 Aborting a Copy ‘In Progress’
The Copy portion of a Policy backup occurs after the native backups have completed.
Aborting a Copy does not stop the native backup portion of the policy from completing. Only the Copy portion is stopped.
To stop a Copy in progress:
In the Backup Monitor, select the policy.
When the Lifecycle Status is ‘Storing to Storage Repository ...’, select
 Abort Copy to Storage Repository.
21.6.3 Stopping a Storage Repository Cleanup in Progress
If a Storage Repository Cleanup is ‘In progress’, in the Policies tab, select the policy, and then select ![]() Stop Lifecycle Operations to stop the Cleanup. See the Information in section 21 for the reasons you might want to stop the Storage Repository Cleanup.
Stop Lifecycle Operations to stop the Cleanup. See the Information in section 21 for the reasons you might want to stop the Storage Repository Cleanup.
Stopping Storage Repository Cleanup does not stop the native snapshot cleanup portion of the policy from completing. Only the Storage Repository cleanup portion is stopped.
Stopping Storage Repository Cleanup of a policy containing several instances will stop the cleanup process for a policy as follows:
N2W will perform the cleanup of the current instance according to its retention policy.
N2W will terminate all Storage Repository Cleanups for the remainder of the instances in the policy.
N2W will set the session status to Aborted.
N2W user will get a ‘Storage Repository Cleanup of your policy aborted by user’ notification by email.
To stop a Storage Repository Cleanup in progress:
Determine when the Storage Repository/Archiving is taking place by going to the Backup Monitor
Select the policy and then select
 Log.
Log.When the log indicates the start of the Cleanup, select
 Stop Lifecycle Operations.
21.6.4 Deleting a Repository
To delete a repository and all backups stored in it:
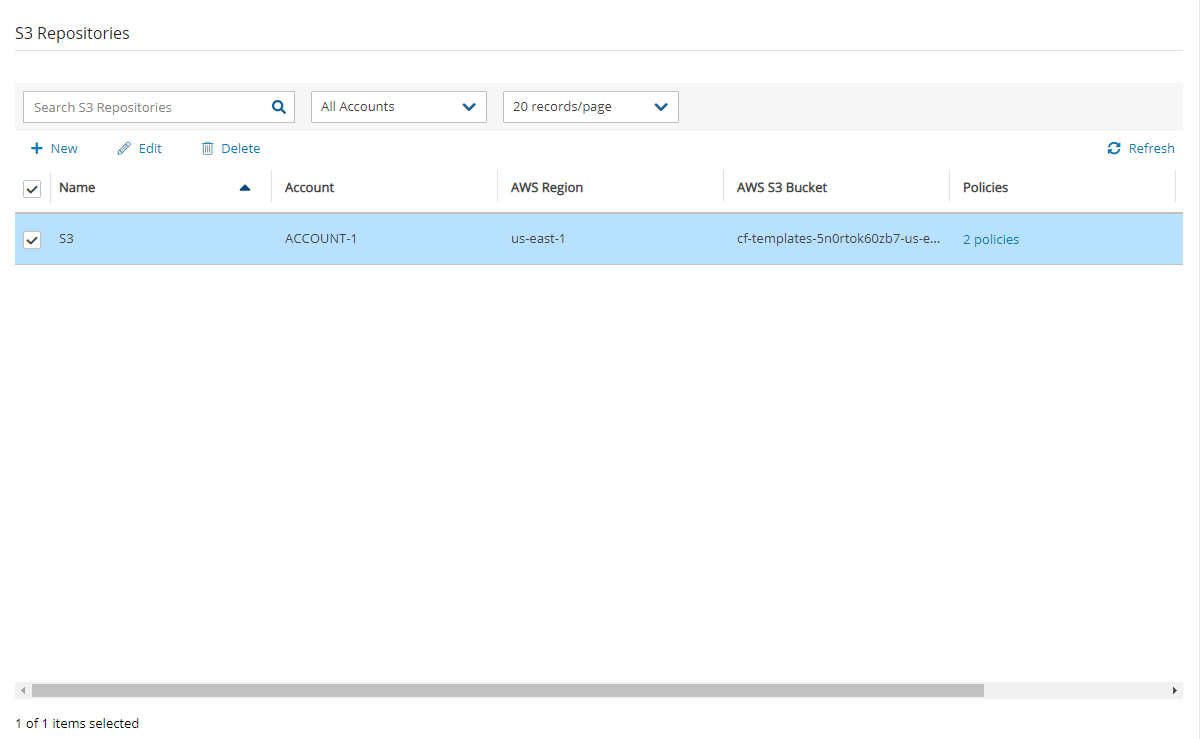
In the Storage Repositories tab, select AWS Cloud.
Select a repository, and then select
 Delete.
Last updated
Was this helpful?

