17 Alerts, Announcements, Notifications, and Reporting
N2W provides many ways to communicate with you about the status and state of your resources and operations.
N2W manages the backup operations of your EC2 servers and Azure Virtual Machines. To notify you when something is wrong and to integrate with your other cloud operations, N2W allows sending alerts, notifications, and even raw reporting data. And when something is not wrong, N2W can send you an announcement of interest, such as a new feature or money-saving promotion.
So, if you have a network operations center (NOC), are using external monitoring tools or just want an email to be sent to the system administrator whenever a failure occurs, N2W has an answer for that.
Report types include:
Audit
AWS Backups
AWS Protected Resources
AWS Resource Control Operations
AWS Snapshots
AWS Resources Summary (PDF) of regular, DR, and S3 Backups, Volume Usage Percentage, and other metrics
AWS Usage
AWS Unprotected Resources (Scheduled Report only)
Azure Backups
Azure Protected Resources
Azure Resources Summary Report (PDF) of regular, DR, S3 Backups, Volume Usage Percentage, and other metrics
All tables have an Export Table reporting option on the right side of the action toolbar. See section 3.7 for details.
17.1 Alerts
Alerts are notifications about issues in your N2W backup solution. Whenever a policy fails, in backup or DR, an alert is issued so you will know this policy is not functioning properly. If there are current alerts, Alerts ![]() in the toolbar has a number to show you how many there are. Select Alerts
in the toolbar has a number to show you how many there are. Select Alerts ![]() to open the Alerts list.
to open the Alerts list.
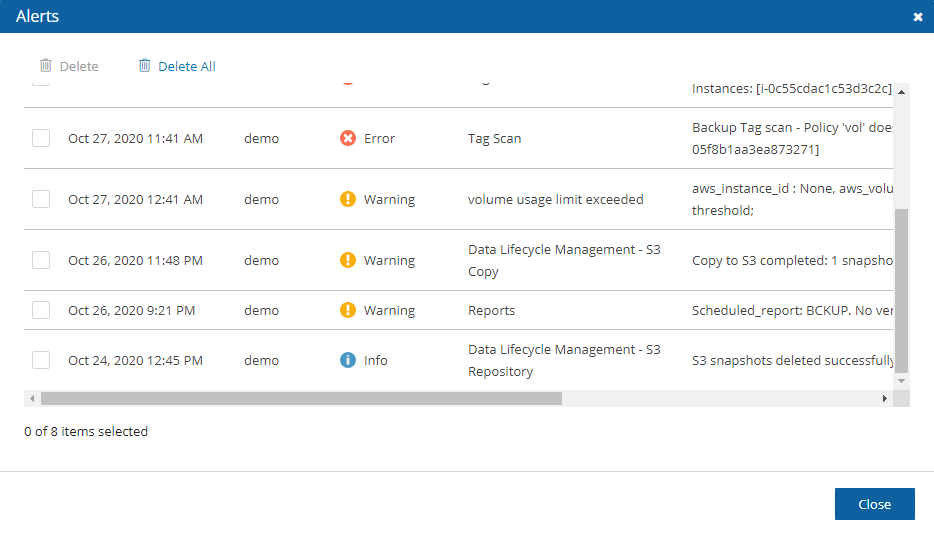
Later, when the policy succeeds, the alert is turned off or deleted, so you will know that the issue is resolved. Alerts can be issued for failures in backup and DR, as well as general system issues like license expiration, for relevant installations.
Depending on the resolution of the output device, a list of Alerts is automatically shown under the Dashboard. The Dashboard list shows the same information except for an abbreviated message and is grouped by functional categories, such as Backup and Resource Control.
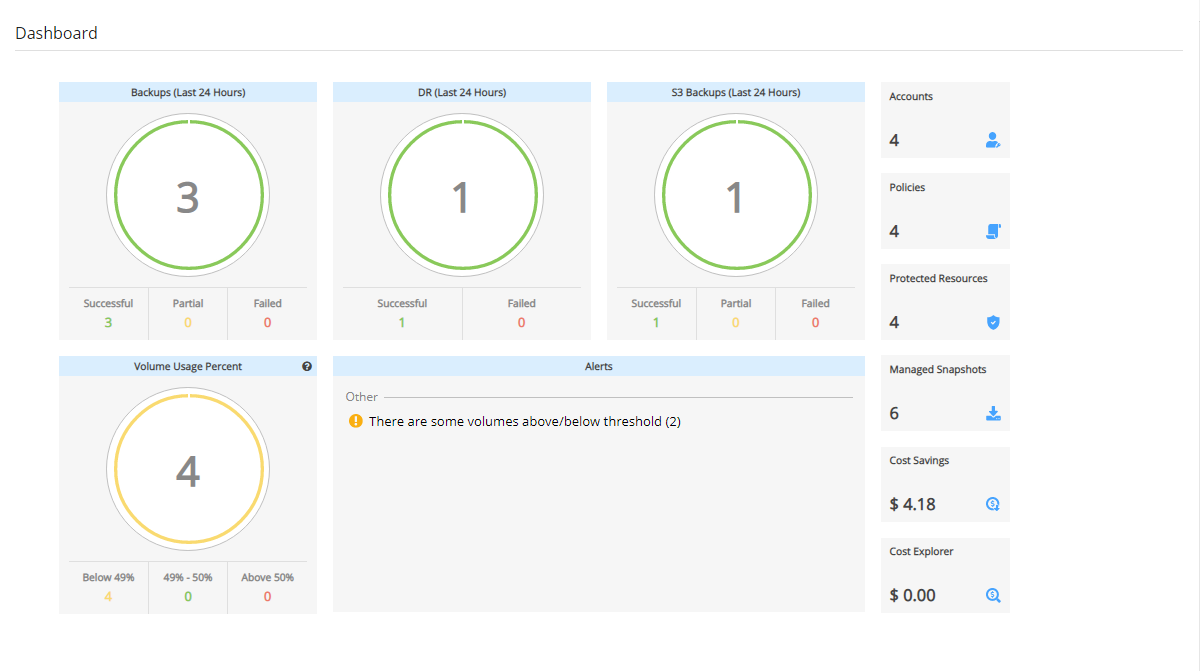
You can manage the number of Alerts shown by selecting alerts to remove in the toolbar Alerts list and then selecting ![]() Delete.
Delete.
17.2 Pull Alerts
If you wish to integrate N2W with 3rd party monitoring solutions, N2W allows API access to pull alerts out of N2W. A monitoring solution can call this API to check if N2W has alerts. When calling this API, the caller receives the current alerts in JSON format. The call is an HTTPS call, and if you configured the N2W server to use an alternate port (not 443), you will need to use that port for this API call as well. N2W requires an authentication key from the caller. Every N2W user can define such a key to get the relevant alerts. The root user can also get relevant alerts from other managed users, but not from independent users.
To configure an API call:
In the toolbar, select Settings in the User menu.
In the User Settings panel, select the API Access tab.
To enable access and generate an Authentication Key:
Select API Access.
To generate a new Authentication Key and invalidate the current, select Generate API Authentication Key.
Select Save.
After enabling and setting the key, you can use the API call to get all alerts:
https://{{host}}/api/alerts

A simple example in Python is:
The JSON response is a list of alert objects, each containing the following fields:
category
title
message_body
alert_time (time of the last failure)
policy
severity
17.3 Using SNS
N2W can also push alerts to notify you of any malfunction or issue via SNS. To use it, your account needs to have SNS enabled. SNS can send push requests via email, HTTP/S, SQS, and depending on location, SMS.
With SNS you create a topic, and for each topic, there can be multiple subscribers and multiple protocols. Every time a notification is published to a topic, all subscribers get notified. For more information about SNS, see https://aws.amazon.com/sns/.
N2W can create the SNS topic for you and subscribe to the user email defined in the configuration phase. To add subscribers, go to the SNS Dashboard in the AWS Management console), add a recipient, and choose a protocol (SMS, HTTP, etc.), A link to this console is in the N2W notifications screen.
For the small volume of SNS messages N2W uses, there is usually no cost or it is negligible. For SNS pricing see https://aws.amazon.com/sns/pricing/.
17.3.1 Configuring SNS
To configure users for SNS:
In the toolbar, select Settings in the User menu
Select the Notifications tab in the User Settings panel.
For each of the boxes, select a value from its list.
Depending on the type of credentials selected in the Authenticate using box, you may be prompted with additional boxes:
CPM Instance IAM Role – Requires no additional selections.
Account – Select the Account name or add a new Account by selecting
 New.
New.IAM User Credentials – Enter the AWS Access and Secret keys.
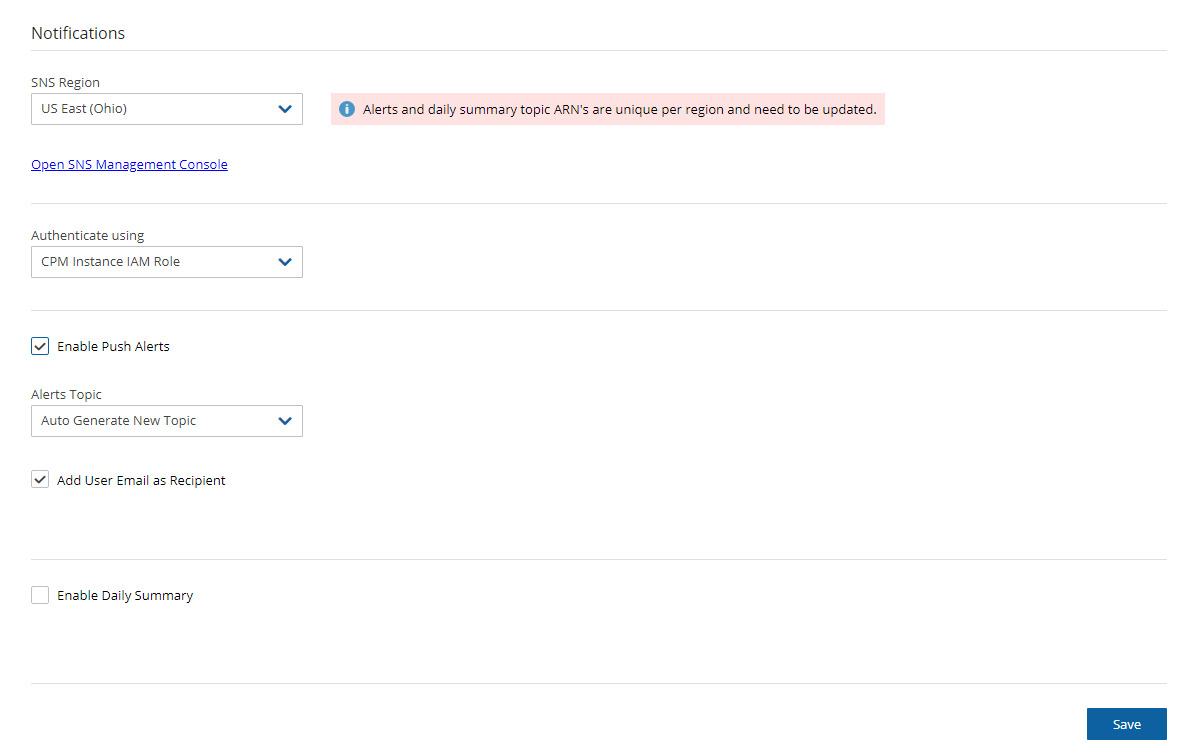
To use SNS:
You will need to enter AWS account credentials for the SNS service.
There is one notifications configuration per user, but there can be multiple AWS accounts, where applicable.
SNS credentials are not tied to any of the backed-up AWS accounts. You can choose a region, and enter credentials, which can be regular credentials, IAM user. See section 16.3. To use the N2W Server instance’s IAM role (only for the root user), type
use_iam_rolefor both access and secret keys.If you are the root (main) user, you can choose whether to include or exclude alerts about managed users. See section 18.2.
SNS is used both for push alerts and for sending a daily summary.
17.4 Push Alerts
Push alerts use SNS to send notifications about malfunctions and issues in N2W’s operation.
To enable push alerts:
In the Notifications tab of the User Settings panel, select Enable Push Alerts.
Define the Alerts Topic by selecting one of the following options in the list:
To create a new topic, select Auto Generate New Topic.
To use a current topic, select Use Existing Topic. Enter the name in the Alerts Topic Name box. Or, you can copy the topic’s ARN from the SNS tab of the AWS Management Console (Open SNS Management Console).
To have the user also receive the alert as an email, select Add User Email as Recipient. The recipient will receive a message requesting subscription confirmation before receiving alerts.
To see which SNS topic the Alerts is currently configured to use, select Use Existing Topic in the Alerts Topic list. The Summary Topic Full ARN will show the SNS topic. To check which email is configured for a topic, see the Topics and Subscriptions views under the SNS service in the AWS console.
17.5 Daily Summary
The Daily Alert Summary is a message that is sent once a day, summarizing all current alerts, and some policy warnings, in the system. It can be configured instead of, or in addition to, regular alerts. It can be useful for several reasons:
If you are experiencing issues frequently it sometimes reduces noise to get a daily summary. Furthermore, since backup is the second line of defense, some people feel they do not need to get an instant message on every backup issue that occurs.
Even if there are no issues, a daily summary is a reminder that everything is ok. If something happens and N2W crashed altogether, and your monitoring solution did not report it, you will notice the Daily Summary will stop.
The Daily Summary contains a list of policies that are disabled and policies that do not have schedules assigned to them. Although neither is an error, sometimes someone can accidentally leave a policy disabled or without a schedule and not realize that it is not working.
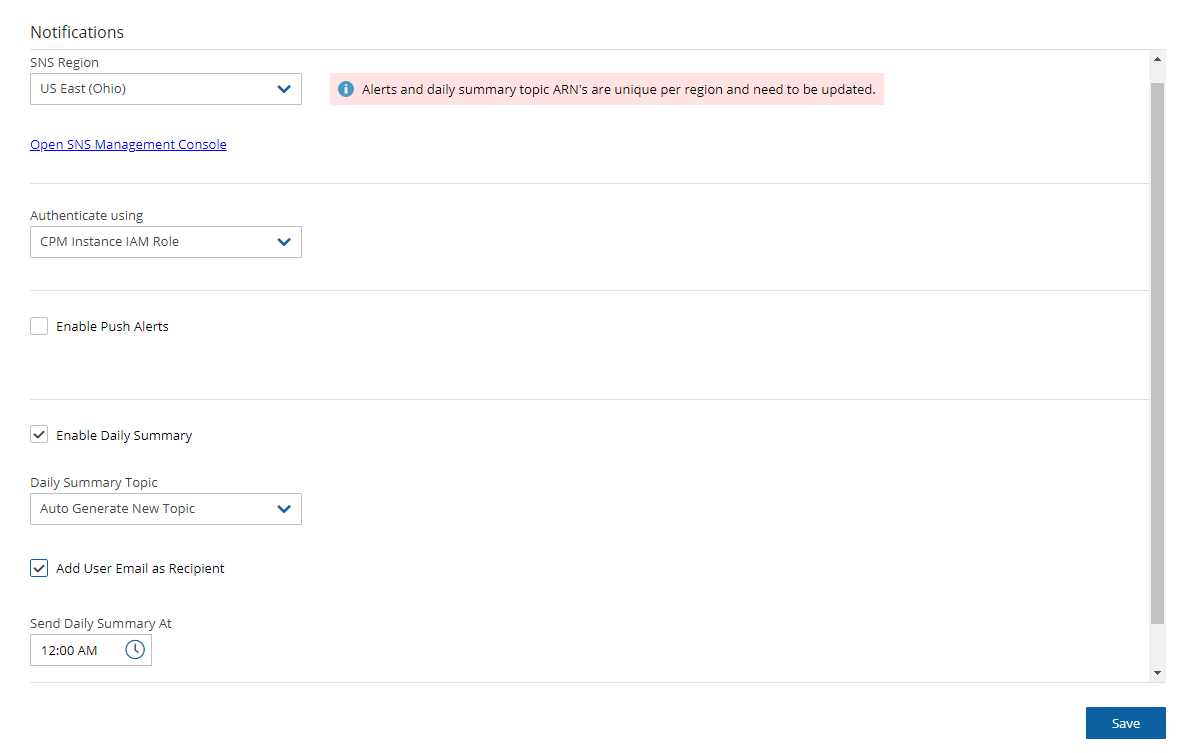
To configure the Daily Summary:
In the Notifications tab of the User Settings, select Enable Daily Summary.
Define the Daily Summary Topic by selecting one of the following options in the list:
If you want to use the Alert topic for summaries, select Use Existing Topic. Enter a Summary Topic Name.
To create a new topic, select Auto Generate New Topic.
To have the user also receive the summary as email, select Add User Email as Recipient.
In the Send Daily Summary At
 list, select the hour and minutes to send the notification.
Select Save.
To test the notification, select Test Daily Summary.
There is an advantage of using a separate topic since sometimes you want different recipients: It makes sense for a system admin to get alerts by SNS and to get the daily summary by email only. The display name of the topic appears in the message, and in emails, it appears as the sender name. With separate topics, it is easier to distinguish alerts.
To see which SNS topic the Daily Summary is currently configured to use, select Use Existing Topic in the Daily Summary Topic list. The Summary Topic Full ARN will show the SNS topic. To check which email is configured for a topic, see the Topics and Subscriptions views under the SNS service in the AWS console.
17.6 Resources Summary PDF Report
The new downloadable Summary PDF report for AWS and Azure accounts resembles the Dashboard in layout, except for the Alerts section, and provides historical data for the filtered period. The PDF includes Dashboard graphics and statistics:
Backups, with breakdowns for Successful, Partial, and Failed, for Backups, DR Backups, and S3 Backups
Volume Usage Percentage, with breakdowns below, within, and above usage thresholds
Statistics for Accounts, Policies, Protected Resources, Managed Snapshots, Cost Savings, and Cost Explorer
Filters are available for the Resources Summary report as follows:
AWS - User, and period.
Azure - User, account, and period.
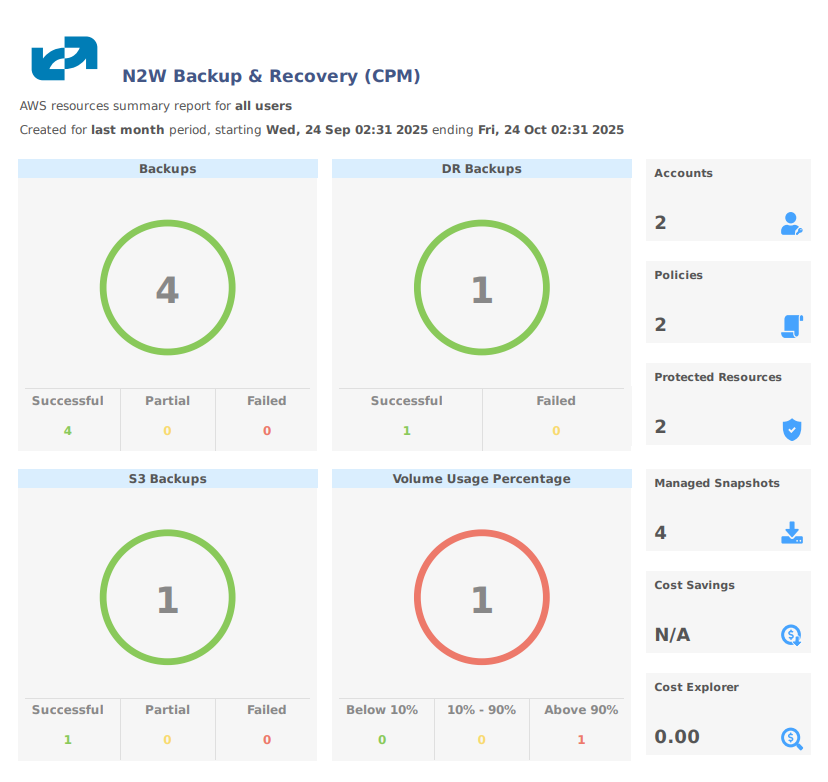
You can create the Summary PDF report as follows:
As a Scheduled Report - see section 17.10.1.
As an Immediate Report Generation - see section 17.10.3.
When using the REST API, see REST API/SCHEMA DOCS. Report time filters are:
period_type: ‘M’ | ’W’ for prior Months or Weeksperiod_length: number ofperiod_typeunits
17.7 Raw Reporting Data
You can download two raw data reports in CSV format (Comma Separated Values) for AWS and Azure. These reports are for the logged-in user. For the root user, they will include also data of other managed users. These reports include all the records in the database; you can filter or create graphic reports from them by loading them to a spreadsheet or reporting tool. The two reports combined give a complete picture of backups and snapshots taken by N2W.
To download the CSV reports:
In the left panel, select Reports.
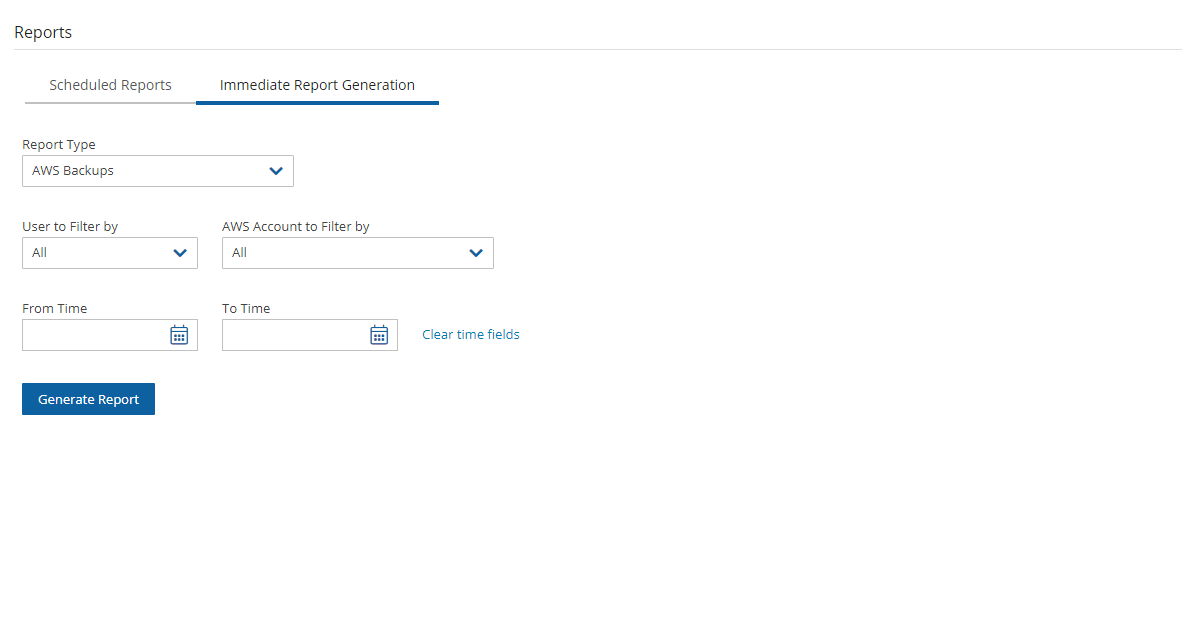
For the backup view, in the Report Type list, select AWS Backups or Azure Backups.
For the snapshot view, in the Report Type list, select AWS Snapshots or Azure Backups.
For further details on Scheduled Reports, see section 17.10.1.
Select
 Run Now.
17.7.1 Backup View CSV Report
This report will have a record for each backup (similar to the Backup Monitor) with details for each of the backups, including backups imported to S3.
AWS
Azure
Field / Description
X
X
Backup ID – A unique numerical ID representing the backup
X
X
Account – Name of the account if the system has multiple users and the user downloading the report is root.
X
AWS Account Number –ID of the AWS account.
X
Azure subscription id – ID of the Azure subscription.
X
X
Policy – Name of the policy.
X
X
Status – Status of the backup, the same as in the Backup Monitor.
X
DR Status – Status of DR, same as in the Backup Monitor.
X
S3 Copy Status – Status of a Copy to S3. If Import equals Yes, then backup was imported to S3.
X
Archive Status – Status of a Copy to Glacier Archive.
X
X
Start Time – Time the backup started.
X
X
End Time – Time the backup ended.
X
X
Is Retry – Yes if this backup was a retry after failure, otherwise no.
X
X
Marked for Deletion – Yes if this backup was marked for deletion. If yes, the backup no longer appears in the Backup Monitor and is not recoverable.
X
X
Deleted – Yes if the backup was deleted.
X
Import - Yes if the backup was imported to S3.
X
Expiration Time - Time retention ends in Start Time format.
X
DR Expiration Time - Time DR retention ends in Start Time format.
17.7.2 Snapshot View CSV Report
This report will have a record for each AWS EBS or RDS or Azure VM and Disk snapshot in the database.
Snapshots with the backup option ‘AMIs Only’ will be included in the Snapshot report, while ‘Snapshots with initial AMI’ will not be included.
AWS
Azure
Field / Description
X
X
Backup ID – ID of the backup the snapshot belongs to. Matches the same snapshots in the previous report
X
X
Account – Name of the account.
X
Snapshot Account – Name of snapshot account.
X
Snapshot AWS Account – Number of AWS snapshot account.
X
Azure Subscription ID – ID of the Azure Subscription.
X
X
Policy – Name of the policy.
X
X
Status – Status, such as ‘Backup Successful’ or ‘All Snapshots Deleted’.
X
Region – AWS region.
X
Location – Azure location.
X
X
Type – Type of snapshot.
· For AWS: EBS, RDS, or EBS Copy, which is a DR copied snapshot.
· For Azure: VM or Disk.
X
Volume/DB/Cluster – AWS ID of the backed-up EBS volume, RDS database, or cluster.
X
Volume/DB/Cluster Name – Name of backed-up volume, database, or cluster.
X
Instance – If this snapshot belongs to a backed-up EC2 instance, the value will be the AWS ID of that instance, otherwise it will contain the string: None
X
Instance Name – Name of the instance.
X
Backed Up Resource Id – ID of backed up resource.
X
Backed Up Resource Name – Name of backed-up resource.
X
Related VM ID – ID of related VM.
X
Related VM Name – Name of related VM.
X
Snapshot/Image ID - ID of the snapshot or image.
X
Snapshot ID – ID of the snapshot.
X
X
Succeeded – Yes or No.
X
X
Start Time – Time the snapshot started.
X
X
End Time – Time the snapshot ended.
X
X
Deleted At – Time of deletion, or N/A, if the snapshot was not deleted yet.
X
Import – Yes if the snapshot was imported to S3.
X
Lock Expiration Time - Time lock retention ends in Start Time format
Additional columns contain data for tracking changes in storage size for EBS and S3 copies:
AWS
Azure
Field / Description
X
Volume Size (GB) - Logical size of volume, as specified during creation or resizing.
X
Valid Data Size (GB) – Part of the volume that is allocated and used at the time of the snapshot. From this number, you can deduce volume utilization.
X
Changed Data Size (GB) – If the snapshot is incremental, and N2W can locate the previous snapshot, then this is the amount of data in the current snapshot that is different from the previous snapshot, i.e., the size of the incremental snapshot. If ‘Unknown’, the above conditions are not met. From this number, you can deduce the data change rate.
X
Disk Size (GB) – Size of disk.
17.7.3 Keeping Records After Deletion
By default, when a backup is marked for deletion, it will be deleted right away from the N2W database, and therefore not appear in the reports. There are exceptions, such as if N2W could not delete all the snapshots in a backup (e.g., a snapshot is included in an AMI and cannot be deleted). Sometimes you need to save records for a period after they were marked for deletion for compliance, such as General Certificate of Conformity (GCC). To keep records after deletion, see section 9.4.
17.8 AWS Usage Reports
In addition to the raw reports, you can also download AWS CSV usage reports. A usage report for a user will give the number of AWS accounts, instance, and non-instance storage this user is using. This can be helpful for inter-user accounting.
In the left panel, select the Reports tab.
For the usage report (current user), select AWS Usage in the Report Type list and your username in the User list.
To get the usage report (all users) for the root user, select AWS Usage in the Report Type list and All in the User list.
Select
 Run Now.
The columns for the N2WS_aws_usage_summary_report are as follows:
Date – Date of report. Each line represents a different day.
User ID – N2W user ID. Users are defined in ‘Users’ settings tab.
User Name - N2W user Name. Users are defined in ‘Users’ settings tab.
Num Instances – number of unique backed up instances.
Independent Volumes (GiB) – Number of GIBs of unique backed up volumes.
RDS Databases (GiB) – Number of GIBs of unique backed up RDS DBs.
Number of Controlled Entities - Number of unique entities controlled by Resource Control.
Redshift Clusters (GiB) - Number of GIBs of unique backed up Redshift Clusters.
DynamoDB (GiB) - Number of GIBs of unique backed up DDBs.
Number of Elastic File Systems (EFS) - Number of unique backed up EFS).
EFS (GiB) - Number of GIBs of unique backed up EFSs.
Number of FSx systems - Number of unique backed up FSxs.
FSX (GiB) - Number of GIBs of unique backed up FSxs.
Total Non-Instance Storage (GiB) - Number of GIBs of unique resources excluding instance volumes and including independent volume GiBs, GiBs of all DB types, FSx GiBs, EFS GiBs, and SAP Hana GiBs.
Number of instances in DR policies – Number of unique instances in policies with DR enabled.
Number of instances in S3 policies – Number of unique instances in policies that Copy to S3 Repository.
Scanning Tags – True if the N2W uses the periodical ‘scanning tags’.
Capturing VPCs – True if the N2W uses the periodical ‘Capture networks’.
Number of Policies using AWS Immutable Lock – Number of policies with ‘enable immutable lock’ flag enabled.
17.9 Protected Resources and AWS Unprotected Resources Reports
The AWS and Azure protected reports provide information about AWS and Azure resources with backup protection. The unprotected resources report is available for AWS accounts only.
In the left panel, select the Reports tab.
For AWS accounts, select AWS Unprotected or Protected Resources in the Report Type list.
For Azure accounts, select Azure Protected Resources in the Report Type list.
For the current user, select your username in the User list.
For the root user, to get all users, select All in the User list
Select
 Run Now.
When you are notified that the report has completed, check your Downloads folder.
AWS resources that are tagged with key:’cpm backup’ or 'cpm_backup', value:’no-backup’ will be ignored. Also, see section 14.1.5.
17.9.1 Protected Resources
The protected resources report contains information about AWS resources with backup policies.
Account / Azure Account
User Name (on all user reports)
Resource ID
Resource Name
Region (AWS) / Location (Azure)
Polices / Azure Policies
Schedules
Resource Type (Azure)
The protected resources report is available immediately for the current user or all users depending on the account type.
The protected resources report is also available as a Scheduled Report. See section 17.10.1.
17.9.2 AWS Unprotected Resources
The AWS unprotected resources report is available as a Scheduled Report only and contains information about the AWS resources that do not have backup policies.
Resource Type
Name of resource
Resource ID
Region
Partial
Account
User
Count of number of unprotected resources per resource type.
17.10 Reports Page
All Reports are accessible from the Reports tab in the left panel.
The reports will be available in your Downloads folder. Reports are for the logged-in user. For the root user, the reports will also include the data of other managed users.
17.10.1 Scheduled Reports
Scheduled Reports allow you to create a schedule for each report. To receive a Scheduled Report, configure at least one recipient email address and the SES service for that email. See section 18.7.
You can run reports outside of a schedule and create ad hoc reports for download:
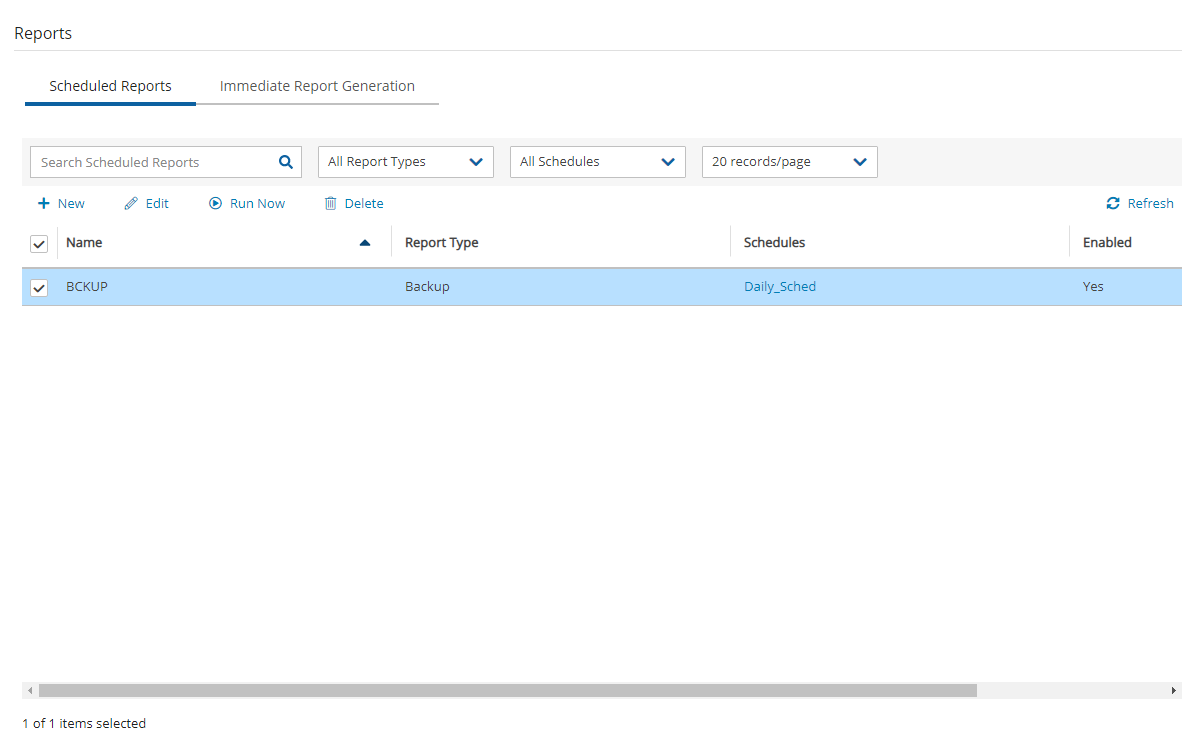
In the Scheduled Reports tab, Run Now generates a defined Scheduled Report and sends emails to its recipients.
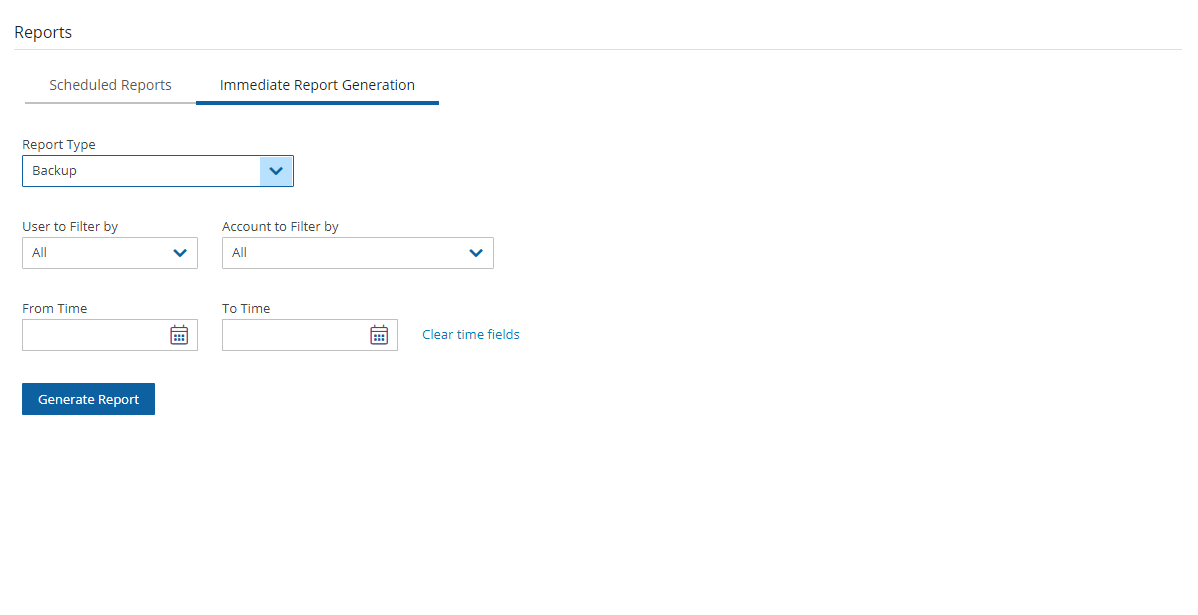
In the Immediate Report Generation tab, you can define a new report for immediate execution and download.
Also, see section 17.10.3.
By default, the Reports page opens with a list of all reports which have been scheduled. To narrow the list, use the search box, or the filters for report type, user, and schedule.
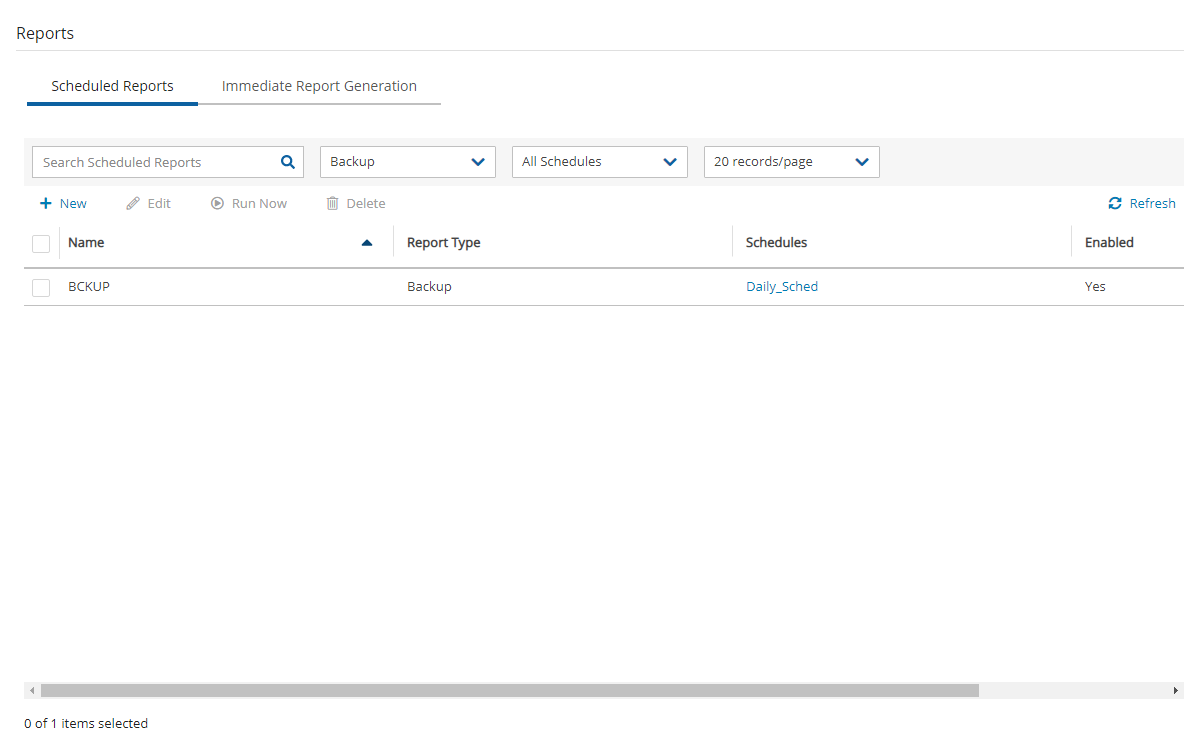
Filters are available based on the chosen Report Type. Depending on the report, you can filter the results as follows:
Audit – Filter for User and records for prior days, weeks, or months.
AWS / Azure Backups – Filter for User, Account, and records for prior days, weeks, or months.
AWS / Azure Protected Resources – Filter for User and Account.
AWS Resource Control Operation – Filter for Account and records for prior days, weeks, or months.
AWS / Azure Snapshots - Filter for Account and records for prior days, weeks, or months.
AWS Resources Summary (PDF) - Filter for User and historical data for prior weeks or months. Information contained is the same as in the Dashboard except that it is historical. Alerts are not included.
Azure Resources Summary (PDF) - Filter for User, Account, and historical data for prior weeks or months. Information contained is the same as in the Dashboard except that it is historical. Alerts are not included.
AWS Usage – Filter by User and records for prior days, weeks, or months. Select Detailed or Anonymized.
AWS Unprotected Resources - Filter by User and Account.
17.10.2 Defining a Scheduled Report
Reports are run according to their defined schedule and immediately using![]() Run Now. Schedules reports must include at least one email recipient.
Run Now. Schedules reports must include at least one email recipient.
You can create a Scheduled Report without a schedule and edit the report later after creating the schedule.
To create a scheduled report:
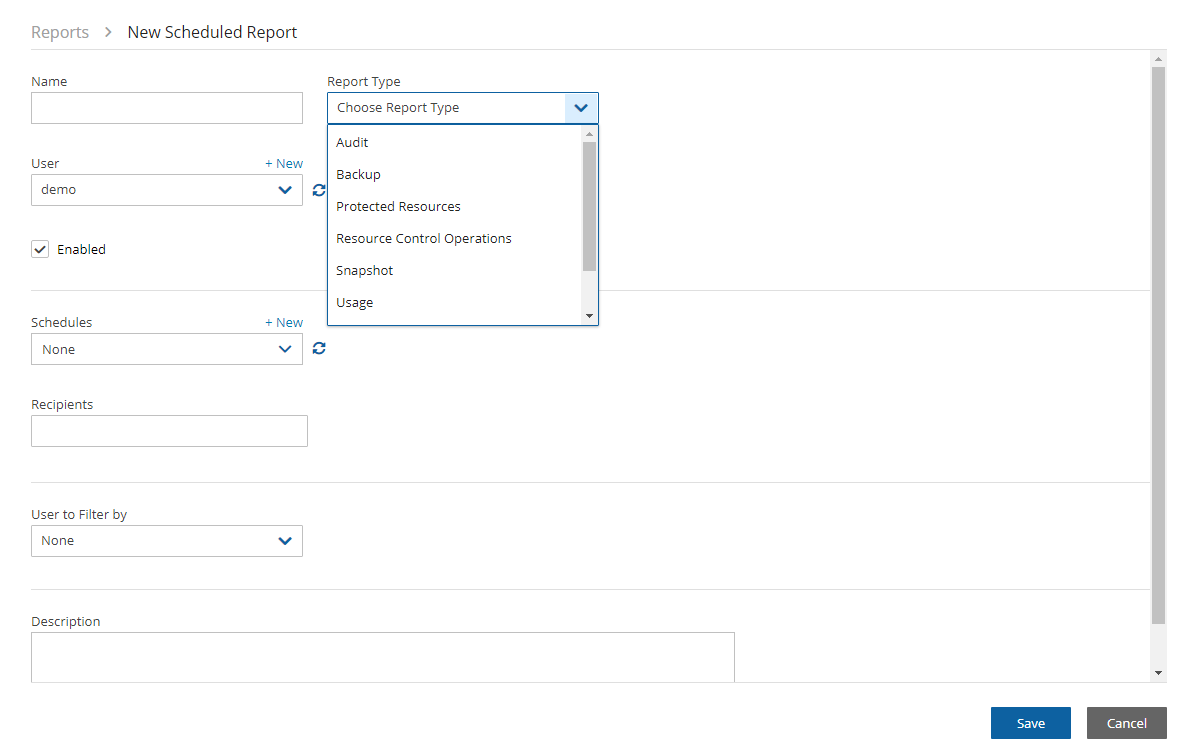
Select the Scheduled Reports tab and then
 New.
New.Enter a name for the new report and choose the Report Type.
By default, the report is enabled. To disable the Schedule Report, clear Enabled.
In the Schedules list, select one or more schedules. To create or edit a schedule, see section 4.1.1.
In the Recipients box, enter the email address of recipients, separated by a semi-colon (‘;’).
Select from the filters presented for the Report Type.
If Include Records From Last boxes appear, you can select the number (first list) of Days, Weeks, or Months (last list) to include in the report. The default is all available records.
In the Description box, enter an optional informative description.
Select Save.
17.10.3 Running Reports Outside Their Schedule
To run a Scheduled Report and send emails to its recipients immediately:
In the Scheduled Reports tab, select the report in the list and then select![]() Run Now.
Run Now.
To define a new report and download it immediately:
Select the Immediate Report Generation tab.
Select a Report Type and one or more filters depending on the Type selected, as listed above in section 17.10.1.
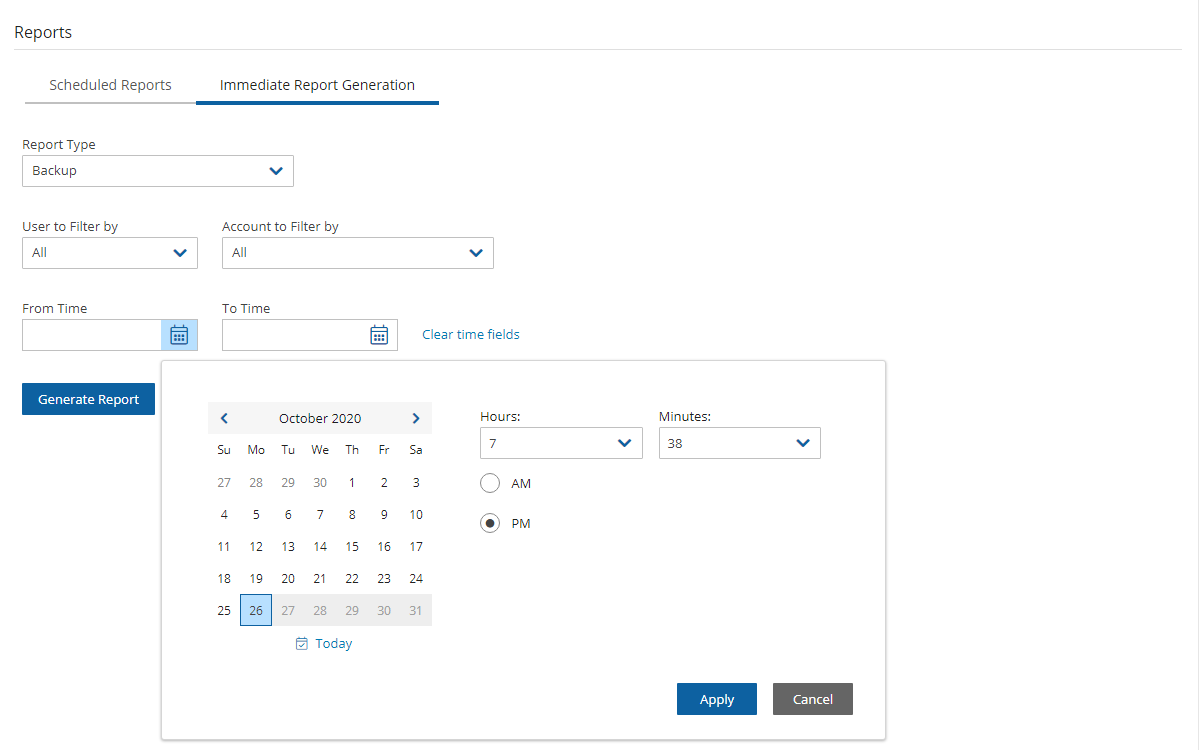
To filter the report data by date and time, select Calendar
 and choose the From and To date and time values. Select Apply after each definition.
Select Generate Report. The output will be downloaded by your browser.
17.11 Examples of AWS Alerts
AWS uses SNS to provide several N2W alert services by subscription.
17.11.1 Subscription Confirmation Alert
After subscribing to CPM Alerts in AWS, you will receive an email with a confirmation link:

Select the Confirm subscription link. You will receive a subscription confirmation email:

17.11.2 Daily Summary Alert
Following is an example of a CPM Daily Summary where all AWS functions were OK:

17.11.3 Unprotected Resources Alert
Following is an example of an alert that the unprotected resources report is available:

17.12 Announcements
Announcements are a method for N2W to communicate directly to users about non-operational topics, such as promotions and other sales-related information.
In the toolbar, the Announcements icon ![]() shows the number of unread announcements waiting in the user’s mailbox. In the Announcements inbox panel, select an announcement to open.
shows the number of unread announcements waiting in the user’s mailbox. In the Announcements inbox panel, select an announcement to open.
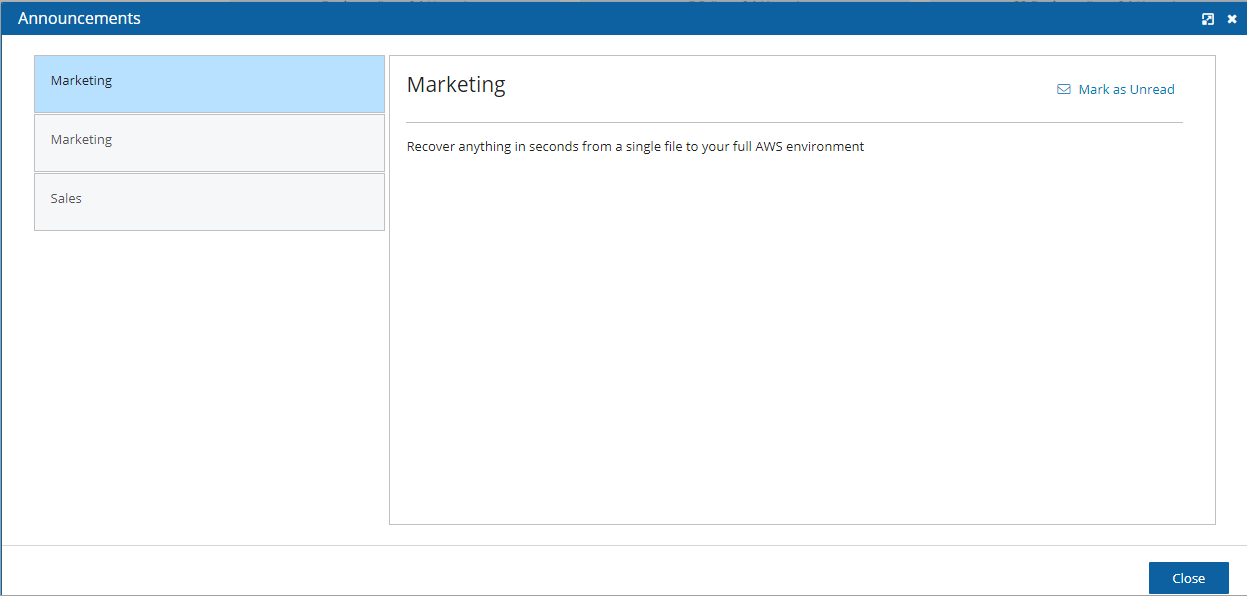
After selecting an announcement, you can reset the message status by selecting ![]() Mark as Unread in the upper right corner of the message.
Mark as Unread in the upper right corner of the message.
Was this helpful?

