Appendix E - Splunk Integration Support
Learn how to integrate Splunk with N2W.
N2W Backup & Recovery Instance is now supporting the monitoring of backups, DR, copy to S3, alerts, and more by Splunk. The N2W add-on features:
Ability to define data input from N2W via a Technology Add-on (TA)
Ability to monitor resources and instances
An N2WS app with 2 dashboards for displaying operational insights:
N2WS activity monitor - Information about the data
N2WS Alerts
Limitations:
No support for Microsoft Azure
No support for multiple CPMs
Supported with Splunk Enterprise only
Integration consists of installing Splunk and configuring the TA for N2W.
E.1 Configure N2W Server for Splunk
To configure the N2W Server:
Edit the N2W configuration file as follows:
>> su cpmuser
>> vi /cpmdata/conf/cpmserver.cfg
[external_monitoring]
enabled=True 2. Restart apache:
3. To check the status of the Splunk integration, in N2W, go to Help > About and verify that 'External monitoring (Datadog / Splunk) enabled' is Yes.
E.2 Installation on Splunk
Splunk can work with a proxy for reaching N2W APIs.
Verify that you have the correct app installation files:
N2WS_app_for_splunk.splta_N2WS_for_splunk.spl
Both files can be downloaded from the Splunk MarketPlace.
To install:
Log on to your Splunk Web and in the Enterprise Apps screen, select Settings
 .
.

The Manage Apps page opens.
2. In the upper right, select Install app from file.

3. For an initial installation:
a. Browse for the N2WS_app_for_splunk.spl file. Select Upload.

b. Browse for ta_N2WS_for_splunk.spl. Select Upload.
4. For updates, browse for the current file and select Upgrade app.
Installation of Splunk is fully documented at https://docs.splunk.com/Documentation/Splunk/8.1.1/Installation/InstallonLinux
E.3 Configuration of TA for N2W
Two configurations are required:
TA of the REST API
Data inputs from N2W for Alerts and Dashboard information
To configure the TA:
Go to splunk > App N2WS Add-on > Configuration.
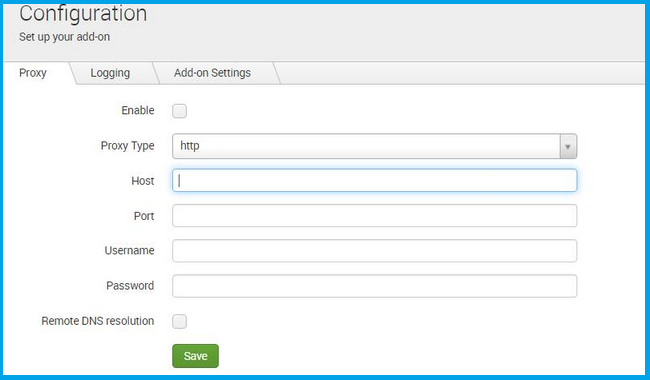
If needed, select the Proxy tab, complete the settings, and select Save.

3. In the Logging tab, select the TA Log level: DEBUG, INFO, WARNING, ERROR, CRITICAL.
4. In the Add-on Settings tab, set the API Url of the target server and the API Key. You can copy and paste the API URL and API Key, or both can be left empty for the customer to fill in.
The API Url is the address of your N2W server.
You can generate an API Key in N2W at User > Settings > API Access.

5. Select Save.
To configure data Inputs:
Both Dashboard and Alerts inputs should be defined.
In the App menu, select Inputs
 .
.In the Create New Input menu, select N2WS Dashboard information or N2WS Alerts
 .
.Enter the relevant data input information:
Name - Unique name of the input.
Interval - Time interval for fetching the data from N2W in seconds. 300 is recommended.
Index - The Splunk index (silo) to store the data in:
For Alerts, n2ws_alerts
For Dashboard information, n2ws_di
Last alert ID - Leave blank.
Select Update.
When finished, the Inputs should look like this:

To manage the Inputs, in the Actions column, select from the Action menu: Edit, Delete, Disable, or Clone.
To configure default data indexes:
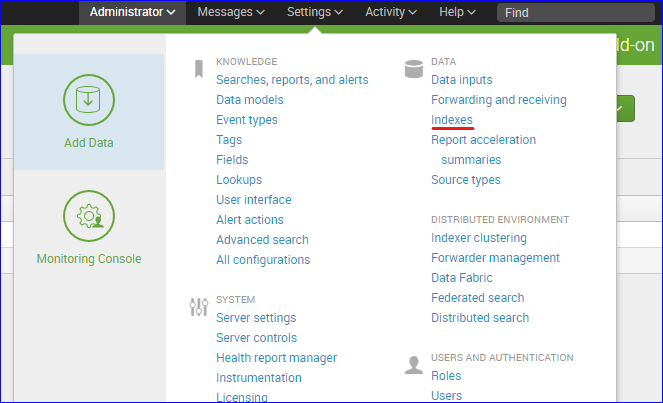
Select Settings on the upper right corner and then select Indexes.

2. Verify that the following indexes exist under the N2W app. If not, select New Index to add indexes of the CPM information.
n2ws_alerts
n2ws_di

3. In the file system, copy macros.conf from the default folder to the local folder. For example,
Source: C:\Program Files\Splunk\etc\apps\N2WS_app_for_splunk\default
Target: C:\Program Files\Splunk\etc\apps\N2WS_app_for_splunk\local
4. Edit the macros.conf file under 'local' and change the default index to the new indexes that were created.

3. Restart the Splunkd service from Windows Services.
E.4 Viewing Dashboards
Go to Splunk Apps and find N2WS app for splunk. The N2WS app contains tabs for N2WS activity monitor and N2WS Alerts. Edit and Export options are available in the upper right corner of each dashboard.
E.4.1 N2WS activity monitor
Filter for Time Range (defaults to last 24 hours) and Users, including root and delegates.
Displays All Accounts, Policies, Protected Resources, Managed Snapshots, Backups DR, S3 Backups, Volume Usage, and other requested data.

For Protected Resources and Managed Snapshots, select the displayed number to drill down and view a table of the resources and the number of items for each resource type for the selected users, or managed snapshots, count of each type, and a total.
E.4.2 N2WS Alerts
The Alerts dashboard includes filters for:
Time range - Last 24 hours (default)
User - All (default) or username
Severity - All or Info or Warning
Category - All or Tag Scan, volume usage limit exceeded

The list defaults to descending sort order. Select any column to change sort order.
Time - Date, time, event ID
User
Severity
Category
Message
Was this helpful?

