3 Start Using N2W
Now you can jump in and start building your backup and recovery services.
N2W opens to the Dashboard – an overview of recent backups, recoveries, alerts, resources, and costs.
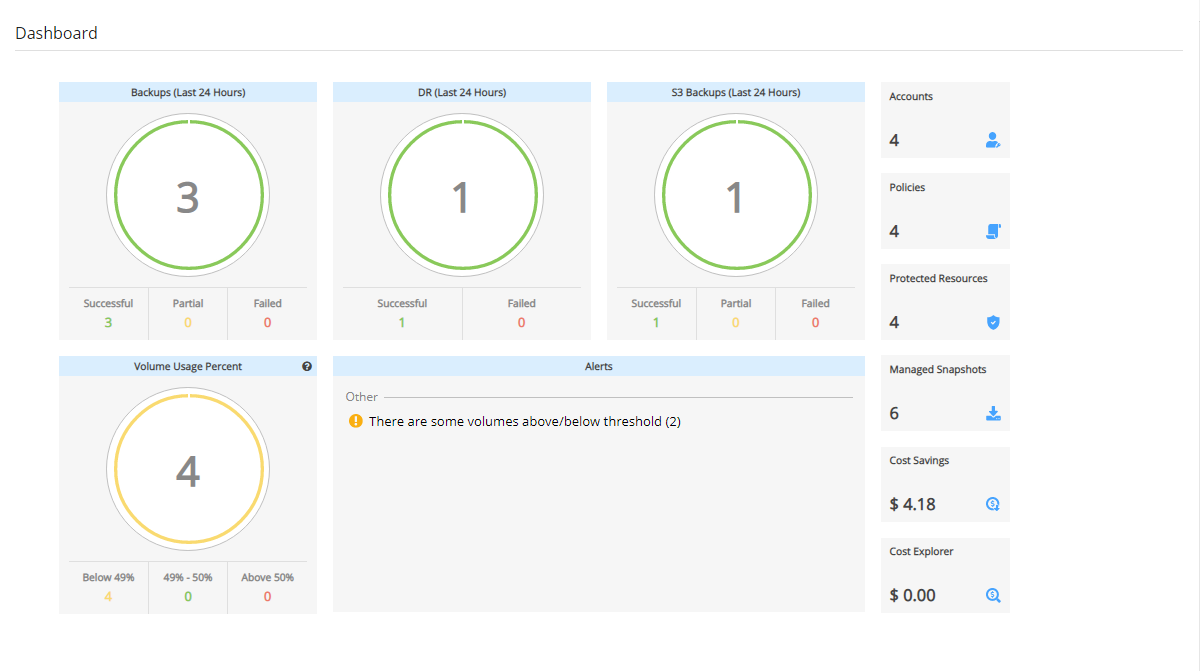
Depending on your device resolution, the Alerts tile may not appear in the Dashboard. Regardless of screen resolution, all Alerts are available by selecting Alerts ![]() in the toolbar.
in the toolbar.
The first step in using N2W is to associate one or more of your cloud accounts with N2W.
With AWS accounts you will be able to:
Perform backup and recovery operations for a variety of AWS resource types
Perform Disaster Recovery (DR)
Copy to a Storage Repository (AWS S3, Azure, Wasabi)
Manage volume usage
Monitor costs and savings
With Azure accounts, you will be able to perform backup and recovery operations for Azure VMs, SQL Servers, and Disks, and copy to a Storage Account. See section 26 for complete details.
With Wasabi accounts, you will be able to create a Storage type account. See section 27.
3.1 Associating an AWS Account
To associate an AWS account for Recovery, you will need to either:
Enter AWS credentials consisting of an access key and a secret key, or
Use an IAM role, either on the N2W server instance or cross-account roles.
Following are the steps to associate an N2W account with an AWS account:
To manage your users and roles and obtain AWS credentials, go to the IAM console at https://console.aws.amazon.com/iam/home?#users
Follow the directions to either add a new account or view an existing account.
Capture the AWS credentials.
If the AWS account will be operating in special regions, such as China Cloud or US Government Cloud, see section 3.1.5 before adding the account in N2W.
To associate the AWS account with an N2W account, go to N2W:
In the left panel, select the Accounts tab.
b. In the
 New menu, select AWS account.
Complete the fields, entering the required information for the Account Type and Authentication method.
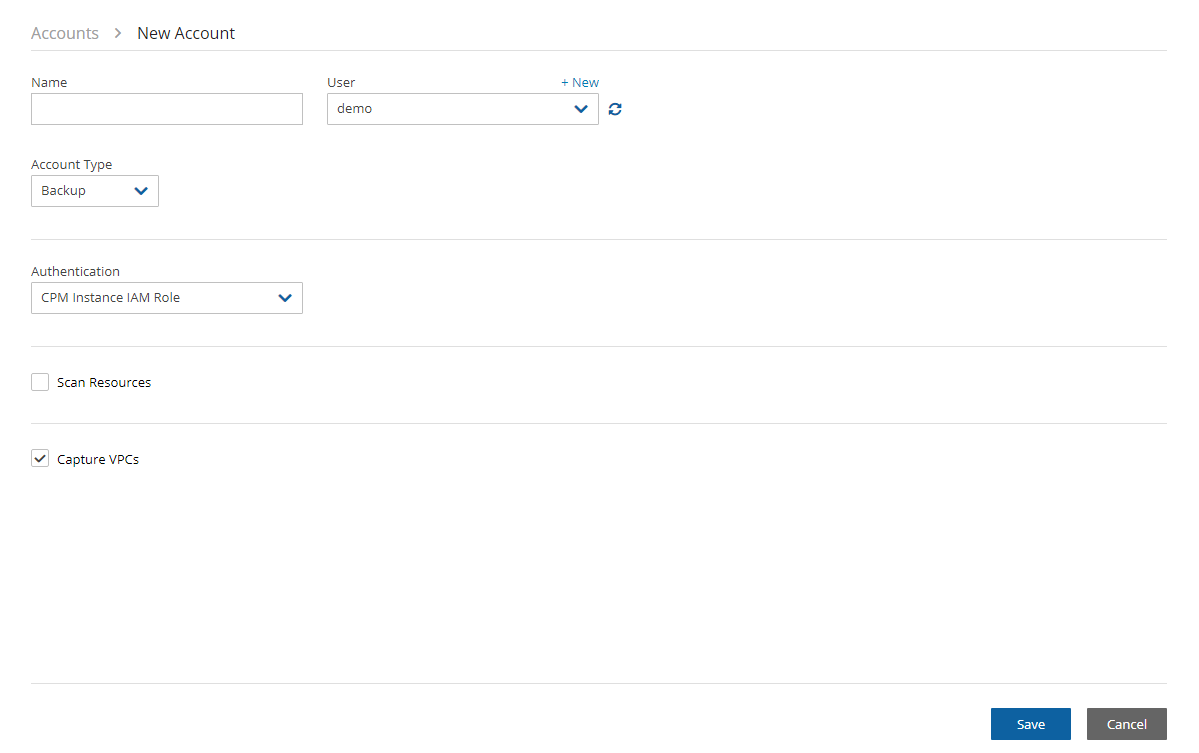
You can add as many AWS accounts as your N2W edition permits.

3.1.1. Account Type
If you are using the Advanced or Enterprise Edition or a free trial, you will need to choose an account type.
The Backup account is used to perform backups and recoveries and is the default 3333.
The DR account is used to copy snapshots to as part of cross-account functionality.
You choose whether this account is allowed to delete snapshots. If the account not allowed to delete snapshots when cleaning up, the outdated backups will be tagged. Not allowing N2W to delete snapshots of this account implies that the presented IAM credentials do not have the permission to delete snapshots.
Enable Use Secured DR Account to select specific permissions for resource types and activities for prohibition. The Secured DR Account Check operation warns the N2W user about the existence of Prohibited Permissions in IAM policies of the DR account. Turn on the Check Secured DR Account Periodically toggle to perform a period check of whether the DR account backups are compromised by the presence of the prohibited permissions. For details about period and immediate checking of the account, see section 3.1.4.
The Storage type account is used to receive backups for subsequent recovery or safekeeping. Wasabi accounts are Storage type accounts. See section 27.
For accounts operating in special regions, in the AWS Cloud Type list, select the type of AWS cloud. See section 3.1.5.
3.1.2. Authentication
N2W Supports the following methods of authentication:
IAM User - Authentication using IAM credentials, access and secret keys.
Using IAM User credentials is not recommended as they are less secure than using IAM roles.
CPM Instance IAM Role – If an IAM role was assigned to the N2W server at launch time or later, you can use that IAM role to manage backups in the same AWS account the N2W server is in.
Only the root/admin N2W user is allowed to use the IAM role.
Assume Role – This type of authentication requires another AWS account already configured in N2W. The operation of using one account to take a role and accessing another account is called assume role.
To allow one account to access another account, define a cross-account role in the target account and allow access from the source account.
Regions must be enabled in both the source and target accounts.
You can add as many AWS accounts as your N2W edition permits.
To allow account authentication using Assume Role in N2W:
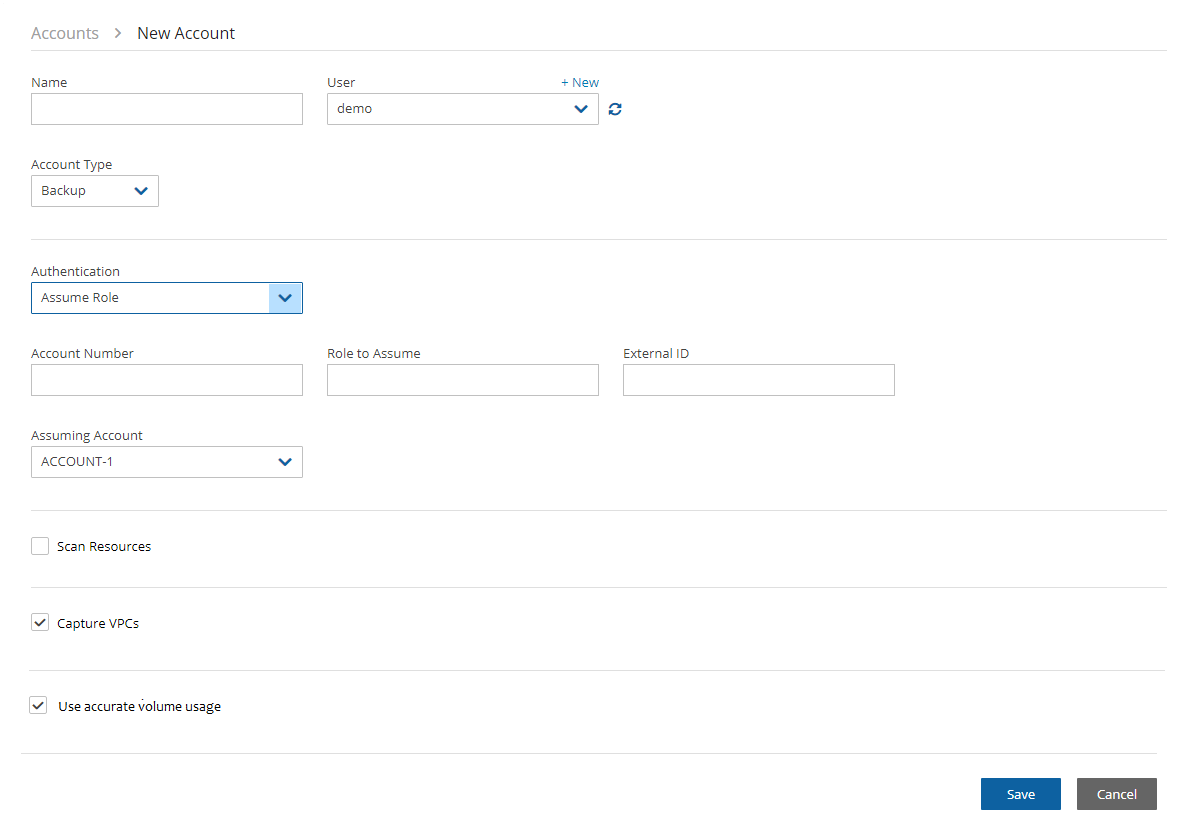
In the Authentication box, choose Assume Role.
In the Account Number box, type the 12-digit account number, with no hyphens, of the target account.
In the Role to Assume box, type the role name, not the full Amazon Resource Name (ARN) of the role. N2W cannot automatically determine what the role name is, since it is defined at the target account, which N2W has no access to yet.
The External ID box is optional unless the cross-account role was created with the 3rd party option.
In the Assuming Account list, choose the account that will assume the role of the target account. If you are the root user or independent user and have managed users defined, an additional selection list will appear enabling you to select the user.
Select Scan Resources to include the current account in tag scans performed by the system. Once Scan Resources is Enabled:
In the Scan Regions list, select the regions to scan. To select all regions, select the check box at the top of the list. To filter regions, start typing in the search box.
In the Scan Resource Types list, select the types of resources to scan. Select the top check box for all, or use the search box to filter types.
The Capture VPCs option defaults to enabled. Clear Capture VPCs to disable for this account. See section 23.
The Use accurate volume usage option defaults to enabled. Clear to disable for this account. See section 25.
Select Save.
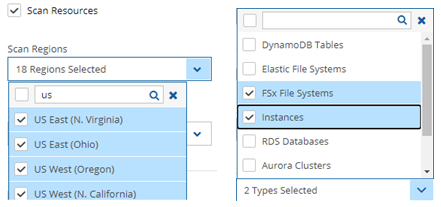
Scanning only specific resource types can reduce tag scan processing time and is useful when user permissions are limited to certain resource types.
3.1.3 Secured DR Account
The N2W Secured DR account feature hardens N2W security. It allows the N2W user to better protect the backups of his resources by making sure that backups kept in the DR account are not compromised by unwanted permissions. N2W can perform a periodic check to alert the user about IAM Users/Roles of the DR account that have unwanted IAM permissions.
The risk of unwanted permissions is demonstrated in the following example:
If an IAM Role of a DR account has an attached policy that includes the “ec2:DeleteSnapshot” permission, the snapshot is in danger of getting deleted.
The N2W user has the flexibility of defining risky permissions for an account.
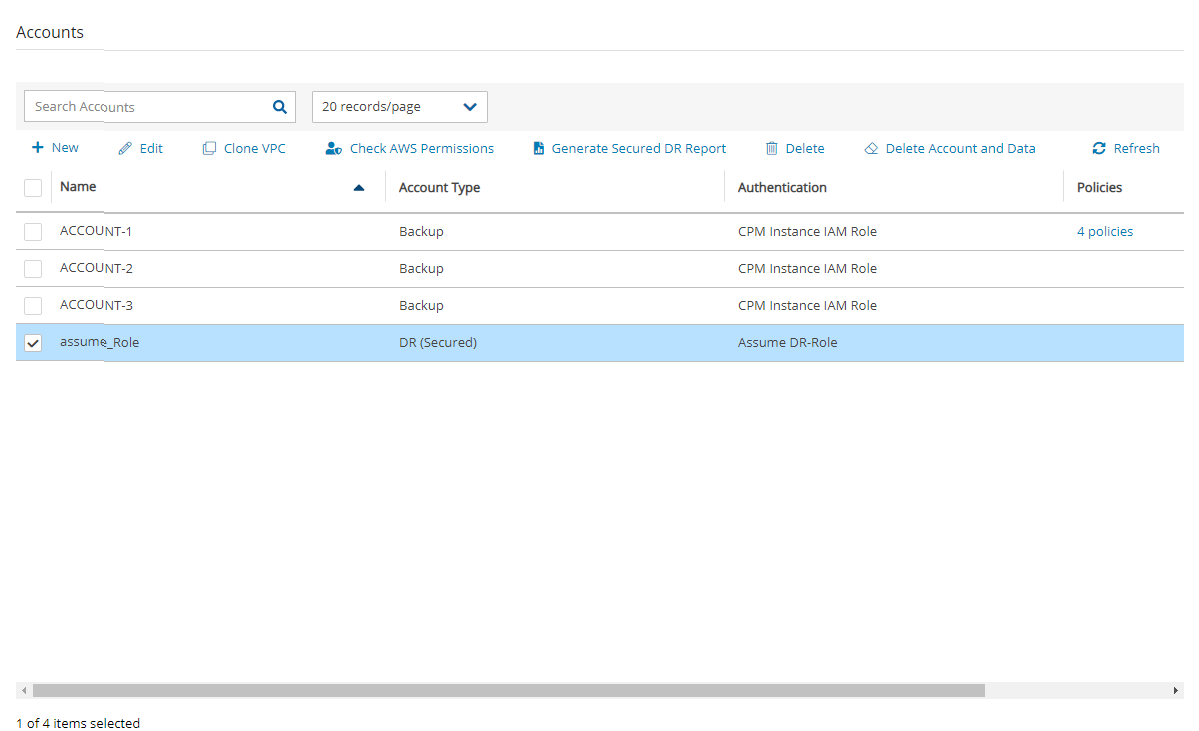
To define a 'Secured' DR Account and prohibited permissions:
In the Accounts tab, select a DR account, and then select
 Edit.
Edit.Select Use Secured DR Account, and then select Select Prohibited Permissions. By default, all permissions are prohibited.
For each type of target or action, clear the permissions to be 'allowed', and then select Apply.
Select Save.
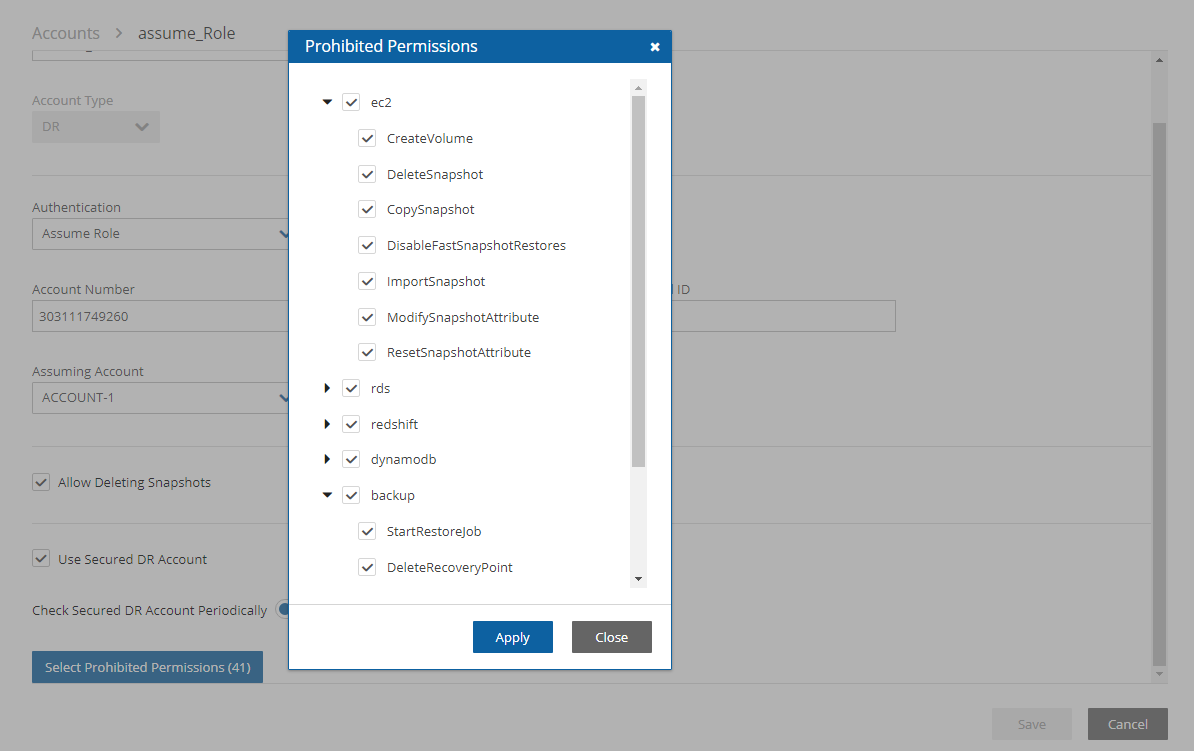
N2W will check for policies whose account has permissions defined as 'prohibited' and list them as compromised in the check log. You can then generate the Secured DR Account Report to identify the accounts and policies at risk. See section 3.1.4.
The required IAM permissions for the DR account to check its users and roles are:
iam:ListUsers
iam:ListRoles
iam:SimulatePrincipalPolicy
iam:ListAccessKeys, for authentication
Removing permissions may compromise the safety of N2W backups. If permissions are removed, a warning alert for the secured DR account will appear as a potential backup risk.
3.1.4 Checking Secured DR Accounts
Two reports are available for checking Secured DR Accounts. If the Check Secured DR Account ‘Show Log’ indicates that there are compromised permissions, then you can run the Generate Secured DR Report to view the policies and users with the compromised permissions.
Check Secured DR Account – Creates a summary status log (Show Log) with the number of policies and accounts with compromised permissions. The check can be run periodically throughout the day or run immediately.
Generate Secured DR Report - A detailed list of the AWS policies and the prohibited permissions that are compromised for an account of the current user.
To check Secured DR Accounts:
In the General Settings tab, select the Security & Password tab.
To check the DR accounts periodically during the day, select Check Secured DR Account, select an hourly interval in the Secured DR Check Interval list, and then select Save.
To run the report immediately, select Check Secured DR Account Now, and confirm.
To view the progress and status of the operation, select Background Tasks
 in the toolbar. Background Tasks only appears after the first Check Secured DR Account or Clone VPC operation. Select View All Tasks.
To view the log, select Show Log. To download, select
 Download Log in the upper right corner of the log. The
 Secured_DR_Account_check_log_<date>_<time>.csvfile contains Log Time, security Level Type, and Log Message.
To generate Secured DR Account reports:
In the Accounts tab, select a DR (Secured) account.
To check the status of the Secured DR Account periodically during the day:
Select
 Edit.
Edit.Turn on the Check Secured DR Account Periodically toggle.
To view the interval for checking Secured DR Accounts, select the Secured DR Check Interval hours.
Select Save.
To run the detailed report, in the Accounts tab list, select a DR (Secured) Account, and then select
 Generate Secured DR Report.
The downloaded file (Secured_DR_Account_check_<account>_<date>_<time>.csv) contains a list with the following data:
AWS IAM Policy
AWS Policy’s User/Role
Compromising Permission
3.1.5 Special Regions
If the account that you are about to create will be operating with non-standard AWS regions, such as China or US government clouds, it is necessary to first contact N2W Support (see section 3.6) to adjust the N2W configuration. After N2W Support has made the adjustment, when you create the N2W account, you will be prompted for the AWS Cloud Type.
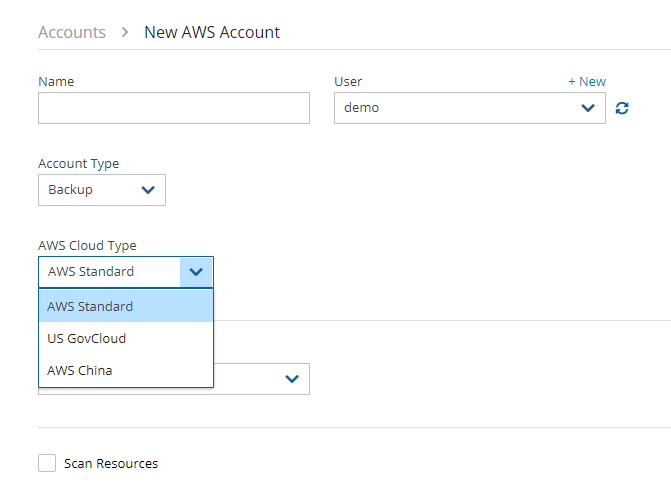
The type of cloud will appear in the Cloud column in the list of policies.

3.2 Associating Azure and Wasabi Accounts
To associate an Azure account with an N2W account, see section 26.
To associate a Wasabi account, see section 27.
3.3. Deleting Accounts
There are two options when deleting an account:
Delete the CPM account and all its resources and metadata, BUT leave the AWS account and all its related data on AWS. Select
 Delete.
Delete the CPM account and all its resources and metadata, AND delete the AWS account and all its data, including AWS Storage Repositories. Select
 Delete Account and Data.
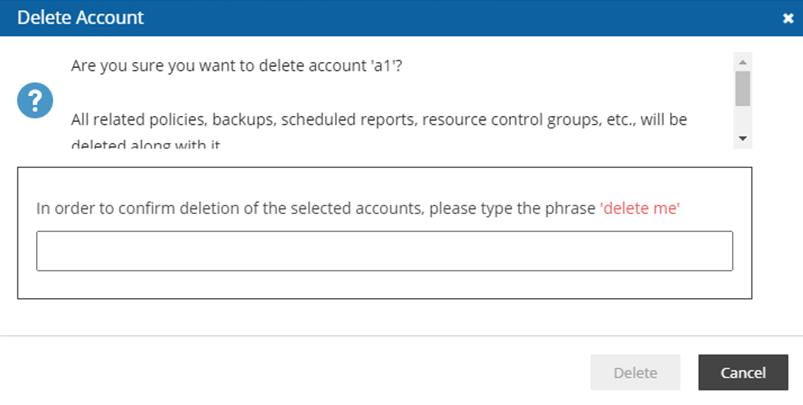
In each case, you will be provided with an explanation of the scope of the delete and a prompt to confirm. In the Delete Account confirmation dialog box, type ‘delete me’ and then select Delete.
3.4 Managing Volume Usage
As part of starting to use N2W, you might want to enable alerts for when a volume's usage exceeds high and low thresholds. Volume usage reporting can become an integral part of the Dashboard.
Drives without a drive letter are not supported on volume usage.
After upgrading N2W, the Volume Usage tables may appear to be empty. Running a policy that includes instances with volumes will populate the Volume Usage tables with the respective volumes.
If the Volume Usage Alert is enabled, a generic message for volumes exceeding the threshold will appear on the Dashboard Alerts tile. In the Volume Usage Percentage tile, the number of volumes below, within, and above the thresholds are shown.
If Use accurate volume usage was enabled in the account definition, the following are considerations:
N2W now uses file system data to determine accurate volume usage, particularly when deleting data or formatting disks.
Make sure SSM is installed on your instance as Windows and Linux commands are run from CPM using SSM.
Mac OS is not supported.
For Ubuntu version 18, add the IAM Role: AmazonSSMManagedInstanceCore.
Volume usage is assessed at the completion of every backup if more than 24 hours has passed since the last calculation for the policy.

To report volume usage:
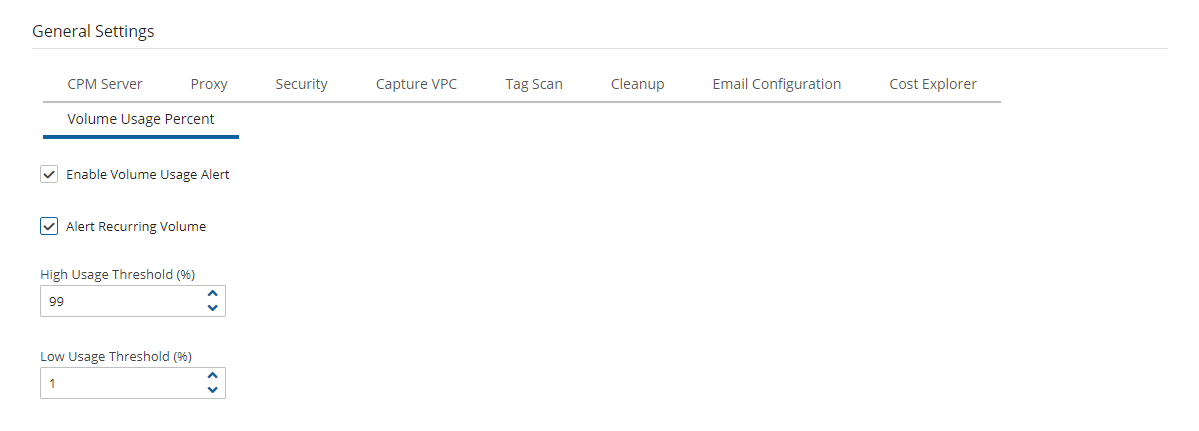
In General Settings of the
 Server Settings, select the Volume Usage Percent tab.
Select Enable Volume Usage Alert.
Enter a percentage in the High Usage Threshold and Low Usage Threshold (%) boxes for when to initiate an alert.
To enable an alert for each time a backup is run on a volume with usage exceeding the High or Low Usage Threshold, select Alert Recurring Volume. The recurring alert is turned off by default, and the alert is initiated only when there is a change in the usage or a change in the threshold that has caused the initiation.
Select Save.
If there is a volume usage alert, select the Volume Usage Percent tab in the main screen to view the specific volume and percentage which initiated the message.
The Accuracy column symbol shows the status of Use accurate volume usage calculation. Green ![]() is successful calculation, and red
is successful calculation, and red ![]() is failed calculation. Hover over the symbol to show the reason. To disable Use accurate volume usage, see section 3.1.2.
is failed calculation. Hover over the symbol to show the reason. To disable Use accurate volume usage, see section 3.1.2.
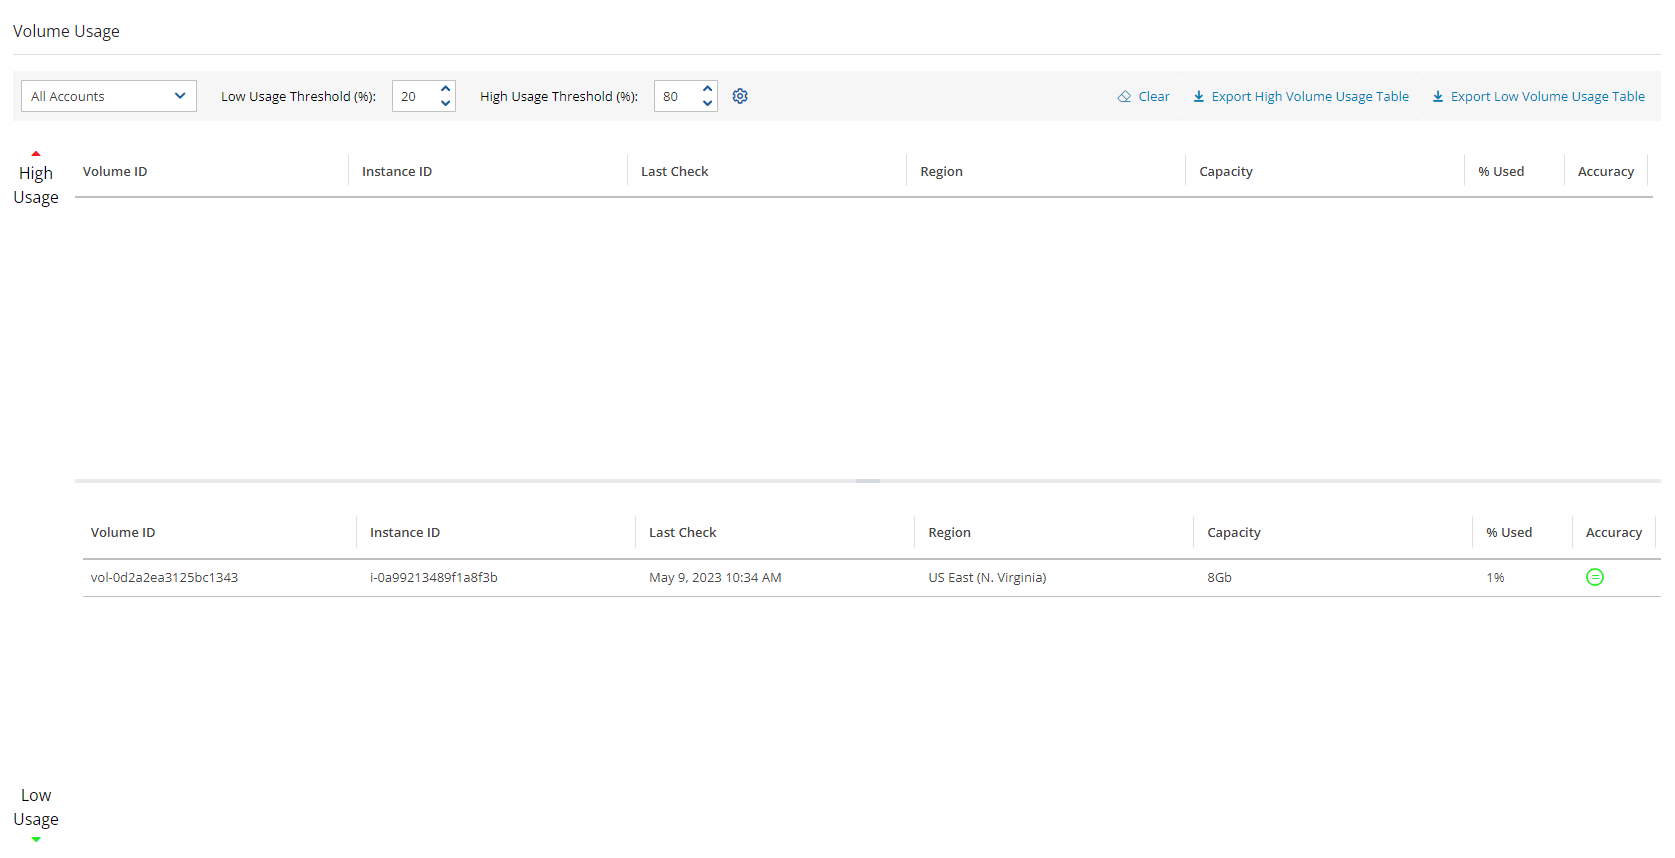
You can evaluate whether additional volumes are nearing the alert thresholds by adjusting the High Usage and Low Usage Thresholds in the Volume Usage screen and selecting the Enter key.
If a volume’s usage changes from high to low, or low to high, there will be an additional alert for that volume.
Changing the usage thresholds in the Volume Usage Percent tab does not change the alert thresholds set in the General Settings tab.
Enabling and configuring usage thresholds while adding a user will override the alert thresholds set in the General Settings tab.
3.5 Importing Non-N2W Backups to S3
You can quickly lower your storage costs for existing non-N2W backups by moving them to a more economical S3 storage class. After successfully importing your snapshots with the AnySnap Archiver feature, you can then safely delete the original snapshots.
Currently, the Import to S3 feature supports only EBS snapshots.
Importing consists of the following steps:
In AWS, apply custom tags to backups to import.
In N2W, create an S3 Repository. See section 21.1.
In the Policies tab, create an Importer Policy with identical custom tags. The maximum number of custom tags per policy is 20.
Verify a scan of the snapshots to import by executing Import Dry Run.
Start the import. Review the progress in the Policies tab.
If necessary, pause the import to change the S3 configuration or to postpone the migration process. See section 3.5.3.
Review the import process with Show Imported Backups or Show Import Log for snapshots imported to S3.
After the import process, N2W attaches an
import_policy_nametag with the name of the policy to the snapshot. The tag excludes the snapshot from additional importing.If necessary to restart the import, remove the
import_policy_nametag using the AWS Snapshot console.For bulk tag removals, use the AWS Resource Group service. Verify that you have the correct tag key/value pair.
The Import Dry Run scans all AWS snapshots defined in the Importer Policy and marks for import those meeting the following criteria:
Snapshot date is within the Start/End Time Range.
AWS tag values equal the Import by Tags values defined in the Policy.
Snapshot date is the latest within the Record Duration. N2W marks for import the last backup made within the number of hours defined as record duration. If the duration is set for 2 and there are 3 snapshots with import tags within a 2-hour period, only the last snapshot will be imported.
3.5.1 Creating an Importer Policy
Expiration of storage for S3 snapshots is computed from their EBS snapshot creation date. The S3 storage retention period is determined by the Keep backups in S3 for at least configuration value. If the retention period is set for 12 months and there are 2 imported snapshots, one 11 months old and the other 10 months old, the 11-month-old snapshot will be deleted from S3 in 1 month and the other in 2 months.

In the + New menu of the Policies tab, select New Importer Policy. When multiple clouds are enabled, select New AWS Importer Policy.
In the Policy Details tab:
Enter the policy Name, and select the User and Account.
The optional Description box would be an excellent place to identify details of the import.
In the Import Parameters tab:
Select the Start/End Source Data Time Range. End Time defaults to Up to Import Start.
In the Backup Record Interval (Hours) list, select the number of hours from which to select the latest snapshot. For example, if you select 6 and there are 4 snapshots within a period of 6 hours, only the last one of the 4 snapshots is imported.
Enter at least 1 Import by Tags. All regions in the specified account will be scanned.
In the S3 Storage Configuration tab, there must be at least 1 retention condition:
In the Keep backups in S3 for at least lists, select a minimum retention period.
To move S3 backups for archival in Glacier, turn on the Transition to Cold Storage toggle and select the archiving frequency and retention period.
In the Target repository list, select the repository to import to.
In the Immediate Access Storage class list, select the storage type for this import. Default is Standard.
If Transition to Cold Storage is enabled, select an Archive Storage Class.
Select Save. After saving, the
 Import Dry Run and
  Start Import buttons are enabled, and the import status in the far-right column is
  Not Started.
3.5.2 Testing Import with Dry Run
After creating the Importer policy, select the policy, and then select ![]() Import Dry Run. In the upper right corner, the Dry Run Started message
Import Dry Run. In the upper right corner, the Dry Run Started message ![]() appears. Shortly after the Dry Run completes and the Started message has automatically closed, the
appears. Shortly after the Dry Run completes and the Started message has automatically closed, the Import Snapshots Dry Run [policy name] yyyy mm dd hh mn.CSV file downloads. The report contains the list of the snapshots scanned and whether they meet the criteria for import. Fields include Backup Record number, CPM Account number, AWS Account number, Import (Yes or No), Region, Type (Resource), Volume, Snapshot ID, Start Time, Volume Size in GB, and the Dry Run Parameters.
Review and adjust the Import policy or tags as needed.
3.5.3 Running the Migration
To perform the actual import:
Select the policy, and then select
 Start Import. The Import policy started message
  appears.
To view progress details of the import process:
Select
 Show Import Log.
In the far-right column, view the migration status symbol. Refer to the table of status symbols in section 3.5.4.
If it is necessary to pause the import to S3, in the Policies tab, select
 Pause Import. To resume, select
  Resume Import, and the process will restart the copy of the paused snapshot from scratch.
If it is necessary to stop the import to S3, in the Backup Monitor, when the Lifecycle Status is 'Storing in S3 ...', select
 Abort Copy to S3. To resume, in the Policies tab, select
  Resume Import, and the process will restart the copy of the snapshot from the beginning.
In the Backup Monitor, you can view the final status of the import in the Lifecycle Status column. For statuses other than
 Stored in S3, hover over the symbol for a description of the status.
In the Policy tab, when the import is finished:
Select
 Show Imported Snapshots.
To lower costs, you can
 Delete EBS Snapshots. The icon is active only if the import was 100% successful.
Before deleting any snapshots, N2W recommends that you perform a test recovery for each region/account that you imported from to verify that everything is working as expected.
Snapshots imported to S3 are included in the Backup and Snapshot reports. See section 17.7.
3.5.4 Migration Progress and Status Symbols
During the actual migration, you can monitor the progress in the Policies tab by viewing the following migration status symbols in the far-right column. A symbol indicates that the policy is an importer policy, and its color and design indicate its migration status. Following is a summary of the symbol colors:
Yellow: Not started, paused, pausing, no items found
Green: Scanning, running, deleting EBS snapshots (with some yellow)
Blue: Copy complete, moved to S3
Red: Copy failed
To view status details, hover over the symbol.
Symbol
Importer Policy Migration Status
Next Actions
![]()
Not started
![]() Start Import
Start Import

Scanning for custom tags, import criteria
![]() Show Import Log
Show Import Log
![]()
Copying
![]() Show Import Log
Show Import Log
![]()
Completed without finding snapshots
Reconfigure; ![]() Import Dry Run
Import Dry Run
![]()
S3 running
![]()
S3 copy completed
![]() Show Imported Snapshots
Show Imported Snapshots
If needed, Delete EBS Snapshots
![]()
Deleting EBS snapshots
![]() Show Import Log
Show Import Log
![]()
Moved to S3
![]() Show Imported Snapshots
Show Imported Snapshots
![]()
Glacier initializing
![]()
Glacier running - in progress
![]()
Glacier running
![]()
Glacier partial
![]() Show import Log
Show import Log
![]()
Glacier - expired snapshots deleted
![]() Show import Log
Show import Log
![]()
Glacier - all snapshots deleted
![]() Show import Log
Show import Log
![]()
Glacier OK
![]() Show import Log
Show import Log
![]()
Glacier aborted
![]() Show import Log
Show import Log
![]()
Pausing
If needed, ![]() Abort Copy to S3
Abort Copy to S3
![]()
Paused
![]() Resume Import to continue, or
Resume Import to continue, or
![]() Abort Copy to S3 to stop
Abort Copy to S3 to stop
![]()
Failed
![]() Show Import Log
Show Import Log
[No symbol]
Indicates a backup policy
3.6 Customizing User Views
Individual users can customize certain UI components:
Minimize toolbars and filter bars in table views
Minimize the left navigation menu
Select columns to show in a table
Select number of records per page in table views
Change and save column widths
N2W saves the customizations per user and per browser.
3.6.1 Minimizing Toolbars and Filter Bars
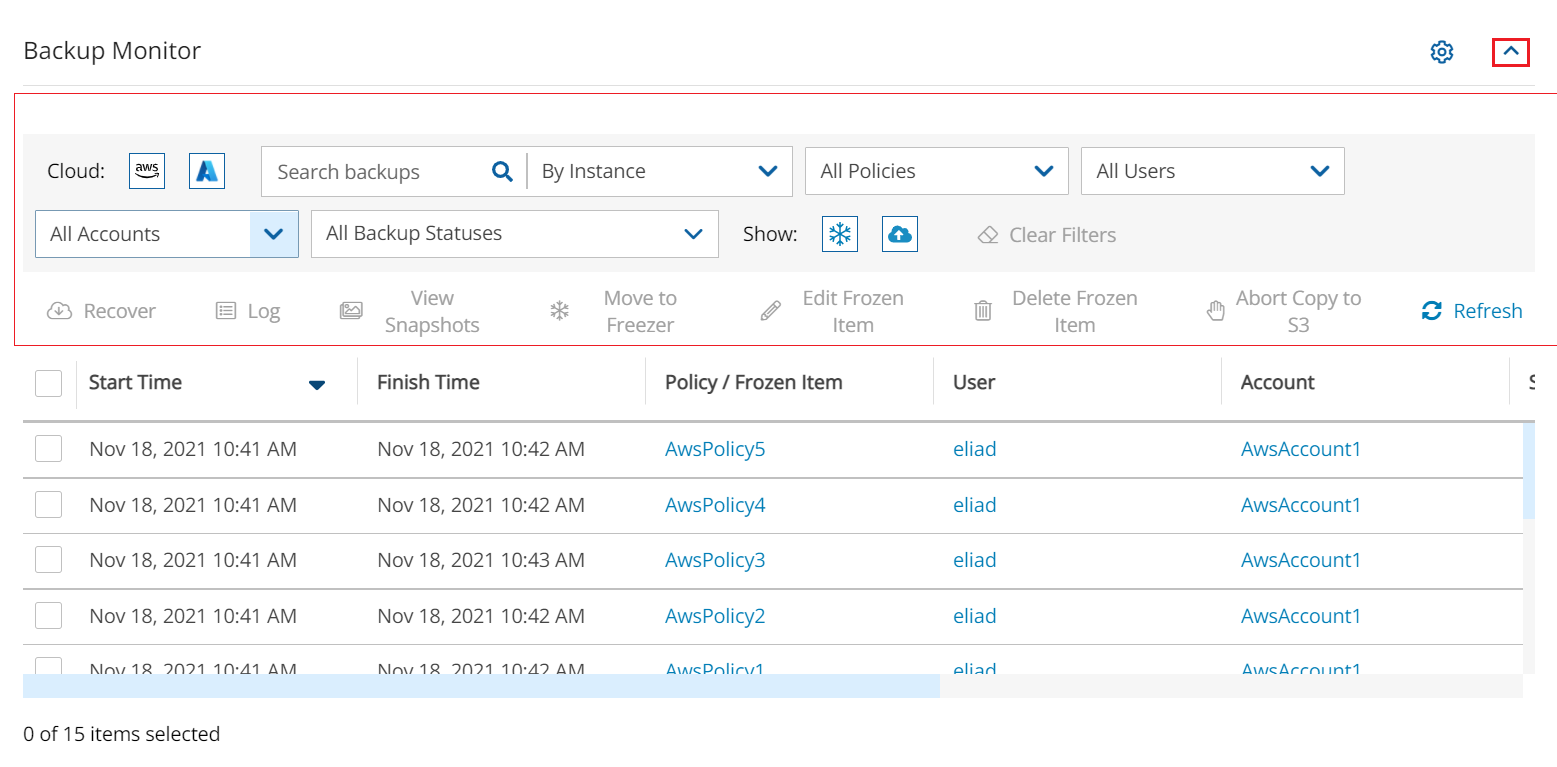
Toolbar and filter bar minimization extends the display of tables in list views. The up arrow minimization button (marked in red) is in the top-right corner of the view. Selecting the up arrow hides the bars shown within the thin red outline.
Before minimization:
After minimization:
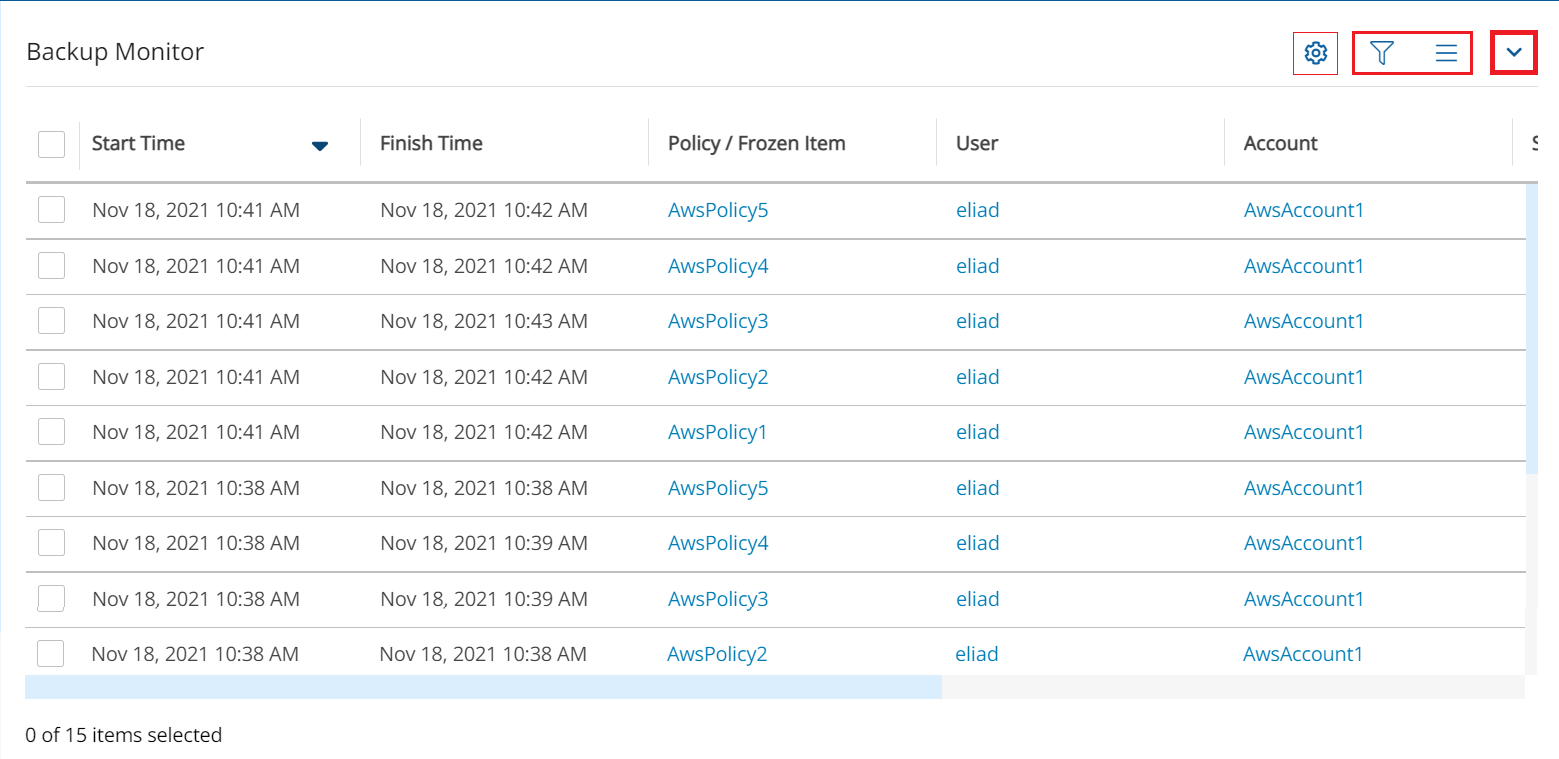
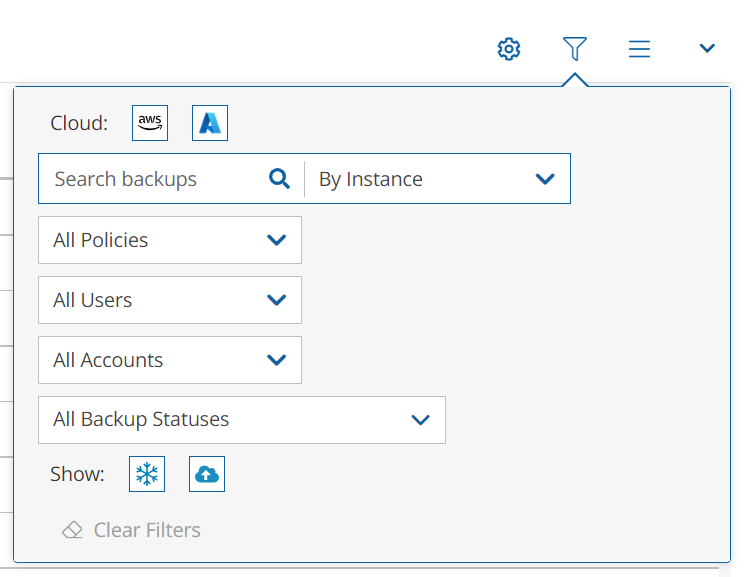
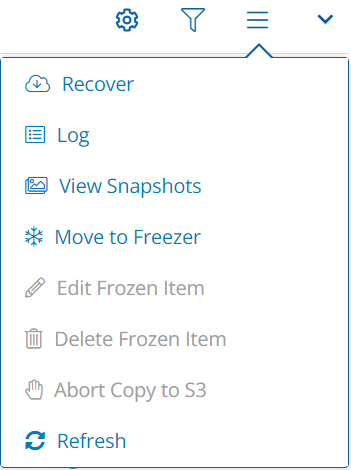
After minimizing, new buttons appear to the left of the minimization button.
To open the Filters dialog box, select![]() :
: 
To open the Toolbar menu, select![]() :
: 
3.6.2 Minimizing the Left Navigation Menu
You can fold the left navigation menu to extend the display of a table. Hover over the menu bar. Select the minimization button that appears to the right of the Dashboard menu item.
Before minimization:
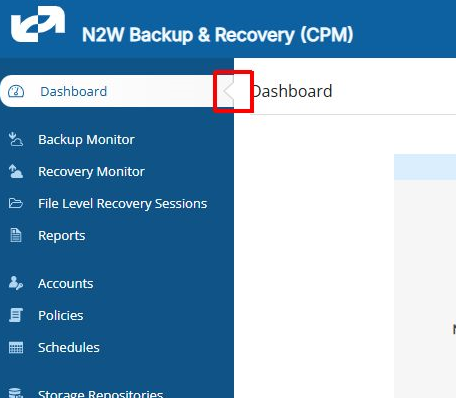
After minimization:
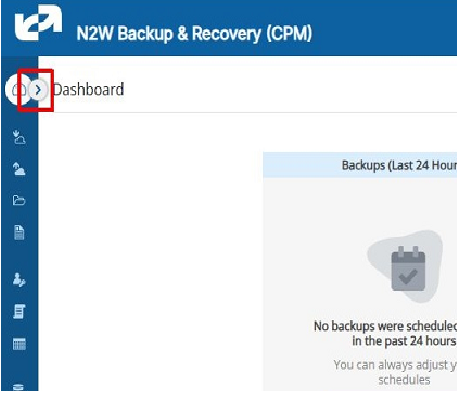
3.6.3 Table Column Selection and Display Settings
User can select the most relevant columns to show in the table. Select Display Settings ![]() above the table.
above the table.
For example, in the following table, the DR Status and Lifecycle Status columns are empty and redundant:
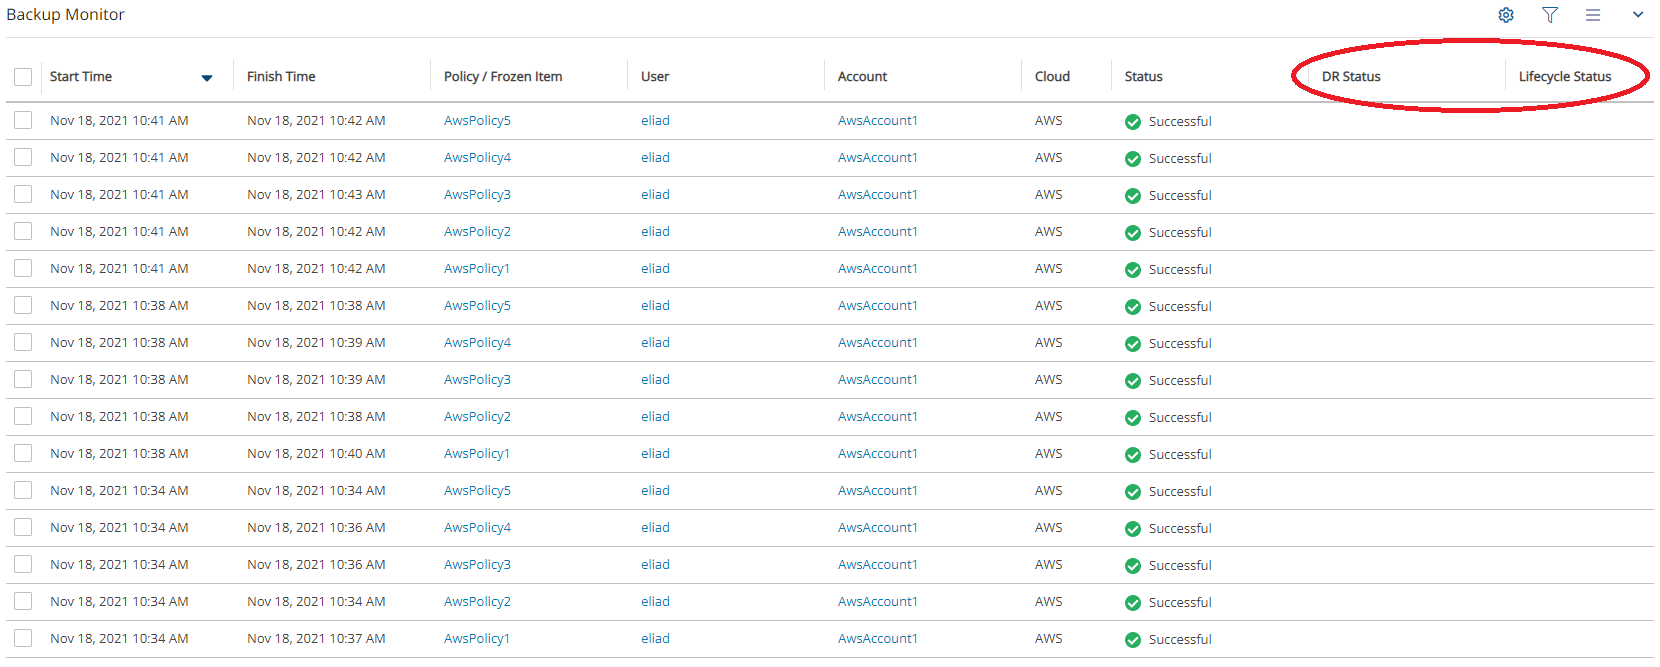
To hide the empty columns, select Display Settings ![]() . A list of all columns opens.
. A list of all columns opens.
Clear the columns to hide. 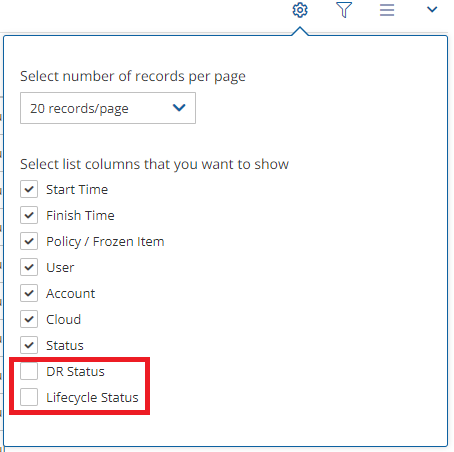
The “number of records per page” option also appears in this dialog box.
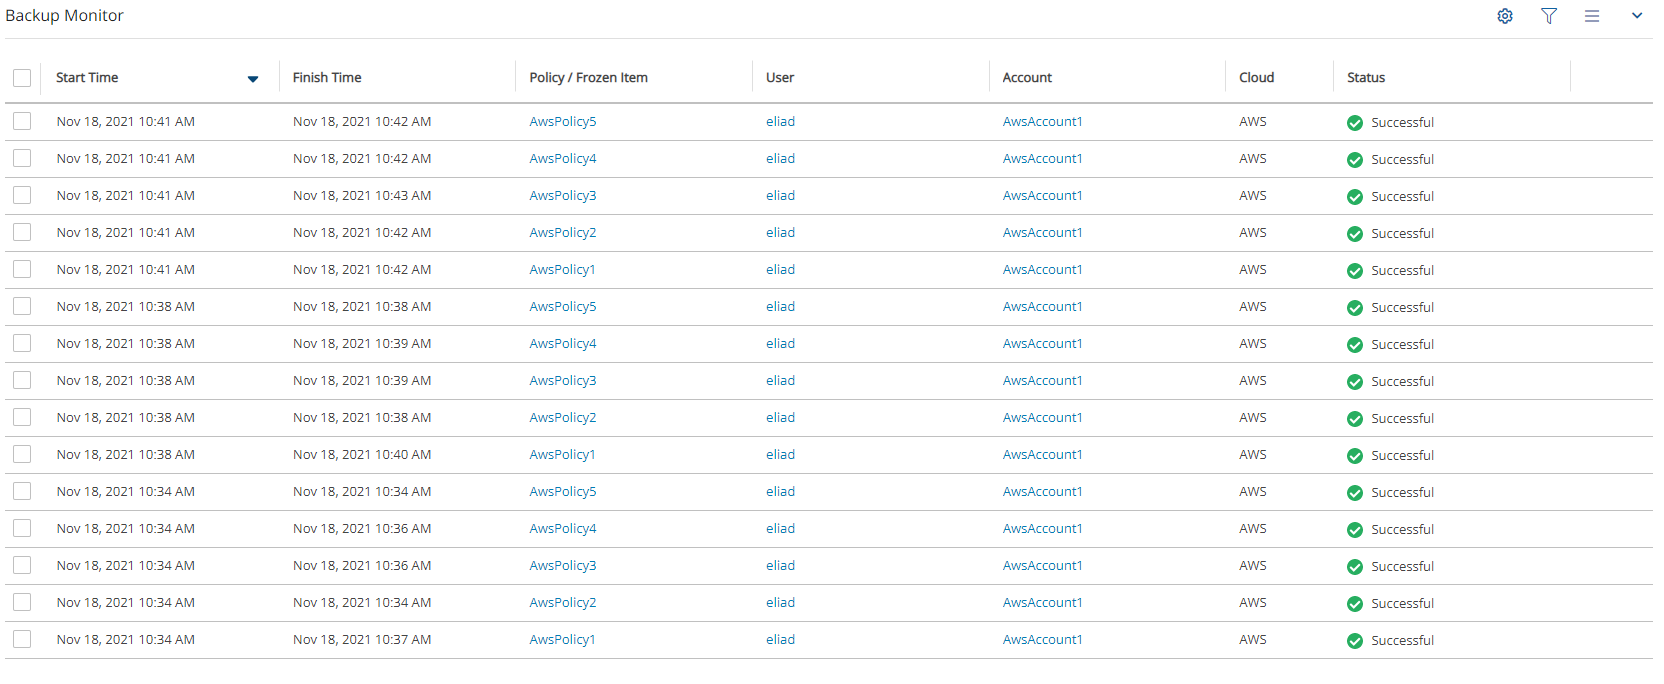
After hiding the 2 columns, the other columns become wider or do not change if they have a fixed size or a user-defined size.
3.7 Exporting Table Data
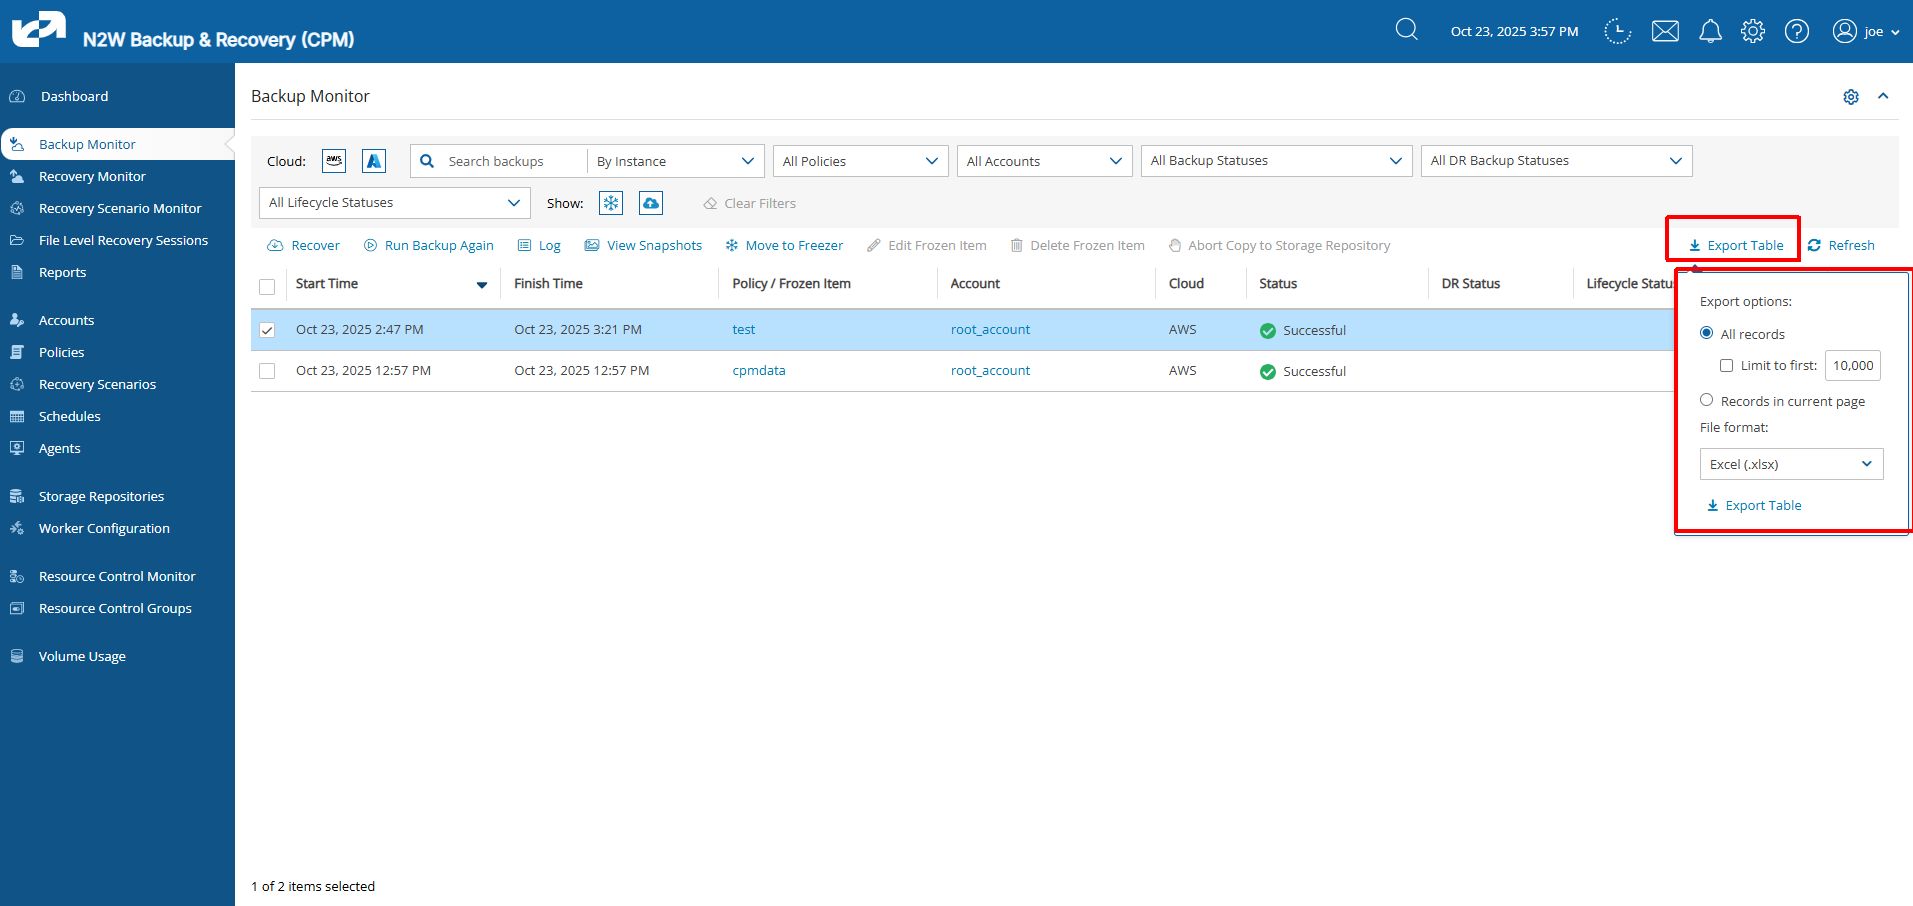
For any displayed table in N2W, you can export all records, some records, or only the table records on the current page, by selecting Export Table on the right side of the action toolbar.
Select the number of records and the output File format, such as CSV, and then select ![]() Export Table.
Export Table.
3.8 N2W Help and Support
You can email support issues to N2W Software support.
For the online help and support menu, select Help & Support ![]() in the top right toolbar.
in the top right toolbar.
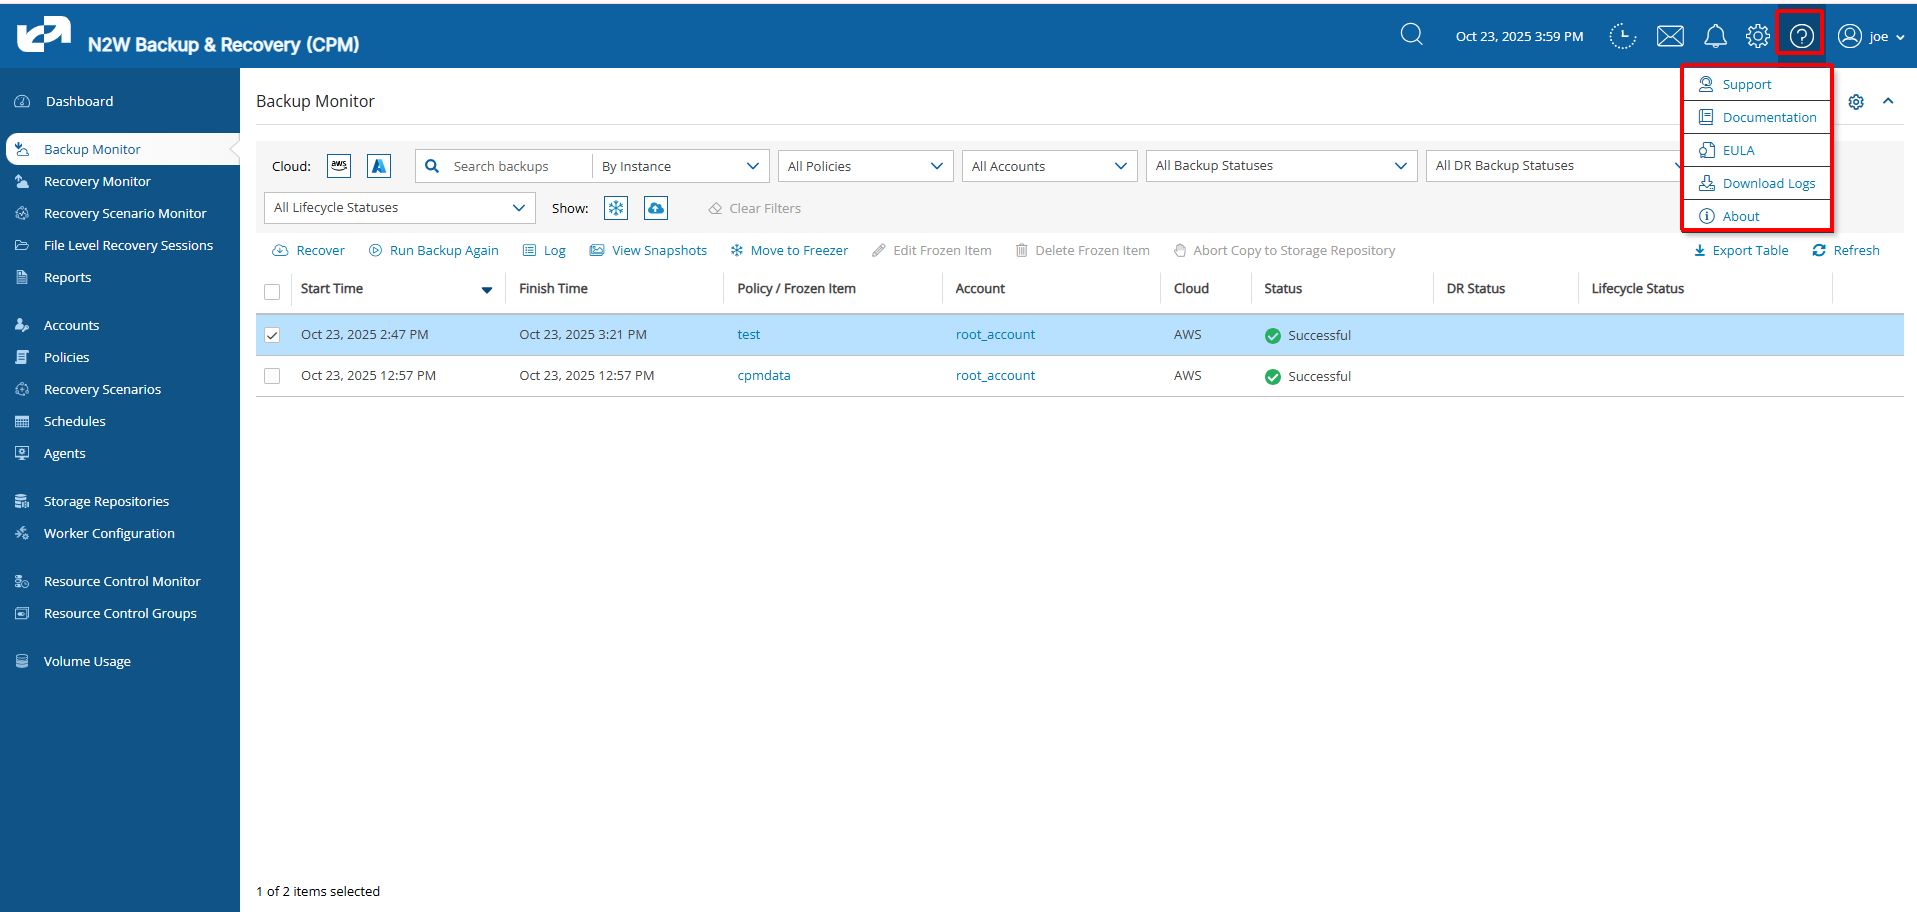
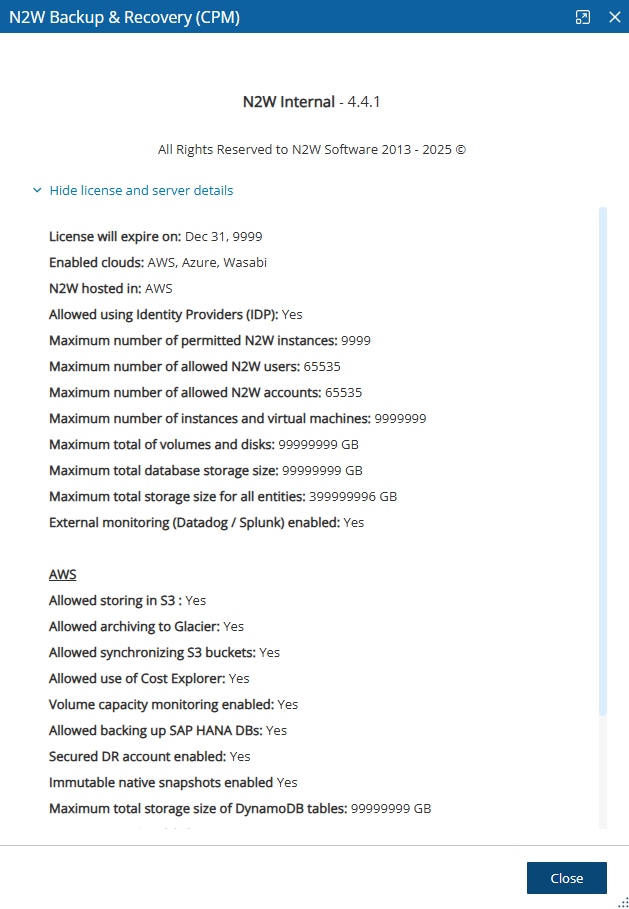
You can view your current privileges on the N2W licensed server or activation key by selecting About and then selecting Show license and server details.
For self-service support using the N2W knowledge base, documentation, how-to guides, and tutorial videos go to the N2W Support Center by selecting Support.
To go directly to the docs and guides, select Documentation.
To collect and download support logs, select ![]() Download Logs. In the Download Support Logs dialog box, select the relevant logs and time frame, and then select Download Logs.
Download Logs. In the Download Support Logs dialog box, select the relevant logs and time frame, and then select Download Logs.
The following options are available:
Collect N2W Basic Logs - These logs are always collected by default.
Check Account permissions (AWS/Azure/Wasabi) – Against the required permissions for cloud services and resources.
Collect Worker Logs – When support is needed for worker-related issues. If enabled, you can choose to include logs from any worker (the default), or collect only logs related to specific policies.
Collect System Logs – For comprehensive system debugging.
Collect Miscellaneous System/Backup Logs from last - Select Day, Week, or Month in the list.
N2W support covers all N2W Software users including AWS Outposts.
Last updated
Was this helpful?

