19 N2W IdP Integration
Here you will learn about integrating Identity Providers (IdP) with N2W.
N2W supports users configured locally (local users) and users configured using the organization’s federated identity provider (IdP).
Local users are created and managed using the N2W User Management capabilities described above.
IdP users are users whose credentials are received from the organization’s IdP. N2W can be configured to allow users in the organization’s IdP system to log in to N2W using their IdP credentials. Integration with IdP systems is performed using the SAML 2.0 protocol.
N2W supports:
Active Directory (AD) 2012 and 2016. If using SAML 2.0, AD 2019 also supported.
Azure Active Directory-based Single Sign-On (SSO)
IDP vendors who support SAML 2.0
The N2W root user can only login through the local user account even when N2W is configured to work with IdP.
Configuring N2W to work with IdP consists of the following:
Configuring the IdP to work with N2W
Configuring N2W to work with the IdP
Configuring N2W Groups in N2W
Configuring N2W Groups and Users in IdP
19.1 Configuring IdPs to Work with N2W
N2W supports the SAML 2.0 protocol for integration with IdP systems. N2W Software qualifies only certain IdP systems internally, but any SAML 2.0 compliant IdP system should be able to work smoothly with N2W.
19.1.1 Prerequisites to IdP Integration with N2W
Before configuring N2W to work with an IdP system, it is required that N2W be configured in the IdP system as a new application. Consult the IdP system’s documentation on how to configure a new application.
When configuring N2W as a new IdP application, verify that:
The default Name ID format used in SAML requests is set to Unspecified, or modify the default N2W configuration as per section on N2W configuration below.
The X509 certificate Secure hash algorithm is set to SHA-256.
The following URL values are used:
<N2W-Address>is either the DNS name or the IP address of the N2W Server.Entity ID -
https://<N2W-Address>/remote_auth/metadataSign in response -
https://<N2W-Address>/remote_auth/complete_login/Sign out response -
https://<N2W-Address>/remote_auth/complete_logout/
As part of configuring N2W as a new IdP application, the IdP system will request a file containing the N2W x509 certificate. The certificate file can be obtained from the N2W Settings screen in the Identity Provider tab. In the Settings tab, select ![]() Download CPM's Certificate and choose a location to save the file. See section 19.1.2.
Download CPM's Certificate and choose a location to save the file. See section 19.1.2.
If configuring Microsoft Active Directory/AD FS to work with N2W, refer to section 19.4.1.
19.1.2 Configuring N2W for IdP Integration
If configuring N2W for integration with Microsoft Active Directory/AD FS, refer to section 19.5.
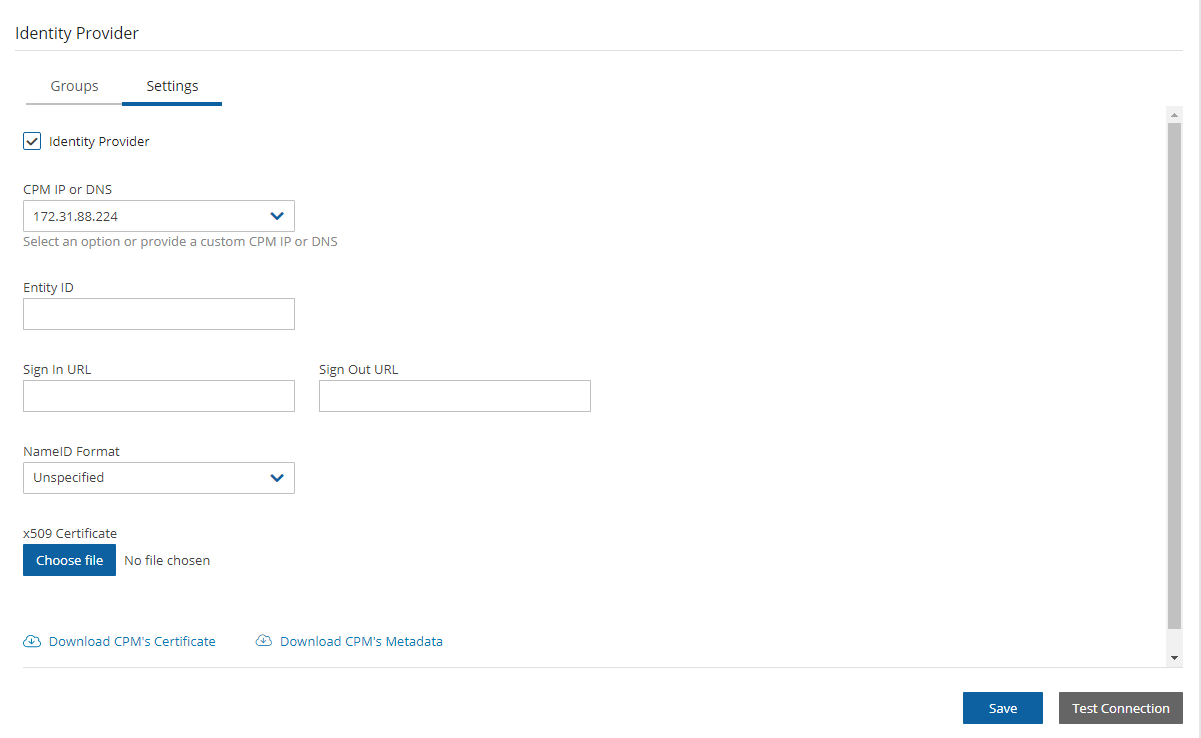
To configure N2W to work with the organization’s IdP:
In the N2W toolbar, select
 Server Settings.
In the left panel, select the Identity Provider tab and then select the Settings tab.
Select Identity Provider. The configuration parameters appear.
Complete the following parameters.
Once all the parameters have been entered, select Save.
Optionally, you can Download CPM’s Certificate and Metadata.
Select Test Connection to test the connection between N2W and the IdP.
CPM IP or DNS – The IP Address or DNS name of the N2W server.
N2W accepts either the IP address or DNS name in many fields. However, some IdPs require that N2W be configured using the format used when configuring N2W as an application in the IdP system. If the IdP uses DNS names, use DNS names in N2W, and if the IdP uses IP address, use IP addresses in N2W.
Entity ID – The Identity Provider Identifier’s URI provided by the IdP system. Consult the IdP system’s documentation.
Sign In URL – The authentication request target is the URL, provided by the IdP system, to which N2W will redirect users after entering their IdP credentials. Consult the IdP system’s documentation.
Sign Out URL – The logout request target is the URL, provided by the IdP system, to which N2W will redirect users once they logout of N2W. Consult the IdP system’s documentation.
NameID format – The format of the SAML NameID element.
X509 Certificate – Select Choose file to upload the IdP’s X509 certificate. Consult the IdP system’s documentation about obtaining their x509 certificate.
19.2 Configuring Groups and Group Permissions on the N2W Side
Groups and the permissions assigned to groups are configured in N2W. When an IdP user logs into N2W, the information about the user’s group membership is received from the IdP and that group’s permissions are assigned to the user.
Every IdP user must belong to an N2W group. IdP users who do not belong to a group, even if they have user-specific permissions as detailed below, cannot log on to N2W. Logon by IdP users who do not belong to a group will be failed with an appropriate error message.
Default groups do not appear until Identity Provider is enabled in the Settings tab.
N2W comes with pre-defined groups named with the prefix default:
default_managed_usersdefault_independent_usersdefault_root_delegatesdefault_root_delegates_readonly
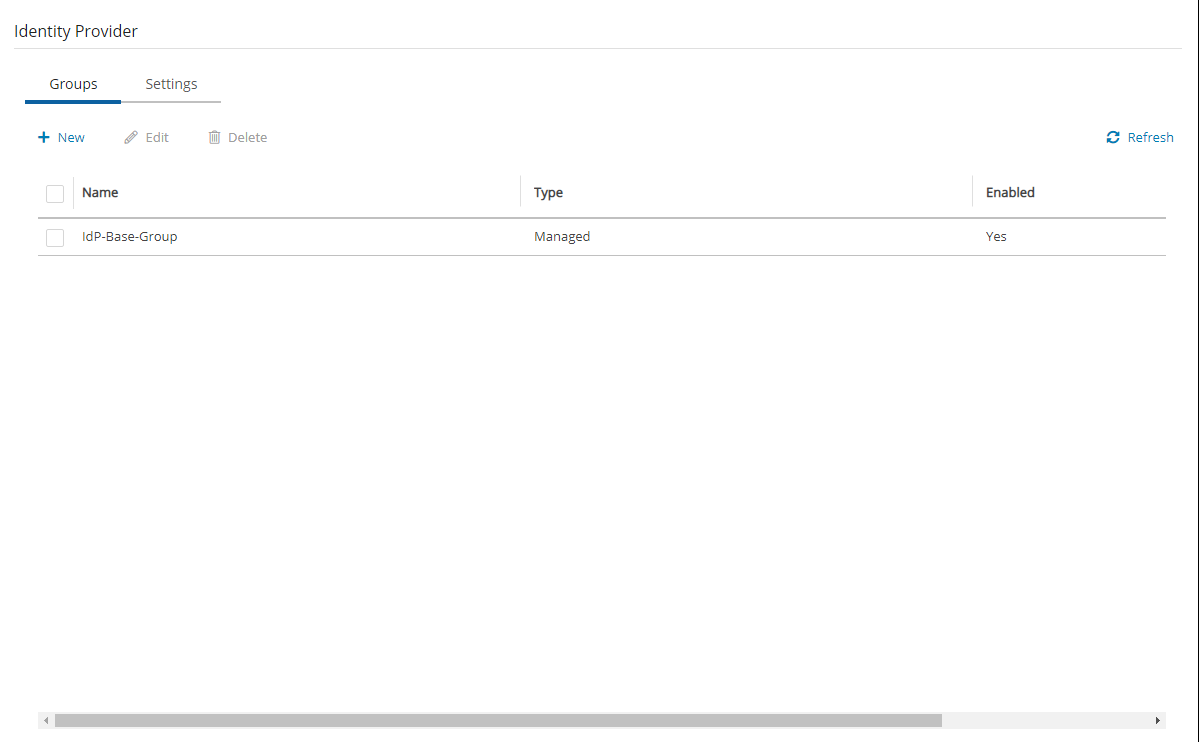
The default groups cannot be modified or deleted. To see the permission settings assigned to the default groups, select the group name.
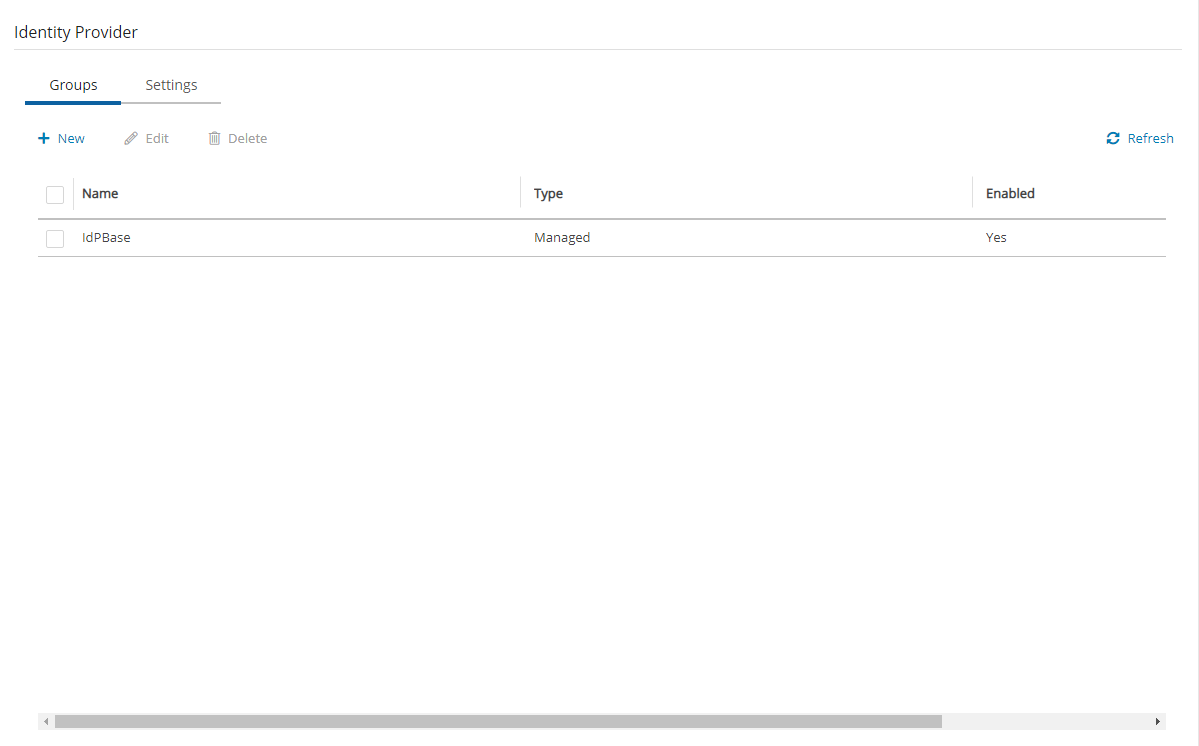
Additional groups can be created and removed easily in the Identity Provider tab of the N2W Server Settings screen.
To add a group:
The group permission settings essentially mirror the user permissions detailed in section 18.
In the Identity Provider tab, select the Groups tab and then select
 New. The New IDP Group screen will appear.
Complete the fields as needed, and then select Save.
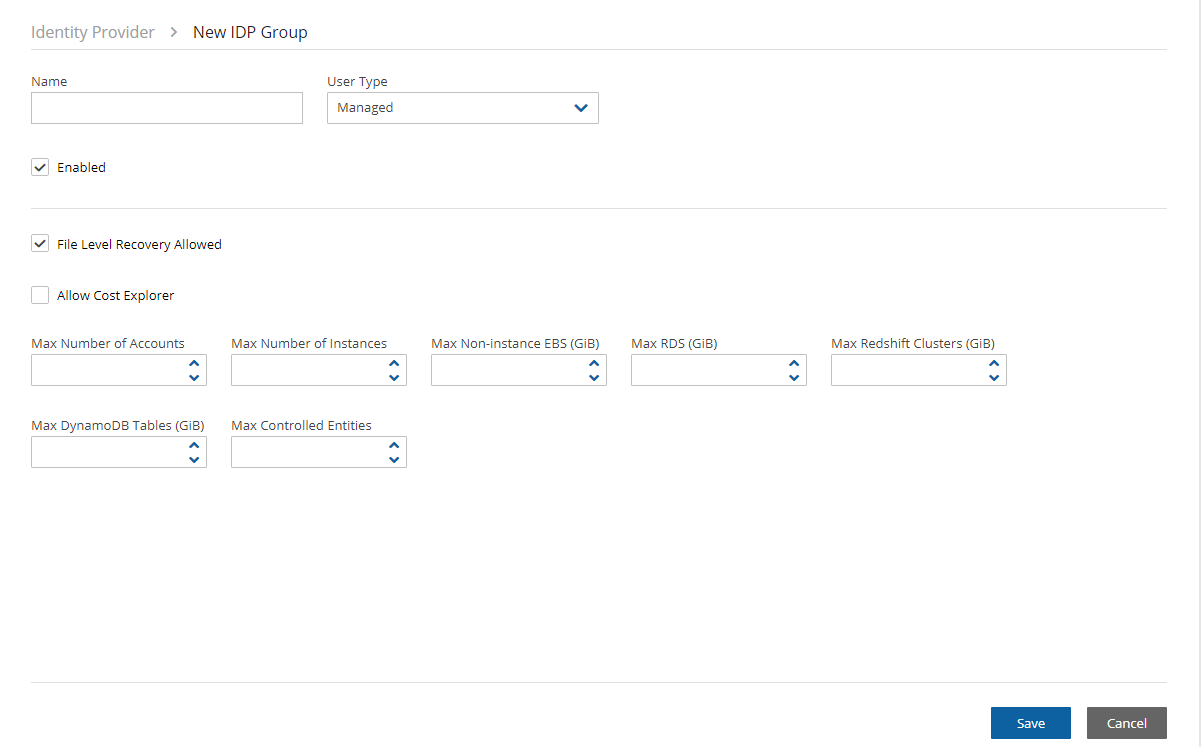
Name – Name of the group.
User Type – For details, see section 18. Parameters depend on the User Type selected.
Managed
Independent
Delegate
Enabled – When disabled, group users will not be able to log on to N2W.
For User Type Managed:
File Level Recovery Allowed– When selected, members of the group can use the file-level recovery feature.
Allow Cost Explorer – When selected, members of the group can see cost data. For Cost Explorer information, see section 25.
Max Number of Accounts – The maximum number of AWS accounts users belonging to this group can manage.
Max Number of Instances – The maximum number of instances users belonging to this group can manage.
Max Non-Instance EBS (GiB) – The maximum number of Gigabytes of EBS storage that is not attached to EC2 instances that users belonging to this group can manage.
Max RDS (GiB) – The maximum number of Gigabytes of RDS databases that users belonging to this group can manage.
Max Redshift Clusters (GiB) – The maximum number of Gigabytes of Redshift clusters that users belonging to this group can manage.
Max DynamoDB Tables (GiB) – The maximum number of Gigabytes of DynamoDB tables that users belonging to this group can manage.
Max Controlled Entities – The maximum number of allowed entities for Resource Control.
For User Type Delegate:
Original Username – Username of delegate. The Original Username to which this group is a delegate is required although the Original Username does not yet need to exist in N2W. After creation, the Original Username cannot be modified.
Allow to Perform Recovery – Whether the delegate can initiate a recovery.
Allow to Change Accounts – Whether the delegate can make changes to an account.
Allow to Change Backup – Whether the delegate can make changes to a backup.
19.3 Configuring Groups on the IdP Side
IdPs indicate a user’s group membership to N2W using IdP claims. Specifically, the IdP must configure an Outgoing Claim Type of cpm_user_groups whose value is set to all the groups the user is a member of, both N2W related groups and non-N2W related groups.
Group names on the IdP side no longer need the ‘cpm’ prefix. In cases where the names of the group users are assigned to in the IdP is of the form cpm_<group-name-in-N2W>, for example cpm_mygroup where mygroup is the name of a group that was created in N2W, the <group-name-in-N2W> part of the name must match the name of a group in N2W. See section 19.2. For example, to give IdP users permissions of the N2W group default_managed_users:
The relevant users can be members of an IdP group called
cpm_default_managed_users.The IdP must have an outgoing claim called
cpm_user_groups.The value of the claim must include the names of all the user’s groups in the IdP, which presumably includes
cpm_default_managed_users.
Or
The relevant users can be members of an IdP group called
default_managed_users.The IdP must have an outgoing claim called
cpm_user_groups.The value of the claim should not include the names of all the user’s groups in the IdP, which presumably is
default_managed_users.
An IdP user logging onto N2W can belong to only one N2W group, i.e., of all the groups listed in the cpm_user_groups claim, only one can be an N2W group, such as cpm_mygroup. If an IdP user is a member of more than one N2W group, the logon will fail with a message indicating the user belongs to more than one N2W group.
19.3.1 Understanding N2W User Permissions
A user logged into the N2W system can have several types of permissions. This section discusses the different types of permissions as they are applied to N2W IdP integration. For full treatment of the meanings of these permissions, see section 16.3. To override N2W group permissions on a per user basis, see section 19.3.2.
General User Attributes
Attribute Name
Mandatory
Meaning
Valid Values
user_type
N
Type of user.
Managed
Independent
Delegate
user_name
N
Username in N2W.
Alphanumeric string
user_email
N
User’s email address.
Valid email address
Attributes for Independent and Managed Users
Attribute Name
Mandatory
Meaning
Valid Values
allow_file_level_ recovery
N
Whether the user is allowed to use the N2W file-level restore feature.
yes, no
max_accounts
N
Number of AWS accounts the user can manage in N2W. Varies by N2W license type.
Number between 1 and max licensed
max_instances
N
Number of instances the user can backup. Varies by N2W license type.
Number between 1 and max licensed
max_independent_ebs_gib
N
Total size of EBS independent volumes being backed up in GiB (i.e., volumes not attached to a backed-up instance).
Number between 1 and max licensed
max_rds_gib
N
Total size of AWS RDS data being backed up in GiB
Number between 1 and max licensed
max_redshift_gib
N
Total size of AWS Redshift data being backed up in GiB
Number between 1 and max licensed
max_dynamodb_gib
N
Total size of AWS DynamoDB data being backed up in GiB.
Number between 1 and max licensed
max_controlled_entities
N
Total number of AWS resources under N2W Resource Control.
Number between 1 and max licensed.
Attributes for Delegate Users
Attribute Name
Mandatory
Meaning
Valid Values
original_username
Y
Name of the user for whom user_name is a delegate.
Alphanumeric string
allow_recovery_changes
N
Whether the user can perform N2W restore operations.
yes, no
allow_account_changes
N
Whether the user can manage N2W user accounts.
yes, no
allow_backup_changes
N
Whether the user can modify backup policies.
yes, no
allow_settings
N
Whether the user can modify S3 Repository settings.
yes, no
All the permissions detailed above are set for a group when the group is created in N2W. Additionally, it is possible to assign N2W permission at the level of individual IdP users as described in 19.3.2. When there is a conflict between a user’s group permissions and a user’s individual permissions, the individual permissions take precedence.
A permission string consists of key=value pairs, with pairs separated by a semicolon.
For convenience, below is a string of all the possible security parameters. N2W will accept a partial list consisting of any number of these parameters in any order:
19.3.2 Overriding Group Settings at the User Level
Users get the N2W permissions assigned to their group. However, it is possible to give specific IdP group members permissions different from their group permissions.
To override the group permission for a specific user:
The IdP administrator must first enter the new permissions in an IdP user attribute associated with the user. The attribute can be an existing attribute that will now serve this role (e.g.,
msDS-cloudExtensionAttribute1) or a custom attribute added to the IdP user schema specifically for this purpose. The content of the attribute specifies the user’s N2W permissions in the key=value format detailed in section 19.3.1.Permissions specified in the user attribute will override permissions inherited from the group.
Permission types not specified in the user attribute will be inherited from the group’s permissions. For example, if the attribute contains only the value
max_accounts=1, all other permissions will be inherited from the user’s group permissions.
Once a user attribute has been configured with the correct permissions, an IdP claim rule with Outgoing Claim Type
cpm_user_permissionsmust be created. The value of the claim must be mapped to the value of the attribute chosen above.When the user-level claim is enabled, the user will be able to log on to N2W with permissions that are different from the group’s permissions.
If configuring Microsoft Active Directory/AD FS, refer to section 19.6 for details.
19.4 N2W Login Using IdP Credentials
To use IdP credentials to log on to N2W, select the Sign in with Identity Provider option on the N2W Logon screen.

Selecting Sign in with Identity Provider will redirect the user to the organization’s IdP system using SAML.
To log on to N2W as root, log on with the standard user and password option.
19.4.1 Configuring AD/AD FS for Integration with N2W
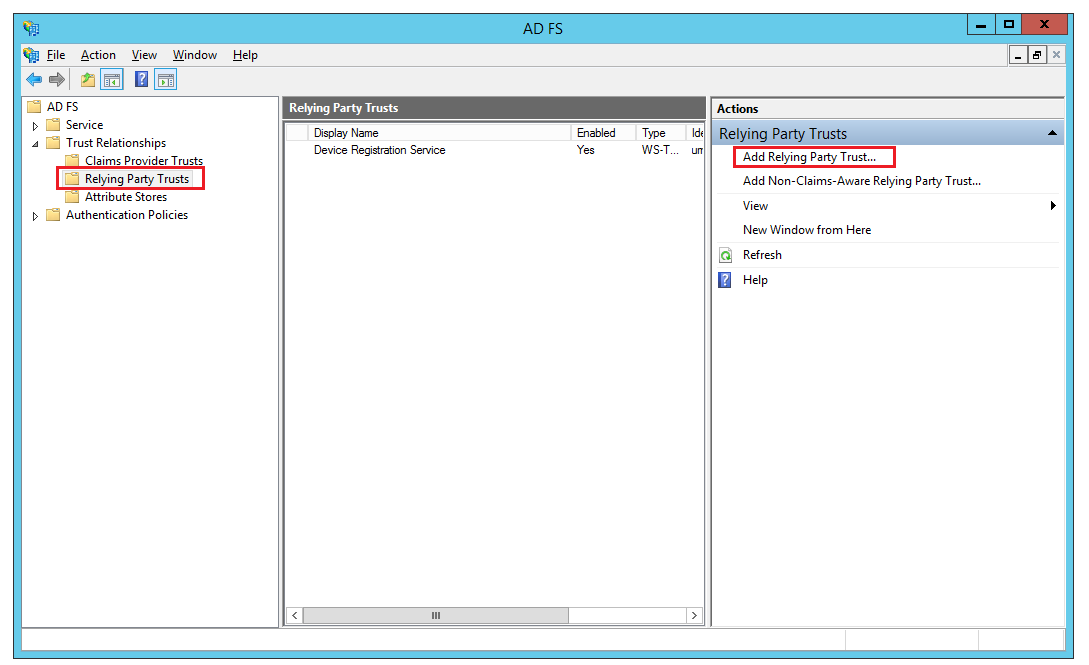
To enable N2W to integrate with AD/AD FS, N2W must be added to AD FS as a Relying Party Trust.
The following AD FS screenshots are from AD 2012. The AD 2016 screens are very similar.
To run the Add Relying Party Trust Wizard:
In the left pane of the AD FS console, select Relying Party Trusts.
In the right pane, select Add Relying Party Trust. . .. The Wizard opens.
Select Start.
Select the Enter data about the relying party manually option.
Select Next.
On the Welcome screen, type the display name for N2W (e.g.,
N2W), and then select Next.On the Choose Profile screen, select the AD FS profile option, and then select Next.
Skip the Configure Certificate screen by selecting Next.
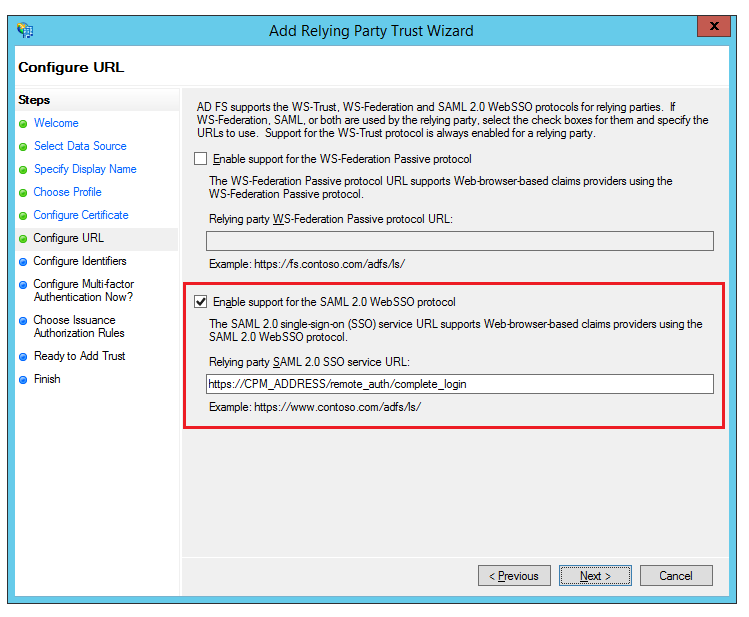
On the Configure URL screen:
Select Enable support for SAML 2.0 WebSSO protocol.
In the Relying Party SAML 2.0 SSO Service URL box, type
https://followed by the N2W DNS name or IP address, and then followed by/remote_auth/complete_login/. For example, the resulting string might look like:https://ec2-123-245-789.aws.com/remote_auth/complete_login/
Select Next.
In the Configure Identifiers screen, type
https://followed by the N2W DNS name or IP address, and then followed by/remote_auth/metadatain the Relying party trust identifier box. For example, the resulting string might look like:https://ec2-123-245-789.aws.com/remote_auth/metadataSelect Add on the right.
Select Next.
On the Configure Multi-factor Authentication Now? screen, select the I do not want to configure multi-factor authentication settings for this relying party trust at this time option, and then select Next.
On the Issuance Authorization Rules screen, select the Permit all users to access this relying party option, and then select Next.
On the Ready to Add Trust screen, review the setting of the Relying party trust configured with the Wizard. When finished, select Next.
On the Finish screen of the Wizard, select Close. There is no need to select the Open the Edit Claim Rules dialogue for this relying party trust when the wizard closes option.

19.4.2 Installing the N2W Certificate
In order for N2W to work with AD FS the X.509 certificate used by N2W needs to be added to the AD FS Trusted Root Certification Authorities list. If you installed your own certificate in N2W when you first configured N2W (as per section 2.4.2), then your certificate may already be in your AD FS root trust. Otherwise, you will need to add it. If you used the certificate N2W creates during installation, you will need to add that certificate into the AD FS Trusted Root Certification Authorities.
To add a root certificate to the AD FS Trusted Root Certification Authorities:
Go to the Signature tab under properties and select Add….
In the File box at the bottom of the screen, type the name of the file containing the N2W x.509 certificate. This will be either:
The root certificate you installed in N2W when it was first configured as per section 2.4.2 if not already in the AD FS Trusted Root Certification Authorities, or
The certificate N2W created when it was first configured.
To obtain a copy of the certificate being used by N2W, either the one you originally installed or the one N2W created, select
 Download CPM's Certificate at the bottom of the Identity Provider tab of the Server Settings screen.
Once you have entered the name of the file, select Open. The N2W certificate is now visible in the center pane in the Signature tab.
In the center pane of the Signature tab, double select the N2W certificate.
Under the General tab, select Install Certificate….
In the Certificate Import Wizard screen, select the Local Machine option, and then select Next.
Select the Place all certificates in the following store option, select Browse…, and then select the Trusted Root Certification Authorities store. Select OK.
Select Next.
Select Finish. Then select OK on the pop-up screen, select OK on the General tab, and then select OK on the Properties screen.
19.4.3 Setting AD FS Properties
Once the Relying Party Trust has been configured, set the AD FS properties.
To set the AD FS properties:
Go back to the AD FS management console, and in the middle pane, right-select the N2W line under Relying Party Trust, and then select Properties.
On the screen that opens, select the Endpoints tab, and then select Add SAML….
In the Edit Endpoint screen, select SAML Logout from the Endpoint type list.
In the Trusted URL box, type the DNS name or IP address of the AD FS server followed by
/adfs/ls/?wa=wsignout1.0(e.g.https://adserver.mycompany.com/adfs/ls/?wa=wsignout1.0)In the Response URL box, type DNS name or IP address of the N2W server followed by
/remote_auth/complete_logout/(e.g.https://ec2-123-245-789.aws.com/remote_auth/complete_logout/).Select OK.
Go to the Advanced tab, and in the Secure hash algorithm list, select SHA-256, and then select Apply.

19.4.4 Creating an AD FS Name ID Claim
To create an AD FS claim:
Open the ADFS management console. In the main page of the management console, select Relying Party Trusts in the left pane.
In the middle Relying Party Trust pane, select the N2W party (e.g., N2W).
In the right pane, select Edit Claim Rules…
In the Edit Claim Rules screen, select Add Rule.
In the Claim rule template list, select Transform an Incoming Claim and then select Next.
Complete the Add Transform Claim Rule Wizard screen:
In the Claim rule name box, type a name for the claim.
In the Incoming claim type list, select Windows account name.
In the Outgoing claim type list, select Name ID.
In the Outgoing name ID format list, select Unspecified.
Select the Pass through all claim values option.
Select OK.


The next step is to add a Token-Groups claim.
19.4.5 Adding a Token-Group’s Claim
An ADFS Token-Groups claim must be configured so that AD FS will send N2W the list of groups a user is a member of. To configure the Token Group’s claim, perform steps 1 and 2 of the Configuring Name ID Claim process in section 19.4.4. Then continue as follows:
In the Claim rule template list, select Send LDAP Attributes as Claims and then select Next.
In the Claim rule name box, type a name for the rule you are creating.
In the Attribute store list, select Active Directory. In the Mapping of LDAP attributes to outgoing claim types table:
In the left column (LDAP Attribute), select Token-Groups - Unqualified Names.
In the right column (Outgoing Claim Type), type
cpm_user_groups.


19.4.6 Testing the Connection
At this point AD FS has been configured to work with N2W. It is now possible to perform a connectivity test between N2W and AD FS.
To test the connection between N2W and AD FS:
Go to the N2W
 Server Settings.
Select the Identity Provider tab.
In the Groups tab, select an Identity Provider.
In the Settings tab, select Test Connection.
Type a valid AD username and password on the logon page.
Select Sign in.
19.5 Configuring N2W to Work with Active Directory/AD FS
To configure N2W to work with the organization’s AD server:
Go to the N2W
 Server Settings.
Select the Identity Provider tab.
In the Identity Provider list, select a Group.
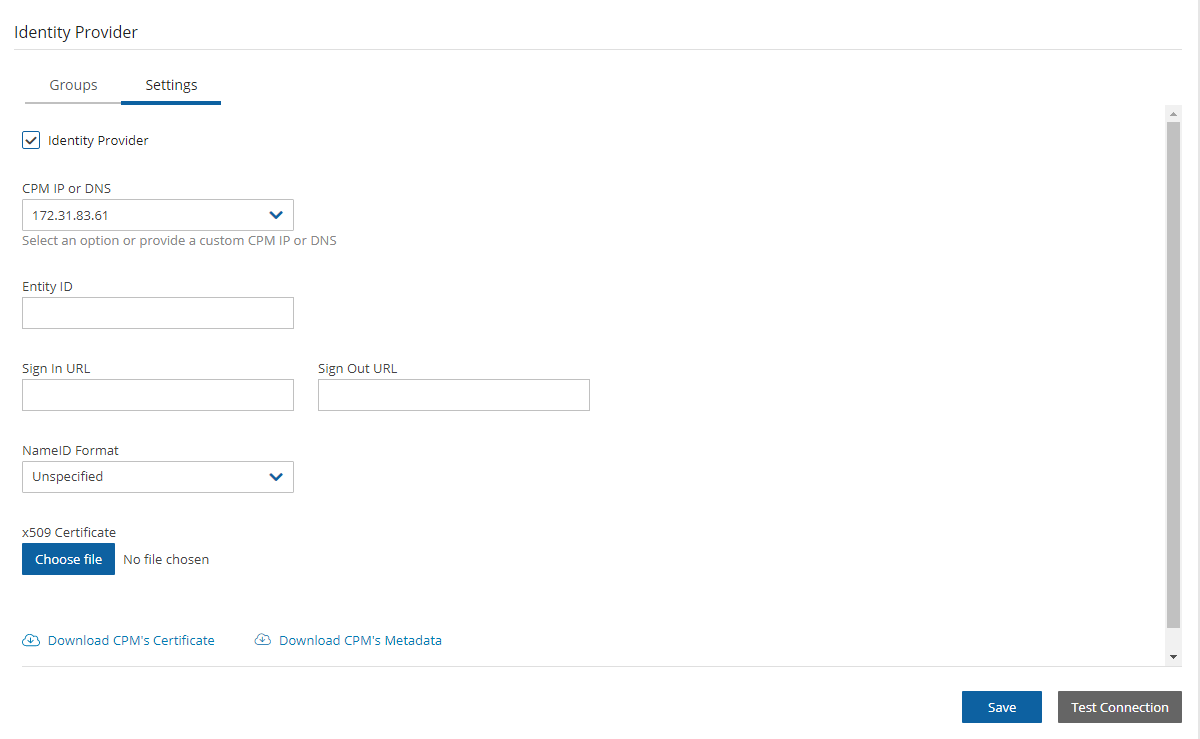
To enable the group, select the Settings tab, and then select Identity Provider. Several IdP related parameters are presented.
In the Entity ID box, type the AD FS Federation Service Identifier, as configured in AD FS. See section 19.5.1 to locate this parameter in AD FS.
In the Sign in URL box, type the URL to which N2W will redirect users for entering their AD credentials. This parameter is configured as part of AD FS. The AD FS server’s DNS name, or IP address, must be prepended to the URL Path listed in AD FS. See the AD FS Endpoints screen (19.5.2) to locate this information.
In the NameID Format list, select the format of the SAML NameID element.
In the x509 cert box, upload the X509 certificate of the AD FS server. The certificate file can be retrieved from the AD FS management console under Service -> Certificates, as shown in section 19.5.3.
Once all the parameters for N2W have been entered, select Save and then select Test Connection to verify the connection between N2W and the IdP.
19.5.1 Federation Service Properties

19.5.2 AD FS Endpoints

19.5.3 Exporting the IdP Certificate
The certificate file can be retrieved from the AD FS management console under Service -> Certificates:
To export the IdP’s certificate:
Double select the Token signing field to open the Certificate screen.
Select the Details tab and then select Copy to File . . . on the bottom right.
Select Next to continue with the Certificate Export Wizard.
Select the Base-64 Encoded X.509 (
.crt) option and then select Next.Type a name for the exported file and select Next.
Select Finish.
19.6 Configuring an AD FS User Claim
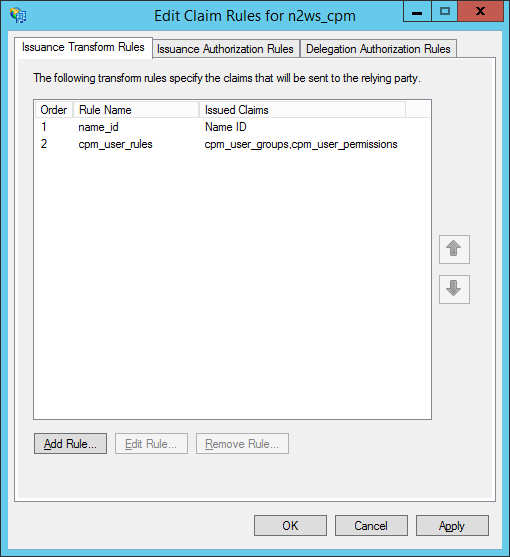
Once a user attribute has been configured with the correct permissions, an ADFS claim rule with Outgoing Claim Type cpm_user_permissions must be created before the user-level permissions can take effect.
To create the claim rule:
Open the AD FS management console.
In the main page of the management console, in the left pane, select Relying Party Trusts.
Select the N2W party (e.g., N2W) in the middle pane, and in the right pane, select Edit Claim Rules.
In the Edit Claim Rules screen, select Add Rule.
In the Add Transform Claim Rule Wizard screen (section 19.6.1), select Send LDAP Attributes as Claims in the Claim rule template list, and then select Next.
The Claim Rule Wizard opens the Edit Rule screen (section 19.6.2). Complete as follows:
In the Claim rule name box, type a name for the rule you are creating.
In the Attribute store list, select Active Directory.
In the Mapping of LDAP attributes to outgoing claim types table:
In the left column (LDAP Attribute), type the name of the user attribute containing the user permissions (e.g.,
msDS-cloudExtensionAttribute1).In the right column (Outgoing Claim Type), type
cpm_user_permissions.
Select OK to create the rule.
Once the user-level claim is enabled, the user will be able to log on to N2W with permissions that are different from the group’s permissions.

19.6.1 Add Transform Claim Rule Wizard

19.6.2 Edit Rule

19.7 Configuring Azure AD and N2W IdP Settings
This section describes how to configure Microsoft Azure Active Directory and N2W IdP settings to communicate and enable logging.
19.7.1 Azure AD Configuration
For complete details on how to configure the Azure AD, see https://docs.microsoft.com/en-us/azure/active-directory/develop/active-directory-optional-claims
19.7.2 N2W IdP Configuration
To view the Azure AD settings for use in N2W configuration:
While still in the Azure AD settings, go to single sign-on and switch to the new view

Scroll down to section 4. These parameters will be used to configure the N2W IdP settings.

To configure the N2W Azure AD IdP settings:
In the N2W UI, go to Server Settings > Identity Provider.
Select the provider, and then select
 Edit.
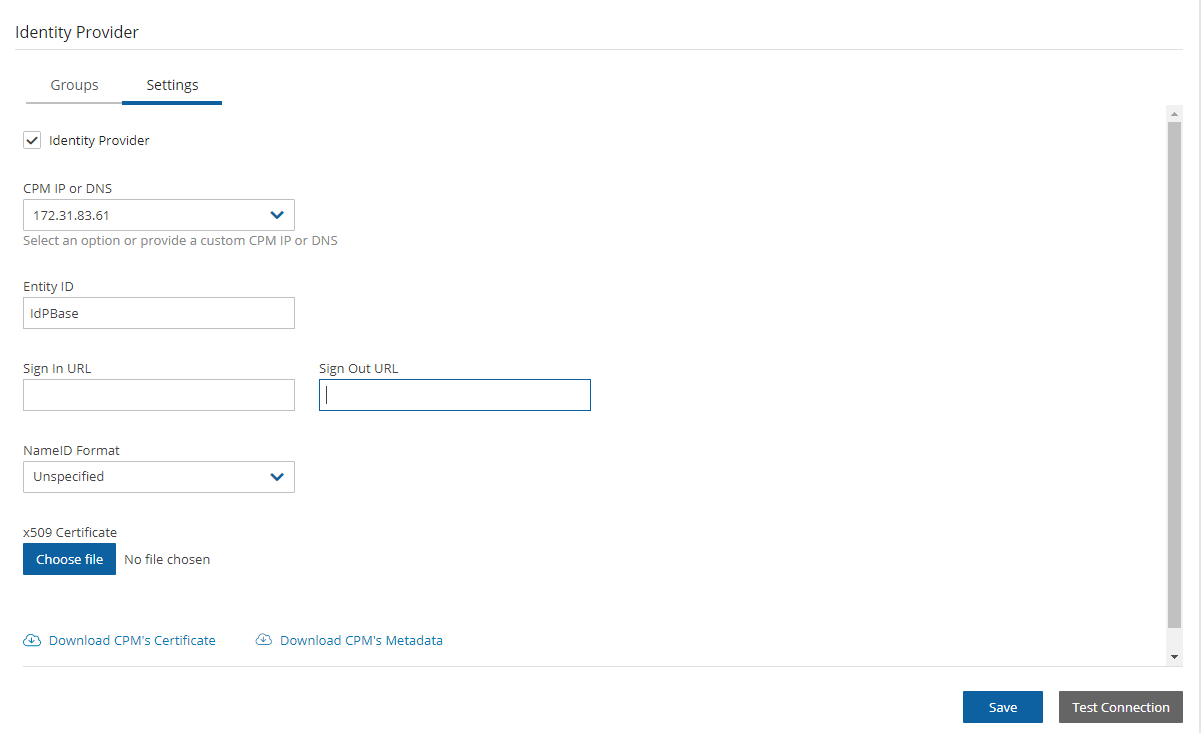
Edit.In the Settings tab, complete the following:
Entity ID - Copy Azure AD Identifier.
Sign In URL - Copy Login URL.
Sign out URL - Copy Logout URL.
NameID Format - Select Unspecified.
x509 cert - Upload the certificate exported in section 19.5.
Add a new group with the name of the group you added in the Azure Active Directory, without the
cpmprefix. Select the Groups tab and then select  New and add a name for the group.
Select Save.
Return to the Settings tab and select Test Connection.
Was this helpful?

