9 Additional Backup Topics
Here we cover some backup topics that haven't been addressed earlier.
9.1 N2W in a VPC Environment
The N2W server runs in a VPC, except in old environments utilizing EC2 Classic. For N2W to work correctly, it will need outbound connectivity to the Internet. To use AWS endpoints, see AWS Regions and Endpoints.
You will need to provide such connectivity using one of the following methods:
Attaching an Elastic IP.
Using a dynamic public IP, which is not recommended unless there is a dynamic DNS in place.
Enabling a NAT configuration, or
Using a proxy.
You will need to access it using HTTPS to manage it and possibly SSH as well, so some inward access will need to be enabled.
If you will run Linux backup scripts on it, it will also need network access to the backed-up instances.
If N2W backup agents will need to connect, they will need access to it (HTTPS) as well.
If backup scripts are enabled for a Linux backed-up instance, it will need to be able to get an inbound connection from the N2W Server.
If a Thin Backup Agent is used in a Windows backed-up instance, the agent will need outbound connectivity to the N2W Server.
9.2 Backup when an Instance is Stopped
N2W continues to back up instances even if they are stopped. This may have important implications:
If the policy has backup scripts and they try to connect to the instance, they will fail, and the backup will have Backup Partially Successful status.
If the policy has no backup scripts and VSS is not configured, or if the policy’s options indicate that Backup Partially Successful is considered successful (section 4.2.2), the backup can continue running, and automatic retention will delete older backups. Every new backup will be considered a valid backup generation.
Snapshots will soon take no storage space since there will be no changes in the volumes, and EBS snapshots are incremental.
Assuming the instance shuts down in an orderly manner and did not crash, backups will be consistent by definition.
N2W recommends that if you are aware of an instance that will be stopped for a while, you disable the policy by selecting its name and changing status to disabled.
Another way to proceed is to make sure the policy is not entirely successful when the instance is stopped by using backup scripts and to keep the default stricter option that treats script failure as a policy failure. This will make sure that the older generations of the policy, before it was stopped, will not be deleted.
If you disable a policy, you need to be aware that this policy will not perform backup until it is enabled again. If you disable it when an instance is stopped, make sure you enable it again when you need the backup to resume
9.3 The Freezer
Backups belonging to a policy eventually get deleted. Every policy has its number of generations, and the retention management process automatically deletes older backups.
To keep a backup indefinitely and make sure it is not deleted, move it to the Freezer. There can be several reasons to freeze a backup:
An important backup of an instance you already recovered from so you will be able to recover the same instance again if needed.
A backup of interest, such as the first backup after a major change in the system or after an important update.
You want to delete a policy and only keep one or two backups for future needs.
Elements in the freezer will not be deleted by the automatic Cleanup process.
To move a backup to the Freezer:
Once a backup is moved to the freezer, you will not be able to move it back.
In the left panel, select the Backup Monitor tab.
Select the backup and then select
 Move to Freezer.
Type a unique name and an optional description for identification and as keywords for searching and filtering later.
After a backup is in the Freezer:
Frozen backups are identified by the frozen symbol
 in the Lifecycle Status column of the Backup Monitor tab.
It will only be deleted if you do so explicitly. Use
 Delete Frozen Item.
If you delete the whole policy, frozen backups from the policy will remain.
It is recovered the same way as from a regular backup.
You can search and filter frozen backups using as keywords the name or description. To change the name or description, select
 Edit Frozen Item.
While in the Backup Monitor, you can switch between showing backup records 'in the Freezer' by turning on and off the![]() toggle key and backup records 'not in the Freezer' by turning on and off the
toggle key and backup records 'not in the Freezer' by turning on and off the ![]() toggle key in the Show
toggle key in the Show ![]() area on the far right of the filters line.
area on the far right of the filters line.
9.4 Running Automatic Cleanup
Automatic Cleanup allows you to manage the frequency of the cleanup process and the:
Number of days to keep backup records, even if the backup is deleted.
Number of days after which to rotate single AMIs.
Keeping backups for long periods of time can cause the N2W database to grow and therefore affect the size you need to allocate for the CPM data volume. N2W Software estimates that every GiB will accommodate the backup of 10 instances. N2W Software estimates that 10 instances are correct when every record is kept for around 30 days. If you want to keep records for 90 days, triple the estimate, i.e., for 10 instances make the estimate 3 GiB, for 20 make the estimate 6 GiB, etc.
To manage the number of generations saved:
In the toolbar, select
 Server Settings.
In the General Settings tab, select Cleanup.
In the Cleanup Interval list, select the number of hours between cleanup runs. Select Cleanup Now to start a cleanup immediately.
In each list, select the number of days to:
Rotate Single AMIs
Keep Deleted Records
Keep User Audit logs
Keep Resource Control Records
To keep retry backup records for reporting, select Keep Retry Backup Records.
The number of days is counted since the backup was created and not deleted. If you want to make sure every backup record is saved for 90 days after creation, even if it was already deleted, select 90.
The S3 Cleanup runs independently according to the retention period configured for the policy in the backup copy settings. See section 21.1. The last S3 Cleanup log however is available in the Cleanup tab.
9.5 Backing up Independent Volumes
Backing up independent volumes in a policy is performed regardless of the volume's attachment state. A volume can be attached to any instance or not attached at all, and the policy will still back it up. Backup scripts can determine which instance is the active node of a cluster and perform application quiescence through it.
9.6 Excluding Volumes from Backup
If you enable the Exclude volumes option in the Tag Scan tab of the General Settings:
The Exclude volumes option overrides the exclusion of volumes performed through the UI.
Tagged instances are not included in the Exclude volumes option and are excluded from backup only when tagged with ‘#exclude’ for the policy.
Following are the ways to exclude volumes from backup:
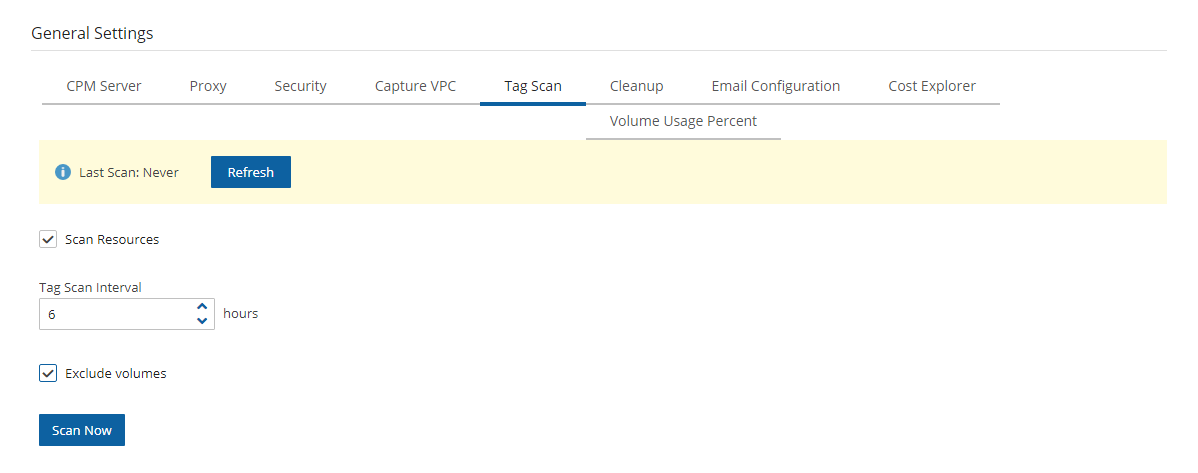
Enabling the Exclude volumes option in General Settings:
In the toolbar, select
 Server Settings > General Settings.
In the Tag Scan tab, select Exclude volumes, and then select Scan Now.
Disabling a scheduled backup time. See section 4.1.4.
Excluding a volume from a policy configuration in the UI. See section 4.2.3.
Using an ‘#exclude’ tag for the policy. See section 14.1.6.
9.7 Regions Disabled by Default
To perform certain actions on Asia Pacific (Hong Kong) and Middle East (Bahrain) AWS regions, managing Session Token Services (STS) is required, as Session Tokens from the global endpoint (https://sts.amazonaws.com) are only valid in AWS Regions that are enabled by default.
For AWS Regions not enabled by default, users must configure their AWS Account settings.
To configure AWS Account settings to enable Session Tokens for all regions:
Go to your AWS console and sign in at https://console.aws.amazon.com/iam
In the navigation pane, select Account settings.
In the ‘Security Token Service (STS)’ section, select Change Global endpoint.
In the Change region compatibility of session tokens for global endpoint dialog box, select Valid in all AWS Regions.
Session tokens that are valid in all AWS regions are larger. If you store session tokens, these larger tokens might affect your system.
For more information on how to manage your STS, see https://docs.aws.amazon.com/IAM/latest/UserGuide/id_credentials_temp_enable-regions.html
9.8 Synchronizing S3 Buckets
You can automatically synchronize S3 buckets using the N2W S3 Bucket Sync feature. When the policy backup runs, N2W will copy the source bucket to the destination bucket, without creating a backup. The buckets are selected and configured in Backup Targets of the Policies tab.
Bucket versioning is not supported. The latest version is automatically selected.
If the source S3 bucket object is of the storage class Glacier or Deep Archive, it is not possible to synchronize the bucket. It is necessary to retrieve and restore the object before synchronizing the bucket.
There is a time limitation when syncing between 2 S3 buckets. N2W will continue performing the synchronization as long as the Maximum session duration for the AWS Role is not exceeded. In the AWS IAM Console, go to the Roles Summary of the CPM instance and select Edit to configure the parameter.
To synchronize S3 buckets:
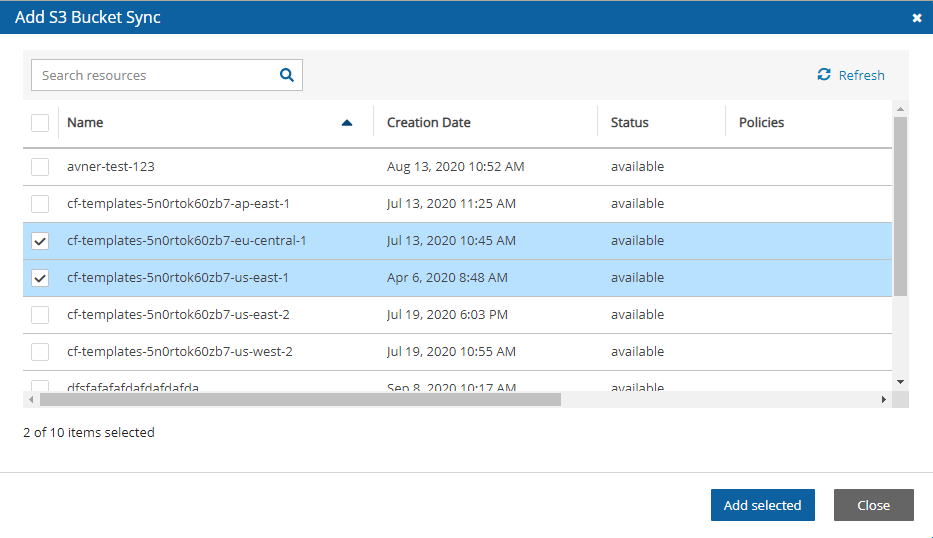
In the Policies tab, select a policy and then select the Backup Targets tab.
In the Add Backup Targets menu, select S3 Bucket Sync. The Add S3 Bucket Sync screen opens.
Choose one or more buckets, and select Add selected. Selected buckets are removed from the table.
In the Backup Targets tab, for each newly added S3 bucket, select the bucket, and then select
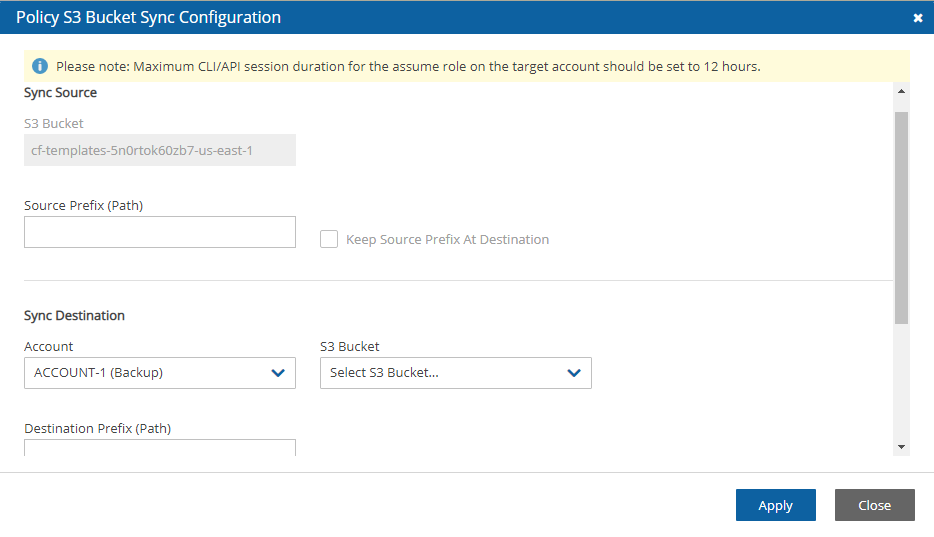
 Configure. The Policy S3 Bucket Sync Configuration screen opens.
In the Sync Source section, you have options to enter a Source Prefix (Path) and to select whether to Keep Source Prefix at Destination. This option will allow you to combine the source prefix with the destination prefix. For example, if the source prefix is ‘/a/b’ and the destination prefix is ‘/c/d’, the objects will be synchronized to ‘a/b/c/d’.
In the Sync Destination section, configure the following, and then select Apply:
Region – Select the destination region to copy to.
Account – Select the destination account to copy to.
S3 Bucket – Select the destination bucket. The account for the destination bucket may be different than the account for the source bucket. See 9.8.1 for cross-account S3 bucket sync.
Destination Prefix (Path) – Enter the destination prefix, if any. If a prefix is entered, the dynamic message under the box will display the destination prefix. If Keep Source Prefix at Destination was selected, the prefix will be the concatenation of the source and destination prefixes. For example, source prefix ‘abc’ and destination ‘xyz’ will result in a destination prefix of ‘abc/xyz’.
Storage Class – Select the S3 Storage Class or S3 Reduced Redundancy Storage:
Standard – For low latency and high throughput.
Reduced Redundancy - Enables customers to store non-critical, reproducible data at lower levels of redundancy than Amazon S3’s standard storage.
Standard IA - For data that is accessed less frequently, but requires rapid access. Ideal for long-term storage.
Delete Extra – Select to delete files that exist in the destination but not in the source during synchronization.
If you change the Storage Class of an S3 Bucket in the Policies tab, the Storage Class of an existing destination bucket will not automatically update during the next S3Sync run. In the Policies tab, select the S3 Bucket Sync object, and then select ![]() Configure.
Configure.
After the Policy has run, view the backup log to see the S3Sync details.

9.8.1 Cross-Account S3 Bucket Sync
The destination S3 bucket policy must have two entries allowing the source account access to the bucket and the objects in the bucket.
If either entry under Resource is missing, the S3 Sync will fail.
For details, see: https://n2ws.zendesk.com/hc/en-us/articles/28878273520797--AWS-S3SYNC-An-error-occurred-AccessDenied-when-calling-the-ListObjectsV2-operation-Access-Denied
For cross-account S3 Bucket Sync:
If using a custom KMS, allow the same in the destination bucket policy.
Cross-account S3 Bucket Sync is executed with the account of the policy, not the account of the destination S3 bucket, and requires cross-account access permissions to objects that are stored in the destination S3 bucket. For further information, see: https://aws.amazon.com/premiumsupport/knowledge-center/cross-account-access-s3/
Allow access for the source account in the destination bucket by adding it to Access Control List in the AWS S3 console. To find the Canonical ID, in the AWS Account menu, go to My security credentials and scroll to Account identifiers.
9.9 Backing up SAP HANA Databases
SAP HANA Database is an in-memory relational database that can run on an AWS EC2 instance.
N2W creates and stores both an EC2 instance and SAP HANA database snapshots as part of a policy backup. SAP HANA snapshots are stored to an AWS Storage Repository. Backups are always full to enable fast restores.
Currently, AWS only supports one backup of an SAP Hana database in parallel. For the time being, N2W allows adding an SAP Hana database to only one Policy.
9.9.1 Prerequisites for Creating an SAP HANA Policy
Complete the following prerequisites before creating SAP HANA policies:
AWS Command Line Interface (AWS CLI) Installation
The latest version of the AWS Command Line Interface (AWS CLI) must be installed and functional on the target instance.
To install or update, see https://docs.aws.amazon.com/cli/latest/userguide/getting-started-install.html
SSM Agent Installation
SAP HANA policies require the installation of SSM agent on the EC2 instance before it is added to an N2W policy. AWS Backint agent configuration is performed by N2W at the time of policy configuration if the target instance is running. SAP HANA backup commands are sent to EC2 instances.
To install and run an SSM agent, see https://docs.aws.amazon.com/systems-manager/latest/userguide/agent-install-sles.html
To check the status of the SSM Agent, see https://docs.aws.amazon.com/systems-manager/latest/userguide/ssm-agent-status-and-restart.html
The Backint configuration and the backup will fail if the target EC2 instance is stopped.
N2W to SAP HANA EC2 instance communication is completed via an SSM agent. Therefore, assign an SSM IAM role with proper permissions to both N2W and the EC2 instance running SAP HANA. See section 6.2.2.
9.9.2 Supporting Cross-Account Backups
To support cross-account backups, configure the S3 bucket policy with the following permissions:
9.9.3 Creating an SAP HANA Policy
An SAP Hana database may be added to only one policy. See note in section 9.9.
Before creating the policy, retrieve the Instance ID and Instance Number from the SYS.M_SYSTEM_OVERVIEW table in the SAP HANA SYSTEMDB database:
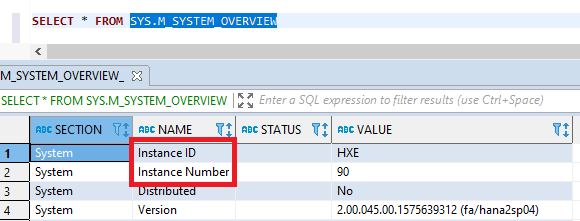
You can also check the following path: /hana/shared/<SID>/HDB<instance>/. In this case, the path is /hana/shared/HXE/HDB90/.
To back up an SAP HANA database:
Ensure that the target EC2 instance is running at the time of backup.
1. In the Policy tab, add the EC2 instance to the selected policy.
2. In the Backup Targets tab, select the instance, and then select![]() Configure.
Configure.

3. Select Enable SAP HANA Backup and complete the configuration:
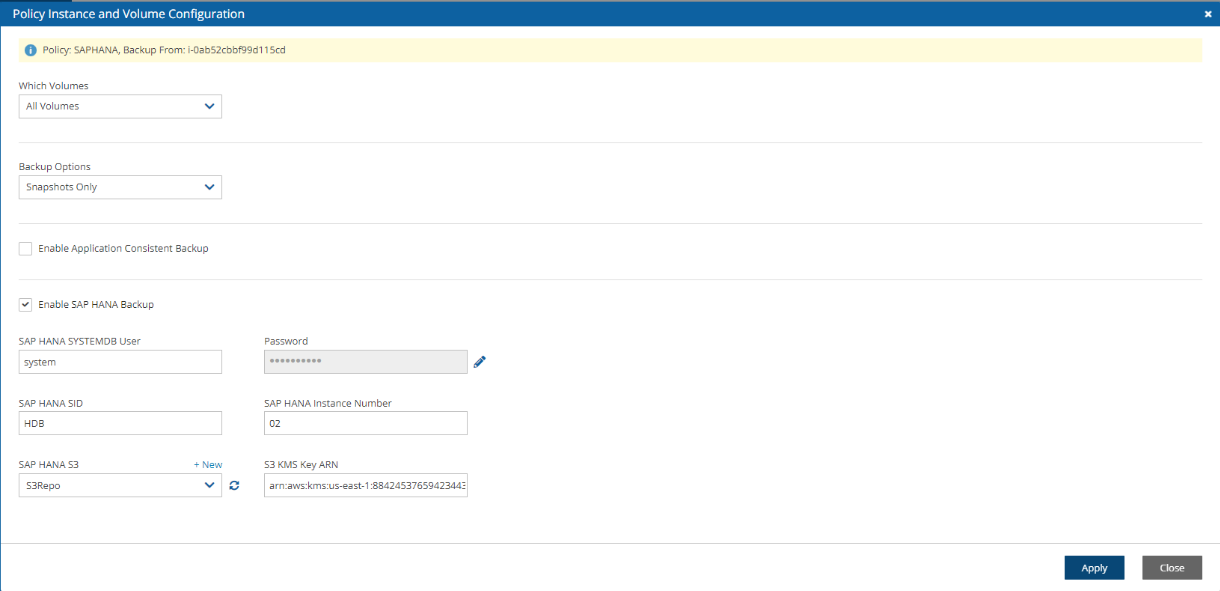
SAP HANA SYSTEMDB User – SAP HANA System DB username.
Password – SAP HANA System DB password.
SAP HANA SID – SAP HANA System ID as shown in the SYS.M_SYSTEM_OVERVIEW table of the SYSTEMDB database.
SAP HANA Instance Number - SAP HANA Instance Number as shown in the SYS.M_SYSTEM_OVERVIEW table of the SYSTEMDB database.
SAP HANA S3 (Bucket) – S3 bucket repository for backup.
S3 KMS Key ARN – S3 KMS key attached to the selected bucket.
4. Select Apply, and then select Save.
9.10 Additional Permissions for RDS Custom Backup and Restore
Additional permissions are required for RDS Custom backup and restore operations:
s3:CreateBuckets3:PutBucketPolicys3:PutBucketObjectLockConfigurations3:PutBucketVersioningcloudtrail:CreateTrailcloudtrail:StartLoggingkms:Decryptkms:GenerateDataKey
For full details about setting up your RDS Custom database for an SQL Server environment, see
Was this helpful?

